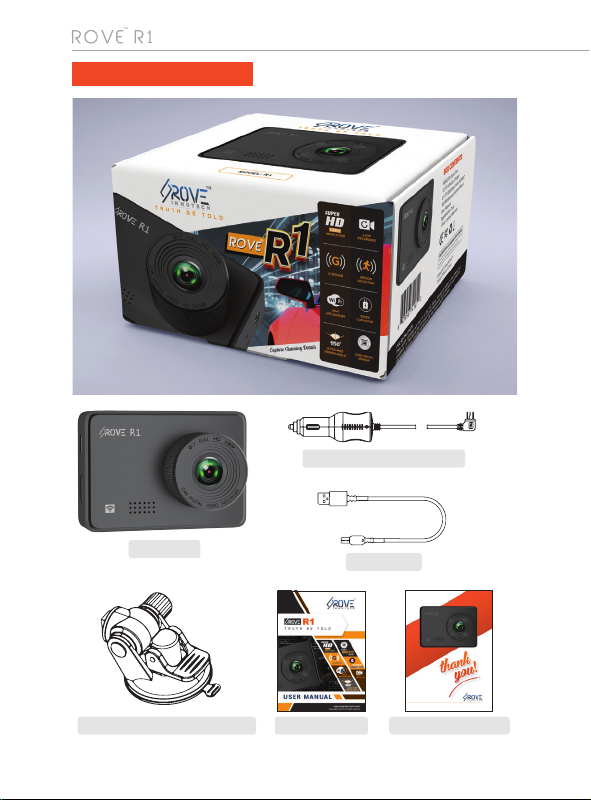
ROVE R1 User manual

www.rovedashcam.com
USER MANUAL
Copyright (C) 2019, All rights reserved
TRUTH BE TOLD
RESOLUTION
G SENSOR
Wi-Fi
APP SUPPORT
ULTRA WIDE
VIEWING ANGLE
SONY
IMX323
SENSOR
SUPER
CAPACITORCAPACITOR
LOOP
RECORDING
TM

GOT
QUESTIONS
Scan the QR Code to Email US
Scan the QR Code to Text US
Text US: 1-401-484-7683
Simply Scan the QR Code with your
iPhone or Android’s Camera to get in touch with us.
Response in just 6 hours
For faster response text us
1 (401) 484-ROVE(7683)
CUSOTMER SERVICE:

Content Guide
3
4
5
6
7
8
9
11
13
15
16
18
20
23
26
27
30
32
33
Introduction
Important Safety Instructions
Camera Specifications
Package Contents
Out Of The Box Instructions
Inserting Memory Card
Installing Your Dashcam
Using Wi-fi Feature
Product Structure
Status Icons: Understanding Status
Understanding Buttons
Understanding 3 – Camera Modes:
Video Settings
Photo Settings
Playback Settings
System Settings
One Year Limited Warranty:
Safety Legal Aspects
Trouble Shooting Your Rove R1 Dash Cam

USER MANUAL
3
INTRODUCTION
Product Overview:
2.45" IPS Screen
Continuous Loop Recording
Full HD Camera (1080p@30fps)
Built-in Wi-Fi
Built-in G-Sensor
Built in Super Capacitor (replace of battery)
150° Wide Angle Lens
Motion Detection
Max Supports up to 128GB Class 10, U3 Speed Micro SD Card
Auto-Recording & Auto-Power Off Interface
Supports USB / AV Out
Supports Multi Language
Features
Thank you for purchasing ROVE R1 Wi-Fi enabled Full HD Digital Vehicle
Dash Cam (Automobile Black Box)... Besides seamless loop recording it
provides high quality image capture & irrefutable evidence for what goes on
from the perspective of your dashboard.
This Product is a leading Full HD Digital Vehicle Black Box Recorder.
Equipped with Super-HD 1080P @30fps with Sony IMX 323 Sensor for state
of the art low light sensitivity and high dynamic range which allows you to
record continuous high-quality video playbacks, it brings phenomenal Full HD
resolution videos even at night time without the need for infrared sensors. It
has superior night vision technology which captures super low light during
night time. It has advanced built-in Wi-Fi, G-Sensor, Emergency Video Lock,
Audio Recording, Loop Cycle Recording, Motion Detection, HDMI Output.
When compared to most dash cam, this exclusive product design provides an
elegant appearance, packed with top rated unique features, superb
unbeatable video recording and it is very easy to use.

4
WARNINGS/PRECAUTIONS: Important Safety Instructions
Failure to comply with safety warnings and regulations can result in
serious injury or death.
Do not put the unit in a damp environment. This device is not designed to be
water proof.
Do not try to open the cover or try to repair it yourself. If the accessories for this
device have any problem, please contact the seller for assistance.
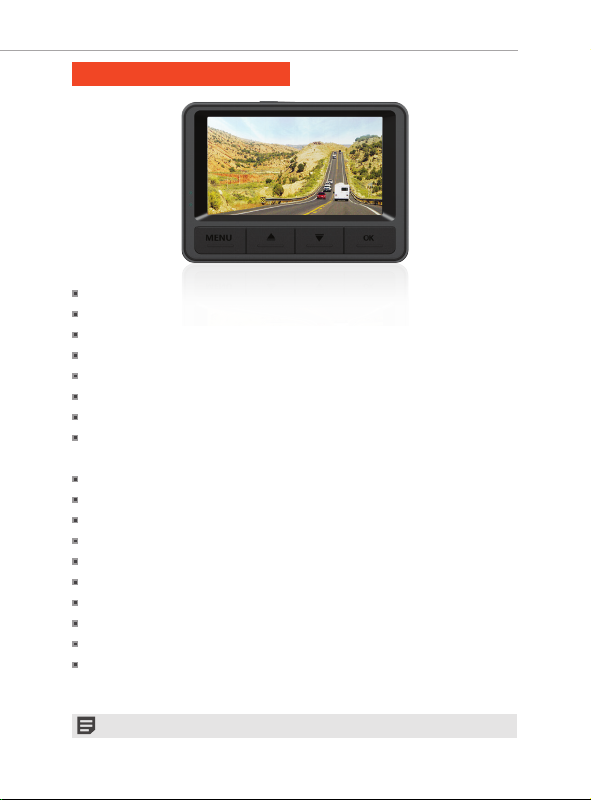
This camera is intended to use inside motor vehicle. Don’t install it where it will
block the driver’s view of the road including mirrors or the deployment of airbags.
Do not place the camera loose on top of the dashboard or in-front of the air bags.
Do not mount the camera where it can be a distraction if it became loose and
fall off the windshield while driving.
Do not expose this device to an excessive heat, dust or use any chemical
substance or cleaning solvent to clean this device. Instead use soft moist cloth
for cleaning.
Pay careful attention when cleaning the lens surface. Use a soft, moist cloth to
clean the lens to avoid compromising video quality.
Removing the camera from the vehicle when not in use is recommended. This
prevents likelihood of theft or exposure to excessive heal to prevent damage
to unit.
Do not operate or install the camera while driving, or attempt to change any
setting etc. Pull off the road first and only do so when it is safe.
Do not drop, puncture or disassemble this product.
Do not use the charger if the cord is broken or damaged.
Keep out of reach of children.
Some countries or USA states prohibit drivers from mounting anything on
windshield or prohibit mounting on certain area of the windshield. It is
owner/operator’s responsibility to mount or use of this device incompliance
with local laws.
Do not leave the camera in the direct sunlight for a long period of time or where
temperature could go above 140°F (60°C).
The camera is designed to be used for normal daily commute recording. It is
not made to continuously record 24/7 365 days.
Please read and understand all instructions before using this product. If any damage
is caused by failure to follow the instructions, the warranty will be voided.
The company is NOT responsible for the loss of any data or your content during
operation or in any circumstance.

USER MANUAL
5
CAMERA SPECIFICATIONS
Specifications are subject to change without prior notice
Processor : NOVATEK NT96658 (Built-In 1GB DDR III)
Sensor : Sony Sensor IMX323 (1/2.9 Exmor CMOS)
Display : 2.45" IPS Screen
Camera lens : 150° Wide-Angle Lens (Lens: 6G + 1 IR)
Aperture : F2.0
G-Sensor : Triaxial Acceleration Sensor (DA380)
Operating Voltage : DC 5V 1.5A
Video Resolution : 1080 FHD (1920x1080), 720P (1280x720),
WVGA (848x480), VGA (640x480)
Video Format/Photo : MOV / JPEG
Battery : Super Capacitor Without Battery
Wi-Fi : Built-in (Default Password Is 12345678)
Operating temperature : -10°C (14°F) to 55°C (131°F)
Storage temperature : -20°C (-4°F) to 70°C (158°F)
Operating Humidity : 15% - 60%RH
Dimension : 49 x 72 x 35mm
Record audio : Yes
Frequency : 50 Hz / 60 Hz
Format : Micro-SD Card.
(Minimum Class 10, U1 Speed Required)

6
DashCAM
Windshield Suction Mount User Manual
Car Charger with Cable
Data Cable
PACKAGE CONTENTS
Registration Card

USER MANUAL
7
OUT OF THE BOX INSTRUCTIONS
1
2
3
4
5
6
7
8
GETTING STARTED
Make sure to always keep the camera plugged into the power source,
because ROVE R1 uses Super Capacitor (NOT an internal battery).
You will need to insert a memory card before you can start recording.
Please insert only SAMSUNG Class-10, U3 or higher speed Micro SD card
up to 128GB max for reliable operation. (NOT included in packaging)
Before first time use, we strongly recommend that you format your
memory card in the camera to prevent any errors and for smooth
operation. (See Page 8)
ROVE R1 dash cam is programmed to turn ON and START RECORDING
automatically when it receives the power, and STOPS RECORDING
automatically within 2-3 seconds when the power is disconnected. (i.e.
when you start /stop your car)
Set Date & Time: Please set the correct date and time by going into the
System Settings. (See Page 27)
How to hide power cable inside your car’s dash board?
There are many people has demonstrated on YouTube how and where
to hide power cable inside your car. You can view one of the ways
here, this video is NOT recorded by us.
https://youtu.be/xwD8Ilk-MHU
How to transfer videos to PC/MAC?
Insert memory card directly to your PC/MAC to view or download
them.
You can also connect your camera to your PC/MAC by included short
USB data cable. Select “Connect as USB Flash Drive.
We recommend VLC Media Player to view your videos. You can get it
free at www.videolan.org
Wi-Fi: You can also connect ROVE R1 Dashcam to your smart phone
directly by using built-in Wi-Fi feature. (See Page 13)
Please read and understand warnings & safety instructions first before
operating.

8
FORMATTING MEMORY CARD:
Must use only Brand Name, Class-10, U3 or higher speed Micro-SD Card.
Max support 128GB
We Recommend SAMSUNG Class 10, U3 Speed Micro-SD Card.
You can
purchase it from Amazon here: http://a.co/2tXJzIL
TO INSTALL:
Insert the MicroSD card
halfway in with the gold
contacts facing the LCD
side (back of the
camera). Now gently
push the card
inward until it clicks
and lock in place.
MOST IMPORTANT about Memory CARD: If you experience camera FREEZING or
LAGGING or STOPS Recording after few seconds. Then It is the issue of the MEMORY
CARD. (NOT THE CAMERA ISSUE) - Please Contact US.
Do not remove or insert MicroSD card when the camera is powered on which may
damage the memory card.
1
TO REMOVE:
To remove the MicroSD card, gently push its top edge inward until it
clicks, and then pops out, then simply pull it out of the slot.
2
Please press OK button to make sure the video is stopped recording first.
Then press the MENU button TWO times to go to the camera’s system
settings. > Then press the DOWN button to scroll down until you see format.
>> Then press the OK button to enter format submenu. >>> then press
DOWN button to highlight the FORMAT. >>>> Then press the OK button to
confirm to format the memory card (The formatting process will be super
quick. You will see pop up message “Please Wait” and once it is gone, which
means formatting is complete.).
After FORMATTING is complete, please restart the camera. (Long press
power button for 2-Seconds to turn OFF, and then press the power button
once to turn ON)
INSERTING MEMORY CARD

USER MANUAL
9
INSTALLING YOUR DASHCAM
The camera comes with the default setting which allows you to start using
your camera right out of the box without changing any settings. Make sure to
Format the memory card before first time use. Then, Simply – Follow the
Steps below:
Important Tips:
•
•
•
Before mounting the dash cam, please clean the windshield using alcohol and wipe it
clean with a dry cloth. Make sure not to touch suction surface of the mount. Finger
grease will prevent the mount from getting strong suction grip. The dash cam is NOT
suitable for Completely Vertical Glass. (Need at-least 20° Angle)
Adjust the lens viewing angle to ensure that it is aligned with the road ahead properly.
Hide the charger cable into the seams around the edge of the dashboard.
Insert the Memory Card
Align the suction mount and the camera into mounting assembly, then slide the mount
towards lock position until it is snug fit. (Image – 1)
Apply the suction mount onto the windshield (Recommended Area: Follow Image – 2)
Image - 1 : Applying Suction Cup
Align the
mount here
Image - 2 : A-B Windshield Area (Rear position of the mirror)
1Then Slide to
Lock Position
2
Plug in the power cable. Turn ON The Car, SET & GO!

10
12
Charger Cable to Car’s 12V
Cigarette Lighter
Mini USB End to Dash Cam’s
USB Port
You must always connect the camera to a power source while operating the
camera.
Connect the larger end of the car charger cable to your car’s cigarette
lighter (12V DC power outlet).
Connect the other, mini-USB end to the mini-USB port on the camera.
Using incompatible cables or charger can cause serious health injury
or damage your device.
Be sure to only use ROVE approved car charger designed for your
device specifically.
Never install this product while driving.
Make sure that the lens is within the wiping range of the windshield
wiper to ensure a clear view even when it rains.
Do not touch the lens with your fingers. Finger grease may be left on
the lens and will result in unclear or blurry videos.
The mount is a suction mount. Make sure to clean the windshield area
with alcohol wipe to remove the evaporated dashboard grease from
windshield before applying the mount. This will get strong suction
grip. Also do not touch the suction surface of the mount. If its greasy,
then clean it with alcohol wipe before applying.
CAUTIONS
•
•
12V Cigarette
Outlet

USER MANUAL
11
USING WI-FI FEATURE
DOWNLOADING ROVE APP
TURN ON WiFi FROM THE CAMERA: Long press OK Button For 3-Seconds to
turn the WiFi Mode On from the camera.
CONNECT WiFi: Now Simply join the ROVE R1 WiFi by going into your iPhone
or Android phone’s Settings > WiFi > ROVE R1 WiFi. Then Enter the default
password: 1 2 3 4 5 6 7 8
NOW OPEN THE ROVE APP: Once your camera is connected to ROVE WiFi
successfully and when you open the ROVE App, the camera will sync automati-
cally. You should see the live video feed from the camera on the ROVE APP.
Then keep exploring the APP from here on.
1
2
3
Connecting ROVE R1 Dash Cam With Smart Phone
Search for “ROVE” in App Store or Google Play Store to find
the App and then download and install it.
Note: Apple logo & App Store are trademarks of Apple Inc., Google logo and Google Play are trademarks of Google Inc.
NOTE: When wifi is ON, you can only operate the camera from the ROVE APP. If
you want to operate from camera side, then turn OFF the WiFi first.

12
Wi-Fi
On
ROVE R1_44334c9b77
Connected, no Internet
WorldT9875
BkIPMDFx58
ATT7b2V788
ATT9j998Q4
TheCombine
Saved
Saved
ROVE R1_44334c9b77
This network has no Internet access.
Stay connected?
Don’t ask again for this network
NO YES
There is one extra step you will have to take. Once you connect to ROVE
R1 WiFi, it will say “No Internet”. Which is fine. You just have to tap on the
pop up notification that will show up in few seconds to select that you still
want to stay connected even though there is NO Internet. Once you select
this OK, you are set to go. Please contact us if you need any help.
Touch here as soon as you
see this notication
Once you enter the default
password for ROVE WiFi and
hit connect, you will see this
pop-up in few seconds.
Once you tap that notification from the LEFT
you will get this screen.
1. Check this box, so your phone
remembers this setting for next time.
2. Then touch YES to stay connected to this WiFi
and save this preference.
Touch here to CHECK this box
FOR ANDROID PHONES
NOTE: If you don’t get the above message, then Turn OFF your WiFi Calling,
Cellular Data and VPN if you are using it. Then try again and it should work.
WorldT9875
BkIPMDFx58
ATT7b2V788
ATT9j998Q4
TheCombine
Saved
Saved
Android System
Wi-Fi has no Internet access
Tap for options
On
ROVE R1_44334c9b77
Connected, no Internet

USER MANUAL
13
PRODUCT STRUCTURE
Memory Card Slot
Power
Mount Assembly Holder
USB
Reset
HDMI OUT
AV-OUT
Menu
Up
Down
Ok
Lens
IPS Screen
Recording
Status LED
Serial Number
Label

14
VIDEO SETTINGS
HOME SCREEN
SYSTEM SETTINGS
PHOTO SETTINGS
Still
Capture Mode
Resolution
Sequence
Compression
1
2
3
Still
Sharpness
White Balance
Colour
ISO
AWB
ISO
Still
Exposure
Anti-Shaking
Date Stamp
SYSTEM SETTINGS
WIFI
Date/Time
Time Mode
Auto Power On/Off
SYSTEM SETTINGS
Key Tone
Language
TV Mode
Car Plate
SYSTEM SETTINGS
Screen Saver
Frequency
Storage Space
Format
SYSTEM SETTINGS
Default Setting
Version
VIDEO SETTINGS
G-Sensor
Exposure
Motion Detection
Record Audio
VIDEO SETTINGS
Resolution
Loop Recording
WDR
TIMELAPSE_REC
WDR
FPS
VIDEO SETTINGS
Date Stamp
JUL
20
00:01:03
01:24:21
1080FHD
2018/12/02
13:22:06
Menu Up Down Ok / Confirm
Loop Recording Timer
(Resets every loop)
Total Trip Timer
(Resets when camera/video restarts)
G-Sensor
Video Resolution
Loop Recording
Microphone Indicator
Memory Card Indicator
Power Indicator
Current Date Current Time
Current Video is
being Locked
Exposure Value
WDR
Motion Detection
Video Mode Recording Status Indicator
(blinking red dot)

USER MANUAL
15
STATUS ICONS: Understanding Status
ICONS WHAT DOES IT MEAN?
Video Mode
Photo Mode
Playback Mode
Blinking Red Dot = Camera Is Recording Video
Micro SD Card Installed
NO Memory Card Installed or Bad Memory Card
Current Loop Video Is Being Locked
Loop Cycle Record Setting
Motion Detection ON
Exposure Setting
WDR = Wide Dynamic Range ON
G-Sensor Setting
Microphone OFF (Mute)
Microphone ON
Power Connected (Blinking)
Loop Timer (Resets Every Loop)
Total Trip Timer (Resets when camera / video restarts)
Video Resolution
Date
Current Time
00:00:00
07:01:02
1080FHD
2018/12/02
13:22:06
Motion Detection OFF
WDR OFF

16
Button Function
Press Once - to confirm a selection
Press Once - to Start/Stop Video recording in Video Mode.
Press Once - to take a snapshot in Photo Mode.
Long Press for 2-Seconds to turn WiFi ON/OFF
Press Once - to turn the camera ON
Long Press for 2-Seconds to turn the camera OFF
UNDERSTANDING BUTTONS
RESET:
Insert paper clip to press the RESET button ONCE to reset
the camera if the camera’s buttons are NOT responding.
R
Press Once - to LOCK the current LOOP Video File
while video is being recorded
Long Press for 2 - Seconds to switch Modes
Press Once - to enter MENU Settings, Press again to switch
to System Settings, then press again to exit the menu.
Press Once - to Scroll UP while in Settings Menu
Press Once - to Mute/Un-Mute Microphone while in Video Mode
Long Press for 3-Seconds to Zoom In while in Video Mode.
Press Once - to Scroll DOWN while in Settings Menu
Press Once - to Turn OFF/ON LCD while in Video Mode
Long Press for 3-Seconds to Zoom Out while in Video Mode

USER MANUAL
17
TURNING ON/OFF YOUR CAMERA
ABOUT SUPER CAPACITOR INFORMATION
AUTO POWER ON/OFF
Super Capacitor is used to generate electricity. Power of R1 Dash Cam is delivered
by a Super Capacitor which is a premium alternative to a lithium-ion battery. This
features an enhanced temperature resistance to hot and cold climates.
Auto Power ON: ROVE R1 Dash Cam is designed to turn ON and start recording
autometically when it receives power. i.e. when the car engine is started.
Auto Power OFF: The camera is also pre-configured to turn itself OFF automati-
cally within few seconds when the power gets disconnected, i.e. when the car
key is turned to LOCK position.
To manually turn ON: Press the power button once.
To manually turn OFF: Press and hold the power button for at least 2 seconds
A capacitor uses conductive plates with an insulating barrier (dielectric) in
between them. The dielectric stops the electrical current entering the capacitor
and this builds up a charge which is stored between the plates.
It charges faster than a battery. The amount of charge a capacitor can hold
depends upon its capacitance or the charge storage capacity.
ROVE R1’s Super Capacitor will hold the charge for about 2 seconds.
MANUAL POWER ON/OFF
How it works?
ROVE R1 dash cam uses a super capacitor which makes it a unique reliable
dash cam on power consumption and safety. Capacitors are more reliable due to
the fact that they are way more resistant to heat unlike batteries; they don’t pose
the risk of overheating and exploding. Super Capacitors extend the overall
product life span and it is built to last.
Why Super Capacitor?
NOTE: If your car’s 12V Outlet is always HOT even when your car is key is locked,
then this auto power on/off feature will not work. To remedy this situation please
contact us.

18
UNDERSTANDING 3 – CAMERA MODES:
1. VIDEO MODE 2. PHOTO MODE 3. PLAYBACK MODE
ROVE R1 has 3 different camera modes:
The “MENU” button will act as two functions. MENU button & MODE button.
MENU Button : Pressing Once (Short) will act as MENU button.
MODE Button : LONG PRESS MENU button for 2-Seconds will act as a MODE Button.
NOTE:
• Each Mode has its own separate Menu Settings.
• System Settings are common between all three Modes.
Lets you take live videos and store
them in the installed Micro SD Card.
VIDEO MODE
00:00:00
1080FHD
2018/12/02
13:22:06
You can’t change any settings from the Menu or Switch Mode while
video is being recorded. Press OK button to STOP Video Recording first if you
prefer to go to MENU or Switch MODES.
TO SWITCH MODE: Long Press the "MENU" button for 2-seconds.
While Under Video Mode:
Dash cam will always start in the video mode every time camera restarts.
Short Press ‘OK’ button to START / STOP video recording manually
(A red dot blinking on top right of screen shows the video recording status)
Short Press UP button to MUTE ON/OFF audio recording with video
Short Press DOWN button to turn the LCD OFF/ON
LONG PRESS and hold UP button for 3-Seconds to Zoom In up to 4X
LONG PRESS and hold DOWN button for 3-seconds to Zoom Out.
•
•
•
•
•
•

USER MANUAL
19
Photo mode lets you take a snapshot.
PHOTO MODE
•
Press OK button to take a SNAPSHOT.
•
Press UP button to ZOOM IN.
•
Press DOWN button to ZOOM OUT.
•
Press Menu Button to enter Photo Settings.
•
Long Press UP button for 2-second to change exposure.
•
Long Press ‘MENU’ Button to switch to playback mode
While Under Photo Mode:
Lets you play your video file or photos.
It can even let you Delete or unlock
any videos while viewing it.
PLAYBACK MODE (Video/Photo)
While Under Playback Mode:
• Press ‘OK’ button to Play/Pause Video.
• Short Press ‘Up’ button to increase speaker volume.
• Short Press ‘Down’ button to lower speaker volume.
• Short Press the ‘MENU’ Button to enter the Playback settings, here you can Delete,
Protect (Unlock/Lock) or Slide Show the files.
• Long Press DOWN button for - 2 Seconds to FF video playback up to 8x
• Long Press UP button for - 2 Seconds to REVERSE FF video playback up to -8x
00000
12M
AWB
OK:
2018_0917_002556_020
1080FHD
09/17/18
00:26
Table of contents
Other ROVE Dashcam manuals