Rowenta PERFECT STEAM DG8520U1 User manual

www.rowenta.com
Instruction for use
Mode d'emploi
Instructivo de operación
Groupe SEB USA - 2121 Eden Road
Millville, NJ 08332, USA - Tel: 1-800-769-3682
Groupe SEB Canada Inc, 345 Passmore Avenue
Scarboroug , Ontario, M1V 3N8
1800131040 DG8510-20 U0_110x154 06/12/13 08:40 Page1

2
1
5
7
9
6*
14
2
10
11
8
3
4
12
13
16 a
16 e
16 d
16
15*
16 b
16 c
17
* according to model - * Selon modèle - * Según modelo
1800131040 DG8510-20 U0_110x154 06/12/13 08:40 Page2

3
fig.5 fig.8fig.7fig.6
fig.10 fig.11 fig.12
fig.13 fig.14
fig.1 fig.3fig.2
Click!
Click!
fig.4
fig.9
PREPARATION - PRÉPARATION - PREPARACIÓN
USE - UTILISATION - USO
1800131040 DG8510-20 U0_110x154 06/12/13 08:40 Page3

4
fig.19 fig.20
fig.15 fig.18
fig.16 fig.17
1/4
1/4
1/4
€
fig.21 fig.22
fig.25 fig.26
fig.23 fig.24
€
1/4
fig.27 fig.28
MAINTENANCE - ENTRETIEN - MANTENIMIENTO
Models equipped with scale collector - Modèles équipés du collecteur de tartre - Modelos
equipados con colector de cal
Models not equipped with scale collector - Modèles non équipés du collecteur de tartre - Modelos no
equipados con colector de cal
1800131040 DG8510-20 U0_110x154 06/12/13 08:40 Page4

5
WELCOME TO
THE ROWENTA WORLD!
Congratulations on choosing the ROWENTA PERFECT STEAM
steam station to care for your garments!
Founded in Germany in 1884, Rowenta has a long history of in-
novation. We create high-performance household appliances
with graceful designs that can be found all around the world.
The ROWENTA PERFECT STEAM steam station enables you to
get professional results at home in less time. Its powerful steam
output ensures perfect steam penetration deeply into fabrics,
while the stainless steel soleplate dries them instantly in just
one pass leaving impeccable results. Unlimited ironing is pro-
vided with the permanent refill water tank, and the exclusive
scale collector guarantees long-lasting performance .
With the ROWENTA PERFECT STEAM steam station, you do not
have to be an expert anymore to get professional results !
OUR ADVICE:
To enjoy and discover how to use your PERFECT STEAM steam
station, we advise you to read through the product instructions
before first use.
1800131040 DG8510-20 U0_110x154 06/12/13 08:40 Page5

6
EN
Important recommendation
Safety in truction
• Ple se re d these instructions c refully before first
use. This product h s been designed for domestic
use only. Any commerci l use, in ppropri te use or
f ilure to comply with the instructions, the
m nuf cturer ccepts no responsibility nd the
gu r ntee will not pply.
• Never unplug the ppli nce by pulling the power
cord. Alw ys unplug your ppli nce:
- before filling the w ter t nk or rinsing the boiler,
- before cle ning the ppli nce,
- fter e ch use,
• The ppli nce must be used nd pl ced on fl t,
st ble, he t-resist nt surf ce. When you pl ce the
iron on the iron rest, m ke sure th t the surf ce on
which you pl ce it is st ble.
• This ppli nce is not intended to be used by persons
(including children) with reduced or imp ired
physic l, sensory or ment l c p cities or persons
l cking ppropri te knowledge or experience, unless
person responsible for their s fety provides either
supervision or ppropri te instructions concerning
use of the ppli nce prior to its use.
• Children should be supervised to ensure they do not
pl y with the ppli nce.
1800131040 DG8510-20 U0_110x154 06/12/13 08:40 Page6

7
• This ppli nce m y be used by children ged 8 or
over nd persons l cking ppropri te knowledge or
experience or persons with reduced or imp ired
physic l, sensory or ment l c p cities provided th t
they h ve been thoroughly instructed reg rding use
of the ppli nce, re supervised, nd underst nd the
risks involved. Children must not be llowed to pl y
with the ppli nce. Cle ning nd m inten nce must
not be c rried out by children unless they re ged 8
or over nd re supervised. Keep the ppli nce nd
power cord out of the re ch of children under 8 ye rs
of ge.
• The surf ces which re m rked with this sign
nd the solepl te re very hot during the use
of the ppli nces. Don’t touch these surf ces
before the iron is cooled down.
• Never le ve the ppli nce un ttended :
- when it is connected to the m ins,
- until it h s cooled down ( round 1 hour).
• Before rinsing the boiler/rinsing the nti-sc le v lve
(depending on the model), w it until the ppli nce is
completely cold nd h s been unplugged for t le st
2 hours before unscrewing the boiler rinse c p/ the
sc le collector cover.
• Be c reful: if the boiler c p or the boiler rince c p
(depending on the model), is dropped or severely
knocked, h ve it repl ced by n Approved Service
Centre, s it m y be d m ged.
EN
Important recommendation
Safety in truction
• Ple se re d these instructions c refully before first
use. This product h s been designed for domestic
use only. Any commerci l use, in ppropri te use or
f ilure to comply with the instructions, the
m nuf cturer ccepts no responsibility nd the
gu r ntee will not pply.
• Never unplug the ppli nce by pulling the power
cord. Alw ys unplug your ppli nce:
- before filling the w ter t nk or rinsing the boiler,
- before cle ning the ppli nce,
- fter e ch use,
• The ppli nce must be used nd pl ced on fl t,
st ble, he t-resist nt surf ce. When you pl ce the
iron on the iron rest, m ke sure th t the surf ce on
which you pl ce it is st ble.
• This ppli nce is not intended to be used by persons
(including children) with reduced or imp ired
physic l, sensory or ment l c p cities or persons
l cking ppropri te knowledge or experience, unless
person responsible for their s fety provides either
supervision or ppropri te instructions concerning
use of the ppli nce prior to its use.
• Children should be supervised to ensure they do not
pl y with the ppli nce.
1800131040 DG8510-20 U0_110x154 06/12/13 08:40 Page7

8
• When rinsing the boiler, never fill it directly from the
t p.
• The boiler c p musn’t be opened during use.
• The ppli nce must not be used if it h s been
dropped, if it h s ny visible d m ge, if it le ks, or if
it functions bnorm lly in ny w y. Do not ttempt
to dism ntle your ppli nce: h ve it ex mined t n
Approved Service Centre to void ny d nger.
• Check the electric l power nd ste m cords for
signs of we r or d m ge prior to use. If the
electric l power cord or the ste m cord is d m ged,
it must be repl ced t n Approved Service Centre
to void ny d nger.
• Accessories, consum bles nd end user repl ce ble p rts must be only purch sed from Tef l or n
Approved Service Centre.
• For your s fety, this ppli nce conforms to ll pplic ble regul tions (Low Volt ge Directive,
Electrom gnetic Comp tibility, Environment, etc).
• Your ste m st tion iron is n electric l ppli nce: it must be used under norm l conditions of use.
It is designed for domestic use only.
• It is equipped with 2 s fety systems:
- pressure rele se v lve designed to void excessive pressure. In the event of m lfunction, the
v lve rele ses excess ste m.
- therm l fuse to void overhe ting.
• Alw ys plug your ste m st tion iron:
- into m ins circuit with volt ge between 120 V nd 127 V,
- into n e rthed electric l socket.
Connecting to the wrong volt ge m y c use irrep r ble d m ge to the ppli nce nd will
inv lid te your gu r ntee.
If you re using m ins extension le d, ensure th t it is correctly r ted (16A) with n e rth, nd is
fully extended
• Completely unwind the power cord before plugging into n e rthed socket.
• The sole pl te of your iron nd the iron rest on the b se unit c n re ch extremely high
temper tures, nd c n c use burns: do not touch them. Never touch the electric l power cords
with the sole pl te of the iron.
• Alw ys use vented/mesh ironing bo rd nd be c reful of hot ste m when ironing close to the
edges of the bo rd.
• Your ppli nce emits ste m, which c n c use burns. Alw ys h ndle the iron with c re, especi lly
when ironing vertic lly. Never direct the ste m tow rds people or nim ls.
• Never immerse your ste m st tion iron in w ter or ny other liquid. Never pl ce it under running
t p.
PLEASE RETAIN THIS INSTRUCTION
BOOKLET FOR FUTURE REFERENCE
1800131040 DG8510-20 U0_110x154 06/12/13 08:40 Page8

9
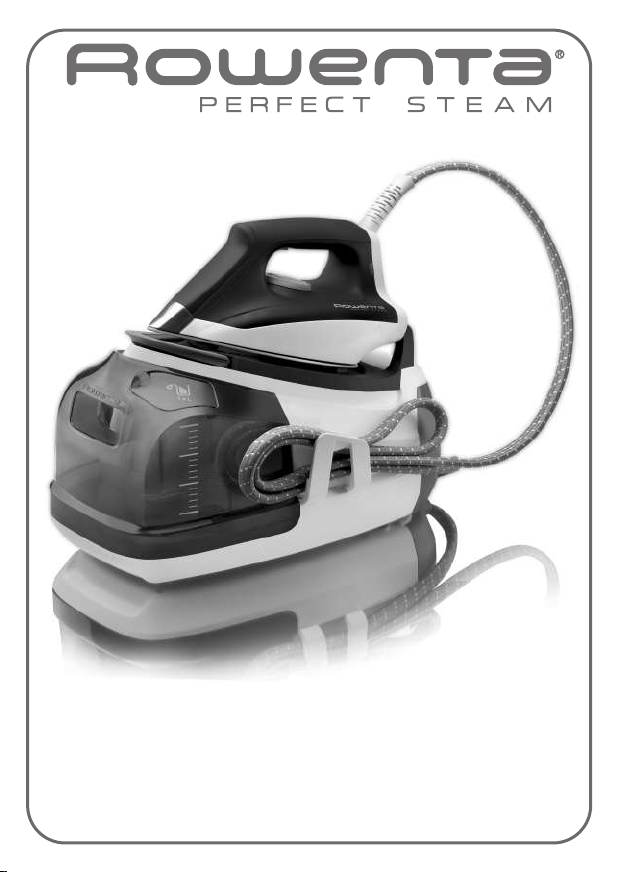
1 • Safety lock (according to model)
• Your steam station is equipped with a
safety lock that holds the iron on to the
base unit in order to facilitate transport
and storage:
• Pull up – fig. 1.
• Push down – fig. 2.
The safety lock allows you to carry your
steam station by the iron handle:
- place the iron on the iron rest of the steam
station and lock it into place (you will hear
an audible “click” sound) – fig. 1.
- Hold the iron by its handle in order to
transport your steam station - fig. 3.
2 • Water recommendations
Tap water
• Rowenta steam stations are designed to
be used with UNTREATED TAP WATER. If
your water is very hard, Rowenta
recommends mixing half untreated tap
water with half distilled water which
reduces the hardness.
Softened water :
• There are many types of household water
softeners and the water from many of
them is perfectly acceptable for use in the
steam station. However, some types of
softeners, particularly those that use
chemicals such as salt, can cause the
appliance to leak or spit during use, this is
notably the case with filtering jugs.
Therefore we would not recommend
using this type of water.
• If you experience this type of problem, we
recommend that you try using untreated
tap water or store-bought distilled water
which can be mixed 50% distilled with
50% untreated tap water. Once you have
changed water it will take several uses to
correct the problem. Rowenta
recommends trying the steam function
for the first time on an old towel or cloth
that can be discarded to avoid potentially
damaging your clothes.
Always remember :
• Heat concentrates the elements in water
during evaporation. The types of water
listed below may contain organic waste,
mineral or chemical elements that can
cause spitting, brown staining or
premature wear of the appliance: water
from clothes dryers, scented or softened
water, water from refrigerators, batteries,
air conditioners, rain water, boiled, filtered
or bottled water. These types of water
should not be used in your ROWENTA
steam station.
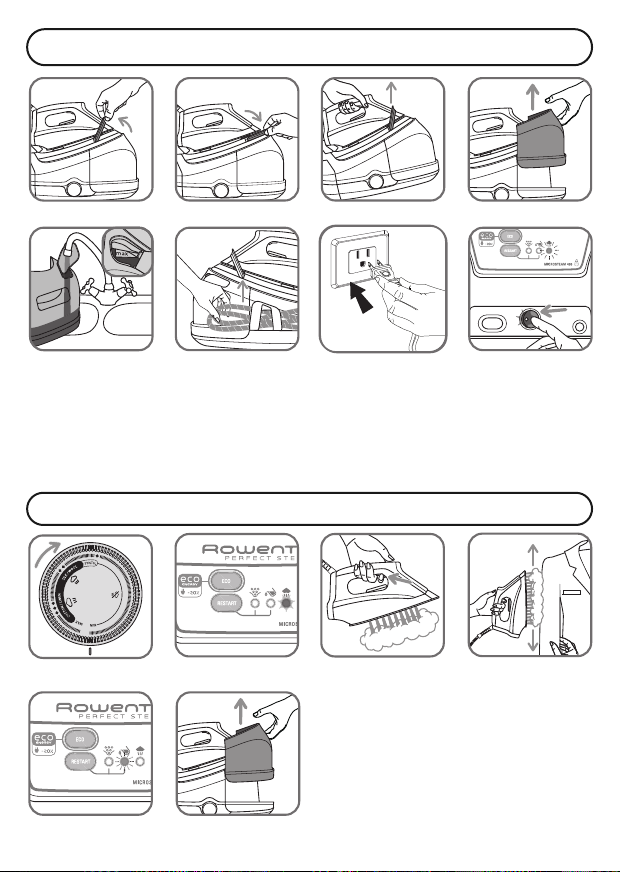
3 • Preparing your steam
station
• Place the steam station on a flat, stable,
horizontal and heat-resistant surface.
DESCRIPTION
1. Iron handle
2. Steam trigger
3. Iron temperature control dial
4. Base unit
5. Precision tip
6. Safety lock (to hold the iron onto the
base unit)
7. Removable 1.4L / 47 fl oz water tank
8. Tank filling shutter
9. "Calc away system" scale collector
or "boiler rinse" cap cover
10. Electric cord storage (Velcro)
11. Iron rest
12. Iron temperature control light
13. Steam cord
14. Steam cord storage clip
15 "Calc Away System" scale collector
16 Control panel
a. Steam ready light
b. ECO button
c. Restart button
d. “Calc Away System” indicator or
“boiler rinse” indicator
e. “Water tank empty” light
17. On/Off switch
according to model
PREPARATION
1800131040 DG8510-20 U0_110x154 06/12/13 08:40 Page9

10
• Lift the removable water tank (located at
the front of the steam station) pressing on
the lock screw located on the tank handle
– fig. 4.
• Fill the tank with untreated tap water,
taking care not to exceed the maximum
level - fig. 5.
• Slide the tank back into its housing until it
“clicks” into place.
• Unwind the electrical power cord it
completely and remove the steam cord
from its housing- fig.6.
• Plug your steam station into a 120 volt
electric outlet - fig.7.
USE
4 • Switching on your steam
station
• Press on the on / off switch - fig. 8, it
begins flashing. The green light located
on the control panel flashes
• When starting, and regularly while it is
being used, your steam station's electric
pump injects water into the boiler. It makes
a noise but this is quite normal.
•
The steam station and the iron are ready for
use when the steam indicator light is on and
the iron light goes out.
5 • Operating the control
panel
•
Flashing green light -
fig. 8
: the water is
heating up in the boiler.
•
Continuous green light -
fig. 10
: steam is
ready for use.
•
Flashing red light -
fig. 13
: the tank is
empty.
• The
“Calc Away System” or the “boiler
rinse" orange indicator flashes -
fig. 15 or
fig. 21
(according to model) : the collector /
boiler needs to be rinsed.
6 • Using your steam station
• Place the iron’s temperature control - fig.
9to the type of fabric to be ironed (see
table below).
• The iron temperature control light turns
on. Important: whenever you start using
your iron and whenever you reduce the
temperature during use, the iron is ready
for use when its indicator light goes out
and when the green light located on the
control panel comes on and remains on.
• During use, when you increase the
temperature of the iron, you can start
ironing immediately.
• ECO Mode: Your steam
station has an ECO mode function which
uses less power whilst still guaranteeing a
sufficient steam output for you to iron your
garments properly.
In order to use this function, once the
thermostat of your iron has been correctly
set (see table above), press on the ECO
button located on the control panel.
The ECO mode can be used on all types of
fabrics, nevertheless for very thick or very
creased fabrics we recommend that you
deactivate ECO mode (by pressing the
ECO button again) to guarantee the best
results.
• During ironing the iron indicator light
switches on and off according to heating
requirements but this has no effect on
use.
• To obtain steam, press on the steam
control button beneath the iron handle
and keep it pressed - fig. 11. The steam
will stop when you release the button.
• Always spray starch on the reverse side of
the fabric to be ironed.
The first time the appliance is used,
there may be some fumes and a slight
smell this is not harmful and will quickly
disappear.
TYPE OF FABRIC SETTING
TEMPERATURE
SYNTHETICS
(Polyester, Acet te, Acrylic, Poly mide)
•
SILK / WOOL
• •
COTTON / LINEN
•••
1800131040 DG8510-20 U0_110x154 06/12/13 08:40 Page10

11
7 • Vertical steam ironing
• Set the temperature of the iron to the max
position.
• Hang the garment on a coat hanger and
hold the fabric slightly taut with one hand.
• Press repeatedly on the steam - fig.11
control button (beneath the iron handle)
moving the iron from top to bottom - fig. 12.
Examples of how to use the vertical
steaming function:
• Removing creases directly on hangers
from delicate fabrics that you do not want
to bring into contact with the hot iron.
• Refreshing a shirt or a suit just before
putting it on.
8 • Dry ironing
• Do not press the steam control button.
9 • Fill the water tank again
• When there is no more steam and the
“Water tank empty” light flashes - fig. 13:
the water tank is empty.
• Remove the water tank using the handle
(on the front of the steam station) - fig. 14
and fill it - fig. 5 do not fill above the Max.
level.
• Push the water tank into position until it
“clicks” into place. Press the Restart
button located on the control panel. The
red light turns off.
• The steam station and the iron are ready
for use when the steam indicator light is
on and the iron temperature control light
goes out.
10 • Storing the steam station
• Turn off the appliance and unplug it.
Place the iron on the iron rest on the
steam station. Lock the iron onto the base
unit by pressing it until you hear an
audible “click”, so your iron is secure
(according to model) – fig 1. Fold the
steam cord in two and place it in its
housing. Wind up the power cord and
attach it with the velcro.
• Leave the steam station to cool for at least
one hour before putting it away if it is to
be stored in a cupboard or confined
space. You can then store your steam
station safely.
Iron temperature control setting: Your
iron is quick to heat up so start with
fabrics to be ironed at a low
temperature and finish with those
which need higher temperatures.
Mixed fibre fabrics: set the ironing
temperature to the setting for the
most delicate fabric. For delicate
fabrics (•), press the steam control
button (under the handle of the iron)
intermittently to avoid any water
droplets appearing with the steam.
If you set your thermostat to “min”,
the iron will not become hot.
When taking a break from ironing,
never place the iron on a metal rest
plate, which could damage the iron
rest plate of the unit. It is equipped
with non-slip pads and has been
designed to withstand high
temperatures.
Recommendations: To prime the steam
circuit, either before using the iron for
the first time, or if you have not used the
steam function for a few minutes, press
the steam control button several times
in a row – fig.11, holding the iron away
from your clothes. This will enable any
cold water to be removed from the
steam circuit.
As steam is very hot: never attempt
to remove creases from a garment
while it is being worn, always hang
garments on a coat hanger. For
fabrics other than linen or cotton,
hold the iron a few centimetres from
the garment to avoid burning the
fabric.
If this occurs, remove the excess
water.
EN
1800131040 DG8510-20 U0_110x154 06/12/13 08:40 Page11

12
MAINTENANCE AND
CLEANING
CLEANING
11 • Cleaning the station
• The iron soleplate: Clean the soleplate of
your iron when it is cool with a damp
cloth or a non-abrasive sponge.
• The base unit: Clean the plastic parts of
the appliance occasionally with a soft
cloth.
12 • Easy descaling of your
steam station
For models with scale collector.
• To extend the life of your steam station
and avoid scale on your ironing, your
steam station is equipped with a built-in
scale collector. This collector, located in
the boiler, automatically removes the
scale that forms inside.
Operation:
• An orange “Calc-Away System” light
located - fig. 15 on the control panel starts
flashing to tell you that the scale collector
needs rinsing.
• Once the steam station has cooled
completely, remove the scale collector
cover - fig. 16.
• Unscrew the scale collector and remove it
from the housing; it contains the scale
that has built up in the tank - fig. 17.
• To clean the collector properly, just rinse it
under running water to remove the scale
it contains - fig. 18.
• Put the collector back into its housing and
screw it in completely to keep it watertight
- fig. 19.
• Put the scale collector cover back on - fig.
20.
In addition to this regular maintenance
procedure, we recommend that you rinse
the boiler completely once every 6 months,
or once every 25 times you use your steam
station.
• Make sure that the steam station has
been unplugged and allowed to cool for
at least 2 hours.
• Place the steam station on the edge of
your sink and the iron to one side, on its
heel.
• Remove the collector cover and unscrew
the scale collector - fig. 16-17.
• Hold your steam station at an angle and
use a jug to fill the boiler with 1/4 litre of
tap water.- fig. 24.
• Shake the base unit for a few seconds
then empty it completely into the sink.-
fig. 25-26.
• Fit the collector back in its housing and
screw it on tightly to ensure it is
watertight but do not overtighten it - fig.
19.
• Put the scale collector cover back in
place.- fig. 20.
Models without scale collector
• To prolong the life of your steam station
and prevent the release of scale on to
your ironing, your steam station is fitted
with an orange "Boiler rinse” light that
flashes on the control panel when you
need to drain the appliance - fig. 21.
• If the orange “boiler rinse” warning light
flashes, you can continue ironing
Do not use any descaling substances
(vinegar, industrial descaling
products, etc.) when rinsing the scale
collector: they could damage it.
Before emptying your steam station,
it must always be left to cool for 2
hours to avoid any risks of scalding.
Do not use any cleaning or descaling
products for cleaning the soleplate
or the base-unit. Never hold the iron
or the base unit under the tap.
IMPORTANT! This operation must not
be carried out unless the steam station
has been unplugged for at least two
hours and has cooled down comple-
tely. To carry out this operation, the
steam station must be close to a sink
as water may come out of the tank
when it is opened.
The next time you use your iron,
press the “Restart” button on the
control panel to turn off the orange
“Calc-Away System” light.
1800131040 DG8510-20 U0_110x154 06/12/13 08:40 Page12

13
IS THERE A PROBLEM?
Problems Possible Causes Solutions
The steam station does
not switch on or the iron
indicator and ON/OFF
indicator do not switch on.
The appliance is not
switched on. Check that your appliance is correctly
plugged in and press the illuminated on/off
switch.
Water runs through the
holes in the soleplate. You use steam too
frequently when your iron
is not hot enough.
Wait for the thermostat light to go out before
activating the steam button.
Adjust the frequency of use of the steam
trigger to match the position of the
thermostat (see § 6).
Water has condensed in the
pipes because you are using
steam for the first time or
you have not used it for
some time.
Press on the steam control button away from
your ironing board until the iron produces
steam.
normally but remember to rinse the boiler
before you use it again.
• Place the steam station on the edge of
your sink, with the iron placed to one side,
standing on its heel.
• Unscrew the boiler rinse cap cover anti
clockwise for a quarter of a turn - fig. 22.
• Using a coin, gently unscrew the boiler
rinse cap - fig. 23.
• Holding the steam station in a tilted
position, and using a jug, fill the boiler
with ¼ litre of untreated tap water - fig. 24.
• Shake the base unit for a few moments -
fig. 25 and then empty it completely into
your sink - fig. 26.
• To obtain the best results, we recommend
that this operation is done twice.
• Screw back and tighten up the boiler rinse
cap with a coin - fig. 27.
• Put the boiler rinse cap cover back in place
- fig. 28.
The next time you use the station
press the “restart” button to turn off
the orange light.
The steam station does not work
without the scale collector / boiler
rinse cap (according to model).
Regular descaling of your steam
station helps to maintain its steam
performance over time
IMPORTANT! This operation must
not be carried out unless the steam
station has been unplugged for at
least two hours and has cooled down
completely.
USA : If this troubleshooting does not resolve the issue, before consulting the retailer
or returning the product, please telephone Rowenta Consumer Services at 1-800-769-
3682. Further hints ans tips are obtainable from our homepage www.rowentausa.com
Canada : If you are unable to trace the cause of the fault, contact an official Rowenta
Customer Service Center. The addresses are shown in the enclosed service center
address list. Further hints and tips are obtainable from our homepage:
www.rowenta.ca
1800131040 DG8510-20 U0_110x154 06/12/13 08:40 Page13

14
Problems Possible Causes Solutions
Water streaks appear on
the linen. When taking a break from
ironing, if your ironing
board cover is soaked with
water it is not suited to the
power of a steam station.
Check that your ironing board is suitable. A
mesh type ironing board must be used
avoid condensation.
White streaks come
through the holes in the
soleplate.
Your boiler has a build-up
of scale because it has not
been rinsed out regularly.
Depending on model:
- Rinse the collector when the “Calc-Away
System” indicator flashes.
- Rinse the boiler when the ""Boiler rinse"
light flashes.
If your water is very hard, rinse it more
often.
Brown streaks come
through the holes in the
soleplate and stain the
linen.
You are using chemical
descaling agents or
additives in the water for
ironing.
Never add this type of product to the water
tank (see § 2).
Contact an Approved Service Centre.
The soleplate is dirty or
brown and may stain the
linen.
You are ironing at too high
a temperature. See our recommendations regarding
temperature control setting.
Your linen is not rinsed
sufficiently or you have
ironed a new garment
before washing it.
Ensure linen is rinsed thoroughly to remove
any soap deposits or chemicals on new
garments which may be sucked up by the
iron.
You are using starch. Aways spray starch on the reverse side of
the fabric to be ironed.
There is no steam or there
is little steam. The water tank is empty
(red light flashing). Fill the water tank and press the “Restart”
button on the control panel.
The soleplate temperature
is set to the maximum. The station is working but steam is very hot
and dry. As a result, it is less visible.
The water tank is not
correctly fitted into its
housing.
Push it into position until it "clicks" into
place.
Steam comes out from
around the collector
cover/boiler rinse cap
(according to model).
The collector/cap (according
to model) is not tight
enough.
Tighten the collector/cap after having let the
appliance cool for 2 hours.
The seal of the
collector/cap (according to
model) is damaged.
Contact an Approved Service Centre.
The station is faulty. Stop using the station and contact an
Approved Service Centre.
The red “water tank
empty” light flashes. You did not press the
"Restart" button. Press the “Restart” button on the control
panel until the indicator goes out.
Steam or water escapes
under the appliance. The station is faulty. Stop using the station and contact an
Approved Service Centre.
The orange "Calc-Away
System" or "Boiler rinse"
(according to the model)
light is flashing.
You did not press the
"Restart" button. Press the “Restart” button on the control
panel until the indicator goes out.
ÊUÊ,"7 /Ê /, /" Ê/Ê1, /: www.rowenta.com
/ÃÊ«À`ÕVÌÊÃÊÀi«>À>LiÊLÞÊ,"7 /]Ê`ÕÀ}Ê>`Ê>vÌiÀÊÌiÊ}Õ>À>ÌiiÊ«iÀ`°VViÃÃÀiÃ]ÊVÃÕ>LiÃÊ>`Êi`ÕÃiÀÊÀi«>Vi>LiÊ«>ÀÌÃÊV>ÊLiÊ«ÕÀV>Ãi`]ÊvÊV>ÞÊ>Û>>Li]Ê>ÃÊ`iÃVÀLi`ÊÊÌiÊ,"7 /ÊÌiÀiÌÊÃÌiÊÜÜܰÀÜiÌ>°VThe Guarantee
ROWENTA guarantees this product against any manufacturing defect in materials or workmanship
during the guarantee period within those countries*** as stated in the country list on the last page of
the user manual, starting from the initial date of purchase.
The international manufacturer’s guarantee covers all costs related to restoring the proven defective
product so that it conforms to its original specifications, through the repair or replacement of any de-
fective part and the necessary labor. At ROWENTA’s choice, a replacement product may be provided
instead of repairing a defective product. ROWENTA’s sole obligation and your exclusive resolution
under this guarantee are limited to such repair or replacement.
Conditions & Exclusions
ROWENTA shall not be obliged to repair or replace any product which is not accompanied by a valid
proof of purchase. The product can be taken directly in person or must be adequately packaged and
returned, by recorded delivery (or equivalent method of postage), to a ROWENTA authorized service
centre. Full address details for each country’s authorized service centers are listed on ROWENTA
website (www.rowenta.com) or by calling the appropriate consumer Service centre set out in the
attached Country List.
This guarantee applies only for products purchased and used for domestic purposes and will not
cover any damage which could occur as a result of misuse, negligence, failure to follow ROWENTA
instructions, or a modification or unauthorized repair of the product, faulty packaging by the owner or
mishandling by any carrier. It also does not cover normal wear and tear, maintenance or replacement
of consumable parts, or the following:
- using the wrong type of water or consumable
- damages or bad results specifically due to wrong voltage or frequency as stamped on the
product ID or specification
- scaling (any de-scaling must be carried out according to the instructions for use)
- accidents including fire, flood, thunderbolt etc
- mechanical damages, overloading
- ingress of water, dust or insects into the product
- damage to any glass or porcelain ware in the product
- professional or commercial use
Consumer Statutory Rights
This international ROWENTA guarantee does not affect the Statutory Rights a consumer may have or
those rights that cannot be excluded or limited, nor rights against the retailer from which the consu-
mer purchased the product. This guarantee gives a consumer specific legal rights, and the consumer
may also have other legal rights which vary from State to State or Country to Country. The consumer
may assert any such rights at his sole discretion.
*** Where a product purchased in one listed country and then used in another listed country, the international
ROWENTA guarantee duration is the one in the country of usage, even if the product was purchased in a listed country
with different guarantee duration. The repair process may require a longer time if the product is not locally sold by
ROWENTA. If the product is not repairable in the new country, the international ROWENTA guarantee is limited to a
replacement by a similar or alternative product at similar cost, where possible.
1800131040 DG8510-20 U0_110x154 06/12/13 08:40 Page14

15
ÊUÊ,"7 /Ê /, /" Ê/Ê1, /: www.rowenta.com
/ÃÊ«À`ÕVÌÊÃÊÀi«>À>LiÊLÞÊ,"7 /]Ê`ÕÀ}Ê>`Ê>vÌiÀÊÌiÊ}Õ>À>ÌiiÊ«iÀ`°VViÃÃÀiÃ]ÊVÃÕ>LiÃÊ>`Êi`ÕÃiÀÊÀi«>Vi>LiÊ«>ÀÌÃÊV>ÊLiÊ«ÕÀV>Ãi`]ÊvÊV>ÞÊ>Û>>Li]Ê>ÃÊ`iÃVÀLi`ÊÊÌiÊ,"7 /ÊÌiÀiÌÊÃÌiÊÜÜܰÀÜiÌ>°VThe Guarantee
ROWENTA guarantees this product against any manufacturing defect in materials or workmanship
during the guarantee period within those countries*** as stated in the country list on the last page of
the user manual, starting from the initial date of purchase.
The international manufacturer’s guarantee covers all costs related to restoring the proven defective
product so that it conforms to its original specifications, through the repair or replacement of any de-
fective part and the necessary labor. At ROWENTA’s choice, a replacement product may be provided
instead of repairing a defective product. ROWENTA’s sole obligation and your exclusive resolution
under this guarantee are limited to such repair or replacement.
Conditions & Exclusions
ROWENTA shall not be obliged to repair or replace any product which is not accompanied by a valid
proof of purchase. The product can be taken directly in person or must be adequately packaged and
returned, by recorded delivery (or equivalent method of postage), to a ROWENTA authorized service
centre. Full address details for each country’s authorized service centers are listed on ROWENTA
website (www.rowenta.com) or by calling the appropriate consumer Service centre set out in the
attached Country List.
This guarantee applies only for products purchased and used for domestic purposes and will not
cover any damage which could occur as a result of misuse, negligence, failure to follow ROWENTA
instructions, or a modification or unauthorized repair of the product, faulty packaging by the owner or
mishandling by any carrier. It also does not cover normal wear and tear, maintenance or replacement
of consumable parts, or the following:
- using the wrong type of water or consumable
- damages or bad results specifically due to wrong voltage or frequency as stamped on the
product ID or specification
- scaling (any de-scaling must be carried out according to the instructions for use)
- accidents including fire, flood, thunderbolt etc
- mechanical damages, overloading
- ingress of water, dust or insects into the product
- damage to any glass or porcelain ware in the product
- professional or commercial use
Consumer Statutory Rights
This international ROWENTA guarantee does not affect the Statutory Rights a consumer may have or
those rights that cannot be excluded or limited, nor rights against the retailer from which the consu-
mer purchased the product. This guarantee gives a consumer specific legal rights, and the consumer
may also have other legal rights which vary from State to State or Country to Country. The consumer
may assert any such rights at his sole discretion.
*** Where a product purchased in one listed country and then used in another listed country, the international
ROWENTA guarantee duration is the one in the country of usage, even if the product was purchased in a listed country
with different guarantee duration. The repair process may require a longer time if the product is not locally sold by
ROWENTA. If the product is not repairable in the new country, the international ROWENTA guarantee is limited to a
replacement by a similar or alternative product at similar cost, where possible.
1800131040 DG8510-20 U0_110x154 06/12/13 08:40 Page15

16
BIENVENUE DANS LE
MONDE ROWENTA!
Félicitations d'avoir choisi la centrale vapeur ROWENTA
PERFECT STEAM pour prendre soin de vos vêtements.
Fondée en 1884, Rowenta a une longue histoire en innovation.
Nous créons des appareils domestiques ultra performants
avec des design gracieux qui peuvent être trouvés dans le
monde entier.
La centrale vapeur ROWENTA PERFECT STEAM vous permet
d'obtenir des résultats professionnels à la maison en un rien
de temps. Son puissant débit vapeur assure une parfaite
pénétration de la vapeur au coeur des fibres et sa semelle en
acier inoxydable sèche en un seul passage pour un résultat
parfait. Le réservoir d'eau à remplissage permanent permet un
repassage illimité et le collecteur de tartre exclusif garantie
des performances durables dans le temps.
Avec la centrale vapeur ROWENTA PERFECT STEAM, vous
n'avez plus besoin d'être un expert pour obtenir des résultats
professionnels !
NOTRE CONSEIL:
Pour découvrir et apprécier l'utilisation de votre centrale
vapeur PERFECT STEAM, nous vous recommandons de lire la
notice avec votre première utilisation.
1800131040 DG8510-20 U0_110x154 06/12/13 08:40 Page16

17
FR
Recommandation importante
Con igne de écurité
• Lisez ttentivement le mode d’emploi v nt l
première utilis tion de votre pp reil : une utili-
s tion non conforme u mode d’emploi dég - ger it
l m rque de toute respons bilité.
• Ne débr nchez p s l’ pp reil en tir nt sur le cordon.
Débr nchez toujours votre pp reil :
- v nt de remplir le réservoir ou de rincer l
ch udière,
- v nt de le nettoyer,
- près ch que utilis tion.
• L’ pp reil doit être utilisé et posé sur une surf ce
st ble ne cr ign nt p s l ch leur. Lorsque vous
posez le fer sur le repose-fer, ssurez-vous que l
surf ce sur l quelle vous le reposez est st ble. Ne p s
poser le boitier sur l housse de l pl nche à rep sser
ou sur une surf ce molle.
• Cet pp reil n’est p s prévu pour être utilisé p r des
personnes (y compris les enf nts) dont les c p cités
physiques, sensorielles ou ment les sont réduites, ou
des personnes dénuées d’expérience ou de
conn iss nce, s uf si elles ont pu bénéficier, p r
l’intermédi ire d’une personne respons ble de leur
sécurité, d’une surveill nce ou d’instructions
pré l bles concern nt l’utilis tion de l’ pp reil.
BIENVENUE DANS LE
MONDE ROWENTA!
Félicitations d'avoir choisi la centrale vapeur ROWENTA
PERFECT STEAM pour prendre soin de vos vêtements.
Fondée en 1884, Rowenta a une longue histoire en innovation.
Nous créons des appareils domestiques ultra performants
avec des design gracieux qui peuvent être trouvés dans le
monde entier.
La centrale vapeur ROWENTA PERFECT STEAM vous permet
d'obtenir des résultats professionnels à la maison en un rien
de temps. Son puissant débit vapeur assure une parfaite
pénétration de la vapeur au coeur des fibres et sa semelle en
acier inoxydable sèche en un seul passage pour un résultat
parfait. Le réservoir d'eau à remplissage permanent permet un
repassage illimité et le collecteur de tartre exclusif garantie
des performances durables dans le temps.
Avec la centrale vapeur ROWENTA PERFECT STEAM, vous
n'avez plus besoin d'être un expert pour obtenir des résultats
professionnels !
NOTRE CONSEIL:
Pour découvrir et apprécier l'utilisation de votre centrale
vapeur PERFECT STEAM, nous vous recommandons de lire la
notice avec votre première utilisation.
1800131040 DG8510-20 U0_110x154 06/12/13 08:40 Page17

18
• Il convient de surveiller les enf nts pour s’ ssurer
qu’ils ne jouent p s vec l’ pp reil.
• Cet pp reil peut être utilisé p r des enf nts âgés de
8 ns et plus et les personnes m nqu nt
d’expérience et de conn iss nces ou dont les c -
p cités physiques, sensorielles ou ment les sont
réduites, si elles ont été formées et enc drées qu nt
à l’utilis tion de l’ pp reil d’une m nière sûre et
conn issent les risques encourus. Les enf nts ne
doivent p s jouer vec l’ pp reil. Le nettoy ge et
l’entretien p r l’utilis teur ne doit p s être f it p r
des enf nts à moins qu’ils ne soient âgés de 8 ns et
plus et supervisés. Tenir l’ pp reil et son cordon hors
de l portée des enf nts de moins de 8 ns.
• Les surf ces m rquées p r ce signe et l
semelle sont très ch udes lors de l'utilis tion
de l' pp reil. Ne p s toucher ces surf ces t nt
que le fer n' p s refroidi.
• Ne l issez j m is l’ pp reil s ns surveill nce :
- lorsqu’il est r ccordé à l’ liment tion électrique,
- t nt qu’il n’ p s refroidi environ 1 heure.
• Av nt de vid nger l ch udière/rincer le collecteur
(selon modèle), ttendez toujours que l centr le
v peur soit froide et débr nchée depuis plus de 2
heures pour dévisser le bouchon de vid nge / le
collecteur.
• Attention : Si le bouchon ou le bouchon de vid nge
(selon modèle) est bimé, f ites le rempl cer p r un
Centre Service Agrée.
1800131040 DG8510-20 U0_110x154 06/12/13 08:40 Page18

19
• Lors du rinç ge de l ch udière, ne l remplissez
j m is directement sous le robinet.
• Ne dévissez j m is le bouchon pend nt le
fonctionnement de l’ pp reil.
• L’ pp reil ne doit p s être utilisé s’il chuté, s’il
présente des domm ges pp rents, s’il fuit ou
présente des nom lies de fonctionnement. Ne
démontez j m is votre pp reil : f ites-le ex miner
d ns un Centre Service Agréé, fin d’éviter un
d nger.
• Si le cordon d’ liment tion électrique ou le cordon
v peur est endomm gé, il doit être impér tivement
rempl cé p r un Centre Service Agréé fin d’éviter
un d nger.
• Tous les ccessoires, produits consomm bles et pièces dét chées doivent être chetés en
exclusivité uprès de l m rque Tef l ou un Centre Services Agréé.
• Pour votre sécurité, cet pp reil est conforme ux normes et réglement tions pplic bles
(Directives B sse Tension, Comp tibilité Electrom gnétique, Environnement …).
• Votre centr le v peur est un pp reil électrique: il doit être utilisé d ns des conditions norm les
d’utilis tion. Il est prévu pour un us ge domestique uniquement.
• Il est équipé de 2 systèmes de sécurité :
- une soup pe évit nt toute surpression, qui en c s dysfonctionnement de l’ pp reil, l isse
éch pper le surplus de v peur,
- un fusible thermique pour éviter toute surch uffe.
• Br nchez toujours votre centr le v peur :
- sur une inst ll tion électrique dont l tension est comprise entre 120 et 127 V.
- sur une prise électrique de type «terre».
Toute erreur de br nchement peut c user un domm ge irréversible et nnule l g r ntie. Si vous
utilisez une r llonge, vérifiez que l prise est bien de type bipol ire 16A vec conducteur de terre.
• Déroulez complètement le cordon électrique v nt de le br ncher sur une prise électrique de type
terre.
• L semelle de votre fer et l pl que repose-fer du boîtier peuvent tteindre des tempér tures très
élevées, et peuvent occ sionner des brûlures : ne les touchez p s.
Ne touchez j m is les cordons électriques vec l semelle du fer à rep sser.
• Votre pp reil émet de l v peur qui peut occ sionner des brûlures. M nipulez le fer vec
préc ution, surtout en rep ss ge vertic l. Ne dirigez j m is l v peur sur des personnes ou des
nim ux.
• Ne plongez j m is votre centr le v peur d ns l’e u ou tout utre liquide. Ne l p ssez j m is sous
l’e u du robinet.
MERCI DE CONSERVER CE MODE D’EMPLOI
1800131040 DG8510-20 U0_110x154 06/12/13 08:40 Page19

20
1 • Safety lock (selon modèle)
• Votre centrale vapeur est équipée d'un
arceau de maintien du fer sur le boitier
avec verrouillage pour faciliter le
transport et le rangement :
• Verrouillage - fig.1.
• Déverrouillage - fig.2.
Pour transporter votre centrale vapeur par
la poignée du fer :
- posez le fer sur la plaque repose-fer de la
centrale vapeur et rabattez l’arceau de
maintien sur le fer jusqu’à
l’enclenchement du verrouillage
(identifié par un “clic” sonore) - fig.1.
- Saisissez le fer par la poignée pour
transporter votre centrale vapeur - fig.3.
2• Quelle eau utiliser ?
L’eau du robinet
• Votre appareil a été conçu pour
fonctionner avec l’eau du robinet. Si
votre eau est très calcaire, mélangez
50% d’eau du robinet et 50% d’eau
déminéralisée du commerce.
• Dans certaines régions de bord de mer,
la teneur en sel de votre eau peut être
élevée. Dans ce cas, utilisez
exclusivement de l’eau déminéralisée.
Adoucisseur
• Il y a plusieurs types d’adoucisseurs et
l’eau de la plupart d’entre eux peut être
utilisée dans la centrale vapeur.
Cependant, certains adoucisseurs et
particulièrement ceux qui utilisent des
produits chimiques comme le sel,
peuvent provoquer des coulures
blanches ou brunes, c’est notamment le
cas des carafes filtrantes.
• Si vous rencontrez ce type de problème,
nous vous recommandons d’essayer
d’utiliser de l’eau du robinet non traitée
ou de l’eau en bouteille.
• Une fois l’eau changée, plusieurs
utilisations seront nécessaires pour
résoudre le problème. Rowenta
recommande d’essayer la fonction
vapeur pour la première fois sur une
vieille serviette ou un vieux vêtement
qui peuvent être jetés afin d’éviter
d’endommager vos vêtements.
Souvenez-vous :
• Les eaux de pluie ou contenant des
additifs (comme l’amidon, le parfum ou
l’eau des appareils ménagers) ne peuvent
pas être utilisées. De tels additifs peuvent
affecter les propriétés de la vapeur et à
haute température peuvent former des
dépôts dans la chambre à vapeur ce qui
pourra tâcher votre linge.
3 • Préparez votre centrale
vapeur
• Placez la centrale vapeur sur un
emplacement stable et horizontal ne
craignant pas la chaleur.
• Retirez le réservoir d’eau amovible (situé
à l’avant de la centrale vapeur) à l’aide
de la poignée - fig.4.
DESCRIPTION
1. Poignée du fer
2. Gâchette vapeur
3. Bouton de réglage de la température
du fer
4. Boîtier
5. Pointe précision
6. Safety lock (verrouillage du fer sur le
boitier)
7. Réservoir d’eau amovible 1,4 L
8. Volet de remplissage du réservoir
9. Cache collecteur de tartre ou
bouchon de vidange
10. Rangement cordon électrique
(Velcro)
11. Plaque repose-fer
12. Voyant du fer
13. Cordon vapeur
14. Rangement cordon vapeur
15 Calc Away system
16 Tableau de bord
a. Voyant vapeur prête
b. Touche ECO
c. Touche restart
d. Voyant Calc away system ou
vidange de la chaudière
e. Voyant réservoir vide
17. Interrupteur marche/arrêt
selon modèle
PRÉPARATION
1800131040 DG8510-20 U0_110x154 06/12/13 08:40 Page20
This manual suits for next models
2
Table of contents
Languages:
Other Rowenta Electric Steamer manuals