manuals.online logo
Brands
  1. Home
  2. •
  3. Brands
  4. •
  5. RSA
  6. •
  7. Network Hardware
  8. •
  9. RSA Authentication Manager 8.1 User manual

RSA Authentication Manager 8.1 User manual

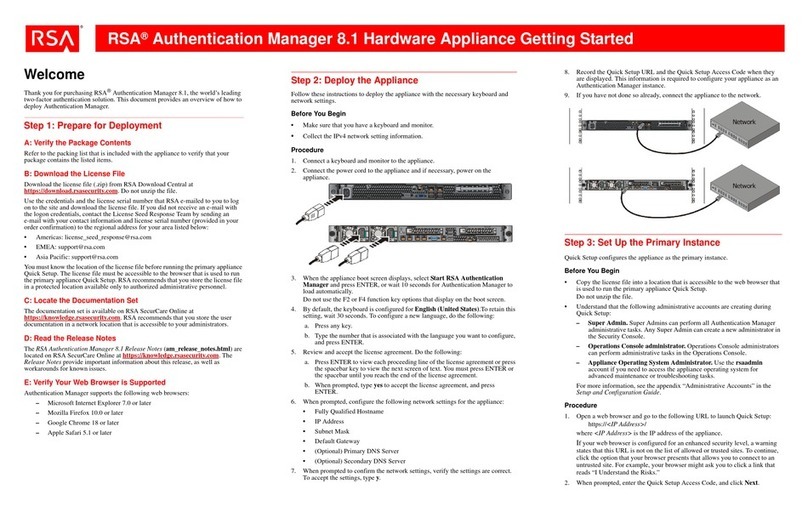
RSA®Authentication Manager 8.1 Hardware Appliance Getting Started
Welcome
Thank you for purchasing RSA®Authentication Manager 8.1, the world’s leading
two-factor authentication solution. This document provides an overview of how to
deploy Authentication Manager.
Step 1: Prepare for Deployment
A: Verify the Package Contents
Refer to the packing list that is included with the appliance to verify that your
package contains the listed items.
B: Download the License File
Download the license file (.zip) from RSA Download Central at
https://download.rsasecurity.com. Do not unzip the file.
Use the credentials and the license serial number that RSA e-mailed to you to log
on to the site and download the license file. If you did not receive an e-mail with
the logon credentials, contact the License Seed Response Team by sending an
e-mail with your contact information and license serial number (provided in your
order confirmation) to the regional address for your area listed below:
•Americas: [email protected]
•EMEA: [email protected]
•Asia Pacific: [email protected]
You must know the location of the license file before running the primary appliance
Quick Setup. The license file must be accessible to the browser that is used to run
the primary appliance Quick Setup. RSA recommends that you store the license file
in a protected location available only to authorized administrative personnel.
C: Locate the Documentation Set
The documentation set is available on RSA SecurCare Online at
https://knowledge.rsasecurity.com. RSA recommends that you store the user
documentation in a network location that is accessible to your administrators.
D: Read the Release Notes
The RSA Authentication Manager 8.1 Release Notes (am_release_notes.html)
are located on RSA SecurCare Online at https://knowledge.rsasecurity.com. The
Release Notes provide important information about this release, as well as
workarounds for known issues.
E: Verify Your Web Browser is Supported
Authentication Manager supports the following web browsers:
–Microsoft Internet Explorer 7.0 or later
–Mozilla Firefox 10.0 or later
–Google Chrome 18 or later
–Apple Safari 5.1 or later
Step 2: Deploy the Appliance
Follow these instructions to deploy the appliance with the necessary keyboard and
network settings.
Before You Begin
•Make sure that you have a keyboard and monitor.
•Collect the IPv4 network setting information.
Procedure
1. Connect a keyboard and monitor to the appliance.
2. Connect the power cord to the appliance and if necessary, power on the
appliance.
3. When the appliance boot screen displays, select Start RSA Authentication
Manager and press ENTER, or wait 10 seconds for Authentication Manager to
load automatically.
Do not use the F2 or F4 function key options that display on the boot screen.
4. By default, the keyboard is configured for English (United States).To retain this
setting, wait 30 seconds. To configure a new language, do the following:
a. Press any key.
b. Type the number that is associated with the language you want to configure,
and press ENTER.
5. Review and accept the license agreement. Do the following:
a. Press ENTER to view each proceeding line of the license agreement or press
the spacebar key to view the next screen of text. You must press ENTER or
the spacebar until you reach the end of the license agreement.
b. When prompted, type yes to accept the license agreement, and press
ENTER.
6. When prompted, configure the following network settings for the appliance:
•Fully Qualified Hostname
•IP Address
•Subnet Mask
•Default Gateway
•(Optional) Primary DNS Server
•(Optional) Secondary DNS Server
7. When prompted to confirm the network settings, verify the settings are correct.
To accept the settings, type y.
8. Record the Quick Setup URL and the Quick Setup Access Code when they are
displayed. This information is required to configure your appliance as an
Authentication Manager instance.
9. If you have not done so already, connect the appliance to the network.
Step 3: Set Up the Primary Instance
Quick Setup configures the appliance as the primary instance.
Before You Begin
•Copy the license file into a location that is accessible to the web browser that
is used to run the primary appliance Quick Setup.
Do not unzip the file.
•Understand that the following administrative accounts are creating during
Quick Setup:
– Super Admin. Super Admins can perform all Authentication Manager
administrative tasks. Any Super Admin can create a new administrator in
the Security Console.
– Operations Console administrator. Operations Console administrators
can perform administrative tasks in the Operations Console.
– Appliance Operating System Administrator. Use the rsaadmin
account if you need to access the appliance operating system for
advanced maintenance or troubleshooting tasks.
For more information, see the appendix “Administrative Accounts” in the
Setup and Configuration Guide.
Procedure
1. Open a web browser and go to the following URL to launch Quick Setup:
https://<IP Address>/
where <IP Address> is the IP address of the appliance.
If your web browser is configured for an enhanced security level, a warning
states that this URL is not on the list of allowed or trusted sites. To continue,
click the option that your browser presents that allows you to connect to an
untrusted site. For example, your browser might ask you to click a link that
reads “I Understand the Risks.”
2. When prompted, enter the Quick Setup Access Code, and click Next.
RSA®Authentication Manager 8.1 Hardware Appliance Getting Started
3. Click Start Primary Quick Setup. Follow the instructions on each screen to
complete Quick Setup.
Record all of the passwords to the administrative accounts that you create
during Quick Setup.
The operating system password is required to access the appliance for
advanced maintenance and troubleshooting tasks. For security reasons, RSA
does not provide a utility for recovering the operating system password.
4. After the instance is configured, you can click the Security Console or
Operations Console URL links to open those consoles. The Security Console
or Operations Console URL links require a fully qualified domain name
(FQDN).
Note: The fully qualified domain name must resolve to your appliance. If you
are having trouble connecting to the Consoles, verify the DNS configuration.
The first time you access the Security Console or the Operations Console, a
warning displays because the default self-signed certificate created after Quick
Setup is not trusted by your browser.
5. Accept the certificate to access the console and prevent the warning from
occurring again. For more information, see the chapter “Deploying a Primary
Appliance” in the Setup and Configuration Guide.
Note: If you plan to migrate from RSA Authentication Manager 7.1, the first
import you complete on RSA Authentication Manager 8.1 overwrites all
existing data in the deployment and removes attached replica instances. For
more information, see the RSA Authentication Manager 7.1 to 8.1 Migration
Guide: Migrating to a New Hardware Appliance or Virtual Appliance.
Logging On to the Consoles
After you have completed Quick Setup, you can use the following links to access a
console.
To view a complete list of URLs that are available for the consoles, see the Setup
and Configuration Guide.
If your web browser is configured for an enhanced security level, add the URL for
each console to the list of allowed or trusted sites, including any additional URLs
that you intend to use. See your browser documentation for instructions about
adding allowed or trusted sites.
To access the Security Console, enter the Super Admin User ID and password that
you specified during Quick Setup. To access the Operations Console, enter the
Operations Console user ID and password that were entered during Quick Setup.
Console URL
Security Console https://<fully qualified domain name>/sc
Operations Console https://<fully qualified domain name>/oc
Self-Service Console If there is no web tier, enter:
https://<fully qualified domain name>/ssc
After installing a web tier, enter:
https://<fully qualified virtual host name>/ssc
If you change the default load balancer port, enter:
https://<fully qualified virtual host name>:<virtual host
port>/ssc
Next Steps
After setting up the appliance, consider which of the following tasks you want to
perform for the Authentication Manager deployment. You must perform all post-
setup tasks on the primary instance.
Support and Service
RSA SecurCare Online offers a knowledgebase that contains answers to common questions and
solutions to known problems. It also offers information on new releases, important technical news, and
software downloads.
The RSA Solution Gallery provides information about third-party hardware and software products that
have been certified to work with RSA products. The gallery includes Secured by RSA Implementation
Guides with step-by-step instructions and other information about interoperation of RSA products with
these third-party products.
Trademarks
RSA, the RSA Logo and EMC are either registered trademarks or trademarks of EMC Corporation in
the United States and/or other countries. All other trademarks used herein are the property of their
respective owners. For a list of RSA trademarks, go to www.emc.com/legal/emc-corporation-
trademarks.htm#rsa.
Copyright © 2013 EMC Corporation. All Rights Reserved.
December 2013
P/N 6925/A0
Task Administrator’s Guide Chapter
Add Authentication Manager users To add users to the Authentication Manager
internal database, see “Administering
Users.”
To link to an external identity source, see
“Integrating LDAP Directories.”
Assign authentication policies “Configuring Authentication Policies”
Import tokens and assign users “Deploying and Administering
RSA SecurID Tokens”
Set up risk-based authentication
(RBA) “Deploying Risk-Based Authentication”
Set up on-demand authentication
(ODA) “Deploying On-Demand Authentication”
Configure and customize end-user
Self-Service for maintenance and
troubleshooting.
“RSA Self-Service”
RSA SecurCare Online https://knowledge.rsasecurity.com
Customer Support Information www.emc.com/support/rsa/
index.htm
RSA Secured Partner Solutions Directory https://gallery.emc.com/
community/marketplace/
rsa?view=overview
Step 4: Set Up a Replica Instance
After you configure the primary instance, you can deploy another appliance and set
up a replica instance.
Keep the appliance on a trusted network until Quick Setup is complete. The client
computer and browser used to run Quick Setup should also be on a trusted network.
Before You Begin
A primary instance must be deployed on the network.
Procedure
1. On the primary instance, log on to the Operations Console, and click
Deployment Configuration > Instances > Generate Replica Package. For
instructions, see the Operations Console Help topic “Generate a Replica
Package.”
2. Deploy the appliance. For instructions, see Step 2: Deploy the Appliance.
3. Open a browser and go to the following URL to launch Quick Setup:
https://<IP Address>/
where <IP Address> is the IP address of the replica appliance.
If your web browser is configured for an enhanced security level, a warning
states that this URL is not on the list of allowed or trusted sites. To continue, click
the option that your browser presents that allows you to connect to an untrusted
site.
4. When prompted, enter the Quick Setup Access Code, and click Next.
5. Click Start Replica Quick Setup. Follow the instructions on each screen to
complete Quick Setup.
Record the operating system password that is created during Quick Setup.
The operating system password is required to access the appliance for advanced
maintenance and troubleshooting tasks. For security reasons, RSA does not
provide a utility for recovering the operating system password.
6. After the instance is configured, do one of the following:
•Click Begin Attach to attach the replica instance to the primary instance.
•Click Defer Attach to attach the replica instance at another time. When
prompted, confirm your choice. The replica instance powers off. You can
attach the replica instance the next time you power on the replica instance.
For instructions, see the Operations Console Help topic “Attach the Replica
Instance to the Primary Instance.”
Web Tier Installation
Web tiers are not required, but your deployment might need them to satisfy your
network configuration and requirements. Authentication Manager includes services,
such as risk-based authentication, dynamic seed provisioning, and the Self-Service
Console, that may be required by users outside of your corporate network. If your
network includes a DMZ, you can use a web tier to deploy these services inside the
DMZ. For more information, see the chapter “Planning Your Deployment” in the
Planning Guide.

Other RSA Network Hardware manuals

RSA enVision 60 Series Operating manual

RSA

RSA enVision 60 Series Operating manual

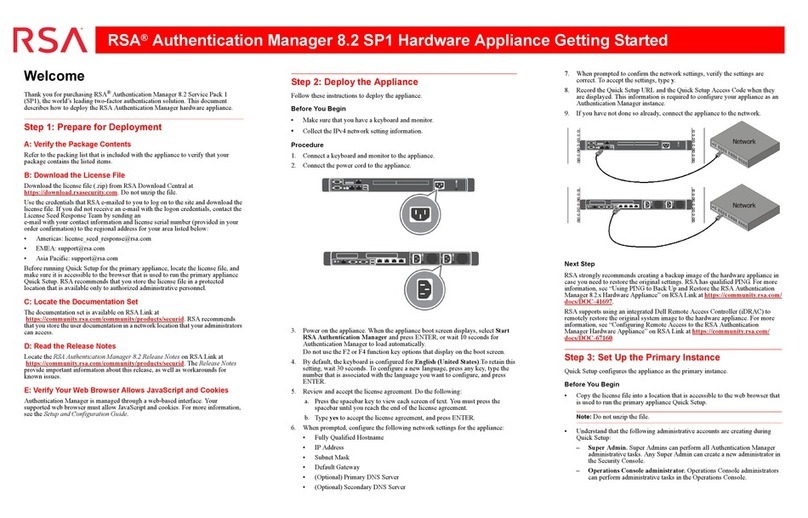
RSA Authentication Manager 8.2 User manual

RSA

RSA Authentication Manager 8.2 User manual

RSA Authentication Manager 8.2 User manual

RSA

RSA Authentication Manager 8.2 User manual

RSA Netwitness Suite 4 Series User manual

RSA

RSA Netwitness Suite 4 Series User manual

RSA NetWitness 6 Series User manual

RSA

RSA NetWitness 6 Series User manual

RSA Authentication Manager 8.1 User manual

RSA

RSA Authentication Manager 8.1 User manual

Popular Network Hardware manuals by other brands

CommScope FDC-W8-FAT Installation instruction

CommScope

CommScope FDC-W8-FAT Installation instruction

Tosibox Central Lock instruction manual

Tosibox

Tosibox Central Lock instruction manual

Cabletron Systems FLIU-1 installation guide

Cabletron Systems

Cabletron Systems FLIU-1 installation guide

Atmel ATAVRAUTOEK1 Getting started

Atmel

Atmel ATAVRAUTOEK1 Getting started

Tecnoalarm RTX500S BWL quick start guide

Tecnoalarm

Tecnoalarm RTX500S BWL quick start guide

XtendLan XL-HCW224C user guide

XtendLan

XtendLan XL-HCW224C user guide

AMX AXB-PSCV Dimensional drawing

AMX

AMX AXB-PSCV Dimensional drawing

Kiloview N6 user manual

Kiloview

Kiloview N6 user manual

aleen EAR 5000 Installation and programming manual

aleen

aleen EAR 5000 Installation and programming manual

D-Link ShareCenter Pulse DNS-320 user manual

D-Link

D-Link ShareCenter Pulse DNS-320 user manual

Overmax CAMSPOT RECORDER 2.1 user manual

Overmax

Overmax CAMSPOT RECORDER 2.1 user manual

NDC 2.4GHz 802.11g Wireless Outdoor Bridge... Specifications

NDC

NDC 2.4GHz 802.11g Wireless Outdoor Bridge... Specifications

MaxLux МХ0058 quick start guide

MaxLux

MaxLux МХ0058 quick start guide

Baldwin Boxall BDM 304 operating instructions

Baldwin Boxall

Baldwin Boxall BDM 304 operating instructions

Cisco Catalyst 2960-XR Configuration guide

Cisco

Cisco Catalyst 2960-XR Configuration guide

UNICORECOMM UB482 Installation and Operation User Manual

UNICORECOMM

UNICORECOMM UB482 Installation and Operation User Manual

ATTO Technology FibreBridge 2370E Specifications

ATTO Technology

ATTO Technology FibreBridge 2370E Specifications

BLiNQ Networks Inc. FW-300i Quick installation guide

BLiNQ Networks Inc.

BLiNQ Networks Inc. FW-300i Quick installation guide

manuals.online logo
manuals.online logoBrands
  • About & Mission
  • Contact us
  • Privacy Policy
  • Terms and Conditions

Copyright 2025 Manuals.Online. All Rights Reserved.