manuals.online logo
Brands
  1. Home
  2. •
  3. Brands
  4. •
  5. RSI Systems Furniture
  6. •
  7. Indoor Furnishing
  8. •
  9. RSI Systems Furniture EZcube User manual

RSI Systems Furniture EZcube User manual

EZcube Installation Guide
RSI Systems Furniture
2
RSI Systems Furniture
EZcube Installation Guide
3-4
5-6
7-8
9
10
11
12
13
Panels
Connection Posts
Top Cap / End Trim
Worksurface Brackets
Support Leg
Shelf
Power Blocks / Connectors
Infeeds
STEP 1: Lift up and remove the fabric tile from one side of the panel.
STEP 2: Determine which side of the panel has Connector-A and Connector-B
STEP 3: Grab your X3 panel screw, stick it through Connector-A and start screw-
ing it into Connector-B.
STEP 4: Before fully tightening the bracket make sure the top of the panel is at
the same height as the panel you are connecting.
NOTE: Any unused connectors should be removed from the panel
Connector-A
(Non-Threaded Connector
Connector-B
(Threaded Connector)
3
RSI Systems Furniture
X3 Panel Connection
EZcube Installation Guide
STEP 1: Determine which side the brackets are on. See Figure 6.3
STEP 1: Lift up the panel you are connecting and lower in on to the interlocking
brackets of the panel you are connecting to See Figure 6.1
Note: While you are connecting you should hear the spring loaded locking
bracket snap into place.
STEP 4: Lift up slightly on the panel to ensure the panels are locked together.
EZcube Installation Guide
4
RSI Systems Furniture
Figure: 6.1
Figure: 6.2
Figure: 6.3
X1 Panel Connection
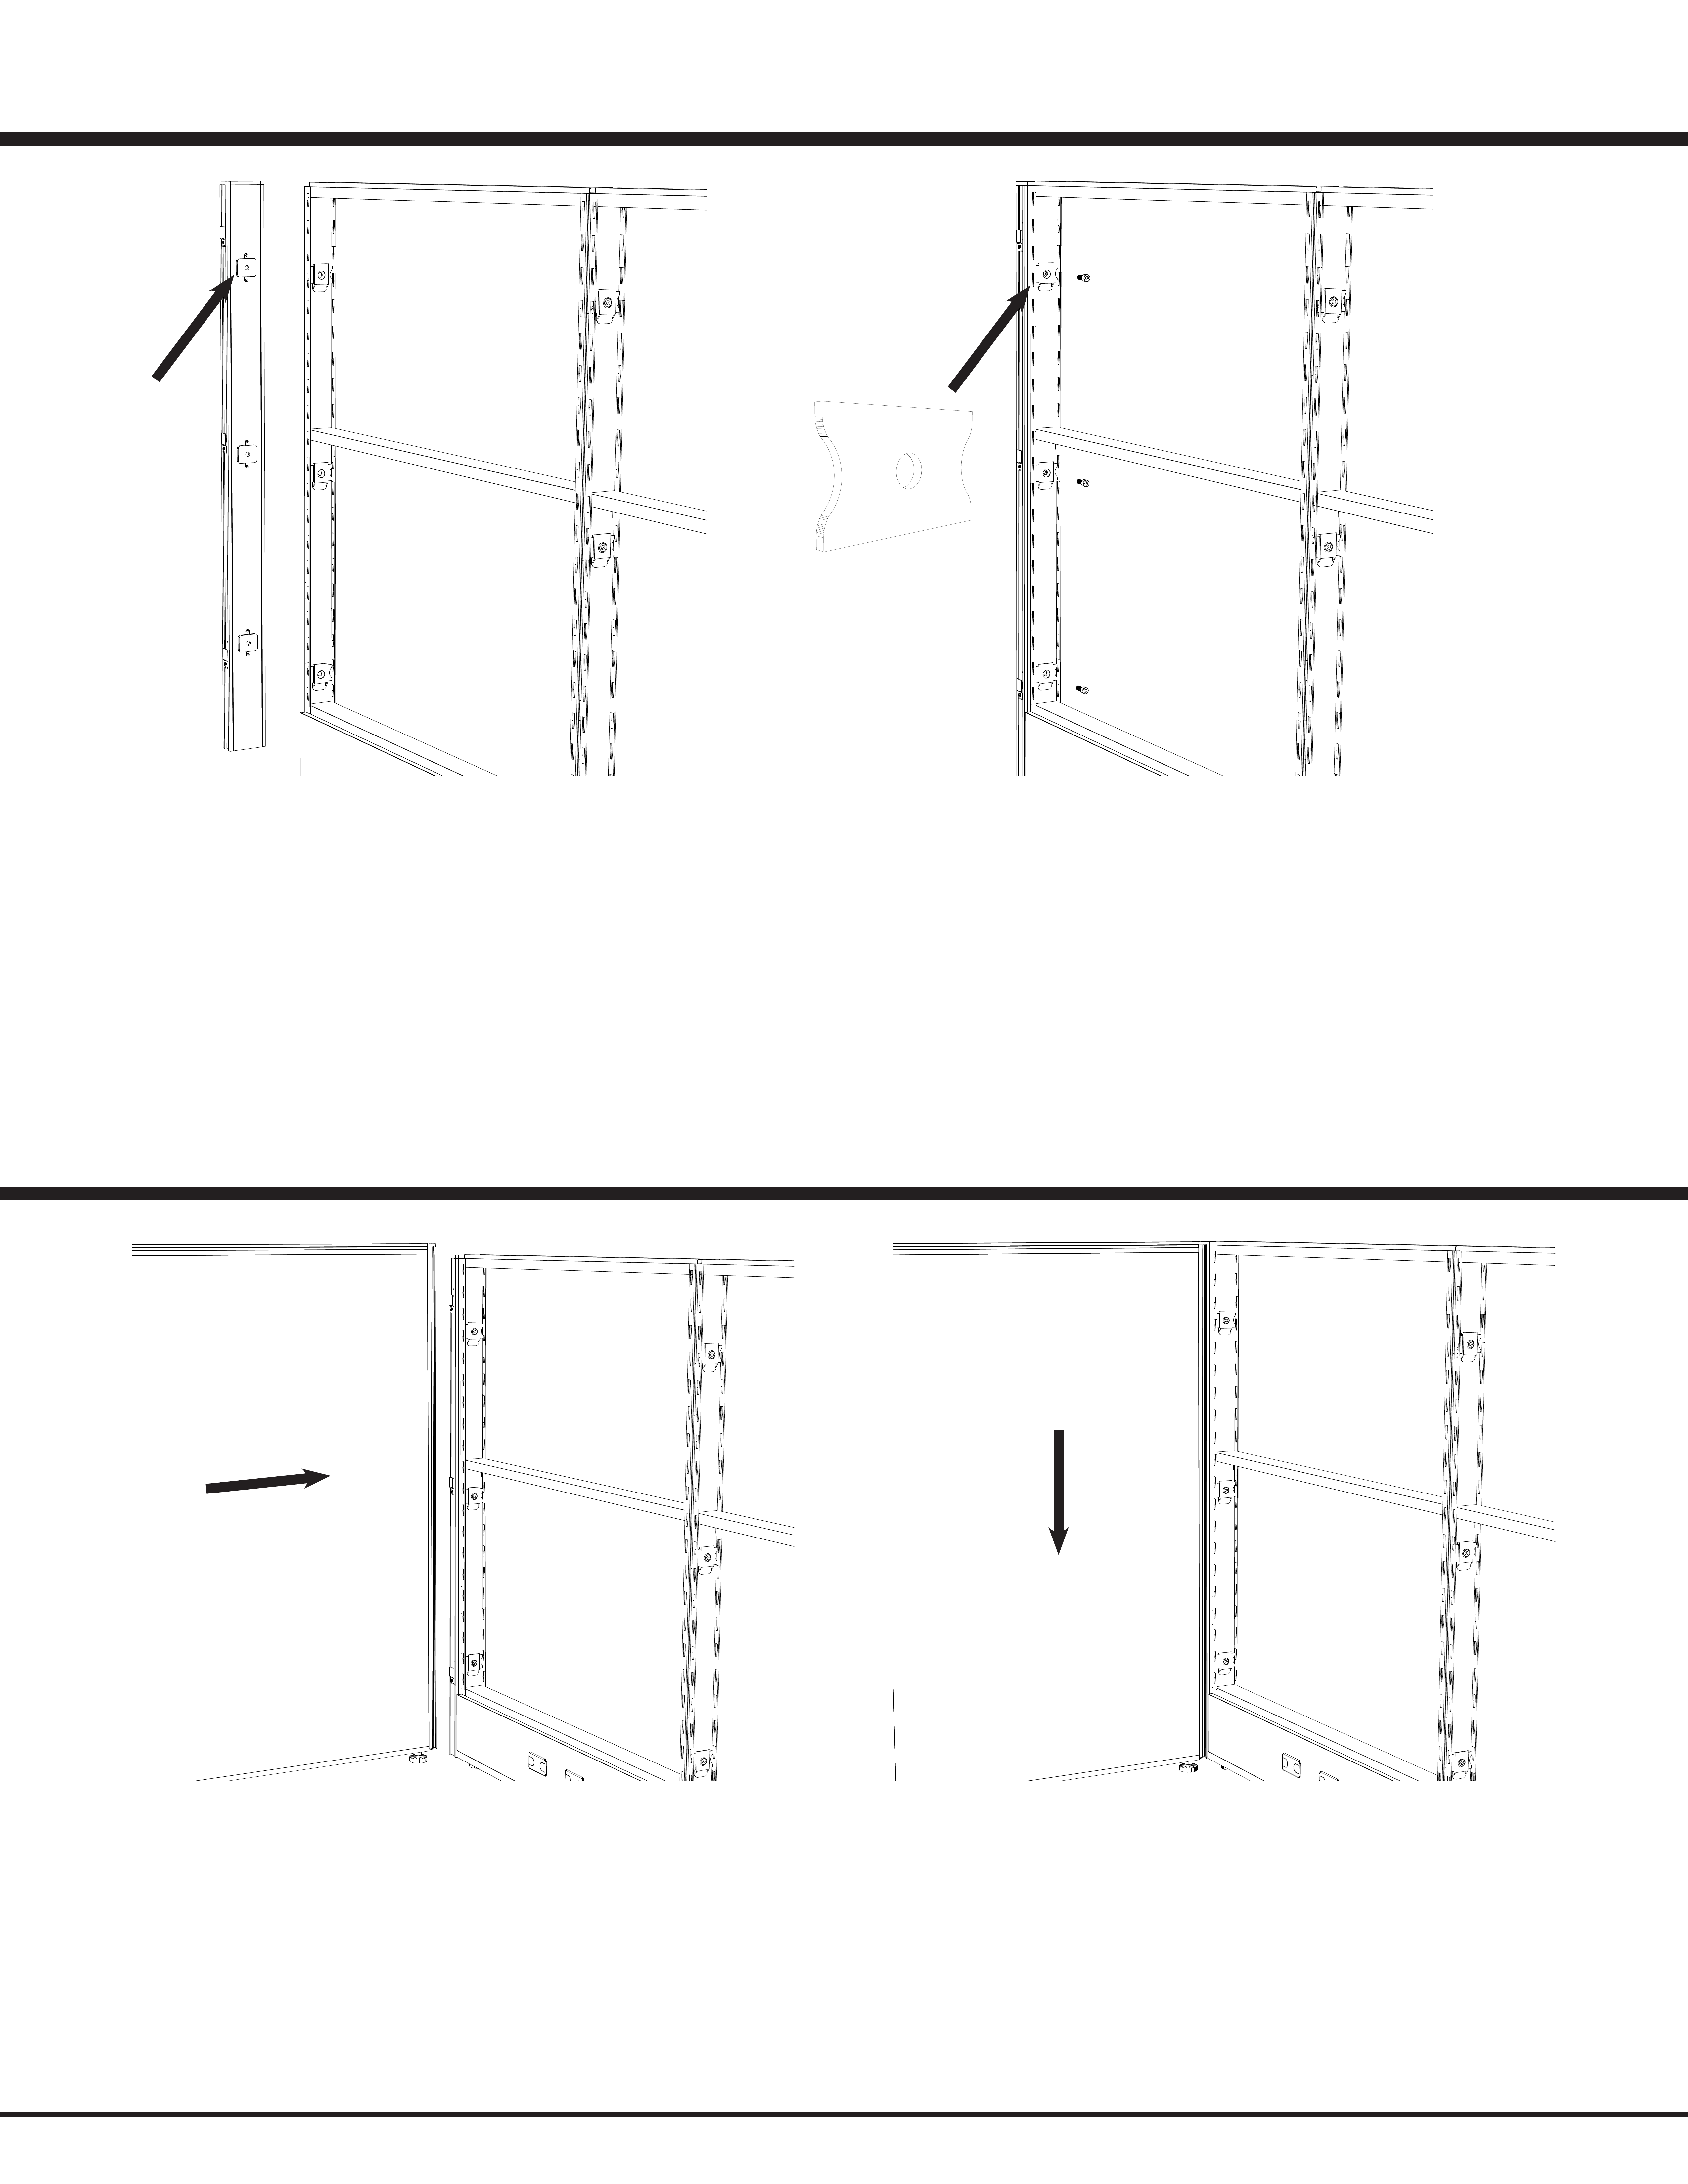
STEP 1: Fit the X31 Post centering pieces (See Figure 7.1) into the X3 Panel Rail.
STEP 2: Feed your X31 Post Screw through the Connector-A bracket and in to the post.
NOTE: If you have Connector-B mounted inside the panel you will need to swap them out with
the extra Connector-A brackets that are included in your hardware pack.
STEP 3: Make sure the top cap line on the X31 Post lines up with the top of the side rail then
tighten then nish tightening the post screw.
STEP 2: Lift up the panel you are connecting and lower in on to the interlocking brackets of the X31 Post you are connecting
to See Figure 7.3
STEP 3: After lowering the panel on to the X31 post you are conneting to you should hear the spring loaded locking bracket
click into place.
STEP 4: Lift up slightly on the panel to ensure the panel and post are locked together.
EZcube Installation Guide
5
RSI Systems Furniture
X3 Panel to X31 Post Connection
X1 Panel to X31 Post Connection
Connector-A
(Non-Threaded Connector
Figure: 7.1 Figure: 7.2
Figure: 7.3 Figure: 7.4
EZcube Installation Guide
6
RSI Systems Furniture
STEP 1: Fit the X3 Post centering pieces into the X3 Panel Rail.
STEP 2: Feed your X3 Ponel Screw through the Connector-A bracket and into the post.
NOTE: If you have Connector-B mounted inside the panel you will need to swap them out with
the extra Connector-A brackets that are included in your hardware pack.
STEP 3: Make sure the bottom top cap line on the X31 Post lines up with the top of the side rail
then nish tightening the screw.
X3 Panel to X3 Post Connection
EZcube Installation Guide
7
RSI Systems Furniture
STEP 1: Snap the top cap down at an an-
gle to get it started.
STEP 2: Make sure that the top cap is
completely seated against the top of
panel.
STEP 1: Attach the End Trim Corner Transi-
tion piece to the End Trim
STEP 2: Slide the End Trim Corner piece
into the Top Cap and make sure the End
Trim is ush against the panel
STEP 3: Get the self tapping screws pro-
vided in the hardware pack and screw
through the frame into the end trim.
X3 Top Cap
X3 End Trim
EZcube Installation Guide
STEP 1: Remove the X1 Panel Side Top cap (See Figure 10.1-10.2)
STEP 2: Unscrew the X1 connecting brackets and slide up and off the panel
STEP 3: Put the X1 Panel Side Top Cap back on the panel
STEP 4: Insert L-Shaped end rst then snap into place
X1 End Trim
8
RSI Systems Furniture
Figure: 10.1 Figure: 10.2
EZcube Installation Guide
9
RSI Systems Furniture
STEP 1: Angle the work surface bracket and insert the top tooth into the Side Rail (See Figure (11.1-11.3)
STEP 2: Make sure the bracket is completely seated on the side rail
STEP 1: Remove X1 Panel Side Top Cap (See Figure 11.7-11.8)
STEP 2: Get the X1 Bracket Screws and screw in the backplate slightly (do not tighten yet) See Figure: 11.9
STEP 3: Measure the height on the X3 work surface brackets so you know what height to install the brackets at.
STEP 4: Slide the loose backplate down the side rail slot with the cantilever attached. Tighten the screws once you have
reached the correct location.
X3 Worksurface Brackets
X1 Worksurface Brackets
Figure: 11.1
Figure: 11.4
Figure: 11.7 Figure: 11.8 Figure: 11.9
Figure: 11.5 Figure: 11.6
Figure: 11.2 Figure: 11.3
EZcube Installation Guide
10
RSI Systems Furniture
Front Edge
STEP 1: Position the leg so it is ush with the front corner edge of the surface.
STEP 2: Attach one screw to the bottom side of the surface. This will provide additional support while you attach the surface to the
corner bracket that will be positioned behind the leg.
STEP 3: Slide the leg over and attach the corner bracket to the worksurface.
STEP 4: Slide the leg back to its original location and attach the remaining screws.
Worksurface Leg Install
EZcube Installation Guide
11
RSI Systems Furniture
STEP 1: Install the shelf ends to the bottom shelf pan with the screws provided.
STEP 2: Angle the shelf and insert the top tooth into the side rail.
STEP 3: Make sure the bracket is completely seated on the side rail
X3 Shelf
Figure: 13.1 Figure: 13.2
Figure: 13.3

Other manuals for EZcube

2

Other RSI Systems Furniture Indoor Furnishing manuals

RSI Systems Furniture EZcube User manual

RSI Systems Furniture

RSI Systems Furniture EZcube User manual

RSI Systems Furniture EZcube User manual

RSI Systems Furniture

RSI Systems Furniture EZcube User manual

RSI Systems Furniture PIVOT User manual

RSI Systems Furniture

RSI Systems Furniture PIVOT User manual

RSI Systems Furniture SCULPT User manual

RSI Systems Furniture

RSI Systems Furniture SCULPT User manual

Popular Indoor Furnishing manuals by other brands

Regency LWMS3015 Assembly instructions

Regency

Regency LWMS3015 Assembly instructions

Furniture of America CM7751C Assembly instructions

Furniture of America

Furniture of America CM7751C Assembly instructions

Safavieh Furniture Estella CNS5731 manual

Safavieh Furniture

Safavieh Furniture Estella CNS5731 manual

PLACES OF STYLE Ovalfuss Assembly instruction

PLACES OF STYLE

PLACES OF STYLE Ovalfuss Assembly instruction

Trasman 1138 Bo1 Assembly manual

Trasman

Trasman 1138 Bo1 Assembly manual

Costway JV10856 manual

Costway

Costway JV10856 manual

moss DESIGN Caisson Credenza Assembly instructions

moss DESIGN

moss DESIGN Caisson Credenza Assembly instructions

Aquaglide FULL DECK 15.0 owner's manual

Aquaglide

Aquaglide FULL DECK 15.0 owner's manual

AREBOS AR-HE-SW30 user manual

AREBOS

AREBOS AR-HE-SW30 user manual

Till-Hilft Fulda 87005.330 Assembly instructions

Till-Hilft

Till-Hilft Fulda 87005.330 Assembly instructions

Twoey Outside 2010 quick start guide

Twoey Outside

Twoey Outside 2010 quick start guide

Hettich Easys 200 operating instructions

Hettich

Hettich Easys 200 operating instructions

The bedboss RELAX 404 Series owner's manual

The bedboss

The bedboss RELAX 404 Series owner's manual

Oeseder Möbelindustrie Bern 991 720 Assembly instructions

Oeseder Möbelindustrie

Oeseder Möbelindustrie Bern 991 720 Assembly instructions

Costway HW68469 user manual

Costway

Costway HW68469 user manual

Next ALIX A27743 Assembly instructions

Next

Next ALIX A27743 Assembly instructions

BROSA Hans Assembly guide

BROSA

BROSA Hans Assembly guide

Prodigg MINIKA PBA015T-FUR installation manual

Prodigg

Prodigg MINIKA PBA015T-FUR installation manual

manuals.online logo
manuals.online logoBrands
  • About & Mission
  • Contact us
  • Privacy Policy
  • Terms and Conditions

Copyright 2025 Manuals.Online. All Rights Reserved.