DE | Austausch des 2-teiligen Gelenks alle 24Monate
Das Gelenk ist ein Verschleißteil und muss deshalb alle 24Mo-
nate ab Kaufdatum getauscht werden.
WARNUNG! Verletzungsgefahr durch brechendes Gelenk.
Wird das Gelenk nicht getauscht, kann es bei Belastung bre-
chen und Personen verletzen.
Senden Sie das Produkt ein, dann übernehmen wir den Aus-
tausch.
Sie können das Gelenk auch bequem zu Hause selbst tau-
schen. Bestellen Sie dazu das Wartungsset Artikel-Nr.4911101.
Das Set enthält 2Gelenkhälften, eine Sicherungsmutter, War-
tungsspray und einen Torx-Schlüssel. Die Austauschanleitung
nden Sie auf der Rückseite.
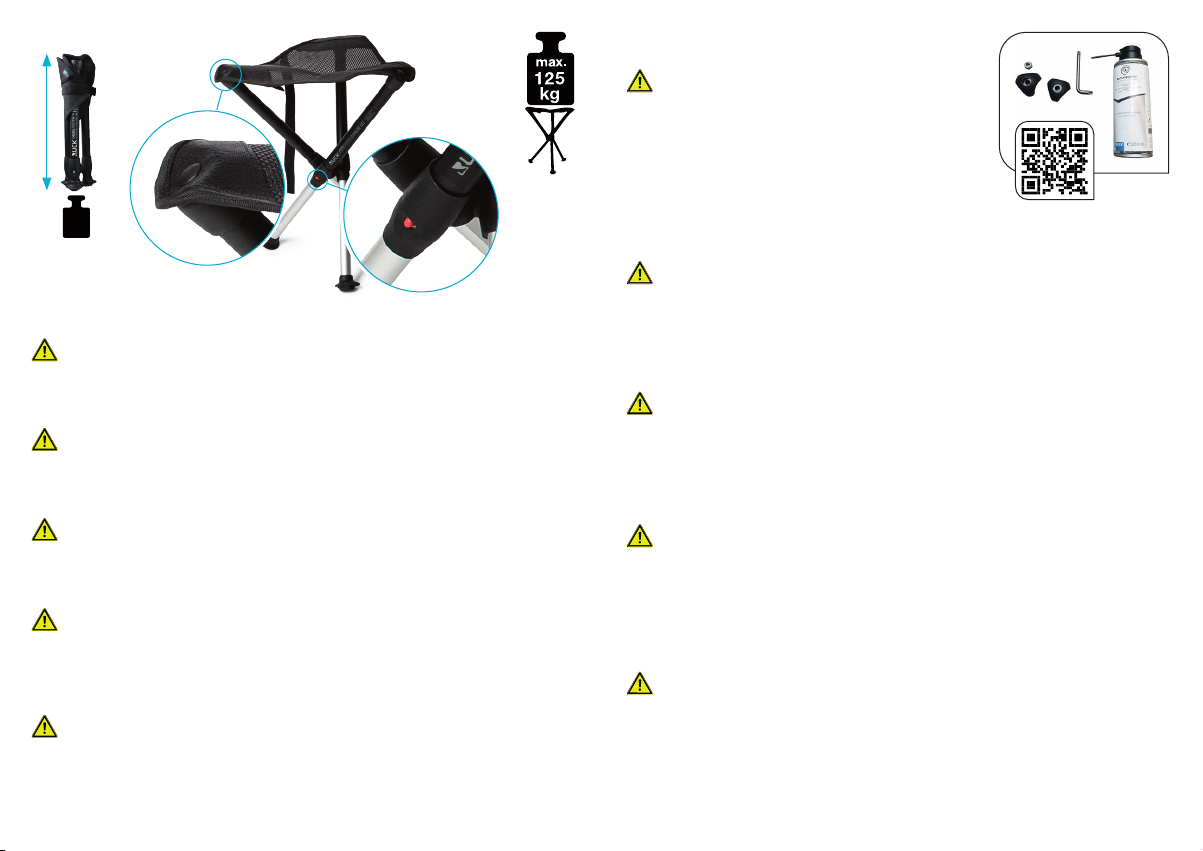
DE | Önen Sie den Klettverschluss und ziehen Sie die Teleskopstangen so weit heraus, bis die
3roten Sperrknöpfe (B) in Sperrstellung sind. Entfalten Sie die Sitzäche.
WARNUNG! Verletzungsgefahr durch lose oder beschädigte Bauteile!
Vor jeder Nutzung: Prüfen Sie den Zustand aller Bauteile und Verbindungselemente. Achten
Sie insbesondere darauf, dass die Sitzäche fest mit den Stangen verbunden ist (A). Setzen Sie
sich nur dann auf den Stuhl, wenn alle Teile unversehrt sind und fest miteinander verbunden.
EN | Open the Velcro fastener and pull out the telescopic rods until the three red locking buttons
(B) are in the locked position. Unfold the seat.
WARNING! Risk of injury from loose or damaged components!
Before each use: Check the condition of all components and connecting elements. Pay particu-
lar attention that the seat is rmly connected to the bars (A). Only sit on the chair if all parts are
intact and rmly connected to each other.
FR | Ouvrez la fermeture velcro et tirez les barres télescopiques jusqu‘à ce que les 3 boutons de
blocage rouges (B) soient en position de blocage. Déplier le siège.
AVERTISSEMENT ! Risque de blessure lié à des composants desserrés ou endommagés !
Avant chaque utilisation : vérier l‘état de tous les composants et éléments de liaison. Veillez en
particulier à ce que le siège soit bien xé aux barres (A). Ne vous asseyez sur la chaise que si tous
les composants sont intacts et solidement reliés entre eux.
IT | Aprire la chiusura in velcro ed estrarre le aste telescopiche nché i 3 pulsanti di blocco rossi
(B) non si trovano in posizione di bloccaggio. Aprire il sedile.
AVVERTENZA! Pericolo di lesioni a causa di componenti allentati o danneggiati!
Prima di ogni utilizzo: vericare lo stato di tutti i componenti ed elementi di collegamento. As-
sicurarsi in particolare che il sedile sia saldamente collegato con le aste (A). Sedersi sulla sedia
soltanto se tutte le parti sono integre e saldamente collegate l’una con l’altra.
RU | Откройте застежку-липучку и вытягивайте телескопические штанги, пока 3 красные
блокировочные кнопки (B) не будут находиться в положении блокировки. Разложите си-
денье.
ПРЕДУПРЕЖДЕНИЕ! Опасность получения травмы из-за ослабленных или повре-
жденных деталей!
Перед каждым использованием: проверяйте состояние всех деталей и соединительных
элементов. Особое внимание уделяйте прочности соединения сидения со штангами (A).
Садитесь на стул только, если все детали целы и прочно соединены друг с другом.
38 cm
REF 1111101
A
B
3x
3x
REF 4911101
EN | Replacement of the 2-part joint every 24 months
The joint is a wearing part and must therefore be replaced every 24 months from the date of
purchase.
WARNING! Risk of injury due to breaking joint.
If the joint is not replaced, it can break under load and injure people.
Send in the product and we will take care of the exchange.
You can also replace the joint yourself in the comfort of your own home. For this purpose, order
the maintenance set (item no. 4911101). The set contains 2 joint halves, a locking nut, mainte-
nance spray and a Torx key. You will nd the replacement instructions on the back.
FR | Remplacement de l‘articulation composée de 2 parties tous les 24 mois
L‘articulation est une pièce d‘usure et doit donc être remplacée tous les 24 mois à partir de la
date d‘achat.
AVERTISSEMENT ! Risque de blessure dû à la rupture de l‘articulation.
Si l‘articulation n‘est pas remplacée, elle peut se briser sous charge et blesser des personnes.
Envoyez le produit et nous nous chargerons de son remplacement.
Vous pouvez également remplacer facilement l‘articulation chez vous. Pour ce faire, commandez
le kit de maintenance, réf. 4911101. Le kit contient 2 moitiés d‘articulation, un écrou de blocage,
un spray de maintenance et une clé Torx. Les instructions de remplacement se trouvent au dos.
IT | Sostituzione del giunto in 2 parti ogni 24 mesi
Il giunto è una parte soggetta a usura; pertanto va sostituito ogni 24 mesi a partire dalla data
di acquisto.
AVVERTENZA! Pericolo di lesioni in caso di rottura del giunto.
Se il giunto non viene sostituito, può rompersi sotto carico e provocare lesioni alle persone.
Inviateci il prodotto, ci occuperemo noi della sostituzione.
Tuttavia, è possibile sostituire il giunto anche in autonomia, comodamente da casa. In questo
caso, ordinare il kit di manutenzione, N° articolo 4911101. Il set contiene le 2 metà del giunto, un
dado di sicurezza, lo spray per manutenzione e una chiave Torx. Le istruzioni per la sostituzione
si trovano sul retro.
RU | Замена 2-сегментного шарнира каждые 24 месяца
Шарнир является быстроизнашивающейся деталью и поэтому подлежит замене каждые
24 месяца с даты покупки.
ПРЕДУПРЕЖДЕНИЕ! Опасность получения травмы из-за сломанного шарнира.
Если шарнир не заменен, он может сломаться под нагрузкой и привести к травме.
Отправьте нам изделие, и мы сможем произвести замену.
Вы также можете без проблем заменить шарнир дома. Для этого закажите комплект для
техобслуживания, арт. № 4911101. Комплект содержит 2 половины шарнира, стопорная
гайка, аэрозоль для техобслуживания и ключ «звездочка». Инструкция по замене рас-
положена сзади.
qr.de/Chair40Wartungsset