Introduction
Congratulations on the purchase of this RUKY vehicle. You
have acquired a quality product that will certainly give you
great pleasure.
This manual contains information on the safe use of your
vehicle and its care. Please read these information carefully
before using the vehicle for the rst time and keep in a safe
place for future reference! Failure to observe the information
contained in this manual may impair the safety of your child.
Should you have any questions, please contact your dealer
or contact us via our website www.ruky.de.
Warnings!
In order to prevent accidents or injuries occuring later, the
assembly must be carried out very carefully by an adult.
Take sucient time to do this. Several assembly steps re-
quire manual skill and practise in handling tools (e.g. span-
ner). If you are unsure, then please contact your specialist
dealer or a workshop.
This toy has potentially some sharp edges. Use only in suit-
able terrain with no obstacles and level surface. This vehicle
does not comply with the requirements of German Road
Trac Regulations (StVZO).
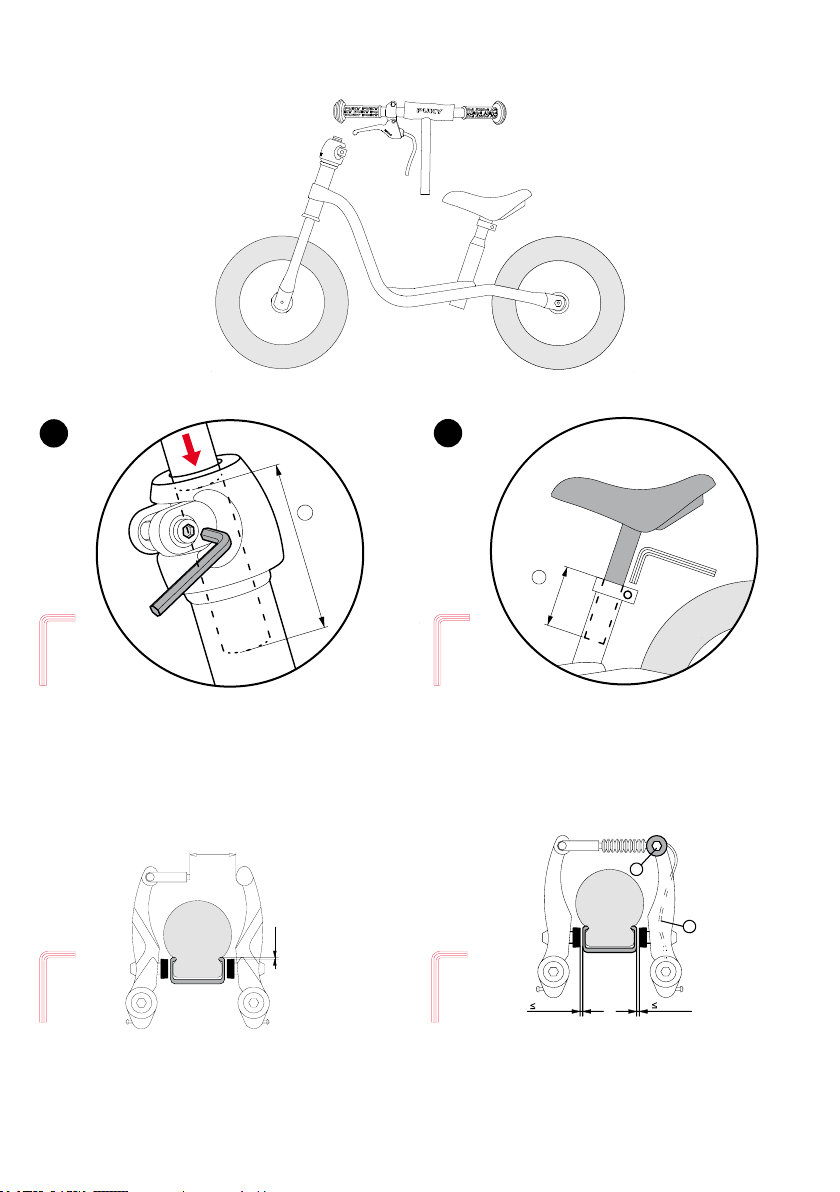
Adjustment
Adjust the bike to the size of the child. Adjust the saddle so
that the sole of the child‘s foot still reaches the ground if the
legs are slightly bent when driving. After adjusting the sad-
dle position adjust the handlebar so that the child can easily
reach the handlebar when sitting on the bike.
Please observe the minimum insertion depth marks for sad-
dle stem (min. 65 mm) and handlebar (min. 60 mm).
Balance bike with brake YES/NO?
Due to their motor skills, children who start to learn at he the
age of approx. 2,5 years to ride a balance bike are not able
to stop such a vehicle by themselves with the handbrake.
There is a risk that supervising persons may be persuaded
in believing in a „non-existing safety“ and therefore do not
pay enough attention to the novice drivers, because the bal-
ance bike is tted with a brake.
Observations reveal that driving the balance bike gives chil-
dren great fun for a long time. For this group of advanced
drivers it makes sense to t one model with a brake system
suitable for children. But these young riders still need the
attention of grown ups.
For some models the brake system can be retrotted as
a „spare parts kit“ by the specialist dealers.
Liability
The legal liability for material defects applies. Damages
caused by inappropriate use, the eects of force, insucient
maintenance or due to normal wear and tear are excluded
from the liability of material defects.
Parents’ responsibility
Risks during play are, for the most part, excluded when
used in accordance with the intended purpose. However,
please take into consideration that unforeseen situations
and hazards may occur as a result of the natural need for
movement and the temperament of young children and ad-
olescents for which the manufacturer cannot be held liable.
Teach children and teenagers how to use the vehicle cor-
rectly, in order to avoid falls and collisions.
Type label
The type label is located underneath the frame. Please record
the information on the identication plate in the cycle pass-
port at the end of this manual so that you have all the in-
formation you need in the event of any questions or when
ordering spare parts.
Maintenance and care
Before use, check all parts for possible wear as well as
screw connections for proper seating. Self-tightening nuts
are hard to loosen and must be replaced after complete dis-
assembly!
Pay special attention that the handlebar and the saddle are
secure and cannot be rotated! Check the tire pressure at
regular intervals (the prescribed pressure is indicated on the
sides of the tires). As with car tires there is a risk of local
decolouration or staining of the natural rubber when the bike
rests on its wheels in the same position for a long time. Take
the necessary precautions to avoid this.
In order to maintain the high, design-specied safety levels,
all worn or defective parts are to be immediately replaced by
original RUKY spare parts. For safety reasons, the vehicle
should not be used until it has been fully repaired. Bent or
deformed parts should not be repaired but instead should
be replaced.
Spare parts: Tires (incl. inner tubes), handlebar grips, brake
The vehicle may not be cleaned with a high-pressure clean-
er. Clean the vehicle using a mild soapy solution and care-
fully wipe dry using a soft cloth. Keep the vehicle away from
corrosion-promoting materials (road salt, sea water, fertil-
iser). The vehicle may not be stored in damp conditions.
Unpacking and scope of delivery
Do not use any sharp objects when opening the packag-
ing and removing protective material. By doing so, you may
damage the paint or parts of the vehicle.
Check that the delivery is complete and undamaged. If any-
thing is missing, please contact your dealer before you start
to assemble the vehicle.
Small parts which are required during assembly (e.g. screws
and washers) must be kept out of the reach of small chil-
dren. Also keep all packaging materials away from children.
There is a danger of suocation as a result of swallowing
the parts.
In some cases, it is necessary to tighten screws with a pre-
scribed torque. This torque value is stated in Newtons (e.g.
2 Nm). If the torque with which a screw is tightened is too
low, the connection may still be too loose and therefore un-
safe. If the torque is too high, screws and other parts may be
damaged or destroyed.
You require the following tools for assembly
(not included in scope of delivery)
• Allen key 5mm