Rush DC 1 Aqua User manual

RUSH DC 1 Aqua
User Manual
Professional Entertainment Technology

© 2013-2014 Martin Professional ApS. Information subject to change without notice. Martin
Professional and all affiliated companies disclaim liability for any injury, damage, direct or indirect
loss, consequential or economic loss or any other loss occasioned by the use of, inability to use or
reliance on the information contained in this manual. The Martin logo, the RUSH by Martin logo, the
RUSH by Martin name, the Martin name and all other trademarks in this document pertaining to
services or products by Martin Professional or its affiliates and subsidiaries are trademarks owned or
licensed by Martin Professional or its affiliates or subsidiaries.
Martin Professional • Olof Palmes Allé 18 • 8200 Aarhus N •Denmark • www.martin.com
Manual: Revision D

Table of contents
Safety information ............................................................................................. 5
Introduction ..................................................................................................... 10
Before using the product ............................................................................. 10
Physical installation......................................................................................... 11
Fastening the fixture to a flat surface .......................................................... 11
Mounting the fixture on a truss.................................................................... 11
Securing with a safety cable........................................................................ 12
AC power ........................................................................................................ 13
Linking fixtures to power in a chain ............................................................. 14
Fixture overview.............................................................................................. 15
Control data link .............................................................................................. 17
Tips for reliable data transmission .............................................................. 17
Connecting the DMX data link..................................................................... 18
Fixture setup ................................................................................................... 18
Using the control menus.............................................................................. 18
DMX addressing.......................................................................................... 18
Standalone operation .................................................................................. 19
Backlight...................................................................................................... 20
Manual Mode / manual standalone control ................................................. 20
Auto test ...................................................................................................... 21
Temperature................................................................................................ 21
Fixture operating hours readout .................................................................. 21
Software version.......................................................................................... 21
Reset ........................................................................................................... 21
Effects ............................................................................................................. 22
Water effect ................................................................................................. 22
Color control ................................................................................................ 22
Electronic dimming ...................................................................................... 23
Focus........................................................................................................... 23
Maintenance ................................................................................................... 24
Cleaning ...................................................................................................... 24
Replacing the primary fuse.......................................................................... 25

DMX protocol .................................................................................................. 26
Control menus................................................................................................. 28
Troubleshooting .............................................................................................. 30
Specifications.................................................................................................. 31

RUSH DC1 Aqua User Manual 5
Safety information
WARNING!
Read the safety precautions in this manual before installing,
operating or servicing this product.
The following symbols are used to identify important safety information on the
product and in this manual:
Warning!
Safety hazard.
Risk of severe
injury or
death.
Warning!
Powerful light
emission. Risk
of eye injury.
Warning!
See user
manual for
important
safety
information.
Warning!
Hazardous
voltage. Risk
of lethal or
severe electric
shock.
Warning!
Hot surfaces
and fire
hazard.
Warning! Risk Group 2 product according to EN 62471. Do not
stare directly into the beam. Do not view the light output with
optical instruments or any device that may concentrate the
beam.
This lighting fixture is for professional use only – it is not for
household use. The fixture must be installed by a qualified
technician. The safety of the installation is the responsibility of
the installer. The fixture presents risks of severe injury or death
due to fire hazards, electric shock and falls. It produces a
powerful, concentrated beam of light that can create a fire
hazard or a risk of eye injury if the safety precautions below are
not followed.
If you have any questions about how to install, operate or
service the fixture safely, please contact your Martin™ distributor
(see www.martin.com/distributors for details) or call the Martin™
24-hour service hotline on +45 8740 0000, or in the USA on 1-
888-tech-180.

RUSH DC1 Aqua User Manual
6
Respect all locally applicable laws, codes and regulations when
installing, operating or servicing the fixture.
There are no user-serviceable parts inside the fixture. Do not
open it. Refer any service or repair operation not described in
this manual to an authorized Martin™ service technician. Do not
try to carry out any such operation yourself, as doing so may
present a health or safety risk. It may also cause damage or
malfunction and it may void your product warranty.
Install, operate and service RUSH by Martin™ products only as
directed in their user manuals, or you may create a safety
hazard or cause damage that is not covered by product
warranties.
Follow the safety precautions listed below and observe all
warnings in this manual and printed on the product. Keep this
user manual for future use.
For the latest user documentation and other information for this
and all Martin™ products, please visit the Martin website at
http://www.martin.com
Protection from electric shock
Do not expose the fixture to rain or moisture.
Disconnect the fixture from AC power before carrying out any
installation or maintenance work and when the fixture is not in
use.
Ensure that the fixture is electrically connected to ground (earth).
Use only a source of AC power that complies with local building
and electrical codes and has both overload and ground-fault
(earth-fault) protection.
Socket outlets or external power switches used to supply the
fixture with power must be located near the fixture and easily
accessible so that the fixture can easily be disconnected from
power.
Replace defective fuses with ones of the specified type and
rating only.
Isolate the fixture from power immediately if the power plug or
any seal, cover, cable, or other component is damaged,

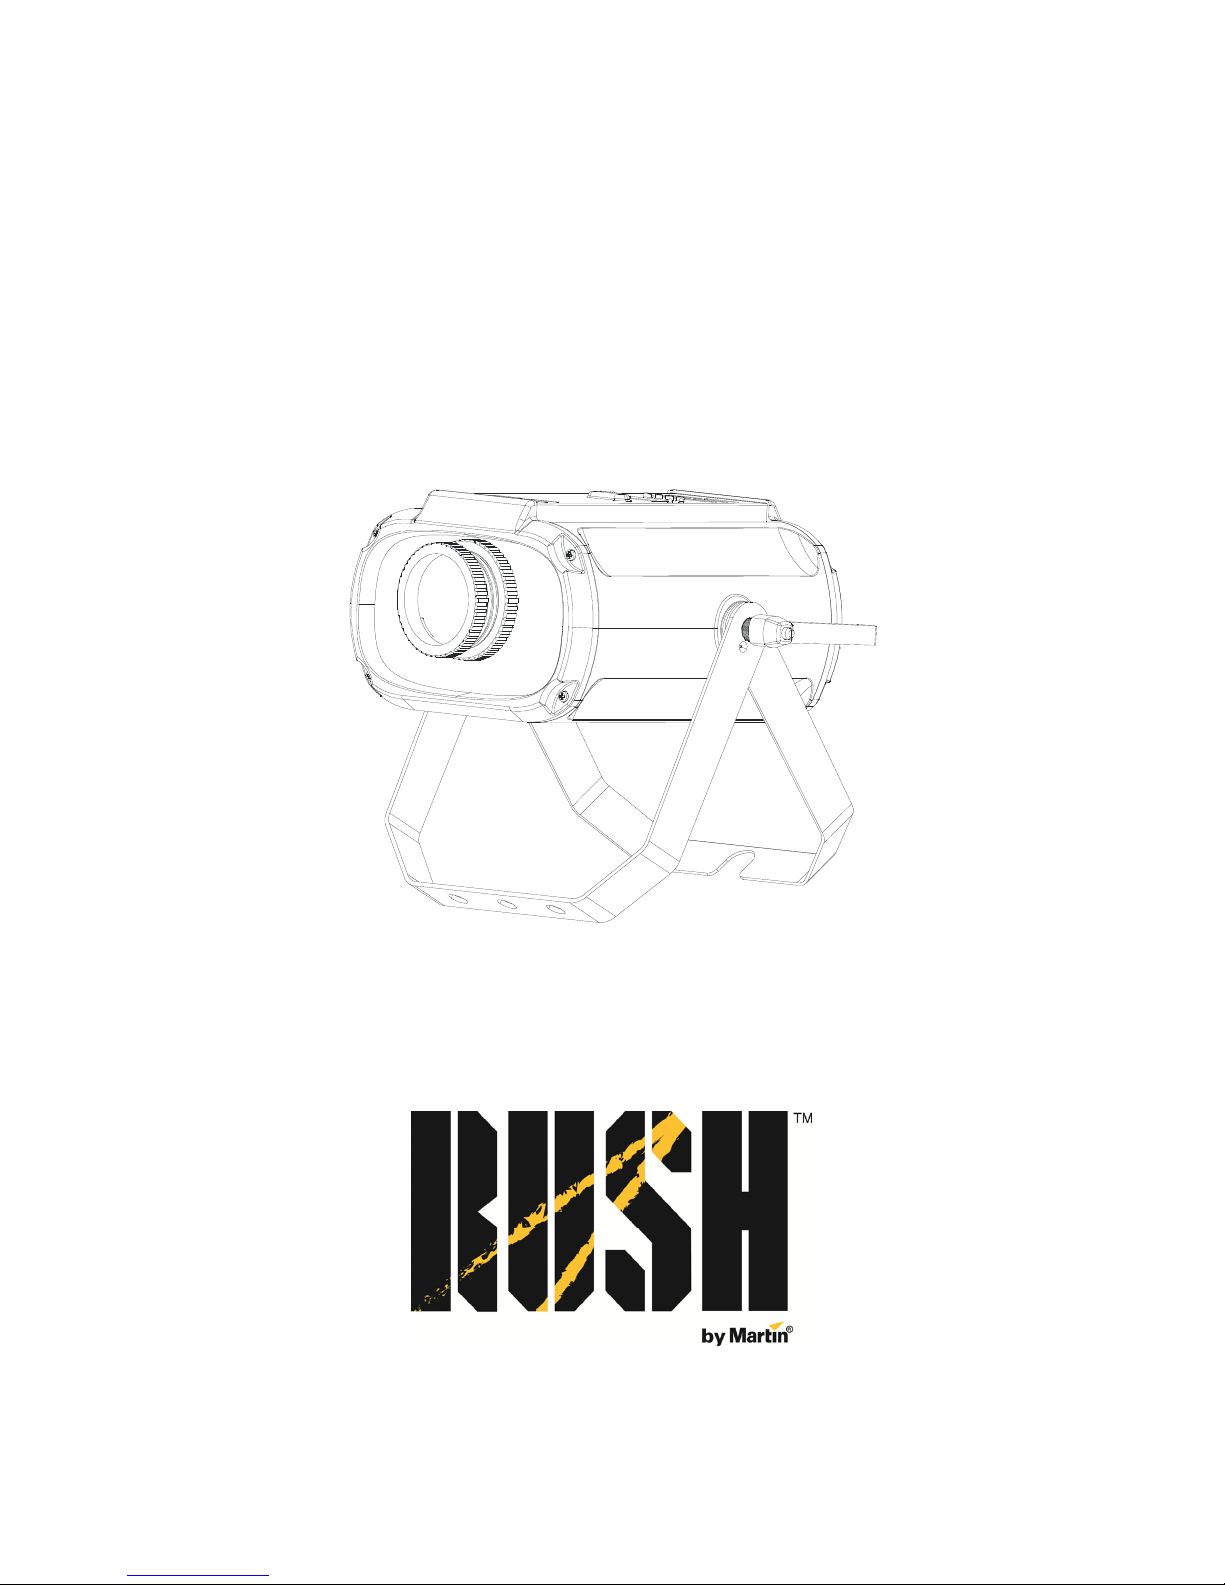
RUSH DC1 Aqua User Manual 7
defective, deformed, wet or showing signs of overheating. Do
not reapply power until repairs have been completed
Before using the fixture, check that all power distribution
equipment and cables are in perfect condition and rated for the
electrical requirements of all connected devices.
Use only Neutrik PowerCon cable connectors to connect to the
fixture’s power sockets.
Do not connect devices to power in a chain that will exceed the
electrical ratings of any cable or connector used in the chain.
The supplied power input cable is rated 6 A and can safely
supply only one fixture with mains power. Do not connect any
device to the fixture’s MAINS OUT connector when using this
cable. If you replace this cable and also use the replacement
cable to supply only one fixture with mains power, the
replacement cable must also be rated 6 A minimum, have three
conductors 18 AWG or 0.75 mm² minimum conductor size, have
an outer cable diameter of 6 - 15 mm (0.2 - 0.6 in.) and be
temperature-rated to suit the application. In the USA and
Canada the cable must be UL listed, type SJT or equivalent. In
the EU the cable must be type H05VV-F or equivalent.
To connect fixtures to mains power in a chain, you must first
obtain 14 AWG or 1.5 mm2power input and throughput cables
that are 16 A rated and temperature-rated to suit the application.
In the USA and Canada the cables must be UL-listed, type SJT
or equivalent. In the EU the cables must be type H05VV-F or
equivalent. Suitable cables with Neutrik PowerCon connectors
are available from Martin™ (see ‘Accessories’ on page 33). If
you use these cables, you can connect fixtures to power in a
linked chain, MAINS OUT throughput socket to MAINS IN input
socket, but do not link more than:
•Twelve (12) RUSH DC1 Aqua fixtures in total at 100-120 V,
or
•Twenty-eight (28) RUSH DC1 Aqua fixtures in total at
200-240 V.
The voltage and frequency at the MAINS OUT socket are the
same as the voltage and frequency applied to the MAINS IN
socket. Only connect devices to the MAINS OUT socket that
accept this voltage and frequency.

RUSH DC1 Aqua User Manual
8
Protection from burns and fire
Do not use the fixture to illuminate surfaces within 200 mm (7.9
ins.) of the fixture.
Do not operate the fixture if the ambient temperature (Ta)
exceeds 40° C (104° F).
The surface of the product casing can reach up to 43° C
(110° F) during operation. Avoid contact by persons and
materials. Allow the fixture to cool for at least 10 minutes before
handling.
Keep flammable materials well away from the fixture. Keep all
combustible materials (e.g. fabric, wood, paper) at least 100 mm
(4 in.) away from the fixture.
Ensure that there is free and unobstructed airflow around the
fixture. Provide a minimum clearance of 100 mm (4 in.) around
fans and air vents.
Do not attempt to bypass thermostatic switches or fuses.
Do not stick filters, masks or other materials onto any optical
component.
Protection from eye injury
Do not stare directly into the light output. Ensure that persons
are not looking directly into the LEDs when the product lights up
suddenly. This can happen when power is applied, when the
product receives a DMX signal, or when certain control menu
items are selected.
Do not look at the light output with magnifiers, telescopes,
binoculars or similar optical instruments that may concentrate
the light output.
To minimize the risk of eye irritation or injury, disconnect the
fixture from power at all times when the fixture is not in use, and
provide well-lit conditions to reduce the pupil diameter of anyone
working on or near the fixture.
Protection from injury
Fasten the fixture securely to a fixed surface or structure when in
use. The fixture is not portable when installed.

RUSH DC1 Aqua User Manual 9
Ensure that any supporting structure and/or hardware used can
hold at least 10 times the weight of all the devices they support.
If suspending from a rigging structure, fasten the fixture to a
rigging clamp. Do not use safety cables as the primary means of
support.
If the fixture is installed in a location where it may cause injury or
damage if it falls, install as directed in this manual a secondary
attachment such as a safety cable that will hold the fixture if a
primary attachment fails. The secondary attachment must be
approved by an official body such as TÜV as a safety
attachment for the weight that it secures, must comply with EN
60598-2-17 Section 17.6.6 and must be capable of bearing a
static suspended load that is ten times the weight of the fixture
and all installed accessories.
Check that all external covers and rigging hardware are securely
fastened.
Do not operate the fixture with missing or damaged covers,
shields or any optical component. If shields, lenses or ultraviolet
screens have become visibly damaged to such an extent that
their effectiveness is impaired, for example by cracks or deep
scratches, the fixture must be returned to an authorized Martin™
service agent for replacement.
Block access below the work area and work from a stable
platform whenever installing, servicing or moving the fixture.
In the event of an operating problem, stop using the fixture
immediately and disconnect it from power. Do not attempt to use
a fixture that is obviously damaged.
Do not modify the fixture in any way not described in this manual
or install other than genuine RUSH by Martin™ parts.

RUSH DC1 Aqua User Manual
10
Introduction
The RUSH DC 1 Aqua™ is a dynamic effect lamp that projects moving water
effects. It has a 75 W LED engine with long-life white LEDs. Besides fully
adjustable water effect projections, the DC 1 Aqua features a color wheel with
five color flags and smooth 0-100% continuous electronic dimming. The fixture
is rugged, lightweight and compact.
The DC 1 Aqua can be controlled using any DMX-compliant controller or it can
run in standalone mode with a choice of three shows. Fixtures in standalone
mode can be linked and their shows synchronized in master/slave operation.
The fixture is supplied with this user manual, a 1.5 m (5 ft.) power cable (local
power plug not included) and a folding bracket that can also be used for
rigging clamp attachment.
Before using the product
1. Read ‘Safety information’ on page 5 before installing, operating or
servicing the fixture.
2. Unpack and ensure that there is no transportation damage before using
the fixture. Do not attempt to operate a damaged fixture.
3. If the fixture is not going to be hard-wired to a mains supply, install as
directed in this manual a local power plug (not supplied) on the supplied
power cable.
4. Before operating, ensure that the voltage and frequency of the power
supply match the power requirements of the fixture.
5. Check the RUSH support pages on the Martin Professional website at
www.martin.com for the most recent user documentation and technical
information about the fixture. RUSH by Martin™ user manual revisions are
identified by the revision letter at the bottom of the inside cover.
Note that when the fixture is powered on for the first time, it may smoke slightly
as it warms up, but this will only last a few minutes and is no cause for
concern.

RUSH DC1 Aqua User Manual 11
Physical installation
Read ‘Safety information’ on page 5 before installing the
fixture.
The fixture is designed for indoor use only and must be used in
a dry location with adequate ventilation. Ensure that none of the
fixture’s ventilation slots are blocked.
Fasten the fixture to a secure structure or surface. Do not stand
it on a surface or leave it where it can be moved or fall over. If
you install the fixture in a location where it may cause injury or
damage if it falls, secure it as directed in this user manual using
a securely anchored safety cable that will hold the fixture if the
primary fastening method fails.
Martin™ can supply suitable safety cables and rigging clamps for use with the
fixture (see ‘Accessories’ on page 33).
Fastening the fixture to a flat surface
The fixture can be fastened to a hard, fixed, flat surface that is oriented at any
angle. Ensure that the surface and all fasteners used can support at least 10
times the weight of all fixtures and equipment to be installed on it.
Fasten the fixture securely. Do not stand it on a surface or leave it where it can
be moved or fall over. If you install the fixture in a location where it may cause
injury or damage if it falls, secure it as directed below with a securely anchored
safety cable that will hold the fixture if the primary fastening method fails.
Mounting the fixture on a truss
The fixture can be clamped to a truss or similar rigging
structure in any orientation. When installing the fixture
hanging vertically down, you can use an open-type clamp
such as a G-clamp. When installing in any other orientation,
you must use a half-coupler clamp (see illustration on right)
that completely encircles the truss chord.
To clamp the fixture to a truss:
1. Check that the rigging structure can support at least 10 times the weight of
all fixtures and equipment to be installed on it.
2. Block access under the work area.

RUSH DC1 Aqua User Manual
12
3. Fold the legs of the mounting bracket together and bolt a rigging clamp
securely to the mounting bracket. The bolt used must be M12, grade 8.8
steel minimum. It must pass through both mounting bracket legs and be
fastened with a self-locking nut.
4. Working from a stable platform, hang the fixture with its clamp on the truss
and fasten the clamp securely.
5. Secure the fixture with a safety cable as directed below.
Securing with a safety cable
Secure the fixture with a safety cable (or other secondary attachment) that is
approved for the weight of the fixture so that the safety cable will hold the
fixture if a primary attachment fails.
Loop the safety cable through the eyebolt in the back of the fixture (see 3in
illustration on page 15) and around a secure anchoring point. Do not loop the
safety cable around the fixture’s mounting bracket only, as this will leave the
fixture unsecured if it separates from the bracket.

RUSH DC1 Aqua User Manual 13
AC power
Read ‘Safety information’ on page 5 before connecting the
fixture to AC mains power.
Warning! The mains power input cable supplied with the
fixture is rated 6 A and can supply only one fixture with
mains power. Do not connect any device to the fixture’s
MAINS OUT power throughput socket when using this input
cable. If you want to connect other fixtures to the MAINS
OUT socket, see ‘Linking fixtures to power in a chain’ on
page 14.
For protection from electric shock, the fixture must be grounded
(earthed). The power distribution circuit must be equipped with a
fuse or circuit breaker and ground-fault (earth-fault) protection.
Socket outlets or external power switches used to supply the
fixture with power must be located near the fixture and easily
accessible so that the fixture can easily be disconnected from
power.
Do not insert or remove live power connectors to apply or cut power, as this
may cause arcing at the terminals that will damage the connectors.
Do not use an external dimming system to supply power to the fixture, as this
may cause damage to the fixture that is not covered by the product warranty.
The fixture can be hard-wired to a building electrical installation if you want to
install it permanently, or a power plug (not supplied) that is suitable for the
local power outlets can be installed on the power cable.
If you install a power plug on the power cable, install a grounding type
(earthed) plug with integral cable grip that is rated minimum 250 V, 6 A. Follow
the plug manufacturer’s instructions and connect the wires in the power cable
as shown in this table:
Live or L Neutral or N Earth, Ground or
US system Black White Green
EU system Brown Blue Yellow/green
The fixture has an auto-ranging power supply that accepts AC mains power at
100V~240V, 50/60Hz. Do not apply AC mains power at any other voltage or
frequency to the fixture.

RUSH DC1 Aqua User Manual
14
Linking fixtures to power in a chain
If you obtain a 14 AWG / 1.5 mm2power input cable and 14 AWG / 1.5 mm2
throughput cables from Martin™ (see ‘Accessories’ on page 33), you can relay
mains power from one fixture to another by connecting fixtures to power in a
linked daisy-chain, MAINS OUT throughput socket to MAINS IN input socket.
Using 14 AWG or 1.5 mm2cables from Martin™, you can link:
•Maximum twelve (12) RUSH DC1 Aqua fixtures in total at 100-120 V, or
•Maximum twenty-eight (28) RUSH DC1 Aqua fixtures in total at 200-240 V.
If you install a power plug on the 14 AWG / 1.5 mm2power input cable
available from Martin™, install a grounding type (earthed) plug with integral
cable grip that is rated minimum 16 A, 250 V.

RUSH DC1 Aqua User Manual 15
Fixture overview
1 - Display
2 - Status LEDs
The LEDs on the control panel give the following indications:
DMX On DMX input present
MASTER On Master mode
SLAVE On Slave mode
3 - Buttons
The four buttons on the control panel have the following functions:
MENU
•Activate menus, or
•Return to the previous level of the menu
structure, or
•Hold to exit the menus (this occurs
automatically after a period where there has
been no user input).
DOWN Go down a menu branch
UP Go up a menu branch
ENTER Confirm the selected function

RUSH DC1 Aqua User Manual
16
4 - DMX input/output sockets
A 5-pin male XLR socket accepts input from a DMX512 data link. A 5-pin
female XLR output (thru) socket allows the DMX link to be daisy-chained to the
next fixture.
5 - Mains power input
A blue Neutrik PowerCon socket is provided to connect the fixture to AC mains
power.
6 - Mains power throughput
The white Neutrik PowerCon socket can be used to supply power to other
fixtures only if you respect the safety precautions given in this manual (see
‘Safety information’ on page 5).
7 - Fuse
The fixture’s T 3.15A fuse is located in a fuseholder next to the display.
8 - Safety cable attachment point
Eyebolt for securing the fixture with a secondary attachment such as a safety
cable.

RUSH DC1 Aqua User Manual 17
Control data link
A DMX 512 data link is required in order to control the fixture via DMX or to
use the master/slave functionality. The fixture has 5-pin XLR connectors for
DMX data input and output.
The number of daisy-chained fixtures is limited by the number of DMX
channels required by the fixtures in relation to the maximum 512 channels
available in one DMX universe. Note that if independent control of a fixture is
required, it must have its own DMX channels. Fixtures that are required to
behave identically can share the same DMX address and channels. To add
more fixtures or groups of fixtures when the above limit is reached, add a DMX
universe and another daisy-chained link.
Tips for reliable data transmission
Use shielded twisted-pair cable designed for RS-485 devices: standard
microphone cable cannot transmit control data reliably over long runs. 24
AWG cable is suitable for runs up to 300 meters (1000 ft.). Heavier gauge
cable and/or an amplifier are recommended for longer runs. The pin-out on all
connectors is:
•pin 1 = shield
•pin 2 = cold (-)
•pin 3 = hot (+)
Pins 4 and 5 in the XLR connectors are not used in the fixture but are available
for possible additional data signals as required by the DMX512-A standard.
Standard pin-out is:
•pin 4 = data 2 cold (-)
•pin 5 = data 2 hot (+).
To split the link into branches, use a splitter, such as the Martin 4-Channel
Opto-Isolated RS-485 Splitter/Amplifier. Terminate the link by installing a
termination plug in the output socket of the last fixture. The termination plug,
which is a male XLR plug with a 120 Ohm, 0.25 Watt resistor soldered
between pins 2 and 3, “soaks up” the control signal so it does not reflect and

RUSH DC1 Aqua User Manual
18
cause interference. If you use a DMX splitter, terminate each branch of the
link.
Connecting the DMX data link
To connect the fixture to data:
1. Connect the DMX data output from the controller to the closest fixture’s
male XLR DMX input connector.
2. Connect the DMX output of the fixture closest to the controller to the DMX
input of the next fixture and continue connecting fixtures output to input.
Terminate the last fixture on the link with a 120-Ohm resistor.
Fixture setup
This section explains the fixture characteristics that can be set that determine
how it can be controlled and will behave. These settings are made using the
menus available from the control panel, and are retained, even when the
fixture is powered off.
Using the control menus
See also the control menu structure table in ‘Control menus’ on page 28.
To access the control menus, press the MENU button. Navigate the menu
structure using the MENU, ENTER, DOWN and UP buttons. Select any
required menu option using the ENTER button. To return to a higher level in
the menu structure without making any change, press the MENU button (this
will occur automatically after an interval where there has been no user input).
DMX addressing
The DMX address, also known as the start channel, is the first channel used to
receive instructions from a DMX controller. The fixture can be controlled using
signals sent by a DMX controller on twelve channels. Each DMX controlled
fixture must have a DMX address set. For example, if a fixture has a DMX
address of 10, it uses channels 10, 11, 12 and 13. The next fixture on the DMX
link can be set to a DMX address of 14.
For independent control, each fixture must be assigned its own control
channels. Two fixtures of the same type may share the same address, if
identical behavior is desired. Address sharing can be useful for diagnostic
purposes and symmetric control, particularly when combined with the inverse
pan and tilt options.

RUSH DC1 Aqua User Manual 19
To set the fixture’s DMX address:
1. In the control menu, select DMX ADDRESS and press ENTER to confirm.
The current address will blink in the display.
2. Use the UP and DOWN buttons to select the address (001 to 512).
3. Once the address has been selected, press ENTER to set it (or press
MENU to exit without saving any changes).
Standalone operation
The fixture can run a standalone light show without needing a DMX signal. 3
different pre-programmed standalone shows are available.
Show mode
To select which pre-programmed show a fixture runs in standalone mode:
1. Select SHOW MODE and press ENTER to confirm.
2. Use the DOWN and UP buttons to select SHOW 1 to SHOW 3 (pre-
programmed shows).
3. Press ENTER to set (or press MENU to exit without making a change).
Master/slave operation
Fixtures in standalone mode can be linked in a chain and set to master/slave
operation, where one master fixture running a standalone show controls the
behavior of slave fixtures. Two slave modes are available:
•Fixtures in Slave 1 mode copy the master.
•Fixtures in Slave 2 mode are synchronized with the master but have slight
variations in behavior.
You must set all the fixtures except one as slaves. If you set more than one
fixture in the chain to act as master, you may cause damage that is not
covered by the product warranty.
To run fixtures in master/slave operation:
1. In the Master/Slave menu, set one fixture to Master and set all the other
fixtures to Slave 1 or Slave 2.
2. Link fixtures in a chain, using DMX cable to connect one fixture’s DMX
OUT socket to the next fixture’s DMX IN socket.
3. Set the master fixture in the chain to run a standalone show using its
SHOW MODE menu (see ‘Show mode’ above).
4. Make sure that the fixtures are not receiving a DMX signal.

RUSH DC1 Aqua User Manual
20
When fixtures are correctly connected and set up in master/slave operation,
the Master status LED on the master fixture and the Slave status LED on slave
fixtures light constantly.
Recovering from Loss of Step in Master/Slave Operation
If you power a master fixture or a slave fixture off while a chain of fixtures is
operating in master/slave mode, master/slave synchronization will be lost.
There are three possible ways of recovering from this and getting fixtures to
run the master/slave show in sync again. You can use one of the following
methods:
•Power all fixtures off then on again.
•Activate the master fixture's menu mode by entering the menus in the
master fixture's control panel. Then, after a few seconds, exit the menus.
•Send a DMX signal to all fixtures. Then, after a few seconds, shut down
the DMX signal.
Backlight
To turn the control panel display backlight on or off:
1. Select BACK LIGHT menu and press ENTER to confirm. The present
mode will blink in the display.
2. Use the DOWN and UP buttons to select ON or OFF.
3. Press ENTER to save your selection (or press MENU to exit without
saving any changes).
Manual Mode / manual standalone control
Fixture functions can be tested and controlled manually. To manually control
effects:
1. Select MANUAL MODE and press ENTER.
2. Use the DOWN and UP buttons to select COLOR, WAVE 1, WAVE 2 or
DIMMER. Press ENTER to select (or press MENU to exit without making a
change).
3. Use the DOWN and UP buttons to specify a value from 0 to 255 for the
selected effect.
4. Press ENTER to confirm the value and activate the effect (or press MENU
to exit without making a change).
5. Each time you confirm a selection with ENTER, press MENU to go back
through the menu structure.
Other manuals for DC 1 Aqua
1
Table of contents
Other Rush Lighting Equipment manuals

Rush
Rush MH 2 Wash User manual

Rush
Rush MH 4 Beam User manual

Rush
Rush MH 1 Profile Plus User manual

Rush
Rush PAR 1 RGBW User manual

Rush
Rush MH-3 Beam User manual

Rush
Rush DC 1 Aqua User manual

Rush
Rush Pin 1 CW User manual

Rush
Rush MH 4 Beam User manual

Rush
Rush MH 6 Wash User manual

Rush
Rush PAR 2 CT Zoom User manual
Popular Lighting Equipment manuals by other brands

Spectronics
Spectronics Spectroline Maxima ML-3500M Series Operator's manual

Schuch
Schuch nD8611 L02 W Series operating instructions

Bresser
Bresser BR-S60 RGB instruction manual

Knightsbridge
Knightsbridge LED Series Installation & maintenance manual

Laserworld
Laserworld Ecoline Series manual

Martin
Martin Atomic Colors user manual