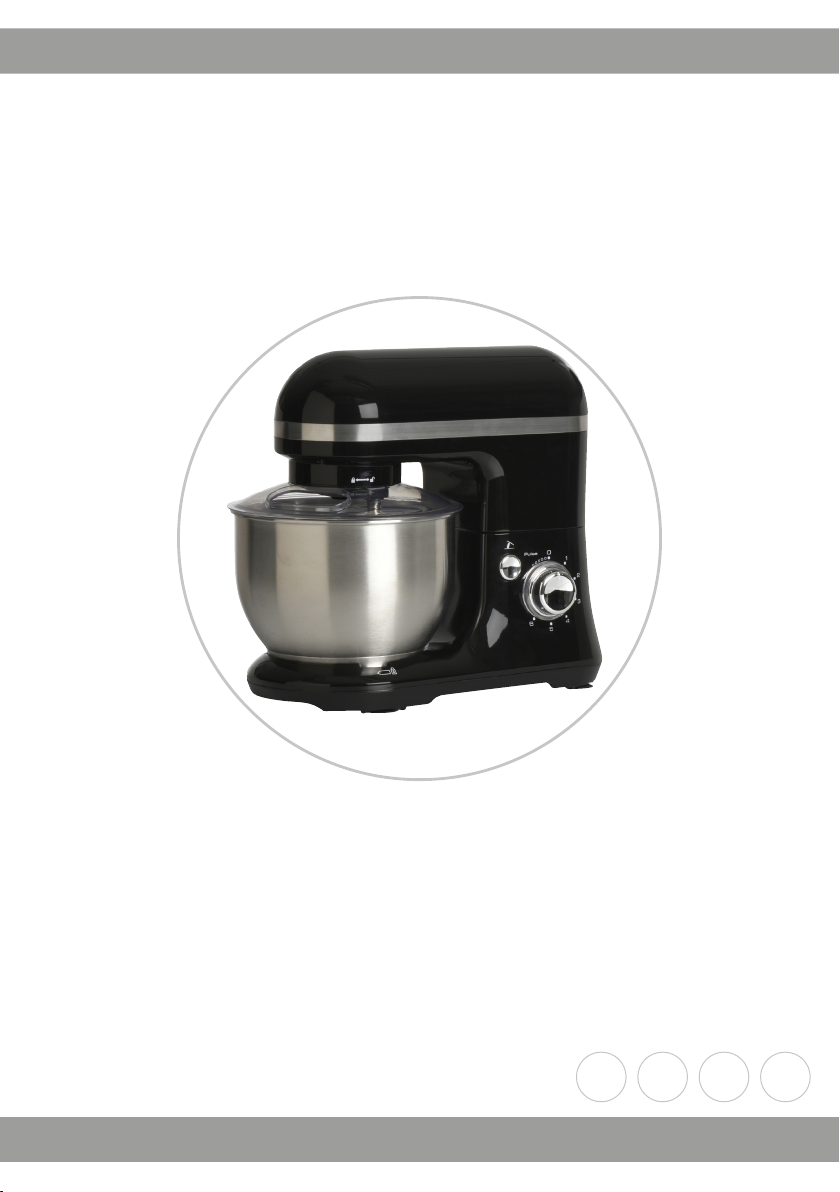
RUSTA 900701300101 User manual

Manual/Bruksanvisning/Gebrauchsanweisung
SEENG NO DE
Mixer
Köksmaskin / Kjøkkenmaskin / Küchengerät Mixer
Item no. 900701300101, 02, -03, -04

2
Mixer
Read the user manual carefully to make sure that the product is assembled, used and
maintained correctly, as described in the instructions in this user manual. Keep the user
manual for future reference.
GENERAL SAFETY INSTRUCTIONS
Before using electrical appliances, basic safety precautions should al-
ways be followed including the following:
• The appliance is for household use only. This appliance is not for com-
mercial use.
• For indoor use only.
• Keep away from sources of heat, direct sunlight, humidity and sharp
edges. Do not use the appliance with wet hands. If the appliance is
humid or wet, unplug it immediately.
• Never immerse the cord or the mixer in water or any other liquid.
• When cleaning or putting it away, switch o the appliance and always
pull out the plug from the socket (pull on the plug, not the cable). If the
appliance is not being used and remove the attached accessories.
• Do not operate the machine without supervision. If you should leave
the workplace, always switch the machine o or remove the plug from
the socket.
• Do not use the appliance any part is damaged. Never use if the cord is
damaged.
• There are no parts of the appliance that the user can repair on their
own. Always contact our customer service for further assistance.
• To avoid the exposure to danger, always have a faulty cable be repla-
ced only by the manufacturer, by our customer service or by a quali-
fied person and with a cable of the same type.
• Use only original spare parts. The use of spare parts or accessories
not provided by the manufacturer may result in danger.
ENG
Thank you for choosing to
purchase a product from Rusta!
Read through the entire manual
before installation and use!

3
• Dispose all packaging (plastic bags, boxes, polystyrene etc.) after
unpacking.
• In order to protect children from the hazards of electrical equipment,
please ensure that this device is only used under supervision. This
device is not a toy. Do not allow small children to play with it.
• Do not interfere with any safety switches.
• Do not insert anything into the rotating hooks while the machine is
working.
• Place the machine on a smooth, flat and stable working surface.
• Do not insert the mains plug of the machine into the power socket
without having installed all the necessary accessories.
• This appliance is not intended for use by persons (including child-
ren) with reduced physical, sensory or mental capabilities, or lack of
experience and knowledge, unless they have been given supervision
or instruction concerning use of the appliance by a person responsible
for their safety.
WARNING!
If these instructions are not followed, an accident may
lead to serious personal injury or property damage.
Rated voltage 220 –240 V~50/60 Hz
Power 650 W
TECHNICAL DATA

4
ENG
1. Place the mixing bowl into its holding device and turn the bowl until it locks into place.
2. In order to lift the arm, push the rise button down. The arm will now move upwards.
3. Mount the required accessories by inserting the top into the output shaft and locking.
4. Now fill in your ingredients. Do not overfill the machine - the maximum quantity of
ingredients is 1.2 kg.
5. Lower the arm using the rise button.
6. Insert the main plug into a properly installed 230V/50Hz safety power socket.
7. Switch the machine using the speed button to a speed between 1 and 6
(corresponding to the mixture).
8. For pulse function (kneading at short intervals), turn the switch to the “PULSE”
position. The switch has to be held in this position according to the desired interval
length. When the switch is released it returns automatically to the “0” position.
Main Components and Standard Accessories:
1
Output shaft
5
Whisk
2
Rise button
6
Beater
3
Speed knob
7
Dough hook
4
Power Cord
8
Mixing bowl
Using the Mixer
1. Place the mixing bowl into its holding device and turn the bowl until it locks into place.
2. In order to lift the arm, push the rise button down. The arm will now move upwards.
3. Mount the required accessories by inserting the top into the output shaft and locking.
4. Now fill in your ingredients. Do not overfill the machine - the maximum quantity of ingredients is 1.2 kg.
5. Lower the arm using the rise button.
6. Insert the main plug into a properly installed 230V/50Hz safety power socket.
7. Switch the machine using the speed button to a speed between 1 and 6 (corresponding to the mixture).
8. For pulse function (kneading at short intervals), turn the switch to the “PULSE”position. The switch has to be
held in this position according to the desired interval length. When the switch is released it returns
automatically to the “0”position.
Adjusting the Levels and using the accessories
Levels
Use
Type of Mixture
1-3
Dough hook
Heavy mixtures (e.g. bread, short pastry)
1
2
8
3
6
7
5
4
1
1
8
7
2
34
5
6
1. Output shaft
2. Rise button
3. Speed knob
4. Power cord
5. Whisk
6. Beater
7. Dough hook
8. Mixing bowl
MAIN COMPONENTS AND STANDARD ACCESSORIES
USING THE MIXER

5
RIGHT OF COMPLAINT
By law the product must be returned to the place of purchase along with the original
receipt in the event of a complaint. The user is liable for any damage to the product that
is caused by not using the product for its intended purpose or by not following this user
manual correctly. The right of complaint will not apply in these instances.
INFORMATION ABOUT HAZARDOUS WASTE
Used products should be handled separately from
household waste. They should be taken for recycling in
accordance with local rules for waste management.
9. After kneading/stirring, turn the speed knob back to the “0” position as soon as the
mixture has been kneaded to your desired consistency. Then remove the main plug.
10. Press the rise button downwards and the arm will be raised.
11. The mixture can now be released from the mixing bowl with the help of a spatula.
12. The mixing bowl can now be removed.
13. Clean the parts as described under the section CLEANING.
ADJUSTING THE LEVELS AND USING THE ACCESSORIES
LEVELS USE TYPE OF MIXTURE
1–3 Dough hook Heavy mixtures (e.g. bread, short pastry)
2–4 Beater Medium-heavy mixtures (e.g. crepes, sponge mixture)
5–6 Whisk Light mixtures (e.g. cream, egg white)
Pulse Whisk Interval (e.g. for mixing sponge, egg white)
NOTE! With heavy mixtures, do not operate the machine for more than six minutes at a
time, after each six minutes allow the mixer to cool down for at least 10 minutes.
CLEANING
• Before cleaning, unplug the mixer from the socket.
• Never immerse the housing and motor in water or any other liquid.
• Do not use any sharp or abrasive detergents.
• Clean the housing using a damp cloth.
• The mixing bowl and accessories can be cleaned in hot soapy water or in a
dishwasher (max 60ºC).
• Allow all parts to dry thoroughly before reassembling the mixer.

6
Köksmaskin
Läs bruksanvisningen noggrant och se till att produkten installeras, används och under-
hålls på rätt sätt enligt instruktionerna. Spara bruksanvisningen för senare bruk.
SÄKERHETSFÖRESKRIFTER
Innan användning av elektriska apparater bör grundläggande säkerhets-
åtgärder alltid vidtas, inklusive följande:
• Apparaten är endast avsedd för hushållsbruk. Apparaten är inte till för
kommersiellt bruk.
• Endast för inomhusbruk.
• Hålls undan från värmekällor, direkt solljus, fukt och vassa kanter.
Använd inte apparaten med våta händer. Om apparaten är fuktig eller
våt, koppla från strömmen genast.
• Låt aldrig sladden eller mixern täckas av vatten eller annan vätska.
• För rengöring eller förvaring, stäng av apparaten och dra alltid ut
strömkabeln (dra i stickproppen, inte i sladden). När apparaten inte
används, och avlägsna anslutna tillbehör.
• Använd inte maskinen utan uppsyn. Om du lämnar arbetsplatsen,
stäng alltid av maskinen eller dra ur sladden.
• Använd inte maskinen om någon del skadats. Använd aldrig om
strömkabeln skadats.
• Apparaten har inga delar som användaren kan laga själv. Kontakta
alltid vår kundtjänst för vidare hjälp.
• För att undvika fara, se till att trasig kabel endast byts ut av tillver-
karen, av vår kundtjänst eller av behörig individ, och med kabel av
samma typ.
• Använd endast originalreservdelar. Användning av reservdelar och
tillbehör från annan än tillverkaren kan resultera i fara.
• Kassera allt emballage (plastpåsar, lådor, polystyren osv.) efter upp-
packning.
SE
Tack för att du valt att
köpa en produkt från Rusta!
Läs igenom hela bruksanvisningen
innan montering och användning!

7
• För att skydda barn från farorna med elektrisk utrustning, se till att
apparaten endast används under uppsyn. Apparaten är inte någon
leksak. Låt inte små barn leka med den.
• Manipulera inte säkerhetsströmbrytarna.
• Stick inga föremål i de roterande krokarna när maskinen är igång.
• Placera maskinen på en jämn, flat och stabil arbetsyta.
• Anslut inte maskinens huvudkontakt i eluttag innan nödvändiga tillbe-
hör installerats.
• Denna apparat är inte avsedd för personer (inkl. barn) med fysiska,
sensoriska eller mentala funktionshinder, eller bristande erfarenhet
och kunskap, om inte under överinseende eller med lämpliga anvis-
ningar om apparatens användning från den som ansvarar för deras
säkerhet.
VARNING!
Om föreskriften inte efterföljs kan en olycka leda till
allvarlig person- eller egendomsskada.
Märkspänning 220 –240 V~50/60 Hz
Eekt 650 W
SPECIFIKATIONER

8
SE
Main Components and Standard Accessories:
1
Output shaft
5
Whisk
2
Rise button
6
Beater
3
Speed knob
7
Dough hook
4
Power Cord
8
Mixing bowl
Using the Mixer
1. Place the mixing bowl into its holding device and turn the bowl until it locks into place.
2. In order to lift the arm, push the rise button down. The arm will now move upwards.
3. Mount the required accessories by inserting the top into the output shaft and locking.
4. Now fill in your ingredients. Do not overfill the machine - the maximum quantity of ingredients is 1.2 kg.
5. Lower the arm using the rise button.
6. Insert the main plug into a properly installed 230V/50Hz safety power socket.
7. Switch the machine using the speed button to a speed between 1 and 6 (corresponding to the mixture).
8. For pulse function (kneading at short intervals), turn the switch to the “PULSE”position. The switch has to be
held in this position according to the desired interval length. When the switch is released it returns
automatically to the “0”position.
Adjusting the Levels and using the accessories
Levels
Use
Type of Mixture
1-3
Dough hook
Heavy mixtures (e.g. bread, short pastry)
1
2
8
3
6
7
5
4
1
1
8
7
2
34
5
6
1. Kraftaxel
2. Höj-knapp
3. Hastighetsknapp
4. Elsladd
5. Ballongvisp
6. Visp
7. Degkrok
8. Bunke
ANVÄNDNING AV MIXERN
1. Placera bunken i dess fasthållningsanordning och vrid tills den låses fast.
2. Tryck ner höj-knappen för att lyfta armen. Armen lyfts uppåt.
3. Montera lämpligt tillbehör genom att sätta in toppen i kraftaxeln och låsa.
4. Fyll sedan på dina ingredienser. Fyll inte maskinen för mycket – maximal mängd
ingredienser är 1,2 kg.
5. Sänk armen med hjälp av höj-knappen.
6. Sätt huvudkontakten i ett korrekt installerat säkerhetsuttag 230V/50Hz.
7. Ställ in maskinen på hastighet mellan 1 och 6 med hjälp av hastighetsknappen
(beroende på blandningen).
8. För pulsfunktion (knådning i korta intervall), vrid reglaget till “PULSE”. Reglaget måste
hållas i detta läge enligt önskad intervallängd. När du släpper reglaget återvänder det
automatiskt till läget “0”.
ÖVERSIKT DELAR OCH TILLBEHÖR

9
REKLAMATIONSRÄTT
Enligt gällande lag ska produkten vid reklamation lämnas in på inköpsstället och origi-
nalkvitto bifogas. Användaren är ansvarig för eventuella skador på produkten om pro-
dukten använts till ändamål den inte är avsedd för eller om bruksanvisningen inte följts.
Reklamationsrätten gäller i sådant fall inte.
INFORMATION OM MILJÖFARLIGT AVFALL
Uttjänt produkt ska hanteras separat från
hushållsavfall och lämnas in för återvinning
enligt lokala regler för avfallshantering
9. Efter knådning/omrörning, vrid hastighetsknappen tillbaka till “0”-läge så snart
blandningen nått önskad konsistens. Dra sedan ur strömkabeln.
10. Tryck ner höj-knappen och armen lyfts.
11. Blandningen kan nu tömmas från bunken med hjälp av spatel.
12. Bunken kan nu avlägsnas.
13. Rengör delarna enligt beskrivning i avsnittet RENGÖRING.
NIVÅJUSTERING OCH ANVÄNDNING AV TILLBEHÖR
OBS! För tyngre blandningar, kör inte maskinen mer än sex minuter i taget. Låt sedan
mixern svalna i minst 10 minuter.
RENGÖRING
• Innan rengöring, dra ut mixerns strömkabel.
• Låt aldrig hölje eller motor täckas av vatten eller annan vätska.
• Använd inte starka eller slipande rengöringsmedel.
• Rengör höljet med en fuktig trasa.
• Bunken och tillbehören kan rengöras i hett tvålvatten eller i diskmaskin (max 60ºC).
• Låt alla delar torka ordentligt innan du sätter ihop mixern igen.
NIVÅER ANVÄNDNING TYP AV BLANDNING
1–3 Degkrok Tyngre blandningar (t.ex. bröd, mördeg).
2–4 Visp Mellantunga blandningar (t.ex. pannkakor, sockerkakssmet).
5–6 Ballongvisp Lättare blandningar (t.ex. grädde, äggvita).
Puls Ballongvisp Intervall (t.ex. för blandning av sockerkakssmet, äggvita).

10
NO
Kjøkkenmaskin
Les bruksanvisningen nøye og sørg for at produkten monteres, brukes og vedlikeholdes
riktig i henhold til instruksjonene. Ta vare på bruksanvisningen for fremtidig bruk.
SIKKERHETSINSTRUKSJONER
Følg alltid grunnleggende sikkerhetsinstruksjoner ved bruk av elektriske
apparater, inkludert følgende:
• Dette apparatet er kun til bruk i husholdninger. Dette apparatet er ikke
til kommersiell bruk.
• Kun til innendørs bruk.
• Hold borte fra varmekilder, direkte sollys, fuktighet og skarpe kanter.
Bruk ikke brødristeren med våte hender. Trekk ut kontakten umiddel-
bart hvis apparatet er fuktig eller vått.
• Senk aldri ledningen eller kjøkkenmaskinen ned i vann eller noen an-
nen type væske.
• Når apparatet skal rengjøres eller settes bort, må du slå det av og
alltid trekke ut kontakten (trekk i støpselet, ikke i ledningen). Hvis ap-
paratet ikke er i bruk, må alt tilbehør tas av.
• Ikke bruk maskinen uten tilsyn. Slå alltid av maskinen eller trekk ut
kontakten hvis du går bort fra arbeidsstedet.
• Ikke bruk apparatet hvis noen av delene er skadet. Ikke bruk apparatet
hvis ledningen er skadet.
• Apparatet har ingen deler som brukeren kan reparere på egen hånd.
Kontakt alltid kundeservice hvis du behøver mer hjelp.
• For å unngå å utsettes for fare må ødelagte ledninger alltid byttes av
produsenten, vår kundeservice eller kvalifisert personell, og med en
ledning av samme type.
• Bruk kun originaldeler. Bruk av reservedeler eller tilbehør som ikke er
levert av produsenten, kan føre til fare.
Takk for at du valgte å kjøpe et
produkt fra Rusta!
Les gjennom hele bruksanvisningen
før installasjon og bruk!

11
ADVARSEL!
Dersom instruksjonene ikke følges kan det føre alvorlig
skade på person eller eiendom.
Nominell spänning 220 –240 V~50/60 Hz
Eekt 650 W
SPESIFIKASJONER
• Kast all emballasje (plastposer, esker, isopor osv.) når maskinen er
pakket ut.
• For å beskytte barn mot farene ved elektrisk utstyr må du sikre at
dette apparatet bare brukes under tilsyn. Dette apparatet er ingen
leke. Ikke la små barn leke med det.
• Ikke tukle med noen av sikkerhetsbryterne.
• Ikke sett noe inn i de roterende krokene mens maskinen går.
• Plasser maskinen på en jevn, flat og stabil arbeidsoverflate.
• Ikke sett inn kontakten på maskinen før du har satt på alt nødvendig
tilbehør.
• Dette apparatet kan brukes av personer (inkludert barn) med reduser-
te fysiske, sensoriske eller mentale evner eller manglende erfaring og
kunnskap kun dersom de er under tilsyn eller er gitt instruksjoner om
bruk av apparatet på en sikker måte av en person som står ansvarlig
for sikkerheten deres.

12
NO
Main Components and Standard Accessories:
1
Output shaft
5
Whisk
2
Rise button
6
Beater
3
Speed knob
7
Dough hook
4
Power Cord
8
Mixing bowl
Using the Mixer
1. Place the mixing bowl into its holding device and turn the bowl until it locks into place.
2. In order to lift the arm, push the rise button down. The arm will now move upwards.
3. Mount the required accessories by inserting the top into the output shaft and locking.
4. Now fill in your ingredients. Do not overfill the machine - the maximum quantity of ingredients is 1.2 kg.
5. Lower the arm using the rise button.
6. Insert the main plug into a properly installed 230V/50Hz safety power socket.
7. Switch the machine using the speed button to a speed between 1 and 6 (corresponding to the mixture).
8. For pulse function (kneading at short intervals), turn the switch to the “PULSE”position. The switch has to be
held in this position according to the desired interval length. When the switch is released it returns
automatically to the “0”position.
Adjusting the Levels and using the accessories
Levels
Use
Type of Mixture
1-3
Dough hook
Heavy mixtures (e.g. bread, short pastry)
1
2
8
3
6
7
5
4
1
1
8
7
2
34
5
6
1. Drivaksel
2. Heveknapp
3. Hastighetsbryter
4. Strømledning
5. Visp
6. Rørespade
7. Eltekrok
8. Blandebolle
• BRUK AV KJØKKENMASKINEN
1. Sett blandebollen i sporet og vri bollen rundt til den låses på plass.
2. Skyv heveknappen nedover for å løfte armen. Armen beveger seg oppover.
3. Monter ønsket tilbehør ved å sette inn toppen i drivakselen og låse det fast.
4. Deretter har du i ingrediensene. Ikke overfyll maskinen – maksimal ingrediensmengde
er 1,2 kg.
5. Senk armen med heveknappen.
6. Sett inn støpselet i en jordet 230 V / 50 Hz stikkontakt.
7. Slå på maskinen, og bruk hastighetsbryteren til å angi en hastighet på mellom 1 og 6
(som passer til deigen).
8. Slå på pulsfunksjon (knaing med korte intervaller) ved å vri bryteren til PULSE-stilling.
Bryteren må holdes i denne stillingen så lenge du ønsker å bruke pulsfunksjonen. Når
du slipper bryteren, går den automatisk tilbake til 0-stilling.
OVERSIKT DELER OG TILLBEHØR

13
REKLAMASJONSRETT
I henhold til gjeldende lov skal produktet ved reklamasjon leveres inn på kjøpsstedet
med maskinstemplet kvittering vedlagt. Brukeren er ansvarlig for eventuelle skader på
produktet dersom produktet brukes til noe annet enn det som er tiltenkt, eller dersom
bruksanvisningen ikke følges. I slike tilfeller bortfaller reklamasjonsretten.
INFORMASJON OM FARLIG AVFALL
Utslitt produkt skal ikke kastes i husholdningsavfall,
men leveres til gjenvinning i henhold til lokale
regler for avfallshåndtering
9. Etter knaingen/røringen vrir du hastighetsbryteren tilbake til 0-stilling så snart
deigen har den konsistensen du ønsker. Trekk deretter ut kontakten.
10. Trykk heveknappen nedover for å heve armen.
11. Nå kan du ta ut deigen fra blandebollen med en slikkepott.
12. Ta ut blandebollen.
13. Rengjør delene som beskrevet under RENGJØRING.
NIVÅJUSTERING OG BRUK AV TILBEHØR
MERK! Ved tunge deiger må maskinen ikke brukes i mer enn seks minutter om gangen.
Etter seks minutter må du la maskinen kjøle seg ned i minst 10 minutter.
RENGJØRING
• Trekk ut kontakten på kjøkkenmaskinen før rengjøring.
• Senk aldri selve kjøkkenmaskinen og motoren ned i vann eller noen annen type
væske.
• Ikke bruk skarpe gjenstander eller slipende rengjøringsmidler.
• Rengjør yttersiden med en fuktig klut.
• Blandebollen og tilbehøret kan rengjøres i varmt såpevann eller i oppvaskmaskin
(maks. 60ºC).
• La alle delene tørke godt før kjøkkenmaskinen settes sammen igjen.
NIVÅ BRUK DEIGTYPEN
1–3 Eltekrok Tunge deiger (f.eks. brød, paideig)
2–4 Rørespade Middels tunge deiger (f.eks. pannekakerøre, kakerøre)
5–6 Visp Lette deiger (f.eks. fløte, eggehvite)
Puls Visp Intervall (f.eks. til blanding av kakedeig, eggehvite)

14
DE
Danke, dass Sie sich für den
Kauf eines Produktes von
Rusta entschieden haben!
Vor der Montage und Benutzung
die gesamte Gebrauchsanleitung
durchlesen!
Küchengerät Mixer
Lesen Sie die Gebrauchsanleitung sorgfältig durch. Achten Sie darauf, dass das Produkt
gemäß der Gebrauchsanleitung installiert, verwendet und gewartet wird. Bewahren Sie
die Gebrauchsanweisung für eine evtl. spätere Verwendung auf.
SICHERHEITSANWEISUNGEN
• Bei der Nutzung elektrischer Geräte sind stets grundlegende Sicher-
heitsmaßnahmen zu beachten, einschließlich der Folgenden:
• Das Gerät ist nur für den Gebrauch im Haushalt vorgesehen. Es ist
nicht für gewerbliche Zwecke vorgesehen.
• Nicht zum Gebrauch im Freien geeignet.
• Halten Sie das Gerät von Hitzequellen, direktem Sonnenlicht, Feuchtig-
keit und scharfen Kanten fern. Verwenden Sie das Gerät nicht mit nas-
sen Händen. Ziehen Sie sofort den Stecker aus der Steckdose, wenn
das Gerät feucht oder nass ist.
• Tauchen Sie das Netzkabel oder den Mixer niemals in Wasser oder
andere Flüssigkeiten ein.
• Wenn Sie das Gerät Reinigen oder Verstauen, schalten Sie es zunächst
aus und ziehen Sie den Stecker aus der Steckdose (am Stecker anzie-
hen, nicht am Kabel). Entfernen Sie die angeschlossenen Zubehörteile,
wenn das Gerät nicht verwendet wird.
• Lassen Sie das Gerät nicht unbeaufsichtigt laufen. Wenn Sie sich
vom Gerät entfernen, schalten Sie es immer aus und ziehen Sie den
Stecker aus der Steckdose.
• Verwenden Sie das Gerät nicht, wenn einzelne Teile davon beschädigt
sind. Verwenden Sie das Gerät niemals mit beschädigtem Netzkabel.
• Das Gerät enthält keine Teile, die der Benutzer selbst reparieren kann.
Wenden Sie sich deshalb immer an Ihren Kundendienst, um Hilfe zu
erhalten.
• Lassen Sie schadhafte Kabel nur vom Hersteller, von unserem Kun-
denservice oder von qualifiziertem Personal durch ein Kabel gleicher

15
WARNHINWEIS!
Wenn die Vorschriften nicht befolgt werden, kann ein Unfall
zu gravierenden Verletzungen oder Sachschäden führen.
Nennspannung 220 –240 V~50/60 Hz
Leistung 650 W
SPEZIFIKATIONEN
Art ersetzen, um Gefahren auszuschließen.
• Verwenden Sie nur Original-Ersatzteile. Die Verwendung von Ersatz-
teilen oder Zubehörteilen, die nicht vom Hersteller angeboten werden,
kann zu Gefahren führen.
• Entfernen Sie nach dem Auspacken alle Verpackungsmaterialien
(Plastikbeutel, Boxen, PS etc.).
• Um Kinder vor den Gefahren beim Gebrauch von Elektrogeräten zu
schützen, stellen Sie bitte sicher, dass sie dieses Gerät nicht ohne
Beaufsichtigung verwenden. Das Gerät ist kein Spielzeug. Lassen Sie
deshalb kleine Kinder nicht damit spielen.
• Manipulieren Sie keine Sicherheitsschalter.
• Geben Sie keine Gegenstände in die rotierenden Haken, wenn sich das
Gerät im Betrieb befindet.
• Stellen Sie das Gerät auf einen glatten, ebenen und stabilen Arbeit-
suntergrund.
• Stecken Sie den Netzstecker des Geräts erst dann in die Steckdose
ein, wenn Sie alle notwendigen Zubehörteile installiert haben.
• Dieses Gerät ist nicht für den Gebrauch durch Personen (einschließlich
Kindern) mit eingeschränkten körperlichen, sensorischen oder geisti-
gen Fähigkeiten oder mangelnder Erfahrung und Wissen vorgesehen,
wenn sie nicht von einer Person, die für ihre Sicherheit verantwortlich
ist, beaufsichtigt werden und Anweisungen zu einem sicheren Ge-
brauch erhalten haben.

16
DE
VERWENDUNG DES MIXERS
1. Stellen Sie die Rührschüssel auf ihre Halterung und drehen Sie die Schüssel, bis sie
einrastet.
2. Drücken Sie den Auf-/Ab-Schalter, um den Arm nach oben zu bewegen. Der Arm
bewegt sich nach oben.
3. Schließen Sie das benötigte Zubehör an, indem Sie die Oberseite in den Antriebsschaft
stecken und einrasten lassen.
4. Füllen Sie nun die Zutaten ein. Überfüllen Sie das Gerät nicht – die maximale Kapazität
für die Zutaten beträgt 1,2 kg.
5. Senken Sie den Arm ab, indem Sie erneut den Auf-/Ab-Schalter drücken.
6. Stecken Sie den Netzstecker in eine geeignete Sicherheitssteckdose (230V/50Hz) ein.
7. Stellen Sie mit dem Geschwindigkeits-Schalter die gewünschte Geschwindigkeit von 1
bis 6 ein (abhängig von der jeweiligen Mischung).
8. Um die Impulsfunktion (kneten in kurzen Intervallen) zu nutzen, drehen Sie den Schalter
Main Components and Standard Accessories:
1
Output shaft
5
Whisk
2
Rise button
6
Beater
3
Speed knob
7
Dough hook
4
Power Cord
8
Mixing bowl
Using the Mixer
1. Place the mixing bowl into its holding device and turn the bowl until it locks into place.
2. In order to lift the arm, push the rise button down. The arm will now move upwards.
3. Mount the required accessories by inserting the top into the output shaft and locking.
4. Now fill in your ingredients. Do not overfill the machine - the maximum quantity of ingredients is 1.2 kg.
5. Lower the arm using the rise button.
6. Insert the main plug into a properly installed 230V/50Hz safety power socket.
7. Switch the machine using the speed button to a speed between 1 and 6 (corresponding to the mixture).
8. For pulse function (kneading at short intervals), turn the switch to the “PULSE”position. The switch has to be
held in this position according to the desired interval length. When the switch is released it returns
automatically to the “0”position.
Adjusting the Levels and using the accessories
Levels
Use
Type of Mixture
1-3
Dough hook
Heavy mixtures (e.g. bread, short pastry)
1
2
8
3
6
7
5
4
1
1
8
7
2
34
5
6
1. Antriebsschaft
2. Auf-/Ab-Schalter
3. Geschwindigkeitsschalter
4. Netzkabel
5. Schneebesen
6. Quirl
7. Knethaken
8. Rührschüssel
HAUPTKOMPONENTEN UND STANDARD-ZUBEHÖR

17
in die Position „PULSE“. Der Schalter muss so lange gehalten werden, wie die Funktion
andauern soll. Sobald Sie den Schalter loslassen, springt er zurück in die Position „0“.
9. Drehen Sie nach dem Kneten/Rühren den Schalter wieder in die Position „0“, sobald die
Mischung die gewünschte Konsistenz hat. Ziehen Sie anschließend den Netzstecker.
10. Drücken Sie den Auf-/Ab-Schalter. Der Arm bewegt sich nach oben.
11. Jetzt können Sie die Mischung mit einer Spachtel aus der Rührschüssel nehmen.
12. Jetzt können Sie die Rührschüssel entnehmen.
13. Reinigen Sie die Einzelteile, wie im Abschnitt REINIGUNG beschrieben.
EINSTELLUNG DER STUFEN UND VERWENDUNG DES ZUBEHÖRS
HINWEIS! Lassen Sie das Gerät bei schweren Mischungen nicht länger als sechs Minuten
am Stück laufen. Lassen Sie es nach sechs Minuten immer für mindestens 10 Minuten
abkühlen.
REINIGUNG
• Ziehen Sie vor dem Reinigen das Netzkabel aus der Steckdose.
• Tauchen Sie das Gehäuse und den Motor niemals in Wasser oder andere Flüssigkeiten ein.
• Verwenden Sie keine aggressiven oder scheuernden Reiniger.
• Reinigen Sie das Gehäuse mit einem feuchten Tuch.
• Die Rührschüssel können in warmen Seifenwasser oder in der Geschirrspülmaschine
(max. 60ºC) gereinigt werden.
• Lassen Sie alle Teile gut abtrocknen, bevor Sie den Mixer wieder zusammenbauen.
STUFEN VERWENDUNG ART DER MISCHUNG
1–3 Knethaken Schwere Mischungen (z.B. Brotteig, Mürbeteig).
2–4 Quirl Mittelschwere Mischungen (z.B. Crêpes, Biskuitteig).
5–6 Schneebesen Leichte Mischungen (z.B. Schlagsahne, Eischnee).
Impuls-Funktion Schneebesen Intervall (z.B. zum Rühren von Biskuitteig, Eischnee).
INFORMATIONEN ÜBER UMWELTGEFÄHRLICHEN ABFALL
Dieses Produkt darf am Ende seiner Lebensdauer nicht über den normalen
Haushaltsabfall entsorgt werden, sondern muss je nach den kommunalen
Bestimmungen für Abfallbeseitigung einem Sammelpunkt für das Recycling
von elektrischen und elektronischen Geräten übergeben werden.
REKLAMATIONSRECHT
Nach geltendem Recht wird das Gerät bei Reklamation in die Verkaufsstelle zurückge-
bracht. Der Originalbeleg muss beigefügt werden. Für Schäden, die durch nicht bestim-
mungs- und unsachgemäßen Gebrauch entstanden sind, ist der Käufer verantwortlich.
In diesen Fällen verliert das Reklamationsrecht seine Gültigkeit.

NOTES
........................................................................................................................................................................................................
........................................................................................................................................................................................................
........................................................................................................................................................................................................
........................................................................................................................................................................................................
........................................................................................................................................................................................................
........................................................................................................................................................................................................
........................................................................................................................................................................................................
........................................................................................................................................................................................................
........................................................................................................................................................................................................
........................................................................................................................................................................................................
........................................................................................................................................................................................................
........................................................................................................................................................................................................
........................................................................................................................................................................................................
........................................................................................................................................................................................................
........................................................................................................................................................................................................
........................................................................................................................................................................................................
........................................................................................................................................................................................................
........................................................................................................................................................................................................
........................................................................................................................................................................................................
........................................................................................................................................................................................................
........................................................................................................................................................................................................
........................................................................................................................................................................................................
........................................................................................................................................................................................................
........................................................................................................................................................................................................
........................................................................................................................................................................................................
........................................................................................................................................................................................................
........................................................................................................................................................................................................
........................................................................................................................................................................................................
........................................................................................................................................................................................................
........................................................................................................................................................................................................
........................................................................................................................................................................................................
........................................................................................................................................................................................................
........................................................................................................................................................................................................
........................................................................................................................................................................................................

........................................................................................................................................................................................................
........................................................................................................................................................................................................
........................................................................................................................................................................................................
........................................................................................................................................................................................................
........................................................................................................................................................................................................
........................................................................................................................................................................................................
........................................................................................................................................................................................................
........................................................................................................................................................................................................
........................................................................................................................................................................................................
........................................................................................................................................................................................................
........................................................................................................................................................................................................
........................................................................................................................................................................................................
........................................................................................................................................................................................................
........................................................................................................................................................................................................
........................................................................................................................................................................................................
........................................................................................................................................................................................................
........................................................................................................................................................................................................
........................................................................................................................................................................................................
........................................................................................................................................................................................................
........................................................................................................................................................................................................
........................................................................................................................................................................................................
........................................................................................................................................................................................................
........................................................................................................................................................................................................
........................................................................................................................................................................................................
........................................................................................................................................................................................................
........................................................................................................................................................................................................
........................................................................................................................................................................................................
........................................................................................................................................................................................................
........................................................................................................................................................................................................
........................................................................................................................................................................................................
........................................................................................................................................................................................................
........................................................................................................................................................................................................
........................................................................................................................................................................................................
........................................................................................................................................................................................................

Rustas kundtjänst: Tel. 0771 28 10 10
Konsumentkontakt: Rusta Kundtjänst, Box 5064, 194 05 Upplands Väsby, SVERIGE
Hemsida: www.rusta.com
E-post: [email protected]om
SE
Customer Service Rusta: Tel. +46 (0)771 28 10 10
Consumer contact: Rusta Customer Service, Box 5064, 194 05 Upplands Väsby, SWEDEN
Website: www.rusta.com
E-mail: [email protected]om
ENG
Rustas kundetjeneste: Tlf. +46 (0)771 28 10 10
Forbrukerkontakt: Rusta Kundetjeneste, Box 5064, 194 05 Upplands Väsby, SVERIGE
Hjemmesida: www.rusta.com
E-post: [email protected]om
NO
Kundenservice Rusta: Tel. +46 (0)771 28 10 10
Kundenkontakt: Rusta Kundtjänst, Box 5064, 194 05 Upplands Väsby, SCHWEDEN
Website: www.rusta.com
E-mail: [email protected]om
DE
Manual/Bruksanvisning/Gebrauchsanweisung
01/2017
Item no. 900701300101, 02, -03, -04
This manual suits for next models
3
Table of contents
Languages:
Other RUSTA Mixer manuals