manuals.online logo
Brands
  1. Home
  2. •
  3. Brands
  4. •
  5. Rutland County Garden Furniture
  6. •
  7. Lawn And Garden Equipment
  8. •
  9. Rutland County Garden Furniture Rutland Pergola User manual

Rutland County Garden Furniture Rutland Pergola User manual

Assembly Instructions
Rutland Pergola
1
Before you commence the assembly process we recommend that you read these instructions thoroughly
beforehand to familiarise yourself with the assembly process and to also check that you have the correct
components. If for any reason you need assistance, you can find our contact details on the final page of
these instructions.
We highly recommend that any assembly is carried out on an open flat, level surface if possible with
sufficient space. You will also require the assistance of 2 adults to complete assembly safely.
Please note: For a free-standing pergola you can remove up to 600mm from the bottom of each post prior to commencing construction
Package contents
Tools required
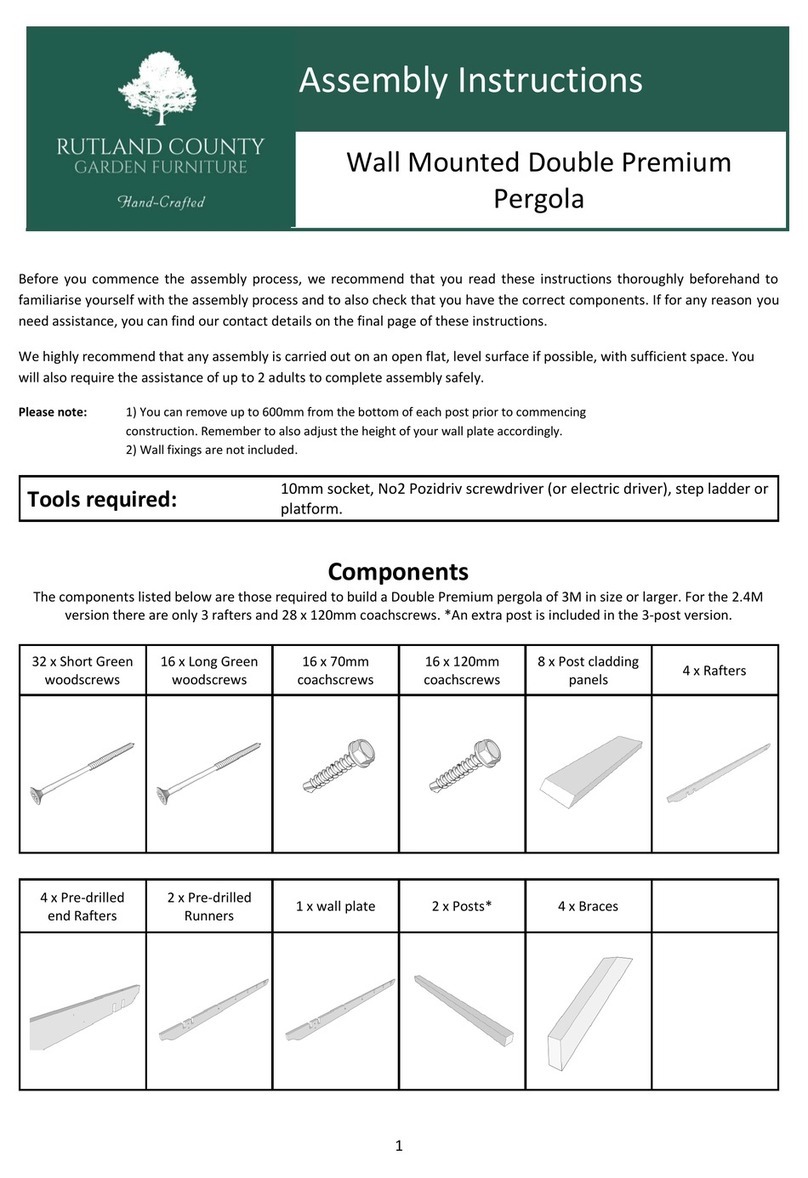
4 x Posts (6 for 4.2 & 4.8M where applicable)
4 x 500mm diagonal braces (8 for 4.2 & 4.8M where
applicable)
4 x 800mm diagonal braces
2 x Runners
6 x Rafters
12 x 120mm M8 Coach screws
12 (20 for 6 post) x Longer Green Screws
16 (20 for 6 post) x Shorter Green screws
10mm socket drive
Electric screwdriver with No2 Pozidrive bit
Or No2 Pozidrive Screwdriver
Platform or Step ladder
The Rutland Pergola
Rutland Pergola
Rutland County Garden Furniture Ltd, Ashbourne House, 2 Dovecote Meadows,
Aslackby, Sleaford, Lincs, NG34 0HZ.
Company No: 7670072 VAT No: 151744027
2
Step 1
Step 2
Take one of the posts and one of the runners and
arrange on the floor as shown...
...so that the notch in the post can accommodate the
runner...
Step 3
Step 4
...and the post is perpendicular to the runner and its
outside edge is aligned with the pencil mark near the
runner's end.
Slide the post onto the runner and fix into place
using 2 of the longer green screws through the pre-
drilled holes. Then align one the short braces as
shown, aligning it so that its ends are flat and also
central against the runner and post. Now fix it into
place using a longer green screw through the pre-
drilled hole at each end. Repeat Steps 1 to 4 for the
remaining 3 posts and runner.
Rutland Pergola
Rutland County Garden Furniture Ltd, Ashbourne House, 2 Dovecote Meadows,
Aslackby, Sleaford, Lincs, NG34 0HZ.
Company No: 7670072 VAT No: 151744027
3
Step 5
Step 6
A 4.2 or 4.8M version will have an extra post midway
along each runner. Align and attach it as in Step 3
and 4...
...and attach 2 braces, one to each side as shown
using the longer green screws...
Step 7
Step 8
Using your assistants, lay out the two frames
assembled in the previous steps, facing each other as
shown above so that they are approximately 60cm
less than the length of one rafter apart.
Get one of the rafters ready to be slotted in place
and have your assistants support the 2 frames
vertically as shown above.
Rutland Pergola
Rutland County Garden Furniture Ltd, Ashbourne House, 2 Dovecote Meadows,
Aslackby, Sleaford, Lincs, NG34 0HZ.
Company No: 7670072 VAT No: 151744027
4
Step 9
Step 10
Using the step ladder or platform for elevation,
carefully lower the rafter (slot side down) onto the
two frame runners...
...so that the rafter sits on the outside of the post at
both ends as shown. Now repeat this for the other
end of the Pergola so it resembles Step 9.
Step 11
Step 12
Now add further braces to secure the rafter in place.
First align its top edge with the rafter...
Rutland Pergola
Rutland County Garden Furniture Ltd, Ashbourne House, 2 Dovecote Meadows,
Aslackby, Sleaford, Lincs, NG34 0HZ.
Company No: 7670072 VAT No: 151744027
5
Step 13
Step 14
...and slide into place so that the bottom edge sits
against the post.
Ensure the brace outside edge is flush with the post
before securing it into place through the pre-drilled
holes with 2 x shorter green screws at the top (do
not over tighten) and one longer greem screw at the
bottom.
Step 15
Step 16
Place a second rafter on the runners (slot side down)
and use the markings on the runners to position
both ends of the rafter correctly.
Now secure the correctly positioned rafter in place,
using a coach screw thought the pre-drilled hole into
the top of the runner at both ends of the rafter.
Rutland Pergola
Rutland County Garden Furniture Ltd, Ashbourne House, 2 Dovecote Meadows,
Aslackby, Sleaford, Lincs, NG34 0HZ.
Company No: 7670072 VAT No: 151744027
6
Step 17
Step 18
Continue adding and securing the remaining 3
rafters, using the spacer as before to ensure the
correct spacing .
The Pergola construction is now complete. It can
remain freestanding or for more security the legs
can be sunk into the ground and concreted in place.
Optional Step
Attach the optional Pedestal panels to the bottom of
each post as shown. Line up each panel on the post
so that it is flush with the bottom face and secure
each one into place with 4 x woodscrews.
We hope that you found your product quick and easy to assemble but if not and you require any
further assistance or have any questions you can contact us by telephone on: 01778 440803
Email: [email protected]
www.rutlandcountygardenfurniture.co.uk

Other Rutland County Garden Furniture Lawn And Garden Equipment manuals
Rutland County Garden Furniture 29688 User manual

Rutland County Garden Furniture

Rutland County Garden Furniture 29688 User manual

Rutland County Garden Furniture Shade Pergola User manual

Rutland County Garden Furniture

Rutland County Garden Furniture Shade Pergola User manual

Rutland County Garden Furniture Wall Mounted Double Premium Pergola User manual

Rutland County Garden Furniture

Rutland County Garden Furniture Wall Mounted Double Premium Pergola User manual

Rutland County Garden Furniture The Wall Mounted Box Pergola & Decking Kit User manual

Rutland County Garden Furniture

Rutland County Garden Furniture The Wall Mounted Box Pergola & Decking Kit User manual

Popular Lawn And Garden Equipment manuals by other brands

Montgomery Ward ZYJ-290C Owner's guide and parts list

Montgomery Ward

Montgomery Ward ZYJ-290C Owner's guide and parts list

Vitavia BASIC 401 Assembly instructions

Vitavia

Vitavia BASIC 401 Assembly instructions

Kooper flash 2192076 User instructions

Kooper

Kooper flash 2192076 User instructions

Ryobi RLM36X46S240 Original instructions

Ryobi

Ryobi RLM36X46S240 Original instructions

RUSTA Privacy screen Acacia 625901090101 manual

RUSTA

RUSTA Privacy screen Acacia 625901090101 manual

Agri-Fab 45-0546 manual

Agri-Fab

Agri-Fab 45-0546 manual

PestBye PB0034 manual

PestBye

PestBye PB0034 manual

Veritable Exky CLASSIC EDITION user manual

Veritable

Veritable Exky CLASSIC EDITION user manual

Gardenline 81324-20 user manual

Gardenline

Gardenline 81324-20 user manual

SmartStore SM1507 Assembly instructions

SmartStore

SmartStore SM1507 Assembly instructions

BCP SKY6601 instruction manual

BCP

BCP SKY6601 instruction manual

Husqvarna BMP 335 Operator's manual

Husqvarna

Husqvarna BMP 335 Operator's manual

NaturCut IDEAL owner's manual

NaturCut

NaturCut IDEAL owner's manual

SNOWJOE 24V-X2-DTS15-CT Operator's manual

SNOWJOE

SNOWJOE 24V-X2-DTS15-CT Operator's manual

Garantia Ergo L 75 Installation instruction

Garantia

Garantia Ergo L 75 Installation instruction

Toro TRX-20 Operator's manual

Toro

Toro TRX-20 Operator's manual

Makita XUC01 Repair manual

Makita

Makita XUC01 Repair manual

Sealey PHA100 instructions

Sealey

Sealey PHA100 instructions

manuals.online logo
manuals.online logoBrands
  • About & Mission
  • Contact us
  • Privacy Policy
  • Terms and Conditions

Copyright 2025 Manuals.Online. All Rights Reserved.