manuals.online logo
Brands
  1. Home
  2. •
  3. Brands
  4. •
  5. RVM
  6. •
  7. Greenhouse Kit
  8. •
  9. RVM CAMELLIA User manual

RVM CAMELLIA User manual

CAMELLIA
9,84 ft
6,75 ft
6,88 ft
Technical manual
pages.
2-6
pages.
7-22
Technical certicate
Assembly manual
3
2
Description
Greenhouses «CAMeLLIA» Are desIGned to CreAte A CLIMAte fAvorAbLe for the CuLtIvAtIon of hortICuLturAL
Crops on fArMLAnds.
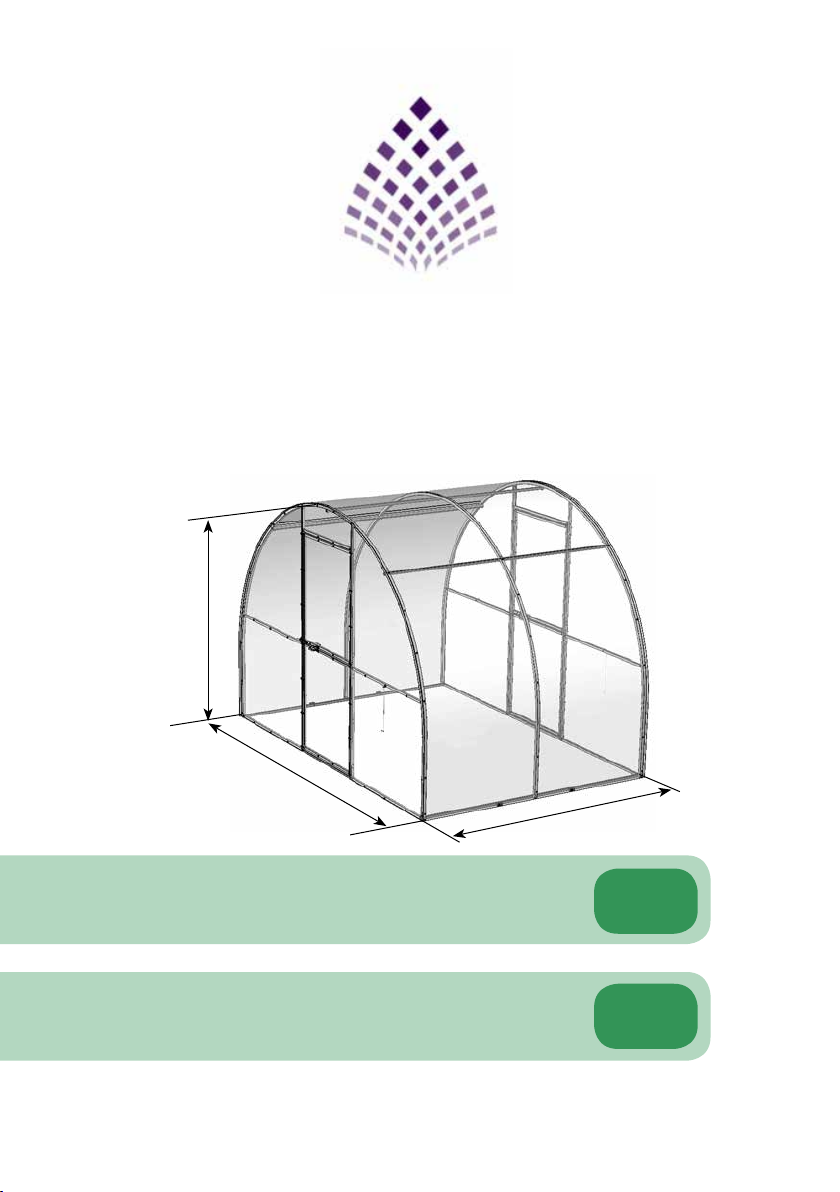
the Greenhouse CAn be of dIfferent LenGths, dependInG on the CustoMer’s desIre. the requIred LenGth of
Greenhouse Is provIded by the purChAse of AddItIonAL pACkAGes wIth extendInG Inserts. eACh Insert extends the
bAsIC Greenhouse set for 6,5 ft. the LenGth of the bAsIC set Is 13,12 ft. the heIGht of IstALLed Greenhouse frAMe
Is 6,88 ft
The assembly and operation of greenhouse «CAMELLIA» shall be carried out
strictly in accordance with the instruction manual and the rules laid down in
the data sheet. Technical data sheet shall be kept.
!
Operation rules
before using, the greenhouse should be assemblied and installed in accordance with the
instructions. If the greenhouse is installed by third parties, customer should check the assembling
quality for compliance with the instructions.
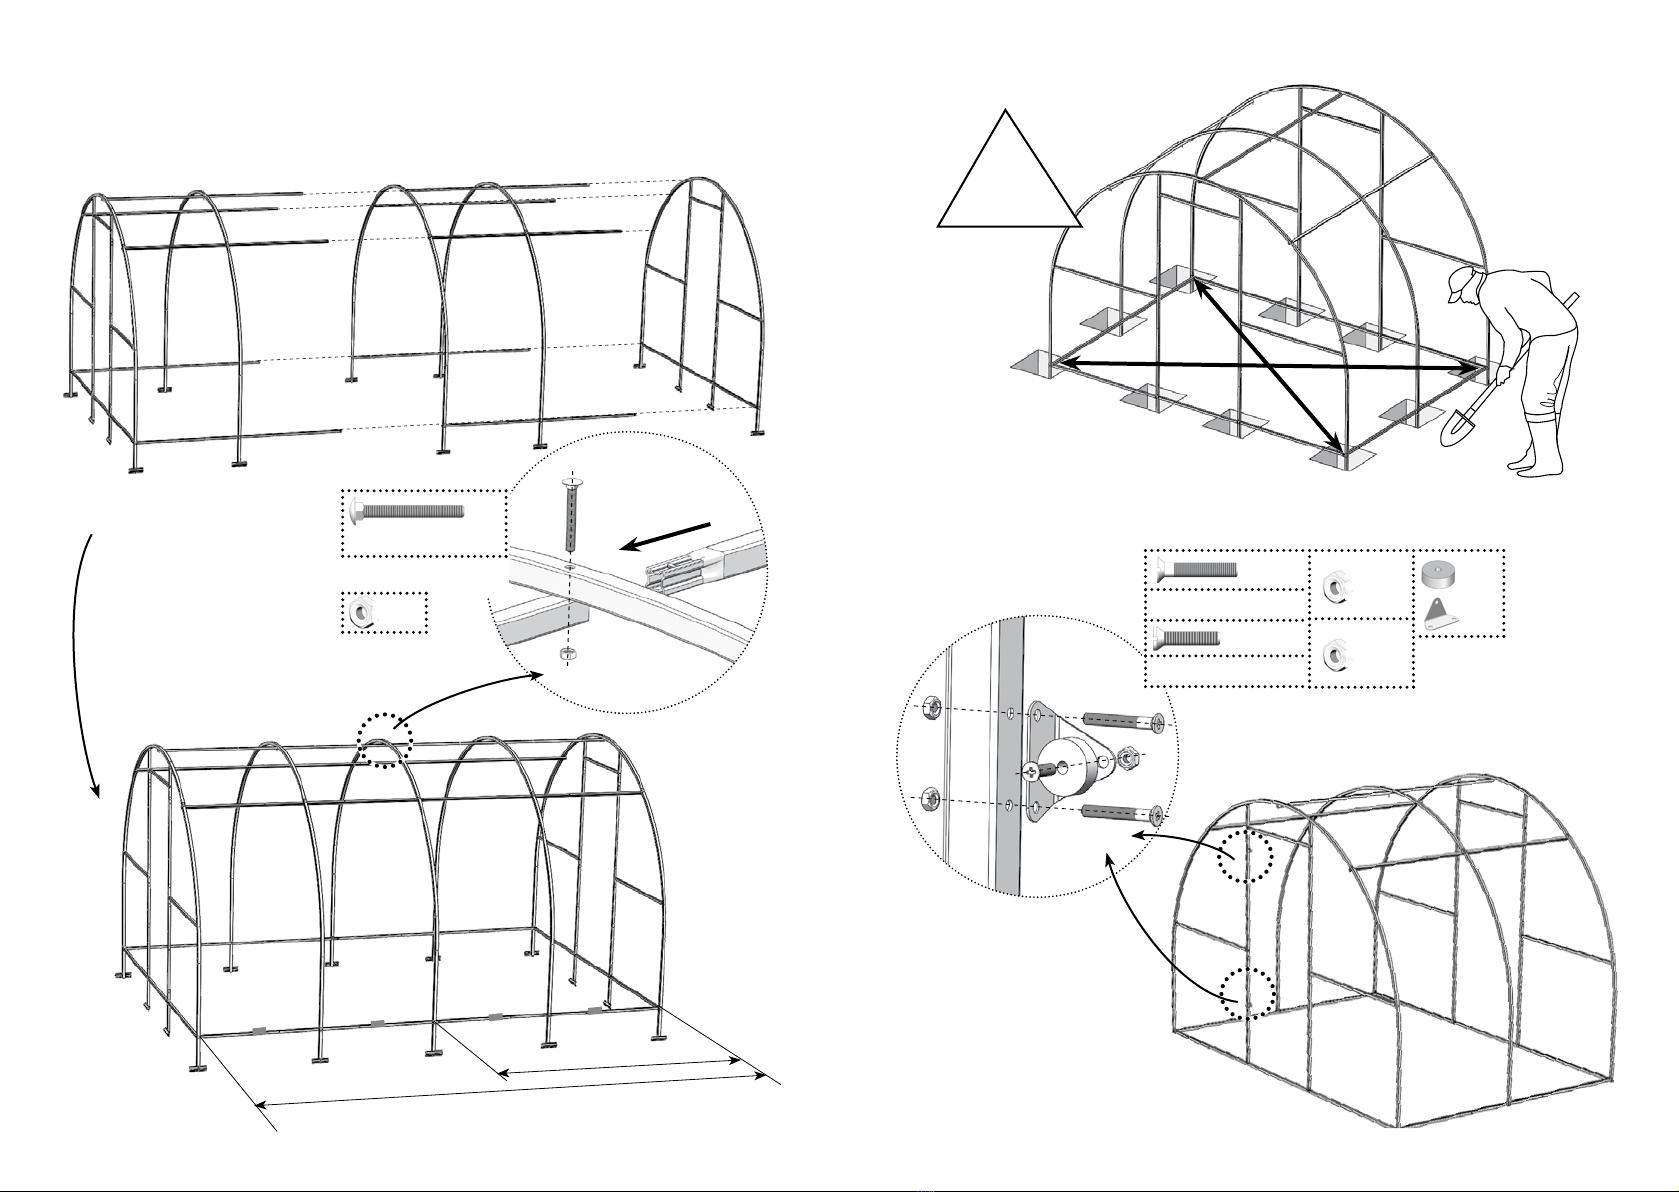
Do not install a greenhouse near the buildings and trees from which snow or ice can fall. Keep the
distance of not less than 6,6 ft.
The greenhouse is designed to withstand the wind not more than 49,21 ft/s.
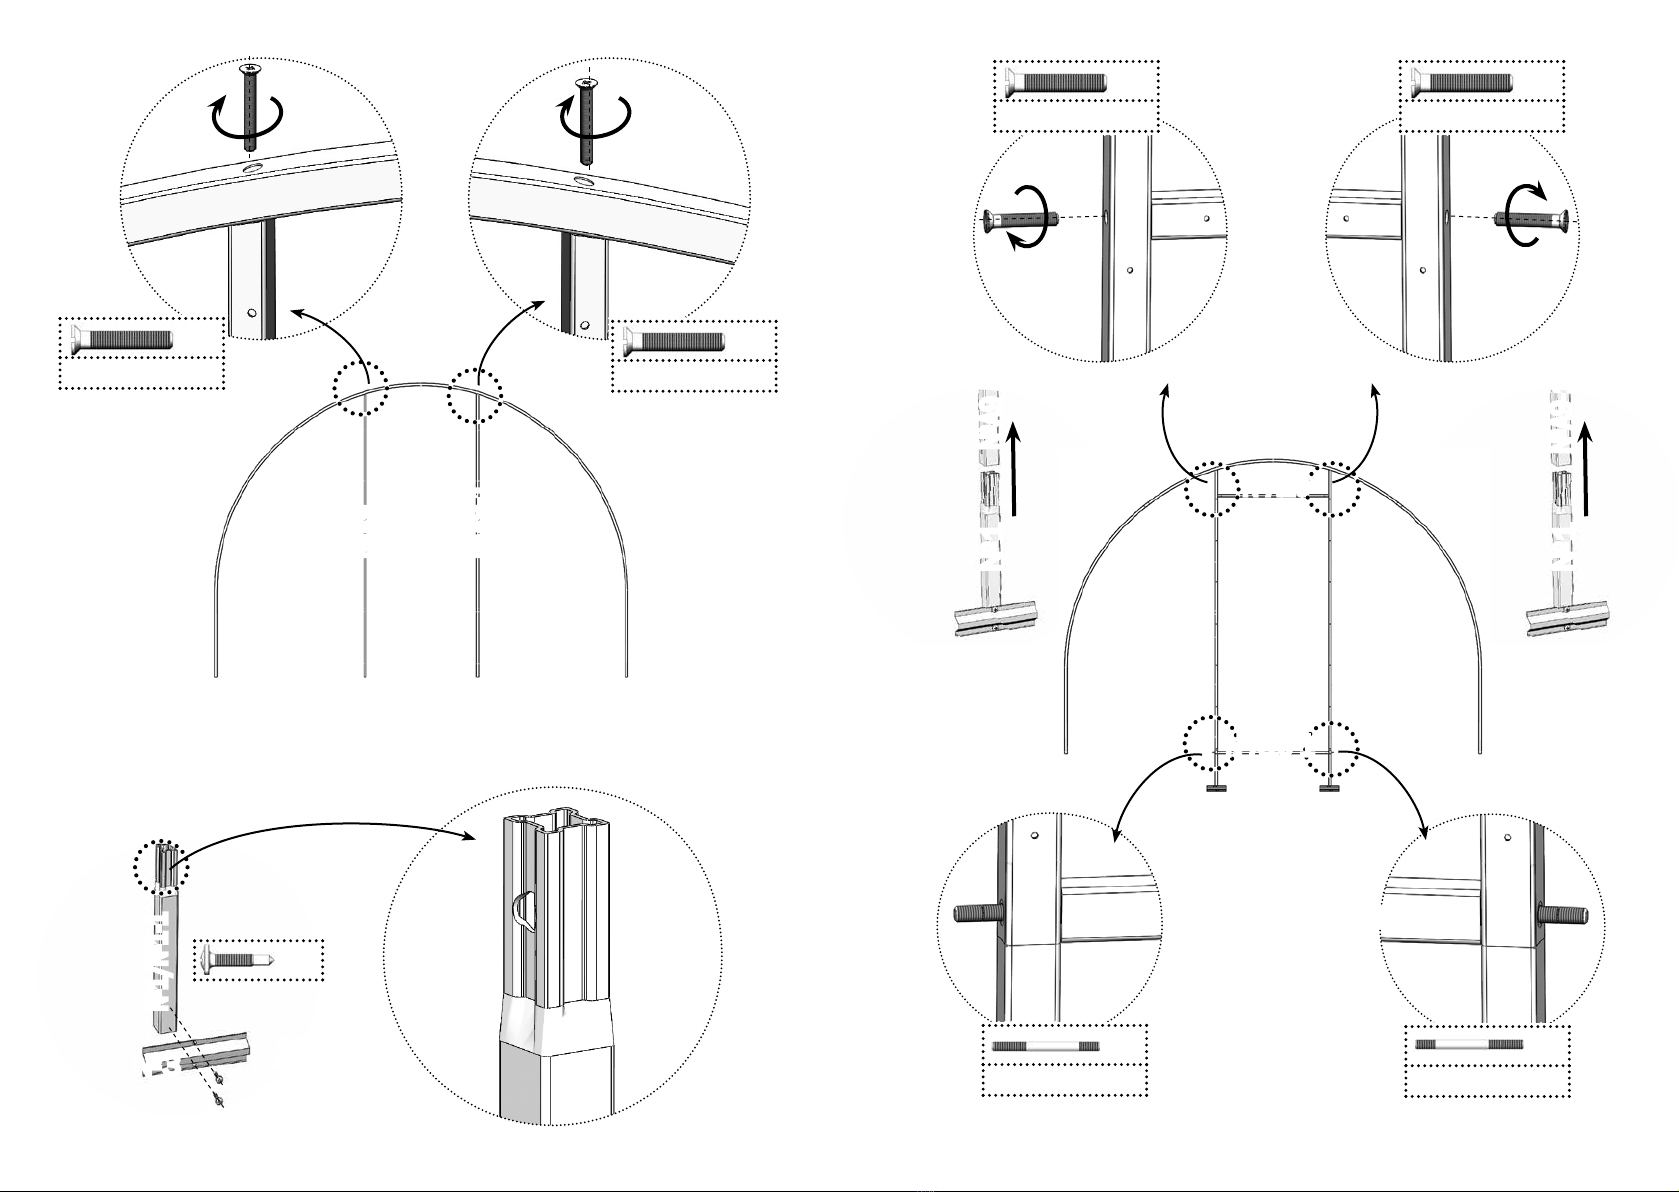
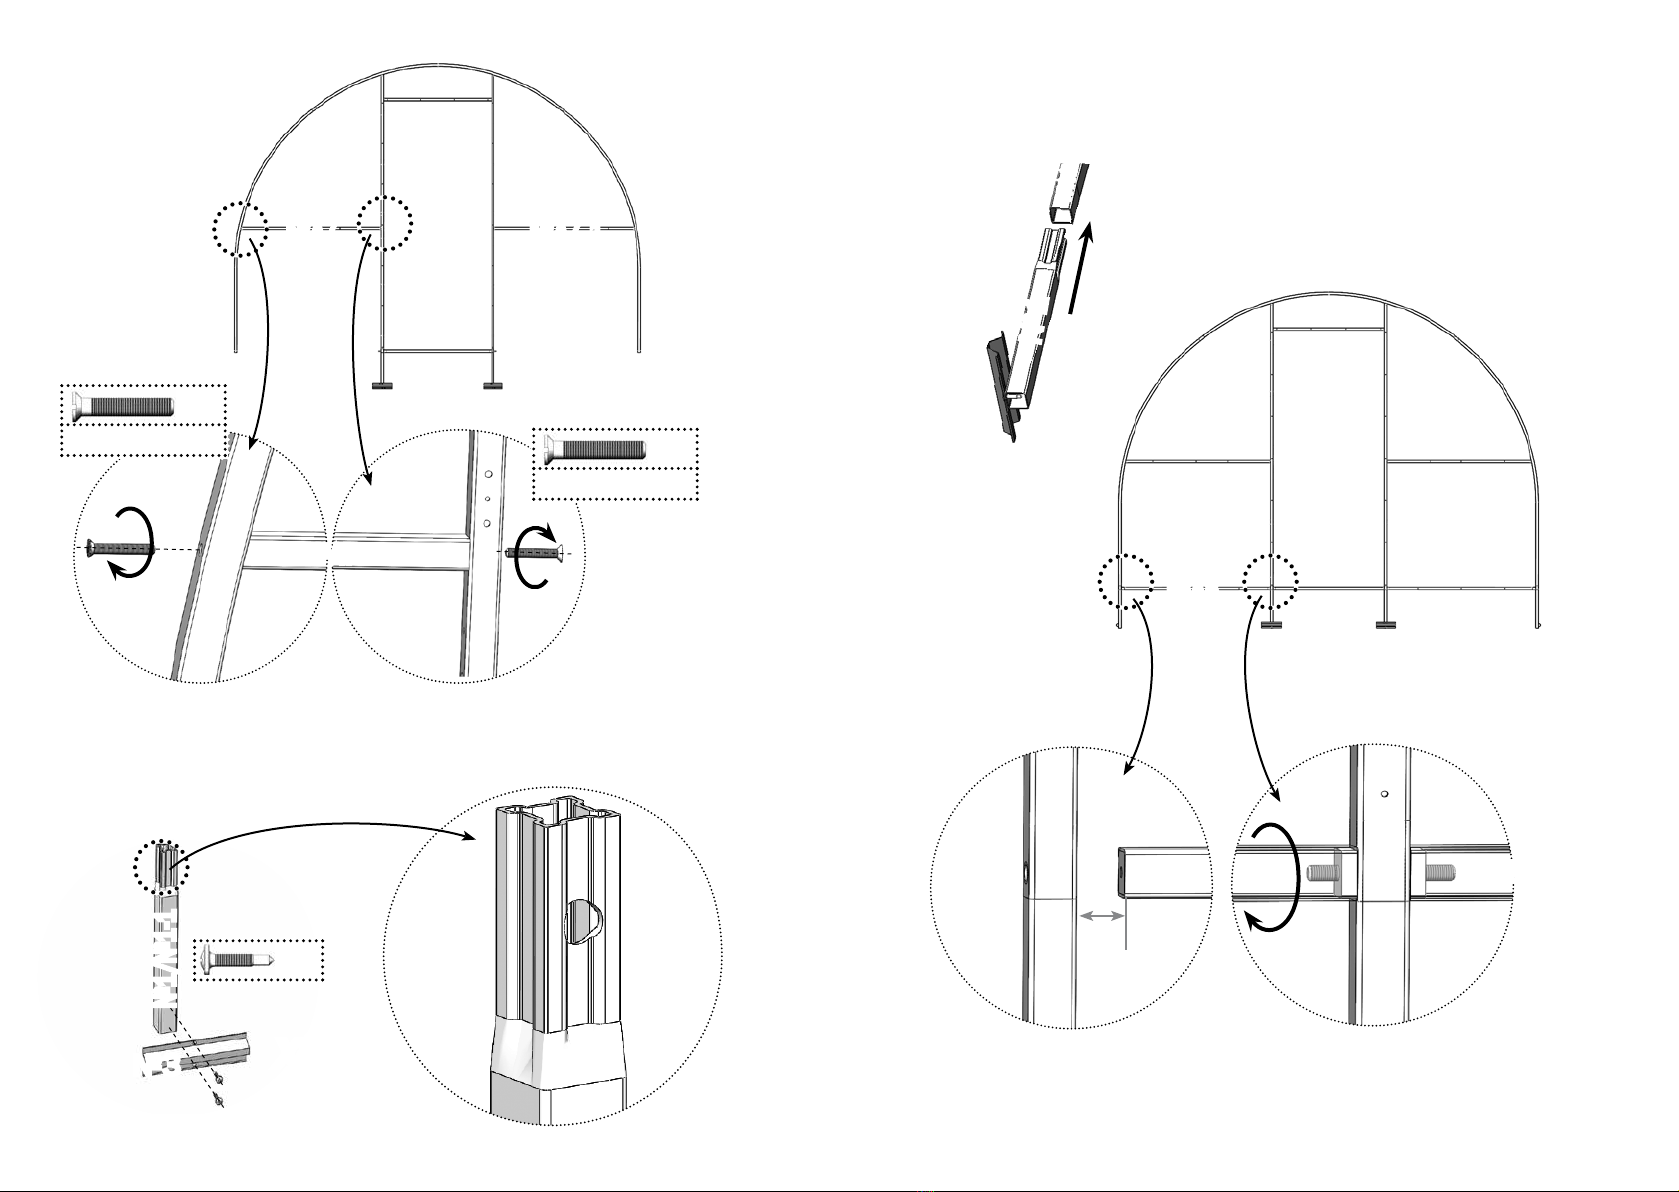
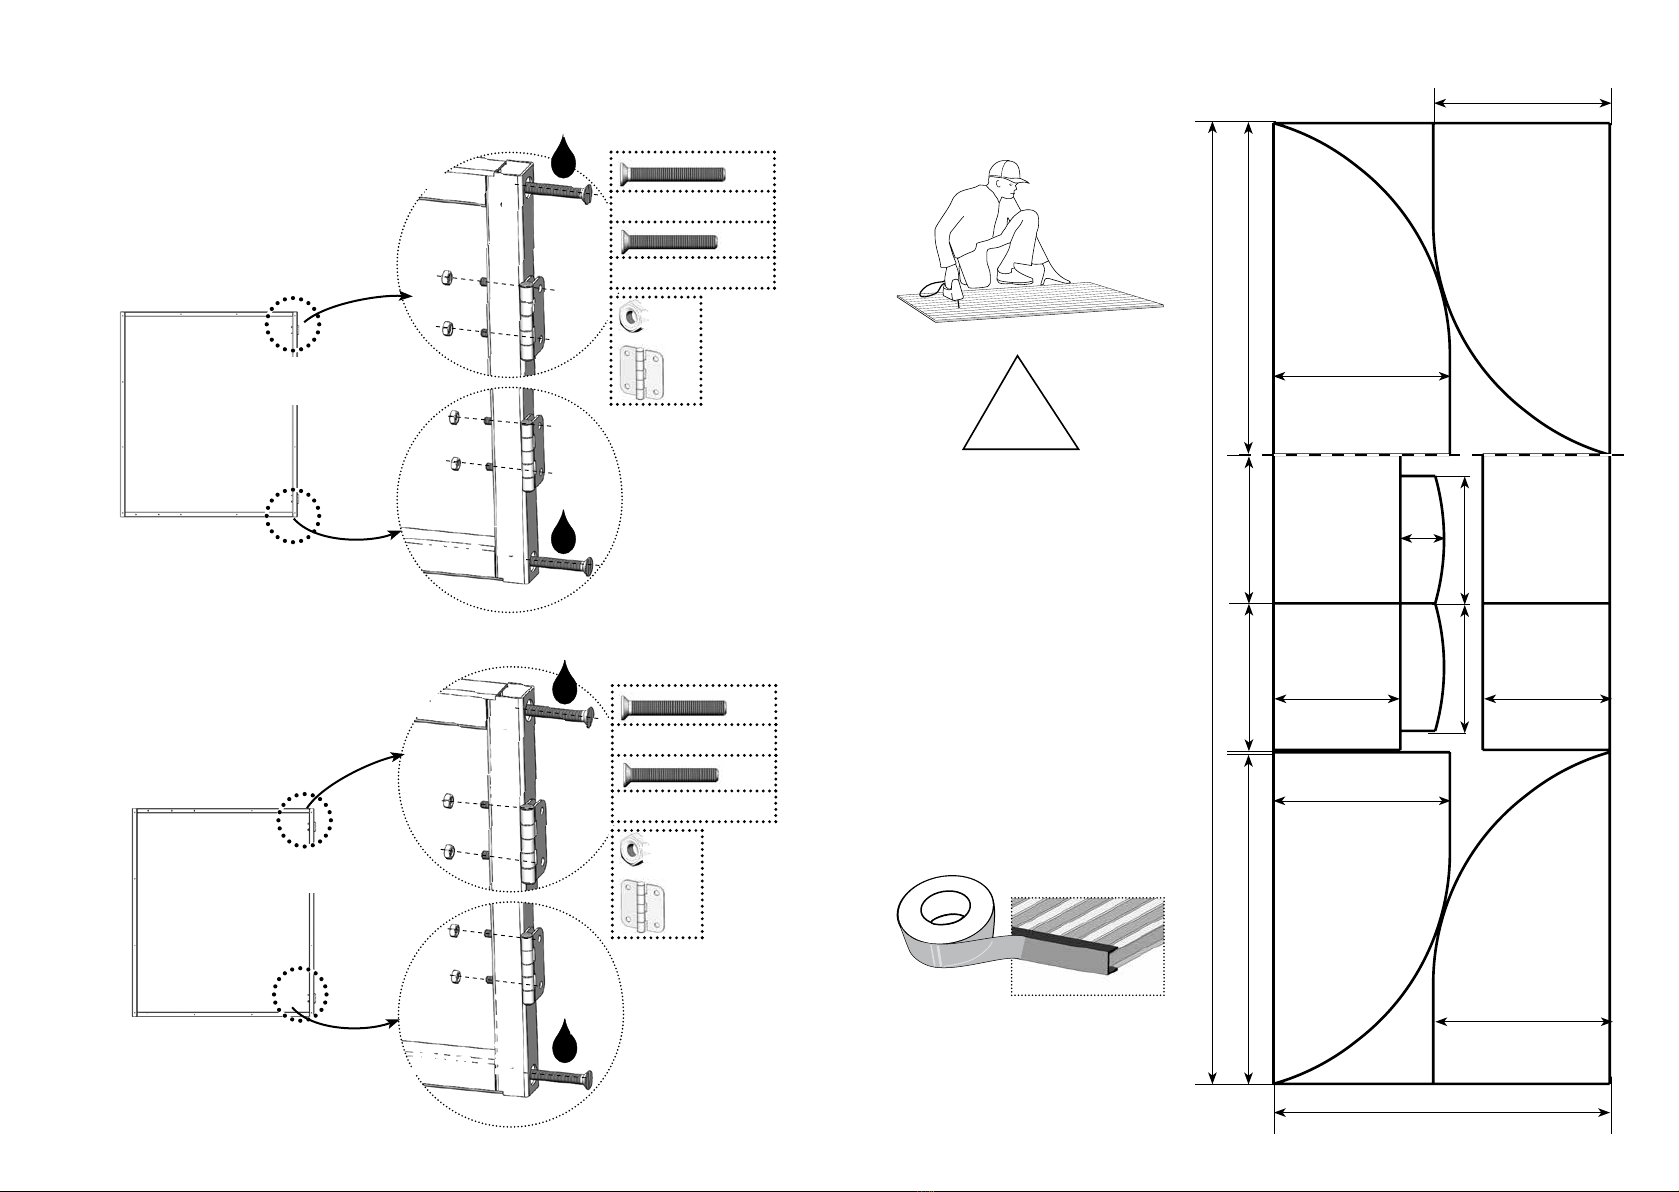
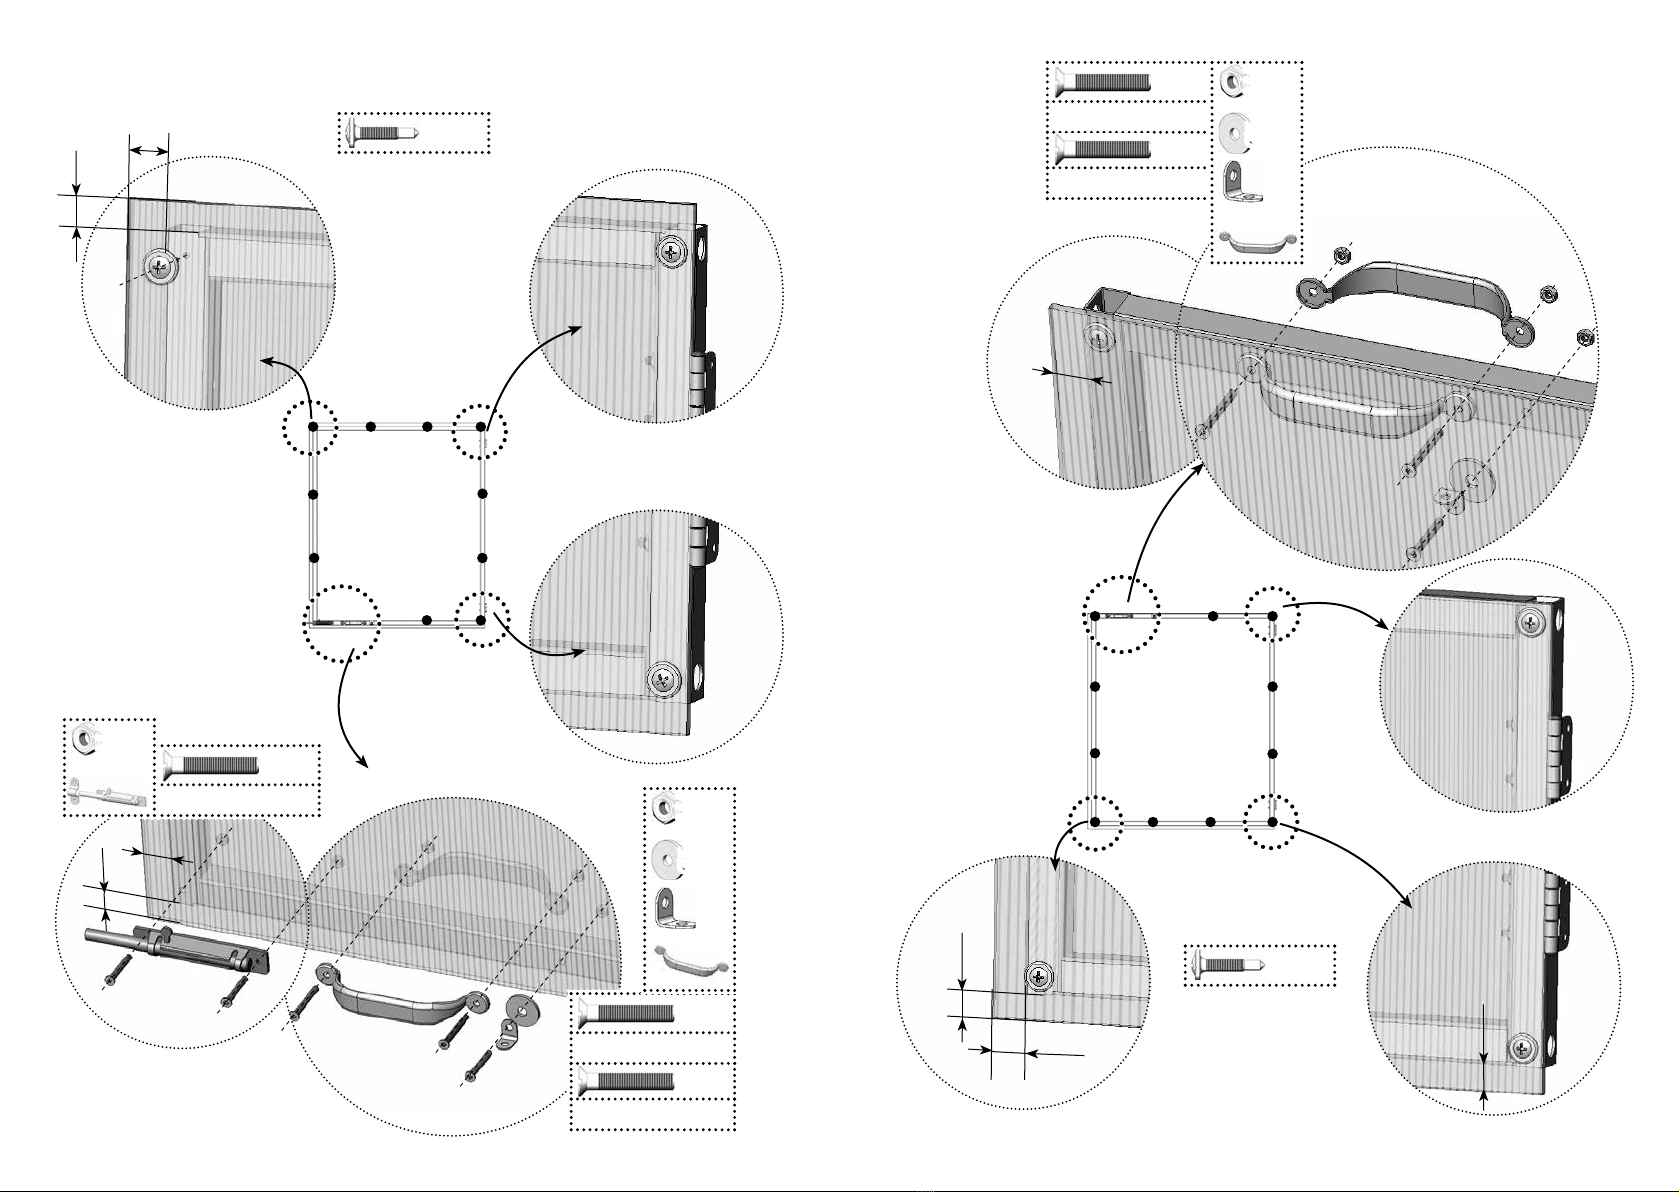
Greenhouse frame is made of galvanized steel tubes. Assembly is carried out using pins, screws
and nuts. Supply scope includes all the parts required to fix the cladding. Screws for polycarbonate
fixing must be tightened with minimal torque set on screwdriver. Greenhouse cladding can be
included in supply scope at the customer’s request. Basic set requires 2 6,88х19,68ft polycarbonate
sheets of 0,013 ft thickness. Each insert requires one 6,88х19,68ft polycarbonate sheet of 0,013
ft thickness.
if necessary, cladding can be disassembled in the reverse order.
longitudinal stiffness of the greenhouse is provided by fixed polycarbonate. This should be
considered at the frame assembling.
Cleaning and washing of the polycarbonate sheets.
1. Rinse the sheet with warm water.
2. wash the sheet with a solution of mild soap or household detergent and warm water, using
a soft cloth or sponge to remove dirt.
3. Rinse with cold water and wipe with a soft cloth.
Never use abrasives or highly alkaline cleaning compositions for cleaning polycarbonate
sheets. Dry rubbing of the surface will damage the protective layer of the cladding and shorten
its shelf life. Never rub the surface of polycarbonate sheets with brushes, metallic cloth or
other abrasive materials.
when disinfecting the greenhouse from pathogens causing fungal and bacterial diseases,
do not use «sulfur blocks» to avoid frame corrosion (blackening).
№В4В Upper arc (25х25)
х 1
№В4Н Lower arc (25х25)
х 2
№В4НК Lower outer arc (25х25)
х 4
№В4ВК Upper outer arc (25х25)
х 2
№1-1 Leg L=0,98 ft (25х25)
х 6
№1 Leg L=0,98 ft (20х20)
х 4
№А2 Span L=6,88 ft (20х20)
х 5
№А9
Door opening pole
L=6,72 ft (20х20
)
х 2
№А9-1
Door opening pole
L=6,72 ft (20х20
)
х 2
№А10 Door opening horizonta
L=2,62 ft (20х20)
х 2
№А10-1 Door opening horizonta
L=2,62 ft (20х20)
х 2
Hook
х 2
1 BOX BASE
5
4
№А7 Side wall tie bar
L=3,37 ft (20х20)
х 2
№А7-1 Side wall tie bar
L=3,37 ft (20х20)
х 2
№А8 Side wall horizontal
L=3,41 ft (20х20)
х 4
№А11 Vent window
L=2,95 ft (20х20)
х2
№А11-1 Vent window
L=2,95 ft (20х20)
х6
№А12 Vent window horizontal
L=2,46 ft (20х20)
х 2
№А12-1 Vent window horizontal
L=2,46 ft (20х20)
х 4
№А12-2 Vent window horizontal
L=2,46 ft (20х20)
х 2
Hook bracket
х 6
hinge
х 8
Magnet bracket
х 4
Magnet
х 4
Handle
х 8
Overlay door bolt
х 2
Duct tape
х 1
1 BOX BASE
Screw M3х14 х 4
Screw M4х30 х 57
Screw M4х35 х 9
Screw M6х45 х 32
Screw M6х55 х 15
Screw M6х60 х 4
Pin
M6х55 х 4
Self tapper 4,2х16 х 130
Self tapper 4,8х25 х 90
nut M4 х 4
nut M4 х 70
nutа M6 х 15
washer х 8
№3 Support
х 10
№В13 Insertion (25х25)
х 4
Ø3Ø4
Ø6
Ø5
7
6
№А2-1 Span L=6,88 ft (20х20)
х 5
№1-1 Leg L=0,98 ft (25х25)
х 4
№В4В Upper arc (25х25)
х 2
№В4Н Lower arc (25х25)
х 4
№3 Support
х4
№В13 Insertion (25х25)
х 4
Screw M6х55 х 14
Nut M6 х 14
Self tapper 4,2х16 х 12
Self tapper 4,8х25 х 28
Ø6
1 BOX INSERT
1
2
х2
х1
№В4В №В4Н
№В4НК
№В4НК
№В4ВК
№В4ВК
№
В
4
Н
К
№
В
4
Н
К
/
№
В
4
Н
№
В
4
В
К
№
В
4
В
№
В
4
Н
M6х55
M6х55 х1
M6х55
х1
M6х55
х1
9
8
3
х4
№3
№1/№1-1
4
№А9
№А9-1
х2
№В4ВК
№А9
№В4ВК
№А9-1
M6х45
х1
M6х45
х1
х2
№1
5
№1
№А9
№А10-1
№1
M6х55
х1
№А9-1
№А10-1
№1
M6х55
х1
№А9
№А10
№А9
№А10
M6х45
х1
M6х45
х1
№А9
№А9-1
х2
№А10-1
№А10
11
10
6
№А7-1№А7
№В4НК
M6х45
х1
х6
№3
№1/№1-1
7
х2
M6х45
х1
№А7
№А9
8
№1
№А8№А8
№А8
№1
№А10-1
№В4НК
№А4НК/В4НК
№А8
13
12
9
№А2
№А2
№А2
№А2
№А2
№А2
№А2
№В4ВК
№В4В
M6х55
х1
M6х55
х1
№А2
№А8
№В4НК
№1-1
M6х60
х1
х1
Ø6
х1
Ø6
х1
Ø6
M6х55
х1
10
6,75 ft
BASE
11
M6х55
х1
M6
х1
х1
15
14
13,51/ 20,27/ 27,03 ft 6,75 ft
BASE EXTENSION WITH
INSERTS
11-А
M6х55
х1
х1
Ø6
12
L1=L2
!
L2
L1
13 х1
х1
M4х30
M3х14
х2
х1
х2
х1
M4M3
17
16
№А11-1 №А11-1
№А12-2
14
х2
№А12-1
№А12-2
№А11-1
№А11-1
№А12-1
thread lock or
paint
thread lock or
paint
В
M6х45
M4х30
х2
х4
х4
M4
х2
16
Cellular polycarbonate shall be
installed strictly defined side out
(towards the sun), which has a
protective layer. The protective
layer is usually at the side with
the inscriptions on the transport
film. The film on the other side of
sheet is transparent. After marking
the sheet, but prior to its cutting,
make a mark on the protected side
of the sheet for each piece: after
removal of the transport film sheet
sides are not visually different. The
transport film is stripped from both
sides immediately before fixing the
cladding on the frame.
Polycarbonate edges with open cells
shall be covered with a duct tape.
!
3,63
3,63
3,63
3,63
0,89
2,60
6,88
2,60
6,81
19,68
6,81
3,01
2,612,61
3,01
№А11-1
№А12
№А11-1
№А12-1
х2
№А12-1
№А12
№А11
№А11-1
thread lock or
paint
А
M6х45
M4х30
х2
х4
х4
M4
х2
thread lock or
paint
19
18
0,049 ft
0,042 ft
17
х2
А
M4х30
х2
х10
х2
M4
х1
M4х30
M4х35
х1
х2
х3
M4
х1
Ø5
х1
х2
0,049 ft
0,042 ft
18
0,049 ft
0,042 ft
х2
В
M4х30
M4х35
х1
х2
х3
M4
х1
Ø5
х1
х2
х11
0,042 ft
0,049 ft
21
20
х2
№11-1
№9-1
19
20
C
C
D
D
В
A

х8
Ø4
M4х30
х8 21
х2


M4х30
х1
M4х30
х1
х1
х1
х22
х28
х1
х1
х1
х1
Ø4
Ø4
23
22
22
х2


х21 х2
24
EN

Popular Greenhouse Kit manuals by other brands

Palram Applications BeIIa 8x8 instructions

Palram Applications

Palram Applications BeIIa 8x8 instructions

VOLYA DACHNAYA-STRELKA 2011 Assembly manual

VOLYA

VOLYA DACHNAYA-STRELKA 2011 Assembly manual

Dancover ARROW 2,6 manual

Dancover

Dancover ARROW 2,6 manual

ACD R205 Retro manual

ACD

ACD R205 Retro manual

Velcom CAMELLIA R Technical manual

Velcom

Velcom CAMELLIA R Technical manual

Dancover STRONG 3x4 m manual

Dancover

Dancover STRONG 3x4 m manual

Promex Mainau Assembly instruction

Promex

Promex Mainau Assembly instruction

GrowSpan 113170 manual

GrowSpan

GrowSpan 113170 manual

ClearSpan R020B00001 manual

ClearSpan

ClearSpan R020B00001 manual

Palram Snap&Grow Assembly instructions

Palram

Palram Snap&Grow Assembly instructions

Juliana Veranda Assembly instruction

Juliana

Juliana Veranda Assembly instruction

Eden Blockley manual

Eden

Eden Blockley manual

Sproutwell Small Circle Assembly instructions

Sproutwell

Sproutwell Small Circle Assembly instructions

Halls QUBE 66 manual

Halls

Halls QUBE 66 manual

GrowSpan Twist-of-the-Wrist Assembly instructions

GrowSpan

GrowSpan Twist-of-the-Wrist Assembly instructions

harvst Terrace manual

harvst

harvst Terrace manual

ACD Serranova 24 manual

ACD

ACD Serranova 24 manual

Royal Well Slim kweken Viola manual

Royal Well

Royal Well Slim kweken Viola manual

manuals.online logo
manuals.online logoBrands
  • About & Mission
  • Contact us
  • Privacy Policy
  • Terms and Conditions

Copyright 2025 Manuals.Online. All Rights Reserved.