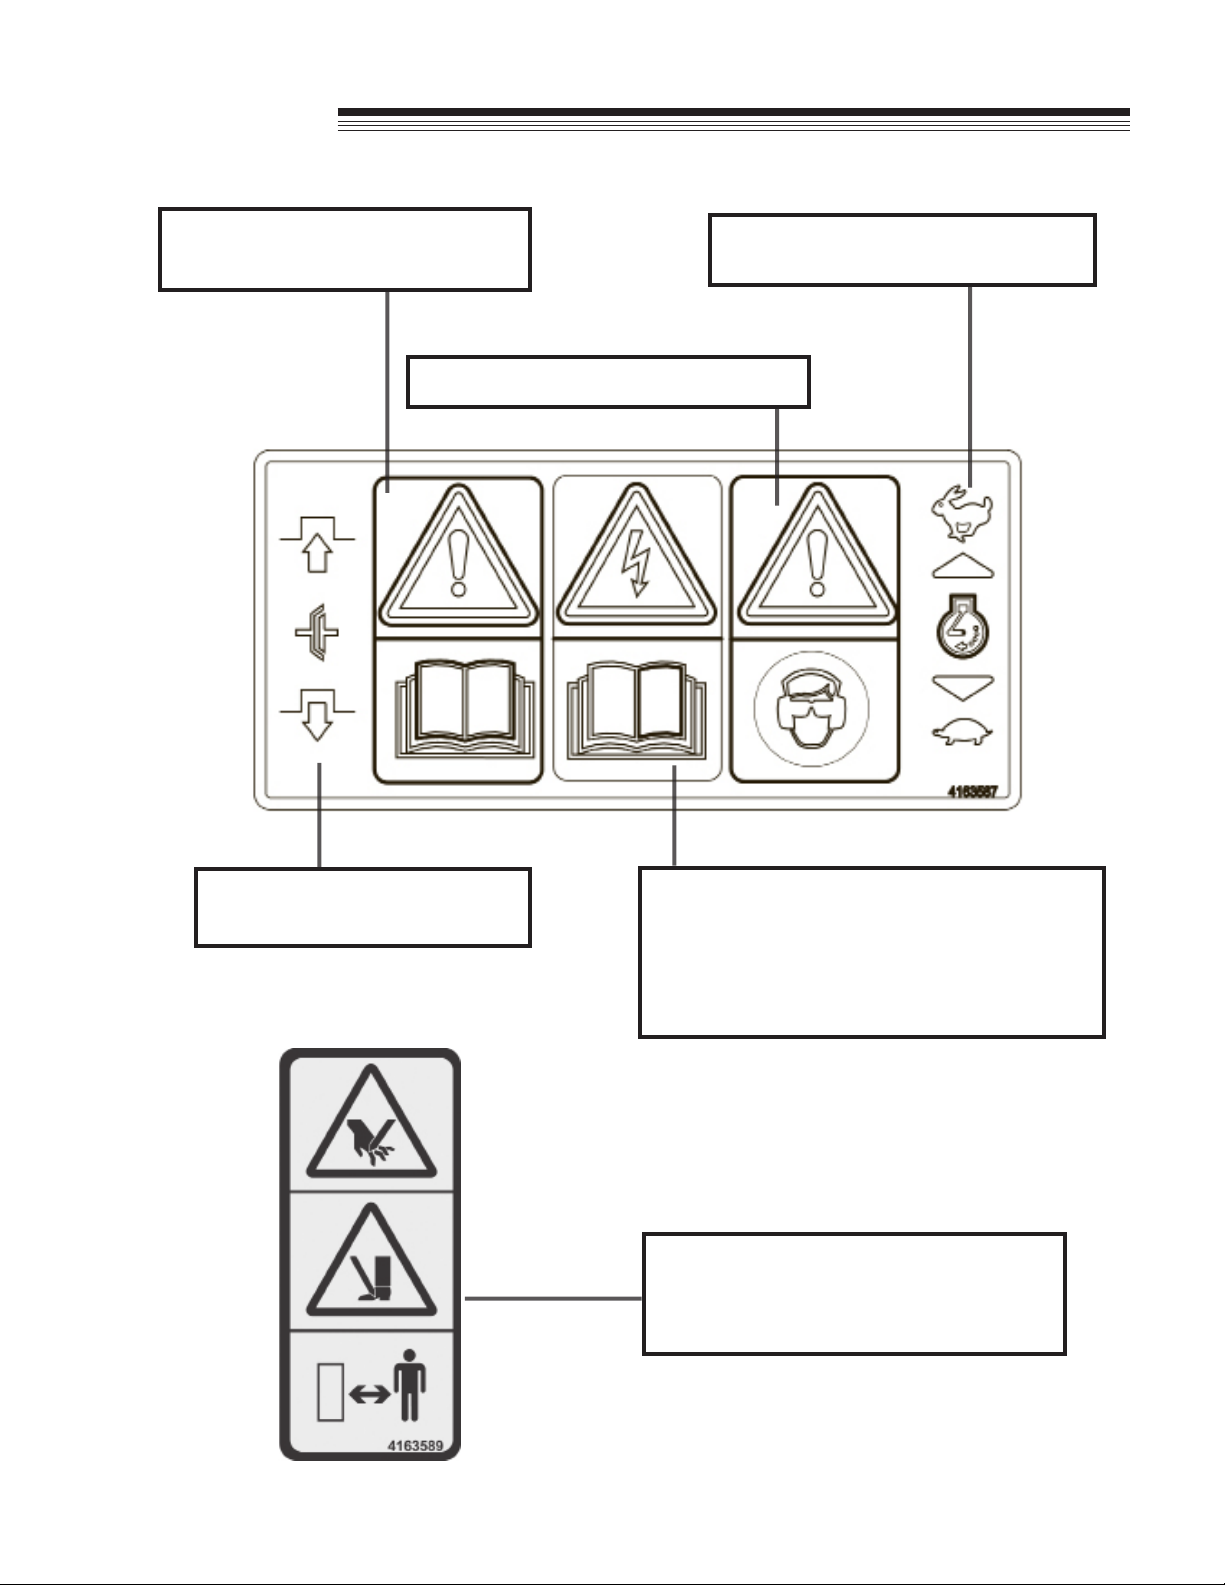
ryan JR SODCUTTER 744844G User manual

BEDIENUNGS-HANDBUCH
MAN 4164644-DE
Rev. A 01-2010
Übersetzung der Originalanleitung
Ersatzteilhandbuch 4164645
HANDGEFÜHRTER SODENSCHNEIDER MIT SELBSTANTRIEB
744844G
JR SODCUTTER 6,5 PS B&S 302 mm
744845G
JR SODCUTTER 6,5 PS B&S 457 mm
744944C
JR SODCUTTER 5,5 PS HONDA 302 mm
744945C
JR SODCUTTER 5,5 PS HONDA 457 mm

CALIFORNIA
Proposition 65 Warning
Diesel engine exhaust and some
of its constituents are known to the
State of California to cause cancer,
birth defects and other reproductive
harm.
WARNING
The engine exhaust from this product
contains chemicals known to the State
of California to cause cancer, birth
defects or other reproductive harm.
CALIFORNIA
Proposition 65 Warning
Battery posts, terminals, wiring
insulation, and related accessories
contain lead and lead compounds,
chemicals known to the State of
California to cause cancer and birth
defects or other reproductive harm.
WASH HANDS AFTER HANDLING.

1
Jr.
Sodcutter
01-2010
IMPORTANT MESSAGE
Thank you for purchasing this Schiller Grounds Care, Inc. product. You have purchased a world class product,
one of the best designed and built anywhere.
This machine comes with an Operation and Safety Manual and Parts/Service Manual. The useful life and good
service you receive from this machine depends to a large extent on how well you read and understand this
manual. Treat your machine properly, lubricate and adjust it as instructed, and it will give you many years of
reliable service.
Your safe use of this Schiller Grounds Care, Inc. product is one of our prime design objectives. Many safety
features are built in, but we also rely on your good sense and care to achieve accident-free operation. For best
protection, study the manual thoroughly. Learn the proper operation of all controls. Observe all safety precau-
tions. Follow all instructions and warnings completely. Do not remove or defeat any safety features. Make sure
those who operate this machine are as well informed and careful in its use as you are.
See a Schiller Grounds Care, Inc. dealer for any service or parts needed. Schiller Grounds Care, Inc. service
ensures that you continue to receive the best results possible from Schiller Grounds Care, Inc. products. You
can trust Schiller Grounds Care, Inc. replacement parts because they are manufactured with the same high
precision and quality as the original parts.
Schiller Grounds Care, Inc. designs and builds its equipment to serve many years in a safe and productive man-
ner. For longest life, use this machine only as directed in the manual, keep it in good repair and follow safety
warnings and instructions. You'll always be glad you did.
Schiller Grounds Care, Inc.
One Bob Cat Lane
Johnson Creek, WI 53038-0469
TABLE OF CONTENTS.............................................................................................. PAGE
SAFETY.........................................................................................................................................................2-6
LABELS........................................................................................................................................................7, 8
CONTROLS......................................................................................................................................................9
OPERATION............................................................................................................................................. 10, 11
ADJUSTMENTS........................................................................................................................................12-14
MAINTENANCE/SERVICE........................................................................................................................15-16
STORAGE......................................................................................................................................................17
TROUBLESHOOTING ...................................................................................................................................18
SPECIFICATIONS..........................................................................................................................................19
EC DECLARATIONS OF CONFORMITY.................................................................................................20, 21
Original Language Instructions
See Manual 4164645 for Parts Information

2
Jr.
Sodcutter
MODEL NUMBER: This number appears on
sales literature, technical manuals and price lists.
SERIAL NUMBER: This number appears only
on your mower. It contains the model number
followed consecutively by the serial number.
Use this number when ordering parts or seeking
warranty information.
SAFETY
NOTICE !!!
Unauthorized modications may present extreme
safety hazards to operators and bystanders and
could also result in product damage.
Schiller Grounds Care, Inc. strongly warns against,
rejects and disclaims any modications, add-on
accessories or product alterations that are not
designed,developed,testedandapprovedbySchiller
Grounds Care, Inc. Engineering Department. Any
Schiller Grounds Care, Inc. product that is altered,
modied or changed in any manner not specically
authorized after original manufacture–including the
addition of “after-market” accessories or component
parts not specically approved by Schiller Grounds
Care, Inc. will result in the Schiller Grounds Care,
Inc. Warranty being voided.
Any and all liability for personal injury and/or
property damage caused by any unauthorized
modications, add-on accessories or products not
approved by Schiller Grounds Care, Inc. will be
considered the responsibility of the individual(s) or
company designing and/or making such changes.
Schiller Grounds Care, Inc. will vigorously pursue
full indemnification and costs from any party
responsiblefor such unauthorized post-manufacture
modications and/or accessories should personal
injury and/or property damage result.
This symbol means:
ATTENTION!
BECOME ALERT!
Your safety and the safety of others is involved.
Signal word denitions:
The signal words below are used to identify levels
of hazard seriousness. These words appear in this
manual and on the safety labels attached to Schiller
Grounds Care, Inc. machines. For your safety and
the safety of others, read and follow the information
given with these signal words and/or the symbol
shown above.
DANGER indicates a hazardous situation which,
if not avoided, WILL result in death or serious
injury.
WARNING indicates a hazardous situation which,
if not avoided, COULD result in death or serious
injury.
CAUTION indicates a hazardous situation which,
if not avoided, COULD result in minor or moderate
injury. It may also be used to alert against unsafe
practices or property damage.
CAUTION used without the safety alert symbol
indicates a potentially hazardous situation which, if
not avoided, MAY result in property damage.

3
Jr.
Sodcutter
SITE PREPARATION AND CIRCUMSTANCES
– Evaluate the terrain to determine how to safely
perform the job. Only use accessories and
attachments approved by the manufacturer.
– Clear the area to be cut of objects such as rocks,
toys, wire or other debris that may be thrown or
get tangled in the sod cutter.
– Be sure the area is clear of pets and people,
especially young children. Never assume they
will remain where you last saw them. Stop the
machine if any enter the area.
– Cut sod only in daylight or in good articial light.
MACHINE PREPARATION
Operator preparation and training
Read the Operation & Safety
Manual
– If an operator or mechanic
cannot read English, it is
the owner's responsibility
to explain this material to
them. If any portion of this
material is unclear, contact
your factory representative
for clarication.
– Become familiar with the safe operation of the
equipment, operator controls and safety signs.
Be prepared to stop the engine quickly in an
emergency. Do not operate or allow another
person to operate this machine if there are any
questions about safety.
– All operators and mechanics should be trained.
The owner is responsible for training the users.
– Wear appropriate clothing, including safety
goggles or safety glasses with side shields when
operating. Wear substantial footwear. Do not
operate barefoot or wearing open sandals. Long
hair, loose clothing or jewelry may get tangled in
moving parts.
– Wear appropriate hearing protection.
– Wear safety glasses.
– Never allow children, unskilled or improperly
trained people to operate this equipment. Local
regulations can restrict the age of the operator.
– Keep warning labels and this operator's manual
legible and intact. Replacement labels and
manuals are available from the factory.
– Do not operate machine while under the
inuence of drugs or alcohol, or any other
condition of impairment.
– The owner/user can prevent and is responsible
for accidents or injuries occurring to themselves,
other people or property.
SAFETY
MACHINE PREPARATION
– Check operator presence interlock system. Ad-
just or have any problems repaired before using.
– Do not tamper with or defeat safety devices.
Keep guards, shields and interlock safety devices
in place and in proper working condition. They
are for your protection.
– Keep all fasteners such as nuts, bolts and pins
well secured.
– Visually inspect blade and blade bolts for wear or
damage. Replace worn or damaged blades and
bolts.
– Verify that machine and attachments, if any, are
in good operating condition.
– Do not engage blade until ready to cut sod.

4
Jr.
Sodcutter
OPERATING SAFELY
IN GENERAL
– Use extra care when loading or unloading the
machine into a trailer or truck.
– Use caution when making turns and crossing
roads and sidewalks. Stop blade when not
cutting sod.
– Do not run the engine in an enclosed area where
dangerous carbon monoxide fumes can collect.
– Never leave a running machine unattended.
Always turn off blade and stop engine when
leaving the operator position. When leaving
the machine be sure the wheel drive clutch is
engaged.
– Use extreme caution when reversing or pulling
machine towards you.
– Stop operation if someone approaches.
– Never leave a running machine unattended.
Always disengage drive, and stop engine.
STARTING
– Start according to instructions in this manual or
on the machine.
– Before attempting to start the engine, make sure
the master clutch is disengaged.
_ When starting the engine, make sure hands and
feet are clear of the blade.
– Do not change engine governor settings or
overspeed the engine. Operating the engine
at excessive speed can increase the hazard of
personal injury.
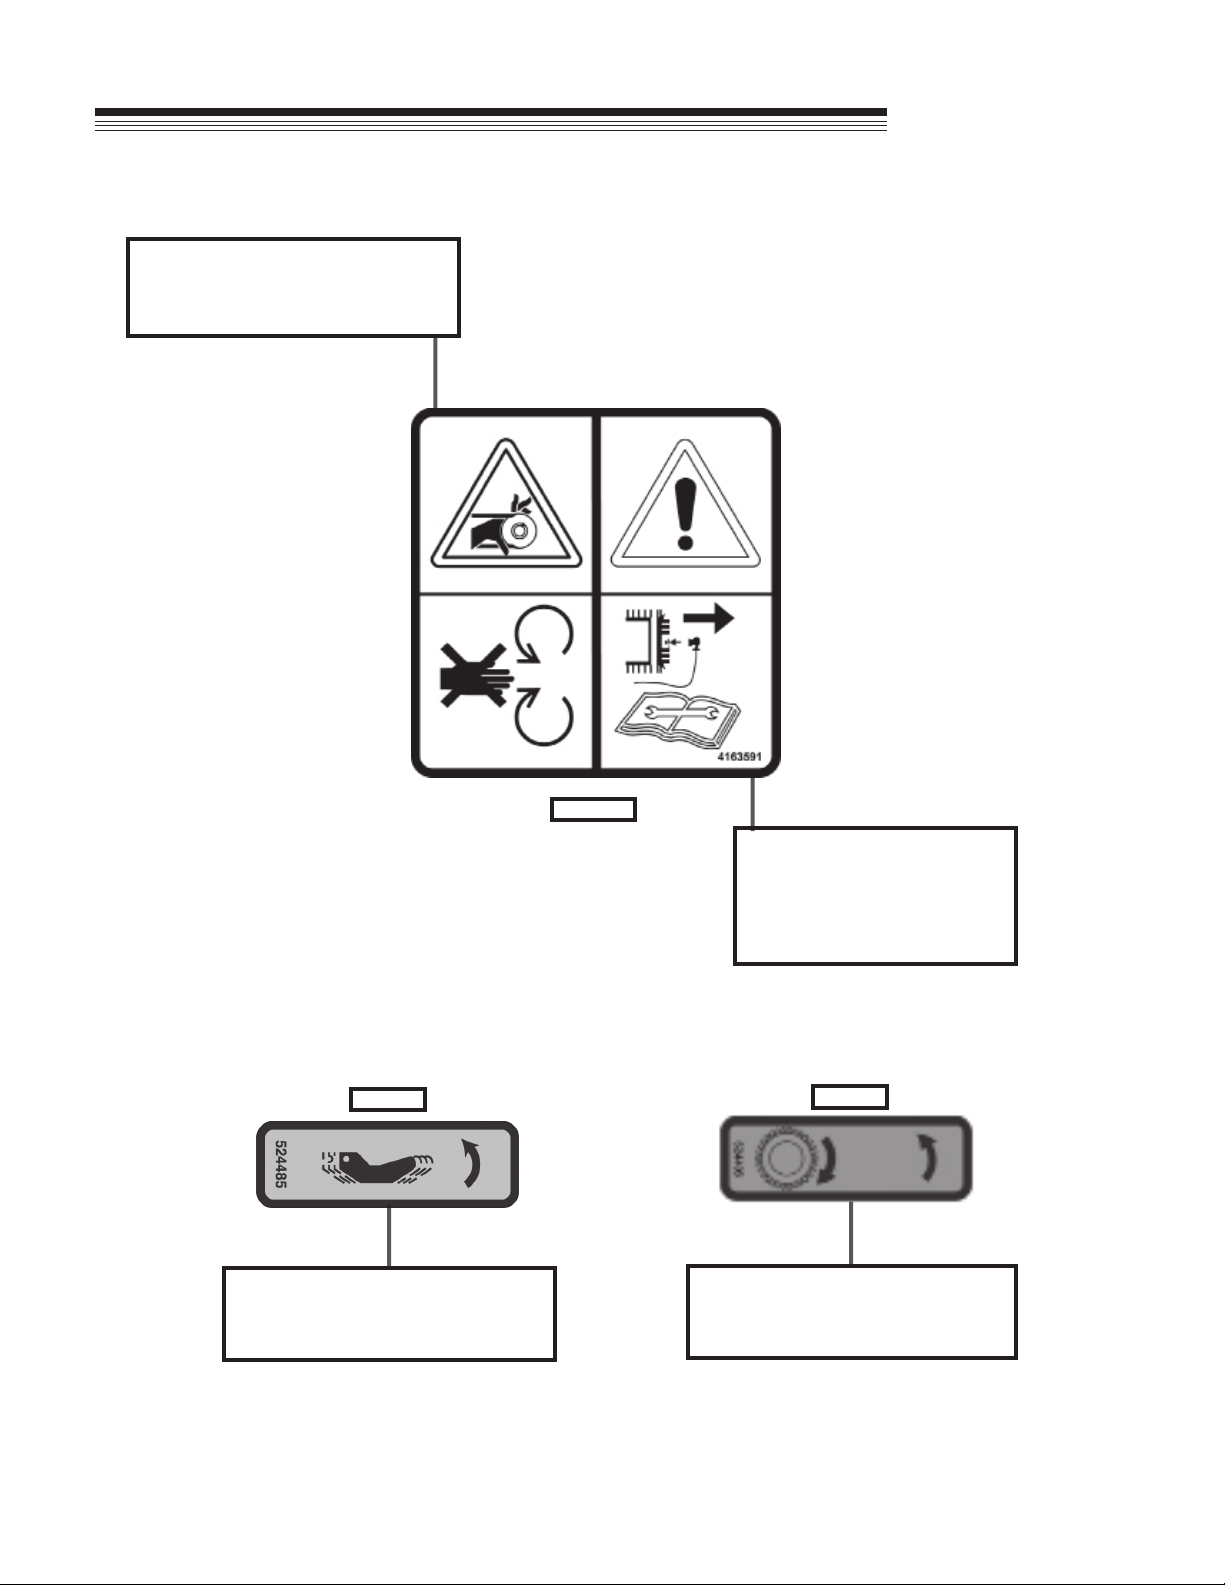
INTERRUPTING OPERATION
- Before leaving the operator's position:
- Park on level ground.
- Disengage the master clutch.
- Shut off the engine.
- Disengage the master clutch and wait until the
blade stops moving then disengage the blade
clutch:.
- when not cutting sod;
- for transport;
- when crossing surfaces other than grass.
- Disengage the master clutch, stop the engine,
and wait until the blade stops moving:
- before refueling;
- before making blade adjustment .
- Disengage the master clutch, stop the engine,
and disconnect the spark plug wire(s):
- before clearing blockages;
- before checking, cleaning or working on the
machine;
- after striking a foreign object. Inspect the
machine for damage and have repairs made
before restarting;
- if the machine begins to vibrate abnormally:
shut off machine immediately. Inspect
and have repairs made as needed before
restarting;
- except for repairs or adjustments as specically
noted, such as for carburetor adjustment,
where the engine must be running. Keep
hands and feet clear of moving parts in these
circumstances.
- Allow the blade to come to a complete stop when
stopping operation to clear blockages, unclog,
inspect the machine, do maintenance or repair.
- Reduce the throttle setting during engine shut-
down and, if the engine is provided with a shut-
off valve, turn the fuel off at the conclusion of
operation.
SAFETY
OPERATING ON SLOPES
- Slopes are a major factor in loss of control and tip
over accidents that sometimes lead to severe injury
or death. All slopes require extra caution.
- Before operating on slopes, evaluate the risks
involved.
- Do not operate on slopes if uneasy or uncertain.
Ultimate responsibility for safe operation on slopes
rests with the operator.
- Do not operate on steep slopes.
- Keep all movement on slopes slow and gradual.
- Do not cut sod near drop-offs, ditches or embank-
ments. The machine could suddenly turn over if a
wheel runs over the edge or an edge caves in.
- Do not turn on slopes unless necessary, and then
turn slowly and downhill when possible.
- Be sure of your footing on slopes.
- With walk behind machines, operate across slopes,
not up and down.
- Avoid starting or stopping on a slope. If wheels lose
traction, disengage the cutter blade and proceed
straight down the slope.

5
Jr.
Sodcutter
Fuel
- Petrol (gasoline) and
diesel fuels are ammable;
petrol (gasoline) vapors
are explosive. Use extra
care when handling.
- Store only in containers
specically designed for fuel.
- When refueling or checking fuel level:
- Stop the engine and allow to cool;
- Do not smoke;
- Refuel outdoors only;
- Use a funnel;
- Do not overll;
- If fuel is spilled, do not attempt to start the
engine until the spill is cleaned up and vapors
have cleared.
- Replace caps on fuel containers and tanks
securely.
Sparks from static electricity can start res or cause
explosions. Flowing fuel can generate static electric-
ity. To prevent static electricity sparks:
- Keep fuel containers electrically grounded. Do
not ll containers in a vehicle or on a truck or
trailer bed with a plastic liner. Fill containers on
the ground away from the vehicle.
- When practical, remove petrol (gas) powered
equipment from the truck or trailer and refuel it on
the ground. If equipment must be refueled on the
truck or trailer, refuel from a portable container
rather than a dispenser nozzle.
- Keep the dispenser nozzle in contact with the rim
of the fuel tank or container opening until fueling
is complete. Do not use a nozzle lock-open
device.
SAFETY
MAINTENANCE SAFETY
In general
- Maintain machine according to manufacturer's
schedule and instructions for maximum safety
and best results.
- Park machine on level ground.
- Never allow untrained personnel to service ma-
chine.
- Guards should only be removed by qualied
maintenance technician for maintenance/service.
Replace when work is complete.
- Adjust or repair only after the engine has been
stopped and the blade has stopped moving.
- Disconnect spark plug wire(s) before doing any
maintenance.
- Replace parts if worn, damaged or faulty.
For best results, always replace with parts
recommended by the manufacturer.
- Do not dismantle the machine without releasing
or restraining forces which may cause parts to
move suddenly.
- Provide adequate support, e.g. jack stands for
lifted machine or parts if working beneath.
- Do not put hands or feet near or under rotating
parts.
- Clean up spilled oil or fuel thoroughly.
- Replace faulty mufers.
- To reduce re hazards, keep the engine, muf-
er, and fuel storage area free of grass, leaves,
debris buildup or grease.
Blades
The sod cutter blade is sharp
and can cut. Use extra cau-
tion when handling. Remove
obstructions with care. Wrap
the blade or wear gloves.
- Only replace blade. Never
straighten or weld.
- Keep other persons away from blades.
WARNING
WARNING

6
Jr.
Sodcutter
SAFETY
STORAGE SAFETY
- Stop the engine and allow to cool before storing.
- Drain the fuel tank outdoors only.
- Store fuel in an approved container in a cool, dry place.
- Keep the machine and fuel containers in a locked storage place to prevent tampering and to keep children
from playing with them.
- Do not store the machine or fuel container near heating appliances with an open ame, such as a water
heater, or an appliance with a pilot light.
- Keep petrol (gasoline) storage area free of grass, leaves and excessive grease to reduce re hazard.
- Clean grass and debris from cutting units, drives, mufers and engine to help prevent res.

7
Jr.
Sodcutter
LABELS
ATTENTION:
Read and understand Operator Manual.
Replace manual if lost or damaged.
ATTENTION:
Wear hearing protection and safety glasses.
ENGINE THROTTLE CONTROL:
Move forward to increase engine speed.
Move rearward to decrease engine speed.
MASTER CLUTCH:
Move lever forward to engage.
Move lever rearward to disengage.
UNDERGROUND UTILITY HAZARD:
Contacting underground utilities may cause leaks,
explosions or electrocutions.
-Check operation area for underground utilities
such as electrical, gas, and water lines.
-Do not operate where underground utilities are
present.
Moving blades/blade arms cut/crush Hazard
Stay clear of blade/blade arms while operating.
Stop engine before servicing or adjusting.

8
Jr.
Sodcutter
LABELS
ROTATING PARTS:
Entanglement / Amputation Hazard
Do not operate with cover removed.
Stop engine before servicing.
ATTENTION:
-Read Operator Manual before
servicing or repairing.
-Remove spark plug wire be-
fore servicing or repairing.
4163591
524485
Rotate lever counter clockwise to
engage sodcutter blade drive.
Rotate lever clockwise to disengage
sodcutter blade drive.
524486
Rotate lever counter clockwise to
engage wheel drive.
Rotate lever clockwise to disengage
wheel drive.

9
Jr.
Sodcutter
CONTROLS
MASTER CLUTCH CONTROL LEVER(A)
Engages / disengages drive belt. Applies brake
to drive belt when pulled FIRMLY to rear.
THROTTLE CONTROL (B)
Controls engine speed.
ENGINE SWITCH
(Located on the engine)
Move to "ON" position to start engine. Move to
"OFF" position to stop the engine.
OPERATOR PRESENCE CONTROL (C)
With master clutch control engaged, engine will
stop if operator presence lever is not depressed.
BLADE DEPTH CONTROL LEVER (D)
Raises or lowers cutting blade.
BLADE DEPTH CONTROL LOCKING LEVER (E)
Locking lever holds blade depth control in
desired position.
BLADE ANGLE LOCKING LEVER (F)
Locks blade angle.
DEPTH STOP (G)
Allows resetting of blade depth to the previous
cutting height.
BLADE AND WHEEL SHIFTER HANDLES (H & J)
Engage and disengage blade for cutting and
gears for driving Sodcutter.
CASTER WHEEL LOCKING LEVER (K)
Allows for straight cutting when locked (down)
and curved cutting when unlocked (up).

10
Jr.
Sodcutter
OPERATION
PRE-OPERATION CHECK LIST
(OPERATOR'S RESPONSIBILITY)
- Review and follow all safety rules and safety
decal instructions.
- Check that all safety decals are installed and in
good condition. Replace if damaged.
- Check to make sure all shields and guards are
properly installed and in good condition.
- Check that all hardware is properly installed and
secured.
- Check to be sure engine is free of dirt and
debris. Pay particular attention to the cooling
ns, governor parts and mufer. Clean air intake
screen. Check air cleaner; service is necessary.
- Inspect area. Remove stones or other hard
objects that might cause damage.
- Check that there are no underground utilities in
work area.
- Check all lubrication points and grease as
instructed in manual.
- Perform a functional check of the safety interlock
system each time you operate the unit. If it
doesn't work, repair before using the machine.
Petrol(Gasoline) is
extremely ammable and
highly explosive under
certain conditions. BE
SURE to install fuel cap
after refueling.
Fill fuel tank with good quality, clean,
unleaded regular petrol (gasoline) to the level
recommended by the engine manufacturer.
TO CHECK OR ADD FUEL:
- Use a funnel to avoid spilling.
- Do it outdoors.
- Do not smoke.
- Stop the engine; allow to cool.
- Do not overll.
- Clean up spilled fuel.
BEFORE STARTING THE ENGINE
1. Be familiar with the controls, how each functions,
and what each operates.
2.. Check engine oil level. Add oil if necessary,
following the engine manufacturer's
recommendations. Refer to engine manual
supplied with machine.
3. Open the fuel valve.
4. Fill the fuel tank with the amount and type of fuel
recommended by the engine manufacturer.
5. CHOKE: For cold starts, set the throttle lever to
the half-open position and move the choke to the
ON position. For warm starts set the throttle to
the half-open position and the choke to the OFF
position.
OPERATOR PRESENCE INTERLOCK SYSTEM
To start the engine:
- The master clutch must be disengaged.
To operate the machine:
- The operator must hold down the operator
presence lever or engaging the master clutch will
kill the engine.

11
Jr.
Sodcutter
OPERATION
STARTING THE ENGINE
1. Move the engine switch to the "ON" position.
2. Pull the recoil starter to start the engine.
3. If the choke is ON when the engine starts,
gradually back it off until the engine runs with no
choke at all.
MOVING OF UNIT
To move unit without running blade:
1. Place blade shifter handle in "disengaged"
position (handle will point straight out from unit)
See Figure 1.
2. Set engine speed to slow.
3. Engage drive shifter handle.
4. Depress operator presence control.
5. Engage master clutch control lever.
6. Adjust throttle to desired walking speed.
To move unit without running the engine, put drive
shifter handle and clutch control lever in the
"disengaged" position. Push unit to move it.
CUTTING SOD
WARNING
Underground utilities. Electrocution, explosion,
service disruption risk.
Before beginning any work, check with the local
authorities for underground utility location and
depth. Do not operate where there is any risk
of contacting underground utilities. Contacting
buried utilities could result in a service outage.
Contacting buried electrical wires could result in
electrocution. Contacting a buried gas line could
result in an explosion.
This precaution is especially important when
using attachments such as the mole blade or
trencher which operate at greater depths.
1. Move machine to the area where sod is to be
cut. With the engine off and the master clutch
disengaged, stand on the right side of the
machine. Loosen the Blade Depth Control
Locking Lever with your right hand, then use the
handle bar to tip the machine forward and hold
it with your left hand. Lower the Blade Depth
Control Lever with your right hand until it hits the
preset Depth Stop. Tighten the Locking Lever.
2. Start the engine, then engage the wheel drive
and the blade drive with the Wheel Drive Shifter
Lever and the Blade Drive Shifter Lever.
3. For straight cutting, leave the caster wheel
locking lever down. For cutting irregular or
curved shapes, raise the caster wheel locking
lever up and forward.
4. Adjust the throttle to full speed. With the
machine tipped forward, engage the Master
Clutch. The machine will start moving forward
and the blade drive will operate. Lower the
machine into the sod and cut for a short distance.
5. Stop the machine and check the sod thickness.
Adjust the Depth Stop and blade if necessary.
See Adjustment section.
6. Continue cutting. At the end of each pass lift up
on the handle to raise the blade out of the sod
and turn around for the next pass.

12
Jr.
Sodcutter
ADJUSTMENTS
DRIVE BELT ADJUSTMENT
Keep belt free of oil and dirt, and adjusted to
proper tension at all times.
Belt tension is adjusted by loosening four (4)
engine mounting bolts and shifting engine on the
base.
Belt tension is correct when the distance between
the roll pin and sleeve on the master clutch rod is
1" to 1 1/4" (25-30mm)when the master clutch is
engaged.
ADJUSTING DEPTH OF CUT
3/4" (20mm) is a good general starting depth of cut.
Depth of cut can be varied from there depending on
conditions and what you are trying to accomplish.
1. Make an initial depth setting. Park the machine
on a hard surface. Loosen depth control locking
lever E and lower depth control lever D until the
blade rests on the surface.
2. Loosen the depth gauge lock E and set top of
depth gauge G to the 3/4" (20mm) mark on
the label. Tighten the depth gauge lock knob to
secure the depth gauge setting.
3. Use your left hand to tip the machine forward
while lowering the depth control lever D until the
depth control crossbar hits the Depth Stop G.
Tighten the locking lever E to lock in the depth
setting, make a trial run in turf. Check the depth
of cut.
4. Re-adjust the depth gauge G and depth control
lever D if necessary.
NOTE: Numbers on depth gauge do not necessarily
represent thickness of sod being cut. The
numbers are useful as a reference for making
changes.
BRAKE BAND ADJUSTMENT
When adjusted properly:
- With the Master Clutch Control Lever engaged, the
brake band is not braking the large drive pulley.
- When the Master Clutch Control Lever is disen-
gaged, there will be some braking occurring on the
large drive pulley.
- When the Master Clutch Control Lever is disen-
gaged, and pulled back rmly, the brake will fully stop
the large drive pulley.
1. For less braking, loosen the locknut, unscrew the
adjusting screw, then retighten the locknut.
2. For more braking, loosen the locknut, turn the
adjusting screw in, then retighten the locknut.
Start the machine, and check for proper operation.
Readjust if necessary. IF the engine kills when
engaging the Master clutch Control Lever, the
brake may be set too tight.

13
Jr.
Sodcutter
ADJUSTING OPERATOR PRESENCE CONTROL
1. To adjust operator presence cable, pull clutch
control handle Arearward as far as possible.
2. Press operator presence handle (right handlebar)
down as far as possible.
3. Adjust cable until the pivot arm Ccontacts the
arm extending from the operator presence switch
B.
4. Tighten cable clamp to secure cable. Check for
proper operation.
ADJUSTMENTS
ADJUSTING BLADE ANGLE (PITCH)
1. Loosen blade angle control locking lever Fand
move H-frame forward or backward until blade is
at desired angle (pitch).
2. Tighten blade angle control locking lever F.
BLADE ANGLE (PITCH)
Under normal operating conditions, blade angle
is minimal (blade bottom is at). In extremely
hard soil or when cutting with a dull blade, the
blade may want to ride out of the ground. It may
then help to adjust blade angle forward (see
Adjusting Blade Angle below). A short trial run
will indicate which is the best blade angle.
NOTE: Extreme blade angles put extra stress on
the side arms. To reduce stress on the machine,
operate with the attest blade angle that gives
satisfactory results.
Cover removed for clarity

14
Jr.
Sodcutter
ADJUSTMENTS
HANDLE SUPPORT SPRING
This spring Shelps support the handle. If the four (4)
isolator handle mounts are sagging or distorted, the two
locking adjustment nuts Tcan be tightened downward to
increase the spring force and raise the handle.
HANDLE STOP BOLTS
These two bolts Y limit the amount of handle movement.
This prevents damage to the handle isolators, and provides
positive control of the machine when extra effort is required
to lift or turn. The rear stop bolt position is adjustable..
Loosen the two bolts Xon the bolt centering plates on each
side and tighten with the stop bolts centered in the two
handle holes Z.

15
Jr.
Sodcutter
When replacement parts are required, use genuine
Schiller Grounds Care, Inc. parts or parts with
equivalent characteristics, including type, strength
and material. Failure to do so may result in
product malfunction and possible injury to the
operator and/or bystanders.
Carbon monoxide present in the exhaust is an
odorless and deadly gas. Never start or run the
engine inside where exhaust fumes can collect.
Provide enough fresh air to keep fumes from getting
too strong.
Replace any warning decal that becomes illegible
immediately.
DAILY MAINTENANCE
Operator Presence System
For the engine to run, the Operator Presence Lever
must be held when the Master Clutch Control is
engaged.
To Check:
1. Start the engine and run at 1/2 throttle with the master
clutch disengaged.
2. Engage the master clutch holding the Operator
Presence Lever. Release the operator presence lever
and the engine should stop.
Repair the machine before using if the Operator
Presence System does not kill the engine.
Blades:
Check for damage. Replace any broken, cracked or
otherwise damaged blades. Do not weld or straighten
blades. Replace or sharpen dull blades. See
sharpening instructions.
Hardware:
Tighten any nuts and bolts that are found loose.
Replace any broken or missing cotter pins. Repair any
other problems before operating.
Engine:
See engine manual for oil change intervals and oil
specications. See engine manual for air cleaner
service intervals and service procedure.
Lubrication:
The gear case is initially lled with 3 1/2 pints (1.7 L) of
EP 140 Gear Lube. Do not add to this amount unless
oil is changed or lost through leakage. Gear case
drain plug D.
On all pressurized lubrication ttings use a good grade
of Lithium Based lubricant.
The Jr. Sodcutter has 6 lubrication ttings. Lubricate
pitman arms (1 each side) and side arms (1 each side)
after every 4 hours of use.
Lubricate side arm pivots (1 each side - top of unit)
after every 8 hours of use.
Check gear case lubricant level using dipstick E
located on top of gear case. Check lube with dipstick
sitting on threads, do not screw in.
MAINTENANCE / SERVICE

16
Jr.
Sodcutter
MAINTENANCE / SERVICE
DRIVE BELT REPLACEMENT
1. Remove shield on left side of unit.
2. Remove nut securing brake band to clutch
control rod.
3. Remove cotter pin on outside of guard support
rod and move brake band over to nut on rod.
4. Loosen two bolts Asecuring belt guide to
provide clearance when removing belt.
5. Remove belt from engine pulley. To do this,
loosen upper and lower belt guards, or remove
the engine pulley.
6. Install new belt in reverse procedure. Route the
belt as shown.
7. Adjust belt and brake band. See Adjustment
Section.
BLADE SHARPENING
Wear the appropriate personal protective equipment
when sharpening blades.
1. Hand le bottom blade at 45O angle until no at
remains.
2. To keep cutting edge less than 1/16" (1.5mm)
on 45Oangle, grind milled surface back at 15Oto
less than 1/16"(1.5mm).
3. Hand le side blades at 45O until no at remains.
4. To keep cutting edge less than 1/16"(1.5mm) on
45Oangle, grind milled surface back at 15Oto
less than 1/16"(1.5mm).

17
Jr.
Sodcutter
STORAGE
STORAGE INSTRUCTIONS
To prevent possible explosion or ignition of
vaporized fuel, do not store equipment with fuel
in tank or carburetor in enclosure with open ame
(for example, a furnace or water heater pilot
light).
Daily Storage
1. Check engine oil level and air lter element daily.
2. Check oil level in gear case.
3. Close fuel valve at bottom of fuel tank.
4. Clean cutting blade (grass, dirt, etc.).
EXTENDED STORAGE
Before the equipment is put into storage for any
period exceeding 30 days:
1. Drain all fuel from fuel tank and lines (use a
hose or fuel line, routed from fuel tank shut-off to
proper container).
2. Start engine and run until all fuel is used from the
carburetor oat bowl.
3. While engine is warm, drain the crankcase
oil and rell with the proper weight of oil
corresponding to the season when the equipment
will next be used.
4. Remove the spark plug and squirt a small
quantity of engine oil into the cylinder. Turn the
engine over a few times to distribute the oil.
5. Lubricate all lubrication ttings.
6. Clean and oil cutting blade to prevent rust.
To put equipment into operation after an
extended storage:
1. Fill fuel tank with clean fresh fuel.
2. Check crankcase oil level, and start engine.
3. Check fuel system for fuel leaks.

18
Jr.
Sodcutter
TROUBLE SHOOTING
This manual suits for next models
3
Table of contents
Languages:
Other ryan Lawn And Garden Equipment manuals

ryan
ryan 544283D User manual

ryan
ryan JR SODCUTTER 6HP B&S 12" User manual

ryan
ryan 744865D User manual

ryan
ryan REN-O-THIN 544865B User manual

ryan
ryan 544945A JR. SODCUTTER Guide

ryan
ryan GA 24 User manual

ryan
ryan JR Sodcutter 544844D Building instructions

ryan
ryan 544951J Application guide

ryan
ryan 554910A User manual
Popular Lawn And Garden Equipment manuals by other brands

Makita
Makita EE400MP Original instruction manual

Everbloom
Everbloom Two Tiers Raised Garden Bed installation guide

Allied
Allied 295 Operator and parts manual

Stihl
Stihl MF-MM instruction manual

Cedarshed
Cedarshed 8x8 MABEL Assembly instructions

FLORABEST
FLORABEST FLV 1200 B1 translation of original operation manual