manuals.online logo
Brands
  1. Home
  2. •
  3. Brands
  4. •
  5. SACTO
  6. •
  7. Power Tools
  8. •
  9. SACTO NX35 User manual

SACTO NX35 User manual

NX 35
I
GB
RIVETTATRICE OLEOPNEUMATICA
PER INSERTI M3 / M10
ISTRUZIONI D’USO
MANUTENZIONE
E
REMACHADORA OLEONEUMATICA
PARA TUERCAS REMACHABLES
M3 / M10
INSTRUCCIONES DE USO
PIEZAS DE REPUESTO
HYDROPNEUMATIC TOOL
FOR INSERTS M3 / M10
INSTRUCTIONS FOR USE
SPARE PARTS
D
PNEUMATISCH-HYDRAULISCHES
NIETGERÄT FÜR BLINDNIETMUTTERN
M3 / M10
BEDIENUNGSANLEITUNG
ERSATZTEILE
 
(according to 2006/42/EC, as per Annex II, point A)
The manufacturer: 43- - Via C. Porta, 61 - 20831 Seregno (MB)
Phone (+39) 0362 232307 - Fax (+39) 0362 235 842
5)"55)&."$)*/&
Name: -&01/&6."5*$*7&5&3Model: '035)3&"%&%*/4&35450 - meeting the rele-
vant Directive 2006/42/EC - Machinery and Diretttiva subsequent amendments Name and address
of the person authorized to build the technical dossier: Mr. Walter Santin at the SACTO Srl based
in Seregno (MB) Via Porta, 61.
GB
!H
(secondo 2006/42/CE, come da Allegato II, Punto A)
Il fabbricante: 43- - via C. Porta, 61 - 20831 Seregno (MB)
Tel. (+39) 0362 232307 - Fax (+39) 0362 235842
$)&-"."$$)*/"
D nominazion : Rivettatrice oleopneumatica Mod llo: NX35 per inserti filettati da M3 a M10 - è con-
forme alle disposizioni pertinenti direttiva 2006/42/CE – Diretttiva Macchine e successive modificazioni e
integrazioni. Nome e indirizzo della persona autorizzata a costruire il fascicolo tecnico: Sig. Santin Walter
presso la Sacto srl con sede in Seregno (MB) via Porta, 61.
I
;;
(nach 2006/42/EG, nach Anhang II, Punkt A)
Der Hersteller: "$5043- - Via C. Porta, 61 - 20831 Seregno (MB)
Telefon (+39) 0362 232307 - Fax (+ 39) 0362 235 842
;%"44%*&"4$)*/&
Name: -&01/&6."5*$ *7&5&3 Model:  'C3 &8*/%&&*/4?5:&  #*4  - Erfüllung der
einschlägigen Richtlinie 2006/42/EG ist - Maschinen und Diretttiva späteren Änderungen Name und
Anschrift der Person, berechtigt, die technischen Unterlagen zu erstellen: Herr Walter Santin am Sacto
Srl in Seregno (MB) Via Porta, 61 basiert.
D
G
(según 2006/42/CE, según el Anexo II, punto A)
El fabricante: "$5043-- Via C. Porta, 61-20831 Seregno (MB)
Teléfono (+39) 232 307 0362 - Fax (+ 39) 0362 235 842
 26&-".>26*/"
Nombre: 3&."$)"%03"0-&0/&6.>5*$0%&56&3$"43&."$)"#-&" - es correspon-
diente Directiva 2006/42/CE - Nombre Maquinaria y Diretttiva modificaciones posteriores y la direc-
ción de la persona autorización para construir el expediente técnico: Sr. Walter Santin - Sacto Srl
con sede en Seregno (MB) Via Porta, 61.
E
2
NX 35
Seregno 10/10/2012
SACTO srl – Walter Santin
Il legale rappresentante / The legal representative
Der gesetzliche Vertreter / El representante legal
....................................................
3
NX 35

Technical data – guarantee ........................................................................page 4-5
Safety measures ........................................................................................page 6-7
Operating instructions ................................................................................page 8-11
Size changing ............................................................................................page 12-13
Oil topping up .............................................................................................page 14
Maintenance of the tool .............................................................................page 15
List of spare parts ......................................................................................page 16-19
GB
!
Technische Daten – Gewährleistung .........................................................Seiten 4-5
Sicherheitsmassnahmen ............................................................................Seiten 6-7
Gebrauchsanweisungen ............................................................................Seiten 8-11
Wechsel der Gewindedornabmessung ......................................................Seite 12-13
Nachfüllen von Öl .......................................................................................Seite 14
Wartung ......................................................................................................Seite 15
Ersatzteile ...................................................................................................Seite 16-19
D

Datos técnicos – garantía ..........................................................................pag. 4-5
Instrucciones para la salvaguardia ............................................................pag. 6-7
Instrucciones para el empleo .....................................................................pag. 8-11
Cambio de formato ....................................................................................pag. 12-13
Llenado de aceite .......................................................................................pag. 14
Manutención ...............................................................................................pag. 15
Repuestos ..................................................................................................pag. 16-19
E

Dati tecnici – garanzia ...............................................................................pag. 4-5
Istruzioni per la sicurezza ..........................................................................pag. 6-7
Messa in servizio .......................................................................................pag. 8-11
Cambio formato tirante ..............................................................................pag. 12-13
Rabbocco olio ............................................................................................pag. 14
Manutenzione .............................................................................................pag. 15
Parti di ricambio .........................................................................................pag. 16-19
I
ø 25
ø 48
269
287
90
mm
mm
ø 25
mm
mm
mm
4
NX 35
"5*5&$/*$*
Pressione aria 6 bar
Volume d’aria libera per ciclo 8 litri
Forza (6bar) 20,10 KN
Corsa 6,5 mm
Livello rumore < 75 db (A)
Vibrazioni < 2,5 M/sec2
Peso 2,1 kg
&$)/*$"-%"5"
Air pressure 6 bar
Air consumption per stroke 8 litres
Force (6 bar) 20,10 KN
Stroke 6,5 mm
Noise level < 75 db (A)
Vibration < 2,5 M/sec2
Weight 2,1 kg
&$)/*4$)&"5&/
Luftsdruck 6 bar
Luftverbrauch pro Takt 8 liter
Setzkraft (6 bar) 20,10 KN
Hub 6,5 mm
Geräuschpegel < 75 db (A)
Vibration < 2,5 M/sec2
Gewicht 2,1 kg
"5045@$/*$04
Presión del aire 6 bar
Consumo max. aire libre, por ciclo 8 litri
Fuerza (6 bar) 20,10 KN
Carrera 6,5 mm
Nivel de ruido < 75 db (A)
Vibraciones < 2,5 M/sec2
Peso 2,1 kg
GB
D
E
I
5
NX 35
"3"/:*"
Le rivettatrici Sacto sono garantite per 12 mesi dalla data di consegna riportata sulla
fattura di vendita.
La garanzia ha validità solo quando la rivettatrice viene utilizzata per gli usi per i quali
è stata fabbricata.
Decade la validità se l’attrezzo non è sottoposto a manutenzione periodica, non ven-
gono rispettate le disposizioni del fabbricante, oppure viene manomesso o sottoposto
a tentativi di riparazione.
In caso di difetti o guasti, la Sacto srl, previa verifica, stabilisce a suo insindacabile giu-
dizio se il difetto o guasto rientra nella garanzia o è da attribuire a cattivo uso dell’u-
tensile.
I
6"3"/5&&
Sacto riveting tools have a 12-months guarantee, with validity from the date stated on
sales invoice.
This guarantee is valid only if the tool is used properly and for the purposes for which it
has been manufactured and is subordinated to periodic maintenance of the tool and to
the instruction of the manufacturer, or is tampered with or subjected to attempted repair.
In case of defects or faults, Sacto srl, after checking the tool, decides to its own judg-
ment if the defect or the breakdown is covered by the guarantee or is from attributing
to bad use of the tool.
GB
&8?)3-&*456/(
Die Nietgeräte von Sacto sind durch eine Garantie von 12 Monaten ab der
Rechnungsdatum gedeckt .
Die Gewährleistung hat Geltung, nur wenn die Nietgeräte für die vorgesehenen
Verwendungszwecke eingesetzt wird.
Die Garantie ist nicht gültig, wenn das Werkzeug nicht in der im Bedingungs- und
Wartungsanleitung spezifizierten Weise bedient ist. Dekade Gültigkeit, wenn das Gerät
manipuliert wird oder unterworfen Reparaturversuche.
Bei Mängeln oder Fehlern, Sacto srl, nach einer Kontrolle, entscheidet nach
ausschliesslich eigenem Ermessen, wenn die Fehlern der Garantie unterliegt oder sind
sie der schlechter Nutzung dem Werkzeug zuschreiben.
D
"3"/5*"
Las remachadoras Sacto tienen una garantía de 12 meses desde la fecha de entrega
indicada en la factura de venta.
La garantía tiene validez sólo si la remachadora se utiliza para el empleo para lo que
ha sido fabricada.
Ya no hay validez si no se hace una manutención periódica al utensilio o si no se respe-
tan las indicaciones del fabbricante. Década validez si el aparato es manipulado o
sometido a intentos de reparaciones.
En caso de defectos o fallas, Sacto srl, previa comprobación, decide si el defecto está
cubierto por la garantía o está causado por la mala utilización del utensilio.
E
"'&59.&"463&4D&"%$"3&'6--95)&'0--08*/(*/4536$5*0/4#&'03&64&
•Use the tool properly and for the purposes for which it has been manufactured.
•Any kind of modification made on the tool and its equipment by the customer itself, will be done
under the fully responsibility of the customer. In this case, Sacto srl declines any responsibility.
•The tool must be always kept in safety conditions and must be revised at regular intervals by
expert and authorized workers, following the maintenance procedures of Sacto srl.
•The tool will always be used following the EC normative “on health and safety measures on job”
CEE 89/392 and 91/368. Any problem or information regarding the correct operating of the tool,
will have to be turned to Sacto srl.
•The safety measures to be observed during the use of the tool, must be explained from the
customer to all users. Always detach the air feeding from the take-off point of the tool before
regulating, repairing and cleaning operations.
•Don’t use the tool if is turned towards other persons.
•Operating pressure have not to exceed 6 bar.
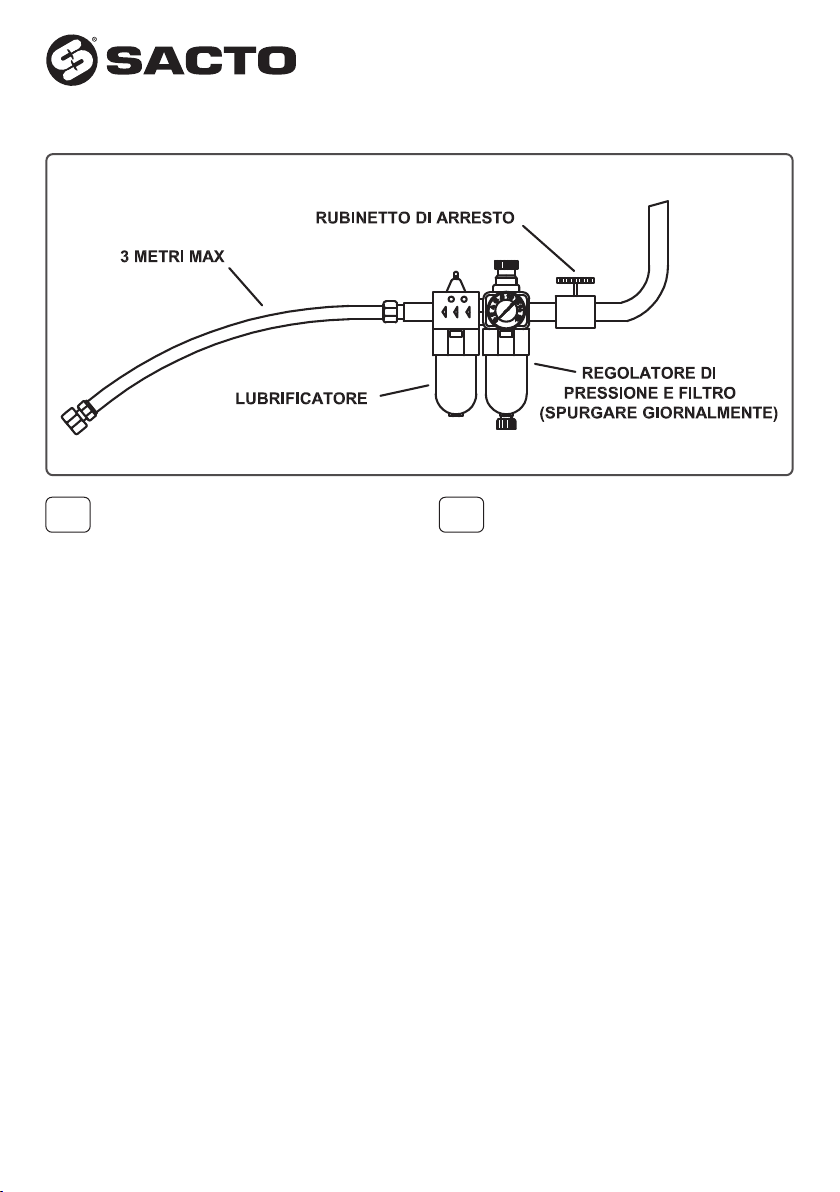
•Make sure that the air discharges are not blocked or covered and the feeding hoses are always
in good working conditions.
•The operations of maintenance, repairing and cleaning must be done when the tool is not fed.
•When using the tool, wear protective glasses or visors and gloves.
•Use only original spare parts for repairing and maintenance. Sacto srl declines any responsibi-
lity for any kind of damages caused by not observing the above and following instructions (direc-
tive CEE 85/734).
•If the noise level is over the safety limit of 85 db (A), use the proper hearing protections (anti-
noise headset tec.).
6
NX 35
GB
*$63&::"D&((&3&"55&/5".&/5&-&*4536:*0/*13*."%&--H640
•Non utilizzare questo utensile se non per gli usi propri.
•Qualsiasi modifica eseguita dal cliente all’utensile o a qualsiasi accessorio fornito dalla Sacto srl,
sarà eseguita sotto la responsabilità assoluta del cliente. La Sacto srl declina ogni responsabilità.
•L’utensile deve essere sempre mantenuto in condizioni di sicurezza e deve essere controllato
da personale addestrato e competente, ad intervalli regolari, secondo le procedure di manuten-
zione stabilite dalla Sacto srl.
•L’utensile dovrà essere sempre utilizzato secondo le norme relative “alla salute e sicurezza sul
lavoro” CEE 89/392 E 91/368. Qualsiasi problema o informazione relativi al funzionamento cor-
retto dell’utensile dovrà essere rivolto alla Sacto srl.
•Le precauzioni da osservare quando si utilizza questo utensile devono essere spiegate dal
cliente a tutti gli operatori. Staccare sempre l’alimentazione dell’aria dal punto di entrata dell’at-
trezzo prima di regolare, montare o smontare un tirante o una testa.
•Non utilizzare l’utensile rivolgedolo verso altre persone.
•La pressione operativa non dovrà superare i 6 bar.
•Assicurarsi che gli scarichi d’aria non siano bloccati o coperti e che i tubi flessibili siano sempre
in buone condizioni.
•Le operazioni di manutenzione, riparazione e pulizia dell’utensile dovranno essere eseguite
senza alimentazione dell’aria.
•Quando si usa l’utensile, indossare occhiali, visiere protettive e guanti.
•Usare esclusivamente ricambi originali. La Sacto srl declina ogni responsabilità per danni che si
dovessero verificare per inadempienza dell’utilizzatore (direttiva CEE 85/734).
•In caso di esposizione quotidiana al rumore, superiore al limite di sicurezza di 85 DB (A), fare
uso di adeguati mezzi di protezione individuali (cuffie, tappi antirumore).
I
7
NX 35
"-7"(6"3%*"D&&3"55&/5".&/5&-"4*/4536$$*0/&4"/5&4%&-&.1-&0
•Utilizen este utensilio sólo para el empleo para lo que ha sido creado.
•Cualquier modificación del cliente al utensilio o su equipo serà hecha bajo su propia responsa-
bilidad. Sacto srl declina cada responsabilidad.
•La herramienta debe estar siempre en condiciones de seguridad y tiene que ser revisado
periódica mente de trabajadores expertos y autorizados según los procedimientos de manuten-
ción de Sacto srl.
•Utlizar siempre el utensilio según las directivas sobre “la salud y seguridad en el trabajo” CEE
89/392 y 91/368. Para cualquier problema o información sobre el correcto funcionamiento de
la remachadora, dirigen a Sacto srl.
•El cliente tiene que explicar a todos los operadores las medidas de seguridad que deben obser-
varse durante el utilizo del utensilio. Separar siempre la alimentación del aire del punto de entra-
da del utensilio antes de la regulación y las operaciones de reparación y limpieza.
•No tengan el utensilio contra otras personas.
•La presión de trabajo no debe superar los 6 bar.
•Controlen que las descargas del aire no sean cubiertos y que las mangueras de alimentación
sean siempre en buenas condiciones de trabajo.
•Ejecuten operaciones de manutención, reparación y limpieza del utensilio sin la alimentación
del aire.
•Cuando se utiliza la herramienta, ponerse las gafas protectoras y guantes.
•Utilizen sólo repuestos originales. Sacto srl declina cada responsabilidad para los defectos cau-
sados por la no observación de las instrucciones (directiva CEE 85/734).
•Si el nivel del ruido es mucho más sobre el límite de seguridad de 85 DB (A), utilizar adecua-
das medida de protección (antiruído auriculares).
E
*$)&3)&*54."44/").&/D*&/5&*-6/(703&#3"6$)%&4&3?54"6'.&3,4".-&4&/
•Das Werkzeug darf nur für eigene Benutzung gebrauchen werden.
•ede Änderung des Kundes an das Werkzeug oder seine Zubehör von Sacto srl, wird unter die
volle Verantwortung des Kundes gemacht sein. Sacto srl lehnt jede Verantwortung ab.
•Halten Sie immer das Werkzeug im Sicherheitsbedingungen und prüfen es regelmäßig immer
von Facharbeitern auf Grund von dem Bedingungs- und Wartungsanleitung von Sacto srl.
•Benützen Sie immer das Werkzeug gemäß den Gesetzen “Gesundheit und Sicherheit in der
Arbeit” CEE 89/392 UND 91/368. Für jede Problem oder Informationen in Bezug auf den
korrekten Betrieb des Werkzeugs, sollten Sie an Sacto srl wenden.
•Die Sicherheit Maßnahmen bei der Verwendung des Werkzeugs muss von den Kunden an alle
Benutzer erklärt werden. Lösen Sie immer die Luft Fütterung aus dem Eingang des Werkzeugs
vor ein Zugbolzen oder Kopfteil zu regulieren, ersetzen oder sauber machen.
•Benützen Sie nicht das Werkzeug, wenn es sich gegenüber andere Personen ist.
•Betriebsdruck muss 6 bar.
•Stellen Sie sicher, dass die Luft Ableitungen nicht abgedeckt sind und dass die
Beschickungsschläuche immer in gute Arbeitsbedingungen sind.
•Die Tätigkeit der Wartung, Reparatur und Reinigung müssen gemacht sein, wann das Werkzeug
nicht gefüttert ist.
•Wenn Sie das Werkzeug benützen, tragen Sie die Brille, schützende Schirme und Handschuhe.
•Verwenden Sie nur Originalersatzteile. Sacto srl übernimmt keine Verantwortung für jede Art von
Schäden, die durch nicht Beachtung der oben Anweisungen folgen (Direktive CEE 85/734).
•Wenn die Geräuschpegel über die Sicherheitsbegrenzung von 85 DB (A) ist, müssen Sie immer
Ohrenschutz tragen (wie Gehörschutzkapseln oder Ohrenhauben).
D
8
NX 35
!
La rivettatrice NX35 è progettata per
l’utilizzo di inserti filettati da M3 a M10.
Alimentazione aria
Tutti gli attrezzi vengono fatti funzionare con
aria compressa, ad una pressione di 6 bar.
Suggeriamo di utilizzare dei regolatori di pres -
sione e dei sistemi di filtraggio auto ma tico
sulla rete principale di alimentazione aria.
Questi dovranno essere montati a 3 metri di
distanza dall’attrezzo (vedere lo sche ma), per
assicurare la durata massima dell’attrezzo
con un minimo di ma nu tenzione.
I tubi flessibili per l’aria compressa in en trata
devono essere in grado di sostenere una
pressione massima del 150% della pres sio -
ne massima prodotta nel sistema, o 10 bar,
qua le dei due livelli sia il maggiore.
I tubi fles sibili per l’aria compressa in en tra -
ta dovranno es sere resistenti all’olio, do -
vran no essere ri ve stiti esternamente di ma -
teriale resistente alle abrasioni e do vran no
essere protetti qua lora le condizioni di lavo -
ro pos sano dan neggiarli.
Tutti i tubi fles sibili per l’aria com pressa
devono avere un dia me tro di passaggio
minimo di 6,4 mm o 1/4di pollice.
Il regolatore di pressione deve essere
impostato a 6,5 bar, in considerazione della
caduta di pressione dei 3m dall’utensile.
I
The tool NX35 can be employed only for
threaded inserts of M3 to M10 diameter.
Air feed
All the tools works with compressed air,
with a pressure of 6 bar.
We suggest to use regulators of pressure
and automatic filtering systems on the
main net of feeding air.
These will have to stay to 3 meters of
distance from the tool (see the drawing), in
order to assure an optimal pressure in the
tool and its maximum duration-life with a
minimum maintenance.
The flexible tubes for the air compressed
in entrance must be in a position to
supporting a pressure of 10 bars and will
have to be resistant to the oil, covered of a
material resistant to the abrasions and
protected in case bad job conditions could
damage them.
All the flexible tubes for the compressed
air must have a diameter of minimum
passage of 6,4 mm or 1/4of inch.
The pressure regulator must be set up to
6,5 bars in consideration of the pressure
fall.
GB
9
NX 35

Das Werkzeug NX35 son nur für
Blindnietmuttern MM M3-M10.
Luftbeschickung
Das Werkzeug arbeitet mit Druckluft, auf
einen Druck von 6 bar. Benützen Sie
Druckreglern und automatische Filterung
für die hauptsächlich System der
Luftbeschickung.
Sie müssen 3 Meter weit von dem
Werkzeug (wie das Bild) sein, um die
längste Lebensdauer mit der minimaler
Wartung zu gewähren.
Die flexibel Schläuche für die
Druckluftbeschickung müssen eine 10
bar Druck unterstützen und müssen
ölwiderstandsfähig sein. Sie sollten
auch gedeckt sein mit einen Material,
das sie gegen die Abrasion schützt und
sollten beschützt sein wenn die
Arbeitsbedingungen ihnen beschädigen
können. Die flexibel Schläuche für die
Druckluft müssen einen minimalen
Durchmesser von 6.4 mm oder 1/4inch
haben. Der Druckregler muss an 6.5 bar
angelegt sein, rechnen die Drucksfall des
Werkzeug.
D
La remachadora NX35 puede utilizarse
sólo para insertos fileteados de diametro
M3-M10.
Alimentaci n del aire
Todos los utensilios funcionan con aire
comprimido, con una presión de 6 bar. Le
recomendamos utilizar reguladores de la
presión y sistemas automáticos de filtrado
en la red de alimentación del aire.
Estos tienen que estar 3 metros lejos del
utensilio (miren el esquema), para
asegurarse una óptima presión en el
utensilio y su máxima duración con el
mínimo de manutención.
Los tubos flexibles para el aire comprimido
deben mantener una presión de 10 bar y
deben ser resistentes al aceite, tenendo
en el interior un material resistente a las
abrasiones y protegidos si las condiciones
del trabajo los dañan.
Todos los tubos flexibles para el eire
comprimido deben tener un diámetro
mínimo de 6,4 mm o 1/4de pulgada.
El regulador de presión debe ser
planteado a 6,5 bar considerando la
caída de presión.
E
10
NX 35
!
Per la preparazione dell’uten ile verifi -
care che e o non ia collegato all’aria
compre a.
La sc lta d l tirant d v ss r ad guata
alla misura d ll’ins rto ch si vuol utilizzar .
•P r il corr tto s rraggio d ll’ins rto è molto
important la r golazion d lla sporg nza
d l tirant , v rificar la sporg nza avvitando
un ins rto ch si d v utilizzar fac ndo una
l gg ra pr ssion con lo st sso sull’ str mi-
tà d l tirant , qu st’ultimo d v uscir dall’in-
s rto di un millim tro ca., s la sporg nza d l
tirant maggior o minor int rv nir sulla
r golazion E con il p rno in dotazion .
•Introdurr l’ins rto n l foro di applicazion
t n ndo l’ut nsil in modo ch l’ass d l
tiran t sia p rp ndicolar al piano di fis-
saggio. (Fig. A)
•Azionar l gg rm nt il pulsant P d ll’u-
t nsil fin quando non si avv rt un aum n-
to d lla r sist nza (fas di trazion d ll’in-
s rto) (Fig. B), poi continuar ad azionar il
pulsant P finché l’ins rto non si è svitato
dal tirant (fas di svitam nto) (Fig. C)
•N l caso in cui l’ins rto si blocchi durant
l’uti lizzo il motorino non ri sca a svitarlo,
staccar l’aria d ins rir n ll’apposito foro H
il p rno in dotazion , svitando manualm nt .
I
P
A
B
Fig. A
Fig. B
Fig. C Fig. E
Fig. D
R golazion E
Foro H
11
NX 35

When you are etting the tool it mu t not
be connected to the air y tem.
Th choic of th ti rod must b according
to th siz if th ins rt to b us d.
•It’s important adjust th ti rod protrusion
b for op rating, tak th ti rod protrud s
by on thr ad (on mm.) from th back of
th nut as standard. If th ti rod protrud s is
too long or too short, adjust th protrusion
with th r gulation E with th adjustm nt pin.
•Ins rt th nut into th application hol , holding
th tool so that th axis of th ti rod is p r-
p ndicular to th surfac to b fix d (Fig A).
•Pr ss th l v r P until it starts g tting hard r
(traction and fixing phas ) (Fig. B), continu
to pr ss th l v r P as far as it will go
(unscr wing phas ) (Fig. C) and stay in this
position until th ins rt is unscr w d from th
ti rod.
•In cas that during op ration th ins rt g ts
stuck on th ti rod, and th tool motor is no
mor abl to unscr w it, in this situation dis-
conn ct th air syst m, and insrt th pin in
th prop r hol H to unscr w it by hand.
GB
D
E

Vor da Gerät zu vorbereiten, bitte
beachten Sie da e mit der Druckluft
nicht verbunden i t. Wähl n Si in r
G wind dorn d r ang m ss n zu d r
rwünscht Blindni tmutt rnabm ssung ist.
•Um di richtig Blindni tmutt rnspannung
zu mach n ist di R g lung d n
G wind dornvorsprung s hr wichtig. Um
d n Vorsprung zu prüf n, schraub n Si
in Blindni tmutt r an wi folgt:
mach n Si in r l icht Druck mit
d r Blindni tmutt r auf di
G wind dornspitz , d r G wind dorn
soll aus d r Blindni tmutt r zirka in
Millim t r vorschau n. W nn d r
G wind dornvorsprung gröss r od r
kl in r ist, änd rn Si di R g lung E
mit d m s ri nmässig n Bolz n.
•St ll n Si di Blindni tmutt r in d n
Anw ndungsloch. Halt n Si das G rät
um di G wind dornachs auf di
B f stigungs b n s nkr cht ist. (Bild A)
•Drück n Si l icht auf d n Knopf P bis
wann Si in Wid rstandsv rgröss rung
b m rk n (Blindni tmutt rantri bsphas )
(Bild B), dann s tz n Si fort d n Knopf P
zu drück n bis wann di Blindni tmutt r
aus di G wind dorn aufg schrob n ist
(Abschraub nsphas ). (Bild C)
• W nn di Blindni tmutt r währ nd di
V rw ndung v rkl mm rt sich und d r
Motor si nicht aufschraub n kann, lös n Si
di Druckluftv rbindung und st ck n Si d n
s ri nmässig n Bolz n in d n ig ns dazu
b stimmt n Loch H. Dann aufschraub n Si
di Blindni tmutt r von Hand.

Para preparar la máquina e nece ario contro-
lar que no ea conectada al aire comprimido.
El gir l tirant xacto s gún la m dida d la
tu rca r machabl qu d b n utilizar.
•Para una corr cta utilización d la tu rca s
muy important la r gulación d la protub -
rancia d l tirant . Controlar la protub rancia
atornillando una tu rca qu d b n utilizar y
apr tandola lig ram nt sobr la xtr midad
d l tirant qu d b salir d la tu rca d un
milím tro apróximadam nt ; si la protub -
rancia d la tu rca s mayor o m nor int r-
v nir sobr la r gulación E con l p rno qu
stá n l quipami nto.
•Introducir la tu rca n l aguj ro d j -
cución, t n ndo l ut nsilio para qu l
j d l tirant s a p rp ndicular al plano
d fijación. (Fig. A)
•Accionar lig ram nt l botón P d la máqui-
na hasta qu no s oiga un aum nto d la
r sist ncia (op ración d tracción d la tu r-
ca) (Fig. B), lu go sigu n accionando l
botón P hasta qu la tu rca no s haya
d stornillada d l tirant (op ración d
d stornillami nto) (Fig. C)
•Si la tu rca s para durant la utilización y l
motor no consigu d stornillarla, d sp gu n
l air introduzcan n su proprio aguj ro
H l p rno qu stá n l quipami nto,
d stornillando manualm nt .
12
NX 35
FAG
CDE B
!
41"3&1"354$*3$-&48*5)EF4)"--
#&$)"/(&%$0.1-&5&-98*5)5)&3*()54*:&
The tool is supplied equipped with 6 threaded tie
rods from M3 to M10, with corresponding heads
, ring nuts and reduction.
By changing the type of threaded inserts, also the tie
the tie rod, head and ring nut group must be changed.
For changing the tie rod, please proceed as follows:
lDisconnect the air supply from the tool
lUnscrew the ring net with the 20 mm standard
spanner, then remove it along with head 
lWith the 22 mm standard spanner unscrew the
nosepiece 
lWith two 12 and 17 mm standard spanner
unscrew the nut and extract the threaded tie
rods 
lAfter having replaced the reduction , the
threaded tie head and the ring with that one of
the right size, carry out the above-mentioned
operations in reverse order.
GB

! "% 0(/* $".#*0 %&- 5*3"/5& *
1"35*$0-"3* $&3$)*"5* %&70/0 &44&3& 4045*56*5*
$0.1-&5".&/5&
La rivettatrice viene fornita con 6 tiranti filettati da
M3 a M10 con relative teste , ghiere  e
adattatori.
Al variare della filettatura degli inserti occorre ese -
guire la sostituzione del gruppo tirante testa, ghiera e
adattatori.
Per il cambio del tirante procedere nel modo seguente:
lTogliere aria alla rivettatrice.
lAllentare la ghiera con la chiave da 20 mm
quindi rimuoverla assieme alla testa .
lCon una chiave da 22 mm svitare il canotto porta
testa 
lCon due chiavi da 12 e 17 mm smontare la
ghiera da cui estrarre il tirante .
lDopo aver sostituito l’adattatore , il tirante ,
l’adattatore , la testa , e la ghiera con quelli
della filettatura desiderata, ripetere l’ope ra zione
nel senso inverso.
I
13
NX 35


 'C3 +&%&3 &$)4&- %&4
&8*/%&%03/%*&0#&/#&3&*'5&&*-&/.C44&/
("/:&34&5:54&*/
Das Gerät ist mit 6 Gewindedorn von M3 zu
M10, die dazugehörigen Köpfe , die
Deckungsringen und die Anpassungsgliede
ausgestattet.
Bei jeder Wechsel der
Blindnietmutterabmessung, müssen Sie die
Gruppe Gewindedorn-Kopf-Deckungsring und
Anpassungsgliede ganz ersetzen.
Um der Gewindedorn zu wechseln, bitte machen
Sie wie folgt:
lTrennen Sie die Luft aus den Gerät.
lLösen Sie den Deckungsring mit dem 20mm-
Inbussschlüssel und dann nehmen Sie den Teil
C zusammen mit dem Kopf ab.
lLösen Sie den Dusentrager mit einem
22mm-Inbussschlüssel.
lMit zwei Inbussschlüsseln von 12 und 17mm
montieren Sie den Deckungsring ab und
dann ziehen Sie den Gewindedorn aus.
lNach Sie die Anpassungsgliede , der
Gewindedorn , die Anpassungsgliede , der
Kopf und der Deckungsring mit der
gewünschten Abmessung ersetzt haben,
wiederholen Sie diese Handlung in
entgegengesetzter Richtung.
D
G 1"3" $"%" $".#*0 %& 5*3"/5&
)"9 26& 4645*56*3 505"-.&/5& -04 "35A$6-04
&/3&+"%04
La remachadora tiene 6 tirantes de M3 hasta
M10 con sus cabezas , silenciadores y
adaptadores.
Cuando cambia el ribete de las tuercas hay que
sustituir el grupo tirante cabeza, silenciador y
adaptadores.
Para cambiar el tirante actuar en esta manera:
lSacar el aire de la remachadora
lAflojar el silenciador con la llave de 20
milímetros y sacarlo con la cabeza .
lCon una llave de 22 milímetros destornillar el
tubo porta cabeza .
lCon dos llaves de 12 y 17 milímetros
desmantelar el silenciador y sacar el
tirante .
lDespués de haber sustituido el adaptador , el
tirante , el adaptador , la cabeza y el
silenciador  con los del ribete deseados,
repetir la operción en el senso contrario.
E
14
NX 35

The tapping up of the oil is necessary when
occurs a power loss of the riveting tool or after
a long period of use. Proceed as per the follo-
wing instructions:
l Disconnect the air supply from the tool and
keep the tool in a vertical position.
lRemove the cover N°15 of the oil using a 3
mm Allen wrench, screw the oil syringe
(equipped) introducing a proper quantity of
hydraulic oil viscosity 32°.
lRemove the syringe, then screw the oil cover
with its o-ring and tighten with a force not
over 6/8 Nm and clean up the oil in excess.
During this operation, wear protective gloves
and don’t waste oil in the environment. In case
of contact of oil with skin, wash carefully the
part with water and soap. See p. 10, photos D.
GB

Il rabbocco dell’olio è necessario quando si
avverte una diminuzione della corsa della rivet-
tatrice. Procedere nel seguente modo:
lTogliere aria all’utensile e tenerlo in po -
sizione verticale.
lSvitare il tappo dell’olio (N°15) con la chiave a
brugola da 3 mm, avvitare la stringa in
dotazione iniettando una quantità adeguata
di olio idraulico con viscosità 32°.
l Togliere la stringa, avvitare il tappo con la
guarnizione e stringere con una forza non
superiore a 6/8 Nm e pulire l’olio in eccesso.
N.B. Nell’operazione di rabbocco, proteggersi
con guanti e non disperdere nell’ambiente
l’eventuale olio residuo. In caso di contatto,
lavarsi con sapone. Vedi foto D pag. 10.
I<=
Wenn Ihren Nietgerät einer nachlassende Hub
hat, müssen Sie Öl nachfüllen. Bittemachen
Sie wie folgt:
lTrennen Sie die Luft aus den Werkzeug und
halten Sie es in die senkrechte Position.
l Lösen Sie den Ölverschluss N°15 mit dem
3mm-Inbussschlüssel, schrauben Sie die
Spritze an und spritzen Sie Hydrauliköl mit
Viskosität 32°.
l Nehmen Sie die Spritze ab, schrauben Sie
den Ölverschluss mit der Dichtung an.
Drücken Sie mit einer Kraft nicht über 6/8
Nm und reinigen Sie das Öl zuviel.
ACHTUNG: Während Sie Öl nachfüllen, tragen
Sie Schutzhandschuhe und zerstreuen Sie
nicht Altöl in der Umwelt. Bei Ölberührung mit
der Haut, waschen Sie sich sorgfältig mit
Wasser und Seife. Siehe Seite 10, Fotos D.
D

El llenado de aceite es necesario cuando hay una
disminución de la carrera de la remachadora.
Proceden en la siguiente manera:
l Eliminar el aire al utensilio y mantenerlo con
una posición vertical;
l Quitar el tapón del aceite N°15 con la llave
Allen de 3 mm, atornillar el cordon equipada
introducendo una cantidad adecuada de
aceite hidráulico con viscosidad 32°;
lQuitar el cordon; atornillar el tapón y
estrechar con una fuerza que no sube 6/8
Nm y limpiar el aceite en exceso;
N.B.: Durante el llenado de aceite, ponerse
guantes y no dispirden el aceite residuo en
el ambiente. En caso de contacto, lavarse
con jabón. Vea la página 10 de fotos D.
E
15
NX 35
!
Manutenzione giornaliera
Controllare il tirante / testa. Il filetto non deve
essere danneggiato.
Controllare la pressione, che non deve
superare i 6 bar.
Controllare se ci sono perdite di aria o olio.
Revisione della rivettatrice
È consigliato procedere alla revisione della
rivettatrice ogni 500.000 cicli, oppure almeno
ogni 2 anni. Si consiglia di rivolgersi ai centri
autorizzati o direttamente alla Sacto srl.

Per lo smaltimento della rivettatrice, attenersi alle
leggi nazionali in materia di smaltimento rifiuti.
Smontare la rivettatrice, suddividendo i vari
componenti (alluminio, acciaio, plastica etc.) e
procedere alla rottamazione, in conformità a
quanto prescritto dalla normativa nazionale.
I
Tägliche Wartung
Prüfen Sie dass der Zugbolzen und der
Kopfteil nicht beschädigt sind.
Prüfen Sie dass der Luftdruck nicht über 6 bar ist.
Prüfen Sie dass keine Luftsausströmene oder
Ölausfliessene sind.
Nietgerätsüberholung
Nach 500.000 Takten oder zwei ahr Arbeit, das
Nietgerät soll eine Generalüberholung machen.
Wenden Sie sich ausschließlich an autorisierte
Kundendienstzentren oder direkt an Sacto srl.

Bei der Entsorgung des Nietgerät, sollten Sie
an den nationalen gesetzlichen Bestimmungen
halten. Trennen Sie die verschiedene
Bestandteile (Aluminium, Stahl, Kunstoffe etc.)
der Maschine und verschrotten sie, laut
Gesetz.
D

Manutenci n diaria
Controlar el tirante / cabeza. El remache roscado
no debe ser estropeado.
Controlar la presión, que no debe superar los 6 bar.
Controlar si hay pérdidas de aire o aceite.
Revisi n de la remachadora
Se aconseja revisar completamente la re ma -
chadora cada 500.000 ciclos, o cada dos años.
Se aconseja dirigirse sólo a centros autorizados o
directamente a Sacto srl.

Para eliminar la remachadora seguir con
atención cuanto establecido por las leyes
nacionales. De sarmar la remachadora, dividendo
los dife rentes componentes (aluminio, acero,
plástico etc.) y efe ctuar la eliminación, en el
respecto de las normas vigentes.
E

Daily maintenance
Check up the tie rod / head. The thread must
not be damaged.
Check the air pressure, which don’t have to
exceed 6 bar.
Check eventual losses of oil or air.
Overhaul of the tool
We suggest to carry out a complete overhaul of
the riveting tool after 500.000 cycles, or every
two years. For this operation, please apply to
authorized centres or to Sacto srl directly.

For the elimination of the tool, make reference to
your national laws for safety and environments
care. Disassemble the tool, dividing its com -
ponents by materials (aluminium, steel, plastic
etc.) then proceed to scrap in compliance to the
current law.
GB
16
NX 35
26
25
24
23 22 21
20
13
16
12 11
14
15
10
98 7 654
321
19 18 17
30
31
29 28
32
33
34
35
74
39
75
38
65
66
68
34
67
59
60
61
62
63 64
58
36 37
71
76
54
53
57
50
55
56
51
52
49
73
71
70 69 40 41 42 43 44 45 46
47
48
27
17
NX 35
 0% 5 &4$3*:*0/& &4$3*15*0/
1 168110M3 1 Testa M3 Head M3
1 168110M4 1 Testa M4 Head M4
1 168110M5 1 Testa M5 Head M5
1 168110M6 1 Testa M6 Head M6
1168110M8 1 Testa M8 Head M8
1168110M10 1 Testa M10 Head M10
2 168111 1 Ghiera Nut
3168112 1 Canotto Nosepiece
4 168114 1 Porta tirante Connection base
5 168116M3 1 Adattatore M3 Adaptor M3
5 168116M4 1 Adattatore M4 Adaptor M4
5 168116M5 1 Adattatore M5 Adaptor M5
5 168116M6 1 Adattatore M6 Adaptor M6
5 168116M8 1 Adattatore M8 Adaptor M8
5 168116M10 1 Adattatore M10 Adaptor M10
6 168125M3 1 Tirante M3 Tie rod M3
6 168125M4 1 Tirante M4 Tie rod M4
6 168125M5 1 Tirante M5 Tie rod M5
6 168125M6 1 Tirante M6 Tie rod M6
6 168125M8 1 Tirante M8 Tie rod M8
6 168125M10 1 Tirante M10 Tie rod M10
7 168130M3 1 Riduzione esagonale M3 Hexagoanl reduction M3
7 168130M4 1 Riduzione esagonale M4 Hexagoanl reduction M4
7 168130M5 1 Riduzione esagonale M5 Hexagoanl reduction M5
7 168130M6 1 Riduzione esagonale M6 Hexagoanl reduction M6
7 168130M8 1 Riduzione esagonale M8 Hexagoanl reduction M8
7 168130M10 1 Riduzione esagonale M10 Hexagoanl reduction M10
8 168131 1 O-ring O-ring
9 168132 1 Supporto tirante Spindle tie road
10 168133 1 Dado Nut - closure
11 168134 1 Ghiera Pin
12 168135 1 Guarnizione Gasket
13 168136 1 Corpo idraulico Hydraulic body
14 168137 1 O-ring O-ring
15 168138 1 Vite tappo Tapping screw
16 168139 1 Gancio Hook
17 168140 4 O-ring O-ring
18 168141 2 Anello Leading ring
19 168142 1 Vite Screw
20 168143 1 Guarnizione Gasket
21 168144 1 Pistone idraulico Hydraulic piston
22 168145 1 Molla Spring
23 168146 1 Regolazione corsa Stroke adjustment
24 168147 1 Distanziale Spacer
25 168148 1 Innesto femmina Piston pin
26 168149 1 Innesto maschio Piston pin
27 168150 1 Molla Spring
28 168151 1 Ghiera Pin
29 168152 1 Motore Motor
30 168153 1 Canotto porta motore Motor holding case
31 168154 1 Perno Pin
32 168155 1 Rondella nylon Naylon washer
33 168156 1 Molla Spring
34 168157 1 O-ring O-ring
35 168158 1 Vite Screw
36 168159 2 Rondella rame Copper washer
37 168160 2 Tubo aria d. 5 Air tube
38 168161 5 Vite M3 Screw
39 168162 3 Vite M5 Screw
40 168163 1 Perno valvola Pin valve
41 168164 2 O-ring O-ring
42 168165 3 O-ring O-ring
43 168166 3 Ghiera guida Principal ring nut
44 168167 1 Valvola Valve

GB

I
18
NX 35
45 168168 1 Perno valvola Pin valve
46 168169 1 Dado valvola Leading valve
47 168170 1 Grilletto Trigger
48 168171 1 Spina Pin
49 168172 2 O-ring O-ring
50 168173 1 Cilindro oleodinamico Hydraulic cylinder
51 168174 2 O-ring O-ring
52 168175 1 Anello Leading ring
53 168176 1 Cilindro pneumatico Pneumatic cylinder
54 168177 1 Ghiera inferiore Lower ring nut
55 168178 4 Raccordo M6 Spacer
56 168179 2 Tubo aria d. 6 Tube
57 168180 1 Tubo aria Tube
58 168181 1 Molla Spring
59 168182 1 Perno Pin
60 168183 1 Guarnizione Gasket
61 168184 1 O-ring O-ring
62 168185 1 Pistone pneumatico Pneumatic piston
63 168186 1 Vite Screw
64 168187 1 O-ring O-ring
65 168188 1 O-ring O-ring
66 168189 1 Chiusura Covering
67 168190 1 Dado Nut - closure
68 168191 1 Fondello di protezione Protection bottom
69 168192 1 Silenziatore Silencer
70 168193 3 Vite M4 Screw
71 168194 2 Coppia impugnature Handle
73 168195 4 Vite Screw
74 168196 1 Protezione Protection
75 168197 2 Vite Screw
76 168198 1 Attacco aria Air connector
 0% 5 &4$)3&*#6/( &4$3*1$*B/
1 168110M3 1 Kopf M4 Cabeza M3
1 168110M4 1 Kopf M5 Cabeza M4
1 168110M5 1 Kopf M5 Cabeza M5
1 168110M6 1 Kopf M6 Cabeza M6
1 168110M8 1 Kopf M8 Cabeza M8
1 168110M10 1 Kopf M10 Cabeza M10
2 168111 1 Schraubenmutter Dado
3 168112 1 Dusentrager Cabeza
4 168114 1 Drehkupplung Puerta tirante
5 168116M3 1 Ansatz M3 Adaptador M3
5 168116M4 1 Ansatz M4 Adaptador M4
5 168116M5 1 Ansatz M5 Adaptador M5
5 168116M6 1 Ansatz M6 Adaptador M6
5 168116M8 1 Ansatz M8 Adaptador M8
5 168116M10 1 Ansatz M10 Adaptador M10
6 168125M3 1 Gewindedorn M3 Tirante M3
6 168125M4 1 Gewindedorn M4 Tirante M4
6 168125M5 1 Gewindedorn M5 Tirante M5
6 168125M6 1 Gewindedorn M6 Tirante M6
6 168125M8 1 Gewindedorn M8 Tirante M8
6 168125M10 1 Gewindedorn M10 Tirante M10
7 168130M3 1 Sechskantreduzier M3 Reductor Hexsagonale M3
7 168130M4 1 Sechskantreduzier M4 Reductor Hexsagonale M4
7 168130M5 1 Sechskantreduzier M5 Reductor Hexsagonale M5
7 168130M6 1 Sechskantreduzier M6 Reductor Hexsagonale M6
7 168130M8 1 Sechskantreduzier M8 Reductor Hexsagonale M8
7 168130M10 1 Sechskantreduzier M10 Reductor Hexsagonale M10
8 168131 1 O-ring O-ring
9 168132 1 Lager Soporte tirante
10 168133 1 Schraubenmutter Dado

E
!
D
19
NX 35
11 168134 1 Stift Silenciador
12 168135 1 Dichtung Guarnicòn
13 168136 1 Hydraulikgehäuse Cuerpo
14 168137 1 O-ring O-ring
15 168138 1 Schraub VerschluβTornillo tapón
16 168139 1 Aufzughaken Gancho
17 168140 4 O-ring O-ring
18 168141 2 Führungsring Anillo
19 168142 1 Schraub Tornillo
20 168143 1 Dichtung Guarnicòn
21 168144 1 Hydraulikkolben Pistón hydraulico
22 168145 1 Feder Resorte
23 168146 1 Hubeinstellung Ajuste de la carrera
24 168147 1 Distanzstuck Distanciador
25 168148 1 Kolbenbolzen Cruceta
26 168149 1 Kolbenbolzen Cruceta
27 168150 1 Feder Resorte
28 168151 1 Stift Silenciador
29 168152 1 Motor Motor
30 168153 1 Motorhalter Porta motor
31 168154 1 Ventilstifte Pernio
32 168155 1 Nailon Scheibe Arandela
33 168156 1 Feder Resorte
34 168157 1 O-ring O-ring
35 168158 1 Schraub Tornillo
36 168159 2 Kupfer Scheibe Arandela de cobre
37 168160 2 Luftrohr Tubo aire
38 168161 5 Schraub Tornillo
39 168162 3 Schraub Tornillo
40 168163 1 Ventilstifte Pernio válvula
41 168164 2 O-ring O-ring
42 168165 3 O-ring O-ring
43 168166 3 Führungsring Virola principal
44 168167 1 Ventil Válvula
45 168168 1 Ventilstifte Pernio válvula
46 168169 1 Führungsring Anillo válvula
47 168170 1 Drucktaster Gatillo
48 168171 1 Verdichtung Espina
49 168172 2 O-ring O-ring
50 168173 1 Hydraulik-Zylinder Cilindro hidráulico
51 168174 2 O-ring O-ring
52 168175 1 Führungsring Anillo principal
53 168176 1 Pneumatikzylinder Cilindro néumatico
54 168177 1 Unterring Virola inferior
55 168178 4 Zwischenteil Distanciador
56 168179 2 Rohr Tubo
57 168180 1 Rohr Tubo
58 168181 1 Feder Resorte
59 168182 1 Ventilstifte Pernio
60 168183 1 Dichtung Guarnicòn
61 168184 1 O-ring O-ring
62 168185 1 Pneumatikkolben Pistón néumatico
63 168186 1 Schraub Tornillo
64 168187 1 O-ring O-ring
65 168188 1 O-ring O-ring
66 168189 1 Deckung Cobertura
67 168190 1 Schraubenmutter Dado
68 168191 1 Schutzscheibe Casquillo
69 168192 1 Schalldampfer Silenciador
70 168193 3 Schraub Tornillo
71 168194 2 Hebelam Empunadura
73 168195 4 Schraub Tornillo
74 168196 1 Schutzscheibe Protecciòn
75 168197 2 Schraub Tornillo
76 168198 1 Deckung Ataque
Stampato a Ottobre 2012
SACTO srl - Via C. Porta 61 - 20831 Seregno (MB) Italia
Telefono +39 0362 232307 - Telefax +39 0362 235842
www.sacto.it - [email protected]

Popular Power Tools manuals by other brands

Stanley XGrip N08QI user manual

Stanley

Stanley XGrip N08QI user manual

Matco Tools MCL1238RA operating instructions

Matco Tools

Matco Tools MCL1238RA operating instructions

Ryobi 5133002516 Original instructions

Ryobi

Ryobi 5133002516 Original instructions

Meister MAS12V operating instructions

Meister

Meister MAS12V operating instructions

Stanley ProSert XTN20 instructions

Stanley

Stanley ProSert XTN20 instructions

Makita TW001GZ instruction manual

Makita

Makita TW001GZ instruction manual

TE Connectivity SOLARLOK Operator's manual

TE Connectivity

TE Connectivity SOLARLOK Operator's manual

Bosch GNA 2,0 Professional Original instructions

Bosch

Bosch GNA 2,0 Professional Original instructions

Nova PRO-TEK G3 Operation manual

Nova

Nova PRO-TEK G3 Operation manual

Klein Tools BAT20-7161 instruction manual

Klein Tools

Klein Tools BAT20-7161 instruction manual

Makita PJ7000 instruction manual

Makita

Makita PJ7000 instruction manual

Parkside PASSK 20-Li A1 Translation of the original instructions

Parkside

Parkside PASSK 20-Li A1 Translation of the original instructions

Esco 20408 instruction manual

Esco

Esco 20408 instruction manual

BGS technic 2834 instruction manual

BGS technic

BGS technic 2834 instruction manual

Northern Industrial Tools 12Volt Chainsaw Sharpener 141259 owner's manual

Northern Industrial Tools

Northern Industrial Tools 12Volt Chainsaw Sharpener 141259 owner's manual

Grizzly G0619 owner's manual

Grizzly

Grizzly G0619 owner's manual

Atlas Copco PRO W2631 Original product instructions

Atlas Copco

Atlas Copco PRO W2631 Original product instructions

Laser 5455 instructions

Laser

Laser 5455 instructions

manuals.online logo
manuals.online logoBrands
  • About & Mission
  • Contact us
  • Privacy Policy
  • Terms and Conditions

Copyright 2025 Manuals.Online. All Rights Reserved.