Saeco XSMALL HD8642 User manual

USER MANUAL
PLEASE READ THIS USER MANUAL CAREFULLY BEFORE USING THE MACHINE.
Register your product and get support at
www.saeco.com/welcome
English
Type HD8642 / HD8643
EN
02
02

IMPORTANT SAFEGUARDS
When using electrical appliances, basic safety precautions should always be
followed, including the following:
1. Read all instructions.
2. Do not touch hot surfaces. Use handles or knobs.
3. To protect against fire, electric shock and injury to persons do not immerse
cord, plugs, or appliance in water or other liquid.
4. Close supervision is necessary when the appliance is used by or near
children.
5. Unplug from outlet when not in use and before cleaning. Allow to cool
before putting on or taking off parts, and before cleaning the appliance.
6. Do not operate any appliance with a damaged cord or plug or after the
appliance malfunctions, or has been damaged in any manner. Return
appliance to the nearest authorized service facility for examination, repair
or adjustment.
7. The use of accessory attachments not recommended by the appliance
manufacturer may result in fire, electric shock or injury to persons.
8. Do not use outdoors.
9. Do not let cord hang over edge of table or counter, or touch hot surfaces.
10.Do not place on or near a hot gas or electric burner, or in a heated oven.
11.Always attach plug to appliance first, then plug cord into wall outlet. To
disconnect, turn any control to “off”, then remove plug from wall outlet.
12.Do not use appliance for other than intended use.
13.Save these instructions.
SAVE THESE INSTRUCTIONS

CAUTION
This appliance is for household use only. Any servicing, other than cleaning
and user maintenance, should be performed by an authorized service center.
Do not immerse machine in water. To reduce the risk of fire or electric shock,
do not disassemble the machine. There are no parts inside the machine
serviceable by the user. Repair should be done by authorized service personnel
only.
1. Check voltage to be sure that the voltage indicated on the nameplate
corresponds with your voltage.
2. Never use warm or hot water to fill the water tank. Use cold water only.
3. Keep your hands and the cord away from hot parts of the appliance during
operation.
4. Never clean with scrubbing powders or harsh cleaners. Simply use a soft
cloth dampened with water.
5. For optimal taste of your coffee, use purified or bottled water. Periodic
descaling is still recommended every 2-3 months.
6. Do not use caramelized or flavored coffee beans.
INSTRUCTIONS FOR THE POWER
SUPPLY CORD
A. A short power-supply cord (or detachable power-supply cord) is to be
provided to reduce risks resulting from becoming entangled in or tripping
over a longer cord.
B. Longer detachable power-supply cords or extension cords are available
and may used if care is exercised in their use.
C. If a long detachable power-supply cord or extension cord is used,
1. The marked electrical rating of the detachable power-supply cord or
extension cord should be at least as great as the electrical rating of the
appliance
2. If the appliance is of the grounded type, the extension cord should be a
grounding-type 3-wire cord, and
3. The longer cord should be arranged so that it will not drape over the
counter top or table top where it can be pulled on by children or tripped
over.

2
ENGLISH
Congratulations on your purchase of a Saeco Xsmall fully
automatic espresso machine!
To fully benet from the support that Philips Saeco oers,
please register your product at www.saeco.com/welcome.
The machine is suitable for preparing espresso coee using
whole coee beans.
In this user manual you will nd all the information you need
to install, use, clean and descale your machine.

ENGLISH
3
CONTENTS
IMPORTANT..................................................................................................... 4
Safety Instructions .......................................................................................................................... 4
Warnings......................................................................................................................................... 4
Cautions.......................................................................................................................................... 6
Compliance with Standards ............................................................................................................ 7
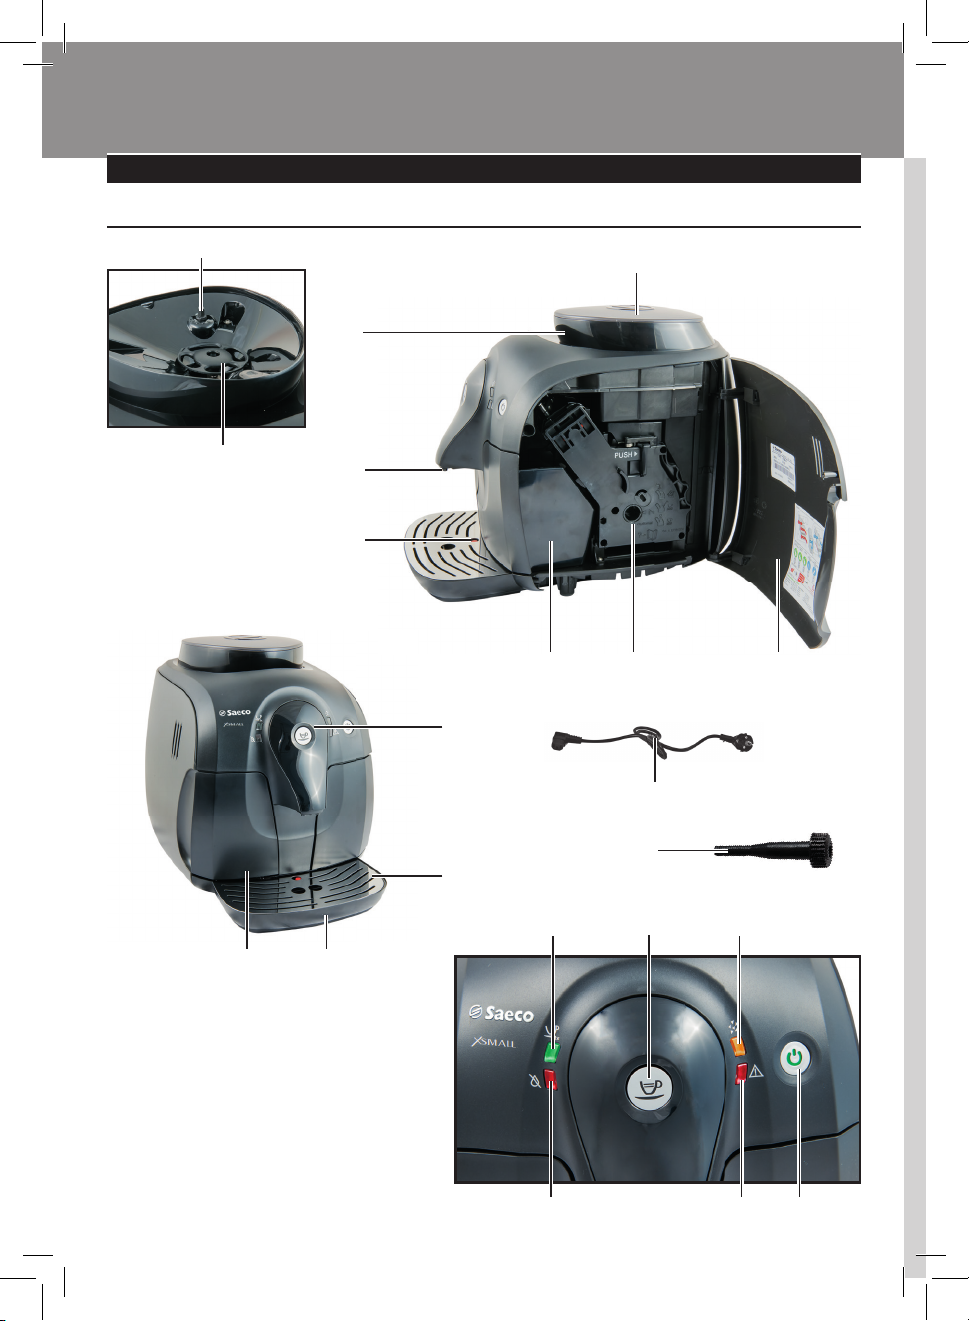
INSTALLATION................................................................................................. 8
Product Overview............................................................................................................................ 8
General Description......................................................................................................................... 9
PREPARING FOR USE.......................................................................................10
Machine Packaging....................................................................................................................... 10
Preparing for Use .......................................................................................................................... 10
USING THE MACHINE FOR THE FIRST TIME ........................................................12
Circuit Priming .............................................................................................................................. 12
Automatic Rinse/Self-Cleaning Cycle............................................................................................. 13
“INTENZA+”Water Filter Installation ............................................................................................ 15
ADJUSTMENTS................................................................................................16
Saeco Adapting System................................................................................................................. 16
Adjusting the Ceramic Coee Grinder............................................................................................ 17
Adjusting the Coee Length ......................................................................................................... 19
BREWING COFFEE ...........................................................................................20
CLEANING AND MAINTENANCE ........................................................................21
Daily Cleaning of the Machine....................................................................................................... 21
Daily Cleaning of the Water Tank................................................................................................... 22
Weekly Cleaning of the Brew Group and of the Coee Outlet Duct................................................ 22
Monthly Lubrication of the Brew Group ........................................................................................ 25
DESCALING.....................................................................................................26
Preparation ................................................................................................................................... 26
Descaling ...................................................................................................................................... 27
Rinsing.......................................................................................................................................... 28
INTERRUPTION OF THE DESCALING CYCLE ........................................................30
UNDERSTANDING THE DIFFERENT LIGHTS ........................................................32
Control Panel................................................................................................................................. 32
TROUBLESHOOTING........................................................................................35
ENERGY SAVING..............................................................................................37
Stand-by....................................................................................................................................... 37
Disposal ........................................................................................................................................ 37
TECHNICAL SPECIFICATIONS............................................................................38
WARRANTY AND SERVICE................................................................................38
Warranty....................................................................................................................................... 38
Service .......................................................................................................................................... 38
ORDERING MAINTENANCE PRODUCTS ..............................................................39

4
ENGLISH
IMPORTANT
Safety Instructions
This machine is equipped with safety devices. Nevertheless,
read and follow the safety instructions carefully and only use
the machine properly as described in these instructions to
avoid accidental injury or damage due to improper use of the
machine. Keep this user manual for future reference.
The term WARNING and this icon warn against possible
severe injuries, danger to life and/or damage to the machine.
The term CAUTIONand this icon warn against slight
injuries and/or damage to the machine.
Warnings
• Connect the machine to a wall socket with a voltage
matching the technical specications of the machine.
• Connect the machine to a earthed wall socket.
• Do not let the power cord hang over the edge of a table or
counter, or touch hot surfaces.
• Never immerse the machine, the mains plug or power cord
in water: Danger of electrical shock!
• Do not pour liquids on the power cord connector.
• Do not touch hot surfaces. Use handles and knobs.
• Remove the mains plug from the wall socket:
- if a malfunction occurs;
- If the machine will not be used for a long time;
- before cleaning the machine.

ENGLISH
5
Pull on the mains plug, not on the power cord. Do not
touch the mains plug with wet hands.
• Do not use the machine if the mains plug, the power cord
or the machine itself is damaged.
• Do not make any modications to the machine or its
power cord. Only have repairs carried out by a service
centre authorised by Philips to avoid any hazard.
• The machine should not be used by children younger than
8 years old.
• The machine can be used by children of 8 years and upwards
if they have previously been instructed on the correct use of
the machine and made aware of the associated dangers or if
they are supervised by an adult.
• Cleaning and maintenance should not be carried out by
children unless they are more than 8 years old and super-
vised by an adult.
• Keep the machine and its power cord out of reach of chil-
dren under 8 years old.
• The machine may be used by persons with reduced physi-
cal, sensory or mental capabilities or lacking sucient
experience and/or skills if they have previously been
instructed on the correct use of the machine and made
aware of the associated dangers or if they are supervised
by an adult.
• Children should be supervised to ensure that they do not
play with the machine.
• Never insert ngers or other objects into the coee
grinder.

6
ENGLISH
Cautions
• The machine is for household use only. It is not intended
for use in environments such as canteens, sta kitchens of
shops, oces, farms or other work environments.
• Always put the machine on a at and stable surface.
• Do not place the machine on hot surfaces, directly next to
a hot oven, heater units or similar sources of heat.
• Only put roasted coee beans into the coee bean hopper.
If ground coee, instant coee, raw coee beans or any
other substance is put in the coee bean hopper, it may
damage the machine.
• Let the machine cool down before inserting or removing
any parts.
• Never use warm or hot water to ll the water tank. Use
only cold non-sparkling drinking water.
• Never clean with scrubbing powders or harsh cleaners.
Simply use a soft cloth dampened with water.
• Descale your machine regularly. The machine indicates
when descaling is needed. Not doing this will make your
appliance stop working properly. In this case repair is not
covered under your warranty!
• Do not keep the machine at temperature below 0 °C.
Residue water in the heating system may freeze and cause
damage.
• Do not leave water in the water tank if the machine is
not used over a long period of time. The water can get
contaminated. Use fresh water every time you use the
machine.

ENGLISH
7
Compliance with Standards
The machine complies with art.13 of the Italian Legislative
Decree dated 25 July 2005, no. 151“Implementation of the
Directives 2005/95/EC, 2002/96/EC and 2003/108/EC on
the restriction of the use of certain hazardous substances in
electrical and electronic equipment, as well as waste disposal”.
This machine complies with EU Directive 2002/96/EC.
This Philips appliance complies with all the applicable
standards and regulations relating to the exposure to
electromagnetic elds.

8
INSTALLATION
Product Overview
1
12
19 20 21
11 10
14
5
13
6 7
2
3
4
15
8
9
16 17 18

ENGLISH
9
General Description
1. Coee bean hopper lid
2. Coee bean hopper
3. Coee dispensing spout
4. Full drip tray indicator
5. Coee grounds drawer
6. Brew group
7. Service door
8. Control panel
9. Grill
10. Drip tray
11. Water tank
12. Grinder adjustment knob
13. Ceramic coee grinder
14. Power cord
15. Grinder adjustment key
16. "Double coee" light
17. Coee button
18. Descaling light
19. No water light
20. Warning light
21. ON/OFF button with machine ready light

10
ENGLISH
PREPARING FOR USE
Machine Packaging
The original packaging has been designed and constructed to protect the
machine during transport. We recommend keeping the packaging material
for possible future transport.
Preparing for Use
1Remove the coee bean hopper lid and the drip tray with grill from the
packaging.
2Remove the machine from the packaging.
3For best use, it is recommended to:
• Choose a safe, level surface, where there will be no danger of over-
turning the machine or being injured.
• Choose a location that is suciently well-lit, clean and near an eas-
ily reachable socket.
• Allow for a minimum distance from the sides of the machine as
shown in the illustration.
4Insert the drip tray with grill into the machine. Make sure it is fully
inserted.
Note:
The drip tray collects the water that comes out of the dispensing spout
during each rinse/self-cleaning cycle, as well as coee that might be spilled
during coee preparation. Empty and wash the drip tray daily and each
time the full drip tray indicator is raised.
Caution:
NEVER remove the drip tray when the machine has just been turned
on. Wait a couple of minutes for the machine to carry out a rinse/self-
cleaning cycle.

ENGLISH
11
5Remove the water tank.
6Rinse the water tank with fresh water.
7Fill the water tank with fresh water up to the MAX level and reinsert it
into the machine. Make sure it is fully inserted.
Caution:
Never fill the water tank with warm, hot, sparkling water or any other
liquid, as this may cause damage to the water tank and the machine.
8Slowly pour the coee beans into the coee bean hopper.
Caution:
Only coffee beans must be put into the coffee bean hopper. If ground
coffee, instant coffee, raw coffee beans or any other substance is put in
the coffee bean hopper, it may damage the machine.
9Put the lid on the coee bean hopper.
10 Insert the plug into the socket located on the back of the machine.
MAX

12
ENGLISH
11 Insert the plug at the other end of the power cord into a wall socket
with suitable power voltage.
12
Press the
“ ”
ON/OFF button to turn the machine on; the
“ ”
light
will begin to ash quickly, indicating that the circuit has to be primed.
USING THE MACHINE FOR THE FIRST TIME
When using the machine for the rst time, the following activities need to
happen:
1) You need to prime the circuit.
2) The machine will perform an automatic rinse/self-cleaning cycle.
Circuit Priming
During this process, fresh water ows through the internal circuit of the
machine and the machine warms up. This takes a few seconds.
1Place a container (1L) under the coee dispensing spout.

ENGLISH
13
2Press the “ ” button. The machine dispenses water for a few seconds.
The “ ” light ashes slowly and the “ ” light turns o.
3When water dispensing stops, the “ ” light ashes slowly. The ma-
chine is warming up.
Automatic Rinse/Self-Cleaning Cycle
When warm-up has been completed, the machine automatically performs
a rinse/self-cleaning cycle of the internal circuits with fresh water. This
takes less than a minute.
1Place the container under the coee dispensing spout to catch the
small amount of water which will be dispensed.
2The " " light ashes slowly.
3Wait for water dispensing to stop.
Note:
You can stop dispensing by pressing the " " button.
Flashing

14
ENGLISH
Notes:
The automatic rinse/self-cleaning cycle is initiated when the machine has
been in stand-by mode, or turned o , for more than 15 minutes.
When you have not used the machine for 2 or more weeks you also have
to perform the manual rinsing cycle At the end of the cycle, it is possible to
brew a coee.
4The " " light shines steadily. The machine is ready to brew coee.

ENGLISH
15
“INTENZA+”Water Filter Installation
We recommend you to install the“INTENZA+” water lter as this prevents
limescale build-up in your machine and preserves a more intense aroma of
your coee.
The “INTENZA+” water lter can be purchased separately. For further de-
tails, please refer to the maintenance products page in this manual.
Water is a crucial part of every coee, so it is very important to always have
it professionally ltered. Using the “INTENZA+” water lter will prevent
mineral deposits from building up and improve your water quality.
1Remove the small white lter from the water tank and store it in a dry
place.
2Remove the“INTENZA+” water lter from its packaging, immerse it ver-
tically (with the opening positioned upwards) in cold water and gently
press the sides so as to let the air bubbles out.
3Set the “INTENZA+”water lter according to the hardness of the water
used:
A = Soft water
B = Hard water (standard)
C = Very hard water

16
ENGLISH
4Put the "INTENZA +" water lter into the empty water tank. Press it
down until it cannot move any further.
5Fill the water tank with fresh water and reinsert it into the machine.
6Brew a few coees (see the "Brewing coee" section).
7Remove the tank, ll it with fresh water up to the MAX level and place
it back into the machine.
ADJUSTMENTS
The machine allows for certain adjustments so that you can brew the best
tasting coee possible.
Saeco Adapting System
Coee is a natural product and its characteristics may change according to
its origin, blend and roast. The machine is equipped with a self-adjusting
system that allows the use of all types of coee beans available on the
market except for raw, caramelized and avoured coee beans. The ma-
chine automatically adjusts itself after brewing a certain number of cups of
coee to optimise the extraction.
Steady on
8When the operations described above have been completed, the“ ”
light shines steadily. Machine is ready to brew coee.
Note:
We recommend replacing the "INTENZA +" water lter every 2 months.

ENGLISH
17
Adjusting the Ceramic Coffee Grinder
Ceramic coee grinders always guarantee accurate and perfect grinding
and coarseness for every coee speciality.
This provides full aroma preservation, delivering a truly Italian taste in
every cup.
Warning:
Do not insert fingers or other objects. Only adjust the ceramic coffee
grinder using the grinder adjustment key. The ceramic coffee grinder
contains moving parts that may be dangerous.
You can adjust the ceramic grinders to set the coee grinding to your
personal taste.
Warning:
You can only adjust the coffee grinder settings when the machine is
grinding coffee beans.
1Remove the coee bean hopper lid.
2Make sure that the “ ” green light shines steadily, and that the water
tank and the coee bean hopper are full. Press the " " coee button;
the coee grinder starts grinding.

18
ENGLISH
4
The reference marks inside the coee bean hopper indicate the grind set-
ting. There are 5 dierent grind settings to choose, from position 1 () for
coarse grind - lighter taste to position 2 () for ne grind - stronger taste.
12
Note:
Use the coee grinder adjustment key provided with the machine. You will
taste the dierence after brewing 2-3 cups of coee. If coee is watery or is
brewed slowly, change the coee grinder settings.
3While the coee grinder is operating, press and turn the grinder adjust-
ment knob inside the coee bean hopper one notch at a time.
Warning:
Do not turn the coffee grinder more than one notch at the time to
prevent damage.
5When adjusting has been completed, put the lid back on the coee
bean hopper.
Other manuals for XSMALL HD8642
3
This manual suits for next models
1
Table of contents