SAF-HOLLAND SBS 2220 K0 Setup guide

Repair Instructions
Compressed Air Disc Brake
SAF SBS 2220 K0
XL-SA40001RM-en-DE Rev A • 02.2016
Translation of the original repair instructions

Please note
These repair instructions are intended for the exclusive use of trained persons within the commercial
vehicle industry and related workshops.
The content of this manual is not all-inclusive and not legally binding. SAF-HOLLAND GmbH assumes
no liability as a result of its use. The information contained in this manual neither represents ensured
characteristics of the product nor a guarantee. SAF-HOLLAND GmbH reserves the right to make changes
in the interest of technical progress without prior notice.
No liability is assumed as a result of incorrect or inappropriate components being tted to the product or the
omission of appropriate tests after the servicing of the product. Use appropriate spare parts documentation
when obtaining spare parts. Use only genuine SAF-HOLLAND GmbH spare parts in repairs.
This manual is subject to the copyright of SAF-HOLLAND GmbH. All rights reserved. No part of this manual
may be reproduced, copied or translated in any form or by any means without the prior written permission
of SAF-HOLLAND GmbH. Brand names mentioned in this manual are not identied as such in all cases,
but they are nevertheless subject to the provisions of trademark legislation.
The failure of any individual provision of this disclaimer to comply with current legal provisions does not
affect the validity of the remaining provisions.
Copyright
These repair instructions are classied as in accordance with the law on unfair competition.
All rights reserved by
SAF-HOLLAND GmbH
Hauptstraße 26
63856 Bessenbach, Germany
These repair instructions contain text and drawings that without the express permission of the manufacturer
cannot be either fully or partly
duplicated,
distributed or
in any other way disclosed.
Any breach or infringement will result in liability for damage.
2
en
XL-SA40001RM-en-DE Rev A • 02.2016 • Errors and changes excluded © SAF-HOLLAND

Table of contents
1. Component overview 6
1.1 Components of the disc brake 6
1.2 Brake identication and service kits for the disc brake 7
1.3 Brake discs 7
2. General information 8
2.1 Tightening torques 8
3. Structure and function 9
3.1 Sectional drawing of the disc brake 9
3.2 Functional description 10
4. Inspection points 11
4.1 Safety instructions for service and repair work 12
5. Function and visual inspection 13
5.1 Wear inspection of brake pads and brake discs 13
5.2 Inspecting the adjustment function 16
5.3 Checking the movement of the brake calliper 19
5.4 Checking the clearance in the guide bearing area (6) 20
5.5 Inspecting the sealing elements 21
6. Replacing the brake pads 22
6.1 Removing the brake pads 22
6.2 Installing the brake pads 23
6.3 Mounting the wear contacts 25
7. Replacingthepressurettings 27
7.1 Removing the pressure ttings with bellows (13) 27
7.2 Removing and installing the inner seal (22) 29
7.3 Mounting the pressure ttings with bellows (13) 31
8. Removing and installing the brake calliper 34
8.1 Removing the brake calliper from the carrier 34
8.2 Mounting the brake calliper to the carrier (carrier not removed) 36
9. Repairing the brake calliper bearing 40
9.1 Removing the bellows (9) 40
9.2 Replacing the bushing (7) 40
9.3 Replacing the slide bearing (6) on the short bearing side 42
9.4 Installing the bellows (9) 43
10. Replacing the brake chamber 46
10.1 Removing the diaphragm chamber 46
10.2 Fitting the diaphragm chamber 46
10.3 Removing the combined chamber 47
10.4 Fitting the combined chamber 48
3
en
XL-SA40001RM-en-DE Rev A • 02.2016 • Errors and changes excluded © SAF-HOLLAND

Safety guidelines
Note: The safety instructions listed below apply to all service and diagnostics operations on brake systems
and must not be directly associated with the activities and products described in this document. In addition,
always observe the information from the axle/vehicle manufacturer with regard to towing, lifting and
securing the vehicle.
ATTENTION: SAF-HOLLAND SHALL NOT BE LIABLE FOR ANY INJURY OR DAMAGE RESULTING
FROM THE IMPROPER USE OF SERVICE KITS OR SERVICE TOOLS: IMPROPER USE OF SERVICE
TOOLS AND IMPROPER ATTACHMENT OR APPLICATION OF SERVICE KITS CAN GIVE RISE TO
DAMAGE OR HAZARDOUS HANDLING. SAF-HOLLAND
ASSUMES NO LIABILITY IN THIS CASE.
The following precautions, in conjunction with the special hazard warnings provided in this document, must
be observed before and during work on and in the vicinity of compressed-air units:
1. Always wear safety goggles when working with compressed air.
2. Never exceed the air pressures specied by the vehicle manufacturer.
3. Never look directly into a compressed-air jet or point a jet at another person.
4. Never loosen a pressurised hose or compressed-air line. The hose may move around uncontrollably
when air is escaping.
5. When removing a device or maintaining a device in the vehicle, always reduce the pressure in the
subsystem in question to 0 bar. In the event that the vehicle is equipped with an air-dryer system,
remember that the system and any installed regeneration-air tanks may still contain compressed air,
even if other storage tanks have already been emptied.
6. In the event that compressed-air tanks are emptied during work on a vehicle's brake system or its
pneumatic auxiliary equipment, maintain a safe distance from piston rods and the brake linkage as these
may be actuated by a drop in pressure in the brake system. When carrying out work on vehicles with
air suspension, always support the frame in order to prevent sudden lowering and trapping between the
frame and axles or the frame and the ground.
7. Place the vehicle on a level surface and engage the parking brake. Secure the vehicle with wheel
chocks to prevent it from rolling away. A loss of pressure in the compressed-air brake unit can impair
braking efciency.
8. When carrying out work underneath or on the vehicle, and especially when working in the engine
compartment, always switch off the engine and disconnect the battery. If circumstances dictate that the
engine be running, UTMOST CAUTION must be exercised as contact with rotating, moving, leaking, hot
or electrically charged components can cause serious injury. In addition, we also recommend afxing
a sign to the steering wheel bearing the words "CAUTION! WORK BEING CARRIED OUT ON THE
VEHICLE!".
9. When carrying out work on vehicles with air suspension, ensure that the vehicle chassis is mechanically
supported by a support opposite the axle or ground. Doing so provides protection against injury caused
by unexpected lowering of the chassis resulting from a sudden loss of pressure in the air-suspension
system.
10. Inspect all compressed-air lines for kinks and pressure points, drying and overheating. Replacement
parts, pipes, hoses, fastening elements, etc. must correspond to the original parts and must have been
designed specically for these applications and systems. Check that all lines are fastened correctly.
Lines should be routed such that they cannot chafe and are not exposed to extreme heat.
11. Components with damaged threads or individual parts must be completely replaced. Avoid machine
repair or welding work if it cannot be inspected and approved by the vehicle or brake manufacturer.
12. Never attempt to remove, install, disassemble and reassemble a device before having read
through and understood the recommended procedures. Some devices contain highly pre-tensioned
compression springs, which can cause serious injury if not properly disassembled and reassembled.
Use only suitable tools and observe all safety precautions regarding use of the tool.
13. Before removing devices, mark their position and connections so that repaired devices and/or
replacement devices can be properly reinstalled. Ensure that proper supports or auxiliary equipment
are available for the removal/installation of heavy parts.
4
en
XL-SA40001RM-en-DE Rev A • 02.2016 • Errors and changes excluded © SAF-HOLLAND

14. Use only original parts and service kits supplied by SAF-HOLLAND or the vehicle manufacturer. Use
only the recommended tools in accordance with the corresponding instructions from SAF-HOLLAND.
15. The maintained or replaced device must be checked to ensure that it is functioning correctly and
effectively.
16. In the event that devices which could inuence braking performance or the behaviour of the brake
system are replaced or repaired, a nal check must be performed on the roller test bench. Please bear
in mind that when brake pads and/or brake discs and/or drums are replaced, full braking performance
will only be available again after the run-in phase.
17. Use of an impact wrench in conjunction with SAF-HOLLAND service tools for pneumatic disc brakes is
not permitted. SAF-HOLLAND service tools have not been designed for use of an impact wrench. Use
of an impact wrench can damage the service tools and vehicle resulting in a risk of injury.
18. Never use compressed air to clean the brake. Avoid swirling brake dust.
19. Before commissioning the vehicle, ensure that all components and the complete brake system are in
an orderly condition.
Welding
To prevent damage to electrical components, the following safety precautions must be observed:
1. Always mark and remove all connections to electronic control units and modules before commencing
electrical welding work. Make a note of the sequence in which the connections were released.
2. When reconnecting the speed sensors (in reverse order), it is essential that they are mounted in the
designated places. The system's function must be checked with a PC diagnostics system.
5
en
XL-SA40001RM-en-DE Rev A • 02.2016 • Errors and changes excluded © SAF-HOLLAND

1. Component overview
1.1 Components of the disc brake
Key
1 Brake calliper*
2 Carrier*
4 Guide bushing
5 Guide bushing
6 Slide bearing
7 Brass bushing
9 Bellows
10 Cover
11 Pad retainer
12 Brake pad*
12.1 Inner pad
12.2 Outer pad
13 Pressure tting with
bellows
18 Brake chamber**
22 Inner seal
26 Spring cotter pin
37 Cap
39 Socket cap screw
40 Socket cap screw
44 Bolt
45 Washer
58 Ring
61 Adapter
68 Cover
161 Slide bearing bushing
* Variants
** Diaphragm chamber or combined chamber
Component overview
6
en
XL-SA40001RM-en-DE Rev A • 02.2016 • Errors and changes excluded © SAF-HOLLAND

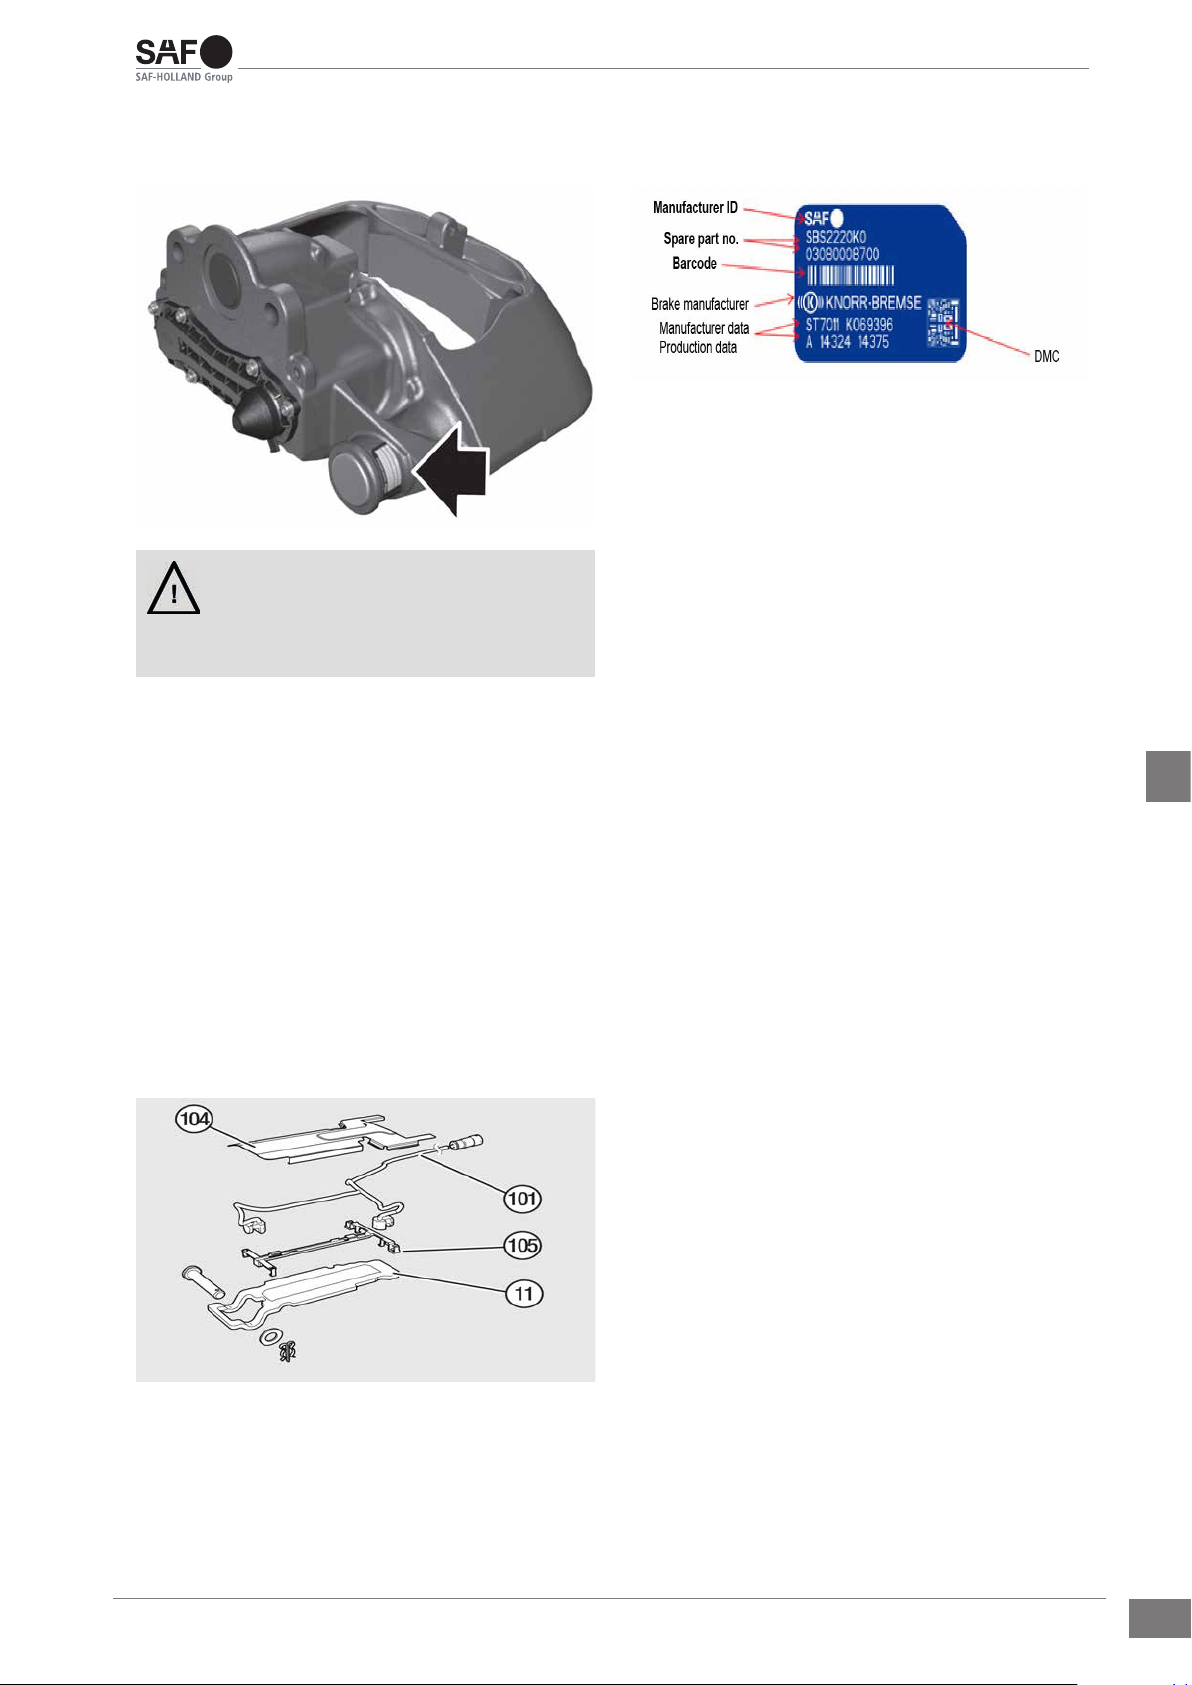
1.2 Brakeidenticationandservice
kits for the disc brake
Use only original SAF-Holland parts.
Danger !
1.2.1 Wear contact kits
11 Pad retainer
101 Wear contact clip sensor with cable
104 Cable guide plate
105 Cable guide
1.3 Brake discs
The respective vehicle manufacturer's regulations
apply to the replacement of brake discs.
These regulations also apply to SAF-HOLLAND
replacement brake discs.
Use of non-approved brake discs is prohibited for
safety and liability reasons.
When replacing brake discs, ensure that the correct
bolted connections and tightening torques are used.
SAF-HOLLAND recommends that brake discs be
replaced axially. Brake discs can be obtained from
the SAF-HOLLAND sales organisation.
In addition, SAF-HOLLAND recommends that the
brake discs be replaced after a period of six years,
even if they do not appear to be worn.
Component overview
7
en
XL-SA40001RM-en-DE Rev A • 02.2016 • Errors and changes excluded © SAF-HOLLAND

2. General information
Use of an impact wrench in conjunction with SAF-HOLLAND tools for pneumatic disc brakes is not
permitted.
Never rotate the adjuster (23) without an adapter (61). The adapter (61) will be irreparably damaged if its
prescribed demolition torque is exceeded. Try again with a new (and unused) adapter (61). In the event
of further damage, the brake calliper must be replaced due to internal damage. Never use an open-end
wrench as doing so can damage the adapter.
SAF-HOLLAND assumes no liability for damage,
injury or damaged SAF-HOLLAND tools resulting
from improper use.
Danger !
2.1 Tightening torques
Item no. Description Tightening torque Width across ats (AF)
Brake calliper on brake
carrier of axle
4 socket cap screws
M18 x 1.5
From inside to outside:
Pre-tightening: 120 Nm
Final tightening: 450 Nm or
120 Nm pre-tightening + 60°
(4 corner multi-tooth)
24 (multi-tooth)
39, 40 Guide bearing on brake
calliper
2 socket cap screws
M16 x 1.5
180 Nm + 90° 14 (internal hex)
18 Diaphragm or combined
chamber
M16 x 1.5
In accordance with the information
from the brake chamber/vehicle
manufacturer.
SAF-HOLLAND specication:
210 Nm incremental
24 (hex)
General information
8
en
XL-SA40001RM-en-DE Rev A • 02.2016 • Errors and changes excluded © SAF-HOLLAND

3. Structure and function
3.1 Sectional drawing of the disc brake
Key:
1* Brake calliper
2* Carrier
4 Guide bushing
5 Guide bushing
6 Slide bearing
7 Brass bushing
9 Bellows
10 Cover
11 Pad retainer
121* Inner brake pad
122*Outer brake pad
13 Pressure tting with bellows
16 Threaded pipe
17 Bridge
18**Brake chamber
19 Lever
20 Roller bearing
22 Inner seal
23 Adjuster
24 Retainer
26 Spring cotter pin
27 Compression spring
30 Roller chain
32 Chain sprocket
33 Wear sensor
37 Cap
39 Socket cap screw
40 Socket cap screw
44 Bolt
45 Washer
46 Brake disc
58 Ring
61 Adapter
68 Cover
161 Slide bearing bushing
* Observe variants
** Diaphragm chamber or
combined chamber
Structure and function
9
en
XL-SA40001RM-en-DE Rev A • 02.2016 • Errors and changes excluded © SAF-HOLLAND
3.2 Functional description
(Sliding calliper brake principle)
Clamping the brake
When braking, the piston rod of the combined or
diaphragm chamber (18) presses on the lever (19).
Power is transferred via the roller bearing (20) to
the bridge (17). The clamping force is exerted on
the inner brake pad (121) via the threaded pipes
(16) and pressure ttings (13).
After overcoming the clearance between the brake
pad (121) and brake disc (46), the reaction force
is transferred to the outer brake pad (122) via the
brake calliper (1).
The contact pressure of the brake pads (12) on the
brake disc (46) produces the braking torque for the
wheel.
Releasing the brake
If braking pressure is reduced, the compression
spring (27) presses the bridge (17) with threaded
pipes (16) and lever (19) back into the initial
position.
Clearance/wear adjustment device of
the brake
The clearance is the distance between the brake
pad (12) and the brake disc (46). This distance is
required to allow the brake disc (46) to run freely
(unbraked) when in the "brake released" state. If
the clearance is too large, the braking distance may
be extended when braking.
The prescribed clearance has been designed to
compensate for operational inuences such as:
• Temperature-dependent changes to component
lengths.
• Viscoelastic effects of the brake pads.
• Manufacturing and axial run-out tolerances of
the disc and hub.
The wear adjustment device ensures a consistent
feed travel by offsetting the abrasion on the brake
pads (12) and the brake disc (46).
With each actuation of the brake, the lever (19)
activates the adjuster (23) after overcoming an
idle stroke representing the design clearance. As
a result, the threaded pipes (16) are pre-turned via
the adjuster (23) and retainer (24) by the amount
by which the prescribed clearance has been
exceeded.
Structure and function
10
en
XL-SA40001RM-en-DE Rev A • 02.2016 • Errors and changes excluded © SAF-HOLLAND
4. Inspection points
Although durable materials have been used,
the general condition of the components must
be checked on a regular basis. The following
information indicates the inspection points of the
disc brake, which if adhered to will help to ensure
long-term, problem-free use of the product.
Every 3 months
The wear state of the brake disc and brake pads
must be checked, irrespective of any indication in
the vehicle (see Chap. 5.1).
On each pad change
The adjustment function (see Chap. 5.2) and the
movement of the calliper over the entire movement
path (see Chap. 5.3) must be checked. In addition,
the pressure tting bellows (13), cap (37), sealing
elements (9, 58) and calliper bearing in the slide
bearing (6) area must be checked for clearance and
damage (see Chap. 5.3.4).
Annually
The movement of the brake calliper within the
clearance (see Chap. 5.3.1) and the presence of
the cover (10), cap (37) and cover (68) must be
checked.
Note: These are minimum intervals. Depending on
use, more frequent component inspection may be
required.
Ensure to observe the information from the vehicle/
axle manufacturer with respect to service intervals
and legally stipulated inspections!
The brake discs must be inspected in accordance
with the information from the axle/vehicle
manufacturer.
To facilitate objective determination of the cause of
a complaint, all damaged parts must be returned in
the event of a complaint.
Inspection points
11
en
XL-SA40001RM-en-DE Rev A • 02.2016 • Errors and changes excluded © SAF-HOLLAND

4.1 Safety instructions for service and
repair work
Observe the applicable safety regulations for
repair and service work on commercial vehicles,
especially the safety precautions for jacking up and
securing the vehicle.
Use only original SAF brake parts.
Always secure the vehicle to prevent it from
rolling away before commencing repair and
service work!
The service/parking brake and, on buses, the
frequent-stop brake, must be released.
Danger !
Observe the repair and service instructions and
wear limits of both the brake pads and brake discs
(see Chap. 5.1).
Use the recommended tools (see Chap. 2.1).
Tighten screws, nuts and bolts to the prescribed
tightening torques (see Chap. 2.4).
Screw threads and threaded holes must be
free of lubricants, grease and residues of screw
locking agent!
Danger !
When tting wheels in accordance with the
instructions from the vehicle manufacturer, ensure
that the wheel has sufcient clearance to the brake
calliper, otherwise there is a risk of damage to the
wheel.
After completing work on the disc brake, always
perform a nal check on the roller test bench to
verify function and effectiveness. Note that the
brake pads and/or brake disc may have reduced
braking efciency during their run-in phase.
Danger !
Observe the safety and environmental guidelines
on pages 5 and 6.
Inspection points
12
en
XL-SA40001RM-en-DE Rev A • 02.2016 • Errors and changes excluded © SAF-HOLLAND

5. Function and visual inspection
5.1 Wear inspection of brake pads and
brake discs
For optimum safety, always remain within the
wear limits of brake pads and brake discs.
Danger !
Brake pads
Check the thickness of brake pads at regular
intervals according to use of the vehicle and in
accordance with the statutory provisions, however
every three months as a minimum, even if a brake
pad wear indicator is connected.
5.1.1 Small cavities on the edges are permissible
(see Fig.).
5.1.2 Large cavities on the surface of the brake
pad are impermissible (see Fig.).
5.1.3 In the event that the thickness of the friction
material at its thinnest point is less than/equal to
2 mm (dimension C), the pads must be replaced
(see Fig.).
A = Overall thickness of a new brake pad 32 mm
B = Pad carrier plate 9 mm
C = Minimum thickness of friction material 2 mm*
D = Absolute minimum thickness of brake pad
11 mm*
*In the event that these minimum thicknesses are
reached, the brake pads must be replaced.
Brake discs
Measure the thickness of the brake disc at the
weakest point (note any burrs on the edge of the
brake disc).
Observe the information from the vehicle/axle
manufacturer.
E = Overall thickness of the brake disc
New dimension = 45 mm
Minimum dimension = 37 mm (brake disc must be
replaced)
In the event that dimension E ≤ 39 mm, the brake
disc must
also be replaced when replacing the pad.
5.1.1 - Brake pad with permissibly small cavities
5.1.2 - Brake pad with impermissible cavities
5.1.3 - Dimensions of brake pad and brake discs
Function and visual inspection
13
en
XL-SA40001RM-en-DE Rev A • 02.2016 • Errors and changes excluded © SAF-HOLLAND

5.1.4 Inspect the brake disc for run-in grooves
and cracks on every brake pad change and replace
if necessary.
The image shows the possible states of the brake
disc surface.
A1 =
Network-like formation of cracks is permissible
B1 = Cracks running towards the centre of the
hub to max. 1.5 mm (width and depth) and
max. 0.75 x a long are permissible
(a = friction ring width)
C1 = Unevenness of the disc surface to 1.5 mm is
permissible
D1 = Continuous cracks into the cooling channel
or to the inner or outer edge of the friction
ring are impermissible. The brake disc must
be replaced.
The image to the right shows examples of crack
and groove formation on a brake disc.
Notes: In surface states A1 to C1, the brake disc
can continue to be used until the maximum wear
dimension E = 37 mm is reached.
SAF-HOLLAND brake discs are maintenance-
free under normal conditions, i.e. polishing on pad
change is not required. D1 occurs only in isolated
cases and polishing of the brake discs is advisable
in order to increase the contact ratio of the brake
pad during the run-in process, e.g. in the event of
heavy scoring over the entire friction surface of the
brake disc. Minimum subsequent dimension after
turning down >39 mm.
In addition, the information from the vehicle
manufacturer with respect to turning down the brake
discs must be observed.
Ensure a consistent, all-over friction surface on the
friction ring. If necessary, replace the brake pads
and brake disc.
Brake disc polishing is impermissible.
Danger !
There is a risk of accident if these regulations are
not observed!
Worn brake pads and/or over-worn brake discs
will reduce or stop braking efciency.
Danger !
5.1.4 - Brake disc tolerance and examples of crack
and groove formation on a brake disc
Function and visual inspection
14
en
XL-SA40001RM-en-DE Rev A • 02.2016 • Errors and changes excluded © SAF-HOLLAND

Check the pad and brake disc wear with the brake
installed:
On all disc brakes equipped with calliper and carrier
marking.
5.1.5 The brake pad thickness with wheels tted
(see Fig.) can be checked at the brake calliper
marking (P) opposite the
xed carrier marking (R) (see Fig.).
If state 5.1.7b has been reached, the brake pad
thickness and brake disc must be checked with the
wheels removed (see Fig.).
If the thicknesses have fallen below the minimum
dimensions (see Fig. 5.1), the brake pads and
brake disc must be replaced.
Replace the brake pads and brake discs only
axially.
Danger !
Wear indicators/signal
5.1.6 Depending on the vehicle manufacturer
and vehicle type, the brakes may be equipped with
wear indicators.
These electrical wear indicators with sensor and
cable are positioned on the pad carrier plate. The
circuit is interrupted when the brake pad wear
reaches its limit (see Fig.).
5.1.5a - With new pads and new brake disc
5.1.5b - With worn pads and worn brake disc; brake
pad and brake disc check required with wheels
removed
5.1.6 - Electrical wear indicator
Observe the information from the respective
vehicle manufacturer.
Note !
Function and visual inspection
15
en
XL-SA40001RM-en-DE Rev A • 02.2016 • Errors and changes excluded © SAF-HOLLAND

5.2 Inspecting the adjustment function
5.2.1 Always secure the vehicle to prevent it from
rolling away before commencing repair and service
work.
5.2.2 The service/parking brake and, on buses,
the frequent-stop brake, must be released.
5.2.3 Check the supply pressure of the brake
system (target: >6.5 bar), connect an external sup-
ply to prevent loss of pressure.
5.2.4 Jack up the vehicle or axle and remove the
wheel (observe the information from the respective
axle/vehicle manufacturer).
5.2.5 Check the temperature of the brake disc. It
must be between -10°C and 50°C.
5.2.6 Check the clearance as follows:
5.2.6.1 Move the brake calliper backwards and
forwards in the guide to check that there is clear-
ance. If necessary, clean the brake and/or repair
the bearings (see Fig.) (see Chap. 9).
5.2.6.2 Actuate the brake once with medium
pressure (approx. 2-3 bar). If the brake cannot be
actuated, slide the brake calliper on its guide pin in
the direction of the centre of the vehicle (see Fig.).
5.2.6.3 Using a suitable tool, press the inner brake
pad (12) away from the pressure ttings (13)
(see Fig.).
5.2.6.1 - Sliding the brake calliper backwards and
forwards in the guide three times
5.2.6.2 - Sliding the brake calliper on its guide pin in
the direction of the inner pad
5.2.6.3 - Pressing away the inner brake pad
5.2.6.4 - Removing the cap and using the adapter
on the adjuster
Ensure that there is no dirt between the outer pad
backs and calliper contact surface as this could
produce inaccurate results. Clean if necessary.
Caution!
5.2.6.4 Remove the cap (37) with the tab (do not
lose the adapter (61) (see Fig.).
Removing the cap (37) with auxiliary equipment can
damage the adjuster seal.
5.2.6.5 Set the initial clearance to 1.3 mm by un-
screwing and then screwing in the brake with the
adapter (61). Set the clearance on the side of the
brake that is turned.
5.2.6.6 Actuate the brake 20x with medium pres-
sure (approx. 2-3 bar).
Function and visual inspection
16
en
XL-SA40001RM-en-DE Rev A • 02.2016 • Errors and changes excluded © SAF-HOLLAND

5.2.6.7 Measure the distance between the pad
backs and the pressure tting (13).
Due to possible bridge tipping, this must be
measured with two gauges at the same time over
the entire surface of the pressure tting and over
both pressure ttings (use 220 mm long feeler
gauges) (see Fig.).
If the clearance difference between the two
pressure ttings is >0.25 mm, the clearance of the
calliper guide must be checked for wear (see 5.3)!
In addition, the clearance at both pressure ttings
must be 0.6 - 1.2 mm.
If the clearance is too large, braking efciency
may impaired. If the clearance is too small, the
brake may overheat and cause further damage.
Danger !
5.2.7 If the clearance is greater than 1.2 mm, the
adjustment function must be checked as follows:
5.2.7.1 Rotate the adjuster with the adapter (61)
three clicks in an anti-clockwise direction (increas-
ing clearance).
5.2.7.2 Fit the ring spanner or socket to the adapter.
Actuate the brake 5 to 10 times (approx. 2 bar). In
the event of a functional adjustment, rotate the ring
spanner or socket cyclically in the direction of the
arrow (see Fig. and note below).
Note: As the cycle rate increases, the twisting angle or
movement of the ring spanner or socket decreases.
If the ring spanner or socket fails to rotate, does
so only on the rst actuation or every actuation
backwards and forwards, the adjuster is faulty and
the brake calliper must be replaced.
5.2.6.7 - Measuring the distance between the pad
backs and pressure tting
5.2.7.1 - Rotating the adjuster with the adapter
three clicks in an anti-clockwise direction
5.2.7.2 - Actuating the brake 5 to 10 times, the ring
spanner or socket must rotate cyclically
Ensure that the ring spanner can rotate freely
in a clockwise direction whilst carrying out the
following procedure.
Note !
Function and visual inspection
17
en
XL-SA40001RM-en-DE Rev A • 02.2016 • Errors and changes excluded © SAF-HOLLAND

5.2.7.3 Smear the seal around the cap with grease.
Ensure that the cap (37) is installed in position as
shown (see arrow). Otherwise, in the case of a
anged brake chamber, the cap (37) can no longer
be used (see Fig.).
Note: The cap (37) should be replaced even if the
brake pads are not replaced.
5.2.8 If the clearance is smaller than 0.6 mm,
the following parameters and functions must be
checked:
5.2.8.1 Check the function of the brake chamber in
accordance with the information from the manufac-
turer.
5.2.8.2 Check the end position of the lever spheri-
cal bearing in the brake.
5.2.8.3 Remove the brake pads (see item 6.1). Re-
move any dirt from the pads, calliper and carrier.
Check the brake pads for incorporation of the
pressure ttings, replace the brake pads if
necessary.
Check the contact surfaces in the carrier for
incorporation, replace the carrier if necessary.
5.2.8.4 Check the brake disc. For brake discs from
SAF-HOLLAND (see 5.1). For brake discs from
other manufacturers, observe their information.
5.2.8.5 Check the movement of the brake calliper
over the entire movement path (see 5.3).
5.2.8.6 Install the brake pads (see 6.2).
5.2.8.7 Mount the brake chamber (see 12.2
or 12.4).
5.2.8.8 Double check the adjustment function
(see 5.2.6ff).
If the clearance at both pressure ttings is still
smaller than 0.6 mm, the brake calliper must be
replaced.
5.2.9 Fit the wheels (observe the information
from the respective vehicle manufacturer).
5.2.7.3 - Seal around cap and installation position
Function and visual inspection
18
en
XL-SA40001RM-en-DE Rev A • 02.2016 • Errors and changes excluded © SAF-HOLLAND

5.3 Checking the movement of the
brake calliper
Movement of the calliper within the clearance
Always secure the vehicle to prevent it from
rolling away before commencing repair and
service work.
The service/parking brake and, on buses, the
frequent-stop brake, must be released.
Danger !
5.3.1 When pushing and pulling on the calliper in
the axial direction (see arrow), it must be possible
to move the calliper within the clearance by hand
(see Chap. 5.2).
Considerable effort is required.
In the event that the calliper cannot be moved, the
movement over the entire calliper guide must be
checked (see item 5.3.2ff).
Movement over the entire calliper guide
5.3.2 Remove the brake pads (see Chap. 6.1).
5.3.3 Turn the pressure ttings (13) back fully
(see Fig.).
5.3.4 The brake calliper (1) must move over the
entire movement path >25 mm (see Fig.).
In the event that the brake calliper does not move
over the prescribed movement path of >25 mm
or fails to move at all, the calliper guide must be
repaired (see Chap. 9).
5.3.1 - Pushing and pulling on the calliper in the
axial direction
5.3.3 - Turning back the pressure ttings, freeing
the guide bushing of dirt
5.3.4 - Movement path of the brake calliper
Function and visual inspection
19
en
XL-SA40001RM-en-DE Rev A • 02.2016 • Errors and changes excluded © SAF-HOLLAND

5.4 Checking the clearance in the
guide bearing area (6)
Note: Before removing the wheel, check that there
is no contact between the brake calliper, parts of
the axle, vehicle and chassis and the carrier.
5.4.1 Remove the wheels. The information from
the respective vehicle manufacturer must be ob-
served.
5.4.2 Remove the pad retainer (11) (see
Chap. 6.1.2).
To perform the measurement, a new brake
pad pair must be installed (see Chap. 6) as the
measurement must, where possible, be conducted
new in the brake calliper position with new brake
pads. In the event that the check is not performed
as part of a pad change, the installation position
of the used brake pads must be marked before
removal so that they can be returned to the same
position.
5.4.3 Slide the brake calliper fully in the direction
of the outside of the vehicle (see Fig.).
5.4.4 Attach magnetic dial gauge stands to the
carrier (2) in the short bearing area (see Fig.).
The cast pockets in the brake calliper (1) may be
used as measuring points - see arrow A.
5.4.5 Set the dial gauge to zero.
5.4.6 Insert a suitable tool (e.g. screwdriver as
shown, with a length of approx. 200 mm) between
the brake calliper (1) as centred as possible to the
carrier (2) and press the brake calliper away in the
clearance area (with normal force) (see Fig.).
5.4.7 Read off the dial gauge. Maximum clearance
= 1 mm.
In the event that clearance is too large, the
bearings must be replaced in full with a suitable
service kit (see Chap. 1.2 and Chap. 9).
If the check is not performed as part a brake
pad change, the previously marked brake pads
can be re-used (Chap. 5.1 "Wear inspection of
brake pads and brake discs" must be observed).
Otherwise, replace the brake pads axially and set
the clearance (see Chap. 6.2).
5.4.8 Fit the wheel. The information from the re-
spective vehicle manufacturer must be observed.
5.4.3 - Sliding the brake calliper towards the outside
of the vehicle
5.4.4 - 5.4.6 - Reading off the clearance on the dial
gauge
Function and visual inspection
20
en
XL-SA40001RM-en-DE Rev A • 02.2016 • Errors and changes excluded © SAF-HOLLAND
Table of contents
Other SAF-HOLLAND Industrial Equipment manuals
Popular Industrial Equipment manuals by other brands

Endress+Hauser
Endress+Hauser 51517656 CleanFit H CPA 475 operating instructions

ESO
ESO CRIRES user manual

Zoeller
Zoeller MEDIUM X2 operating manual

Pepperl+Fuchs
Pepperl+Fuchs PGV100RS-F200-B16-1,5M manual

Bühler technologies
Bühler technologies GAS 222.30 Assembly, installation and operation instructions

Simplex
Simplex STS DAY TANK manual