Safety 1st IH282 User manual

Ultrasonic 360° Humidifier
IH282, IH283, IH284
User Guide
©2013 Dorel Juvenile Group. All Rights Reserved. Todos derechos reservados.
www.djgusa.com (800) 544-1108 www.safety1st.com
Made in CHINA. Hecho en CHINA.
Styles and colors may vary. Los estilos y los colores pueden variar.
Distributed by (Distribuido por) Dorel Juvenile Group, Inc., 2525 State St., Columbus, IN 47201-7494
Dorel Distribution Canada, 873 Hodge, St. Laurent, QC H4N 2B1
11/06/13 4358-4834E
READ ALL INSTRUCTIONS BEFORE ASSEMBLY AND USE.
KEEP INSTRUCTIONS FOR FUTURE REFERENCE.
CAUTION
• Adult assembly is required. Keep small parts away
from children.
WARNING
When using electrical appliances, basic precautions should always
be followed to reduce the risk of fire, electric shock and injury to
person, including the following:
• Use appliance only as described in this manual. Any other
use not recommended by the manufacturer may cause fire,
electric shock, or injury to persons. The use of attachments not
recommended or sold by the manufacturer may cause hazards.
DO NOT use outdoors.
• To avoid fire or shock hazard, plug the appliance directly into
a 120V AC electrical outlet. DO NOT plug in the cord with wet
hands.
• Keep the cord out of heavy traffic areas. To avoid fire hazard,
NEVER put the cord under rugs or near heat registers.
• DO NOT operate any appliance with a damaged cord or plug,
after the appliance malfunctions, or if it has been dropped or
damaged in any manner. Return appliance to manufacturer for
examination, electrical or mechanical adjustment, or repair.
• DO NOT attempt to repair or adjust any electrical or mechanical
functions on this unit. Doing so will void your warranty. The
inside of the unit contains no user serviceable parts. All servicing
should be performed by qualified personnel only.
• Humidifier should be unplugged when not in use.
• DO NOT place humidifier near heat sources such as stoves,
radiators, and heaters. DO locate your humidifier on an inside
wall near an electrical outlet. The humidifier should be at least 4
inches (10 cm) away from the wall for best results. DO NOT allow
the mist outlets to directly face the wall. Moisture could cause
damage, particularly to wallpaper.
• NEVER place humidifier in an area where it is accessible to children.
NEVER use humidifier in a closed room, particularly where a child
may be sleeping, resting, or playing (a closed room may result in
excessive humidity).
• DO NOT attempt to refill humidifier without first unplugging the unit
from its electrical outlet. Failure to heed this warning may cause
personal injury. Be sure to unplug the unit by pulling on the plug and
not the cord. NEVER tilt, move, or attempt to empty unit while it is
operating. Shut off and unplug before removing the water tank and
moving the unit. Use both hands when carrying full tank of water.
• DO NOT block air inlet or outlet while unit is running.
• Always place humidifier on a firm, flat, level surface. A waterproof
mat or pad is recommended for use under the humidifier. NEVER
place it on a rug or carpet, or on a finished floor that may be
damaged by exposure to water or moisture. To prevent damage to
surfaces, DO NOT place humidifier under overhanging surfaces.
• DO NOT use humidifier in an area where humidity level is in
excess of 50%. Use a hygrometer, available at your local retailer,
to measure the humidity. Turn humidifier off if excessive humidity
occurs.
• DO NOT pour water in any openings other than the water tank.
• NEVER place base under water flow or immerse in liquids.
• NEVER operate unit without water in the tank.
• NEVER touch exposed metal diaphragm in base after use. Metal will
be HOT.
• This humidifier requires daily and weekly maintenance to operate
appropriately. Refer to daily and weekly cleaning procedures. Use only
cleaners recommended by the manufacturer.
• NEVER drop or insert any object into any openings.
1
On/Off Button
Float
Sensor
Tank
Tank Handle
(on back side
of tank)
360° Mist Outlets
Base
Mist Adjustment Knob
Cap
NOTE: The recommended humidity level is between 35%-
50%. A humidity level below 20% can be unhealthy and
uncomfortable.
Under normal conditions, it is preferable to use a lower
setting on this humidifier. The mist will not be visible at a
low setting. Only when the humidity level is extremely low
should the higher settings be used. A white mist may be
visible at higher settings and there is an increased risk of
moisture damage, particularly to objects near the humidifier.
NOTE: If moisture forms on the walls or windows of the room, turn off the humidifier. The room already has plenty of humidity and additional moisture may cause damage.
Consumer Information
• Do not return this product to the place of purchase. If any parts are missing, e-mail consumer@djgusa.com, call Consumer Relations at
(800) 544-1108, or fax at (800) 207-8182. You can also visit our web site at www.safety1st.com. Have ready the model number (IH282, IH283, IH284) and
date code (manufacture date located on product label).
How Does it Work?
Humidifiers provide comfort by adding moisture to dry indoor
air. The Ultrasonic 360° Humidifier uses ultrasonic technology.
A metal diaphragm silently vibrates at a very high frequency
to create droplets, producing a cool fog or mist.
The humidifier should be placed with the mist outlets
directed away from any nearby walls or furniture. Ideally, the
humidifier is only projecting a modest amount of moisture
into the air to gently increase the humidity level.
Know Your Unit
STRANGULATION HAZARD! Children have STRANGLED in cords.
NEVER place camera or cords within 6 feet of the crib. Do not use
with an extension cord. Only use the AC adapters provided.
WARNING!
STRANGULATION HAZARD! Children have STRANGLED in cords.
NEVER place Baby Unit or cords within 6 feet of the crib. Do not use
with an extension cord. Only use the AC adapters provided.
WARNING!
Video Monitor instruction warning
Audio Monitor instruction warning
Generic Electrical instruction warning w/ adaptors
Generic Electrical instruction warning
STRANGULATION HAZARD! Children have STRANGLED in cords.
NEVER place cords within 6 feet of the crib.
Do not use with extension cord.
WARNING!

2
Troubleshooting
Meaning Action
Problem Cause Action
• Unit does not turn on
• White powder coming
out of humidifier
• Dampness in rooms on
walls or windows
• Mist output is minimal or
not visible
• Unit turns on and off
• Bubbles in the water or a
gurgling sound
• Water leakage
• Plug in power cord or
re-seat tank
• Adjust the setting
to reduce mist output
• Use distilled or filtered
water instead of tap water
• Turn unit off or adjust the
setting to reduce mist
output
• No action required, as mist
at lower settings is not
visible
• Refill tank
• Clean float (see Care &
Cleaning section)
• Clean gasket (see Care &
Cleaning section)
• Put humidifier on a level
surface and refill tank
• No action necessary
• Discard humidifier, as it
cannot be repaired
• Unit is not plugged in
or tank
is not seated
properly
• High setting
(mist can
look like white powder)
•
Some chemicals used
in safe water treatment
could become white
powder as the water
vaporizes. This is not a
humidifier malfunction.
• High setting
• Low setting
• Tank is almost empty
• The float inside base
unit is dirty
• Gasket in bottom of
tank is dirty
• Humidifier is not on a
level surface so float
is not able to operate
properly
• Normal operation. As
water enters reservoir in
base, air is displaced and
creates bubbles in tank
and possibly a gurgling
sound.
• Product may have
been mishandled.
Each unit was tested
after production and
confirmed to be free of
leaks.
Question Answer
• What are the variables
that affect run time?
• How do I remove film on
the tank?
• How can I extend run
time?
• The estimated run time for this humidifier is based on
average room conditions and is dependent on numerous
variables such as:
- Air exchange in the room.
- Room construction where the humidifier is placed.
- Temperature of the room.
- Humidity levels in the room.
- Movement of occupants and the opening and closing of
doors in the room.
- Home furnishings in the room.
• See “Daily Maintenance” section. Regular cleaning is
recommended.
• Run your unit on the lowest setting.
• Fill tank all the way full and place on the base. Let water
empty into the base until it stops bubbling, then refill and
re-seat tank again. This ensures maximum water capacity
and will extend run time.
Operating Your Humidifier
PRE-OPERATING INSTRUCTIONS
1 Be sure the humidifier is switched OFF (Figure 1).
2 Select a location for your humidifier, on a flat and level surface about 4 inches away from
the wall. DO NOT place the humidifier on a finished floor or near furniture which can be
damaged by too much moisture or water. Place on a moisture-resistant surface.
3 Remove tank by holding the tank handle and lifting straight upward (Figure 2). Bring tank to
the sink. Twist off cap at the bottom of the tank and fill tank with clean, cool water, ideally
distilled water. Additives are NOT recommended. Replace cap by firmly turning clockwise and
then replace tank on the base. The tank will immediately begin to empty into the base.
OPERATING INSTRUCTIONS
1 Plug the humidifier into a 120VAC electrical outlet.
2 To start the humidifier, push the ON/OFF button at the back of the humidifier.
3 Adjust mist direction by rotating the 360° mist outlets to the desired positions. Set the desired output level using mist adjustment knob (Figure 3).
4 When water level is low, the misting function will automatically shut off. To turn the humidifier completely OFF, push the ON/OFF button again.
12
ON OFF
3
Dorel Juvenile Group, Inc., warrants to the original purchaser that this product
(Ultrasonic 360° Humidifier), is free from material and workmanship defects
when used under normal conditions for a period of one (1) year from the date of
purchase. Should the product contain defects in material or workmanship Dorel
Juvenile Group, Inc., will repair or replace the product, at our option, free of
charge. Purchaser will be responsible for all costs associated with packaging and
shipping the product to Dorel Juvenile Group Consumer Relations Department at
the address noted on the front of this document and all other freight or insurance
costs associated with the return. Dorel Juvenile Group will bear the cost of
shipping the repaired or replaced product to the purchaser. Product should be
returned in its original package accompanied by a proof of purchase, either a sales
receipt or other proof that the product is within the warranty period. This warranty
is void if the owner repairs or modifies the product or the product has been
damaged as a result of misuse.
This warranty excludes any liability other than that expressly stated previously,
including but not limited to, any incidental or inconsequential damages.
SOME STATES DO NOT ALLOW THE EXCLUSION OR LIMITATION OF
INCIDENTAL OR CONSEQUENTIAL DAMAGES, SO THE ABOVE LIMITATION OR
EXCLUSION MAY NOT APPLY TO YOU.
THIS WARRANTY GIVES YOU SPECIFIC LEGAL RIGHTS, AND YOU MAY ALSO
HAVE OTHER RIGHTS THAT MAY VARY FROM STATE TO STATE.
One (1) Year Limited Warranty
Care and Maintenance
WEEKLY MAINTENANCE
Remove Mineral Buildup/Scale:
1 Repeat steps 1-3 above.
2 Visually inspect electronic sensor and float inside the base unit. If any scale
build-up is noted, double-check that unit is unplugged and that sensor has had
adequate time to cool, then wipe isopropyl alcohol or vinegar directly on sensor
and/or float with a paper towel, cloth or safety swab to clean. Do not attempt to
remove float to clean.
3 Clean the tank by partially filling it with one 8-ounce cup of undiluted white
vinegar. Leave this solution in the tank for at least 30 minutes, occasionally
swishing the vinegar around inside the tank, then gently clean all interior tank
surfaces with a soft brush. Scale on the exterior of the tank may be removed by
wiping it with a cloth dampened with undiluted white vinegar.
4 Rinse tank thoroughly with clean water to remove the mineral and vinegar residue.
Rinse a second time to ensure that all residue has been removed.
Disinfect Tank:
1 Fill tank 1/2 full with water and 1/2 teaspoon of chlorine bleach. DO NOT place
tank on base unit while it contains the bleach/water.
2 Let the solution stand for 30 minutes, swishing every few minutes. Wet all
surfaces.
3 Carefully empty the tank and rinse with warm water until you can not detect any
bleach smell. Dry with a clean cloth or paper towel.
NOTE: This is an electrical appliance and requires attention when in use.
Follow the recommended guidelines to help prevent micro-organisms
from growing in the humidifier.
DAILY MAINTENANCE
1 Before cleaning, be sure the humidifier is OFF and is unplugged
from the electrical outlet.
2 Remove the tank from the base and place in sink.
3 Drain tank of remaining water and rinse thoroughly to remove any
sediment or dirt. Wipe clean and dry with a clean cloth or paper
towel.
4 DO NOT place base under water. WIPE CLEAN ONLY.
STORAGE INSTRUCTIONS
When not using your humidifier for an extended period of time:
1 Clean, rinse and thoroughly dry the humidifier as directed in weekly
maintenance. DO NOT leave any water in the unit when storing.
Leaving water in the unit may render the unit inoperable for the
following season.
2 Place the humidifier in the original carton and store in a cool, dry
place.

Humidificador Ultrasónico de 360°
IH282, IH283, IH284
Guía para el usuario
©2013 Dorel Juvenile Group. All Rights Reserved. Todos derechos reservados.
www.djgusa.com (800) 544-1108 www.safety1st.com
Made in CHINA. Hecho en CHINA.
Styles and colors may vary. Los estilos y los colores pueden variar.
Distributed by (Distribuido por) Dorel Juvenile Group, Inc., 2525 State St., Columbus, IN 47201-7494
Dorel Distribution Canada, 873 Hodge, St. Laurent, QC H4N 2B1
11/06/13 4358-4834E
LEA TODAS LAS INSTRUCCIONES ANTES DE ENSAMBLAR
Y UTILIZAR DEL MOISÉS. GUARDE ESTAS INSTRUCCIONES
PARA SU USO FUTURO.
PRECAUCIÓN
• Se requiere el armado por parte de un adulto. Mantenga las
piezas pequeñas fuera del alcance de los niños.
ADVERTENCIA
Cuando use aparatos electrodomésticos, debe siempre tomar
precauciones básicas para reducir el riesgo de incendios, choques
eléctricos y lesions a personas, incluidas las siguientes:
• Utilice el aparato electrodoméstico solamente como se describe en este
manual. Cualquier otro uso no recomendado por el fabricante puede
causar incendios, choques eléctricos o lesiones personales. El uso
de accesorios no recomendados o vendidos por el fabricante puede
resultar peligroso. NO UTILIZAR en exteriores.
• Para evitar riesgos de incendio o choques eléctricos, enchufe el
electrodoméstico directamente en una toma de corriente de 120 V CA.
NO enchufe el cable con las manos mojadas.
• Mantenga el cable fuera de las zonas con mucho tránsito. Para evitar
riesgos de incendio, NUNCA coloque el cable debajo de alfombras o
cerca de salidas de calefacción.
• NO opere ningún aparato electrodoméstico que tenga el cable o el
enchufe dañado, que haya tenido un desperfecto, o que se haya caído
o dañado de algún modo. Devuelva el aparato electrodoméstico al
fabricante para su revisión, ajuste eléctrico o mecánico, o reparación.
• NO intente reparar o ajustar ninguna función eléctrica o mecánica de
esta unidad. Si lo hace, anulará la garantía. El interior de la unidad no
contiene piezas que puedan ser reparadas por el usuario. Todo servicio de
mantenimiento debe ser realizado únicamente por personal calificado.
• Desenchufe el humidificador cuando no esté en uso.
• NO coloque el humidificador cerca de fuentes de calor, como estufas,
radiadores y calentadores. SÍ coloque el humidificador en una pared interior,
cerca de una toma de corriente. Para obtener mejores resultados, coloque el
humidificador a no menos de 4 pulgadas (10 cm) de distancia de la pared.
NO permita que las salidas de niebla apunten directamente hacia la pared.
La humedad puede provocar daños, en especial al empapelado.
1
NOTA: El nivel de humedad es recomendado del 35% al 50%.
Un nivel de humedad inferior al 20% puede ser insalubre e
incómodo.
En condiciones normales, es recomendable utilizar un
ajuste menor en este humidificador. La niebla no es visible
en un nivel de ajuste más bajo. Los niveles de ajuste más
altos sólo deben utilizarse cuando el nivel de humedad es
extremadamente bajo. En un ajuste más alto es posible que
se vea una niebla blanca y existe un mayor riesgo de daño
por humedad, especialmente en objetos que se encuentren
cerca del humidificador.
NOTA: Si se acumula humedad en las paredes o las ventanas de la habitación, apague el humidificador. La habitación ya tiene suficiente humedad y el exceso puede causar daños.
Información para el consumidor
• No devuelva este producto al lugar donde lo compró. Si falta alguna pieza, envíe un correo electrónico a consumer@djgusa.com, llame al Departamento de
Relaciones con el Consumidor al (800) 544-1108, o envíe un fax al (800) 207-8182. También puede visitar nuestro sitio web en www.safety1st.com. Tenga a
mano el número de modelo (IH282, IH283, IH284) y el código de fecha (la fecha de fabricación se encuentra en la etiqueta del producto) a mano.
¿Cómo funciona?
Los humidificadores proporcionan comodidad al agregar
humedad al aire en interiores. El Humidificador Ultrasónico
de 360° utiliza la tecnología ultrasónica. Un diafragma de
metal vibra silenciosamente a muy alta frecuencia para crear
pequeñas gotas, lo que produce una fresca niebla o rocío.
Debe colocar el humidificador con las salidas de niebla alejadas
de cualquier pared o mueble cercano. En condiciones ideales, el
humidificador sólo proyecta una modesta cantidad de humedad
en el aire para aumentar ligeramente el nivel de humedad.
Conozca su unidad
STRANGULATION HAZARD! Children have STRANGLED in cords.
NEVER place camera or cords within 6 feet of the crib. Do not use
with an extension cord. Only use the AC adapters provided.
WARNING!
STRANGULATION HAZARD! Children have STRANGLED in cords.
NEVER place Baby Unit or cords within 6 feet of the crib. Do not use
with an extension cord. Only use the AC adapters provided.
WARNING!
Video Monitor instruction warning
Audio Monitor instruction warning
Generic Electrical instruction warning w/ adaptors
Generic Electrical instruction warning
• NUNCA coloque el humidificador en un lugar accesible a los
niños. NUNCA utilice el humidificador en una habitación cerrada,
especialmente en donde un niño se encuentre durmiendo,
descansando o jugando (una habitación cerrada puede provocar un
exceso de humedad).
• NO intente recargar humidificador sin antes desconectar la unidad de
su toma de corriente. El ignorar esta advertencia puede causar lesiones
personales. Asegúrese de desenchufar la unidad tirando del enchufe, y
no del cable. NUNCA incline, mueva o intente vaciar la unidad mientras esté
en funcionamiento. Apague y desenchufe la unidad antes de retirar el
tanque de agua y moverla. Cuando transporte el tanque lleno de agua,
use ambas manos.
• NO bloquee la salida ni la entrada de aire mientras la unidad se
encuentre en funcionamiento.
• Siempre coloque el humidificador en una superficie firme, plana y
nivelada. Se recomienda colocar una alfombra o almohadilla a prueba
de agua debajo del humidificador. NUNCA debe colocarlo sobre una
alfombra o un piso que pueda dañarse por la exposición al agua o
a la humedad. Para evitar daños a las superficies,NO coloque el
humidificador directamente debajo de superficies más altas.
• NO utilice el humidificador en un área donde el nivel de humedad
sea superior al 50%. Para medir la humedad utilice un higrómetro,
disponible de su distribuidor local. Apague el humidificador si hay
exceso de humedad.
• NO vierta agua en aberturas que no sean del tanque de agua.
• NUNCA coloque la base debajo de una corriente de agua ni la sumerja
en líquidos.
• NUNCA haga funcionar la unidad sin agua en el tanque.
• Después del uso, NUNCA toque el diafragma de metal expuesto en la
base, pues estará CALIENTE.
• Para funcionar adecuadamente, este humidificador requiere
mantenimiento diario y semanal. Consulte los procedimientos de
limpieza diarios y semanales. Utilice únicamente los limpiadores
recomendados por el fabricante.
• NUNCA deje inserte ni coloque objetos en las aberturas.
Botón de
encendido/apagado
Flotador
Sensor
Tanque
Base
Perilla de ajuste
de niebla
Salidas de niebla de
360°
Manija del tanque
(en la parte poste-
rior del tanque)
Tapa
¡PELIGRO DE ESTRANGULACIÓN! Los niños se han ESTRANGULADO
con los cables. NUNCA coloque los cables a menos de 6 pies de
distancia de la cuna. No lo use con un cable de extensión.
¡ADVERTENCIA!

12
3
Solución de problemas
Meaning Action
Problema Causa Acción
• La unidad no se
enciende
•
Sale polvo blanco
del humidificador
(la niebla puede
parecer blanca
polvo)
•
Humedad en
habitaciones,
paredes o ventanas
• La salida de niebla
es mínima o no es
visible
• La unidad se
enciende y se apaga
• Burbujas en el agua
o un sonido que
gorjea
• Pérdida de agua
• Enchufe el cable de
alimentación o vuelva a
colocar el tanque en la base
• Cambie el ajuste para reducir
la salida de niebla
• Use agua destilada o filtrada
en lugar de agua del grifo
• Apague la unidad o cambie
el ajuste para reducir la
salida de niebla
• No debe realizarse ninguna
acción, ya que la niebla en
ajustes menores no es visible
• Vuelva a llenar el tanque
• Limpie el flotador (consulte la
sección “Cuidado y limpieza”)
• Limpie la junta (consulte la
sección “Cuidado y limpieza”)
• Coloque el humidificador en
una superficie plana y vuelva
a llenar el tanque
• No debe realizarse ninguna
acción
• Deseche el humidificador,
pues no puede ser reparado
• La unidad no está enchufada
o el tanque no está colocado
adecuadamente
• La unidad está ajustada a un
nivel alto
•
Algunos productos químicos
utilizados en el tratamiento de
agua potable podría conver-
tirse en polvo de color blanco
como el agua se evapora.
•
Esto no indica un mal funcio-
namiento del humidificador.
• La unidad está ajustada a un
nivel alto
• La unidad está ajustada a un
nivel bajo
• El tanque está casi vacío
• El flotador dentro de la uni-
dad de base está sucio
• La junta en la parte inferior
del tanque está sucia
• El humidificador no está en una
superficie plana y el flotador no
puede funcionar correctamente
• Funcionamiento normal. A
medida que el agua ingresa
en el depósito de la base,
desplaza el aire y crea bur-
bujas en el tanque y posible-
mente un sonido que gorjea.
• Es posible que el producto
se haya utilizado de manera
incorrecta. Después de su
fabricación, se prueba cada
unidad y se confirma que esté
libre de pérdidas.
Pregunta Respuesta
• ¿Cuáles son las
variables que afectan el
tiempo de
funcionamiento?
• ¿Cómo elimino la película
del tanque?
• ¿Cómo puedo prolongar
el tiempo de funciona-
miento?
• El tiempo de funcionamiento estimado de este
humidificador se basa en las condiciones de una habitación
típica y depende de numerosas variables, como:
- El intercambio de aire en la habitación.
- El lugar de la habitación donde se coloca el humidificador.
- La temperatura de la habitación.
- Los niveles de humedad de la habitación.
- El movimiento de los ocupantes, y la apertura y el cierre
de las puertas de la habitación.
- Los muebles de la habitación.
• Consulte la sección “Mantenimiento diario”. Se recomienda
realizar una limpieza regular.
• Haga funcionar la unidad en ajustándola al nivel más bajo.
• Llene el tanque completamente y colóquelo en la base.
Deje que el agua se vierta dentro de la base hasta que deje
de burbujear; luego vuelva a llenar el tanque y colóquelo
nuevamente. Esto asegura la máxima capacidad de agua y
prolonga el tiempo de funcionamiento.
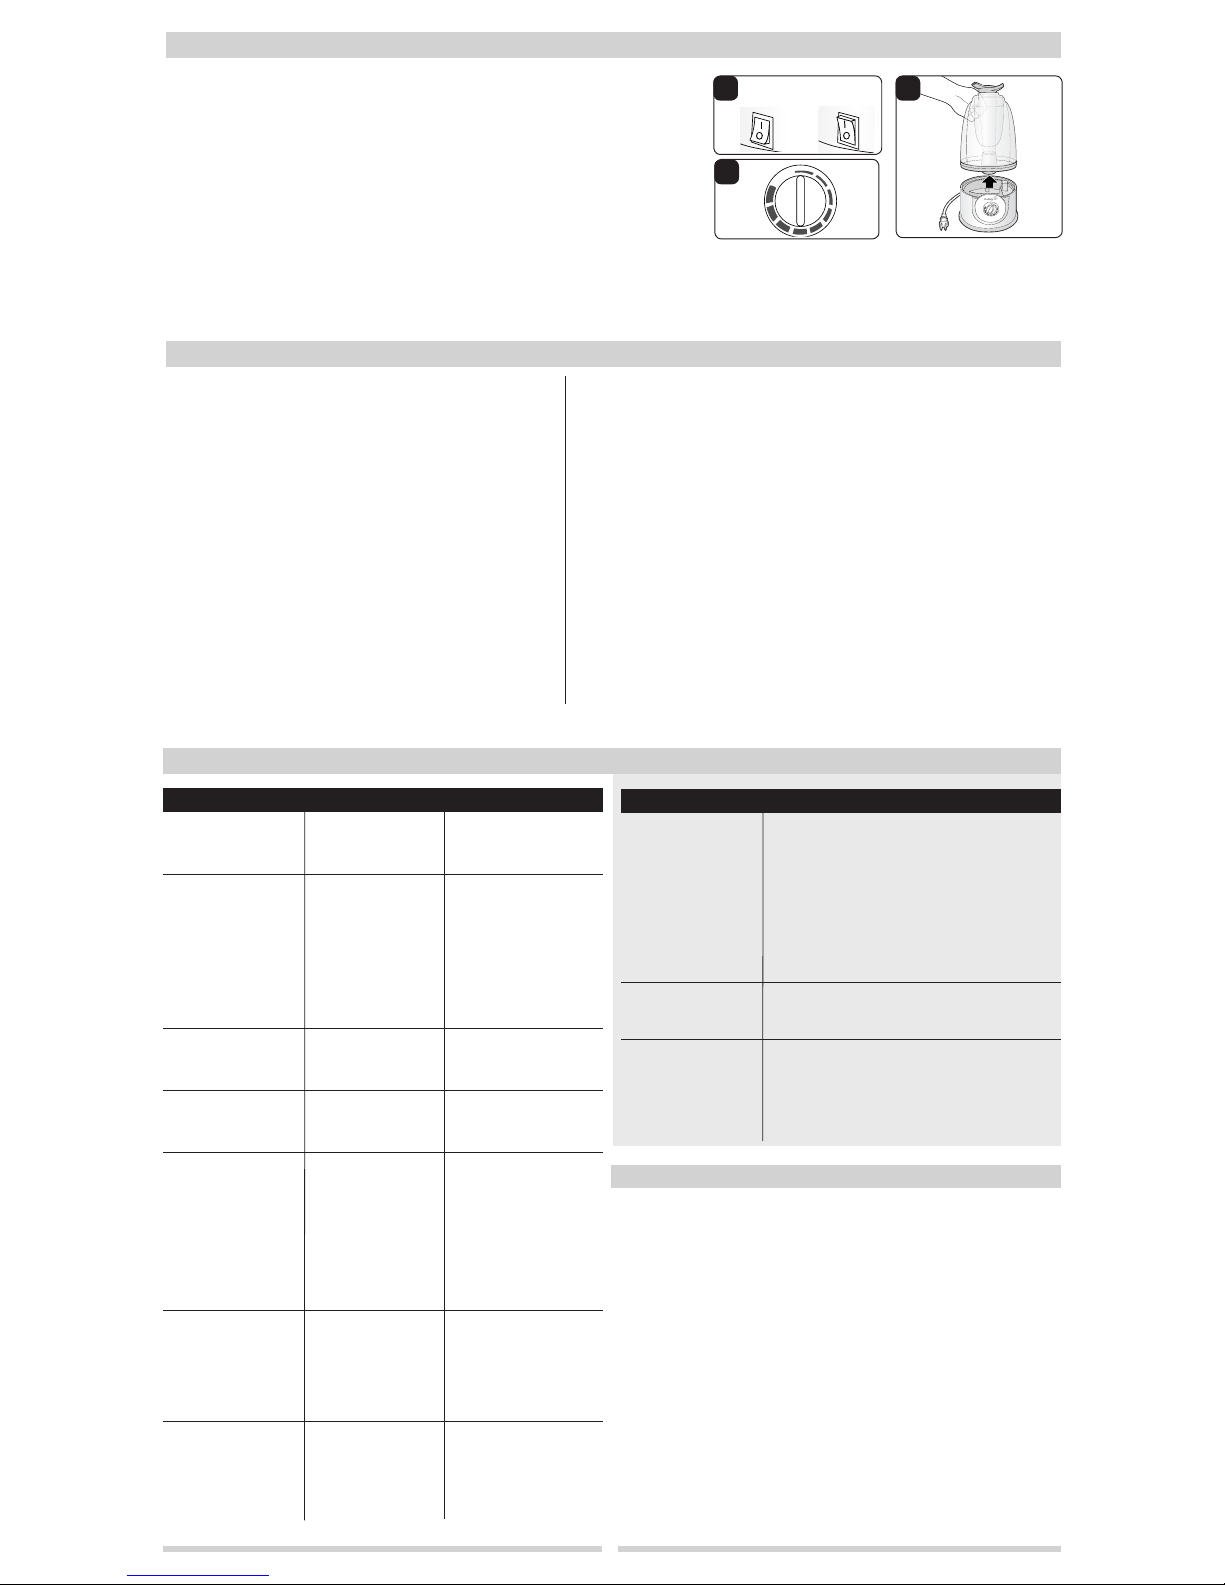
Cómo utilizar el humidificador
INSTRUCCIONES ANTES DE LA OPERACIÓN
1 Asegúrese de que el humidificador esté APAGADO (Figura 1).
2 Coloque el humidificador sobre una superficie plana, a unas 4 pulgadas (10 cm) de distancia de la
pared. NO coloque el humidificador sobre el piso o cerca de muebles que puedan dañarse por el
exceso de humedad o agua. Colóquelo sobre una superficie resistente a la humedad.
3 Retire el tanque sosteniéndolo de la manija y tirando hacia arriba (Figura 2). Lleve el tanque al
lavabo. Desenrosque la tapa en la parte inferior del tanque y llénelo con agua fría. Enrosque la
tapa girándola hacia la derecha y luego coloque el tanque en la base; inmediatamente comenzará a
vaciarse dentro de la base.
INSTRUCCIONES DE OPERACIÓN
1 Conecte el humidificador en una toma de corriente de 120 VAC.
2 Para encender el humidificador, oprima el botón de ENCENDIDO/APAGADO, en la parte posterior de la unidad.
3 Ajuste la dirección de la niebla girando las salidas de niebla de 360° a cualquier posición deseada. Programe el nivel de salida deseado utilizando la perilla
de ajuste de niebla (Figura 3).
4 Cuando el nivel de agua sea bajo, la función de niebla se apagará automáticamente. Para apagar totalmente el humidificador, pulse nuevamente el botón de
ENCENDIDO/APAGADO.
MANTENIMIENTO SEMANAL
Retire la acumulación de minerales/sarro:
1 Repita los pasos 1 a 3 anteriores.
2 Inspeccione visualmente el sensor electrónico y el flotador dentro de la
unidad de base. Si nota acumulación de sarro, compruebe que la unidad
esté desconectada y que el sensor haya tenido tiempo suficiente para
enfriarse. Luego, limpie el sensor y/o flotador con alcohol isopropílico
o vinagre utilizando una toalla de papel o un paño. No intente retirar el
flotador para limpiarlo.
3 Limpie el tanque llenándolo parcialmente con una taza de 8 onzas de
vinagre blanco sin diluir. Deje esta solución en el tanque durante al
menos 30 minutos, revolviendo ocasionalmente el vinagre en el interior
del tanque. Luego, limpie con cuidado todas las superficies internas del
tanque con un cepillo suave. Para eliminar el sarro de la parte exterior del
tanque, límpiela con un paño humedecido con vinagre blanco sin diluir.
4 Enjuague el tanque completamente con agua limpia para eliminar los
residuos de minerales y vinagre. Enjuáguelo una segunda vez para
asegurarse de eliminar todos los residuos.
Para desinfectar el tanque:
1 Llene el tanque con agua hasta la mitad y agregue 1/2 cucharadita de
blanqueador con cloro. NO coloque el tanque en la unidad de base
mientras contiene blanqueador y agua.
2 Deje reposar la solución durante 30 minutos, agitándola cada pocos
minutos. Humedezca todas las superficies.
3 Vacíe el tanque cuidadosamente y enjuáguelo con agua tibia hasta que no
tenga olor a cloro. Séquelo con un trapo limpio o una toalla de papel.
NOTA: Este es un aparato electrodoméstico y requiere atención cuando está
en uso. Siga las pautas recomendadas para ayudar a prevenir el desarrollo de
microorganismos en el humidificador.
MANTENIMIENTO DIARIO
1 Antes de limpiarlo, asegúrese de que el humidificador esté APAGADO y
desenchufado de la toma de corriente.
2 Retire el tanque de la base y colóquelo en el lavabo.
3 Vacíe el tanque y enjuáguelo con abundante agua para retirar cualquier
sedimento o suciedad. Límpielo y séquelo con un trapo limpio o una toalla de
papel.
4 NO coloque la base debajo del agua. LÍMPIELA CON UN PAÑO ÚNICAMENTE.
INSTRUCCIONES DE ALMACENAMIENTO
Cuando no utilice el humidificador durante un período de tiempo:
1 Limpie, enjuague y seque completamente el humidificador como se
indica en el mantenimiento semanal. NO deje agua en la unidad cuando
lo almacene. Si queda agua en la unidad, podría evitar que funcione la
temporada siguiente.
2 Coloque el humidificador en la caja original y guárdelo en un lugar fresco y
seco.
La firma Dorel Juvenile Group, Inc., asegura al comprador original que este producto
(Humidificador Ultrasónico de 360º), está garantizado contra materiales defectuosos o mano
de obra deficiente durante un (1) año a partir de la fecha de compra, si se utiliza en condicio-
nes normales. Si el producto presentara materiales defectuosos o mano de obra deficiente,
Dorel Juvenile Group, Inc. reparará o sustituirá el producto, a nuestra discreción, de manera
gratuita. El comprador cubrirá todos los costes relacionados con el envase y envío del pro-
ducto al Departamento de Relaciones con el Consumidor de Dorel Juvenile Group, a la direc-
ción que aparece al inicio de este documento, y los demás costes de transportación o asegu-
ramiento relacionados con el envío. Dorel Juvenile Group cubrirá los costes de devolución al
comprador del producto reparado o sustituido. El producto debe enviarse en su envase origi-
nal junto con una prueba documental de la compra, ya sea el recibo de venta u otro medio
demostrativo de que el producto aún esté dentro del período de garantía. Esta garantía que-
dará anulada si el propietario hubiera reparado o modificado el producto, o si éste se hubiera
dañado como consecuencia del uso incorrecto.
Esta garantía excluye cualesquiera otras responsabilidades ajenas a la expresada más arriba,
entre otras los daños incidentales o consecuentes.
EN ALGUNOS ESTADOS NO SE PERMITEN LAS EXCLUSIONES O LIMITACIONES
REFERENTES A LOS DAÑOS INCIDENTALES O CONSECUENTES, DE MODO QUE LA
LIMITACIÓN O EXCLUSIÓN ANTES EXPUESTA QUIZÁS NO SE APLIQUE EN SU CASO
PARTICULAR.
ESTA GARANTÍA LE OTORGA DERECHOS LEGALES ESPECÍFICOS Y ES POSIBLE QUE
USTED TAMBIÉN CUENTE CON OTROS DERECHOS QUE PUDIERAN VARIAR EN DISTINTOS
ESTADOS.
Garantía limitada durante un (1) año
ENCENDIDO APAGADO
Cuidado y mantenimiento
2
This manual suits for next models
2
Table of contents
Languages:
Other Safety 1st Humidifier manuals