Safeway SMART SPORT Isofix User manual

1. This is an ISOFIX CHILD RESTRAINT SYSTEM. It is approved to Regulation
No.44,04 series of amendments for general use in vehicles fitted with
ISOFIX anchorages systems.
2. It will fit vehicles with position approved as ISOFIX positions (as
detailed in the vehicle handbook), depending on the category of the
child seat and of the fixture.
3. The mass group and the ISOFIX size class for which this device is
intendedis:Group1(9-18kg)andISOFIXsizeclassB1.
4. The child car restraint can also be installed with a 3-point safety belt,
however always in combination with the adjusted support leg. And it
can only be installed on forward facing seats equipped with an
automatic 3-point safety belt approved in accordance with ECE R16 or
other equivalents standar that comply with SABS 1080.
Unimark Distributors CC, P.O.Box 912-1095,Silverton,0127
Tel:0128041793 Fax:0128041795
www.safewaybabies.co.za info@safewaybabies.co.za
Notice
This product has been approved according to the strictest European
safety standards (ECE R 44/04) and is suitable for Group I (9-18KG).
Group I (9-18kg)
Quality Guarantee
Created with Passion,Designed for Safety
SMART SPORT Isofix
.ISOFIX anchorage installation
3-point-belt installation
.

Content Warning
1.Content .....................................................................................1
2.Warning ....................................................................................2
3.Know your child car seat ..........................................................3-4
4.Five positions of the child car seat ...............................................5
5.Install the child car seat using ISOFIX anchorages system.
Group 1(9-18kg) ........................................................................5
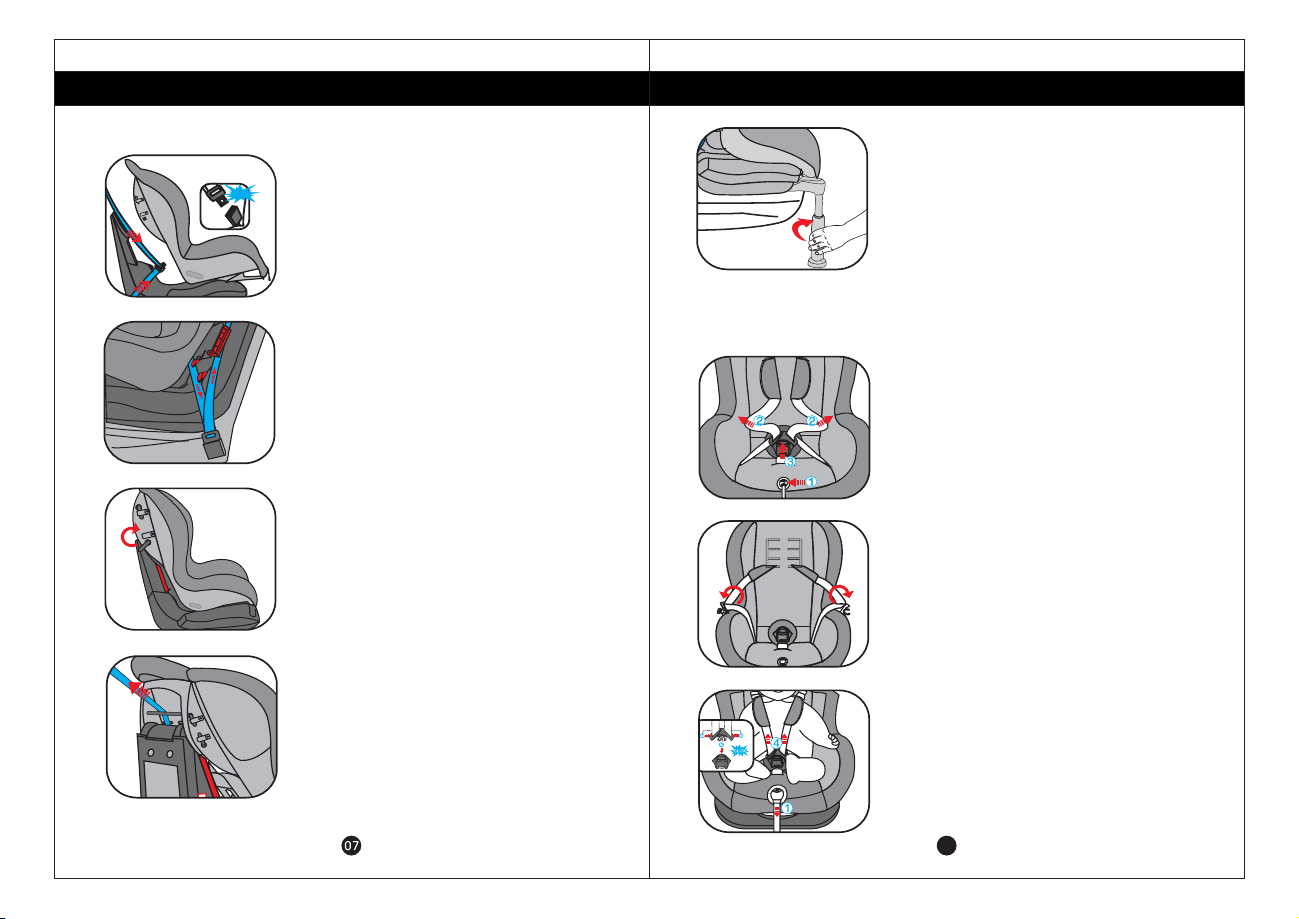
6.Install the child car seat using a 3-point belt with floor support leg.
Group 1(9-18kg).......................................................................6-7
7.Fit your child with harness system Group1(9-18kg) .......................8
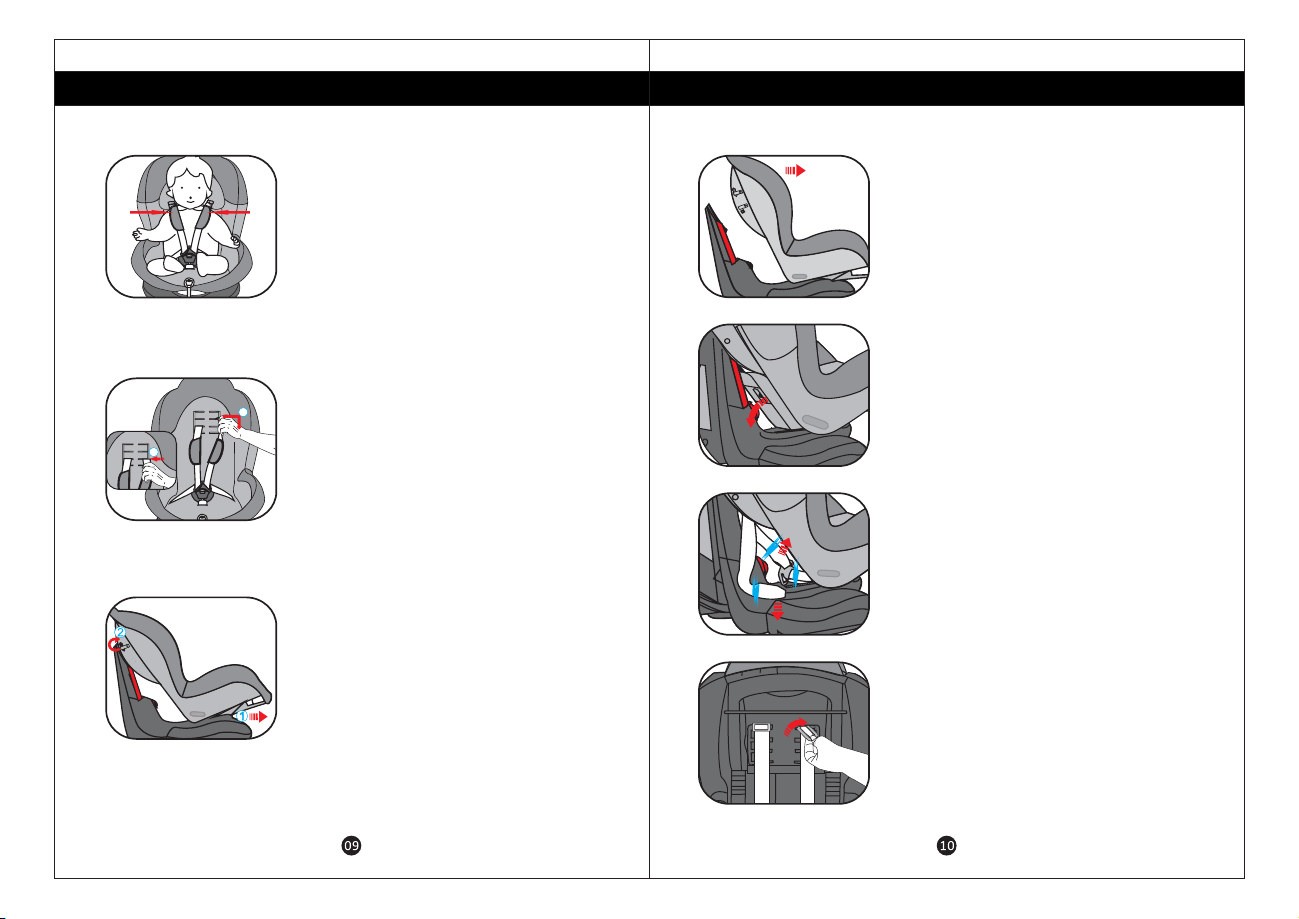
8.Remove the harness system ...................................................9-11
9.Remove and refit the seat cover ................................................12
10. ....................................................................13
12.Additional Instruction.............................................................14
Care instructions
PLEASE READ THOROUGHLY THESE INSTALLATION INSTRUCTIONS BEFORE
COMMENCING INSTALLATION AS AN INCORRECT INSTALLATION COULD BE
DANGEROUS.
DO NOT USE THIS CHILD CAR SEAT IN VEHICLE PASSENGER SEATS EQUIPPED WITH
AIRBAGS.
This child car seat must only be installed in a forward facing position in vehicle
passenger seats.Do not use on side facing or rear facing seats .
Never use this child car seat without fastening the child's harness correctly, and never
attempt to use it without fastening it into the vehicle as described in these instructions.
Donot modifythischildcarseatinanyway.
In the event of an emergency it is important that the child can be released quickly, this
means that the buckle is not fully tamperproof and so your child must be taught never
to play with the buckle .
Do not leave your child unattended in the seat at any time.
It is recommended that this car seat should be changed when it has been subjected to
violentstressesinanaccidentorhasbecomebadlyworn.Periodicallyinspectthe
harness for wear, paying particular attention to the attachment points, stitching and
adjusting devices.
Rigiditemsandplasticpar
Vehicleinteriorscanbecomeveryhotwhenindirectsunlight,itistherefore
recommended that the child seat is covered when not in use. This prevents
components ,particularly those attached to the child seat ,becoming hot and burning
the child.
Luggage and other heavy or sharp objects should be secured in the vehicle.Loose
objects are liable to cause injury in the event of an accident.
The safest seating position for a child car seat is on the rear seat of a vehicle.
The child restraint must not be used without cover.
The seat cover should not be replaced with any other than the one recommended by
the manufacturer, because the cover constitutes an integral part of the restraint
performance.
Donotmakeanyalterationsoradditionstothechildcarseatwithouttheapprovalof
the competent authority.
ts of the child car seat must be so located and installed that
they are not liable,during everyday use of the vehicle to become trapped by a movable
seatorinadoorofthevehicle.
Keep this manual for future reference.
When installed with a 3-point-belt in combination with the support leg,
thechildcarseatmustbeusedwiththe3-pointbeltthatisapprovedtoUN/ECE
Regulation No.16 or other equivalent standards that comply with SABS 1080.
When installed with the ISOFIX attachment, read the vehicle manufacturer’s
IMPORTANT :

1 Seat cover
2
3.
4.
5.
6.
.
.Seat shell
Upper shaft and lock
Lower shaft and lock
Lock-off device
Belt guard door
7. Red hooks
8. Warning markings
9. Belt yoke
10. Seat base
11. ISOFIX connectors
12. ISOFIX indicator
13. ISOFIX release button
14. Head pillow
15. Belt slots
16.
17.
18.
19.
Shoulder pads
Harness strap
Buckle
Crotch strap bracket
20. Harness release button
21. Recline handle
22. Adjuster strap
23. ISOFIX connector
extending lever
24. Floor support leg
Know your child car seatKnow your child car seat

The car seat can be used in five recline positions
Lift the handle, under the front of the seat, up
and pull or push the shell forwards or
backwards Release the handle in the
required position and push until you hear a
distinct click
:
.
.
Five positions of the car seat
!
Click
Place the seat forward facing in your vehicle.
Pull the lever to extend the ISOFIX
connectors.
Lock the two ISOFIX connectors into the
ISOFIX anchorage fixtures of the vehicle
The ISOFIX indicator will turn to green when
the connectors are locked to the anchorages.
.
Installing the child car seat using the ISOFIX system.
Group 1(9-18kg)
Pull and hold the ISOFIX adjusting lever, and
push the child seat backwards into the vehicle
seat. Release the lever when there is no space
between the child seat back and vehicle seat.
InstallationInstallation
Extend the floor support leg fully out Adjust
the height of the floor support leg by rotating
the end,to ensure that the leg is touching
the floor of the vehicle firmly
,
.
Installing the child car seat using the 3 point safety belt
with the floor support leg.
Group 1 9 18kg
-
(- )
Adjust the child car seat into the most-reclined
position(1) then tilt the seat shell forward,.(2)
This child seat can also be installed with a 3-point safety belt,
however always in combination with the adjusted floor
support leg.
Place the child seat on to the vehicle seat.
Pull the lower shaft out of the seat.

InstallationInstallation
Loosen the shoulder belts by pressing the
release button(1) and pulling the shoulder
belts towards you
Note Do not pull on the belt pads
Then open the harness buckle press the
red release button
.
!.
(
).
(2)
(3)
Draw the belts over the hooks on the shell.
22
Put your baby comfortably with his her back
against the shell and make sure that there
are no toys or other hard objects in the shell
/
.
Slide buckle tongue sections together and
insert them into the buckle until you hear a click.
Pull the remaining slack out of the belt
system pull the belts tight with the harness
strap
&
.
(4)
(1)
Fit your child with the harness system.
Group1(9-18kg)
08
Thread the vehicle seat belt through the child
seat base and secure the belt into the belt
buckle.
Ensure the lap portion of the vehicle seat belt
fits under the red hooks and the diagonal
portion of the vehicle seat belt runs directly
from the belt buckle diagonally upwards.
Push the child car seat firmly backwards into
thevehicleseat,pullthediagonalbelttightto
remove any slack in the belt, then place the
diagonal belt into the lock-off device and
fasten it. Return the seat shell backwards and
refit the lower shaft into the child seat back
and lock into position.
Then pull out a small section of the upper
metal shaft, feed the diagonal belt between
the shaft and the seat shell, and secure the
upper metal shaft again.
Ensure that there are no kinks or twists in the
vehicle seat belt.
Extend the floor support leg fully out and
adjust the height of the floor support leg by
rotating the end. Make sure that the leg is
firmly in contact with the floor of the vehicle.
Click

Adjusting the height of the shoulder belts
The correct belt height of the shoulder belts
is attained when the belt disappears into the
shell slightly above the shoulder of the child
that the shoulder belts fit properly
over the shoulders of the child
.
.
Ensure
1
2
Check:
Ensure that the harness belt strap slots
are level with or above your child's
shoulders.
Adjust the child car seat into the
most-reclined position , then take the lower
shaft out of the seat.
Remove the harness system
InstallationInstallation
Open the belt guard door .
Remove the harness belt from the belt yoke.
Pulloutthemetalpartwhichisusedto
fasten the shoulder pad strap to the back
of the seat shell.
Tilt the seat shell forward.

Pull out the metal part which is used to
fasten the belt to the bottom of the seat shell.
Push the metal plate with which the harness
buckle is fixed to the seat shell ,on its side and
upwards through the belt slot
,
.
Pull the harness belts and the pads out of
the belt slots Then open the harness
buckle
.
.
InstallationInstallation
G
Removingandrefittingtheseatcover
Remove the harness .
SEE-Removing the Harness
System on Page 09.
Taketheelasticloopsofthecoveroffthe
hooks under the edge of the seat shell. Now
youcanremovetheseatcover.
Refitting the seat cover
Refittheseatcoverontheseatinreverseorder,asabove.
Hook the elastic hoops onto the hooks under the edge of the seat shell
Refit the harness.

The seatcovercanbewashedwithluke-warmwaterandagentlesoap.
Do not use any abrasive detergents. The cover must be washed by
handatamaximumtemperatureof30 .Donotdryclean
(see also washing instructions).
The bucklemaybecleanedwithwarmwater.
Itisadvisabletobuyanextracoversoyoucanusethechildcarseatatall
timeswhentheoriginalcoverisbeingwashed.
℃
Notice: Take out the instruction manual from the pouch before washing
theseatcover.
Checklist
For safety's sake read through this checklist before you commence your
journey.
Check that the harness belt system fits properly and tightly around
your child and that the shoulder belts are at the correct height.
Checkthatthevehicle’sseatbeltsarenottwisted.
Checkthatthelapstrapofthechildcarseatiswornlowdownsothatthe
pelvis is firmly engaged.
Check regularly that the belt in the child car seat is not damaged.
If it is damaged do not use your product in any circumstances and
contact the supplier or your retail outlet.
Check that you have tightly secured your child car seat with the vehicle
seat belt or the ISOFIX anchorages.
If you have any questions, please contact the supplier or retailer.
Washing instruction
Care instructions
Table of contents
Other Safeway Car Seat manuals

Safeway
Safeway Dolphin User manual

Safeway
Safeway Polar User manual

Safeway
Safeway Unify User manual

Safeway
Safeway Snug'n Safe Astra User manual

Safeway
Safeway INDY User manual

Safeway
Safeway Snug 'n Safe PLUS User manual

Safeway
Safeway Cosmos User manual

Safeway
Safeway MARLIN User manual

Safeway
Safeway EXECUTIVE User manual

Safeway
Safeway SNUG 'N SAFE User manual
Popular Car Seat manuals by other brands

Clek
Clek FOONF instruction manual

Hernik
Hernik Starlight NXT user manual

Dorel Juvenile Group
Dorel Juvenile Group Highrise/AmbassadorBelt-Positioning Booster instruction manual

Thomashilfen
Thomashilfen Defender Reha instruction manual

Chicco
Chicco GRO-UP 123 instructions

Kids Embrace
Kids Embrace High Back Booster Seat instruction manual