Safeway Unify User manual

INSTALLATION INSTRUCTIONS
GROUPS 0 / 1 / 2 / 3 (Birth - 36kg)
Rearward facing Birth to 18kg (BELT / ISOFIX / TT)
Forward facing 9 to 18kg (BELT / FIX)
Booster seat 15 to 36kg (BELT / FIX)
Created with Passion, Designed for Safety
ISOFIX Class Size:
Group 0/1 - “D”

1
Contents
Introduction
Important Notices
Restraint Features
Use of the Child Restraint in the Vehicle
Adjusting the Height of the Headrest / Harness
Adjusting the Recline Position
Using the ISOFIX System
Using the Top Tether System
Using the Buckle & Harness System
Removing the 5-Point Harness for Use as Group 2/3
Install Rearward Facing - Group 0/1 (Birth to 18kg) - Method 1
Install Rearward Facing - Group 0/1 (Birth to 18kg) - Method 2
Install Forward Facing - Group 1 (9 to 18kg) - Method 1
Install Forward Facing - Group 1 (9 to 18kg) - Method 2
Install Forward Facing - Group 2/3 (15 to 36kg) - Method 1
Install Forward Facing - Group 2/3 (15 to 36kg) - Method 2
Removing the Cover / Replacing the Cover
Washing Instructions / Care for the Harness Buckle
Notices
Warranty
Installation Methods
2
3 - 4
5
6
7
7
8
9
10
11
13
15
17
19
21
23
25
26
27
28
29

3
• WARNING: Read this instruction manual carefully. Study the illustrations in
this instruction manual before use, and, when installing the car seat. The Child
Safety Seat is a safety product and is only safe when used according to the
instructions.
• WARNING: The correct fitting of the Child Safety Seat is of vital importance for
the safety of your child. See the Installation section and/or the sticker on the
side of the seat.
• WARNING: Ensure that the rigid items and plastic parts of the Child Safety
Seat are so located and installed that they are not liable, during everyday use of
the vehicle, to become trapped by a movable seat or in a door of the vehicle.
• WARNING: Never use the Child Safety Seat rearward facing on a seat
equipped with a front airbag, as this can result in serious injury or death. This
does not apply to so-called "side airbags".
• WARNING: The Child Safety Seat must only be used on a forward facing seat
that is fitted with an automatic 3-point safety belt or ISOFIX points that are
approved according to ECE R16 or other equivalent standards, that comply to
SABS 1080.
• WARNING: The vehicle seat belt holding the restraint to the vehicle should be
tight, the straps restraining your child should be adjusted to your child’s body,
and the straps should not be twisted.
• WARNING: After an accident, the seat may become unsafe due to damage
that is not immediately noticeable. It should therefore be replaced.
• WARNING: No alterations or additions may be made to the Child Safety Seat,
as this could affect part or the overall safety of the seat.
• WARNING: Always cover the Child Safety Seat when the car is parked in the
sun, as plastic and metal parts may become extremely hot and it may be too hot
for the child's skin. The fabric could also unnecessarily discolour.
• WARNING: Never leave your child unattended in the car.
• IMPORTANT: The lap strap should be worn low down, so that the pelvis is
firmly engaged.
• WARNING: Ensure that all luggage and objects likely to cause injury in the
event of an accident are secured properly.
• WARNING: The Child Safety Seat must not be used without the cover. Always
use an original Child Safety Seat cover, as the cover contributes to the safety of
the seat.
• WARNING: For future use of the seat, it is important that you store the
instruction manual in a safe place and close at hand.
Important Notices

2
Dear parents
Congratulations on the purchase of your Child Safety Seat.
Safety, comfort and user-friendliness have at all times played an important role in
the development of the Child Safety Seats.
This product meets the most stringent safety regulations and has passed the
most stringent compulsary safety testing required by law.
Research shows that a high number of child restraint safety seats are installed
incorrectly. Therefore, please take the time to read through this instruction
manual carefully. Your child’s safety can only be guaranteed if this product is used
according to correct installation following these instructions.
Continuous research by our development team, user tests and consumer
reactions ensure that we are kept fully up-to-date in the field of child safety.
Therefore, if you have any questions concerning the use of the Child Safety Seat,
please do not hesitate to contact us.
Distributor details :
Unimark Distributors CC
P.O. Box 912-1095
Silverton
0127
Tel : +27 12 8041793
Fax : +27 12 8041795
Web : www.safewaybabies.co.za
Introduction

4
• It is recommended that child safety seats not be used longer than 10 years
after the date of purchase. The product properties may deteriorate due to
ageing of the plastic and/or sunlight, without this being visibly apparent.
• The manufacturer has taken into consideration the fact that car seats may
cause indentations in the car upholstery. This is unavoidable, however, due to
the prescribed safety standards, and because the car seat must be installed
tightly in order to protect your child, the manufacturer is not liable for any
damage that may occur to the car upholstery as a result of this.
• The seat must always be secured with a seat belt or ISOFIX points even when
not in use. An unsecured seat may injure other passengers in the car in the
event of an emergency stop.
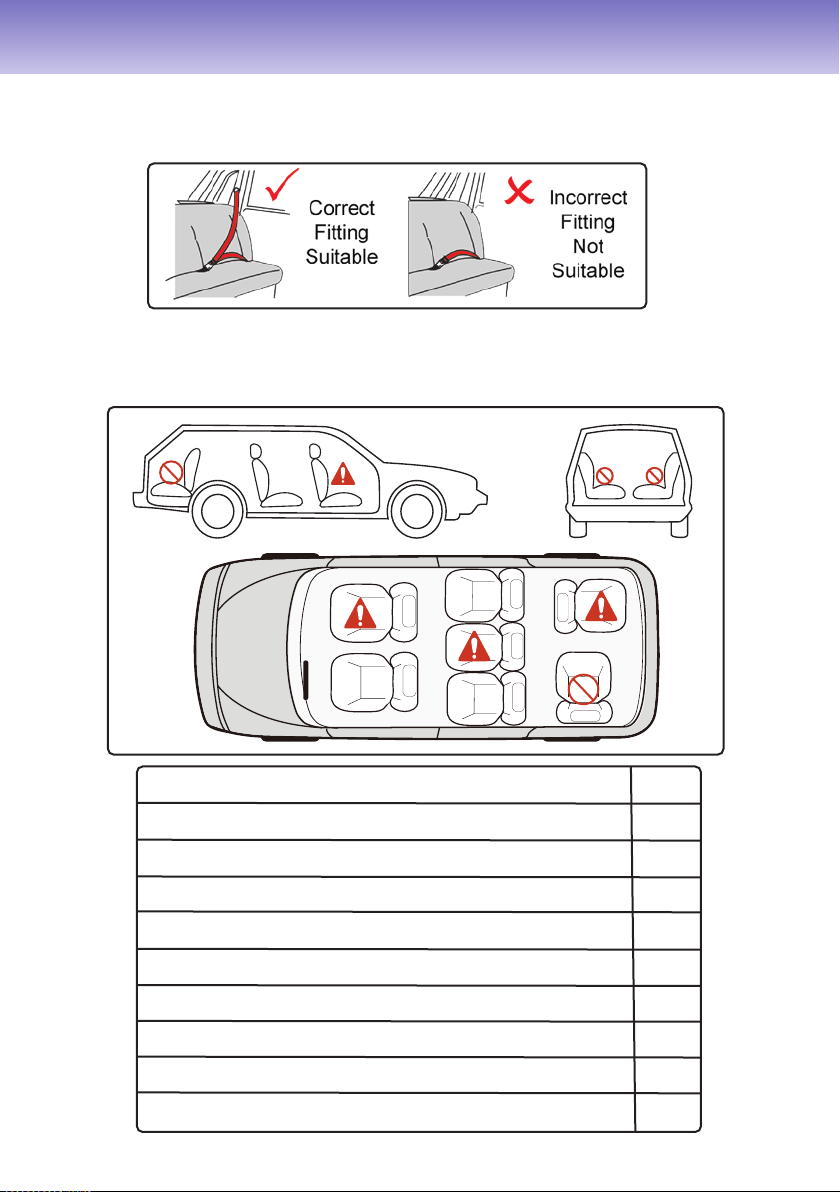
• The Child Safety Seat may be used on either the front or the back seat.
However, we recommend that it is fitted on the back seat.
• Always use the seat, even on short journeys, as this is when most accidents
occur.
• Prior to purchase, check to make sure the seat fits properly in your car, consult
the assistant where you are purchasing your Child Safety Seat.
• Tell your child that he/she should never play with the belt buckle.
• The moving parts of the Child Safety Seat should not be lubricated in any way.
• The safety of the seat can only be guaranteed by the manufacturer if it is used
by the original owner.
• We strongly advise that you never use a second-hand product, as you can
never be sure what has happened to it.
• The belt pads are important for the safety of your child, therefore use them at
all times.
• DO NOT use any load bearing contact points other then those described in the
instruction manual and marked on the child restraint i.e. where the vehicle seat
belt touches the child restraint. If in doubt, please contact the manufacturer.
• NOTE: The adult seat belt buckle should be below the highest load bearing
point of the child safety seat. If in doubt, please contact the manufacturer.
• The Child Safety Seat has been approved according to the strictest European
safety standards (ECE R44/04) and is suitable for Group 0 (Birth-10kg) and
Group 1 (9-18kg), Group 2 (15-25kg) & Group 3 (22-36kg).
• WARNING: Do not use the Child Safety Seat forward facing before your child
is 9kg. It is recommended to use the Child Safety Seat rearward facing up to
13kg.
• The mass group and the ISOFIX size class for which this device is intended is
: Group 0/1 (Birth to 18kg); D.
Important Notices

Shoulder Pads
Comfort Pad
Belt Guide for
Rearward Facing
Buckle
Harness Adjuster
Buckle
Crotch Pad
Headrest
Seat Belt Guide
Head Pillow
Rotate Handle
Harness Adjuster Strap
Recline adjuster
Metal Yoke
Headrest Handle
Top-Tether
Top-Tether Buckle
Vehicle Safety Belt
Routing for Group 1
Top-Tether Hook
ISOFIX Connector
ISOFIX Button
ISOFIX Sleeve
Bracket
Restraint Features
5

6
Please observe the regulations applicable to your particular country.
The safety belt must be approved to ECE R 16 or a comparable standard .
You can use your child car seat as follows:
IMPORTANT: The child seat MUST be installed using a 3-Point Seat Belt.
A 2-Point seat belt may not be used.
Use in vehicle:
Rearward facing child seat
Forward facing child seat
Use with 3-point vehicle belt
Use with 2-point vehicle belt
On centre passenger seat with 3-point belt
On passenger seat with active airbag
On sidewards facing passenger seat
On rearward facing passenger seat
Any passenger seat with ISOFIX
Yes
Yes
Yes
No
Yes
No
No
No
Yes
Use of the Child Restraint in the Vehicle

7
3
12
4
Adjusting the Height of the Headrest / Harness
Adjusting the Recline Position
Adjust the height of the Headrest by pulling the Headrest Handle then move
the headrest up or down to suit your childs’ height. The harness straps move
while adjusting the headrest.
Adjust the Shoulder Straps to the correct height for your child.
Rearward Facing Install:
The Shoulder Straps must be inline or just below your childs’ shoulders.
Forward Facing Install:
The Shoulder Straps must be inline or just above your childs’ shoulders.
1 - Adjust the reclining position of the child seat by pulling the Recline Adjuster
underneath the front of the seat and adjust the seat to the required position.
2 - The seat can be adjusted to 4 recline postions. Positions 1,2 & 3 for
Forward facing. Position 4 for Rearward Facing.
Pull the headrest handle Rearward Facing Forward Facing

8
Using the ISOFIX System
ISOFIX
Optional: Locate the
ISOFIX Anchorage points
and place the ISOFIX
Sleeve Brackets over the
two points.
Press the ISOFIX
Connector’s Release
Button and slide the
connectors outwards
as far as possible.
Connect the ISOFIX
Connectors to the
anchorage points.
Ensure that they
“Click” into place.
Ensure that the Indicators
on the Release Button
turn GREEN.
CLICK
Push the car seat towards
the backrest of the
vehicle.
Ensure that the car seat
is properly secured by
moving it from side to
side. There should be
minimal movement.
To release the ISOFIX System, push the car seat towards the backrest of the
vehicle, press the Release Buttons then pull the Connectors from the
anchorage points.

Using the Top Tether System
The Top Tether System is only used when
the child seat is used in a Rearward Facing
Position.
There are 2 loops on the strap with
the hook. Choose which loop to use
depending on where your Top Tether
Achorage Point is located.
Ensure that the Top Tether Straps are not twisted.
The Hook opening side should be installed downwards.
Lift the headrest upwards
and locate the strap’s
metal brackets.
Twist the brackets
sideways and thread
them through the
backrest.
Remove both straps
from the shell.
Re-thread the straps
through the correct loop
ensuring that the hook
opening is facing
downwards.
Ensure that the buckle
faces outwards.
Thread both straps and
buckles back through
the backrest of the
child seat.
9

10
Using the Buckle & Harness System
Press the Red Buckle
Button to unlock the
buckle then seperate
the two tongues.
To loosen the harness
straps, press the Harness
Adjuster Buckle then pull
the shoulder straps forward.
Do not pull on the Shoulder
Pads as they will not move.
Place the harness
straps to the side of
the seat then place
your child into the
car seat.
To lock the buckle, join
the 2 tongue’s together.
Insert the tongue’s
into the buckle.
Ensure that they CLICK
into place.
DO NOT use the
buckle with only one
tongue.
To fasten the harness
system around your
child, pull the Harness
Adjuster Strap at the
front of the seat.
Ensure that the harness
system is nice and
tight over your child.
CLICK

11
Removing the 5-Point Harness for Use as Group 2/3
Press the Red Buckle
Button to unlock the
buckle then seperate
the two tongues.
Loosen the harness straps
by pressing the Harness
Adjuster Buckle then pull
the shoulder straps forward.
At the back of the seat,
remove the shoulder
straps from the metal
yoke.
Pull the shoulder straps
forward out of the
shoulder pads.
Lift up the headrest
flap.
Unclip the Shoulder Pads
from the bracket and
remove them.
Remove the Crotch Pad
and push the Buckle
through the cover.
Lift the cover up on all
sides.
Insert the Buckle into
the provided hole.

12
Removing the 5-Point Harness for Use as Group 2/3
Rotating the Child Seat
Reconnect the
shoulder straps to the
metal yoke.
Place the straps against
the backrest of the child
seat.
Place the cover back
over the shell.
The child seat can rotate 360 degrees. To rotate the child seat, pull the rotate
handle forwards,
then swivel the seat around to the
required position.
Ensure that the child seat is locked
into place.

13
Install Rearward Facing - Group 0/1 (Birth to 18kg) - Approximately 4 years
METHOD 1 - ISOFIX & TOP TETHER
CLICK
Top Tether
Anchorage
Points

14
Install Rearward Facing - Group 0/1 (Birth to 18kg) - Approximately 4 years
METHOD 1 - ISOFIX & TOP TETHER
Rearward Facing
Rotate the child seat to the Rearward
Facing position (See page 12).
Recline the child seat to the most
reclined position - 4 (See page 7).
Install the ISOFIX System (See page 8)
Locate the Top Tether anchorage point
in your vehicle and connect the Top
Tether Hook to it (See page 9).
Place the Top Tether Hook over the
anchorage point ensuring that it is
properly connected. Tighten the
strap until the indicator turns Green.
Ensure that the car seat is properly
secured by moving it from side to
side. There should be minimal
movement.

15
Install Rearward Facing - Group 0/1 (Birth to 18kg) - Approximately 4 years
METHOD 2 - SEAT BELT INSTALL
Shoulder belt
Lap belt
Rotate the child seat to
the Rearward Facing
position (See page 12).
Recline the child seat to
the most reclined
position - 4 (See page 7).
Place the child seat in a
rearward facing position
on the vehicle seat.

16
Pull the vehicle seat belt
out as far as possible.
Thread the diagonal belt
through the Belt Guide.
Unfasten the harness
buckle and remove
the Comfort Pad.
Place the Lap Belt
section of the seat belt
over the child seat.
Replace the comfort pad
and lock the vehicle seat
belt tongue into the buckle.
Pull the vehicle seat belt
in the direction of the
arrows.
CLICK
Pull the diagonal belt upwards as
tight as possible and place the red
lock-off clip over the diagonal belt
close to the vehicle buckle.
This ensures that the lapbelt holds
the child seat nice and secure.
Ensure that the child seat sits nice
and secure in the vehicle by moving
it from side to side. There should be
minimal movement on the seat.
Install Rearward Facing - Group 0/1 (Birth to 18kg) - Approximately 4 years
METHOD 2 - SEAT BELT INSTALL

17
Install Forward Facing - Group 1 (9 to 18kg) - 1 to approximately 4 years
METHOD 1 - ISOFIX & SEAT BELT INSTALL
Shoulder belt
Lap belt
CLICK

18
ISOFIX
+
Forward Facing
click
Push the child seat
backwards and tighten
the seat belt in the
direction of the arrows.
Optional: Pull the diagonal
belt upwards as tight as
possible and place the red
lock-off clip over the diagonal
belt close to the vehicle buckle.
Ensure that the child seat
is installed with both the
ISOFIX and Vehicle
Seat Belt.
Install the ISOFIX
System (See page 8).
Thread the vehicle seat
belt through the back of
the child seat.
Clip the vehicle seat belt
tongue into the buckle.
Ensure it clicks into place.
Install Forward Facing - Group 1 (9 to 18kg) - 1 to approximately 4 years
METHOD 1 - ISOFIX & SEAT BELT INSTALL

19
Install Forward Facing - Group 1 (9 to 18kg) - 1 to approximately 4 years
METHOD 2 - SEAT BELT INSTALL
18
Shoulder belt
Lap belt
Table of contents
Other Safeway Car Seat manuals

Safeway
Safeway Snug 'n Safe PLUS User manual

Safeway
Safeway MARLIN User manual

Safeway
Safeway INDY User manual

Safeway
Safeway EXECUTIVE User manual

Safeway
Safeway SMART SPORT Isofix User manual

Safeway
Safeway SNUG 'N SAFE User manual

Safeway
Safeway Dolphin User manual

Safeway
Safeway Snug'n Safe Astra User manual

Safeway
Safeway Polar User manual

Safeway
Safeway Cosmos User manual