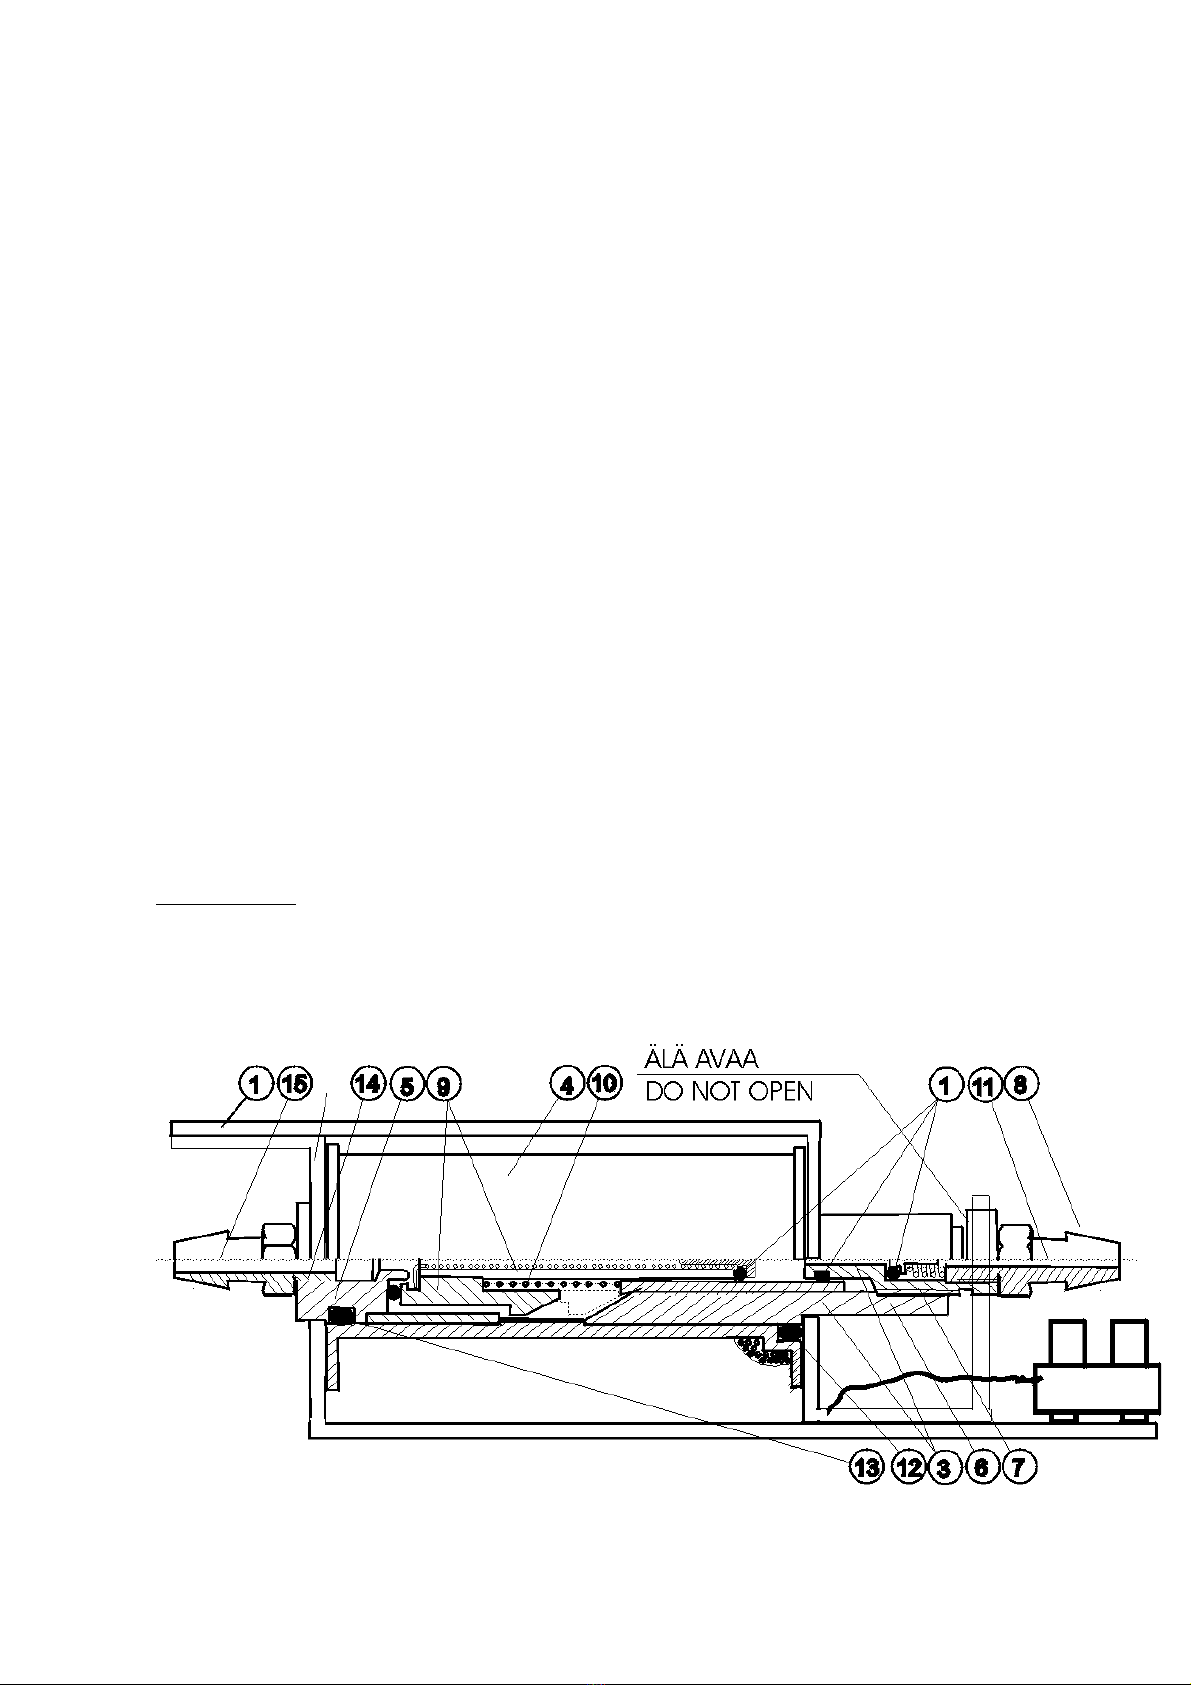
Safire 3200B Technical Document

SAFIRE 3200B AND 3800A FUEL OIL HEATER
INSTALLATION, OPERATION AND MAINTENANCE
You have selected the new generation SAFIRE oil heater as your heating solution.
Although our goal is to take into account all problems arising from normal installation during designing the
product, it is important that persons using this product familiarise themselves with these instructions.
Correct installation and use ensure that the heater works flawlessly for many years to come.
1. INSTALLATION
1.2 PLACEMENT
Place the heater so that warm air circulates in the best possible way in the heated space.
Flue gases can be led to a chimney or directly out through the wall.
The heater should preferably be connected directly to the battery with a dedicated power
cable.
The tank and pump should be placed under the heater. It is advisable to place them outside
the heated space.
There should be 0-100 mm clearance behind and on the sides of the heater in order to help
keep its environment clean and free from foreign objects.
There must be at least one metre of clearance above the heater.
1.3 DUCT INSTALLATION
1. Drill a suitably sized hole for the flue gas pipe to the chimney. Note that the flue gas pipe is not
laterally in the centre of the heater.
2. Seal the flue gas pipe into place with heat-resistant material (e.g. mineral wool or mortar). The flue
gas pipe must lead to the top of the chimney, and it should preferably be insulated with vermiculite.
This will avoid the condensation of the flue gas in the cold chimney, as well as failures and weathering
of the chimney resulting from the condensation.
3. Install a piece of thermal insulation cut to a suitable length.
4. Mount the heater and tighten the flue gas pipe and a potential air intake pipe with their fasteners.
5. The combustion air can be led to the heater e.g. from under the floor. In this case, the air intake must
be protected so that it cannot be clogged (snow, leaves, mice, birds, mosquitoes etc.). The intake pipe
must be insulated indoors in order to prevent condensation on the surface of the pipe.
December 2014
SF-LÄMMITIN OY Tilhenkatu 1 20610 Turku Finlan Tel./Fax 02-2443282
When using a chimney, the combustion air can be
taken from the outside or inside, because there is no
danger of flue gas returning to the inside air due to the
wind pressure, even in case of a power outage.
As the combustion air is taken from the heated space,
the heater functions as a ventilation unit as well, which
reduces the amount of moisture.
It is preferable that the tank is placed outside the
heated space. However, the tank and the pump must
be placed under the bottom of the heater. The lifting
height must be under 2 metres.
If the fuel line is mounted inside the structures or
outside the building, it must be protected with e.g.
electric installation pipe or metal pipe.
A longer fuel line can be used, but the maximum length
between the pump and the fuel tank is 6 metres.
1. HEATER 9. BATTERY
5. FLUE GAS PIPE 13. SEALING
6. PUMP 14. THERMAL INSULATION
8. FILTER

SAFIRE 3200B AND 3800A FUEL OIL HEATER
INSTALLATION, OPERATION AND MAINTENANCE
WALL SLEEVE INSTALLATION
WALL SLEEVE:
When using wall sleeves, the combustion air must be led through a wall sleeve from the outside as well.
1.5 TANK, TANK CONNECTION, PUMP
December 2014
SF-LÄMMITIN OY Tilhenkatu 1 20610 Turku Finlan Tel./Fax 02-2443282
1. Make a ø90 mm hole to the wall, whose
midpoint is at a height of 225 millimetres from the
bottom of the heater.
2. Stretch the air i e (2) in accordance with
the wall thickness, and install it.
3. Attach the interface box (3). Flue gas pipe
height: midpoint 225 mm from the bottom of the
heater.
4. Cut the vent pipe (4) to a suitable length and
fasten it with a clamp (12).
5. Install the overlong flue gas pipe (5) with a
fastener (6).
6. Install thermal insulation ( ) of suitable length
around the flue gas pipe.
. Mount the heater.
8. Remove the housing (10) and diffuser (9) from
the frame of the funnel. The housing can be
removed by lifting its upper part approx. 4 mm.
Attach the frame (8) of the funnel to the wall. Seal
with silicone compound in order to keep water
outside the wall structures. Fasten the topmost
mounting screws (11) temporarily.
9. Cut the flue gas pipe to a suitable size (see
drawing: 12 mm out of the funnel frame)
10. Mount the diffuser (9) of the funnel and the
housing (10). You will have to loosen the topmost
mounting screws for this.
1 HEATER
2 THERMOSTAT TEMPERATURE SENSOR
3 FLUE GAS PIPE
6 PUMP
7 TANK
8 FILTER
9 BATTERY
12 FLUE GAS WALL SLEEVE
14 THERMAL INSULATION

SAFIRE 3200B AND 3800A FUEL OIL HEATER
INSTALLATION, OPERATION AND MAINTENANCE
1.5.1 30L TANK (4 5x315x295mm)
Can be used either upright or horizontally.
The heater comes with tank connection parts (filter, vacuum hose, air hose and
threaded ring).
The tank must be placed under the heater, e.g. in the basement of the house.
If the fuel line and wiring of the pump have to be led through the structures, they
must be protected with e.g. electric plastic installation pipe. For trought the floor
or wall, drill approx. 10 mm hole for fuel line and wiring.
If you want to install the tank and pump inside, select a place where filling the
tank or exchanging tanks does not cause inconvenience.
1.5.3 TANK CONNECTION
1.5.4 PUMP
The pump is installed close to the tank above the liquid surface in an upright position with the
suction side down. The maximum vertical drop from the bottom of the heater to the tank is
approx. 2 metres.
1.6 ELECTRICAL INSTALLATION (see wiring diagram on the back cover)
.
1. The electricity should preferably be input directly from the battery (+ red, - yellow). Protect
the wiring with a 20 A fuse (the electronics of the heater are protected by a 15 A main fuse).
If you need to use longer wires, remember to replace the original wiring with thicker ones so
that the cross-sectional area of the wires in mm2 corresponds with the length of the wires in
metres, e.g. the area of two 10 metre wires should be at least 10 mm2.
In this case, cut the original wires at a suitable length behind the heater and attach thicker
wires with a suitable connecting piece.
Be careful not to connect the wires to the battery with reverse polarity (in this case, the
fuse of the electronics will blow).
2. The wires of the pump are connected to the middle pins of the X10 connector. The wires
cannot be connected the wrong way round.
3. In thermostat installations the sensor is connected to the empty pins of the X10 connector
(see wiring diagram). The wires can be extended and they cannot be connected the wrong
way round.
4. A Gsm- remote start-up device is connected behind the control panel to the X9 connector of
the heater circuit board.
When using automatic start-up, the heater switch should be in the AUTO position.
The circuit board of the heater has a selection connector for the input voltage of the RJ
connector. It should be in the position 2-3 when a 128 remote control device is used (this is
the factory default setting) and in position 1-2 if a Genius control board is used.
December 2014
SF-LÄMMITIN OY Tilhenkatu 1 20610 Turku Finlan Tel./Fax 02-2443282
1. AIR HOSE
2. FUEL HOSE
3. THREADED RING
4. FILTER
5. PROTECTION

2. USAGE
2.1 COMMISSIONING
Make sure before commissioning that:
- the tank is properly installed
- the heater is attached so that all safety distances are taken into account and there is
no risk of fire
- all connections are attached
- there are no foreign objects or materials, which could cause a fire hazard or unpleasant
smells nearby or inside the heater or the funnel.
2.1.1 FUEL
Use winter-quality light fuel oil with the heater. In very cold weather it is appropriate to use fuel
oil for Arctic climates or kerosene, especially when using automatic start-up. It can be difficult
to find winter-quality light fuel oil in the summer. Summer-quality fuel oil can be used
temporarily.
Approx. 2% isopropanol-based gasoline engine antifreeze can be mixed with the fuel in order
to remove water from it (ethanol-based antifreeze for diesel engines MUST NOT be used).
If the heater remains unused in a cold cabin for the winter, it is recommended to run the
heater with kerosene before leaving it unused so that the fuel pump and fuel lines remain filled
with kerosene, which withstands even colder temperatures.
2.1.2 CONTROLS AND INDICATORS
2.1.2.1 CONTROLS
The heater is started by turning the switch to the HEAT position
Automatic control with a control device or timer by turning the switch
to the AUTO position
The heater is shut off by turning the switch to the OFF position
The heating power is adjusted with the push buttons: Short pushes
decrease the power setting and long pushes increase it. The first
push of the button turns on the display, which indicates the power
setting or thermostat.
The numeric isplay shows the power set with the push
buttons or thermostat setting (value = 15 C + isplaye
value). Functions F an L bypass the thermostat, an the
heater is run in either full power (F) or minimum power
(L).
Start-up: heating/automatic start-up
In icators: combustion (green), battery voltage
(yellow), fault (re )

2.1.2.2 INDICATORS
The green indicator light in
the base of the heater blinks during
start-up. If the indicator is not lit
during start-up, the heater is most
likely not powered.
Indicator lights on the heater's
linth:
Green indicator D15 is constantly lit
when the flame sensor has detected
that the combustion has started.
Yellow nd cator D14 indicates a low
voltage.
A low voltage can be caused by too
low battery voltage, too thin power
wires or a bad contact in a
connector.
The heater works with low voltage
when starting up, but if the low
voltage is present after the
preheating stage, the aftercooling
phase is started, the pump is
stopped and the device is turned off.
Red nd cator D13 indicates that
there is a malfunction in the heater.
The pump stops and the error code
is shown on the display (see part 3,
malfunctions and errors)
2.1.3 START-UP
The heater is started by using the
switch HEAT-OFF-AUTO.
The green indicator D15 flashes
The pump starts running (a
knocking sound can be heard and
the decimal on the display starts
blinking), the fan starts running.
The ignition process can be followed
through the observation window.
The green indicator in the heater’s
plinth lights up approx. 1.5-3
minutes after start-up when the
flame sensor has detected a
sufficient combustion.
The ignition process ends after
approx. 6.5 minutes and the heater
is set to the power level of the
thermostat or manual setting.
2.1.3.1 STARTING WITH A REMOTE
START-UP DEVICE
When enabling the start-up device,
make sure that the heater is ready
for use and that air circulation is
possible in the heated space.
Turn the heater’s switch to the
position AUTO.
PLEASE NOTE! Never cover
a heater that is set to
automatic start-u , even if
the switch is not in the
AUTO osition.
If the device is started remotely, it
can be kept on by turning the switch
to the ON position before the
selected heating time ends.
2.1.4 POWER SELECTION
Check that the thermostat
temperature setting or power setting
meets your needs.
2.1.5 POWER ADJUSTMENT
The power is adjusted with push
buttons.
The digital display indicates the set
temperature (15 °C + displayed
value (e.g. 3 = 18 °C).
Positions F (max) and L (min) will
take precedence over the
thermostat, and the heater runs at
maximum or minimum power.
The heater recalls the previous
setting.
2.2 TURNING OFF
The device is turned off by turning
the switch to the OFF position. The
pump stops and the device enters
the aftercooling phase. The fan
keeps running.
The ower su ly of the heater
must not be cut off before the
aftercooling hase has ended
(a rox. 6.5 minutes) e.g. by
using the main switch.
+ -

3 ERRORS, FAILURES
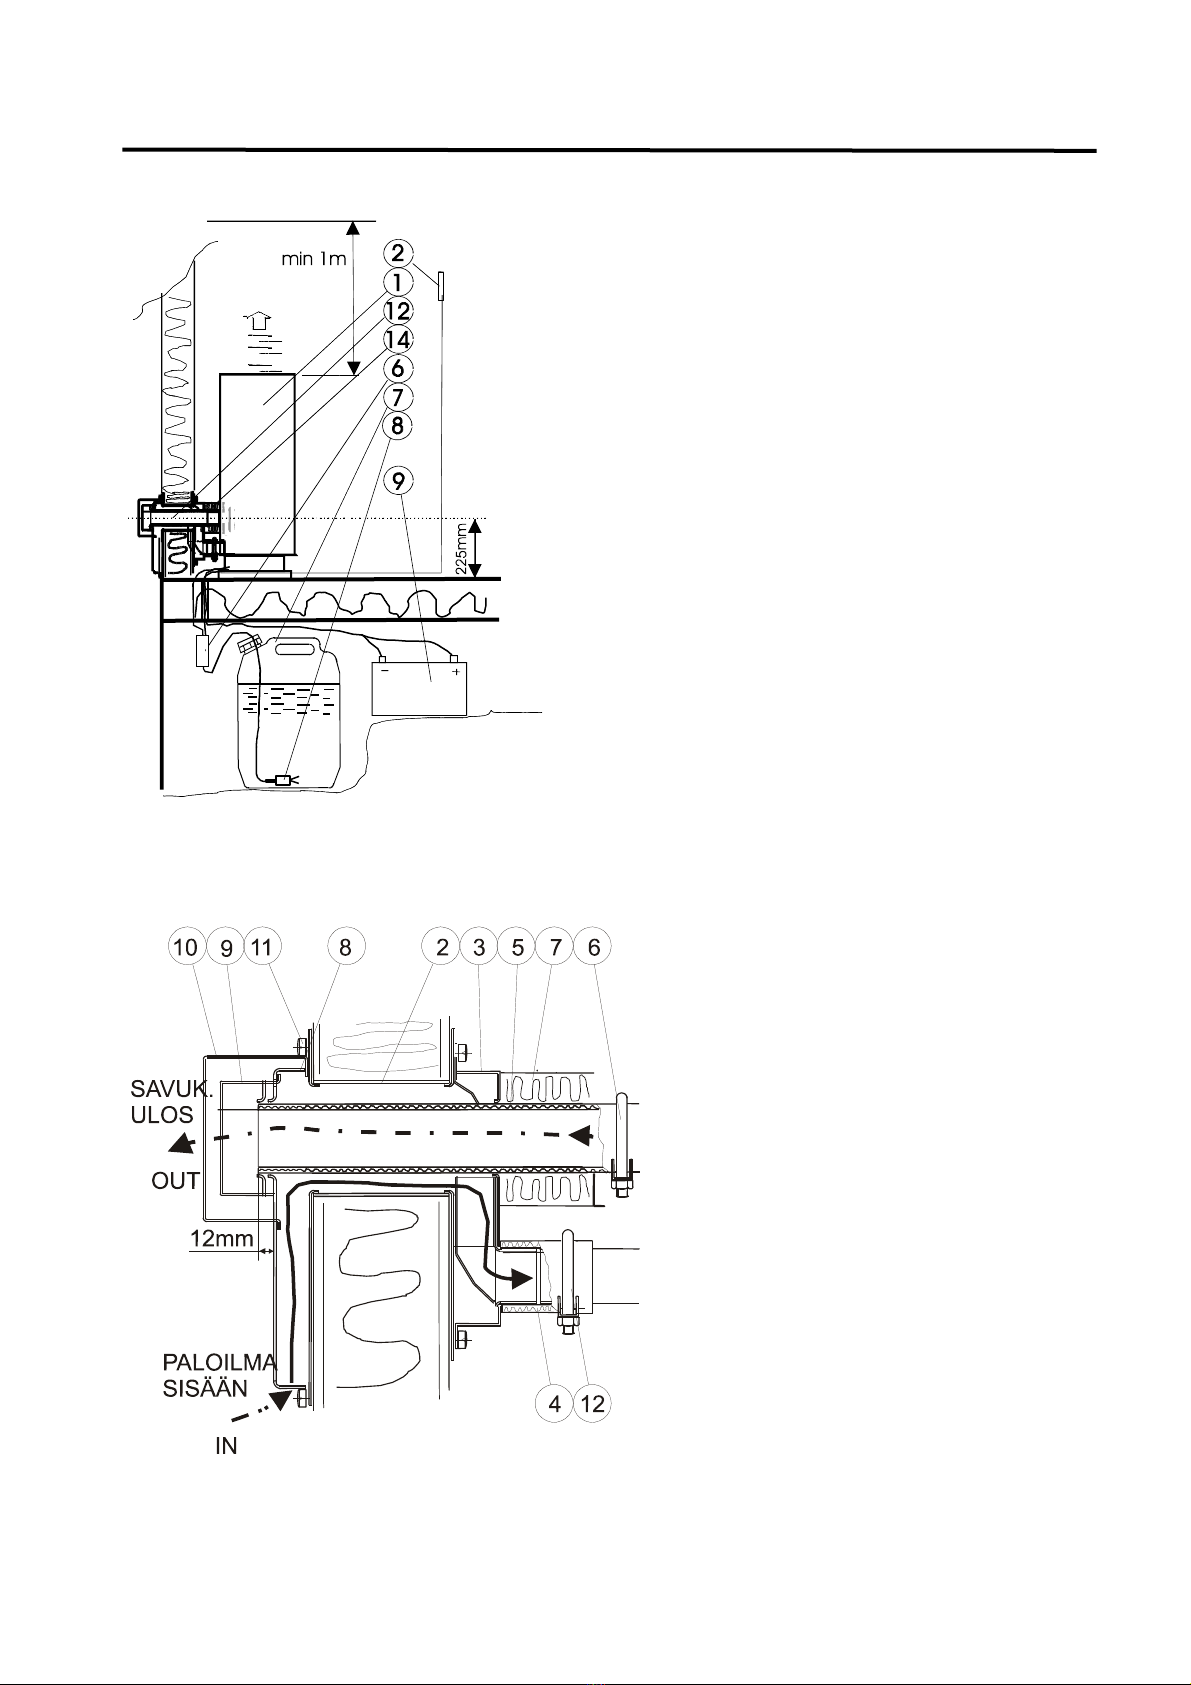
(Identification of indicators: see wiring diagram)
3.1 NORMAL OPERATION:
The green indicator in the heater’s base flashes
when the heater is on and powered.
The green indicator in the heater’s
base indicates that the flame sensor
has detected a flame in the burner.
A flashing decimal point in the display of the circuit
board indicates that power pulses are sent to the
pump. The convection blower of model 3800 A starts
when the heater power exceeds 3,000 W.
3.2 DISCREPANCIES:
If the green indicator is not blinking during start-up,
it is an indication that the heater is not powered.
If the indicator is not lit after the start-
up process (approx. 6.5 minutes), the
device enters the aftercooling phase
and turns off.
The reason for this could be air in the fuel system. A
new start-up attempt can be made if other problems
are not found.
As the heater is running, if the green flame indicator
dims, the red indicator is lit, fault code 3 shows up on
the display and the heater shuts off, it is usually a
sign of an empty fuel tank or a disruption in the fuel
supply. Check the device for issues.
The yellow indicator on the heater’s
base indicates that the input power is
too low (<10.8V, or 10.2V at start-up).
During the start-up process the heater accepts a
lower current. The occurrence of under-voltage
during start-up is usually a sign of too thin or long
power wires to the heater, oxidisation in a connector
or poor connection.
First check the battery status, then the wiring and
connections.
If the under-voltage indicator lights up during use and
the device shuts down, the battery is probably almost
depleted.
If the red indicator is lit, the device
usually shuts down due to a
malfunction indicated by the electronics
(see next chapter).
The most common error is the lack of a flame, which
leads to error code 3 being shown on the display.
Please note! If you have turned off the heater after
the malfunction was shown, you can bring up the error
code again by turning the switch to the AUTO position.
WHEN THE AUTO POSITION IS SELECTED, THE
DISPLAY SHOWS THE LAST ERROR CODE THAT
HAS LED TO THE SHUTTING DOWN OF THE
HEATER.
3.3 ERROR MESSAGES
(in parentheses the text shown on GENIUS screens)
No. 1 (overheat ng fault) indicates overheating.
Overheating is often caused by the heater airways
being blocked, e.g. too tight outlets, or too much fuel,
see page “Inspections”.
No. 2 ( on sat on fault) indicates that the ionisation
electrode is faulty or sooty. The fault also comes up if
the sensor is shorted with the heater frame. The
sensor can be cleaned; see page 8.
No. 3 (combust on fault) indicates that the heater has
stopped due to no flame. This is usually due to the
fuel running out or a blockage in the fuel system.
No. 4 (glow fault) indicates that the glow plug is at
fault: the connector is disconnected, the plug is
broken or its wire is faulty.
No. 5 (combust on fan fault) indicates that there is a
fault in the combustion air fan or its wiring.
No. 5 (convect on fan fault) indicates that there is a
fault in the main fan or its wiring.
No. 7 (undervoltage fault) indicates undervoltage. See
section about indicator lights on the heater.
No. 8 (pump fault) indicates that the circuit of the
pump is not closed.
The letter b (number 11 in SMS’es) indicates that the
overflow sensor has detected oil in the collection
space under the circuit board. It must be cleaned and
the fault must def n tely be repaired before the next
start-up.
The dec mal on the fault d splay blinks with the pulses
of the pump.
The pump is not powered if the decimal does not
blink and the pump does not make a clicking sound.
The fault is either in the wiring of the pump, the coil or
the circuit board.
If the decimal blinks while the pump does not make a
clicking sound, and the wires are not in a short circuit,
the pump is faulty; usually due to fuel thickening or
impurities in the fuel.
+ -

4 INSPECTIONS, MAINTENANCE AND SERVICE
4.1 INSPECTIONS
If there is reason to believe that the heater does not get
enough fuel (power reduced, change in combustion),
check the amount of fuel going to the heater.
The easiest way to measure the fuel feed is to put the
fuel line in a measuring cylinder filled with fuel while the
heater is running on full power setting (the fuel filter
should be removed before starting, as it may cause
measurement errors). Let the heater suck fuel from the
measuring cylinder for e.g. 6 minutes. Multiply the
measured value by ten in order to calculate the fuel
consumption per hour. A model 3200 heater
consumes 300-340 ml/h on full power setting, and 3 0-
390 ml/h for a model 3800 heater. If the measured
result is different from this, the reason for the
difference has to be investigated upon. If the fuel
consumption is too high, it is usually caused by:
erroneous placement of the fuel tank (or measuring
cylinder) above the heater, increase in the basic
frequency of the pump. The normal frequency for a
model 3200 heater is 160 strokes/min on full power
setting, 190 strokes/min for a model 3800 heater, and
45 strokes/min on minimum power setting for both
models.
4.2 MAINTENANCE
If abnormal symptoms appear during operation: a
smell, loss of power or ignition problems, the reason
for the symptom has to be eliminated.
Too much fuel supply may cause impure burning
and overheating.
If the overheating is caused by a defect in the
electronics or pump, always contact product
service.
The formation of a smell is usually caused by a fuel
leak or accumulation of soot in the burner.
The reason for reduced power is usually a reduction
in the pumping volume or a blockage, or impurities
in the pump.
A low fuel consumption may be caused by a
blockage in the fuel system. If the filter has been
found clean, the fuel line is worth checking. The
most common reason for a fuel line blockage is
paraffin formation, which occurs when the fuel is in
cold temperatures. If the fuel line is not completely
blocked, the blockage can be removed by adding
isopropanol to the fuel (gasoline car antifreeze),
which dissolves the paraffin blockage rapidly.
Isopropanol can also be forced through the lines by
using a syringe or e.g. a bicycle pump while the
heater is on (start-up phase).
A small air leak in the suction line (before the pump)
can cause low fuel consumption as well. Check
whether there is a significant amount of air bubbles
in the lines.
Blockages can also occur at the fuel inlet line near
the burner when the heater is used for a prolonged
time. In this case it should be replaced or cleaned.
The cleaning can be performed with a 1.5 mm drill
or by heating the end of the line with a gas flame
and by using a needle etc.
If the mixture of the combustion is too lean e.g. due
to paraffin formation, soot is formed in the inlet line
quickly.
WINTER
If the heater is left unused for a long period in the
cold, there is a risk that the lines and the fuel in the
tank form paraffin (this is a risk in very cold weather
conditions, even when using winter-quality light fuel
oil, and especially if using summer-quality light fuel
oil). In order to avoid starting problems in the spring
NESTE kerosene should be used when using the
heater for the last time before the pause so that
kerosene is left in the lines, pump and filter.
The fuel should be replaced in the spring.
Battery connectors should be disconnected for the
winter.
Check from time to time, especially if the flame in the
burner has changed, that:
1. the heater is supplied with enough power
2. combustion air enters the heater freely. Blockages
can be caused by e.g. spiders, mosquitoes, snow,
water, ice etc.
3. flue gases can leave the heater freely
4. there are no leaks in the fuel lines
5. there are no impurities or water in the bottom of the
fuel tank
6. the fuel filter in the fuel tank is not clogged
. the vent pipe of the fuel tank is not clogged
8. Also make sure that dust has not built up inside the
heater, which may cause a smell and a fire hazard.

4.21 BURNER MAINTENANCE
CLEANING THE IONISATION SENSOR ELECTRODE
Fault No. 2 indicates that the ionisation electrode is sooty, faulty or shorted. Soot build-up on the sensor is not as
common and it is, without exception, the result of poor combustion, and always requires cleaning the burner as
well. The electrode can be cleaned without removing it after the burner is removed. For cleaning you can use e.g.
rubbing alcohol-based cleaning products (car windshield washer fluid, etc.). It is important that the insulation of the
electrode is clean so that current does not leak, which disrupts the functioning of the heater. Also, the electrode
wire should not touch the burner.
The tip of the ionisation sensor should be placed according to the dimensions in the figure. You can cut a piece of
cardboard for measuring, for example. If necessary, you can bend the sensor wire. However, be careful not to
break the insulation. Small cracks will not cause the electrode to malfunction.
.
.
1. Disconnect the power so that the circuit board is
powerless.
2. Remove the control panel of the heater. Disconnect the
wire connectors of the circuit card.
3. Disconnect the fuel inlet line (2).
4. Open the burner compartment cover (3 screws, force the
top of the cover open from the protrusions)
5. Remove the glow plug (1) and its mounting late
6. Remove the burner support spring and the burner (8). If
you are unable to remove the burner, use a hammer and a
suitable piece of wood, see picture. Remove the topmost
centering plate of the spring (11) first in order to remove the
burner cylinder without damaging the ionisation sensor
(10).
. Open the burner hat (5) locking (4) e.g. with a
screwdriver. Push the screwdriver between the cylinder and
the lower ring so that the lower ring can pass the locking
claw. Turn the screwdriver and lift the hat at the same time
in order to lift the lower ring of the hat over the locking.
8. Clean the burner e.g. with an old toothbrush. The soot at
the bottom can be removed with a screwdriver. Use dish
soap and water for cleaning.
9. If required, replace the base fabric (6), which is held in
place by the locking spring ( ).
10. Assemble the burner in the reverse order. Ensure
that the ionisation sensor tip is positioned according to the
figure and that the burner is in the right position. Use a glow
plug to centre the burner during assembly. Ensure before
closing the burner compartment that the distance between
the outer corner of the heat exchanger and the middle of
the fuel inlet pipe is 48 mm. The inlet pipe is now aligned
with the hole.

INSPECTING AND CLEANING THE PUMP
The functioning of the pump can be inspected by letting air bubbles inside the hose.
The fuel progresses 18-20 mm per pump stroke. Slow movement is a sign of a blockage and air bubbles
show that there is an air leak in the suction side or pump. Small sized bubbles do not pose a problem.
Back and forth movement is caused by a leaking non-return valve.
The most common defects of the pump are:
1. Clogging, or the movement of the pump piston is slowed down or hindered altogether due to external
impurities or paraffin.
2. A leaking non-return valve in the suction cycle.
REMOVING SMALL IMPURITIES AND PARAFFIN FROM THE PUMP
1. Remove the pump from the hose connectors.
2. Now you can force isopropanol through the pump with e.g. a syringe.
OPENING AND CLEANING THE PUMP
(only in an extreme emergency; leave this to the service centre, if possible)
1. Remove the pump and remove the hoses from the connectors.
2. Remove the wiring of the pump.
3. Disconnect the wiring connector strip (8) so that it remains attached to the coil wires.
4. Remove the iron shell (1) of the pump by opening its screws.
5. Pull the upper part (3) of the pump out of the coil (4). The piston (9) and spring (10) come loose at the
same time.
6. The lower end of the pump (5) can be removed by pulling as well.
. Now you can wash the insides of the pump with e.g. isopropanol. There should not be any stiffness
between the piston and the cylinder.
8. Check the functioning of the non-return valve by attaching a piece of hose to pump outlet socket (11)
and blowing air under the liquid surface e.g. with an injection syringe. The valve should not leak. If
necessary, you can try to clean by forcing a powerful flow through the valve downstream.
9. DO NOT OPEN the sealed connection ( ) between the pump body (6) and the valve body, as it is
adjusted to the correct stroke length.
10. Assemble in the reverse order. Be sure to check the O-rings (12 and 13), as well as the condition and
cleanliness of their grooves.
In order to ensure the tightness of the hoses, check the clamps when installing the pump. Potential leaks
on the suction side or the pump are seen as air bubbles downstream of the pump, even if they cannot be
seen on the suction side. Note that if there is air in the pump, it will take a while for it to be removed.

INSPECTING AND CLEANING THE PUMP
4.4ELECTRICAL CONNECTIONS
(3800A)
This manual suits for next models
1
Table of contents
Other Safire Heater manuals
Popular Heater manuals by other brands

Solaira
Solaira Alpha H2SALPHAH2-20240 Reference manual

VOLTOMAT HEATING
VOLTOMAT HEATING CYKB20-7 manual

EdenPURE
EdenPURE SunTwin 1000XL Operation and warranty manual

Wilfa
Wilfa GLOW operating instructions

Webasto
Webasto Air Top 2000 ST B installation instructions

Dimplex
Dimplex XL6N Installation and operating instructions