Sage Science BluePippin User manual

DNA Size Selection System
Operations Manual

978-922-1832 ●www.sagescience.com ●support@sagescience.com
BluePippin Operations Manual 460013 Rev F ii
Sage Science Inc.
Suite 2400
500 Cummings Center
Beverly, MA. 01915
© 2018 Sage Science, Inc. All rights reserved. Sage Science and BluePippin are trademarks
of Sage Science, Inc.
All other brands and name mentioned herein are property of their owners.
The BluePippin instrument and gel cassettes are covered by U.S. patents
8,361,298 and 8,361,299.

978-922-1832 ●www.sagescience.com ●support@sagescience.com
BluePippin Operations Manual 460013 Rev F iii
TABLE OF CONTENTS
1INTRODUCTION..............................................................................................................1-1
1.1 System Overview ...................................................................................................................1-1
1.2 How the System Works .........................................................................................................1-2
1.3 Collection Strategies .............................................................................................................1-2
1.4 Collection Types ..................................................................................................................1-3
2KEYS TO SUCCESSFUL COLLECTIONS ......................................................................2-1
2.1 Common Misconceptions ...................................................................................................2-1
2.2 Improving Sample Yield ......................................................................................................2-3
2.3 Improving Sample Yield for HMW DNA .............................................................................2-3
3SAFETY AND PRECAUTIONS........................................................................................3-4
4UNPACKING AND INSTALLATION................................................................................4-1
5WORKFLOW SUMMARY ................................................................................................5-1
6SAMPLE PREPARATION................................................................................................6-1
7PROGRAMMING GUIDE .................................................................................................7-1
7.1 Overview .............................................................................................................................7-1
7.2 Programming Summary ....................................................................................................7-2
7.3 Selecting a Cassette Definition ........................................................................................7-4
7.4 Run Times............................................................................................................................7-5
7.5 Assigning a Reference Marker –external marker ..........................................................7-6
7.6 Assigning Reference Markers –internal standards......................................................7-7
7.7 Warnings and Indicators...................................................................................................7-8
8PROGRAMMING SIZE SELECTIONS –TIGHT, RANGE, AND TIMED MODES ............8-1
8.1 Tight Mode –programming minimum size range collections.......................................8-1
8.2 Range Mode–programming broad size range collections............................................8-2
8.3 Time Mode –programming timed collections ...............................................................8-4
9OPTICAL CALIBRATION ................................................................................................9-1

978-922-1832 ●www.sagescience.com ●support@sagescience.com
BluePippin Operations Manual 460013 Rev F iv
10 PREPARING A CASSETTE...........................................................................................10-1
10.1 Visually Inspect the Cassette ......................................................................................10-1
10.2 Prepare the Cassette for Loading ................................................................................10-3
10.3 Continuity Test...............................................................................................................10-4
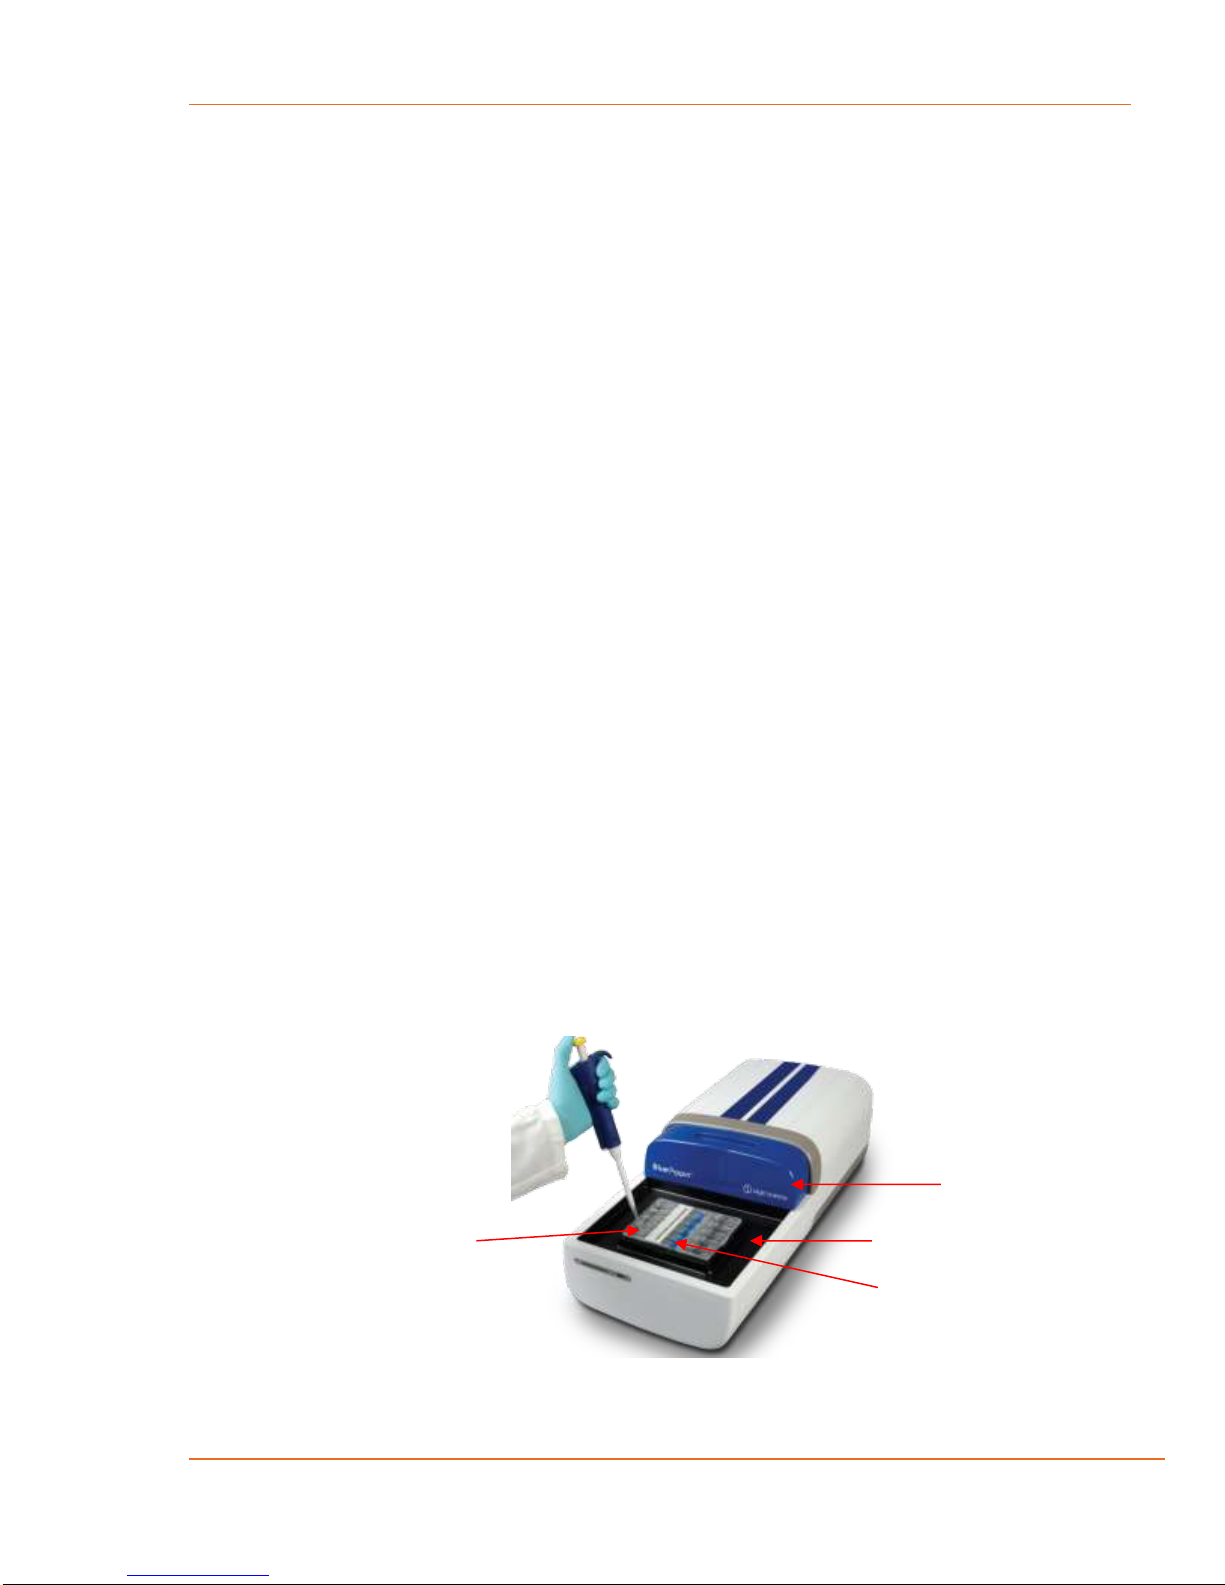
11 LOADING SAMPLES.....................................................................................................11-1
12 RUNNING A PROTOCOL..............................................................................................12-1
12.1 Overview .........................................................................................................................12-1
12.2 Starting a Run.................................................................................................................12-2
12.3 Monitoring a Run ...........................................................................................................12-3
12.4 Log Files .........................................................................................................................12-5
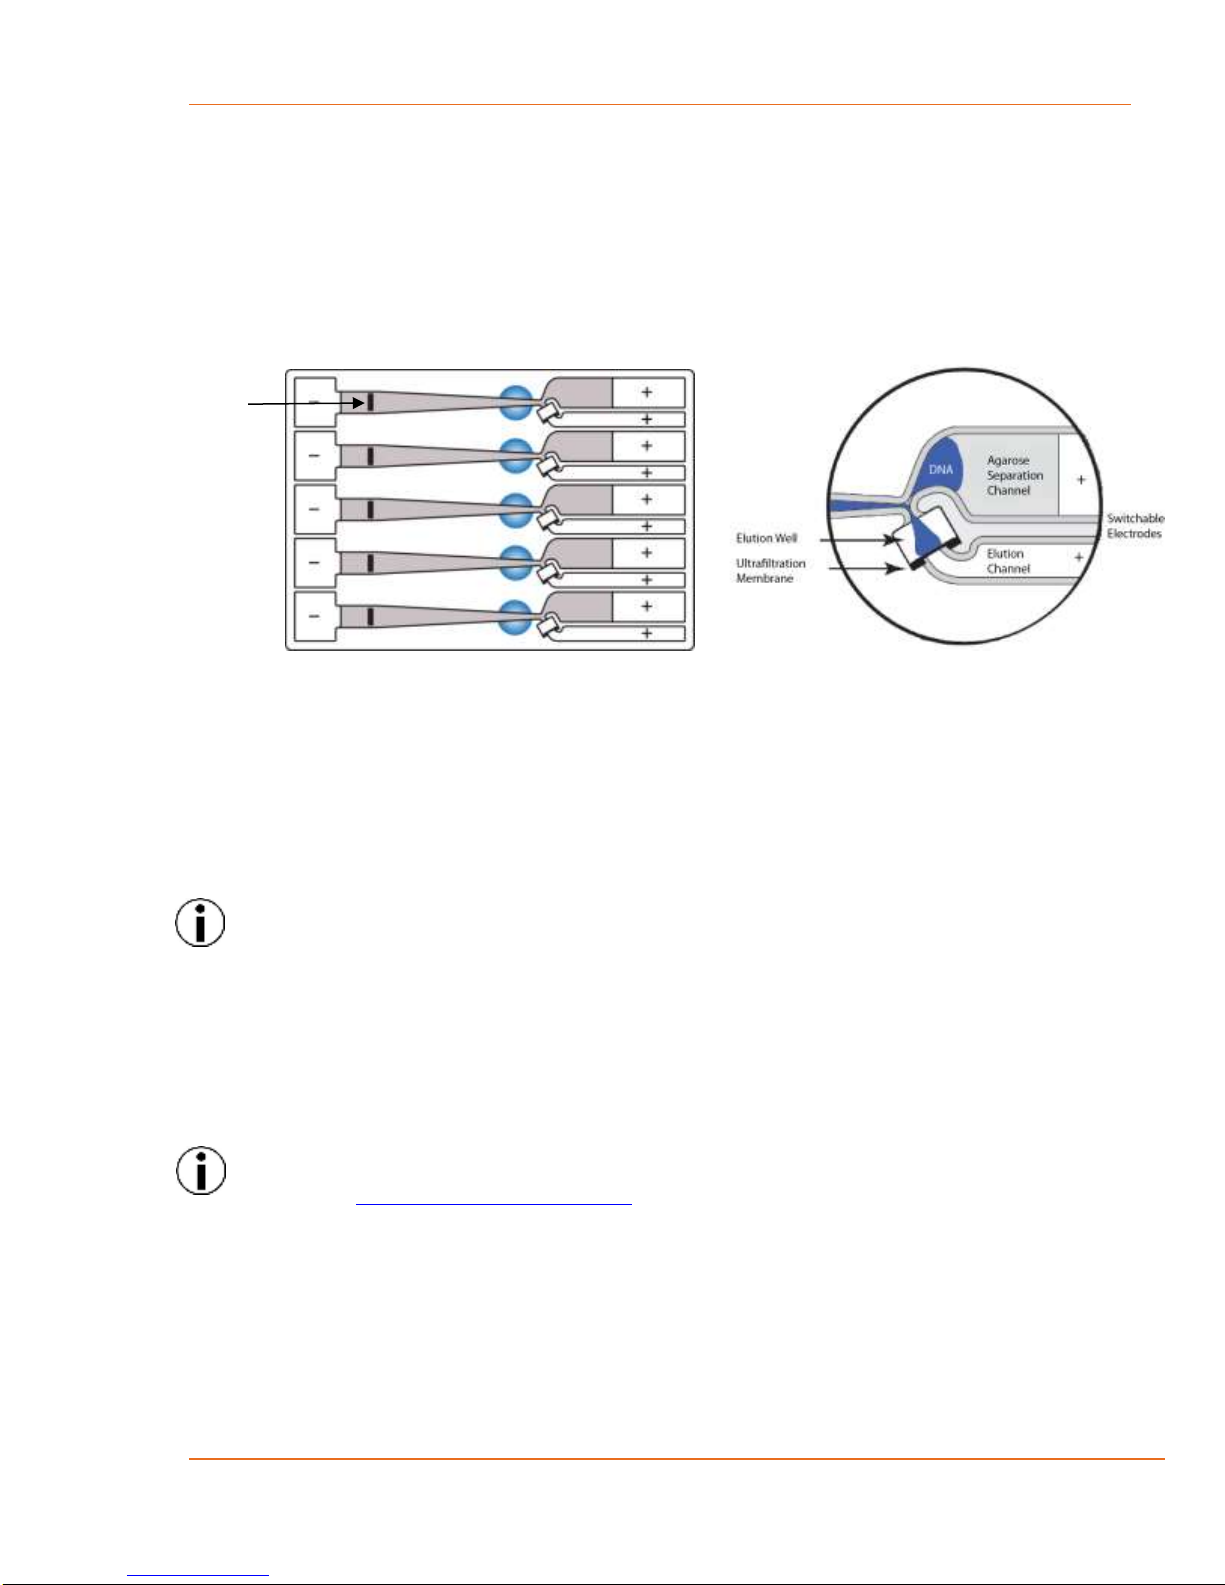
13 SAMPLE COLLECTION ................................................................................................13-1
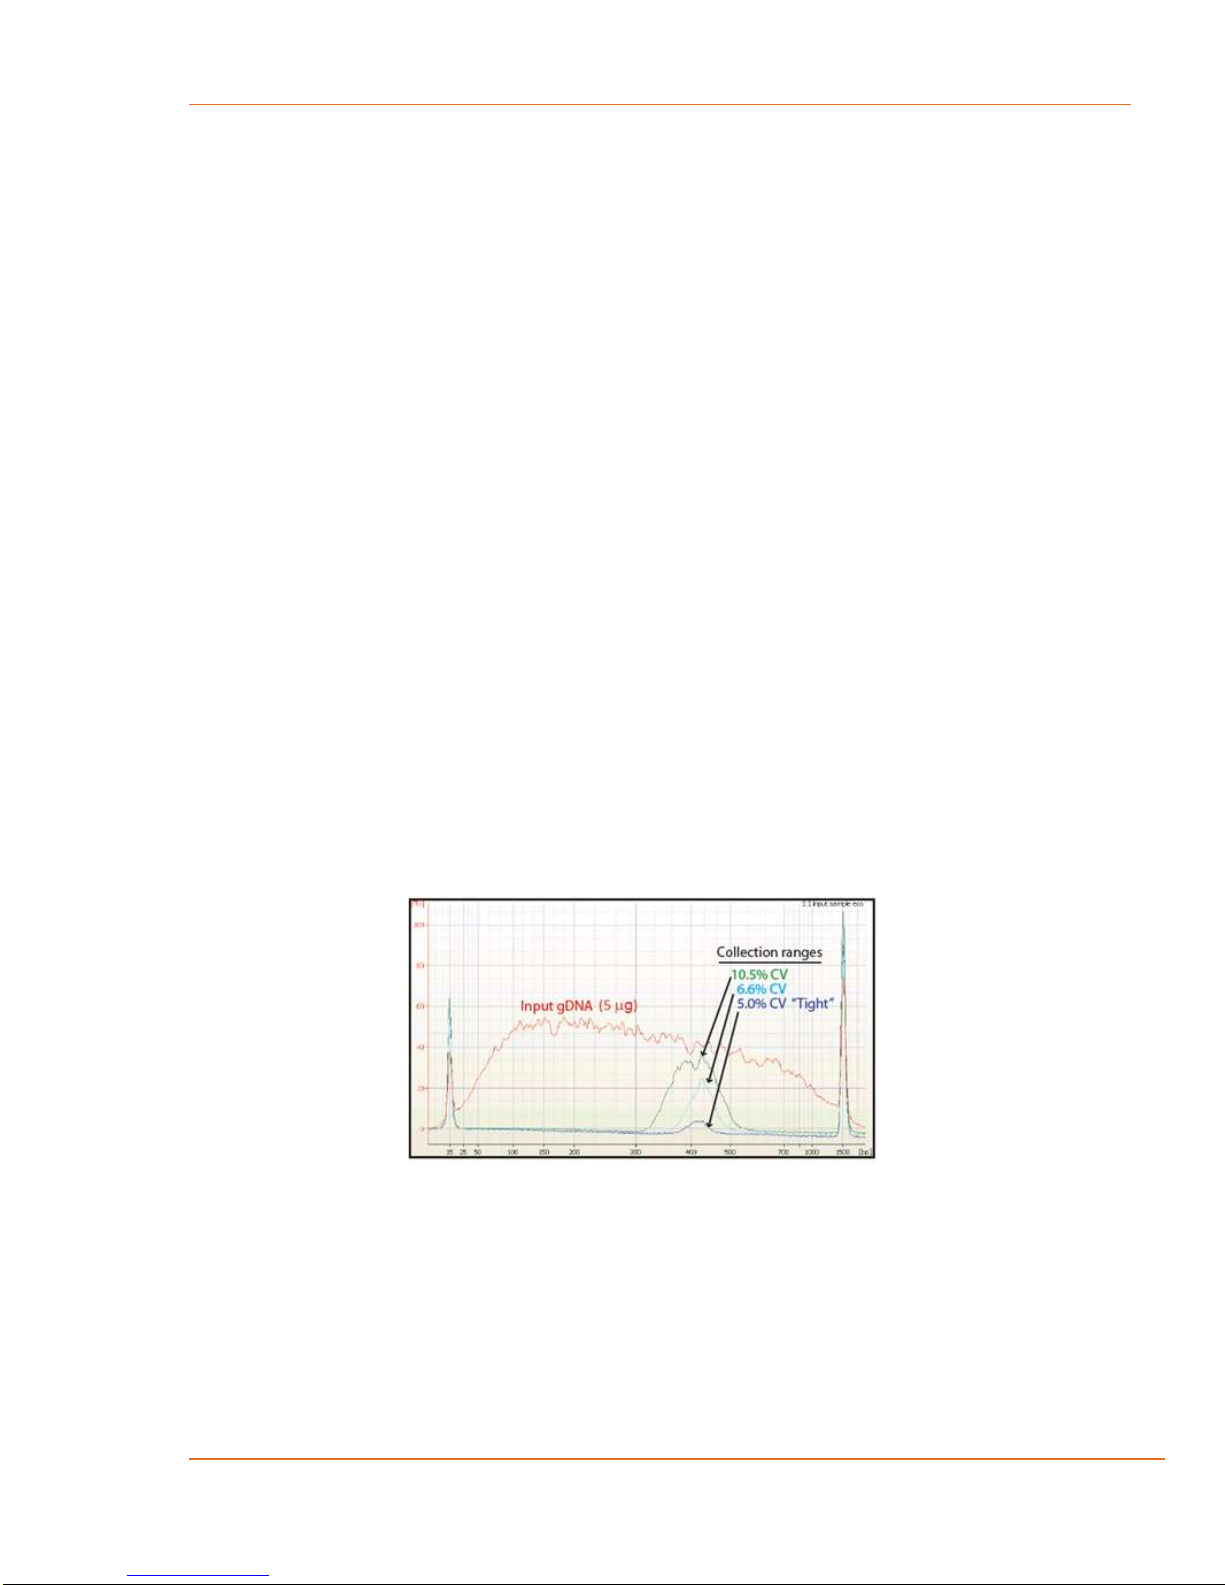
13.1 Overview .........................................................................................................................13-1
14 SAMPLE RECOVERY AND YIELD................................................................................14-1
14.1 Overview .........................................................................................................................14-1
14.2 Intrinsic Sample Recovery on the BluePippin .............................................................14-1
14.3 Improving Product Yield by Selecting a Wider Size Range........................................14-2
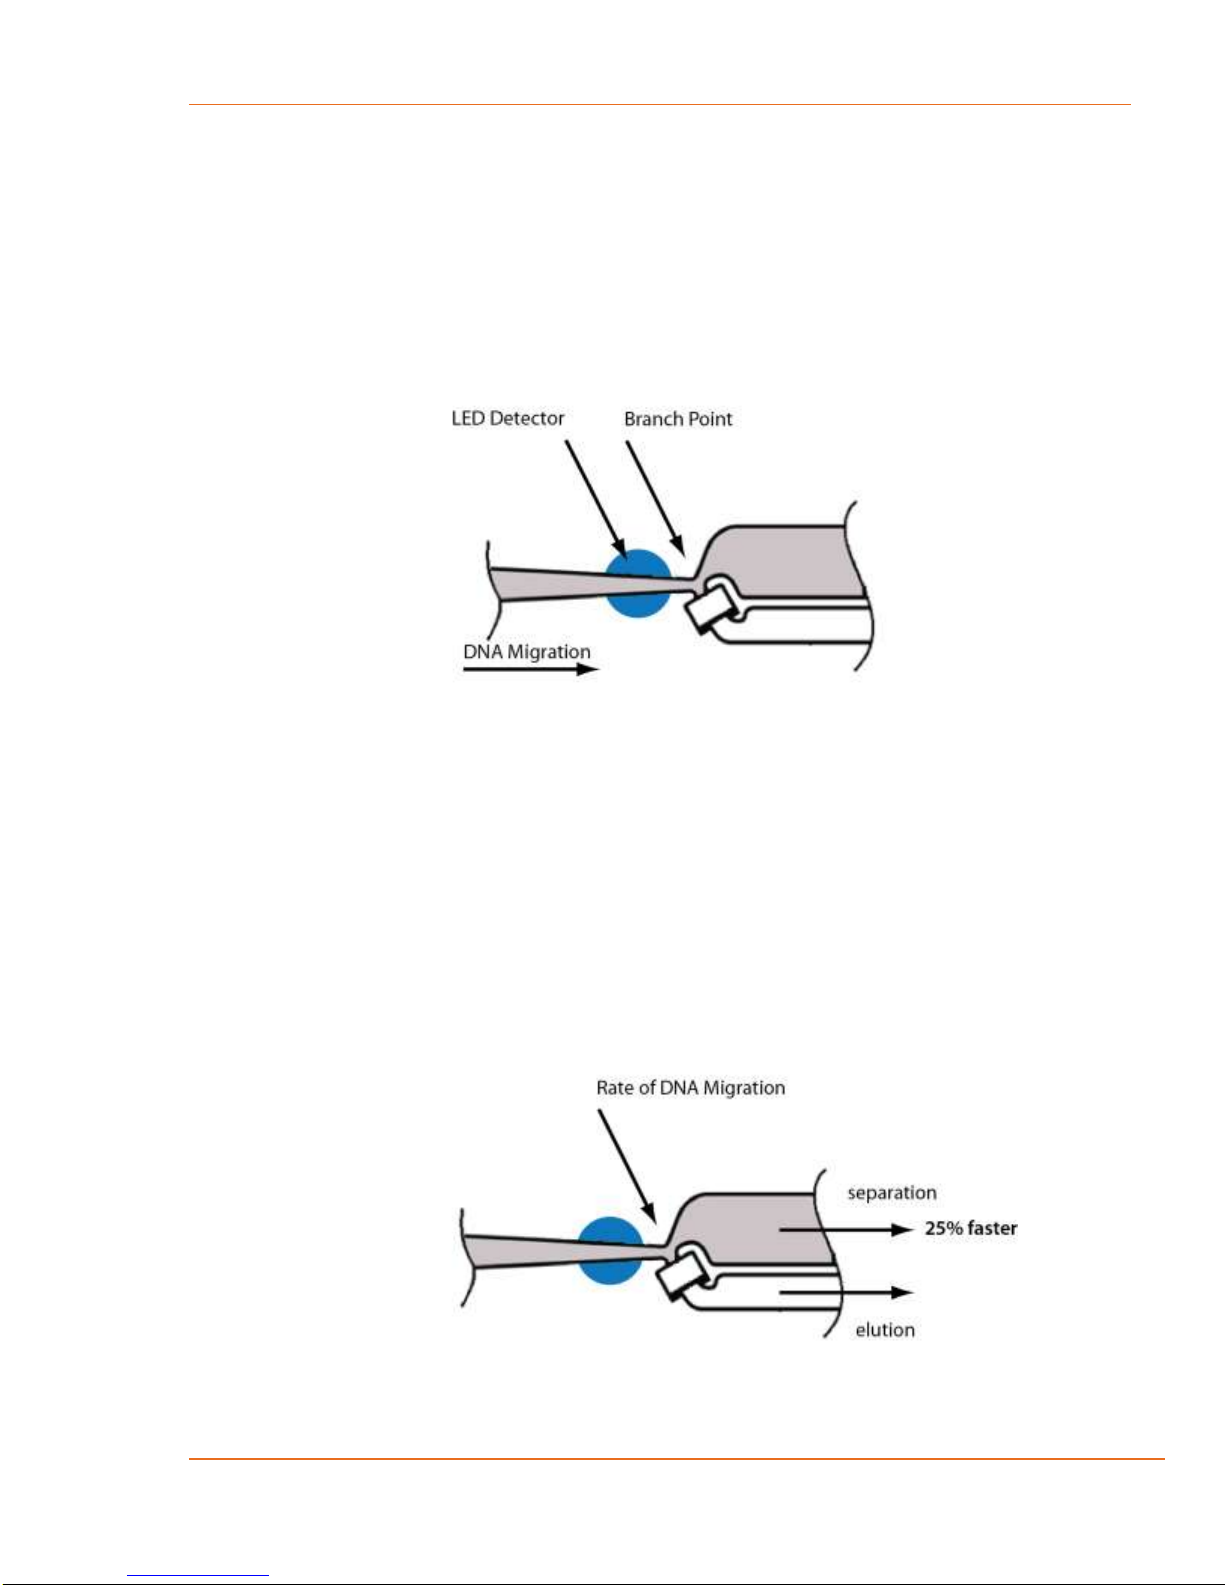
14.4 Improving Product Recovery with the Field Reversal .................................................14-3
14.5 HMW DNA: Recommendations to Improve Yield..........................................................14-4
15 SYSTEM VALIDATION..................................................................................................15-1
16 SYSTEM OPTIONS TAB ...............................................................................................16-1
17 RUNNING IN MANUAL MODE......................................................................................17-1
18 ANALYZING RUNS - LOG REVIEW TAB......................................................................18-1
19 MANAGING FILES -- FILE MANAGER TAB.................................................................19-1
19.1 Overview ..........................................................................................................................19-1
19.2 File Types.........................................................................................................................19-2
19.3 Transferring files.............................................................................................................19-3
20 UPGRADING SOFTWARE ............................................................................................20-1
20.1 Extracting the Files to a USB flash drive .....................................................................20-1
20.2 Upgrading the Pippin Instrument Software..................................................................20-3
CONTENTS (Cont’d)

978-922-1832 ●www.sagescience.com ●support@sagescience.com
BluePippin Operations Manual 460013 Rev F v
21 PREVENTATIVE MAINTENANCE –RINSING ELECTRODES .....................................21-5
21.1 Electrode Rinse Procedure..............................................................................................21-5
22 WARRANTY AND SERVICE .........................................................................................22-1
23 ORDERING INFORMATION..........................................................................................23-1
24 INSTRUMENT SPECIFICATIONS .................................................................................24-1
25 GEL CASSETTES SPECIFICATIONS...........................................................................25-1
25.1 3% Agarose, 90 bp-250 bp, Marker Q2 (internal standards)........................................25-2
25.2 2% Agarose, 100 bp-600 bp, Marker V1 (internal standards) .....................................25-3
25.3 2% Agarose, 100 bp-600 bp, Marker M1 (external marker).........................................25-4
25.4 1. 5% Agarose, 250 bp-1.5 kb, Marker R2 (internal standards).................................25-5
25.5 1. 5% Agarose, High-Pass, Marker R2 (internal standards) ......................................25-6
25.6 0.75% Agarose, 2-6 kb, Marker S1, Low Voltage (external marker)...........................25-7
25.7 0.75% Agarose, 1-6 kb, Marker S1, Pulsed-Field (external marker)...........................25-8
25.8 0.75% Agarose, 3-10 kb, Marker S1, Pulsed-Field (external marker) ........................25-9
25.9 0.75% Agarose, High-Pass Protocols (4-20kb thresholds).......................................25-10
25.10 0.75% Agarose, High-Pass Protocols (30-40kb thresholds) ....................................25-11
25.11 0.75% Agarose, 10-18 kb, Marker U1, Pulsed-Field (external marker) ....................25-12
25.12 0.75% Agarose, 18-27 kb, Marker T1, Pulsed-Field (external marker).....................25-13
25.13 0.75% Agarose, 50kb Target, Marker Z1, Pulsed- Field (external marker)............25-14
CONTENTS (Cont’d)

978-922-1832 ●www.sagescience.com ●support@sagescience.com
BluePippin Operations Manual 460013 Rev F 1-1
1 Introduction
Thank you for purchasing the BluePippin from Sage Science. The BluePippin is an
automated preparative gel electrophoresis system.
We urge you to read this manual to familiarize yourself with the system’s capabilities and
precautions.
1.1 System Overview
There are three components to the BluePippin system:
•Instrument –The instrument includes epifluorescence detectors, an
electrophoresis power supply, an electrode array, and a Linux-based single-
board computer. The system computer is accessed by an external LCD
monitor, mouse, and keyboard. The electrode array is located in the top of the
sliding instrument cover and is not user-accessible.
•Software –System software allows the user to enter parameters that define
the DNA fragment size ranges to be collected. The software also logs
fluorescence and electrical current data which may be analyzed in a review
screen.
•Gel Cassettes –Pre-cast, disposable agarose cassettes are manufactured by
Sage Science. Cassettes are supplied in kits that contain 10 cassettes and
sufficient reagents to complete all collections. Kits have been developed to
address DNA size range collections at various size ranges. Please refer to
Section 23 for kit descriptions and ordering numbers.
Sliding Lid:
electrodes are
embedded inside
the lid
Nest
Gel Cassette
Epi-fluorescent
detectors
The BluePippin Instrument
(the monitor and keyboard are not shown)

978-922-1832 ●www.sagescience.com ●support@sagescience.com
BluePippin Operations Manual 460013 Rev F 1-2
1.2 How the System Works
The BluePippin systems use pre-cast and disposable agarose gel cassettes. DNA
fractions are collected by electro-elution into a buffer-filled well using a branched
channel configuration with switching electrodes. The timing of switching is determined
by measuring the rate of DNA migration with optical detection of labelled markers. The
position of the detectors beneath the gel cassette is shown in the schematic below.
1.3 Collection Strategies
Collection timing (start, duration, and end) is based on the factory calibration
settings provided with a cassette definition file, and the user-input size range settings
in software.
Note: The agarose gel matrix does not contain intercalating dyes or gel stains, sample DNA
is not viewable or monitored.
Size Selections can be undertaken using one of the following strategies:
•Labeled internal standards –Fluorescein labeled DNA internal standards are
added to samples, and run ahead of the input sample. The rates of migration of
the internal standards are used to determine the collection timing within the
sample lane. Up to 5 samples may be run per cassette.
Note: The DNA sequence of internal standards may be found at
www.sagescience.com/support, on the BluePippin resources page in the “Casssette
Guides” section.
•Labeled external marker –The fluorescein labeled DNA marker is loaded in a
single dedicated sample lane during a run. The rates of migration of the markers
are used to determine the collection timing for the remaining sample lanes.
•Timed runs –The beginning and end time of elution (size selection) is set by the
user. Neither internal standards or external markers are used.
Gel Cassette Schematic
Close-up of the collection well
Sample Well

978-922-1832 ●www.sagescience.com ●support@sagescience.com
BluePippin Operations Manual 460013 Rev F 1-3
1.4 Collection Types
The BluePippin can be programmed to size select either
targeted fractions or “High-Pass” collections. The fragment
size distributions are described below:
1. Minimum Size Distribution (“Tight” setting). The
cassette lane will collect the narrowest distribution of
fragments that is achievable given the resolution of
the agarose gel concentration within the cassette.
The distribution is Gaussian, and its range is typically
+/- 16% (CV 8%) of the median fragment size.
2. Range Size Distribution (“Range” setting). The
cassette lane will collect a distribution of fragments
between a starting base pair value and an ending
base pair value. The actual start and end fragment
sizes are typically within +/- 10% of the base pair
values input into the software.
3. High-Pass Size Distribution (uses “Range*”
setting). The cassette lane will collect all
fragments above a base pair threshold. The
method increases the average fragment length of
the collection depending on threshold value and
input DNA distribution profile. High-Pass protocols
require and external marker to be run in one lane.
*Although the cassette continues to collect until the end of the run,
an end base pair value will auto-fill in the software protocol field.
This value should be disregarded, and should not be changed by
users.
Range
Tight
High Pass

978-922-1832 ●www.sagescience.com ●support@sagescience.com
BluePippin Operations Manual 460013 Rev F 2-1
2 Keys to Successful Collections
It is recommended that users closely follow the instructions outlined in this manual until
they become thoroughly familiar with the system. The Quick Guide (included with
cassettes) provides protocol reminders, but is not intended for beginning users.
Keys to successful collections are outlined in the following sections:
•Purity of the input sample (Section 6)
•Optical Calibration (Section 9)
•Preparation of the cassettes (Section 10)
•Sample loading (Section 11)
2.1Common Misconceptions
Users should be aware of the following characteristics of the BluePippin System. These
are part of normal operation of the system, but may seem counterintuitive at first.
2.1.1 Narrowest is not always the best.
The BluePippin can produce very narrow size distributions from sheared genomic
DNA. However, narrower size distributions will necessarily mean that a smaller
fraction of the input DNA will be recovered. Users should broaden their collection
ranges if the default tight settings do not produce enough DNA for their
application.
Figure 2.1. A comparison of the relative sample yield between tight and broader range
size selections of DNA.

978-922-1832 ●www.sagescience.com ●support@sagescience.com
BluePippin Operations Manual 460013 Rev F 2-2
2.1.2 DNA undergoing elution is smaller than DNA at the detector.
The branch point between the separation and elution channels is downstream
from the detector position. Figure 2.2 shows a cassette channel to illustrate.
During normal operation, the leading edge of the DNA fraction scheduled for
elution passes the detector before the start of elution (by up to several minutes).
This offset can give rise to the impression that sample elution is late, even in runs
that are functioning properly.
Figure 2.2. An illustration of the time and base pair difference between the detector
and branch point.
2.1.3 The rate of electrophoresis is faster in the separation channel than in
the elution channel. This may cause misconceptions with regard to the timing
of broad size selections. For instance, if one sample is programmed to select
from 400 –600bp, and a second sample is programmed to select from 200 –600
bp, the narrower range will finish eluting before the broader one, even though both
elutions complete collection at 600 bp. The collections of large DNA fragments,
especially with pulsed –field protocols, can also appear counter-intuitive with
respect to timing.
Figure 2.3. An illustration comparing the relative rate of electrophoresis in the separation
and elution channels

978-922-1832 ●www.sagescience.com ●support@sagescience.com
BluePippin Operations Manual 460013 Rev F 2-3
2.2 Improving Sample Yield
Users should expect an intrinsic yield of between 50-80% of the sample input. This is
based on product validation studies in which restriction fragments have been run and
collected, and the respective DNA amounts compared.
Yield can be affected by DNA becoming lightly bound to the low molecular weight cut-
off membrane in the elution well. At the end of the run, the BluePippin will briefly
reverse field (for 5 seconds). This improves sample yield by up to 20%.
Note: The reverse field feature may be disabled in the Systems Option screen.
2.3 Improving Sample Yield for HMW DNA
Recovering high molecular weight DNA (>2 kb, using all 0.75% agarose gel cassettes)
tend to have lower yields than low molecular weight size selection. The following
additional steps are highly recommended to improve product yield:
1. Wait at least 45 min after termination of the run before removing eluted DNA (it is
OK to leave samples in instrument for hours, i.e. for an overnight run).
2. Rinse the elution well with Tween solution. Tween solution (0.1% Tween 20 in 0.5X
electrophoresis buffer) is provided by Sage Science with cassette kits used with
HMW collections.
After removing the initial eluted volume:
•Remove the eluted sample from elution well at the end of the run
•Add 40l of Tween solution (supplied with the gel cassettes) to the elution well
•Wait 1 minute
•Remove solution and pool with the original extracted sample, or process
separately
.

978-922-1832 ●www.sagescience.com ●support@sagescience.com
BluePippin Operations Manual 460013 Rev F 3-4
3 Safety and Precautions
Icons Used
In this manual, the following icons will be used to provide the user with information
pertinent to the use of the BluePippin.
Caution! Warns the user that injury or instrument damage may occur if the
contents of the warning are not properly followed.
High Voltage! Warns of the risk of electrical shock if the contents of the
warning are not properly followed.
Important! Provide important information about the proper use of the system
that may influence the quality of the result.
Information. Provides additional information regarding the function of the
system or applications for which is used.
Safe Use Guidelines
The BluePippin system is designed to operate under the following environmental
conditions:
•Pollution Degree 2
•Installation category 2
•Altitude 2000m
•Indoor use
•Ambient temperature 17-32oC
•Humidity 10-80%, non-condensing
Standard laboratory precautions should be taken when handling BluePippin Gel
cassettes and operating the BluePippin:
•Wear a lab coat, safety glasses, and gloves.
•Use in proximity of an eye wash station and/or running water.

978-922-1832 ●www.sagescience.com ●support@sagescience.com
BluePippin Operations Manual 460013 Rev F 4-1
4 Unpacking and Installation
Unpacking the BluePippin
The BluePippin Instrument
The BluePippin instrumentation is shipped in two boxes: one will contain the BluePippin
and Accessories and the second box will contain the computer monitor in the
manufacturer’s original packaging. With the boxes in the upright position, open and
confirm that the following items are enclosed:
Monitor
•LCD computer monitor
•Video cable
•Power cord
BluePippin
•BluePippin Instrument
•Accessory box
oComputer keyboard, USB
oUSB computer mouse and mousepad
oPower supply
oPower cord
oRinse cassette (for maintenance of electrodes)
oCalibration fixture (for setting optical baseline before each run)
oOperations Manual

978-922-1832 ●www.sagescience.com ●support@sagescience.com
BluePippin Operations Manual 460013 Rev F 4-2
Setting up the BluePippin
1. Remove the accessory box located on inside edge of box at the front end of the
instrument. Remove the keyboard, mouse, and instrument power supply from their
packaging.
2. Firmly grip both sides of the instrument and lift it from the foam packaging insert. The
BluePippin weighs approximately 14 lbs.Place the Pippin on a table or bench top.
3. Remove the computer monitor from the manufacturer’s box and connect the monitor to
BluePippin using supplied video cable.
4. Connect monitor to power using power supply supplied with monitor.
5. Insert USB connector from computer keyboard into port located in the back of the
Instrument.
6. Connect mouse to BluePippin via USB or PS2 connector at back of instrument.
7. Connect monitor cable into the video port located in the back of the instrument.
8. Connect BluePippin instrument to power via supplied power supply and cable. Power
connector is at rear of instrument.
9. Press power switch located on the rear of the instrument, and wait for software to launch
(approximately 30 seconds).
The BluePippin is ready for use. After the power switch is activated, the
software will launch –allow ~30 seconds.
Figures 4.1 and 4.2 on the next page show the rear panel of the BluePippin.
Figure 4.3 on the following page shows the front panel.

978-922-1832 ●www.sagescience.com ●support@sagescience.com
BluePippin Operations Manual 460013 Rev F 4-3
Power Entry Port
Power Switch
Figure 4.1. Rear Panel Ports
Figure 4.2. Rear Panel Connections
USB Ports (4)
VGA monitor port
Power Cable
Monitor Cable
Key board
Mouse

978-922-1832 ●www.sagescience.com ●support@sagescience.com
BluePippin Operations Manual 460013 Rev F 4-4
Figure 4.3. BluePippin front panel.
USB Port
Indicator Light:
Blue when instrument is
ready for use (power is on,
and software is active).
Indicator Light:
Green when electrophoresis is
underway (protocol is running).

978-922-1832 ●www.sagescience.com ●support@sagescience.com
BluePippin Operations Manual 460013 Rev F 4-5
Unpacking Gel Cassettes
Gel cassettes are shipped in boxes in the following configurations. Ensure boxes are in
the upright position and confirm that the following contents are present:
Dye-free gels with internal standards (50 samples, size selections 90 bp –1.5 kb):
o10 foil-sealed gel cassettes (store at R.T.)
o1 package of adhesive tape for sealing elution wells
o1 reagent kit for 10 cassettes (store at 4oC)
▪550 μl DNA internal standards/ loading solution mix (10
μl/sample)
▪40 ml of spare running buffer
Dye-free gels with labeled external marker (40 samples, size selections >2kb):
o10 foil-sealed gel cassettes (store at R.T.)
o1 package of adhesive tape for sealing elution wells
o1 reagent kit for 10 cassettes (store at 4oC)
▪440 μl DNA size markers (1 x 40 μl load/ cassette)
▪500 μl loading solution (10 μl/sample)
▪2 X 800 l 0.1% Tween 20 in running buffer*
▪40 ml of spare running buffer
* Tween solution is used to improve DNA recovery of larger DNA fragments.
Important! Fluorescein labels will degrade at room temperature –minimize time at RT for
labeled standards and markers

978-922-1832 ●www.sagescience.com ●support@sagescience.com
BluePippin Operations Manual 460013 Rev F 4-6
Storage Conditions for Cassettes and Reagents
The following storage requirements should be observed:
•Gel Cassettes- Store at room temperature in the foil bags until ready for use.
•Internal standards or external markers –store at 4oC minimize time at room
temperature.
•Electrophoresis buffer –may be stored at room temperature or 4oC
•Loading solution –store at 4oC. Bring to room temperature before use.
•Tween Solution –store at 4oC

978-922-1832 ●www.sagescience.com ●support@sagescience.com
BluePippin Operations Manual 460013 Rev F 5-1
5 Workflow Summary
Prepare samples
add loading solution/standard mix to samples
max. 5 samples/cassette
Use internal standard
or external marker?
internal standard
HMW protocol?
(>2kb, 0.75% agarose)
Yes
No
Prepare samples
add loading solution to samples
use external marker
max.4 samples/cassette
external marker
Program a Size Selection Protocol
Select “USE INTERNAL STANDARDS”
Program a Size Selection Protocol
Enter reference lane No. for the external marker
Select “APPLY TO ALL LANES”
Calibrate the Optics
Prepare the Cassette
Run the Continuity Test on the Cassette
Load Samples onto the Cassette
Run the BluePippin

978-922-1832 ●www.sagescience.com ●support@sagescience.com
BluePippin Operations Manual 460013 Rev F 6-1
6 Sample Preparation
Input Sample Characteristics
When running the BluePippin, characteristics of input DNA can affect separation
resolution and efficiency of product recovery. The following general guidelines should
be followed:
•Ionic strength: The ionic strength of the sample should be lower than the
ionic strength of the buffer (80mM monovalent ions). High salt concentrations
can result in slower than expected DNA mobility.
•Protein in the sample: DNA-binding proteins such as ligases or polymerases
can affect the mobility of fragments during separation. Proteins can also reduce
DNA recovery from the elution module by increasing the binding of DNA to the
ultrafiltration membrane at the back of the elution module. For best results,
samples should be de-proteinized prior to loading whenever possible.
•Input DNA size distribution: A knowledge of the input size distribution is
obviously important to program accurate size selection settings. BluePippin
cassettes are calibrated using the Agilent Bioanalyzer to evaluate input and
product sizes, and so, for best results, input size distributions should be
evaluated using the Bioanalyzer. For low concentration samples, the Agilent HS
chip is very useful.
Preparing DNA Samples for the BluePippin
1. Bring DNA sample up to 30μl with TE.
2. Bring internal standard mix (or loading solution if using an external marker) to
room temperature.
3. For each sample, combine 30μl of DNA sample with 10μl of internal standard mix
(or loading solution).
4. Mix samples thoroughly (vortex mixer). Briefly centrifuge to collect.
Recommended sample Load Guidelines
Maximum Load: 5 g sheared genomic DNA
Minimum Load: 15 ng, sheared genomic DNA
Other manuals for BluePippin
1
Table of contents
Other Sage Science Laboratory Equipment manuals
Popular Laboratory Equipment manuals by other brands

Shimadzu
Shimadzu Shim-pack GIST Series instruction manual

caron
caron 7340-25 Operation manual

Metrohm
Metrohm 790 Personal IC Instructions for use

DIGISYSTEM
DIGISYSTEM DSC-302SMD instruction manual

Endress+Hauser
Endress+Hauser Liquiport 2010 CSP44 Brief operating instructions

Uvitron
Uvitron SUNRAY 400 SM instruction manual