Sagem PVR 7200T UK User manual

USER MANUAL
ENGLISH
DIGITAL TERRESTRIAL
TV RECEIVER / RECORDER WITH
HARD DISK AND DOUBLE TUNER
PVR 6200T UK
PVR 6600T UK
PVR 7200T UK*
*Top Up TV compatible
with Digital photo player / recorder
(photo function for the PVR 6600T only)
LU 252 466 456A PVR6200T_6600T_7200T UK.book Page 1 Mercredi, 11. janvier 2006 4:14 16

- I -
1. INFORMED OVERVIEW ......................................................................................................................................... 1
2. GENERAL INFORMATION ..................................................................................................................................... 2
2-1. SAFETY ......................................................................................................................................................... 2
2-2. CARE AND SAFETY INFORMATION ........................................................................................................... 2
2-3. ENVIRONMENT ............................................................................................................................................ 2
3. PREPARATION ...................................................................................................................................................... 3
3-1. ACCESSORIES SUPPLIED .......................................................................................................................... 3
3-2. TERRESTRIAL ANTENNA ............................................................................................................................ 3
4. REMOTE CONTROL UNIT ..................................................................................................................................... 4
4-1. REMOTE CONTROL UNIT ........................................................................................................................... 4
4-2. BATTERIES ................................................................................................................................................... 4
5. QUICK INSTALLATION .......................................................................................................................................... 5
5-1. INSTALL TOPUP TV CARD (ONLY PVR 7200T SERIES) .......................................................................... 5
5-2. CONNECTIONS ............................................................................................................................................ 5
5-3. FIRST INSTALLATION .................................................................................................................................. 6
6. INSTALLATION MENUS ........................................................................................................................................ 7
6-1. ICONS ........................................................................................................................................................... 7
6-2. USER SETTINGS .......................................................................................................................................... 7
6-3. INSTALLING FAVOURITE LISTS ................................................................................................................ 8
6-4. RECEIVER INSTALLATION .......................................................................................................................... 8
7. INFORMATION ..................................................................................................................................................... 10
7-1. RECEIVER .................................................................................................................................................. 10
7-2. HARD DISK ................................................................................................................................................. 10
7-3. ANTENNA SIGNAL ..................................................................................................................................... 10
8. VIDEO RECORDINGS .......................................................................................................................................... 11
8-1. LIVE MODE / DEFERRED MODE .............................................................................................................. 11
8-2. IMMEDIATE RECORDING .......................................................................................................................... 12
8-3. RECORDING PROGRAMMED VIA THE MENU ........................................................................................ 12
8-4. RECORDING PROGRAMMED VIA THE PROGRAMME GUIDE ............................................................... 13
8-5. RECORDING LIST ...................................................................................................................................... 13
8-6. MANAGING THE RECORDING LIST ......................................................................................................... 14
8-7. SAVING A RECORDING ON ANOTHER MACHINE .................................................................................. 15
9. PHOTO EDITOR ................................................................................................................................................... 16
9-1. CARE INFORMATION ................................................................................................................................ 16
9-2. STARTING THE PHOTO EDITOR .............................................................................................................. 16
9-3. READING AND TRANSFERRING A PHOTO ALBUM FROM A MEMORYCARD ..................................... 18
9-4. MANAGING ALBUMS ................................................................................................................................. 20
9-5. MANAGING PHOTOS ................................................................................................................................. 20
9-6. PRINTING ................................................................................................................................................... 21
10. EVERYDAY USE ................................................................................................................................................ 22
10-1. SELECTING A TELEVISION CHANNEL .................................................................................................. 22
10-2. SELECTING A RADIO CHANNEL ............................................................................................................ 23
10-3. ADJUSTING THE AUDIO VOLUME LEVEL ............................................................................................. 23
10-4. CHANGING THE FAVOURITE LIST ......................................................................................................... 23
10-5. TEMPORARILY SELECTING AUDIO LANGUAGES AND SUBTITLES .................................................. 23
10-6. TELETEXT ................................................................................................................................................ 24
10-7. TV / VCR SWITCH .................................................................................................................................... 24
10-8. ELECTRONIC PROGRAMME GUIDE ...................................................................................................... 24
11. CONNECTING A COMPUTER ........................................................................................................................... 25
12. UPDATING THE SOFTWARE ............................................................................................................................ 25
13. PERIPHERAL CONNECTIONS .......................................................................................................................... 26
14. REFERENCE ...................................................................................................................................................... 26
14-1. TROUBLESHOOTING .............................................................................................................................. 26
14-2. SPECIFICATIONS ..................................................................................................................................... 27
14-3. GUARANTEE ............................................................................................................................................ 28
LU 252 466 456A PVR6200T_6600T_7200T UK.book Page I Mercredi, 11. janvier 2006 4:14 16

- 1 -
1. INFORMED OVERVIEW
CONGRATULATIONS!
This is a new generation of Sagem Communication receiver dedicated to Digital Terrestrial Television and is
equippedwithaharddisk.Withthistechnologicaladvantage,youcanmakedigitalvideorecordingsandwith
the PVR6600T, you can also manage even print, photo albums.
Once you have connected your receiver, you will be able to enjoy all the services.
You can update your receiver if new functions or services become available.
The Sagem Communication Receiver follows a continuous development strategy.Therefore, we reserve the
right to make changes and improvements to the product described in this user manual without any prior
notice.
This product complies with EMC directive 89/336/EEC.
CE marking:
The CE marking certifies that the product complies with the essential requirements of the Directive 1999/5/
CE of the European Parliament and Council concerning radio equipment and telecommunication equipment
for the health and safety of users and concerning magnetic interference.
The CE declaration of conformity can be viewed in the support section of the Sagem Communication site
www.sagem.com, or it can be obtained from the following address:
Sagem Communication - Customer relations department
4 rue du Petit Albi - 95800 Cergy Saint-Christophe - France
Copyright © Sagem Communication (SAFRAN Group)
All rights reserved
PVR 6200 T, PVR 6600 T, PVR 7200 T
Digital TV Receiver
IMPORTANT NOTICE
Before unpacking this product further,
Your Set Top Box is supplied with default code 1234.
Have you or your local store checked your Postcode for reception?
Telephone number for your local store is on your till receipt.
Should your Store be unable to help, please check the following Website Links for Digital
Terrestrial signal coverage:
http://www.dtg.org.uk/consumer/freeview.html
htmlhttp://www.freeview.co.uk
http://www.bbc.co.uk/digital
Please note : In order to receive quality digital signal you may need an aerial upgrade.
LU 252 466 456A PVR6200T_6600T_7200T UK.book Page 1 Mercredi, 11. janvier 2006 4:14 16

- 2 -
2-1 SAFETY
Use of the Receiver is subject to safety rules designed to protect users and their environment.
Furthermore, to gain full satisfaction and maximum performance from your Receiver, the following must be applied::
-Install thereceiverindoorsaway fromsunlightand rain:Avoid extremely hotor coldtemperatures. Placethereceiverand mains unit
away from sources of heat such as radiators or gas/electric heaters. Do not place incandescent objects such as candles close to the
receiver. It is advisable to unplug the antenna during thunderstorms. Even if the receiver and television are unplugged, they can still
be damaged by lightning.
- Place the receiver and mains unit in a dry and well-ventilated place.
-Protect the receiver from damp: Place the receiver and mains unit away from rain, damp and dust. Do not place plants nearby to
avoid any splashes when they are watered. If liquid seeps into the receiver or power adapter, unplug them from the power socket and
contact your distributor.
-Avoid violent shocks: Never use the receiver if it is damaged. Always place your receiver on a flat surface where there is no risk of
being bumped or knocked. Never open the receiver or power unit! There is a risk of electric shock. All work on the receiver must be
carried out by qualified personnel.
-Only use the power unit that is supplied: Connect it to the mains in compliance with the installation instructions in this booklet and
the indications written in the identification label that is fixed on the appliance (voltage, current, frequency of the electricity network). By
precaution, in case of danger, the power adapters act as a cut-off device for the 230V supply. They must be located close to the
appliance and be easy to access.
-Do not place anything on top of the receiver (as it would restrict ventilation): The ventilation slots located on the casing preventyour
receiver from overheating. Do not place any objects such as a piece of cloth or sheet of paper on top of these slots. If you place the
receiver in a compartment, leave a space of at least 10 cm each side and 20 cm in front and behind the receiver.
-Place the receiver out of reach of children: Batteries are easily swallowed by young children. Therefore, do not leave the remote
control unitwithin their reach.
- Fuse: The plug of the AC lead contains a fuse. If you need to change the fuse, always use the type of fuse indicated on the plug.
2-2 CARE AND SAFETY INFORMATION
Interference: Do not place the receiver near appliances that may cause electromagnetic interference (for example, loudspeakers). This
could affect receiver operation and distort the picture or sound.
Hard disk: This unit contains a hard disk. Please wait for the unit to go into standby mode before unplugging and moving it..
2-3 ENVIRONMENT
Preservation of the environment is an essential concern of Sagem Communication. The desire of Sagem Communication is to operate
systems observing the environment and consequently it has decided to integrate environmental performances in the life cycle of its
products, from manufacturing to commissioning, use and elimination.
2-3-1 PACKAGING
The presence of the logo (green dot) means that a contribution is paid to an approved national organisation to improve packaging
recovery and recycling infrastructures.
To facilitate recycling, please respect the sorting rules set up locally for this kind of waste.
2-3-2 BATTERIES
If your product contains batteries, they must be disposed of at appropriate collection points.
2-3-3 THE PRODUCT
The crossed-out waste bin stuck on the product or its accessories means that the product belongs to the family of electrical and
electronic equipments.
In this respect, the European regulations ask you to dispose of it selectively:
-At sales points in the event of the purchase of similar equipment.
-At the collection points made available to you locally (drop-off centre, selective collection, etc.).
In this way you can participate in the re-use and upgrading of Electrical and Electronic Equipment Waste, which can have an effect on
the environment and human health.
2. GENERAL INFORMATION
LU 252 466 456A PVR6200T_6600T_7200T UK.book Page 2 Mercredi, 11. janvier 2006 4:14 16

- 3 -
3-1 ACCESSORIES SUPPLIED
Your receiver is suppliedwith the following parts:
• 1 remote control unit
• 2 batteries (AAA) for the remote control unit
• 1 Scart lead for connection to the television
• 1 AC/DC adapter and power cable
• 1 user manual
3-2 TERRESTRIAL ANTENNA
Very often, to get the best reception, you may simply need to adjust your antenna. Alternatively, you can
connectasecondantennatoyoursystem.Forfurtherinformation,pleasecontactyourspecialiseddistributor.
3-2-1 Standard outdoor antenna :
It is preferable to use an outside roof antenna that is designed to receive UHF channels between 21 and 69.
However:
• If your building is equipped withan old antenna model, digital channels that are transmitted at high fre-
quencies may be difficult or even impossible to receive. The problem can only be resolved by changing
the antenna.
• If your building is equipped with an antenna system that contains a filter and channel selector, reception
will most probably not work correctly. In this case, youwill need tocontact theauthorities in charge of the
building.
• Some antennas directed towards ananalogue transmitter must be re-adjusted towardsa digital TV trans-
mitter.
• If you encounter reception problems, you can also try placing the antenna at different heights.
3-2-2 Indoor antenna and antenna installed on a balcony or window :
Inidealreceptionconditions,thistypeofantennaissufficient.However,afewnotesandtipsaregivenbelow:
• Use an antenna that is designed to receive channels 21 to 69.
• Install the antenna close to the window and direct it towards the digital TV transmitter.
• If possible, use an antenna with an amplifier.
3. PREPARATION
LU 252 466 456A PVR6200T_6600T_7200T UK.book Page 3 Mercredi, 11. janvier 2006 4:14 16

- 4 -
4-1 REMOTE CONTROL UNIT
Do not forget to point the remote control unit towards the receiver when using it.
The remote control unit’s functions in PHOTO MODE are explainedseparatelysee “Function ofthe
remote control unitkeys in PHOTO MODE”, page 17.
4-2 BATTERIES
The remote control unit requires two batteries (AAA) to operate.
The diagram in the battery compartmentindicates how to install them.
The batteries supplied are notrechargeable.
FUNCTIONKEYS Radio: Access radio mode
Switch on/place the receiver in standby
TV-AUX: Manage the Scart outputs and Teletext functions
On-screen options
Access the channels and various on-screen options
Access Teletext
Display programme information
Access PHOTO mode on the PVR6600T
Access the programme guide
Access the menus
Move in a page, menu...
Validate a function or option
Go back to the previous screen or mode
Fast forward a recording
Stop
Record
Exit a screen or mode
Raise or lower the volume level
Turn the sound off
Change channel
Access the recording list
Rewind a recording
Pause
Play a programme
4. REMOTE CONTROL UNIT
LU 252 466 456A PVR6200T_6600T_7200T UK.book Page 4 Mercredi, 11. janvier 2006 4:14 16
- 5 -
Before connecting this product, please ensure that Digital Terrestrial Television is available in your region.
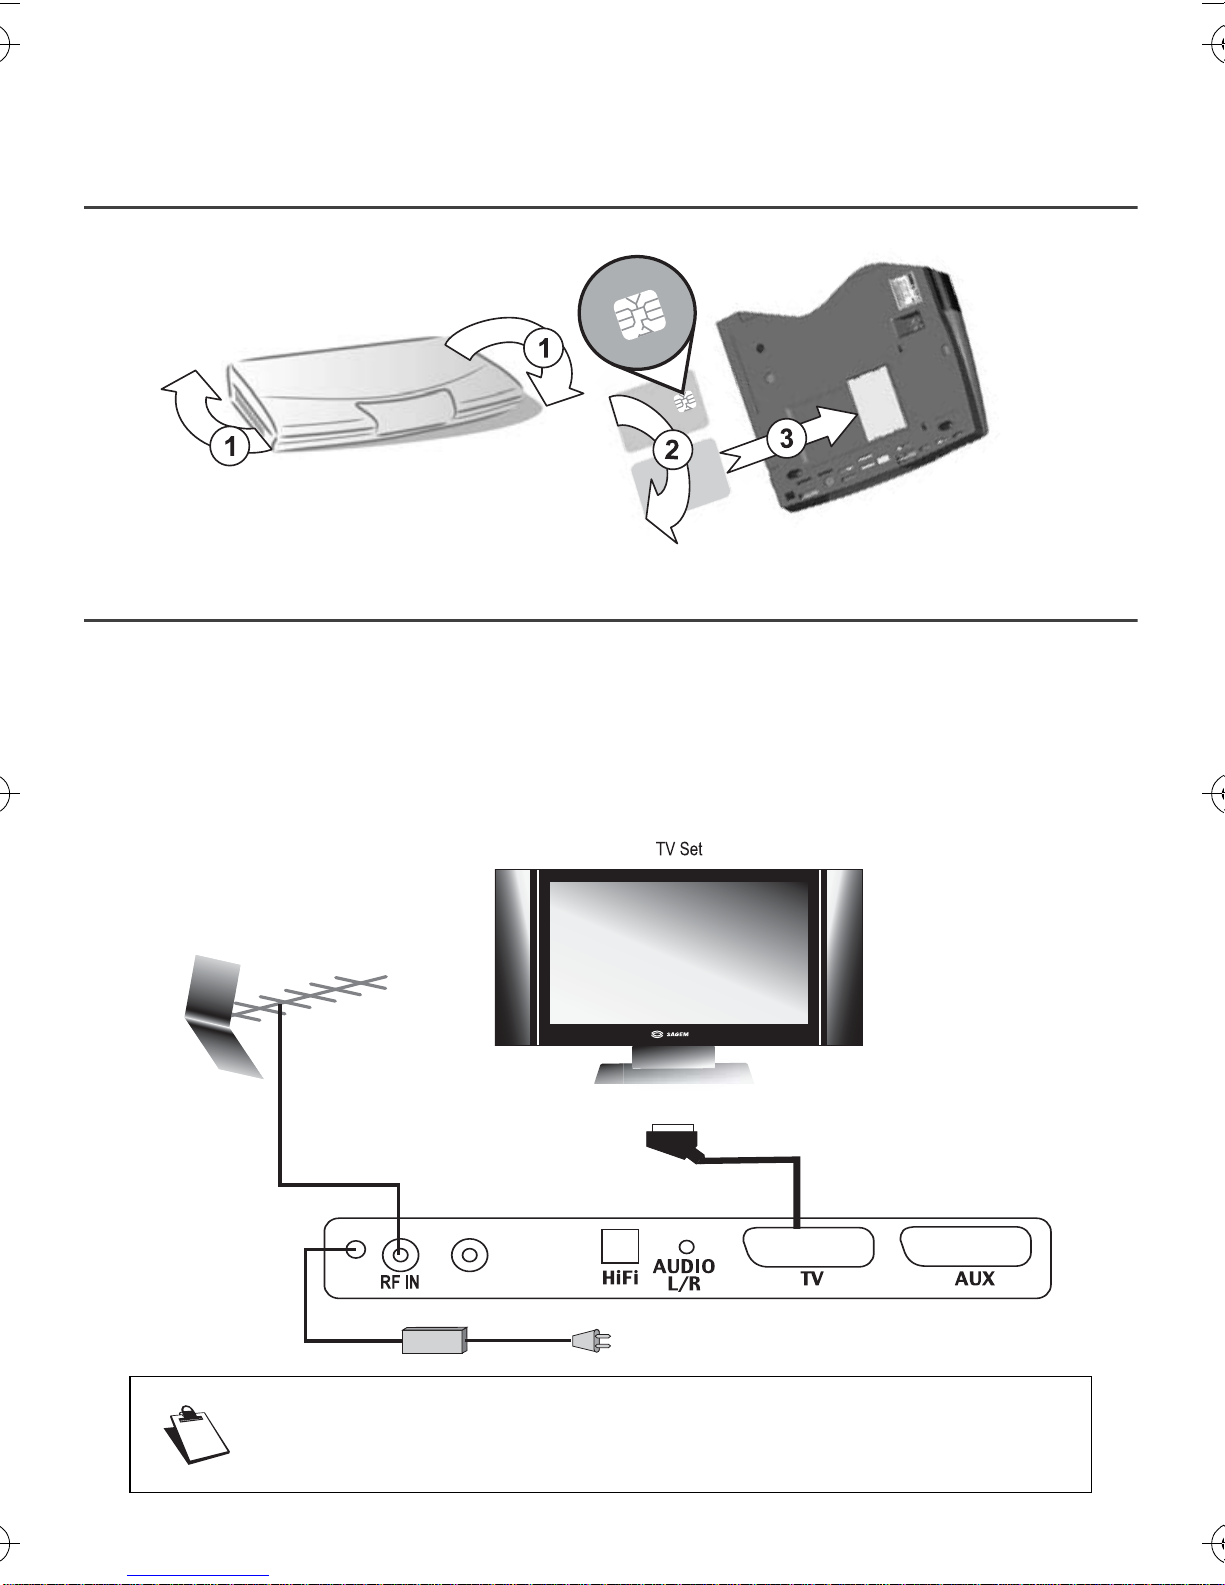
5-1 INSTALL TOP UP TV CARD (only PVR 7200T series)
To access, Top Up TV channels, you may turn the receiver and place the smard card as indicated below.
5-2 CONNECTIONS
BeforeinstallingyourReceiver,pleasecheckthatyourdeliveryiscomplete:usermanual,remotecontrolunit,
batteries (X2), Scart lead and AC/DC adapter.
Please ensure that the appliances to be connected together (Receiver, TV, VCR...) are unplugged before
making any connections.
Connect the appliances together as shown in the diagrams and plug them back into the power socket.
For optimum quality, connect theScart lead to the TV Scart socket that is marked with 3 dots (RGB).
HD
5. QUICK INSTALLATION
To connect peripheral equipment, see “PERIPHERAL CONNECTIONS”, page 26.
LU 252 466 456A PVR6200T_6600T_7200T UK.book Page 5 Mercredi, 11. janvier 2006 4:14 16

- 6 -
5-3 FIRST INSTALLATION
After connecting theReceiver correctly, a first time installation must be carriedout. Switch on your Receiver
(Do not forget to switch on your television at the same time). A welcome screen is displayed.
When the Receiver is ready, press to start the installation.
Select the language and country (UK) with the keys and and validate by pressing .
The receiver automatically searches for the available channels.
If no channels are found,the receiver proposes thatyou adjust the antenna.
Enter a channel number (consult the list of channels that transmit in your sector).
Adjust the antenna until the level and quality signals become green.
Press to go back to the channel search.
If problems persist, please contact your specialised distributor or the Sagem Communication Hotline.
UK Hotline: 0905 77 48 081*.
* 0.15 £/min, tariff cost effective form 06/27/2005.
LU 252 466 456A PVR6200T_6600T_7200T UK.book Page 6 Mercredi, 11. janvier 2006 4:14 16

- 7 -
6. INSTALLATION MENUS
6-1 ICONS
6-2 USER SETTINGS
Tomoveinthescreensandchangethevarioussettings,simplyusethekeys , , , toindicate
your selections,
to validate and to quit the screens.
To access the user settings screen, press . Once you are in the main menu, select USER SETTINGS.
6-2-1 Changing the Receiver code (access code)
In USER SETTINGS, select CHANGE RECEIVER CODE.
This code is usedand requested tolock the installation, Receiver, channels andrecordings.
The default access code is
1234
. If you enter
0000
, the control functions are disabled.
6-2-2 Language selection
In USER SETTINGS, select LANGUAGE SETTINGS.
In the language menu, select the desired language for the menus, audio and subtitles.
6-2-3 User preferences
In USER SETTINGS, select USER PREFERENCES.
Network monitoring:
Network monitoring can be programmed. In this case, you will be informed each time a
new channel or service is installed.
Banner timeout and banner transparency:
The banner display time and level of transparency can be set.
Volume bar timeout:
The volume indicator display time can be set.
Country:
Confirm your geographical location. Please rescan if you change the country.
Recording timers User settings Receiver settings Photo player Recording list
Technical
informations Favourite lists Radio Electronic
program guide
LU 252 466 456A PVR6200T_6600T_7200T UK.book Page 7 Mercredi, 11. janvier 2006 4:14 16

- 8 -
6-2-4 Locking and parental consent
In USER SETTINGS, select LOCKING.
Receiverlocking:
CompletelylocksaccesstotheReceiverwithacode.IfyouselectYES,youwillbeprompted
to enter your access code (1234 by default) each time you switch your receiver on.
Channel locking:
Enables locking for all the channels. If you select YES, you will be prompted to enter your
access code each time you want to look at a channel.
Channel to lock:
To lock some channels only. You will be prompted to enter your access code each time you
want to look at a locked channel.
Level:
to lock programmes that are rated at higher parental consent that the value entered. Select
03
for
maximal control (all programmes rated will be blocked) or
18
(all programmes will be authorized).
Arecordonachannellockedoraprogrammeratedwithanagehigherthanautorizedwillappearonly
in the the full list of recording.
6-3 Installing favourite lists
In MAINS MENU, select FAVOURITE LISTS.
Selected list: By default, all the channels found during the installation are located in list A.
There will be two distinct types of list: TV lists and RADIO lists.
To create new lists (from B to H), simply select them, add (CREATE OR MODIFY) or delete channels.
6-4 RECEIVER INSTALLATION
To move in the screens and change the various settings, simply use the keys , , , to indicate
your selections, to validate and
to quit the screens.
To access the Receiver installation screen, press . Once you are in the main menu, select RECEIVER
SETTINGS.
A code prompt is displayed: enter
1234
then (to change the code, see “Changing the Receiver code (access
code)”, page 7.
6-4-1 Channel search
In RECEIVER SETTINGS, select CHANNEL SEARCH.
A bar indicates the search progress.
If channels are found, a window is displayed prompting you to validate them.
The number of channels in the list may be less than the number displayed when scanning, once the
duplications have been deleted at the end of the search process.
If no channel has been found, refer to the section Antenna signal to adjust the antenna.
LU 252 466 456A PVR6200T_6600T_7200T UK.book Page 8 Mercredi, 11. janvier 2006 4:14 16

- 9 -
6-4-2 TV, VCR and Home Cinema settings
In RECEIVER SETTINGS, select VIDEO AND SOUND SETTINGS.
Usethearrowstonavigateandselectyouroptionsthenvalidate.Toselecttheseoptions,refertothemanuals
for your audio and video equipment.
TV screen format: selection of display mode for your TV set - 4/3 Pan of scan, 16/9, 4/3 letter box.
TV scart standart: selection of video standart (Pal or RGB) for the TV output.
TV RGB output: selection of signal level (low, medium,high) for the RGB signals.
AUX scart: selection of video standart (PAL - or S-VIDEO) for the AUX output.
Digital Audio Output: selection of audio stream for the numericalaudio output. If home cinema is selected,
when an AC3 audio stream is broadcasted, this stream is sent on the numerical audio output otherwise it is
the stereo data thatis sent.
If you are not sure, leave the default settings (do not change them).
Do not select "HOME CINEMA" mode except if the amplifier connected support this mode.
6-4-3 Return to the default factory settings
In RECEIVER SETTINGS, select RESET FACTORY DEFAULT.
If you validate this option, all the channels and settings will be lost.
LU 252 466 456A PVR6200T_6600T_7200T UK.book Page 9 Mercredi, 11. janvier 2006 4:14 16

- 10 -
7. INFORMATION
The information contained in this menu may be requested if you contact your supplier or another service (For
example, maintenance). This information concerns your receiver and the embedded software.
In MAIN MENU, select TECHNICAL INFORMATION. Give information on PVR software.
7-1 RECEIVER
In TECHNICAL INFORMATION, select PRODUCT DATA.
7-2 HARD DISK
In TECHNICAL INFORMATION, select HDD INFORMATION.
7-3 ANTENNA SIGNAL
In TECHNICAL INFORMATION, select ANTENNA SIGNAL INFORMATION.
Enter a value in the CHANNEL line to find out the level and quality of this channel.
7-4 Subscription information (PVR 7200 only)
In technical information select subscription information. Give information on your subscription and smart card.
7-5 MEDIA GUARD INFORMATION (PVR 7200 only)
Give information on Media guard librairy.
LU 252 466 456A PVR6200T_6600T_7200T UK.book Page 10 Mercredi, 11. janvier 2006 4:14 16

- 11 -
8. VIDEO RECORDINGS
Video recorder: Recordings and managing recordings
From 20 to 80 hours of recording are possible, depending on the model and hard disk capacity.
It is possible to watch one programme while recording another programme.
In the same way, it is possible to watch a programme in deferred mode while recording another programme.
Two recordings cannot be programmed in the same time slot.
Take care than MHEG services (red button) are not recorded and also are unavailable during record.
8-1 LIVE MODE / DEFERRED MODE
The unit automatically saves the previous 30 minutes of the channel
that is watched. This sliding recording mode can be used to stop live
mode, rewind and review the programme that was recorded moments
before.
Press , , and to enter the time shift recording. A
bannerwiththeDeferred/Livetimeisdisplayedatthetopofthescreen.
8-1-1 Pause
Deferredplaybackcanbestoppedusingthekey .Youwillthenseethedeferredplaybackdelayincrease
compared to the live programme
8-1-2 Rewind
It is possible to rewind the recording using the key .
You will then see the Deferred/Live delay increase. The rewind speed can be increased (up to 600 times the
normal speed) by pressing this key several times. Therefore, it is possible to rewind 30 minutes (note: To do
this, the current programme must have been watched for at least 30 minutes).
8-1-3 Fast forward
It is possible to fast forward the recording using the key . You will then see the Deferred/Live delay
decrease.
The fast forward speed can be increased (up to 600 times the normal speed) by pressing this key several
times. If you remain in fast forward, you will finish by reaching the live programme.
8-1-4 Play
To play in deferred mode, simply press the key .
8-1-5 Stop
To go back to the live programme, simply press the key .
LU 252 466 456A PVR6200T_6600T_7200T UK.book Page 11 Mercredi, 11. janvier 2006 4:14 16

- 12 -
8-2 IMMEDIATE RECORDING
To record a live programme, select the channel and press .
You can then change channel without the recording being affected.
To stop a recording, press the key .
Access to recording can be locked. To do this, after pressing ,
press the key . Highlight the Locking line and select YES.
The locked programme will then be hidden in the programme list. To access the locked program, press B
(COMPLETE LIST) (cf. recording list chapter).
Whenthekey ispressedseveraltimes,youcanselectarecordingtimein30-minutestepswitha
maximum duration of 4 hours.
8-3 RECORDING PROGRAMMED VIA THE MENU
Press the key then confirm the Recording timers.
Highlight a blank line using and and press . A screen is displayed in which youcan select the
recording options.
Select the recording frequency:
SINGLE (once per day at the scheduled time).
WEEKLY (once per week at the scheduled time).
DAILY(MON-FRI) (at the scheduled time, everyday from Monday to Friday and every week).
DAILY(MON-SA T) (at the scheduled time, everyday from Monday to Saturday and every week).
DAILY(MON-SUN) (at the scheduled time, everyday and every week).
Then enter the channel, date and the recording start and end time.
Validate locking if required to restrict access to this recording (cf. Recording list).
Confirm the schedule by pressing key.
To change a recording, enter the recording timers menu again. Make the required changes on the recording
settings and confirm the schedule.
LU 252 466 456A PVR6200T_6600T_7200T UK.book Page 12 Mercredi, 11. janvier 2006 4:14 16
- 13 -
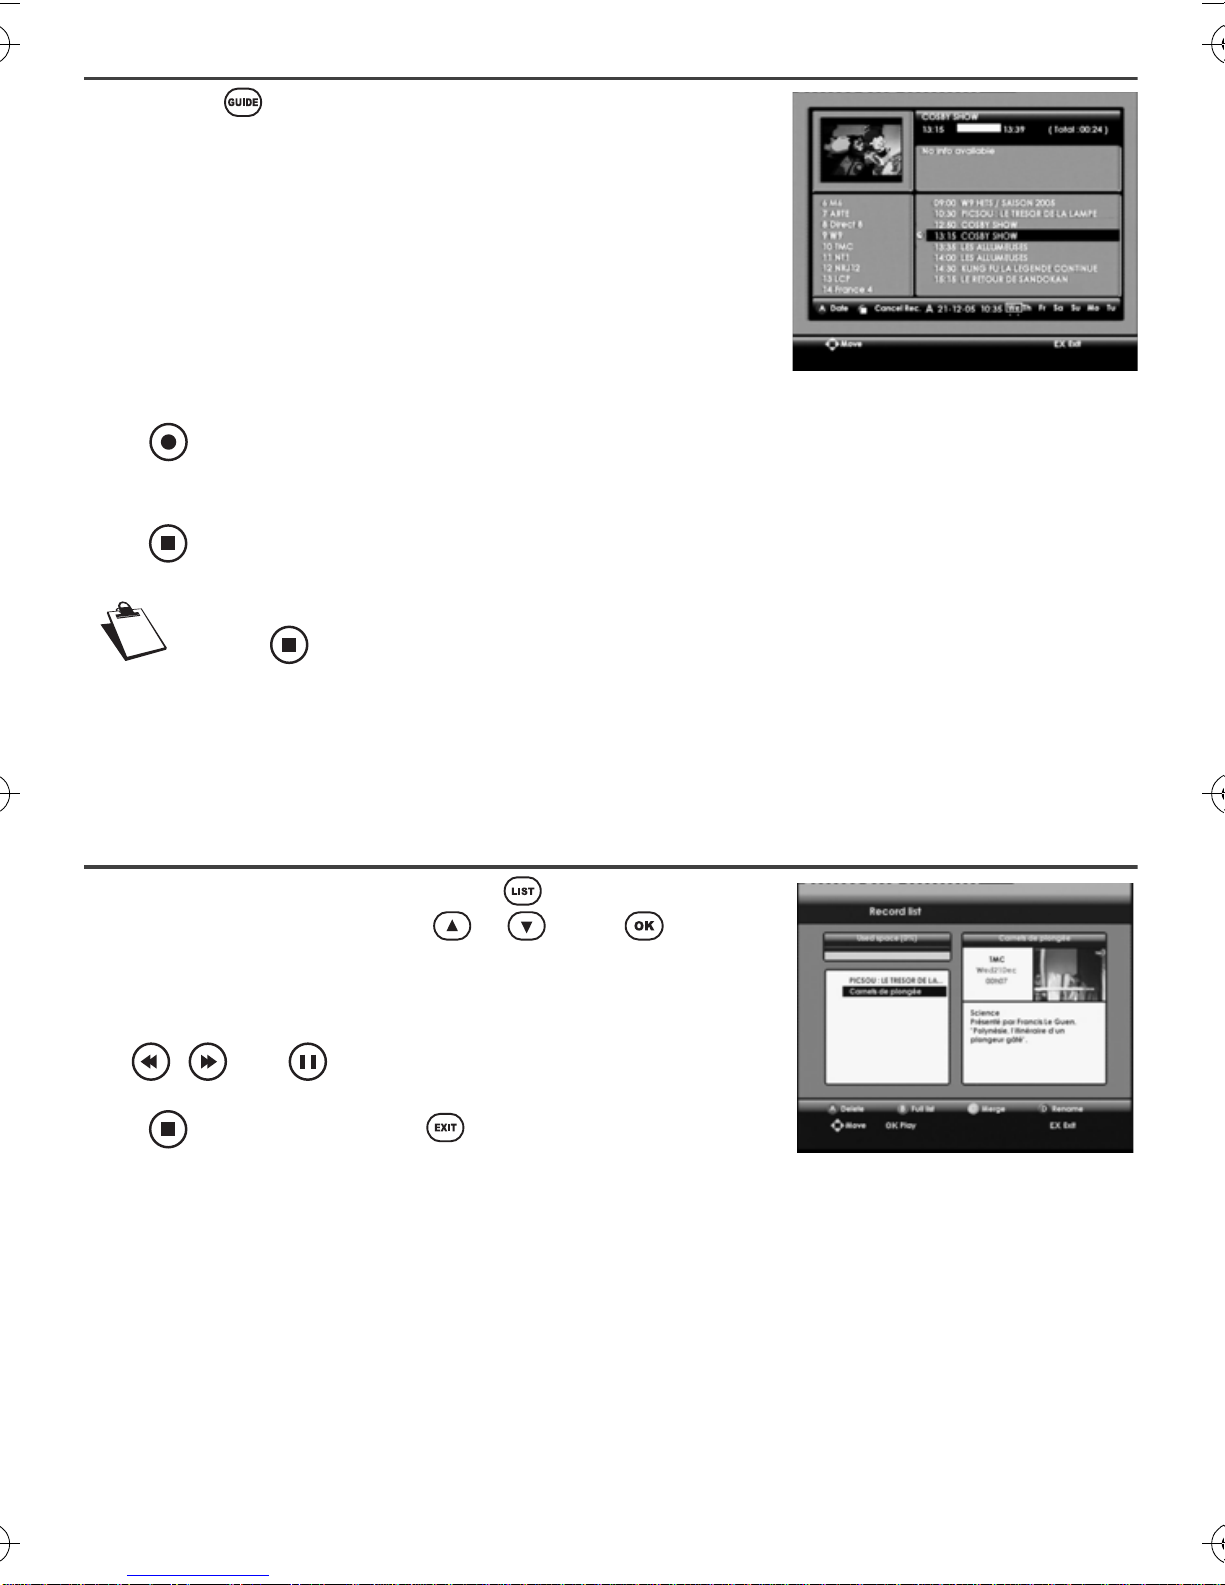
8-4 RECORDING PROGRAMMED VIA THE PROGRAMME GUIDE
Press the key to access the programme guide screen.
The specific feature of recording via the guide is that you can record
specificprogrammesinsteadoftimeslotsonchannels.Ofcourse,tobe
able to do this, the broadcasters must give the information on the
forthcoming programmes.
Move in the screen and select the channel and programme to be
recorded. Use the A key (red) to display all the programmes on the
various days of the week on the selected channel.
Press to validate your selection. A timer confirms the programme recording.Is possible to add margins
or modify the timer in the recording timers (see “RECORDING PROGRAMMED VIA THE MENU”,page 12).
Press to cancel a scheduled recording.
To cancel a recording in progress, you must firstly stop it by going back to live mode and
pressing .
Iftwoconsecutiverecords,onsamechannelaredoneontheEPGandtheendtimeofthefirstisequal
to the beginning times of the second they will be merged together.
8-5 RECORDING LIST
To access the recording list, press the key .
Selectaprogrammeusingthekeys or .Press toplaythe
recording.
In play mode:
Use , , and to move in the recorded programme.
Press to go back to the list or to go back to live mode.
LU 252 466 456A PVR6200T_6600T_7200T UK.book Page 13 Mercredi, 11. janvier 2006 4:14 16

- 14 -
8-6 MANAGING THE RECORDING LIST
The coloured keys A, B, C and D are used to manage the recording list.
8-6-1 Erasing a recorded programme or list
A (red key): To erase the selected programme or the entire list (confirmation banner).
It is impossible to erase the entire list ifa recording is in progress.
8-6-2 Accessing the complete list
The locked recorded programme are hidden in the standard list.Press B (green key) todisplay the complete
list. The codeto access locked programmes is then requested.
8-6-3 Merging recordings
Press C (yellow key) to merge two recordings. Use the C key to successively select the two programmes to
be merged.A confirmation window is displayed. The second recording will be placed directly after the end of
the first recording and the new recording will adopt the name of the longest recording.
8-6-4 Renaiming a record
Press D key (blue key) to rename a record.
Enter a new name using the alphanumeric keypad on the remote control unit (for example, press key 2 for
letter A, press key 2 twice quickly for letter B, etc....).
8-6-5 Erasing a portion of a recording
Another function can be used to:
• Erase a portion of a recording from the beginning to a point thatis determined manually,
• Erase the portion of a recording between two points that will be determined
• Erase the portion of a recording between the current playing position and the end of the recording.
• Cut a recording into two parts.
LU 252 466 456A PVR6200T_6600T_7200T UK.book Page 14 Mercredi, 11. janvier 2006 4:14 16
- 15 -
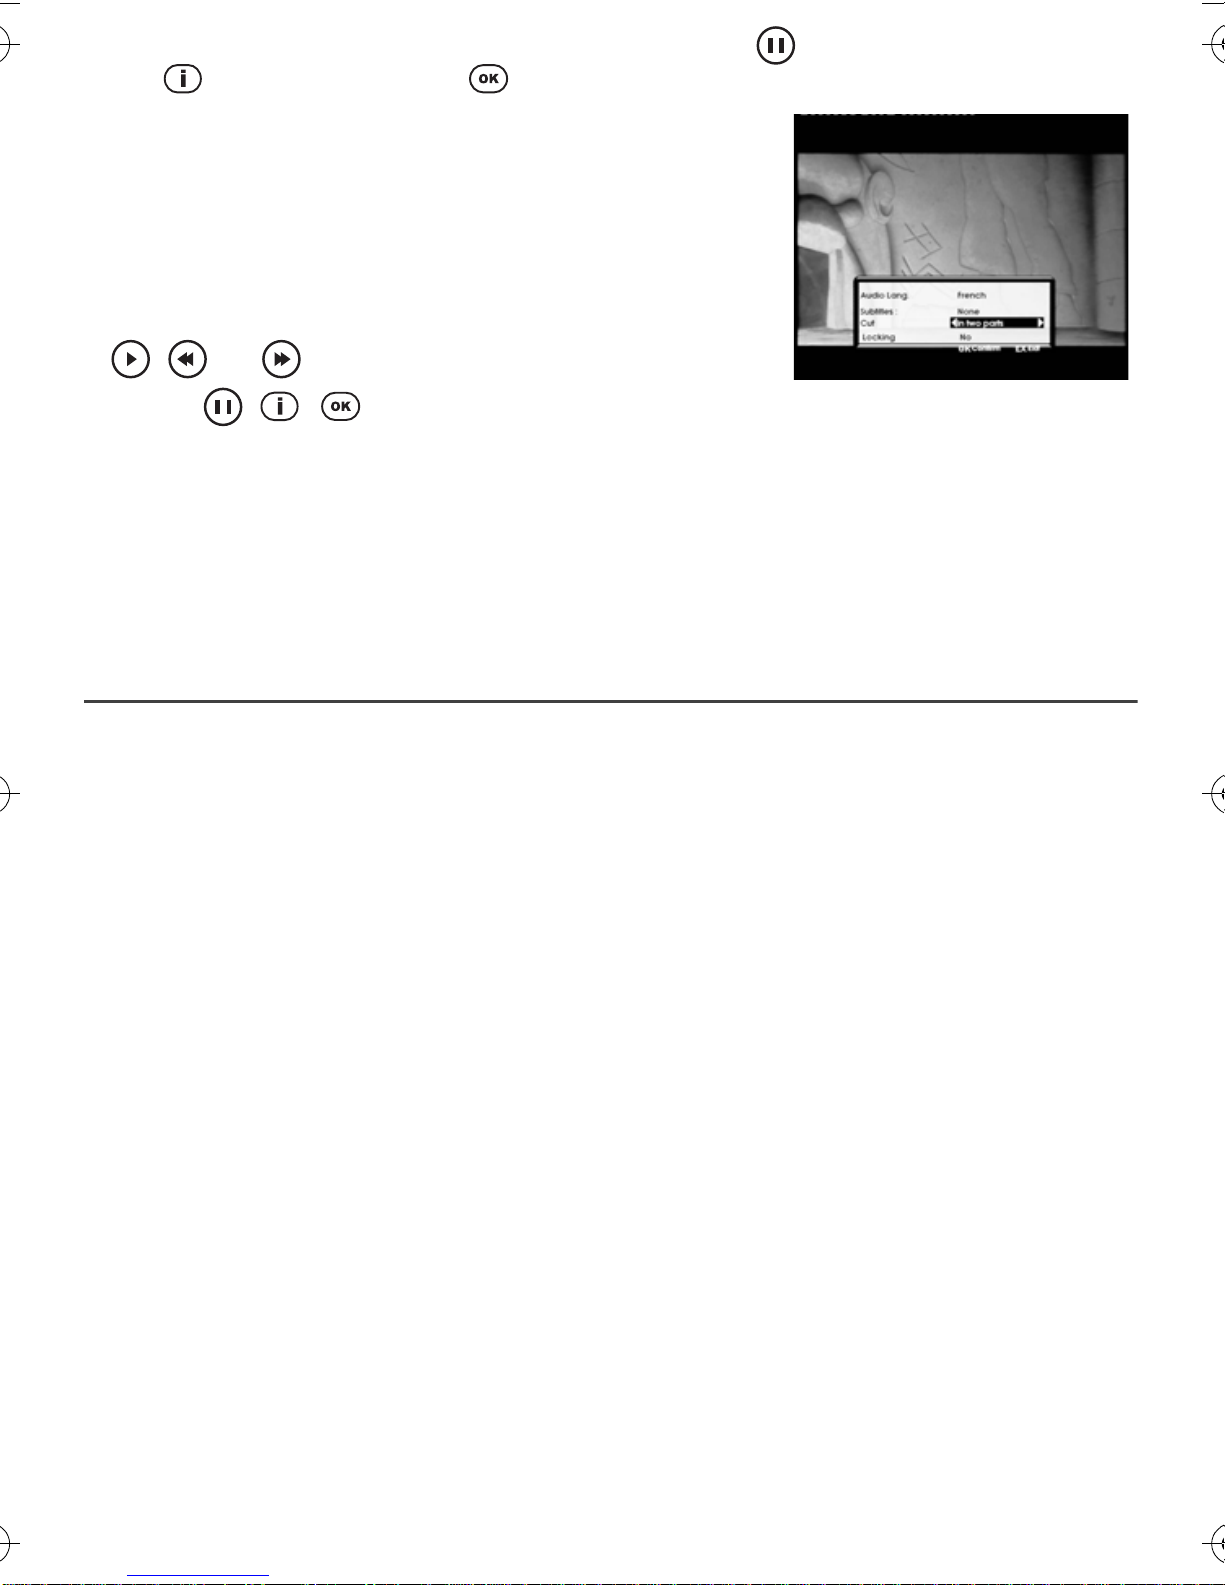
Todothis,selectarecordingfromtherecordinglist,readitandpress atthedesiredlocation.Thenpress
the key to display the banner and for more information.
In CUT, select between:
•at begin: the part of the recording between the beginning and the
selected place will be erased
•in the middle: the partof the recording between the selected place
(index) and the next position will be erased. To select the other end
of the part to the erased, validate [in the middle], then move using
, , and to the second marker. Then repeat the
operation
,
,
and validate [in the middle]again to cut
the selected zone.
•at end: the part of the recording between the selected place and the end will be erased.
•in two parts: the selected recording is cut into two parts that are called ‘1 recording name’ and ‘2
recording name’.
8-7 SAVING A RECORDING ON ANOTHER MACHINE
Connect your video recorder, for example, via the AUX Scart socket.
Select this input on your video recorder.
Select play mode on the receiver and record mode on the video recorder.
Then refer to your video recorder instruction manual for the procedure to follow.
LU 252 466 456A PVR6200T_6600T_7200T UK.book Page 15 Mercredi, 11. janvier 2006 4:14 16
- 16 -
9. PHOTO EDITOR
This equipment only exists for the PVR6600T version.
9-1 CARE INFORMATION
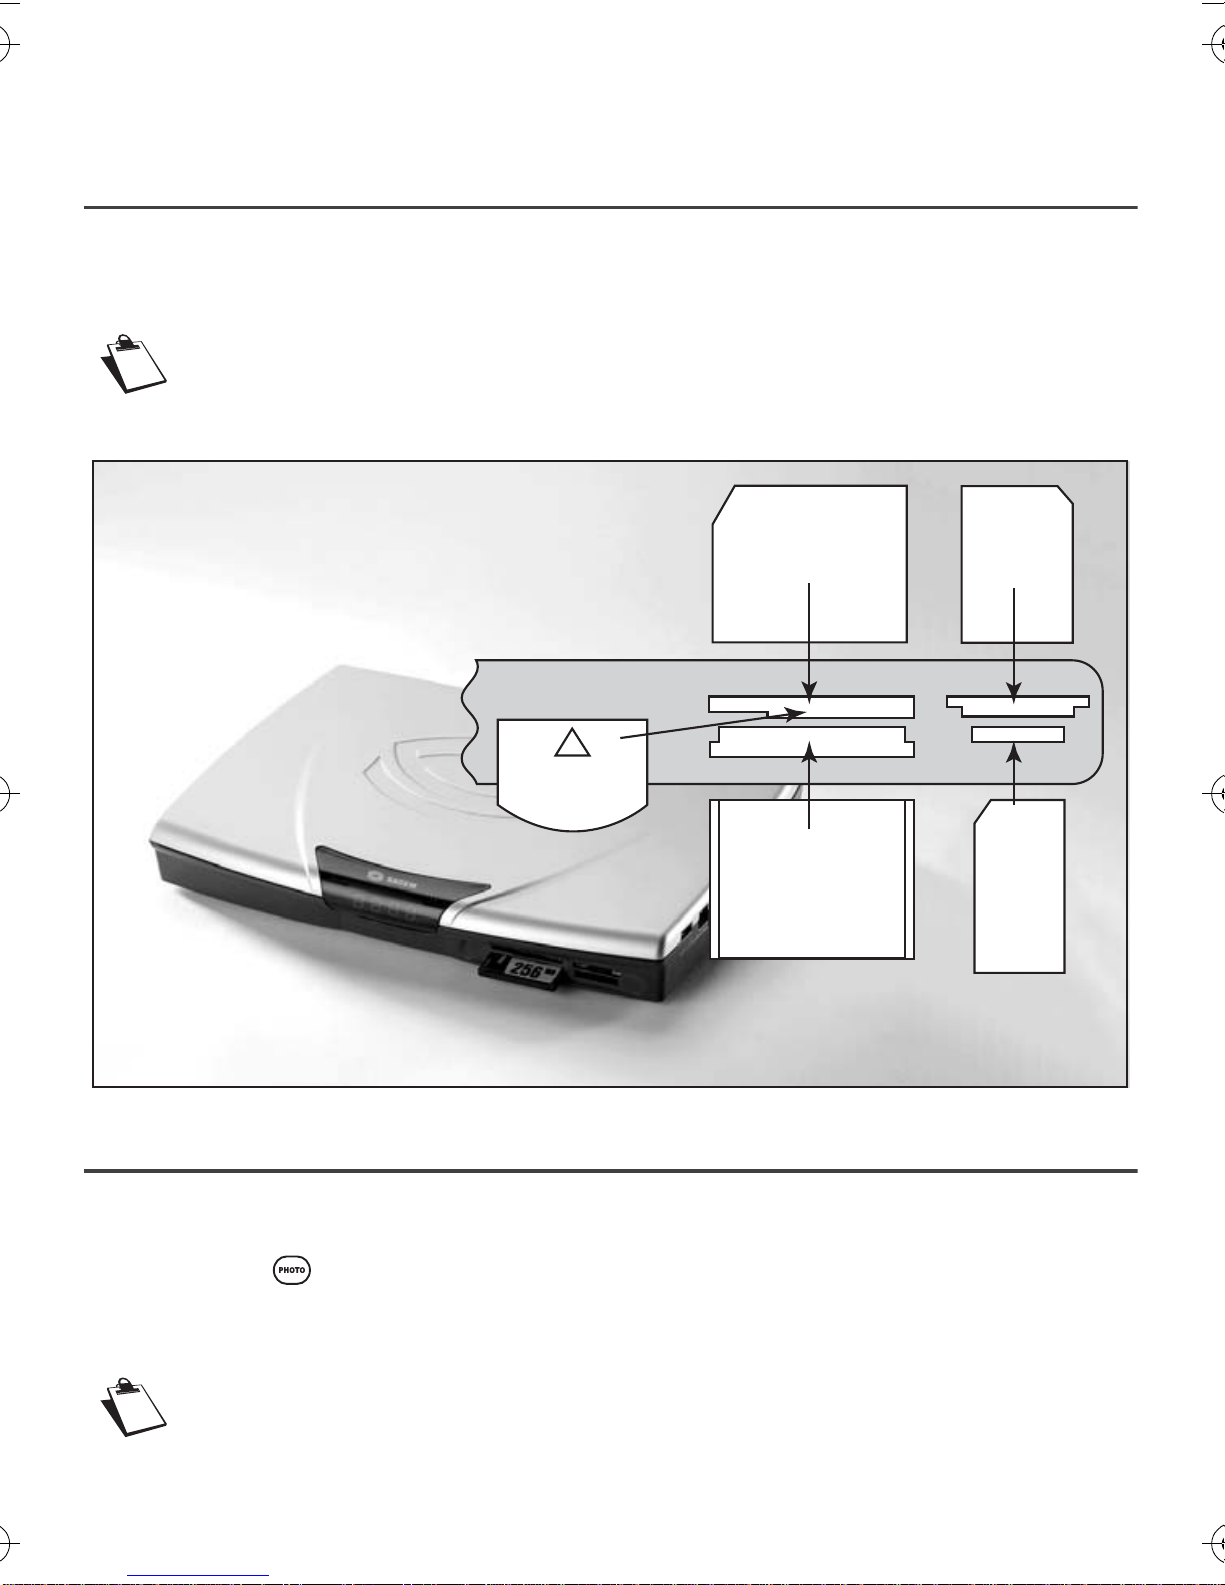
The unit is designed to accept formats CFI and CFII, SM (Smartmedia), MS (Memory Stick), MSPRO
(Memory Stick Pro), SD (Secure Digital), MMC (MultiMediaCard) and xD.
Thesecardsmustbeinsertedinthecorrectslotforthemodelasindicatedinthedrawing.Failingthis,
the card reader and cards may be damaged or the data stored in the cards may be lost.
Only one card must be inserted in the card reader at a time.
Don’t remove card during picture transfer.
9-2 STARTING THE PHOTO EDITOR
You can access the photo editor by:
• inserting a memory card,
• pressing the key
on the remote control unit.
The photo player can only display photosin jpeg format (basic format only).
Photo mode cannot be accessed when a scheduled recording is in progress
Smart MediaTM Card SD Memory
MMC
Memory
Stick and
Memory
Stick PRO
DUO or
DUO PRO
with
adaptator
MicrodriveTM
&
Compact flashTM
xD Picture Card
LU 252 466 456A PVR6200T_6600T_7200T UK.book Page 16 Mercredi, 11. janvier 2006 4:14 16
- 17 -
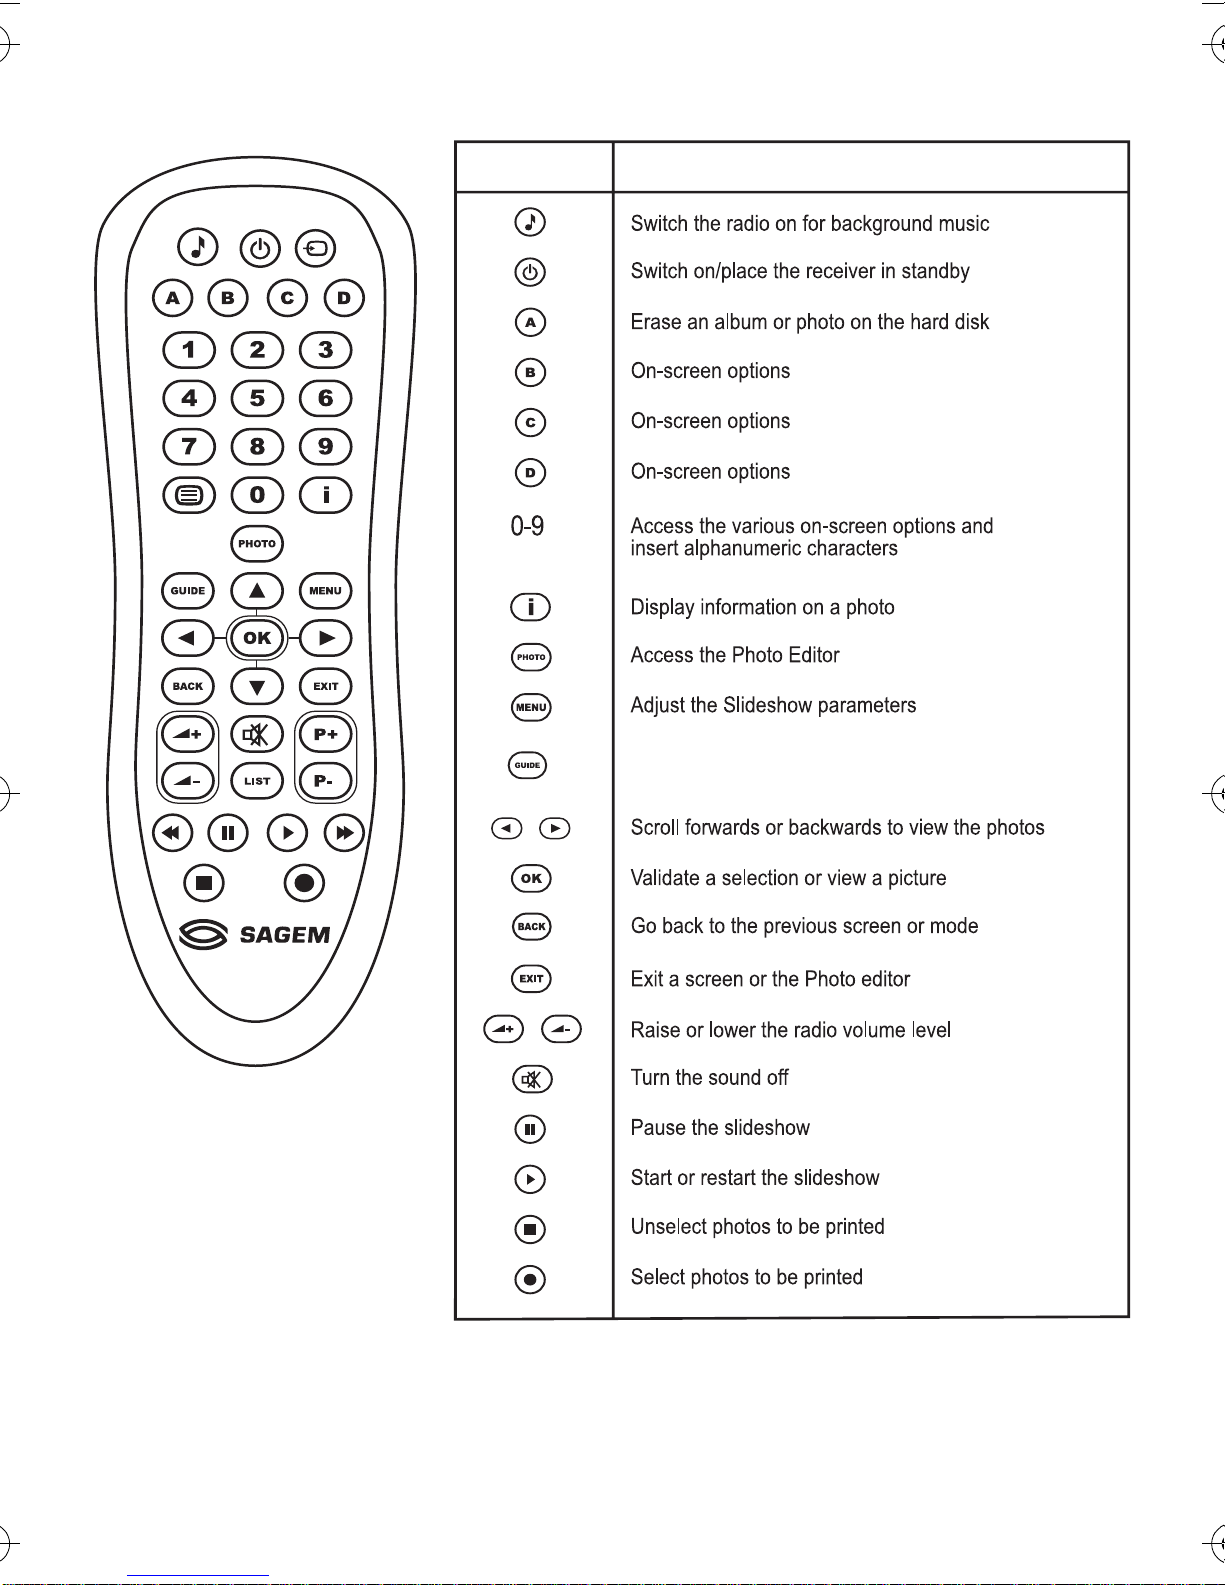
Function of the remote control unit keys in PHOTO MODE
FONCTIONTOUCHES
Help
LU 252 466 456A PVR6200T_6600T_7200T UK.book Page 17 Mercredi, 11. janvier 2006 4:14 16
- 18 -
9-3 READING AND TRANSFERRING A PHOTO ALBUM FROM A
MEMORYCARD
9-3-1 Creating and transferring the photo album
Insert the card. It then becomes visible in the list of albums and photos that are displayed as thumbnails.
Press the C key (yellow) to copy the album to the hard disk.
You can copy the entire album stored on your card as a new album or
place it in analbum that already exists in your Photo editor. Todo this,
select the required destination with the arrow keys , , ,
and confirm.
If you decide to create a new album, it’s default name will be the date
when the oldestjpeg file storedon the card was created. If you wantto
give it a different name, enter a new name using the alphanumeric keypad on the remote control unit (for
example, press key 2 for letter A, press key 2 twice quickly for letter B, etc.).
Ofcourse,you canview thephotos withoutcopyingthemonto thehard disk.When youremove the card,the
card’s folder will disappear from the photo album.
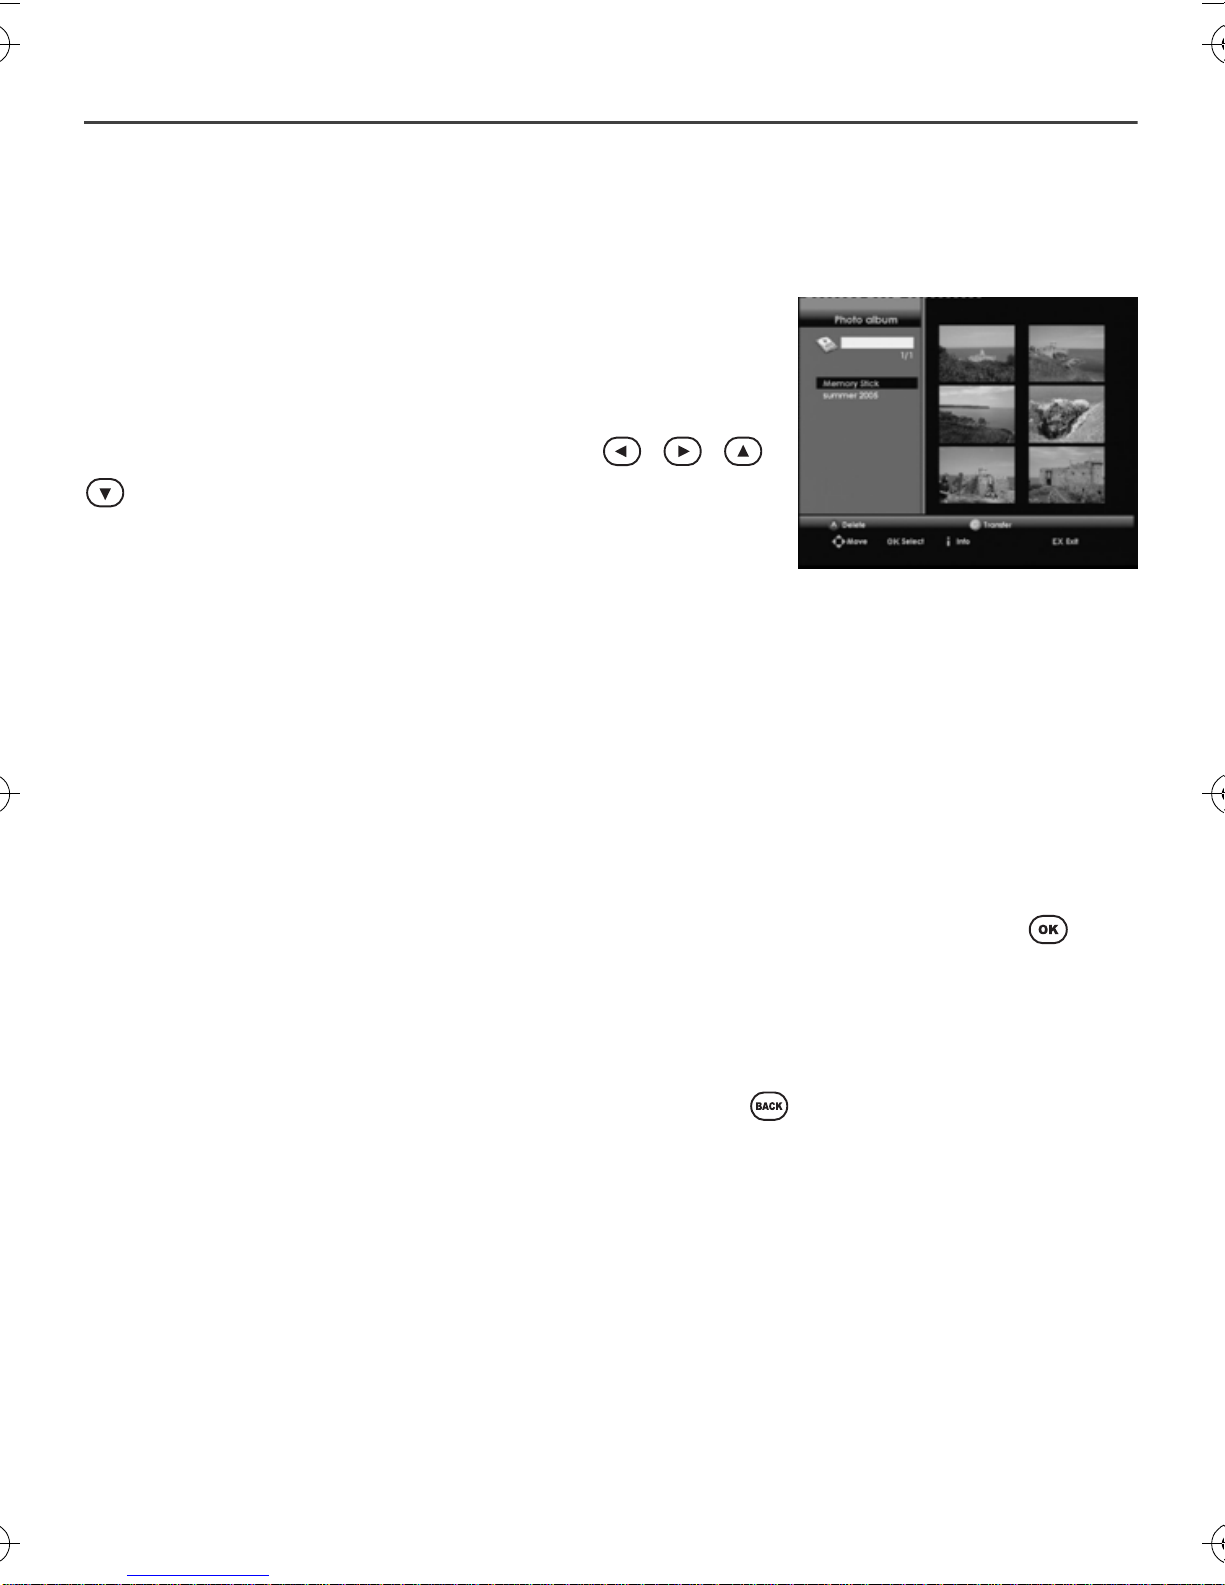
9-3-2 Reading the photo album
Toreadaphotoalbum,regardlessofwhetherornotitisrecordedontheharddisk, pressthekey onthe
remote control unit when it is selected.
The player then displays thumbnails of the photos.
If the carddoes not give the thumbnails, they will notbe displayed, butthis does notstop you from recording
the photos and viewing them in the photo album.
You can go back to the list of photo albums at any time by pressing .
LU 252 466 456A PVR6200T_6600T_7200T UK.book Page 18 Mercredi, 11. janvier 2006 4:14 16
Table of contents
Other Sagem TV Receiver manuals

Sagem
Sagem DTR 6400T User manual

Sagem
Sagem ITD 61 User manual

Sagem
Sagem ITD 58 User manual

Sagem
Sagem DVR 6200T User manual

Sagem
Sagem DTR94 HD FREESAT User manual

Sagem
Sagem ITD 5510 User manual

Sagem
Sagem ITD 58 User manual

Sagem
Sagem ITD 66 User manual

Sagem
Sagem DVR 6400T User manual

Sagem
Sagem ITD 58 User manual


