Salente G4 User manual

MANUAL
MODEL VERSION / DATE
G4 l. / 16.04.2021
EN

2

3
Table of contents
Welcome to use ................................................................................. 4
Product Introduction .......................................................................... 4
Key Function .................................................................................. 4
Parts List........................................................................................ 5
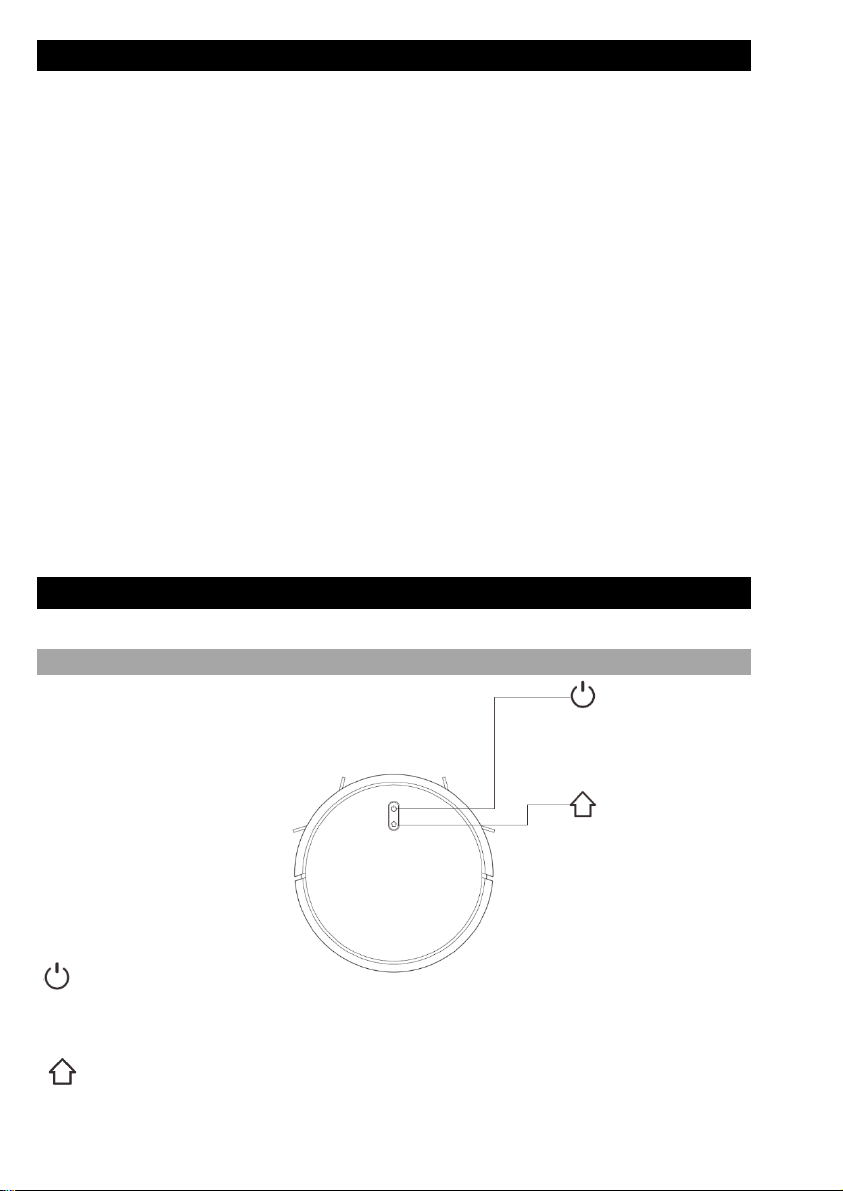
Robot ............................................................................................ 6
Charging Base ................................................................................ 6
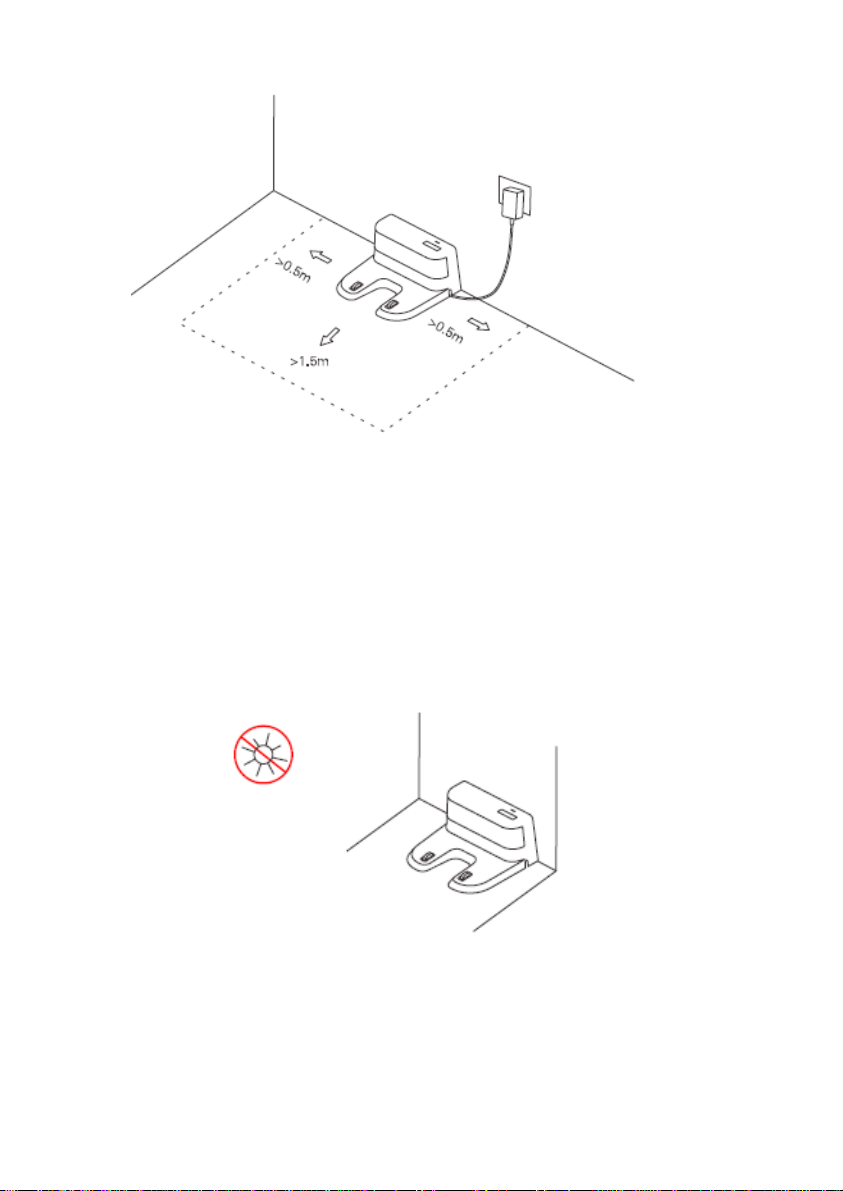
Installation........................................................................................ 7
Instructions......................................................................................12
ON/OFF.........................................................................................12
Sweep/Pause.................................................................................12
Charging .......................................................................................12
Cleaning mode...............................................................................13
Fixed-point cleaning .......................................................................13
WiFi reset......................................................................................14
Silent mode...................................................................................14
Adjustment of suction power ...........................................................14
Adjustment of water flow ................................................................14
UVC mode .....................................................................................14
Remote control instruction ..............................................................15
Daily Maintenance.............................................................................16
Rolling brush (clean it regularly)......................................................16
Side brush (clean it regularly) .........................................................17
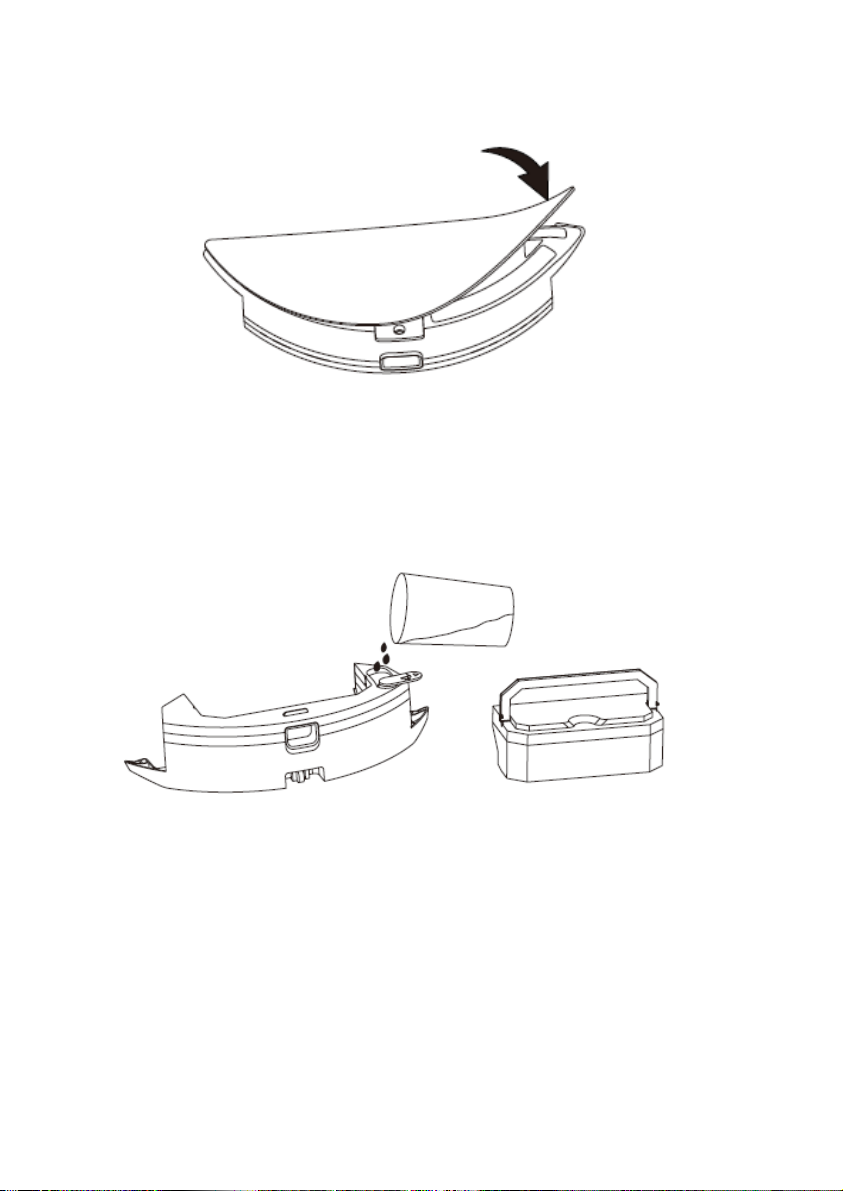
Dust box and filter screen (clean it regularly)....................................18
Filter screen cleaning (clean it regularly) ..........................................19
2in1 electric control water tank (clean it regularly) ............................20
Sensor (clean it regularly)...............................................................21
Sensor (clean monthly) ..................................................................22
Battery .........................................................................................22
Firmware upgrade..........................................................................22
WiFi Connection Guide.......................................................................23
Common Problems ............................................................................27
Troubleshooting................................................................................28
Safety Information............................................................................29
Usage Limitations ..........................................................................29
Battery and Charging .....................................................................30
Basic Parameters ..............................................................................31

4
Welcome to use
Thanks for choosing Smart Robot Vacuum Cleaner Salente G4!
It is a programming robot vacuum working base on gyroscope sensor.
Working together through navigation algorithms, it is able to program the
cleaning path, clean and recharge automatically without manual intervention.
It has:
•UVC sterilization mode
•Adjustment to the floor surface
•Electronically controlled water tank 2-in-1
•Vacuuming and wet wiping simultaneously
•Central Turbo brush and pair of side brushes
You can download the mobile APP by smart phone to check the cleaning map
and running status of the robot in APP in real time, define the cleaning area
and schedule. You can control the robot remotely. Science and technology
make life better.
May you have a nice usage experience!
Product Introduction
Key Function
Sweep/ON &OFF
•Short press to start Sweep/Pause
•Long press for 3s for ON/OFF
Sweep/ON &OFF
•Short press Recharge/Pause
•Long press to start local cleaning

5
Indicator light
•Blue: Normal operation or charging
•Red: Abnormal condition or low battery
•Purple: Equipment is not connected to the network
Reset WiFi
•Press two buttons simultaneously for 3s
Parts List
Charging base
HEPA filter + sponge filter
Adapter
Duster cloth 2x
2x Lift side brush
2x Right side brush
Electric-controlled
water tank
Remote controller

6
Robot
a- Filter screen cover, b- Dust bin button, c- Wall sensor
Sensor and Structure
a- Anti-collision sensor, b- Infrared recharging sensor, c- Anti-drop sensor,
d- Charging contact, e- Universal wheel, f- Side brush, g- UVC lamp,
h- Driving wheel, i- Rolling brush, j- Rolling brush cover buckle
Charging Base
a- Power indicator light, b- Signal emission area, c- Charging base pins
a
b
c
a
b
c
d
e
f
g
h
i
j
a
b
c

7
a- Catching groove, b- Cover plate
a- Wire slot, b- Power adapter port, c- Wrapping post
Installation
1. Connect power line and feed the excess wire into the slot
a
b
a
b
c

8
2. Place charging base against the wall and connect the power
Note:
•Ensure a space of above 0.5m on both sides of the charging base and a
space of above 1.5m in the front
•If the power line is vertical to the ground, it may be dragged by the host
and consequently the charging base may be powered off
•The charging indicator is normally on when powered on, and off when
charged
3. Please do not move the charging base arbitrarily and keep it out of
direct sunlight
Note:
•Direct sunlight will interfere with recharging signal and consequently the host
may be unable to return to the charging base

9
4. Installation of side brush
Make the left side brush (L) and the right side brush (R) correspond to L and
R on the bottom casing, press L and R and the side brushes are installed till
you hear a " cracking " sound.
5. Starting up and charging
Long press to switch on the robot. Charge the robot on charging base
when the power indictor light is normally on
Note: If the machine cannot be started due to low battery, please charge the
host on the charging base and the machine will be started automatically. The
machine can work normally only when the battery level is 20%
6. Connect mobile APP (this step can be skipped)
Please refer to WiFi connection guideline, then connect mobile APP

10
7. Installation of mopping module
Installation of mopping cloth: paste the mopping cloth flatly to the bottom of
water tank
2 in 1 Electric-controlled water tank
Note: please clean the mopping cloth after using to keep it in good cleaning
condition
Fill the water tank: uncap the cover and fill with water
2 in 1 Electric controlled water tank

11
8. Remove the mopping module
When the robot is finished working, press the button in the middle of the
water tank to remove the mopping module backwards, empty the water in
the water tank and clean the mopping cloth (do not move or turn the robot
over during cleaning)
2 in 1 Electric-controlled water tank
9. Instructions for mopping module
For sake of safety, please be sure to remove the mopping module when it is
being charged or left unused. Please do not mop the carpet.
To add water or clean the dust cloth when the machine works, please pause
it, and take it out and reassemble the mopping module according to steps 8
and 9. Please do not move or turn over the host so as to avoid failing in
positioning and losing the map
Mopping function of the machine is intended for wiping and is conductive to
deep cleaning. It cannot remove stubborn stains effectively and replace
labour force

12
Instructions
ON/OFF
Long press key for 3s, the indicator light is on and the machine is started
Long press key for 3s when the machine is under standby mode, the
indicator light is off and the machine shuts down
Note: The machine cannot shut down when the host is being charged
Sweep/Pause
After the machine is started, short press key on the host or start the
machine using mobile APP
(Press any key to pause in use)
Note:
•The cleaning robot cannot be used to remove liquids
• If the battery level is less than 20%, the machine cannot work. Please
charge it
• The machine will return to the charging base automatically if the battery
level is less than 20%
• Please clear various wires (including power line of charging base) on the
ground before use so as to avoid outage and damage of objects or wires
when wires are dragged by the robot
Charging
Automatic mode: The host will return to the charging base automatically after
work
Manual mode: Under suspended state, short press key to start recharging
or when the recharging host is charged under the control of mobile APP, The
indicator light is under breathing mode when the recharging host is charged
Note: If the host fails to locate the charging base, it will return to the original
position automatically. Please put the host back to the charging base manually

13
Cleaning mode
After starting, the machine will follow bow shaped cleaning program to fill up
the floor and finish the cleaning of all rooms one by one in an orderly, efficient
and fully covered manner. The machine will return back to the recharging base
and charge automatically after cleaning finished
a- Completed area, b- Area to be cleaned
Fixed-point cleaning
Long press for 3 seconds, the robot will locate itself, clean the circle area
with diameter 1.5m, and the robot will return to the starting location and stop
working automatically after cleaning finished
a
b

14
WiFi reset
If the mobile phone cannot be connected to the machine due to modification
of router configuration and password or for other reasons, please press key
and key simultaneously for 3s till a voice prompt "WiFi has been reset" is
given and the indicator light turns purple and flickers slowly
Silent mode
You can turn on/off the robot voice by mobile APP or key “e” on the remote
controller.
Adjustment of suction power
You can adjust the suction power to silent level, standard level and high level
by mobile APP
Adjustment of water flow
You can adjust the water flow to low level, standard level and high level by
mobile level
UVC mode
To turn on the UVC mode, press the “j” button on the remote controller or in
the application.
Press UVC OFF, UV light is off.
Press UVC ON, UV light is on, robot can work in every normal mode.
Whatever state/mode the machine is in, the UV lamp can be turned on only
when the machine is running. When the machine is stopped, the UV light will
be turned off.
When you pick up the robot, the UVC light will be shut off immediately to
protect you.

15
Remote control instruction
a- Auto cleaning start/pause, b- Go forward, c- Turn left, d- Adjustment of
suction power, e- Silent mode on/off, f- Edge cleaning, g- Recharging
start/pause, h- Turn right, i- Find robot, j- UVC, k- Spiral cleaning start/pause
b
a
c
d
e
f
g
h
i
j
k

16
Daily Maintenance
Rolling brush (clean it regularly)
1.Turn over the machine and press the buckle on the Rolling brush cover to
take out the Rolling brush
2.Remove dust outside and inside the Rolling brush using a tiny brush and
clean the Rolling brush
3.Reassemble the Rolling brush and press the Rolling brush cover tightly to fix
the buckle
a- Buckle, b- Main brush
a
b

17
Side brush (clean it regularly)
1.Turn over the machine and pull out the side brush upwards
2.Remove hair and dirt and reassemble the side brush
3.Make the left side brush (L) and the right side brush (R) correspond to L and
R on the bottom casing, press L and R to reinstall them
Note: Replace the side brush every 3-6 months so as to ensure the cleaning
effect
a- R (right side brush), b- L (left side brush)
a
b

18
Dust box and filter screen (clean it regularly)
1. Press the button and pull out the dustbin backward
2. Open and clean dustbin

19
Filter screen cleaning (clean it regularly)
1. After a long-time usage, remove the filter gauze, sponge and HEPA
2. Clean the removed filter gauze, sponge and HEPA under water
3. Shake off the water drops and dry it naturally, then use it after completely
dried
4. After dry, install it well in sequence, filter gauze – sponge – HEPA
a- Filter gauze, b- Button, c- Filter cover, d- Sponge, e- HEPA
Note:
•Please wash the filter screen using clear water and do not add any
detergent
•Please do not clean the filter screen using brush and fingers
•Dry the filter screen in the air for at least 24h
•Replace the filter screen every 3-6 months
a
b
c
d
e

20
2in1 electric control water tank (clean it regularly)
1. Remove the mop, pour out the water from water tank
Electric-controlled water tank
2. Clean the mop, dry the water tank and mop
2 in 1 Electric-controlled water tank
Table of contents
Other Salente Vacuum Cleaner manuals
Popular Vacuum Cleaner manuals by other brands

HAEGER
HAEGER Eco Shine VC-70B.036A User instructions

Boma
Boma ASPIRO WET 30 Use and maintenance manual

Kambrook
Kambrook JAGUAR TWISTER KBV50 owner's manual

Würth
Würth master TSS 12 Translation of the original operating instructions

Comet Spa
Comet Spa Premium Series Translation of the original instructions

Ayce
Ayce VSM01C16Q Operator's manual