Salton SFH 450 User manual

INSTRUCTIONS AND WARRANTY
MODEL NO. SFH 450
SALTON FAN HEATER

2
Thank you for purchasing our SALTON Fan Heater, Model SFH 450. Each unit is
manufactured to ensure safety and reliability. Before using for the unit for the first
time, please read the instruction manual carefully and keep it for future reference.
Should you pass the unit on, please ensure that you also pass the Instruction Manual
on.
1. IMPORTANT SAFEGUARDS
Before connecting and switching on the appliance, ensure that the voltage
indicated on the unit’s base plate corresponds to the mains voltage in your
home.
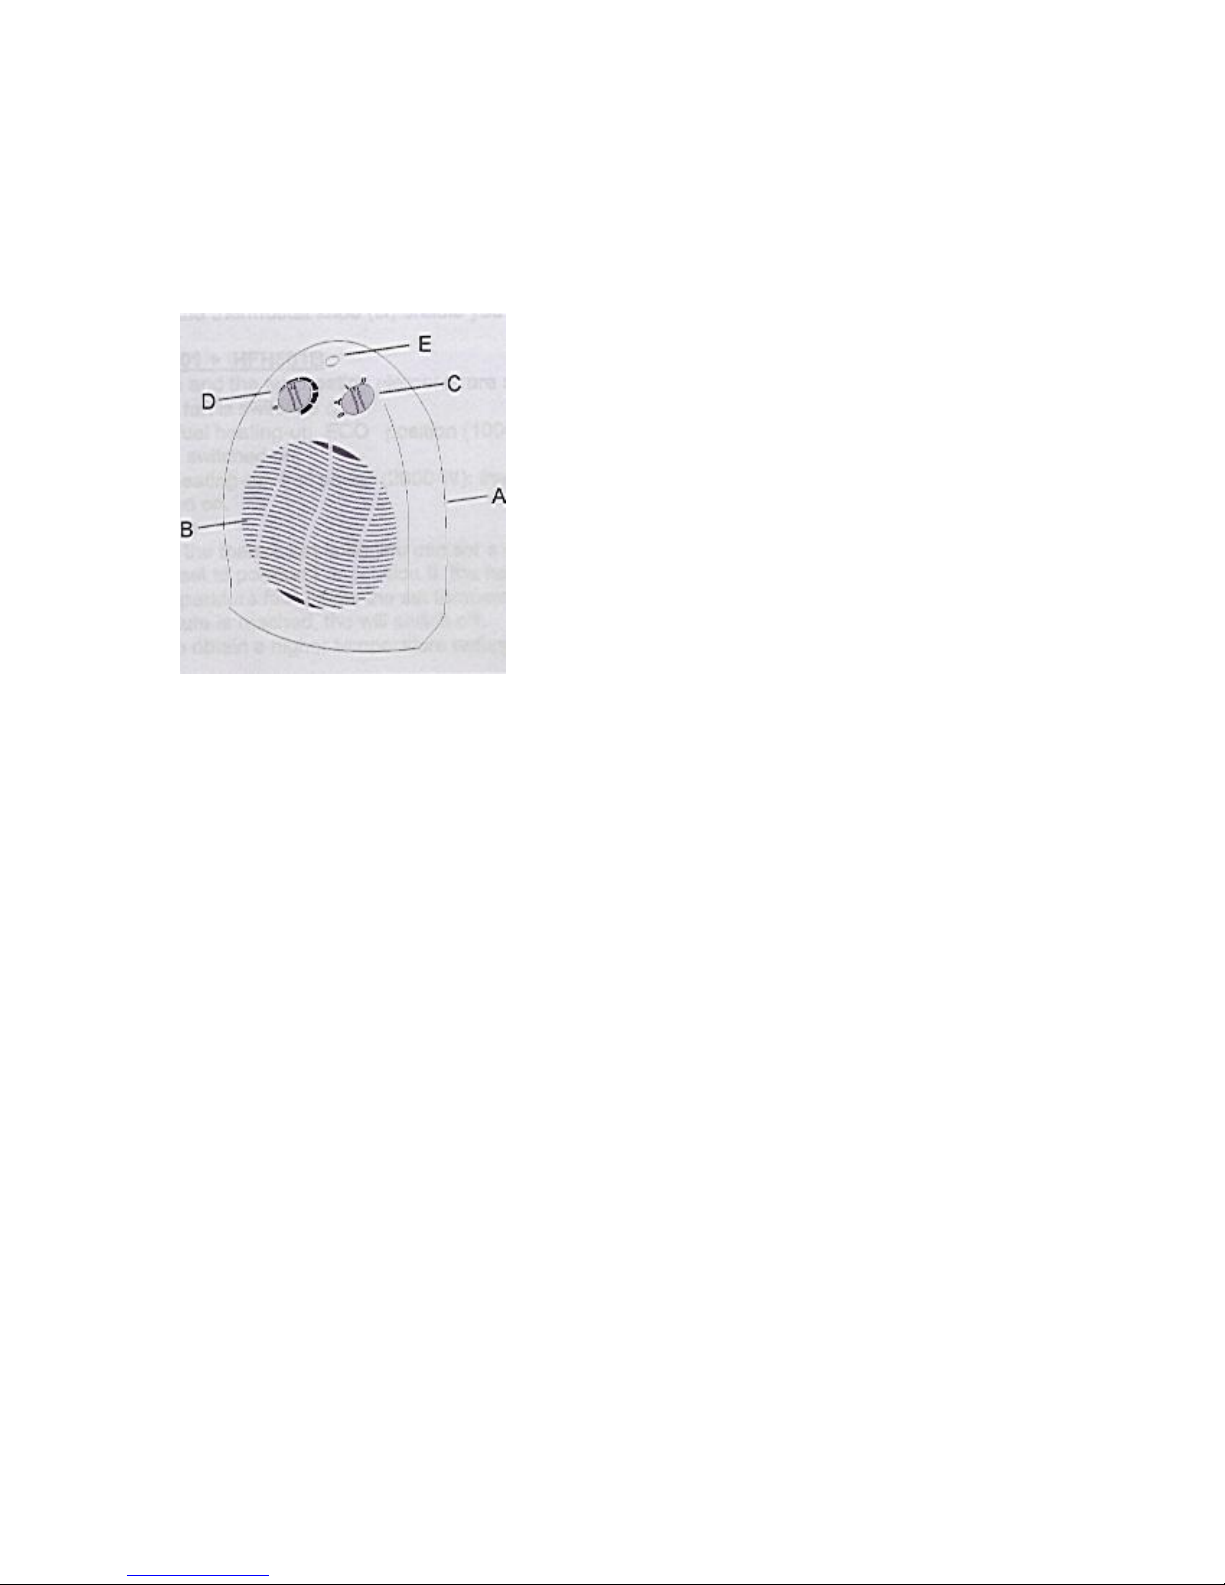
Read the instructions carefully, in conjunction with the illustrations, before
using the appliance for the first time.
The appliance has been double insulated, but always ensure that the unit is
connected to an earthed mains outlet.
When using an extension cord, make sure that the plugs and the cord allow a
high power throughput (16A –220V, 13A –240V). Please unroll the cord
completely to prevent overheating.
Do not leave your home while the appliance is in operation; ensure that the unit
is switched off and that the thermostat is in the minimum position. Always
unplug the appliance when not in use. Do not pull the cord to unplug the unit.
Keep combustible materials (such as furniture, cushions, bedding, paper etc) at
least 100cm away from the fan heater.
Do not hang anything in front of or on the fan heater.
Do not cover the unit. This imposes the risk of overheating.
It may happen, especially if the heater operates in position II, and a second
electrical device is switched on simultaneously, that a fuse or circuit breaker
trips the mains power. In such an instance, the fuse or circuit breaker may not
allow a high electrical power. You may connect the second appliance to another
circuit (through the employment of another fuse or circuit breaker) or have the
electrical installation revised by an authorised electrician.
The heater is not designed for use as the main source of heating. Use the
appliance only for its intended use, i.e. as an extra source of heating in the
home/office.
To avoid the risk of fire and electrical shock, select a safe place for the heater
(refer section: Safe Positioning).
Do not insert any objects in to the heater
Ensure that children do not play with the appliance and are supervised should
they be in the vicinity of the appliance.
The front grille gets hot during usage. Do not touch the grille while the heater is
switched on, nor immediately after switching off the heater since the grille
requires time to cool down.
Only handle the heater with dry hands.
If the cord of this appliance is damaged, discontinue use of the product and
contact the manufacturer for further instructions. The cord must only be
replaced by a service representative of the manufacturer, since special tools
and/or parts are required.

3
2. GENERAL DESCRIPTION
3. SAFETY POSITIONING
The heater must not be located immediately beneath a socket outlet.
Only use the fan heater when it is standing upright, i.e. on its base
For your own safety and that of others, do not use the heater in the immediate
surroundings of a bath, shower or swimming pool. Ensure that the appliance
cannot fall into water (bath wash basin, shower cubicle etc).
Do not use the heater in rooms with explosive gas (e.g. petrol) or while using a
flammable solvent or glue (e.g. when gluing or varnishing parquet floors, PVC
etc).
Allow ample space around the heater. A safe area to be left clear is 50cm at the
top and at the sides, and 120cm at the front.
Prevent overheating of the appliance by keeping the air inlet and outlet grilles
free of obstacles. Do not hang anything on, in front of or above it, to prevent the
risk of fire.
Check the grilles occasionally for accumulated dust. If over-heating should
occur, the built in overheating safety device should switch off the appliance.
Do not allow aerosols, inflammable substances or materials sensitive to heat to
be in the flow of hot air.
Keep the mains cord at a safe distance from the air inlet and outlet grilles.
Do not use the heater on extremely deep-pile carpets!
A Air Inlet Grille
B Air Outlet Grille
C Selector Switch/Fan Speed Setting
D Thermostat Control
E Power Indicator Lamp

4
4. OPERATING INSTRUCTIONS
The selector switch (C) and the thermostat control dial (D) enable you to select the
following functions:
4.1 Selector Switch (C)
Ο= OFF. Both the fan and the two heating elements are switched off.
= “Cool Air”. Only the fan is switched on.
I = “Warm Air” for gradual heating up. ECO position (1000W): the fan and one of
the heating elements is switched on.
II = “Hot Air” for quick heating up. Full power (2000W): the fan and both the
heating elements are switched on.
4.2 Thermostat Control Dial (D)
With the thermostat control dial, a constant room temperature can be set. When
the selector switch is set to position I or to position II, the heater will
automatically switch on as soon as the room temperature falls below the set
temperature.
As soon as the set temperature is reached, the heater will switch off.
Rotate the dial clockwise to obtain a higher temperature setting or anti-
clockwise for a lower temperature setting.
The thermostat control dial may be adjusted while the heater is in use.
To find the ideal thermostat setting:
oFirst set the control dial to the maximum position (rotate clockwise until
the dial cannot turn further).
oAs soon as the temperature is comfortable, turn the dial anti-clockwise
slowly until the heater goes off.
= “Frost Free” position. This position corresponds with the minimum
thermostat setting (i.e. approx. 5C) and can be used to keep the immediate vicinity
of the heater from frost. E.g. to prevent pipes from freezing, position the heater close
to the pipe and select this position.
Please note:
When using the cool air setting , the thermostat control dial should be at its highest
position.
4.3 Control Lamp (E)
The control lamp (E) indicates the operation if step ( , I, or II) is turned on in
combination with the Thermostat switch.
If the thermostat switches off the heater, once the set temperature is reached,
then the control lamp goes off. The control lamp will switch on again when the
thermostat switches on the heater.

5
If the thermostat is set to position O or the heater is switched OFF at the mains,
then the control lamp goes OFF.
5. OVERHEATING SAFETY DEVICE
To prevent damage and risks due to overheating, the built in overheating safety
device will cut the power to the heater as soon as the elements become too hot.
If this should happen:
First ensure that it is not the thermostat that has switched off the heater.
Set the thermostat to maximum position.
If the heater does not switch back on, the safety device has been activated.
Unplug the heater at the mains socket.
Allow the heater to cool down for 30 min.
Check is the heater has been placed correctly (refer section 3- Safety
Positioning).
Ensure that nothing is obstructing the airflow.
If necessary, clean the grilles with a vacuum cleaner to remove any dust
build up or manufacturing dust.
Replace the plug into the wall socket and switch the heater ON again.
If the safety device again switches OFF the heater:
Unplug the heater from the mains wall socket
Have the heater inspected by an authorised service agent or by the supplier.
HINTS BEFORE RETURNING THE APPLIANCE
Is your household socket working properly?
Are all required switches in the ON position?
Ensure that the plug is firmly in the socket and switched on.
Ensure that the heater is standing on an even surface.
6. CLEANING AND MAINTENANCE
Set the selector switch (C) to position O to switch OFF.
Remove the mains plug from the wall socket.
Wait for the heater to cool down sufficiently.
Clean the outside of the heater with a damp cloth. Do not allow water to get into
the appliance.
Clean the air inlet and outlet grilles regularly (with normal use –about twice a
year) with a vacuum cleaner, using the brush attachment.
Do not use detergents, abrasive cleaning liquids or chemical agents to clean the
unit.

6
7. CHANGING THE PLUG
Should the need arise to change the fitted plug, follow the instructions below:
This unit is designed to operate on 230V-240V current only. Connecting to other
power sources may damage the appliance. Connect a three-pin plug as follows:
The wires in this mains lead are coloured in accordance with the following code:
Green/Yellow = Earth
Blue = Neutral
Brown = Live
8. SERVICING THE APPLIANCE
There are no user serviceable parts in this appliance. If the heater is not operating
correctly, please check the following:
You have followed the instructions correctly
That the unit has been wired correctly and that the wall socket is
switched on.
That the mains power supply is ON.
If the appliance still does not work after checking the above:
- Consult the retailer for possible repair or replacement. If the retailer fails to resolve the
problem and you need to return the appliance, make sure that:
The unit is packed carefully back into its original packaging.
Proof of purchase is attached.
A reason is provided for why it is being returned.
If the supply cord is damaged, it must be replaced by the manufacturer or an
authorised service agent, in order to avoid any hazard. If service becomes necessary
within the warranty period, the appliance should be returned to an approved
Amalgamated Appliance (Pty) Ltd service centre. Servicing outside the warranty period
is still available, but will, however, be chargeable.

7
PLEASE AFFIX YOUR PROOF OF PURCHASE/RECEIPT HERE
IN THE EVENT OF A CLAIM UNDER WARRANTY THIS RECEIPT MUST BE
PRODUCED.
W A R R A N T Y
1. Tedelex Trading (Pty) Limited (“Tedelex”) warrants to the original purchaser of this product
(“the customer”) that this product will be free of defects in quality and workmanship which
under normal personal, family or household use and purpose may manifest within a period of 1
(one) year from the date of purchase (“warranty period”).
2. Where the customer has purchased a product and it breaks, is defective or does not work
properly for the intended purpose, the customer must notify the supplier from whom the
customer bought the product (“the supplier”) thereof within the warranty period. Any claim in
terms of this warranty must be supported by a proof of purchase. If proof of purchase is not
available, then repair, and/or service charges may be payable by the customer to the supplier.
3. The faulty product must be taken to the supplier's service centre to exercise the warranty.
4. The supplier will refund, repair or exchange the product in terms of this warranty subject to
legislative requirements. This warranty shall be valid only where the customer has not broken
the product himself, or used the product for something that it is not supposed to be used for.
The warranty does not include and will not be construed to cover products damaged as a result
of disaster, misuse, tamper, abuse or any unauthorised modification or repair of the product.
5. This warranty will extend only to the product provided at the date of the purchase and not to
any expendables attached or installed by the customer.
6. If the customer requests that the supplier repairs the product and the product breaks or fails to
work properly within 3 (three) months of the repair and not as a result of misuse, tampering or
modification by or on behalf of the customer, then the supplier may replace the product or pay
a refund to the customer.
7. The customer may be responsible for certain costs where products returned are not in the
original packaging, or if the packaging is damaged. This will be deducted from any refund paid
to the customer.
TEDELEX TRADING (PTY) LTD (JOHANNESBURG)
JOHANNESBURG TEL NO. (011) 490-9000
CAPE TOWN TEL NO. (021) 552-5161
DURBAN TEL NO. (031) 792-6000
www.amap.co.za
Table of contents
Other Salton Heater manuals
Popular Heater manuals by other brands

Star Progetti
Star Progetti HELIOS INFRARED IRK TITAN Super Power operating instructions

Scarlett
Scarlett SC-056 instruction manual

Neomitis
Neomitis TBLB050B12 Installation and operating instructions

HOMCOM
HOMCOM 820-260V80 Using instruction

Soleus Air
Soleus Air HM2-15-32 owner's manual

Radialight
Radialight CES5000 Installation and operating manual