Saltwater Conversion Marine-Pac 3 User manual

Marine-Pac 3
User Manual

Marine-Pac 3 user manual V1.0, 15.6.14
2
Marine-Pac 3 User Manual
These instructions set out the steps required to set up and maintain your
Marine-Pac 3.
Read this manual before installing the Marine-Pac 3 to ensure correct installation
and maintenance procedures are followed.
©2014 Saltwater Conversion. All rights reserved.
The written and graphic product descriptions in this manual are correct at the time
of printing.
This manual is updated as required. Visit the Saltwater-Conversion website to access
the latest version.
Saltwater Conversion
Unit 16, 595 Willoughby Rd
Willoughby NSW 2067
Australia
Tel: +61 448833089
www.saltwater-conversion.com.au
info@saltwater-conversion.com

Marine-Pac 3 user manual V1.0, 15.6.14
3
Table of contents
Section 1: Marine-Pac 3 at a glance ......................................................................... 4
Section 2: Getting started............................................................................................ 6
Introduction to nano reefing.............................................................................. 6
What is in the box?.............................................................................................. 7
Other equipment you will need to supply ........................................................ 8
Section 3: Setting up the Marine-Pac 3...................................................................... 9
Section 4: Filling the Marine-Pac 3 and Fluval Edge™ ........................................... 26
Section 5: Maintenance and care ........................................................................... 28
Section 6: Uninstalling the Marine-Pac 3 for service............................................... 29
Section 7: Troubleshooting........................................................................................ 31
Disclaimer of liability, and warranty information .................................................... 33

Marine-Pac 3 user manual V1.0, 15.6.14
4
Section 1: Marine-Pac 3 at a glance
Figure 1: Side view

Marine-Pac 3 user manual V1.0, 15.6.14
5
Figure 2: Front view

Marine-Pac 3 user manual V1.0, 15.6.14
6
Section 2: Getting started
The Marine-Pac 3 provides you with the platform you need to turn the Fluval Edge™
aquarium into a stunning saltwater nano reef. The attractive compact design fits into any
contemporary home and is suitable for cultivating advanced corals, delicate reef fish,
anemones and other invertebrates. It allows you to bring a micro-habitat of the Great Barrier
Reef into your own home or office.
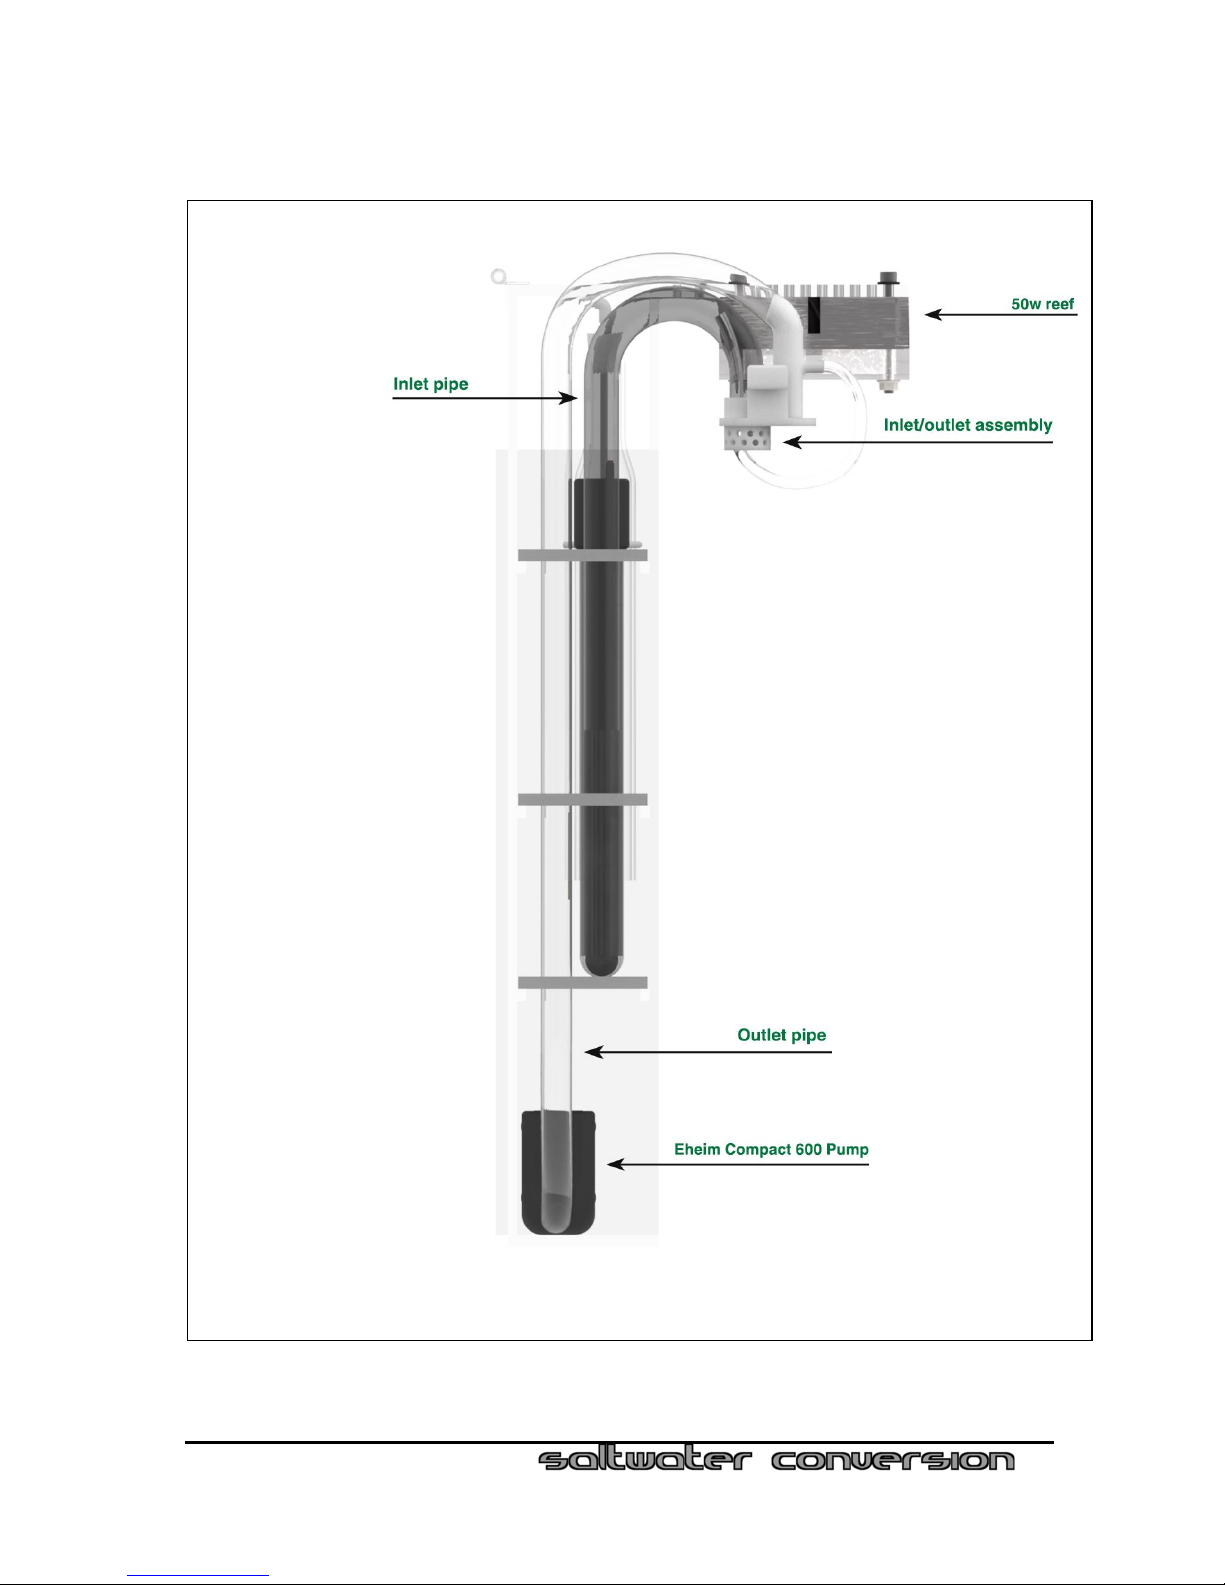
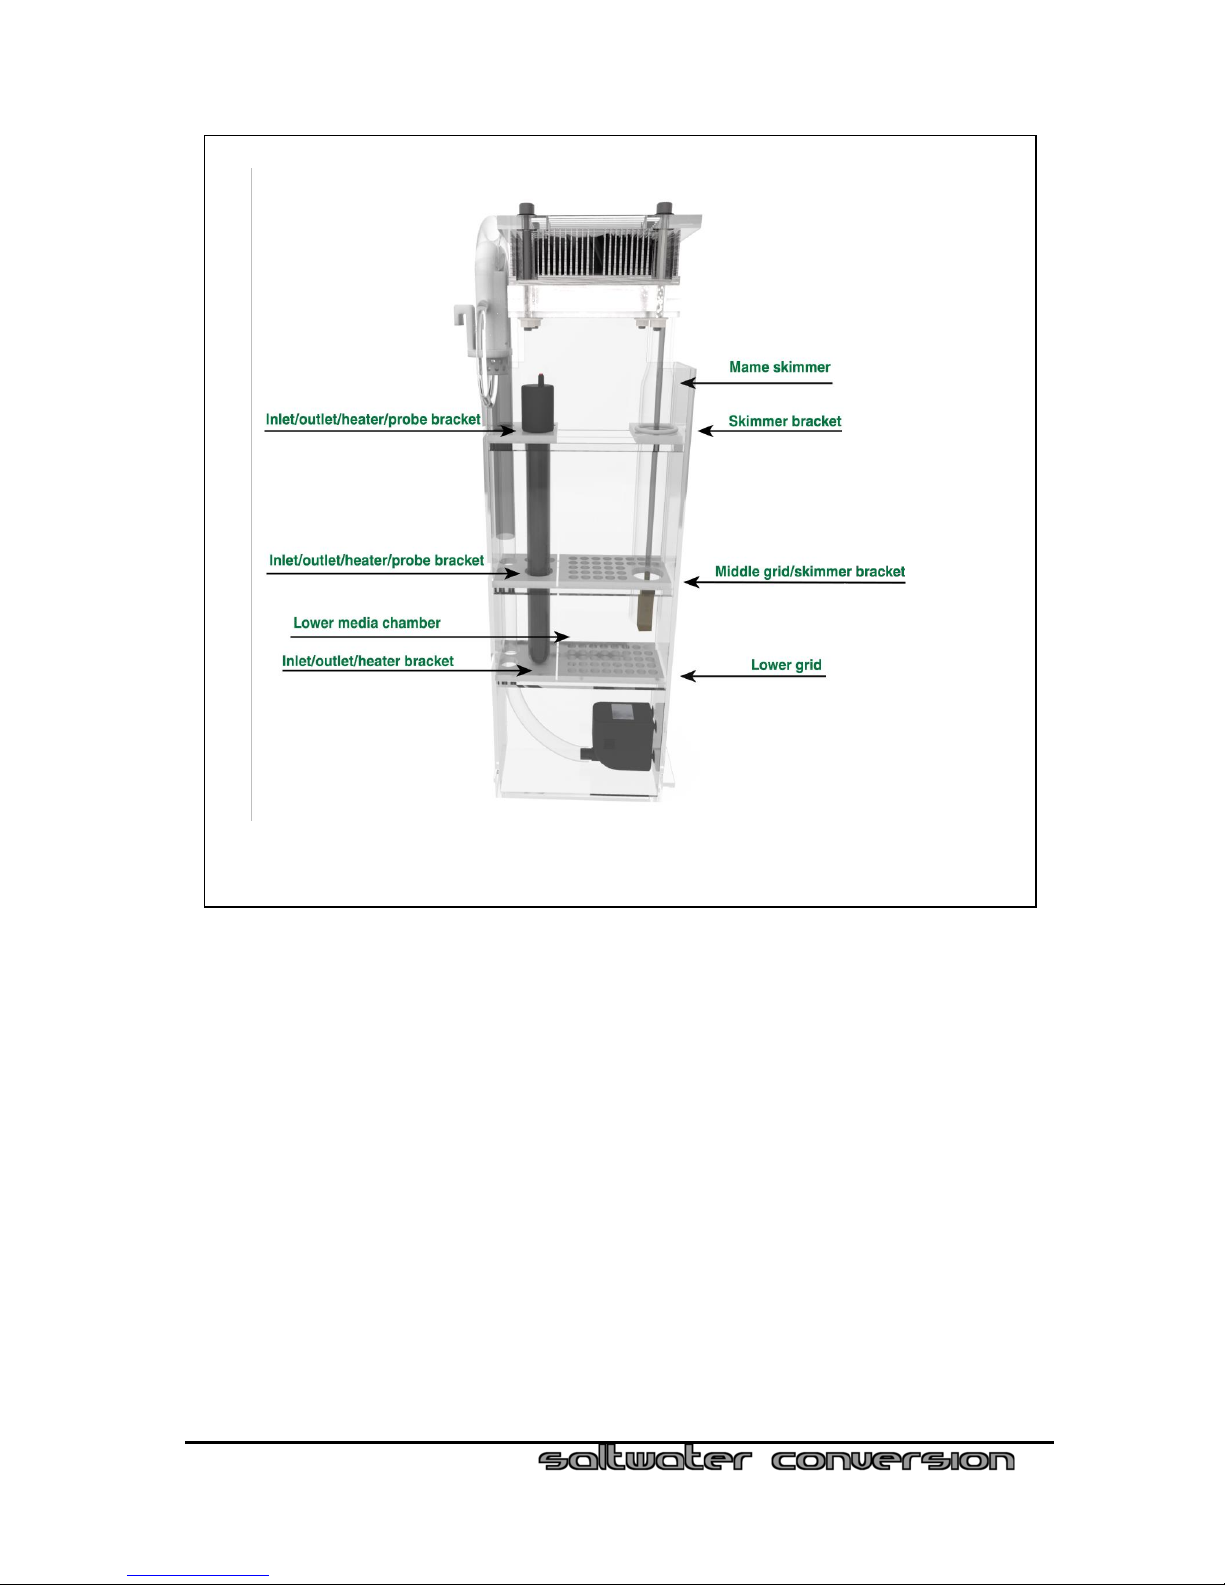
Your Marine-Pac 3 set-up kit includes a best-in-class reef lighting system and Mame©Design
Protein skimmer –everything needed to convert the Fluval Edge™ into a compact state-of-
the-art reef aquarium.
The Marine-Pac 3 is an all in one module that fits into the back of the stunning Fluval Edge
aquarium and converts it into a high performance Nano reef tank.
The Fluval Edge stands unrivalled in its amazing styling and design. It is the only tank available
that presents the viewer with a cube of water visible from every side.
The Marine-Pac 3 enhances the aesthetics and performance of the Fluval Edge by hiding all
of the equipment out of sight. The Marine-Pac 3 has been designed to automatically start
and recover from power outages without priming or manual intervention.
Introduction to nano reefing
Small reefs, or ‘nano reefs’ as they have become known, are becoming increasingly popular
with aquarium hobbyists. They allow you to enjoy a unique connection to the reef in even the
most urban and inland environments. Some of the key advantages are:
less space used
less power
smaller water changes
less bulky gear
less cost to stock
less cost to maintain.
A nano reef also presents is own unique set of challenges that the hobbyist should be aware
of before establishing a new tank.
As the owner of a nano reef, you are ultimately responsible for the lives and wellbeing of
many delicate organisms. Before you start your nano reef, it is your responsibility to learn how
to care for these creatures correctly.
WARNING: Before use, please read all operating instructions and our liability
disclaimer on page 31.

Marine-Pac 3 user manual V1.0, 15.6.14
7
If you are new to the hobby please consider investing in at least one of the following books
to assist you in selecting suitable livestock and corals and finding information on running your
new nano reef:
Nano-Reef Handbook: The Ultimate Guide to Reef Systems Under 15 Gallons—Chris R.
Brightwell
The Simple Guide to Mini-Reef Aquariums—Jeffrey Kurtz.
What is in the box?
1. Marine-Pac 3
2. Inlet/outlet assembly
3. Inlet/outlet hose
4. Mame DesignTM protein skimmer
5. Mame DesignTM waste collection vessel
6. 50W reef light
7. LED driver
8. LED power supply
9. 3 x inlet/outlet/heater/probe bracket
10. Middle grid/skimmer bracket
11. Lower grid
12. Skimmer bracket
13. Universal power supply for light

Marine-Pac 3 user manual V1.0, 15.6.14
8
Other equipment you will need to supply
Heater
A heater maintains the correct water temperature for your reef. Most standard-sized heaters
will fit correctly into the mounting bracket in the Marine-Pac 3. Use a fully submersible heater.
The mounting bracket will accommodate heaters up to 26mm/1.02” diameter. Most
standard heaters are 23mm/0.9” in diameter.
EHEIM™ Compact 600 ©
This is a quality pump, available worldwide. Purchase locally with the appropriate power
plugs and voltage for your region.
Air pump
A small air pump is required to drive the Mame DesignTM skimmer. Purchase this locally with
the appropriate power pugs and voltage for your region.

Marine-Pac 3 user manual V1.0, 15.6.14
9
Section 3: Setting up the Marine-Pac 3
This chapter sets out the 15 steps to set up the Marine-Pac 3.
To start, remove all the components from the box, and unwrap.
Step 1: Connect outlet pipe to pump
Step 2: Set up the pump
Step 3: Install the pump
Step 4: Install the lower grid plate and inlet/outlet/heater plate
Step 5: Install desired filter media into lower media chamber
Step 6: Install the middle grid/skimmer plate and inlet/outlet/heater/probe plate
Step 7: Install the top inlet/outlet/heater plate and skimmer bracket etc.
Step 8: Install the aquarium heater
Step 9: Install the Mame Design™ skimmer
Step 10: Remove the stock lighting
Step 11: Install the Marine-Pac 3 into the back column of the Fluval Edge™
Step 12: Install the back column cover
Step 13: Install back column onto the base of the tank
Step 14: Insert the inlet/outlet assembly
Step 15: Connect up air pump and waste collection vessel to the Mame DesignTM skimmer.
Step 1: Connect outlet pipe to pump.
1. Attach the outlet tube to the EHEIM™ Compact 600©. The pipe is a tight fit and will
stay fitted during normal operation without a hose clamp.
2. If the outlet tube is hard to fit, dip the end of the return hose in a cup of boiling water
to soften it.
WARNING: Take care not to splash boiling water on yourself.

Marine-Pac 3 user manual V1.0, 15.6.14
10
Step 2: Set up the pump.
1. Unbox the EHEIM™ Compact 600©. Insert the included suction cups into the bottom 4
openings on the motor body and pump housing as shown in Figure 5.
2. Set the flow rate on the EHEIM™ Compact 600©to maximum flow by adjusting the
slider to the +position as shown in Figure 5.
Figure 5

Marine-Pac 3 user manual V1.0, 15.6.14
11
Step 3: Install the pump.
1. Wet each of the suction cups on the EHEIM™ Compact 600©and install the pump
into the Marine-Pac 3 as shown in Figure 6. The EHEIM™ Compact 600© must be
pushed to the very bottom of the Marine-Pac 3.
2. If your hands do not easily fit into the Marine-Pac 3, install the pump at the top of the
Marine-Pac 3 and slide it down into position by pushing it with a long object like a
ruler.
3. It is important that the pump is installed on the right hand side (when viewed with the
lighting arm pointing towards you) as shown in Figure 6.
Figure 6

Marine-Pac 3 user manual V1.0, 15.6.14
12
Step 4: Install the lower grid plate and inlet/outlet/heater plate.
This step requires care and patience.
1. Thread the Inlet/outlet/heater plate over the outlet pipe and position it on the lower
shelf. The large hole used to mount the heater should be positioned so it is closest to
you (when viewed with the lighting arm pointing towards you)
2. Install the lower grid plate. The pump’s power cable should go through the hole on
the right hand side (shown in point A in Figure 7.)
Figure 7

Marine-Pac 3 user manual V1.0, 15.6.14
13
Step 5: Install desired filter media into lower media chamber.
Filter media will assist in removing waste and keeping the water pure and of the high quality
needed by most corals and marine life. It will help remove phosphates and hence the
nuisance algae that often occur in the early stages of your tank’s development as it is still
establishing itself. It will also help support the nitrogen cycle in your tank.
To assist in maintaining water quality, filter media can be added to the Marine-Pac 3. Up to
two bags of 100mg filter media can be used at a time.
1. Place the media bags side by side on the lower grid plate, point A in Figure 7.
The following filter products are recommended:
1. Seachem Purigen
Use 100mg sealed mesh bag (typically requires changing every 4 months in the 46l/12g
FluvalEdge™)
Purigen®controls ammonia, nitrites and nitrates by removing nitrogenous organic waste. It
‘polishes’the water for good clarity. Purigen®will assist in keeping the high water quality
required by some advanced corals. Purigen®darkens progressively as it exhausts.
2. Seachem Sea GelTM
Use 100mg sealed mesh bag (typically requires changing every 4 months in the 46l/12g
FluvalEdge™)
SeaGel™ is a blend of MatrixCarbon™ and PhosGuard™. MatrixCarbon™ is an ultra-
capacity carbon used for the removal of organic and colour impurities. PhosGuard™ is a
powerful remover of phosphate, silicate, toxic metals, and acids.

Marine-Pac 3 user manual V1.0, 15.6.14
14
3. Seachem PhosGaurdTM
Use 100mg sealed mesh bag (typically requires changing every 4 months in the 46l/12g
FluvalEdge™)
PhosGuard™ rapidly removes phosphate and silicate from the water. The general consensus
is to limit phosphate (as PO43-) to lower than 0.05 parts per million (ppm) for reef aquariums.
This can be achieved in a variety of ways, but using media such as PhosGaurd™ to adsorb
phosphate may be necessary for some aquarists. This product is highly recommended for
new tanks as it will help control nuisance algae that often occurs in the early stages of your
tank’s development as it is still establishing itself.
Note: Some people prefer to use granular ferric oxide media (GFO) for phosphate removal. If
you prefer to use GFO you will need to purchase a sealable mesh filter media bag and fill it
with a GFO filter media.
4. Live rock rubble
Live rock rubble acts as a biological filter that hosts both the aerobic and anaerobic nitrifying
bacteria required for the nitrogen cycle that processes waste in the tank. You can source live
rock rubble from your local aquarium store. Fill a small sealable mesh filter media bag with
live rock rubble for use in the Marine-Pac 3

Marine-Pac 3 user manual V1.0, 15.6.14
15
Step 6: Install the middle grid/skimmer plate and inlet/outlet/heater/probe plate.
1. Thread the inlet/outlet/heater/probe plate over the outlet pipe and position it on the
middle shelf as shown in Figure 8. The large hole used to mount the heater should be
positioned so it is closest to you (when viewed with the lighting arm pointing towards
you). Notice the position of the two mounting holes for optional water measurement
probes in point B in Figure 8.
2. Install the middle grid plate. The pump’s power cable should go through the hole on
the right hand side (shown in point A in Figure 8). The large hole used to mount the
Mame DesignTM skimmer shown in point C should be positioned so it is closest to you
(when viewed with the lighting arm pointing towards shelf as shown in Figure 8).
Figure 8

Marine-Pac 3 user manual V1.0, 15.6.14
16
Step 7: Install the top inlet/outlet/heater plate and skimmer bracket.
1. Thread the inlet/outlet/heater plate over the outlet pipe and position it on the top
shelf. The large hole used to mount the heater should be positioned so it is closest to
you (when viewed with the lighting arm pointing towards you).
2. Install the skimmer bracket. The pump’s power cable should go through the hole on
the right hand side (shown in point A in Figure 9). The large hole used to mount the
Mame Design TM skimmer (shown in point B) should be positioned so it is closest to you
(when viewed with the lighting arm pointing towards you).
3. Loop the pump’s power cable out of the back right-hand side of the Marine-Pac 3
(when viewed with the lighting arm pointing towards you).
Figure 9

Marine-Pac 3 user manual V1.0, 15.6.14
17
Step 8: Install your heater.
1. Because of the closed top design of the Fluval Edge, a slightly lower water temperate
is recommended as it will assist in retaining oxygen in the water. Follow the setup
instruction of your heaters manufacturer and set the temperature to 23°C.
2. Insert the heater into the heater mounting hole on the left hand side (when viewed
with the lighting arm pointing towards you), as shown in Figure 10.
3. Loop the heater power cable over the back left hand side of the Marine-Pac 3.
WARNING: The manufacturer recommends that you use a fully
submersible heater.
Please note where the minimum water line is on your heater. If the low water line
is above the top of Inlet/outlet/heater/probe plate, install the heater at the
middle Inlet/outlet/heater/probe plate instead.
Figure 10

Marine-Pac 3 user manual V1.0, 15.6.14
18
Step 9: Install the Mame Design™ skimmer.
1. Place the included silicon ring around the Mame Design™ skimmer 145mm from the
bottom edge of the glass skimmer body as shown in Figure 11.
2. Slide the Mame Design™ skimmer into the skimmer bracket. The skimmer’s air intake
and outlet should face away from you (when viewed with the lighting arm pointing
towards you). Attach the two included lengths of airline tubing to the Mame Design™
skimmer.
Figure 11

Marine-Pac 3 user manual V1.0, 15.6.14
19
Step 10: Remove the stock lighting.
1. Remove the original lighting arm, lift the arm up and use a small Phillips head
screwdriver to remove the 4 recessed Phillips head screws (2 each side).
2. Once the screws have been removed, the 2 halves of the stock lighting arm can be
separated and removed. Unscrew the cable clamp holding down the stock lighting
cable in the back column.

Marine-Pac 3 user manual V1.0, 15.6.14
20
Step 11: Install the Marine-Pac 3 into the back column of the Fluval Edge™.
1. The Marine-Pac 3 should sit on top of the lower ledge of the back column.
2. Ensure the power cables from the pump and heater, as well as the air hose from the
skimmer, go down the gap behind the Marine-Pac 3 as shown in Figure 12.
Figure 12
Table of contents
Popular Water Filtration System manuals by other brands

Club Hydrate
Club Hydrate Perfect Pitcher owner's manual

FCI Watermakers
FCI Watermakers MAX-Q+ User manual & installation guide

Purofilter
Purofilter 53-WF-19PF installation instructions

Graco
Graco 213-062 instructions

Astral Pool
Astral Pool Combo 27413 Instruction and operation manual

Purlette
Purlette PL400G owner's manual

Blue Wave
Blue Wave EASY CLEAN 100 instruction manual

Waterco
Waterco ELECTROCHLOR PLUS owner's manual

GE
GE Homespring owner's manual

Everpure
Everpure PBS-400 installation instructions

Frizzlife
Frizzlife PD800-TAM4 owner's manual

Allied Pumps
Allied Pumps KCPS 15FS Installation, operation and maintenance manual