Allied Pumps KCPS 15FS User manual
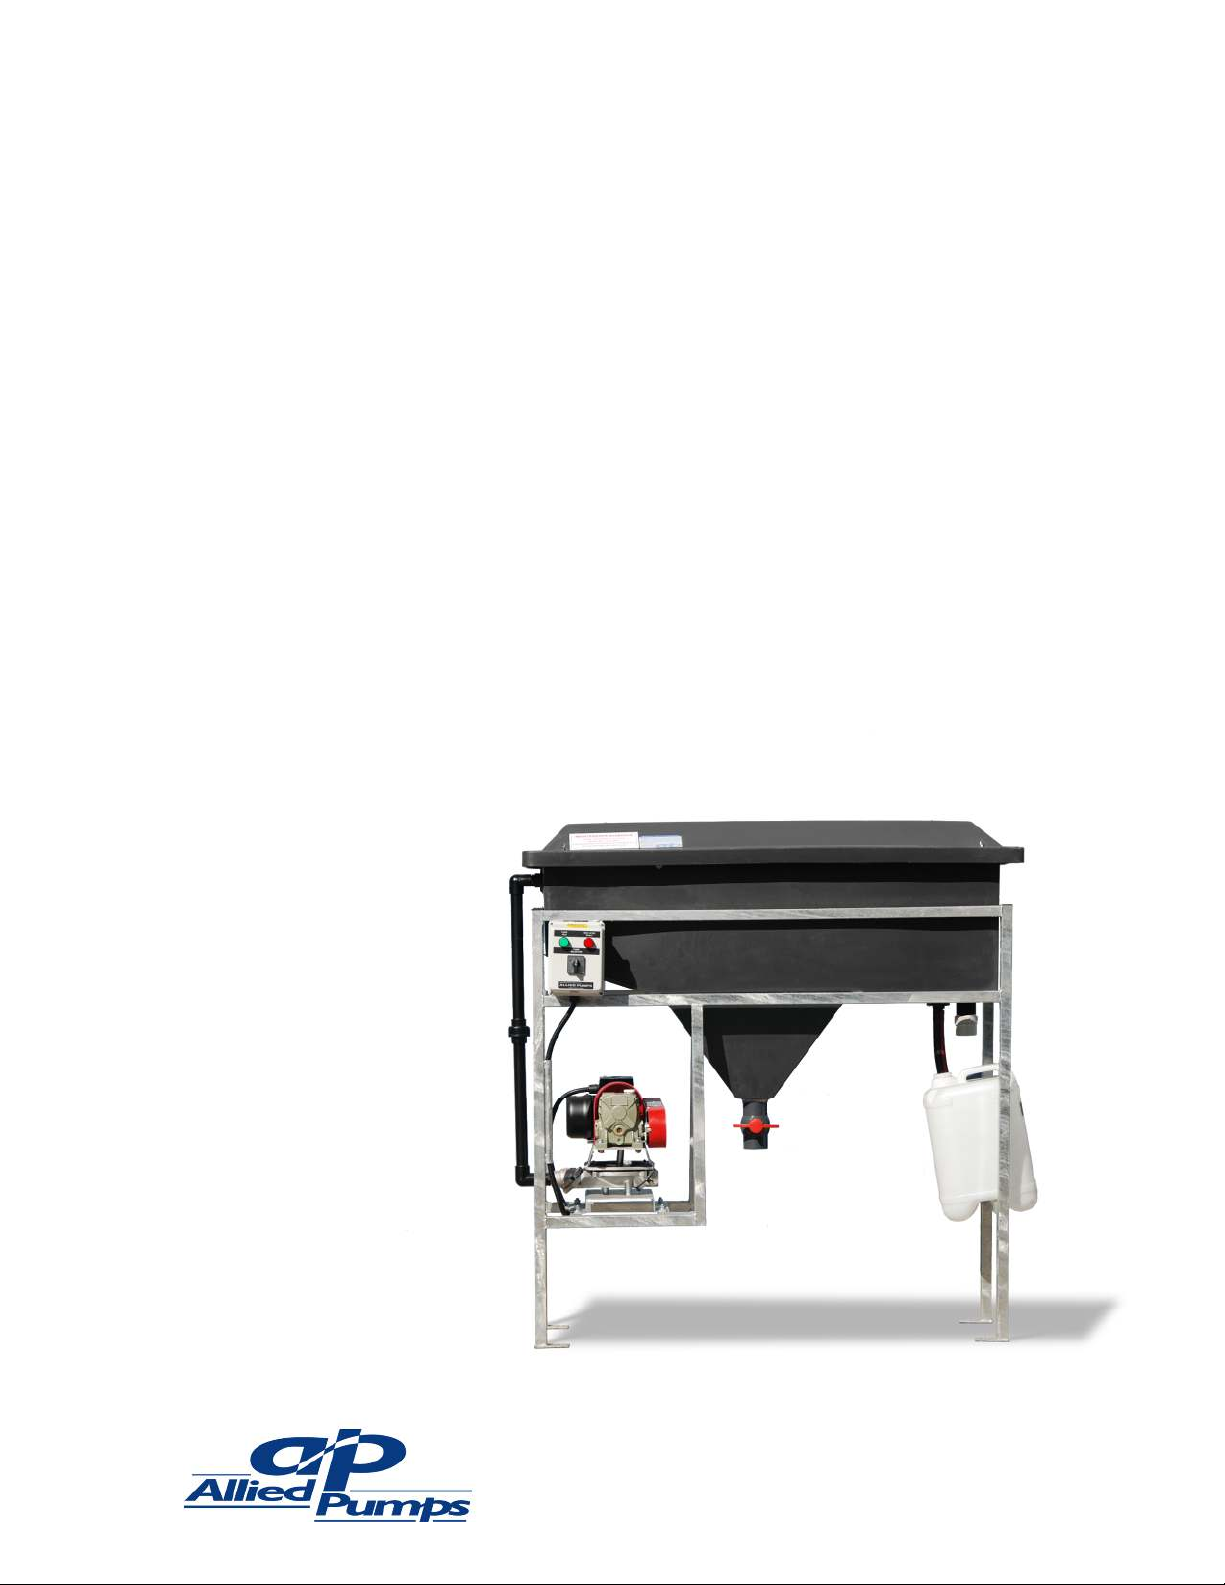
Cleartec Coalescing Separator
Installation, operation, and maintenance manual
June 2023 v4.1
Cleartec Coalescing Plate Separator
Installation, operation, and maintenance
Cleartec Coalescing Separaton IOM - 100823 Doc # 7068 2
Revision History
VER DATE DESCRIPTION OF CHANGES PREPARED CHECKED APPROVED
.1 16/06/2023 ISSUED FOR USE YF JD JD

Cleartec Coalescing Plate Separator
Installation, operation, and maintenance
Cleartec Coalescing Separaton IOM - 100823 Doc # 7068 3
Contents
1
Safety _______________________________________________________ 4
1.1Prior to operation ........................................................................................................................................
1.1.1Correct wash-bay procedures ....................................................................................................
1.1.2Correct maintenance procedures ..............................................................................................
1.2WARNINGS ..................................................................................................................................................
2
System description ___________________________________________ 5
3
Installation ___________________________________________________ 6
3.1Pipework ......................................................................................................................................................... 6
3.2Installation of level floats ............................................................................................................................. 8
3.3Silt arrestors ................................................................................................................................................... 8
3. Oil skimmer and water outlet detail ........................................................................................................ 8
3.5Installation of a diaphragm pump .............................................................................................................. 9
3.5.1General ............................................................................................................................................. 9
3.5.2Electrical ........................................................................................................................................... 9
3.5.3Gear reducer ................................................................................................................................... 9
3.5. Engine ................................................................................................................................................ 9
4
Operations __________________________________________________1
.1Checking the float switches ...................................................................................................................... 10
.2Setting the correct water level ................................................................................................................ 10
.3Adjusting the oil skimmer ......................................................................................................................... 10
. Observe and adjust. .................................................................................................................................... 10
5
Maintenance ________________________________________________11
5.1Cleaning frequency ..................................................................................................................................... 11
5.2Daily maintenance ....................................................................................................................................... 11
5.3Weekly maintenance .................................................................................................................................. 11
5. Quarterly maintenance .............................................................................................................................. 11
5.5How to clean separator ............................................................................................................................ 12
5.6Protection ..................................................................................................................................................... 12
5.7Diaphragm pump maintenance ................................................................................................................ 13
5.8Replacement of diaphragm ....................................................................................................................... 1
5.9Replacement of flap valves ........................................................................................................................ 1
6
Warranty ___________________________________________________15

Cleartec Coalescing Plate Separator
Installation, operation, and maintenance
Cleartec Coalescing Separaton IOM - 100823 Doc # 7068
1 Safety
1.1 Prior to operation
Thank you for choosing the Cleartec System to handle your trade waste requirements.
We are confident that the system will deliver several years of service without issues. However, the
longevity and efficiency of the system is dependent on the following two points, and on those
detailed in this manual. Please familiarise yourself with them prior to operation.
1.1.1 Correct wash-bay procedures
Gravity-based separation systems cannot operate efficiently with degreasers. It is mandatory that
degreasers are not used in a wash-off bay this separator is treating; a quick break biodegradable
detergent must be used.
1.1.2 Correct maintenance procedures
The on-going effectiveness of the system is dependent on regular maintenance (as detailed in this
manual) being carried out. Due to the importance of this procedure, we strongly recommend you
establish a service contract with Allied Pumps Service Division to ensure this is performed properly
and according to the schedule.
1.2 WARNINGS
Under no circumstance must traces of acetone or thinners pass through this separator.
Only allow qualified personnel to install, connect, and operate separator pump, motor, and
switchgear.
This separator is designed to separate oil and water and must not be used for any other
purpose.
This separator is not designed to handle liquids below a pH of 2 or above a pH of 12.
Liquids outside of this range shall not be allowed to pass through the separator, otherwise
serious consequences could result.
Adequate lifting and moving equipment shall be used to prevent injuries to personnel or
damage to equipment.
All pipe and connections shall be verified to be tight, properly supported, and secure before
operation post installation of the separator.
For your safety, read all relevant instruction manuals prior to connecting or operating
equipment, refer to engineer’s department and wear appropriate personal protective
equipment.
Cleartec Coalescing Plate Separator
Installation, operation, and maintenance
Cleartec Coalescing Separaton IOM - 100823 Doc # 7068 5
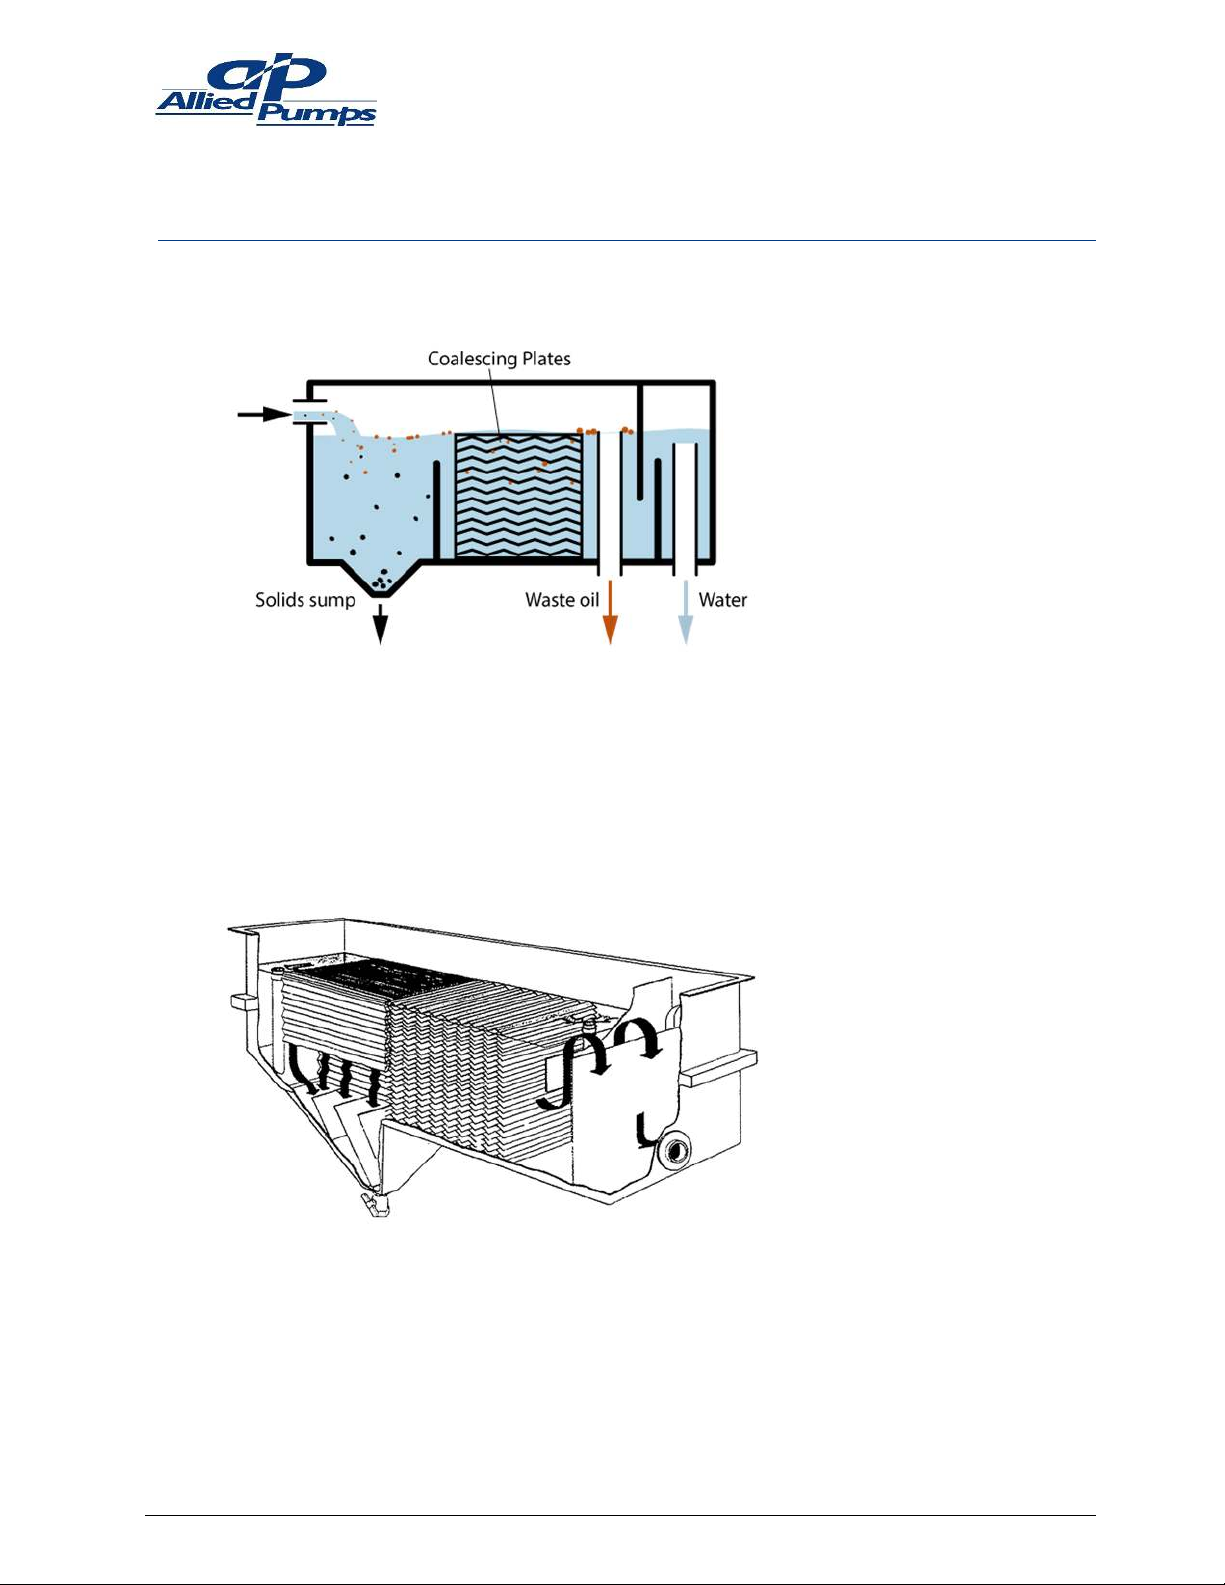
2 System description
The Cleartec Coalescing Plate Separator (CPS) is an enhanced, gravity separator incorporating the
latest technology.
Fig. 1 CPS basic operation
CPS units are designed with a combination of vertical and horizontal coalescing plates. From the
inlet port, the flow is directed through the vertically-orientated plates where solids are separated
under gravity for collection in the hopper below. The horizontally-orientated plates remove oil
droplets by coalescing them to form larger oil particles, thereby increasing their rising velocity and
capture rate.
Fig. 2 CPS plates illustration

Cleartec Coalescing Plate Separator
Installation, operation, and maintenance
Cleartec Coalescing Separaton IOM - 100823 Doc # 7068 6
3 Installation
Position the CPS as close as possible to the waste collection pit that the separator pump is drawing
from.
The CPS should be mounted on a level, reinforced concrete plinth/slab of adequate thickness to
take the weight of the unit. In the case of a wall mounted unit, it should be a structurally sound
wall capable of supporting the weight of the unit when full of liquid.
If the CPS is to be installed in a trafficable area, suitable protection bollards should be installed
accordingly. It is extremely important that the CPS be mounted level to horizontal within tolerance
of ±2.5 mm to facilitate successful operation. Packing under one or more of the legs may be
necessary for the final levelling of the unit. The Separator should be fastened to the plinth with
10 mm sleeve anchor type bolts, one bolt per leg, through the pre-drilled holes.
3.1 Pipework
Correct pipe size is a critical factor affecting pump performance and service life. Refer to pipe
selection chart below. Fit a suction strainer with apertures no more than 25% of pump port size
and a minimum clear area (four) times the port size. Pipe work should be airtight, adequately
supported, and be as short and direct as possible. Use flexible connectors between pump and rigid
pipe work. Fit a pulsation dampener when a pump is installed with rigid pipe work over 5 m in
length. For flexible installations, use reinforced suction hose on both suction and discharge sides.
Do not use lay flat type hose.
Table 1. Pipe selection
* For clean liquids with same viscosity as water ** Maximum suction pipe length 10 m
Suction pipe length Discharge pipe length
0
–
5 m
5
–
10 m**
0
–
5 m
5
–
10 m
10
–
20 m
Separator
Model
Pump
Size
Minimum Internal
Dimensions*
Minimum Internal
Dimensions*
KCPS
15
FS
DS-25
0 mm
50 mm
0 mm
0 mm
0 mm
KCPS
3
FS
DS-25
0 mm
50 mm
0 mm
0 mm
0 mm
KCPS
3
FS
DS-32
50 mm
65 mm
0 mm
50 mm
50 mm
KCPS
6
FS
DS-38
65 mm
80 mm
50 mm
65 mm
65 mm
KCPS
75
FS
DS-50 80 mm 100 mm 65 mm 80 mm 80 mm
KCPS
15
FS
DS-76
100 mm
150 mm
80 mm
100 mm
100 mm
Note: use of pipes smaller than recommended will void warranty
Cleartec Coalescing Plate Separator
Installation, operation, and maintenance
Cleartec Coalescing Separaton IOM - 100823 Doc # 7068 7
Pump suction pipework should be in accordance with the following:
1 Suction line from pit to pump must be as direct as possible with the minimum number of bends.
WARNING The suction line must be fitted with the supplied strainer to prevent blockages.
Failure to do so could damage pump.
2 The suction line should not touch the bottom of the pit. Leave a gap of 10 mm to safeguard
against sludge or other sedimentation entering the pipeline, causing blockages and damage to
pump.
3 Cleaning of this pit should be carried out regularly as discussed in the maintenance section of
this manual.
The suction line from the pit to the pump and from the pump to the separator must be free of
air leaks.
5 Suction and discharge pipework should be supported by stand-off brackets or saddles at regular
intervals to provide adequate support.
6 In the case of discharge to sewer: the pipeline should have a continuous fall.
7 In situations where a fall to sewer is unable to be obtained (or not practical), a pit must be
installed nearby to receive the discharged effluent from the separator. The effluent can then be
discharged to sewer by means of an automatic, submersible pump. In these installations, PVC
pressure pipe should be used and discharged over a suitable industrial waste discharge point.
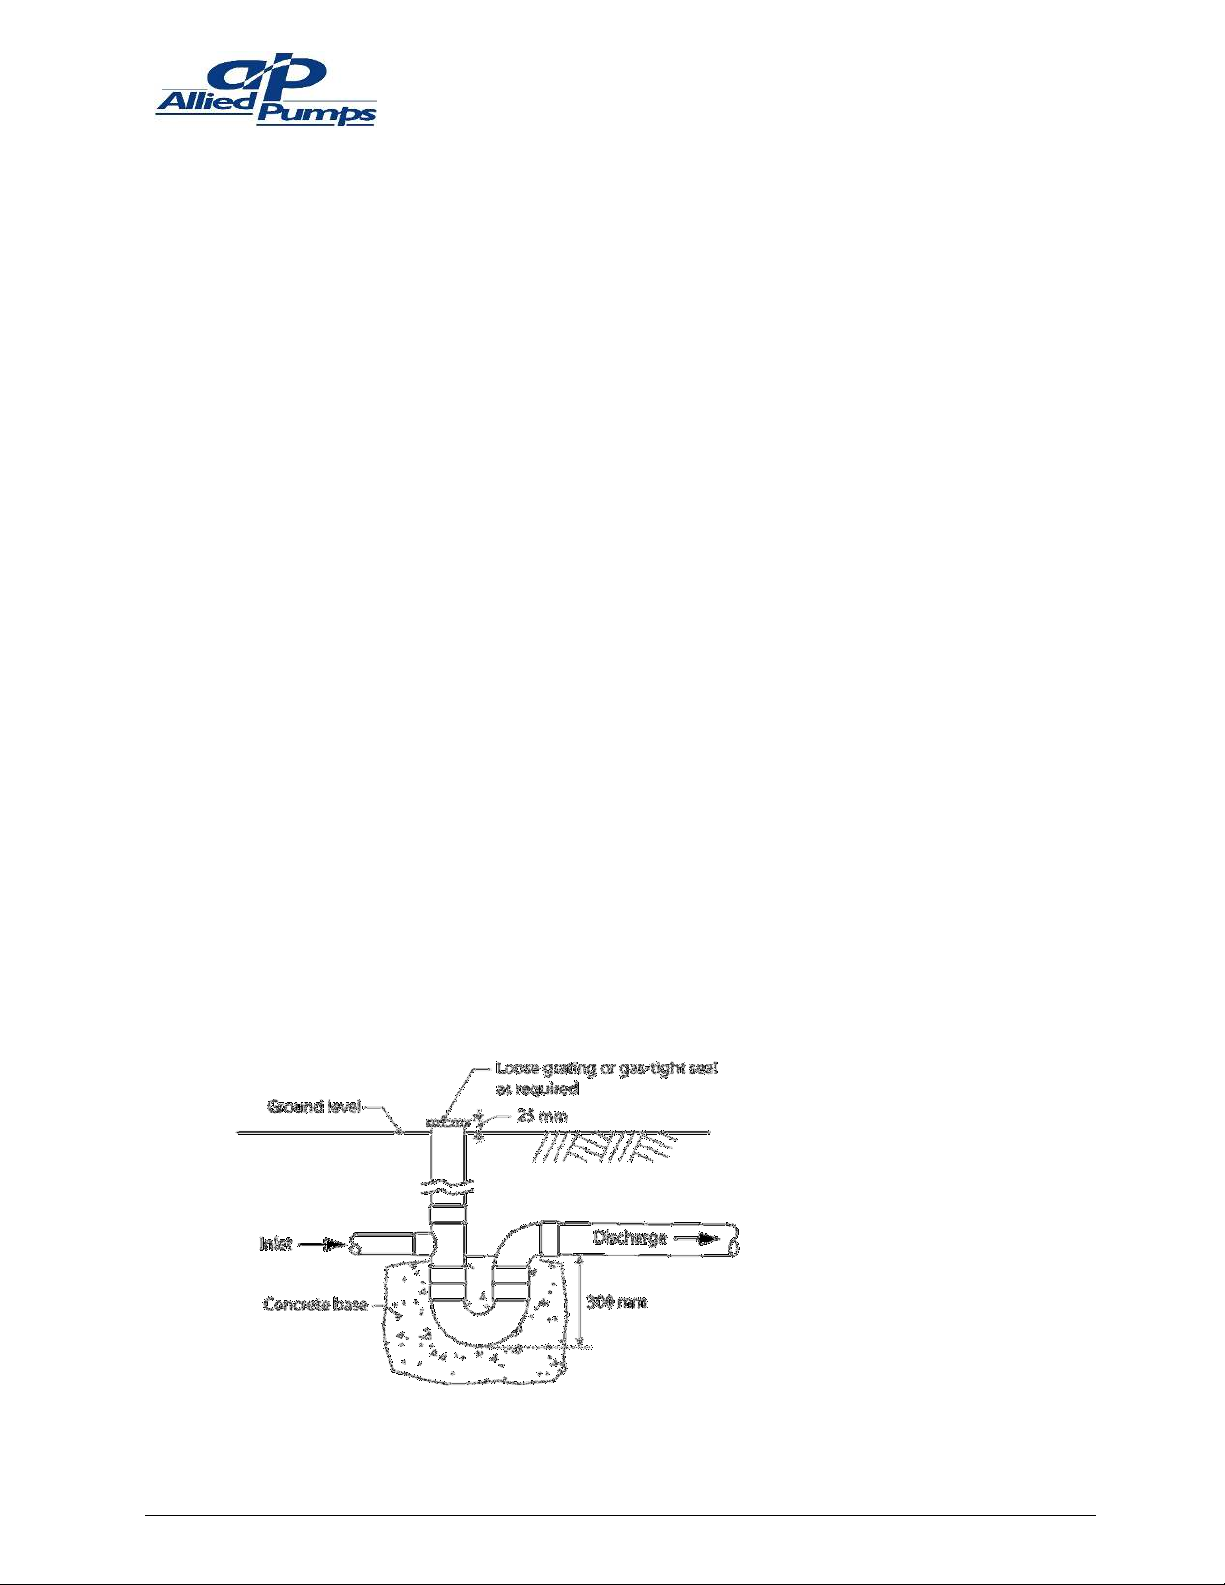
8 Entry to sewer must be via Water Corporation standard design industrial waste discharge point
as illustrated in
Fig. 3
.
9 If the discharge line from the separator is longer than 6 (six) metres, a suitable vent and cowl
must be installed.
10 In the case of sewage pipelines longer than 6 (six) metres: expansion joints must be used at
regular intervals as specified by local trade practise requirements.
11 It is recommended that a union is installed on suction and discharge of pump to allow ease of
disconnection for service and maintenance.
Fig. 3 Water Corporation Standard Design Industrial waste discharge point.
Cleartec Coalescing Plate Separator
Installation, operation, and maintenance
Cleartec Coalescing Separaton IOM - 100823 Doc # 7068 8
3.2 Installation of level floats
1 Float Switches, fitted with cable-weights, are supplied. They should be hung from a tethering
point near the top of the chamber.
2 The pump start/stop float switch should hang approx. 200 mm above the bottom of the pump
suction strainer. If the float switch is not higher than the suction point, the pump will suck air
and will not turn off automatically.
3 The high-level alarm float switch should be hung approximately 150 mm below the invert of the
inlet pipe. This may vary in larger tanks.
Ensure floats are free from obstruction and can move up and down freely.
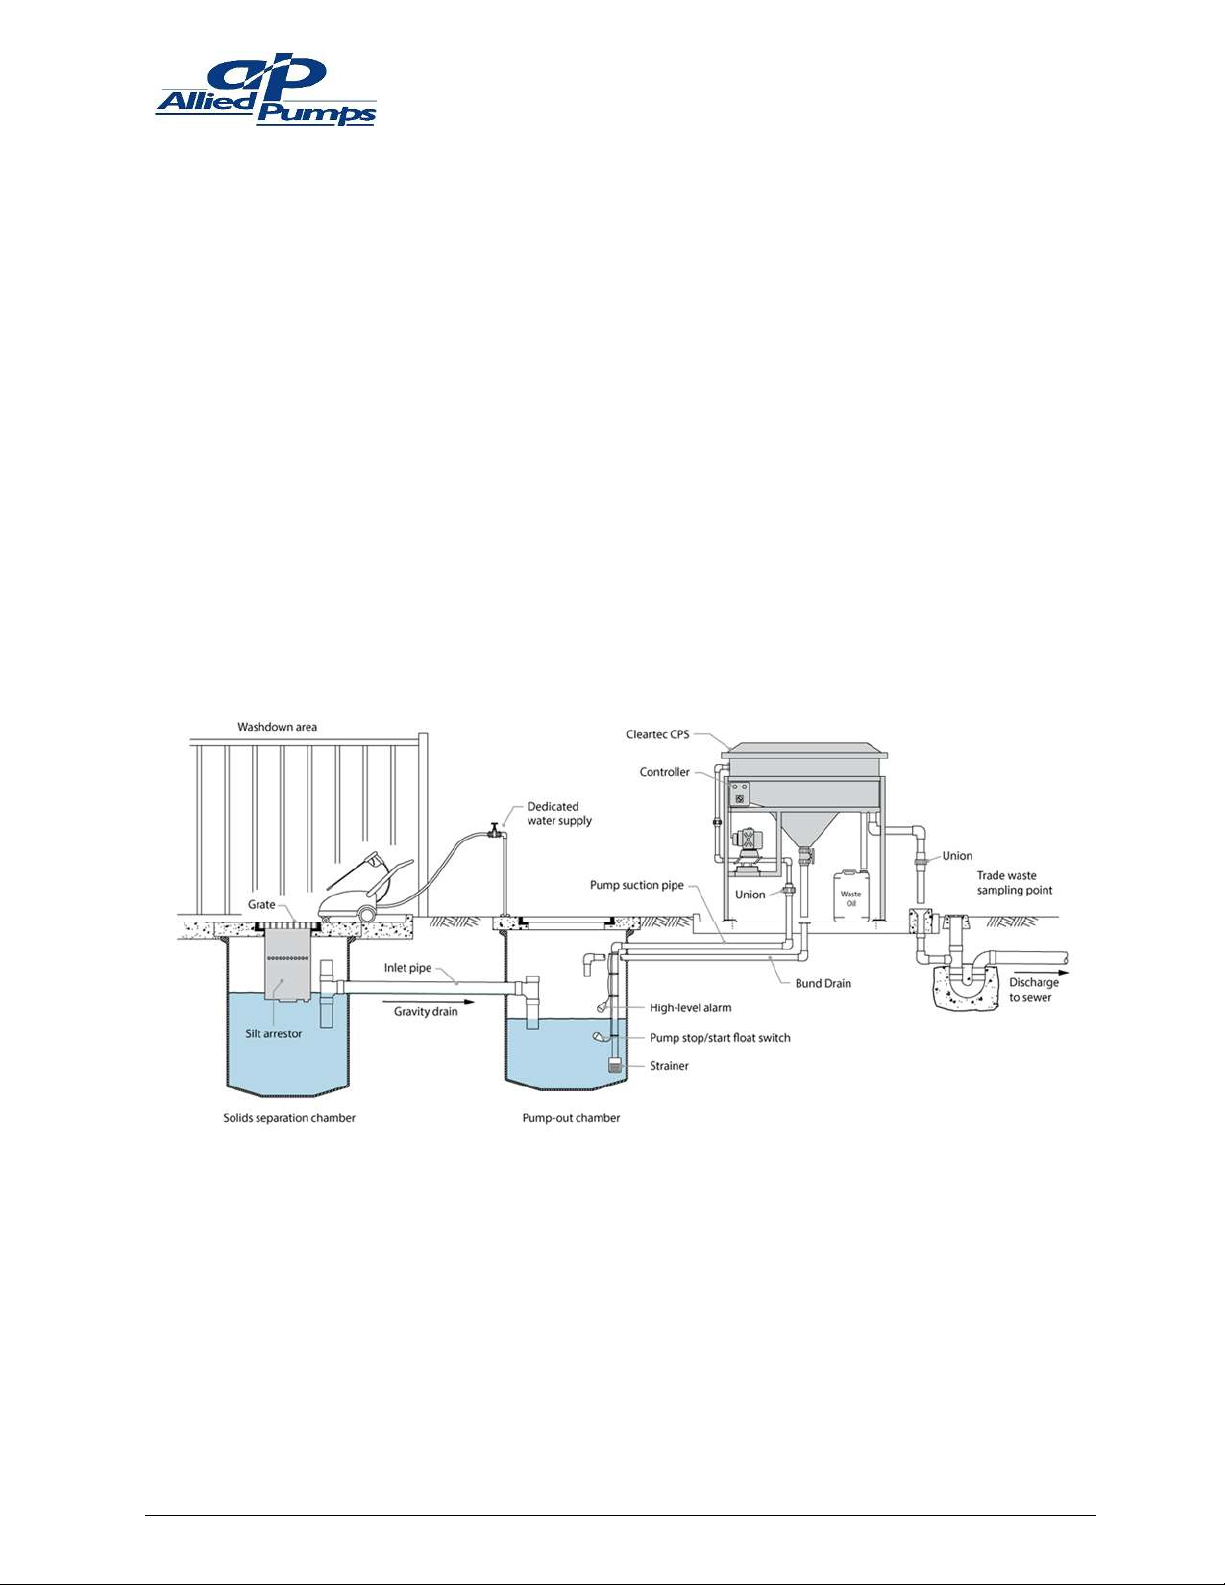
3.3 Silt arrestors
While Cleartec separators can accommodate a nominal amount of sludge, when heavy solids, cloth
or excessive silt is expected, provision should be made for accommodating them in the sump. The
most economical method of achieving this is with a basket silt arrestor. It is advised that every
installation incorporates a silt arrestor to minimise potential damage to pump and the separator.
Refer to
Fig .
For typical installation.
Fig. Cps Common installation diagram
3.4 Oil skimmer and water outlet detail
Ensure oil skimmer is set when pump is operating; oil skimmer is to be set approximately 5 mm
above water level as shown in
Fig. 5
.

Cleartec Coalescing Plate Separator
Installation, operation, and maintenance
Cleartec Coalescing Separaton IOM - 100823 Doc # 7068 9
Fig. 5 Elements in a CPS
Note: This diagram is for illustrative purposes only. It does not apply to a particular model.
3.5 Installation of a diaphragm pump
3.5.1 General
Install the pump level and secure using holes in baseplate.
3.5.2 Electrical
Wire electric motors to manufacturer’s instructions, usually on the motor nameplate or junction
box. Most 2 0 VAC motors have built in overload protection; all other motors require overload
protection wired into the circuit.
Ensure there is unobstructed airflow to the motor cooling fan.
Protect motors from weather and water.
WARNING Check motor rotation. Correct motor rotation is clockwise viewed from the fan
end. Incorrect rotation will damage the pump and void warranty.
3.5.3 Gear reducer
Remove vent plug from oil filler cap.
Check oil is visible in sight glass before starting up.
Recommended oil: Shell Omala 320 Castrol Alpha SP320.
3.5.4 Engine
Fill engine with correct grade oil before operation. (Specified in engine owner’s manual)
Do not operate engine without adequate ventilation.
Check oil level regularly.
Maximum pump speed should not exceed 8 strokes per minute.

Cleartec Coalescing Plate Separator
Installation, operation, and maintenance
Cleartec Coalescing Separaton IOM - 100823 Doc # 7068 10
4 Operations
Before starting up, make certain that the separator is firmly anchored to the plinth and that all
pipework and connections are secure and properly supported.
The pump and suction line should be primed before starting for the first time.
4.1 Checking the float switches
Turn the selector switch in the control panel to Automatic. Check
that the sequence of the level floats is correct. This is done by
lifting each level float by hand. The pump should be activated upon
the rise of the lowest float. The top float should activate the
redlight signal and when both floats are let down, the pump should
turn off.
Fig. 6 Control panel
4.2 Setting the correct water level
Allow the separator to commence operating. The water level should rise to just above the plates. If
it rises higher or lower than this level, the expansion coupling on the water outlet standpipe should
be pushed down or pulled up until the water level is just above the plates (approx. 5 mm).
4.3 Adjusting the oil skimmer
The operating water level rises and falls in accordance with the
hydraulic action of the pump; skimmer should be set 5 mm above
the highest rise level. This is an expansion PVC coupling and is
adjusted by moving the inner sleeve up and down.
Fig. 7 Oil skimmer
4.4 Observe and adjust.
Inspect the liquid flowing through the plates and towards the outlets. Check that no water is
passing over the oil skimmer and if so, adjust accordingly.
Check the effluent is flowing into sewer gully without splashing.
Check the oil waste drum is situated under the waste-oil outlet so there is no spillage.

Cleartec Coalescing Plate Separator
Installation, operation, and maintenance
Cleartec Coalescing Separaton IOM - 100823 Doc # 7068 11
5 Maintenance
5.1 Cleaning frequency
The most suitable period between maintenance is dependent upon the quality of the influent the
separator is to treat. It is recommended that initially, maintenance as described below, be
performed and adjusted if necessary to meet the quantity of sludge in the system.
5.2 Daily maintenance
Remove any obstruction from the grates of the pit and drains.
Visually inspect the system for any leakages. If any detected, report to the Maintenance
Manager.
Visually inspect the control panel. If the panel is not operational, report to the Maintenance
Manager.
Visually inspect the discharge effluent. If the effluent is not typical of normal discharge, take a
sample and record the time and details of the previous work on the wash-bay including the
type of detergent used.
Check that the pump is operational.
5.3 Weekly maintenance
Same procedure as for the daily maintenance is to be followed.
Remove the lid from the separator and remove any floating and solid matter.
Thoroughly wash down the wash-bay.
Check the gear oil level in the reduction gear box.
Check the levels in the waste oil drum and arrange for disposal if required.
Check the level of the sludge in the pit and arrange for disposal if required.
5.4 Quarterly maintenance
Same procedure as for the weekly maintenance is to be followed.
Visually inspect the pit to ensure that the float switches are unobstructed and move up and
down freely.
Clean the separator as per the detailed instructions following.
Clean out the collection pit.

Cleartec Coalescing Plate Separator
Installation, operation, and maintenance
Cleartec Coalescing Separaton IOM - 100823 Doc # 7068 12
5.5 How to clean separator
Disconnect the power supply to ensure that the pump remains inoperative for the entire
cleaning procedure.
Remove the lid of the separator.
Lower the oil skimmer to remove all the oil from the water surface.
Drain the separator by opening the sludge valves at the bottom of the solids hoppers.
Remove nyloc nuts from side of separator and remove all stainless-steel hardware holding
plate packs.
Remove plate packs by lifting with the handle provided.
Inspect and remove any large items that have not drained through the valve.
Hose down the interior of the tank.
Hose through the plate stacks with high-pressure water. Do not dismantle the stacks.
Re-install the plate packs to their original positions.
Refill the separator with potable water and restart the system.
Reset the oil skimmer to the original position of approximately 5 mm above the operating
water level.
Check that the unions are tight and that there are no leaks.
Replace the lid and secure it with wing nuts.
5.6 Protection
Allied Pumps recommends protecting this equipment from direct weather and sunlight; equipment
should also be protected from direct jets of water from any wash down equipment.

Cleartec Coalescing Plate Separator
Installation, operation, and maintenance
Cleartec Coalescing Separaton IOM - 100823 Doc # 7068 13
5.7 Diaphragm pump maintenance
Fig. 8 Diaphragm pump elements
!"
!#!" !
!#!"
$%&! &!' (
#!"&! &'(
)! &!
)! &!"!*
+ !&! &
+ !&! &"#
$$'
,!#
"
&%#%"
-%"!'
.' *!' (
.'!"#%"
.'!"#%"
.' /!
!%% (
0% (
)'
)' "%!!' (
!(1!
! !
."%!

Cleartec Coalescing Plate Separator
Installation, operation, and maintenance
Cleartec Coalescing Separaton IOM - 100823 Doc # 7068 1
5.8 Replacement of diaphragm
1 Disconnect power at supply.
2 Remove all four casing bolts.
3 Lift drive support housing (No. 12) complete with motor and gearbox (No. 13) to one side.
Note
: take care to avoid damage to electrical connection
With access now available to diaphragm (No. 3), remove lower nut (No. 9), washer (No. 10),
and diaphragm plate (No. 2).
5 Note: stay in original position
6 Remove and replace diaphragm (No. 3) with writing on new diaphragm (No. 3) facing upwards.
Refit lower diaphragm plate (No. 2), making sure the inner lip edge on the diaphragm (No. 3) is
in the corresponding grooves in the diaphragm plate (No. 2). Then re-fit lower washer (No. 10)
and nut (No. 9) and tighten.
7 Reposition drive support housing (No. 12) onto (No. 1) and locate outer lip edge of diaphragm
in corresponding grooves in bowl and drive support housing.
8 Re-fit all four casing bolts and tighten evenly. Note: do not over-tighten these bolts
9 Re-connect power supply and check operation.
5.9 Replacement of flap valves
Before attempting to replace the flap valves, it should be noted that the flap valve assemblies
(No. 7) for the suction and discharge ports are identical. Assembly order should be as per diagram
(No. 2). When the flap valve assembly (No. 7) is fitted to the suction of the pump, the flap valve
assembly will be adjacent to the pump casing (No. 1). However, when flap valve assembly (No. 7) is
fitted to the discharge of the pump, the flap valve will be adjacent to the discharge chamber
(No. 5).
1 Disconnect power at supply.
2 Disconnect pipework adjacent to faulty flap valve and corresponding chamber bolts.
3 Remove valve chamber (No. , 5).
Remove flap valve (No. 7) and check components for wear and replace accordingly.
5 Re-assemble flap valve assembly (No. 7) as per diagram (No. 2).
Note
: do not overtighten screw to avoid distortion of flap valve
6 Re-fit valve assembly (No. 7) and check flow directions. Suction valve should push into pump
whilst discharge valve should lift up and both flap valves should re-seal automatically.
7 Re-fit corresponding valve chamber (No. , 5) and chamber bolts and tighten evenly.
8 Reconnect pipework to valve chamber (No. , 5)
9 Reconnect power supply and check operation.

Cleartec Coalescing Plate Separator
Installation, operation, and maintenance
Cleartec Coalescing Separaton IOM - 100823 Doc # 7068 15
6 Warranty
Warranty is subject to Allied Pumps Pty Ltd terms and conditions of sale and limited to
replacement or repair, at Manufacturer’s discretion, of any parts or equipment, excluding and
travel, site, removal or reinstallation costs, for a period of twelve months from date of invoice,
provided such part of equipment is deemed by the respective manufacturer to be faulty. Any work
done on site to inspect or remedy faults that are subsequently not accepted as being under
warranty by the manufacturer (e.g. caused by misuse, fair wear or operating procedures) will be
charged at rates applicable at the time including parts, labour and travelling time.
Warranty does not provide for circumstances outside Allied Pumps’ control including, but not
limited to, seismic activity, base or ground movement, mechanical impact, abuse or negligence, or
general wear and tear.
Warranty does not cover equipment that is not installed, continuously monitored, and maintained
in accordance with the manufacturer’s requirements, including, but not limited to, regular servicing,
and/or regulatory requirements and applicable Australian Standards. Warranty does not cover
damage caused by dry running the pumps.
If Buyer requires our services in respect of site inspection or service outside of what is covered by
Manufacturers’ warranties, then Buyer should enter into a separate agreement with Allied Pumps in
respect to the same. In the event of no such separate agreement, all operations, calibrating,
cleaning, and maintenance of plant is the responsibility of the buyer.
Allied Pumps have not acted as a consultant nor charged design fees on this project, and are in no
way responsible for, nor guarantee any particular level or performance of the treatment plant
supplied or effluent quality unless such guarantee is specially given in writing. Under no
circumstances is Allied Pumps liable for any direct or consequential loss or business interruption or
damage to persons or properties of any nature due to any cause whatsoever.
Application of warranties is conditional on Allied Pumps having received in cash the total contract
price. Furthermore, Allied Pumps reserves the right to withdraw any code compliance, Australian
Standard compliance or selection compliance, should the contract not be paid in full.

Cleartec Coalescing Separaton IOM - 100823 Doc # 7068 16
Appendix A
Quickbreak detergent MSDS
Cleartec Coalescing Separaton IOM - 100823 Doc # 7068 17

Cleartec Coalescing Separaton IOM - 100823 Doc # 7068 18
Appendix B - General Arrangement drawing
Appendix B
General Arrangement (typical layout)

Cleartec Coalescing Separaton IOM - 100823 Doc # 7068 19

Cleartec Coalescing Separaton IOM - 100823 Doc # 7068 20
Appendix C - Maintenance records
Appendix C
Maintenance records
This manual suits for next models
4
Table of contents


