Salus SG888ZB User manual

SMC-GM-CWSG-M1-2019.11v1(2019-11-08)
Connected Wireless System Guide
Module 1 – System Overview, SG888ZB
& SALUS Smart Home Application

Section Page
1 Introduction
Why SALUS? ........................................................................................................1-1
Using this Manual...................................................................................................1-1
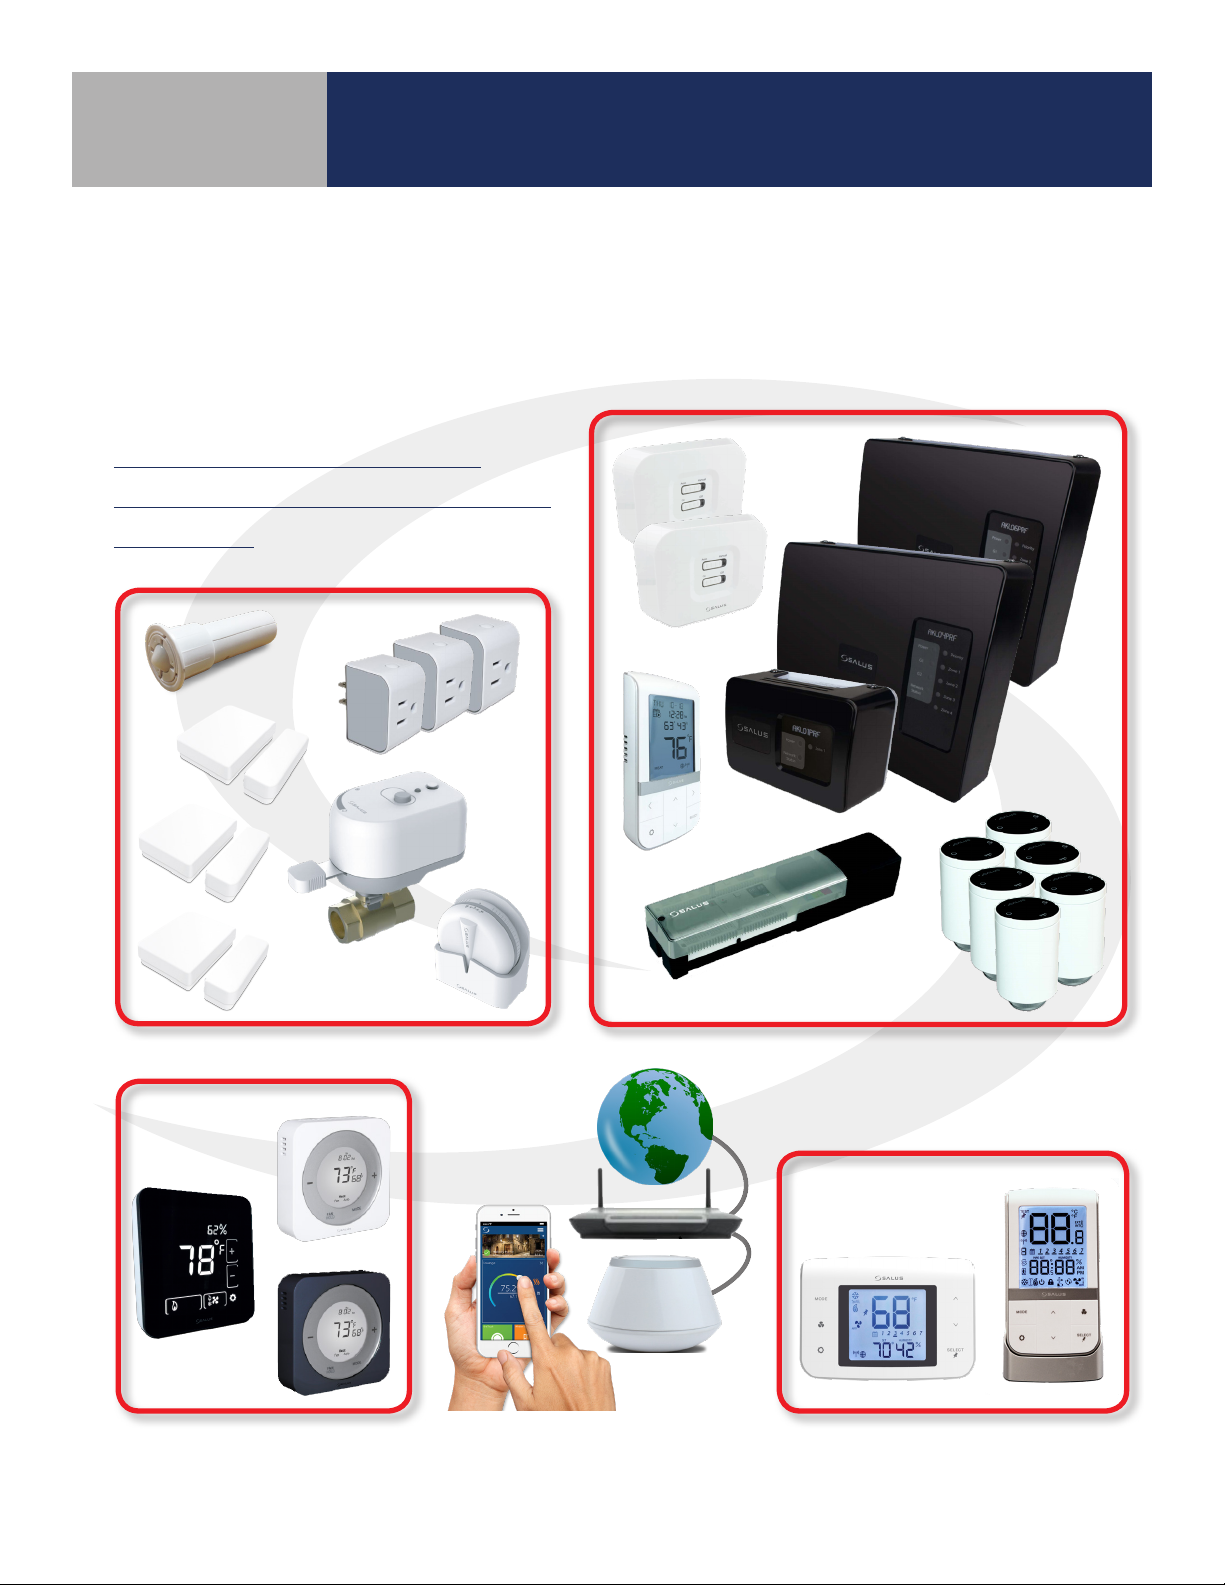
System Overview ...................................................................................................1-2
2 SG888ZB Gateway Installation & SALUS Smart Home Application Setup
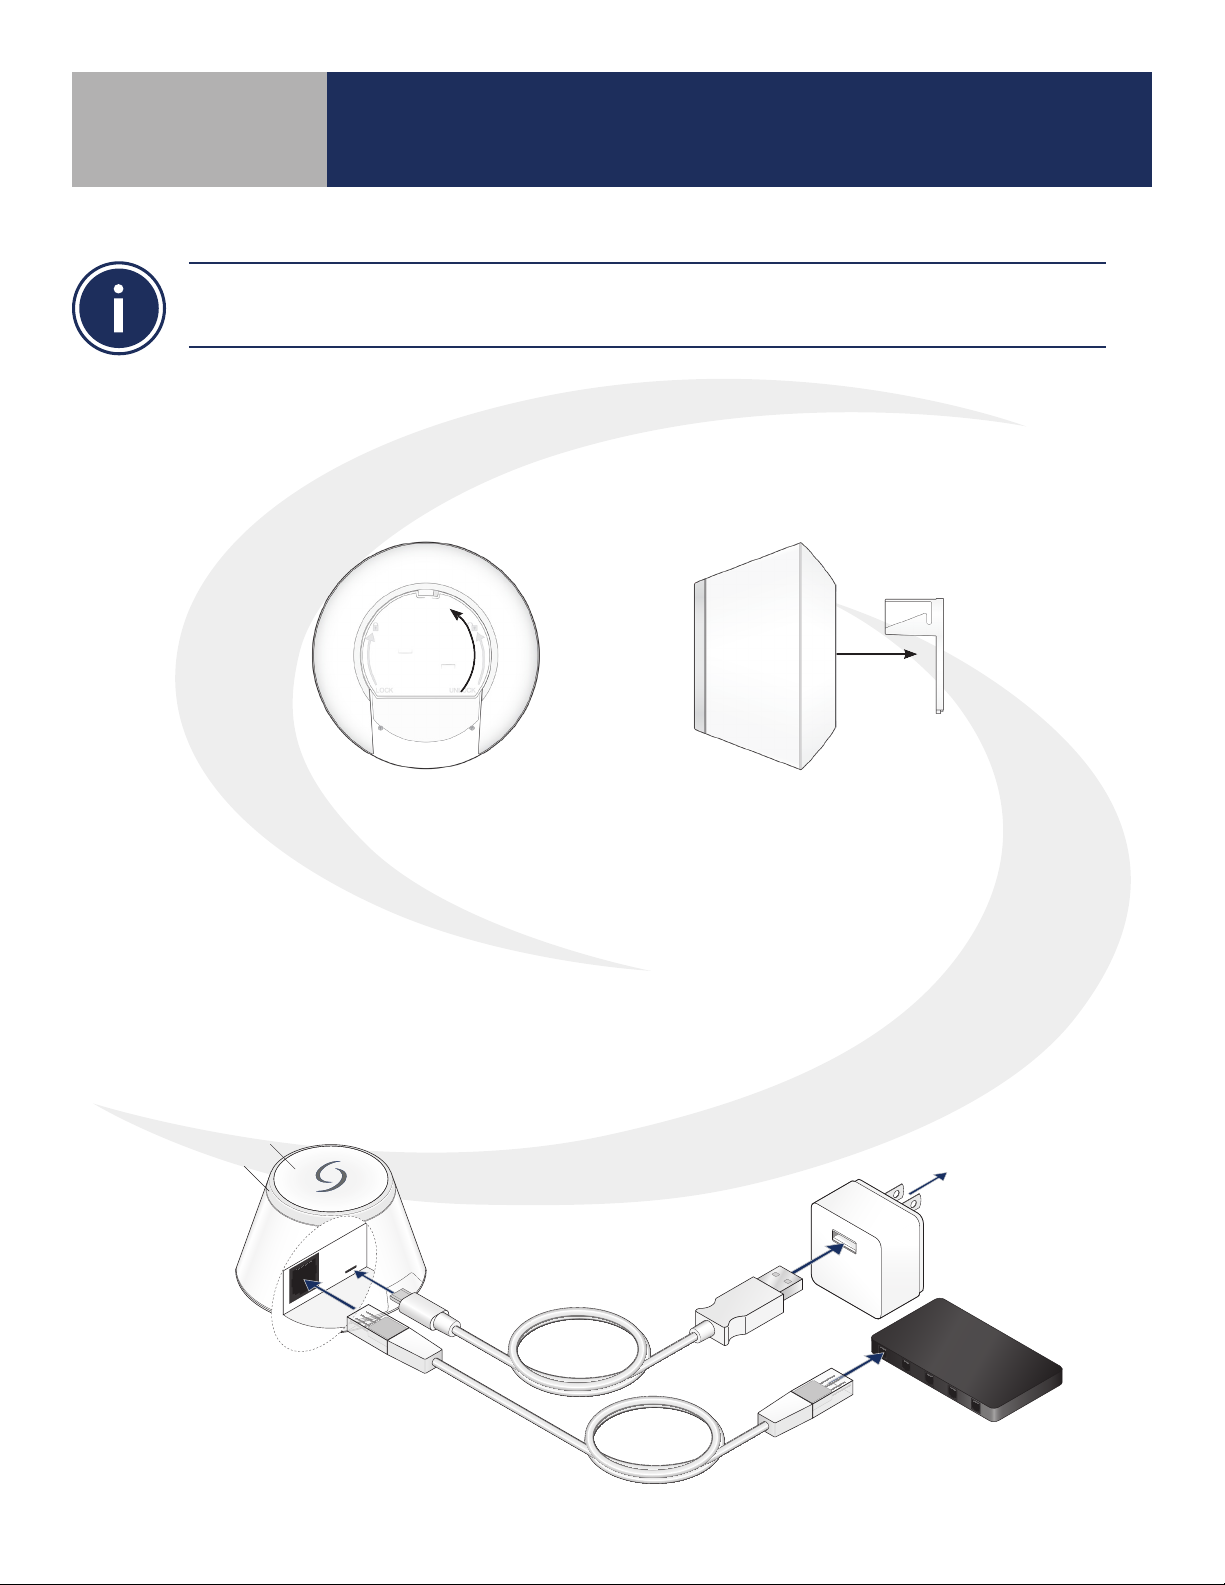
SG888ZB Gateway Installation.......................................................................................2-1
Smart Device Application Download ................................................................................2-3
Online Application Access...........................................................................................2-3
SALUS Smart Home Application Setup...............................................................................2-4
SG888ZB Gateway – wi Setup ......................................................................................2-5
3 SALUS Smart Home Dashboard
Dashboard Overview................................................................................................3-1
Using the Dashboard ...............................................................................................3-2
4 Profile Settings
My Prole...........................................................................................................4-1
Logout .............................................................................................................4-1
5 SALUS Smart Home Main Menu
Devices.............................................................................................................5-1
Gateway.......................................................................................................5-1
All Devices.....................................................................................................5-2
Add New Group ...............................................................................................5-2
Edit Group.....................................................................................................5-3
Add New Device ...............................................................................................5-4
Edit Device ....................................................................................................5-5
Device Alert Management .....................................................................................5-6
Automation ....................................................................................................5-7
Users and Permissions ..............................................................................................5-8
Status ..............................................................................................................5-8
6 Message Window & Status Bar
Message Window ...................................................................................................6-1
Status Bar...........................................................................................................6-2
7 Icons & Device Settings
Icons (Device, Group, Automation) ..................................................................................7-1
Device Settings .....................................................................................................7-1
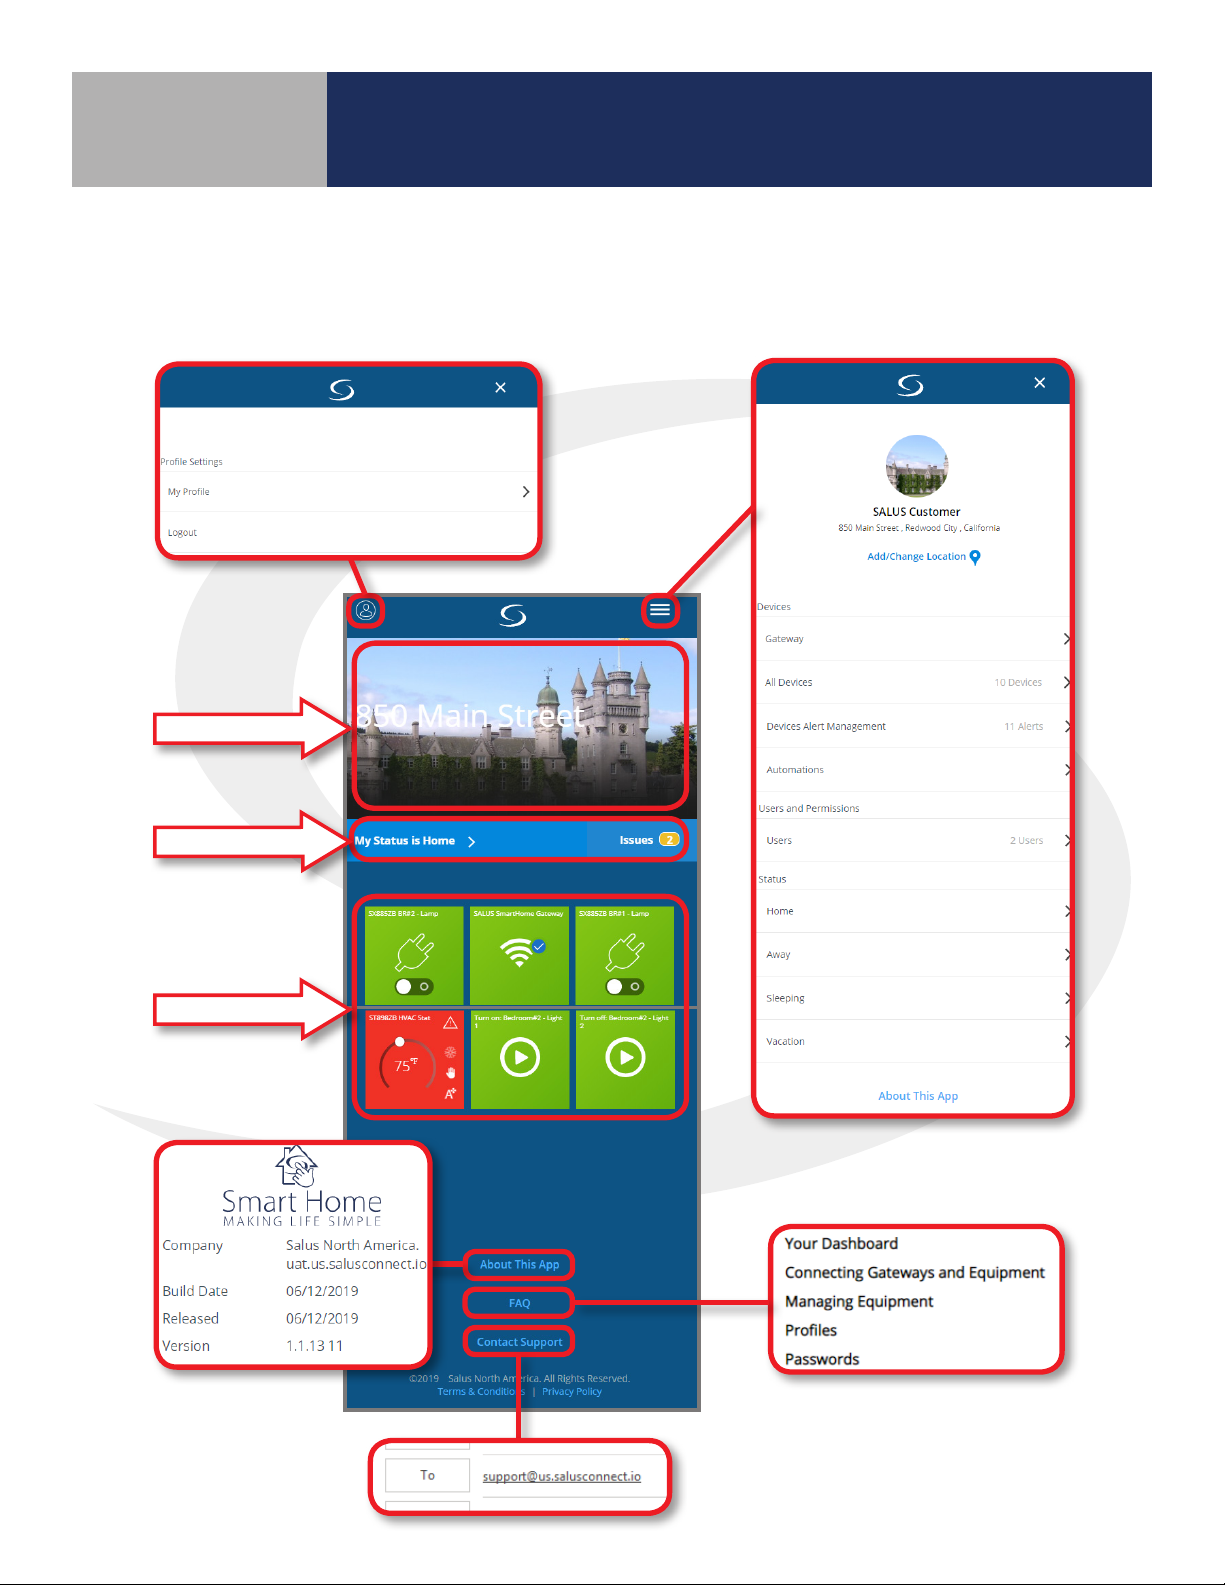
8 About this App/FAQ/Contact Support
About this App .....................................................................................................8-1
FAQ (Frequently Asked Questions)...................................................................................8-2
Contact Support ....................................................................................................8-3
SALUS Connected Wireless System Guide
Contents
Module 1
i

1-1
Introduction
Why SALUS?
Salus designs and manufactures industry-leading hydronics, HVAC, and fan coil products
for heating engineers and contractors who need to drive protability and deliver customer
satisfaction. Through our proven, innovative products, we enable contractors to provide
homeowners and building managers with the comfort and control they need, while reducing
installation times and minimizing costly call-backs. Our easy-to-install wireless hydronic controls,
and patented, industry-rst auto-balancing actuators are advancing the industry.
Salus also oers a broad ecosystem of smart home products, including connected thermostats, a
smart home hub, smart plugs, water valve shuto, and door and window sensors. A proven leader
in the European market since 2003, Salus is currently expanding across North America.
Using this Manual
For the latest Instructions go to: WWW.SALUSINC.COM
Special Attention Boxes
This manual uses special attention icons to alert the reader of important safety concerns, information
important to reliable operation of the controls or helpful installation/setup information.
Safety:
Indicates a condition which may cause severe personal
injury, death or major property damage
Important Information:
Indicates information which requires special attention
for correct operation of the control
Your Benet:
Indicates helpful installation or setup information
Section 1

1-2
Introduction
System Overview
The SALUS Wireless System uses Zigbee communications protocol to provide a universal language
for smart components to work together seamlessly and securely, with or without an internet
connection.
Section 1
SALUS Wireless System
Components with SG888ZB
Gateway
Wireless
Accessories Wireless Hydronic Controls
HVAC
Thermostats
Fan Coil
Controls
SG888ZB
Gateway

2-1
SG888ZB Gateway Installation & Setup
Section 2
Install the SG888ZB Gateway in a central location close to a 120 VAC electrical receptical and free
from radio frequency interference. If the SG888ZB Gateway is intended to be connected to the
internet, it must be close to an internet router for setup. Once the Gateway is connected to the
internet, a wi connection can be established and the Gateway can be moved to another location.
STEP 1. Conrm that all required parts are present in the Gateway package: Gateway with port
cover, Ethernet Cable, USB Power Cable, USB Power Adapter and Installation/Quick Start Guide.
To operate wirelessly with an internet connection, SALUS wireless devices must use the SG888ZB
Gateway. This section provides guidance for installation, joining the Zigbee network with or without an
internet connection and connection to the SALUS Smart Home application.
SG888ZB Gateway Installation
STEP 2. Remove the port cover from the bottom of the Gateway by twisting it ¼ turn
counterclockwise
STEP 3. If connecting the Gateway to the internet, attach the ethernet cable and the power cable to
the gateway only, making sure it is within easy reach of a router or ethernet connection
a) For best results, DO NOT CONNECT the power cable to electrical power outlet until after
ethernet cable is attached to the router
b) If no internet connection is intended, it is not necessary to attach the ethernet cable to
the Gateway
STEP 4. Reattach the port cover on the Gateway
STEP 5. Connect the ethernet cable to the Router if desired
STEP 6. Plug the USB Power Cable into the USB Adapter and connect it to a 120 VAC outlet
Wireless Internet
gateway
USB to
micro USB cable
USB power
adapter
To Internet router
(supplied by
network provider)
Plug into 120V outlet
Multi button
LED light ring
Ethernet cable

2-2
SG888ZB Gateway Installation & Setup
Section 2
STEP 7. When the SG888ZB Gateway is powered, the LED ring around the multi button will be solid
green. The LED will then turn red. Once an internet connection is available (if plugged
in to a router) the LED will turn green. Using the internet connection, the SG888ZB
Gateway will attempt connection to SALUS Smart Home services. If successful, the LED will
turn blue. If no interent connection is detected, the LED will be red.
Connected to
SALUS Smart Home
services.
Not Connected
to the Internet
Gateway is connected to the internet and
communicating with SALUS Smart Home services
Gateway is not connected
to the internet
Gateway is waiting
for device joining
Gateway is powering up and
attempting to establish connections
Gateway is in identify mode
Solid Blue
Solid Green Flashing Green
Solid Red Flashing Red
LED Indications

2-3
SG888ZB Gateway Installation & Setup
Section 2
Smart Device Application Download
Download the SALUS Smart Home application on your
IOS or Android device for remote access to your home
comfort system. After downloading the application,
follow the steps in section 4.1.1 to create a user prole
and set up an SG888ZB Gateway.
Online Application Access
To access your SALUS Smart Home features without a smart phone application, simply log on to: https://uat.
us.salusconnect.io/login.

2-4
SG888ZB Gateway Installation & Setup
Section 2
Choose “Set up an account”
at the bottom of the
screen. After creating a
prole and logging in,
the user is prompted to
activate a gateway.
See the installation
instructions for the
SG888ZB Gateway for
internet and power
connections.
The LED on the
Gateway will be blue
when the device
is connected to
the internet. Read
through the following
activation steps
before proceeding
to prevent a timeout
during activation.
Step 1.
Press the multi-
button on top
of the SG888ZB
Gateway to begin the
activation process.
After 2 minutes, the
activation sequence
will time out, so make
sure all required
information is
available.
The gateway serial
number will appear
once the connection is
initiated.
Step 2. Choose the
correct country, Hour
format and LED Mode.
Then scroll down.
Step 3. Enter the
street address, city,
sate and zip code
for the gateway
and choose a
Gateway name. This
information can
be updated after
activation.
After the SG888ZB
gateway is activated,
a rst-time welcome
message is displayed,
and a Gateway icon is
automatically pinned
to the dashboard.
Click the “x” in the
upper right-hand
corner to remove the
welcome message.
SALUS Smart Home Account Setup
Whether using a smart device or online application, the user will be prompted to set up a user account.

2-5
SG888ZB Gateway Installation & Setup
Section 2
SG888ZB Gateway – wi setup
Step 1. Select the Gateway Icon from the
SALUS Smart Home Dashboard.
Step 2. When the tile ips on the display, select
the icon title to access gateway settings.
Step 3. Scroll to the bottom of
the gateway setting screen and
choose “Scan for wi”.
Step 4. After the application nds available wi
networks, choose the applicable network.
Step 5. Disconnect the SG888ZB Gateway from the ethernet
connection. Be sure that the LED on the Gateway is blue,
indicating it is connected to the internet.
Step 6. Move the Gateway to the desired location.

3-1
SALUS Smart Home Dashboard
Section 3
With your SALUS Smart Home dashboard, you can eortlessly manage your equipment and connected
home from one screen. Here you can pin equipment to the dashboard, automate frequent tasks, and
monitor your gateway connection status and equipment states from a computer or smart device.
Dashboard Overview
Message Window
Status Bar
Device Icons

3-2
SALUS Smart Home Dashboard
Section 3
Choosing the gateway tile icon ips
the tile on the screen.
Click the “x” in the upper right corner
to ip the tile back. Choosing will
unpin the icon from the dashboard.
Choosing the gateway name in the
upper left provides access to options.
Edit the Gateway name by selecting . Clicking
will cause the SG888ZB LED to ash green,
identifying the Gateway. Use to access status
and setup information for the device. Choose
to toggle the pin-to-dashboard status.
Using the Dashboard Home Screen

4-1
Profile Settings
Section 4
The name, email address and phone number can be updated under, “My Prole” at any time. Scrolling
down, the user can choose the country, language, clock format, date format and temperature units. Once
the desired changes are made to the prole, press . An option to delete
the user prole is also available.
Logout
My Prole
Choosing the Logout
option will return the user
to the Sign in screen.
Choose the icon in the top header for the Prole menu.

5-1
Main Menu
Section 5
With your SALUS Smart Home dashboard, you can eortlessly manage your equipment and connected
home from one screen. Here you can pin equipment to the dashboard, automate frequent tasks, and
monitor your gateway connection status and equipment states from a computer or smart device.
Devices
Update and organize SALUS Smart Home Devices
Gateway
Update any of the settings entered during SG888ZB Gateway activation.

5-2
Main Menu
Section 5
Choosing add new group
prompts the user to name the
group and choose devices to
include from
the list of ungrouped
equipment.
Clicking the icon toggles
between pinned and not
pinned to the dashboard.
All Devices
Add, manage or group equipment.
ADD NEW GROUP
Groups are typically used in larger automation systems for keeping track of related equipment. For
smaller systems, it may not be desirable to group devices.

5-3
Main Menu
Section 5
Clicking on an existing device
group allows the user to edit
or delete the group. Use
to edit the group or select
“Delete Group” at the bottom
of the screen.
Clicking a device tile icon
enables access to the device
status, serial number, and
rmware version. In addition,
the user can make changes
to the display name of the
device and, if applicable,
change conguration and/or
schedules.
EDIT GROUP

5-4
Main Menu
Section 5
ADD NEW DEVICE
Before adding a new devices to your
SALUS Smart Home application, review the
installation instructions for the device to be
sure it is ready for connection. In many cases,
several devices may be added at the same
time. When all equipment is ready for pairing,
press “Scan for devices”.
The SALUS Smart Home
application will list of
all devices ready for
connection. For each
component to be
connected, click .
Press .
Give each device a
unique name for easy
identication on the
dashboard then press
.
Choose the to
setup any devices
where required.
Change parameters as desired
and then press .
Follow installation, pairing and setup instructions included with each device to nalize the pairing process.

5-5
Main Menu
Section 5
EDIT A DEVICE
To edit a device pinned
to the Dashboard, simply
click the green tile icon
that represents the device.
The tile ips on the screen
showing limited options.
For example, on a thermostat,
available options are changing the
operation mode (Heat/Cool/O)
or adjusting the target setpoint.
Note that the actual temperature
is on the below the bar, the target
setpoint is on the top.
Clicking the device name
in the upper left of the
tile allows the user more
setting options.
At the bottom of the option
screen is a choice to remove the
device. If this option is chosen,
the device will not be accessible
via the SALUS Smart Home
application.
Choosing a tile from Ungrouped Devices
or Categories works in the same way.

5-6
Main Menu
Section 5
Device Alert Management
Congure Device Alerts and Notications
Choosing Device Alert
Management from the
Main Menu provides
access to preset alerts
and allows users to
create custom alerts.
Click the symbol
expands the alert
description providing
details, the current status
and alerting criteria.
Click “Add an alert” to
create a custom alert.
Enter a name for the
alert and create an alert
by pressing the
symbol after the desired
criteria.
Set the condition,
notication method and
priority for the alert.
Press .
Press to review the alert details, current
status and alerting criteria.
Click to edit the
alert or to delete it.

5-7
Main Menu
Section 5
To set up an automation,
choose “Add a new
Automation” or choose
a shortcut to one from
the list of available
automations.
Example (choosing
from list): Check the
desired action and
scroll down to press
. A tile
for this automation
will be pinned to your
dashboard.
Example (Add a new
Automation): Choose
add a new Automation.
Name the Automation
and choose conditions
and criteria for the
automation.
Automations
Congure Automated Commands
If desired, choose the
Status in which the
automation is to be
applied. Press .
Select preference for
pinning the automation
to the dashboard. Press
.
Review and test the
automation using the
button.
Additional criteria and
timers may be added
depending on the device
chosen. Press .

5-8
Main Menu
Section 5
Users and Permissions
Add users and set permission levels
Click to add a new
user to your SALUS
Smart Home System.
Enter an email address
and choose access level
for new user.
Press .
The new user and
their access level are
displayed. Select to
Edit, Resend Invitation or
Remove Access for Users.
Update user level and
press .
Status
For each Status (HOME, AWAY, SLEEPING, VACATION) choose the temperature setpoint
and other parameters of the connected devices and equipment.
Other manuals for SG888ZB
4
Table of contents
Other Salus Microphone System manuals