Sammic CK-35V User manual

INSTRUCCIONES
USERS MANUAL
GEBRAUCHSANWEISUNG
MODE D’EMPLOI
INSTRUZIONI PER L’USO
MANUAL DE INSTRUÇÕES
Cortadora de hortalizas - cutter
Vegetable preparation machine - cutter
Gemüseschneidemaschine-Kutter
Coupe-légumes-cutter
Tagliatricediortaggi-cutter
Cortadora de hortaliças-cutter
ES
EN
DE
FR
IT
PT
CK-35V/38V
CK-45V/48V
CA-3V/4V
KE-5V/8V


3
- 3 -
1
2
3
4
5 6
7
8
9
10
11
12
13
14
15
16
(FIG 1)
(FIG 2)

4
- 4 -
(FIG 3) CK-35V/CK-38V/CA-3V
(FIG 4) CK-45V/CK-48V/CA-4V (FIG 5) CK-35V/CK-45V/KE-5V/CK-38V/CK-48V/KE-8V

5
- 5 -
FIG 1
1 - Texto informativo
2 - Representación tiempo. Solo modo cutter.
3 - Representación SensoForce motro.
4 - Giro inverso activado. Solo modo cutter.
5 - Detección cabezal cutter y giro eje. Solo modo cutter.
6 - Tiempo. Solo modo cutter.
7 - Detección cabezal cortadora y giro eje. Solo modo cortadora.
8 - Nivel de velocidad y RPM asociado.
9 - Pausa.
10 - Indicador avisos y errores.
FIG 2
Función Ajuste inicial
11 Modo cutter. Activación temporizador Visualización pantalla
12+13 Visualización parámetros en tiempo
real.
14 Motor ON / Motor OFF ----------
15 Modo cutter. Motor ON mientras
se pulsa. Selección idioma
16
Modo cutter. Activación giro inverso
motor.
Modo cortadora. Pulsando 3 sg
acceso a función SensoForce.
Visualización contadores
FIG 3 - Descripción técnica
A - Disco.
B - Rejilla.
C - Expulsor.
D - Teclado.
E - Tapa.
F - Tapa inferior.
G - Boca de evacuación.
H - Base.
I - Cierre de la tapa.
J - Tapa articulada y desmontable.
K - Tolva normal.
L - Tolva cilíndrica y mazo redondo.
M - Pisador.
N - Pasador desmontable.
O - Pasador desmontable.
Y - Bayoneta.
Z - Bayoneta cerrada.
AA - Bayoneta abierta.
FIG 4 - Descripción técnica
A - Disco.
B - Rejilla.
C - Expulsor.
D - Teclado.
E - Tapa.
F - Tapa inferior.
G - Boca de evacuación.
H - Base.
I - Cierre de la tapa.
J - Tapa articulada y desmontable.
K - Tolva normal.
L - Tolva cilíndrica y mazo redondo.
M - Pisador.
O - Pasador desmontable.
P - Llave broca y protector disco.
Q - Broca.
R - Protector disco.
FIG 5 - Descripción técnica
D - Teclado.
F - Tapa inferior.
H - Base.
S - Olla.
T - Cuchilla.
U - Tapa olla.
V - Manivela revolvedor.
W - Junta tapa olla.
X - Revolvedor
Y - Bayoneta.
Z - Bayoneta cerrada.
AA - Bayoneta abierta.

6
- 6 -
Cada máquina lleva las siguientes indicaciones:
- Nombre y dirección del fabricante: SAMMIC S.L - Basarte 1 Azkoitia.
Gipuzkoa (SPAIN)
- El número de serie se indica en la hoja de garantía y en la declaración de
conformidad.
MODELOS
Este manual describe la instalación, funcionamiento y mantenimiento de la
CK-35/38V y CK- 45/48V, CA-3V/4V y KE-5V/8V. La referencia del modelo
y sus características se indican en la placa de identicación colocada en
la máquina. Esta cortadora está diseñada y fabricada de acuerdo con las
directivas Europeas:
- Directiva de máquinas 2006/42/CE.
- Directiva de baja tensión 2014/35/CE.
- Directiva de compatibilidad electromagnética 2014/30/CE.
- Reglamento (CE) n° 1935/2004, sobre los materiales y objetos destinados
a entrar en contacto con alimentos
- Norma de aleaciones de aluminio moldeadas en contacto con alimentos
EN601-2005.
- Norma de higiene y materiales alimentarios: ANSI-NSF 8.
- Norma Cortadoras de Hortalizas: UNE-EN 1678.
- Norma Procesadores de alimentos y mezcla- doras: UNE-EN12852.
- Índice de protección según la norma UNE-EN 60529: Mandos IP-55 y el
resto de máquina IP- 23.
- Los modelos de 120V/60Hz/1~ cumplen con las normas UL-763 y CSAC22.2.
OBSERVACIONES IMPORTANTES
- Para reducir la posibilidad de accidentes (cortocir-
cuitos, heridas o incendios, etc.), obtener las mejores
prestaciones y una buena conservación de la máquina,
es necesario leer y seguir atentamente estas instruccio-
nes. Conserve las instrucciones y haga que todos los
usuarios de la maquina las lean antes de su utilización.
- Los discos (A), rejillas (B), y el conjunto cuchillas (T)
están provistos de cuchillas muy aladas, por tanto,
hay que manipularlas cuidadosamente tanto durante
el desembalaje, como durante el uso y limpieza de las
mismas y de la maquina. Se recomienda utilizar guantes
resistentes.
- Esta máquina es de uso vigilado. No dejar nunca la
máquina en marcha sin que alguien esté a su cargo.
- Antes de utilizar la máquina por primera vez, limpiar
la zona de contacto con alimentos con agua jabonosa
(templada), aclarar y dejarla secar.
- Al término de cada operación y antes de cualquier
intervención para cambio de herramientas o cabezales,
limpieza, revisión o reparación de la máquina, es obliga-
torio desconectar la máquina de la red.
- Este aparato no está destinado para ser usado por
personas (incluidos niños) cuyas capacidades físicas,
sensoriales o mentales estén reducidas, o carezcan de
experiencia o conocimiento, salvo si han tenido supervi-
sión o instrucciones relativas al uso del aparato por una
persona responsable de su seguridad.
- Los modelos citados en el manual han sido diseña-
dos para el uso en hostelería, restauración catering y
comercial, pero nunca para una fabricación industrial
continuada.
-El fabricante no se responsabilizará en aquellos casos
en el que el uso haya sido incorrecto o distinta al citado
anteriormente. Tales como, el uso sanitario, uso quími-
co, uso en atmosferas explosivas…
EMPLAZAMIENTO
Se recomienda colocar la máquina sobre una supercie estable que no
actúe como caja de resonancia, a una altura que sea cómoda y no produzca
fatiga. Colocar el recipiente de recuperación por debajo de la boca de salida
de los alimentos. La máquina no está sujeta y es fácilmente desplazable.
CONEXIÓN ELÉCTRICA
¡ATENCIÓN! ES OBLIGATORIA LA CONEXIÓN A TIERRA. PELIGRO DE
ELECTROCUCIÓN.
Comprobar que las características eléctricas del equipo coinciden con el
de la red.
El equipo se suministra para tensión de 230V 50-60 Hz monofásica o
120V50-60Hz monofásica.
Preparar una toma de corriente mural, con interruptor general de secciona-
miento, y protección diferencial y magneto-térmica de 2P (de 13A a 20A)
con su clavija correspondiente. Colocar un interruptor general o la clavija de
forma accesible para la desconexión de la máquina.
El variador está provisto de un ltro que conduce las perturbaciones
existentes a tierra. Por este motivo puede ocurrir que el diferencial de la
instalación actúe de forma intempestiva. Se recomienda utilizar un diferen-
cial propio para la máquina o uno del tipo “súper inmunizado”. Además, la
máquina está provista de un tornillo externo para la conexión a un sistema
equipotencial de tierra.
UTILIZACIÓN
- No dejar que la comodidad o la familiaridad con el producto (a base de
utilizarlo repetidamente) sustituya la estricta observancia de las normas de
seguridad, manténgase alerta, ponga atención a lo que hace y use el sentido
común al operar el equipo.
- No utilizar el equipo mientras esté cansado o bajo la inuencia de las dro-
gas, alcohol o medicamentos. Si utiliza la herramienta de forma no segura o
incorrecta, puede sufrir daños corporales o materiales.
- NUNCA abrir la tapa antes de que el motor se haya parado por completo.
- NUNCA suprimir los sistemas de bloqueo y de seguridad.
- NUNCA introducir la mano en la boca de salida o en las tolvas de introduc-
ción de alimentos.
- Sólo introduzca alimentos (nunca objetos) en las tolvas.
- NUNCA usar objetos externos para guiar los ingredientes en las tolvas de
entrada o de bocas de salida.
- No se debe sobrecargar la máquina.
- No ejercer excesiva presión con los pisadores, puede deteriorar el producto
y forzar el motor en exceso.
- Se recomienda hacer periodos de marcha de 30 minutos con descansos
de 10 minutos.
LIMPIEZA
- Es necesario desmontar y limpiar la máquina al término de cada día o cada

7
- 7 -
vez que se cambie de producto o de accesorio.
- Todos los elementos que están en contacto con los alimentos se deben
limpiar inmediatamente después de su utilización, con agua caliente y un
detergente admitido en alimentación. Después, aclarar con abundante agua
caliente y desinfectar con un paño suave impregnado en alcohol etílico (90
º).
- NO SE DEBEN utilizar detergentes abrasivos (agua-fuerte, lejía concen-
trada etc…) ni estropajos o rasquetas que contengan acero común. Pueden
causar la oxidación de la máquina.
- Se aconseja que los elementos desmontables de la CK y CA no sean intro-
ducidos en un lavavajillas para su limpieza. Los detergentes pueden producir
deterioro del aspecto supercial.
- NO SE DEBE limpiar el exterior de la máquina con un chorro directo de
agua. Emplear para su limpieza un paño húmedo y cualquier detergente
habitual.
MANTENIMIENTO
- Vericar periódicamente el funcionamiento de las seguridades de la
máquina. En caso de detectar alguna anomalía llamar al servicio técnico
reconocido por SAMMIC.
- Vericar periódicamente el estado del retén del eje de arrastre para preser-
var la estanqueidad
de esta zona. Cada vez que se suelte el eje de arrastre para el mantenimien-
to se recomienda colocar un retén nuevo.
- Si el cable de alimentación se deteriora es preciso instalar uno nuevo antes
de volver a utilizar la máquina. Dicho recambio sólo podrá ser realizado por
un servicio técnico reconocido por SAMMIC.
- El nivel de ruido de la máquina, en marcha y colocada a 1,6m de altura y a
1 m de distancia, es inferior a 70dB(A). Ruido de fondo:32dB(A).
FUNCIONES DEL CONTROL ELECTRÓNICO Y SU
FUNCIONAMIENTO
MARCHA/PARADA (14):
Pone en marcha el motor si todas las seguridades lo permiten. Una segunda
pulsación para el motor.
PULSE (15):
Solo en modo Cutter. El motor se pone en marcha mientras está pulsado
esta tecla y se para al soltarlo.
En los 3 primeros segundos al pulsarlo se accede al menú de selección de
idiomas.
FECHA INVERSA (16):
En modo cortadora pulsándolo durante 3 segundos accedemos a la función
SENSO FORCE. En él es posible ajustar el nivel donde tendremos la señal
acústica indicadora de que hemos llegado al nivel de fuerza con el pisador.
En modo Cutter pulsando la tecla cambiamos el sentido de giro del motor.
Se puede hacer con el motor en macha o parado.
En los 3 primeros segundos al pulsarlo se accede a los contadores que
registran el nivel de trabajo de la maquina.
SUBIR (11)
Cada pulsación incrementa el valor seleccionado en el visor. En los 3 prim-
eros segundos al pulsarlo aparece la versión del programa de la placa de
potencia.
BAJAR (12)
Cada pulsación disminuye el valor seleccionado en el visor. En los 3 primer-
os segundos aparece la versión del programa de la placa de mandos.
TEMPORIZADOR (13)
Solo en modo cutter. Pulsando activamos la función de cuenta atrás. Tras
seleccionar el tiempo, una segunda pulsación conrma el valor.
FUNCIONAMIENTO
Al conectar la máquina el “Visor” (1) visualiza dos rayas centrales (espera).
Si montamos el accesorio “Cortadora de Hortalizas” el visor visualiza el
icono Nº7 (representado un disco de corte) y si montamos el accesorio
“Cutter” el visor visualiza el icono Nº5 (representado el rotor) . Nos indica
que la placa de control ha identicado cada accesorio. También se visualiza
la velocidad en nivel y RPM asociado.
Se pueden seleccionar de 1 a 10 velocidades distintas en el modo de fun-
cionamiento “Cutter” y de 1 a 5 velocidades en el modo de funcionamiento
“Cortadora de Hortalizas”.
- Control de Tiempo: Solo es posible en modo de funcionamiento “Cutter”.
Es posible programar el tiempo para la cuenta atrás y la parada automática
del equipo.
- Si se pulsa marcha y alguna de las seguridades no esta en posición, en la
pantalla aparecerá el texto indicativo asociado.
PUESTA EN MARCHA FUNCIONAMIENTO GENERAL
Modo de funcionamiento “Cortadora de Hortalizas” (CK-35V/38V,
CA-3V/8V).
Con la máquina desconectada de red:
- Con el mecanismo de bayoneta (Y) abierto (AA), colocar el accesorio
“Cortadora Hortalizas” sobre el bloque motor de forma que los tres tetones
del accesorio se introduzcan dentro de los agujeros del mecanismo de
jación rápida. Cerrar (Z) el mecanismo de bayoneta (Y) para bloquear el
accesorio sobre el bloque motor.
- En la CK-35V/38V, CK-45V/48V es necesario colocar la tapa articulada (J)
según se indica en los dibujos, jándolos con el pasador(O).
- En la CK-35V/38V es necesario colocar el pisador (M) según se indica en
los dibujos jándolos con el pasador (N).
- En la CK-35V/38V, CK-45V/48V si se quiere utilizar el cabezal de tubos es
necesario colocarlo según se indica en los dibujos, jándolos con el pasador
(O).
Colocación de discos (A) y rejillas (B).
- Desbloquear el cierre (I), y abrir la tapa articulada (J).
- Colocar el expulsor (C) en su alojamiento del
eje de arrastre.
- La rejilla (B) se inserta en la cavidad de la tapa inferior (D) cuando el pro-
ceso lo requiera.
- Colocar un disco (A) en el eje de arrastre. Para ello introducir el disco (A)
en el eje de arrastre y girarlo en sentido horario hasta que quede encajado
en el eje de arrastre.
- En la CK-45V/48V y CA-4V roscar en el eje de arrastre la broca (Q) o el
revolvedor (R) según el producto a cortar.
- Bajar la tapa articulada (J) y bloquear el cierre(I).

8
- 8 -
Conectar la máquina, y el visor visualizará el icono Nº7 (representado un
disco de corte) y la velocidad en nivel y RPM asociado. Es posible modicar
la velocidad con el motor en marcha o parado.
Con la tapa articulada (J) cerrada y el pisador (M) abajo, si pulsamos
“Marcha” (7) el motor arranca. El icono Nº7 empieza a girar indicando el
movimiento del motor.
Con el motor parado, la tapa articulada (J)cerrada y el pisador (M) arriba,
si pulsamos “Marcha”(7), aparece el icono “Pause” y el texto indicativo de
que es necesario bajar el pisador. Al bajar el pisador (M) el motor arranca.
Con el motor en marcha si subimos el pisador
(M) el motor se para. Al bajar el pisador (M) el motor vuelve a arrancar
automáticamente. Si en 30s no se ha bajado el pisador (M) es necesario
volver a pulsar el pulsador de “Marcha” (7) para poder arrancar la máquina.
Con el motor en marcha si se abre la tapa articulada (J), el motor se para.
Al cerrar la tapa articulada (J) es necesario volver a pulsar el pulsador de
“Marcha” (7) para poder arrancar la máquina.
Si se deja la máquina en marcha con el pisador
(M) abajo, a los 30 minutos la máquina se para automáticamente.
Si se pulsa marcha y alguna de las seguridades no esta en posición, en la
pantalla aparecerá el texto indicativo asociado.
Función FORCE CONTROL:
- Cuando el motor está en marcha mediante el aro 3 de la pantalla se
representa el nivel de fuerza que esta haciendo el motor. Cuando el nivel
se acerca a las posiciones rojas indica que el motor va forzado. Este nivel
varía según las características del producto que se está procesando y la
intensidad que se pisa el pisador.
- Es posible programar una señal acústica para que el usuario sepa que se
ha llegado a un nivel de fuerza determinado. Esto es útil para hacer siempre
la misma fuerza y conseguir una calidad de corte homogénea.
- Al bajar el pisador hacer fuerza hasta oír la señal acústica que indica que
hemos alcanzado el nivel de fuerza deseado. No superar este nivel de fuer-
za para tener el mismo corte durante todo el proceso.
- Para determinar la señal acústica mantener pulsado durante 3s la tecla de
giro inverso C. Así se accede al menú donde se programa el nivel a la cual
el control nos dará la señal acústica indicativa. Pulsar de nuevo la misma
tecla D para salir del menú.
Funcionamiento con la tolva normal (J) y pisador (M). CK-35V/38V y
CA-3V.
- Es necesario que el mazo (L) esté alojado y bloqueado en su oricio. Esto
se hace girándolo en el sentido antihorario.
- Poner en marcha la cortadora.
- Levantar el pisador (M). El motor separa.
- Introducir los productos en la tolva normal(J).
- Al empezar a bajar el pisador (M) el motor arranca y empieza el proceso
de corte. Empujar el producto bajando suavemente el pisador (M). Repetir
la operación una y otra vez.
- Pulsar “Parada” (A) al terminar la producción.
Funcionamiento con la tolva normal (K) de entrada y pisador (M).
CK-45V/48V y CA-4V.
- Es necesario que el mazo (L) esté alojado y bloqueado en su oricio. Esto
se hace girándolo en el sentido antihorario.
- Poner en marcha la cortadora.
- Levantar el pisador (M) y girarlo en sentido antihorario para liberar la zona
de introducción de alimentos de la tolva normal (K). El pisador (M) se puede
dejar apoyado sobre el soporte pisador (M). El motor se para.
- Introducir los productos en la tolva normal (K).
- Al girar el pisador (M) en sentido horario el motor arranca y empieza el
proceso de corte. Empujar el producto bajando suavemente el pisador (M).
Repetir la operación una y otra vez.
- Pulsar “Parada” (4) al terminar la producción.
Funcionamiento con tolva cilíndrica (L). CK- 35V/38V, CK-45V/48V,
CA-3V/4V.
Esta tolva de Ø55mm se utiliza para el corte de productos cilíndricos y alar-
gados, como las zanahorias, endivias, pepinos, etc.
- Poner en marcha la cortadora.
- Desbloquear el mazo (L) girándolo en el sentido horario.
- aIntroducir los productos por el orico y empujarlos suavemente con el
“Mazo”(L). Repetir la operación una y otra vez.
- Pulsar “Parada” (A) al terminar la producción.
IMPORTANTE: Cuando no se utiliza la tolva cilíndrica, dejar el mazo (L)
dentro de la tolva.
Funcionamiento de la CK-35V/38V, CK- 45V/48V y CA-3V/4V con cabe-
zal de tubos.
- Es necesario que el cabezal de tubos esté montado y bloqueado.
- Poner en marcha la cortadora.
- Ir introduciendo los productos por los agujeros superiores del cabezal de
tubos. A los 30 minutos la cortadora automáticamente se para. Si se quiere
seguir trabajando volver a pulsar macha.
- Pulsar “Parada” (4) al terminar la producción.
Modo de funcionamiento “Cutter”. (CK-35V/38V, CK- 45V/48V y
KE-5V/8V):
Con la maquina desconectada de red:
Con el mecanismo de bayoneta (Y) abierto (AA), colocar el accesorio
“Cutter” sobre el bloque motor de forma que los tres tetones del accesorio
se introduzcan dentro de los agujeros del mecanismo de jación rápida.
Para que la máquina funcione el asa tiene que colocarse justo encima del
teclado. Cerrar (Z) el mecanismo de bayoneta (Y) para bloquear el accesorio
sobre el bloque motor.
Colocar el “Conjunto de cuchillas” (T) y cerrar la tapa (U) girándola en senti-
do antihorario hasta que quede encajada y bloqueada. La tapa (U) va provis-
ta de un oricio para la incorporación de producto mientras la máquina está
funcionando y de un conjunto rascador que girándolo revuelve el contenido
de la olla (S) para que el procesado sea más homogéneo.
Al conectar la máquina, la pantalla visualiza el icono Nº5 (representado el
rotor) junto con el nivel de velocidad y la RPM asociada. Es posible modicar
la velocidad del motor en marcha o parado.
El motor se pone en marcha al pulsar la tecla de marcha A, y está en marcha
hasta volver a pulsar la misma tecla o la tecla PULSE B. También arranca
y está en marcha mientras se mantenga pulsada la tecla de PULSE B. Con
el motor en marcha el icono gira.
Es posible cambiar el sentido de giro del motor pulsando la tecla C, tanto con
el motor en marcha como parado. En la pantalla aparece el icono asociado
y el nivel de velocidad se representa con el signo “-“ indicando inverso. Con
el motor en marcha el icono gira en sentido inverso.
Cada vez que se coloca el caldero (cada elaboración nueva) y el motor se
pone en marcha aparece un contador que cuenta el tiempo que dura dicha
elaboración. Este tiempo se resetea únicamente al retirar el caldero.
Si al colocar el caldero se pulsa la tecla RELOJ “D” se puede programar
el tiempo de cuenta atrás. Se acepta pulsando de nuevo la misma tecla o
poniendo en marcha el motor empezando así la cuenta atrás. El temporiza-
dor tiene el aro indicativo (2) asociado para tener una referencia visual de
cuánto falta para el n del proceso. Cuando el tiempo llega a cero el motor
se para y se escucha un pitido indicativo.

9
- 9 -
Función FORCE CONTROL:
Cuando el motor esta en marcha mediante el aro 3 de la pantalla se repre-
senta el nivel de fuerza que esta haciendo el motor. Cuando se el nivel se
acerca a las posiciones rojas indica que el motor va forzado. Este nivel varia
según las características del producto que se esta procesando.
LIMPIEZA
Limpieza de accesorio “Cortadora Hortalizas” CK-35V/38V, CK-
45V/48V y CA-3V/4V:
- Desbloquear el cierre (I) y abrir la tapa articulada(J).
- En la CK-45V/48V y CA-4V, sujetando el disco (A) con la mano sin tocar las
cuchillas, utilizar la llave (P) suministrada junto con la máquina para desmon-
tar la broca (Q) o el revolvedor (R), desenroscándolo en sentido antihorario.
- Retirar el disco (A) girándolo en sentido horario y tirando de él hacia arriba
cuidadosamente. Retirar la rejilla (B) y el expulsor (C).
- En la CK-35V/38V y CA-3V es posible desmontar el pisador (M) y la tapa
articulada (J) para facilitar su limpieza. Para ello hay que desmontar los
pasadores (N y O).
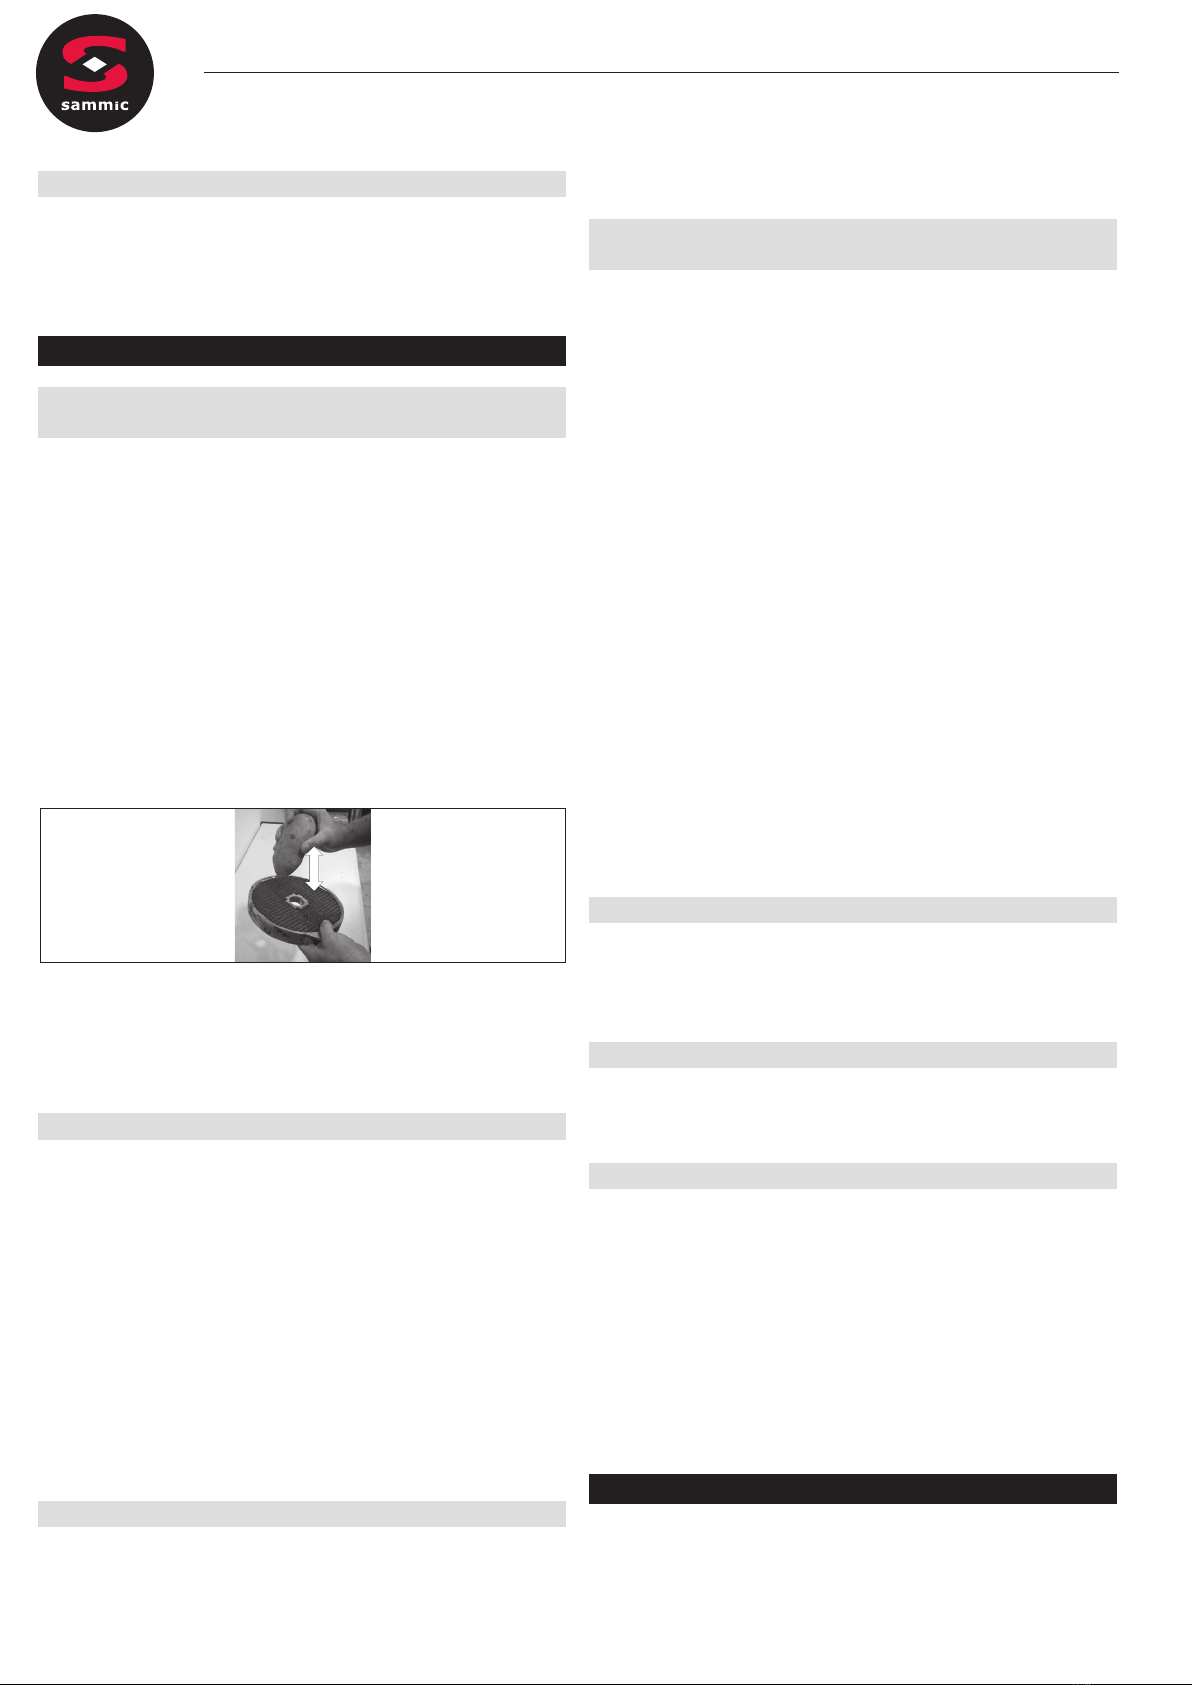
ATENCION: Para poder retirar los productos encajados en las rejillas
(B) basta con golpearlas con una patata alargada o una zanahoria
entera en el sentido de corte. De esta forma no se daña la rejilla (B).
Tener precaución con el lo de la rejilla (B). Nunca utilizar objetos
duros para golpear la rejilla(B).
También existe en el catalogo de Sammic un limpiador de rejillas para las
rejillas FMC-8D y FMC-10D.
Los discos ralladores SH están diseñados de tal forma que la chapa se
puede separar del armazón para su limpieza.
Limpieza de accesorio “Cutter” (CK-35V/38V, CK- 45V/48V y KE-5V/8V):
- Si la suciedad esta seca, adherida a la olla y a las cuchillas, poner agua
caliente y detergente en la olla y hacer funcionar a la máquina para que los
residuos se ablanden.
- Para evitar salpicaduras, una vez procesado el producto, quitar la tapa (U),
colocar la seguridad de la bayoneta (Y) en posición abierta (AA) y quitar la
olla (S) con la cuchilla dentro(T).
- Es posible desmontar el revolvedor (V+X) de la tapa (U). Para ello, man-
teniendo jo el revolvedor (X), apretar y girar la manivela revolvedor (V).
Una vez realizadas estas operaciones se puede separar el revolvedor y la
manivela revolvedor. Para montar de nuevo el revolvedor, introducir de nuevo
el revolvedor (X) en la tapa (U) y la manivela revolvedor (V) en el revolvedor
(X). Empujar el revolvedor (X) y la manivela revolvedor (V) contra la tapa
y girar la manivela revolvedor (X) hasta llegar al tope. Una vez ejecutadas
estas acciones separar el revolvedor (X) y la manivela revolvedor (V).
Limpieza del bloque motor CK:
El exterior de la máquina NO SE DEBE limpiar con un chorro directo de
agua. Emplear para su limpieza un paño húmedo y cualquier detergente
habitual. NO SE DEBEN utilizar detergentes abrasivos (agua fuerte, lejía
concentrada etc…) ni estropajos o rasquetas que contengan acero común,
pueden causar la oxidación de la máquina.
Accesorio “Cortadora Hortalizas”: Funcionamiento de discos (A) y
rejillas (B).
- Discos (A):
- Discos (A) FC-1+ y FC-2+ para cortar patatas “chips” o rodajas nas de
1 y 2mm.
- Discos (A) de FC-3D a FC-25+ para obtener rodajas de 3 a 25mm de
patatas, zanahorias, remolachas, coles, pepinos, calabacines, cebollas,
rábanos, etc.
- Discos (A) con cuchilla curva, para productos blandos, FCC-2+, FCC-3+ y
FCC-5+ para cortar en rodajas toma1te, naranja, limón, plátano, manzana,
etc.
- Discos (A) ralladores tipo SH, desde 2 a 7mm, para deshilar verduras y
rallar queso, pan, nueces, almendras, etc.
Para cortar patatas del tipo “paja” y “cerilla”, tiras de zanahorias, apio, remo-
lacha, etc., discos (A) FCE-2+ , FCE-4+ y FCE-8+
- Discos (A) SH-1 y SH-8 para rallar el pan, queso, chocolate, etc.
- Discos (A) y rejillas (B). Combinaciones posibles:
- Los discos(A) FC-6D, FC-8D, FC-10D combinadas con las rejillas(B), FFC-
8+ y FFC-10+ se obtienen patatas del tipo “fritas”.
- Los discos (A) FC-3D, FC-6D, FC-8D, FC-10D y FC-
14D combinados con las rejillas (B) FMC-8D, FMC- 10D y FMC-14D, se
obtienen dados y/o cubos de 3 a 14 mm de patatas para tortillas, de hortal-
izas y frutas para macedonia, ensalada rusa, etc.
- Los discos (A) FC-20+ y FC-25+ combinados con las rejillas (B) FMC-20+
y FMC-25+ se obtienen dados y/o cubos de 20x20 y 25x25.
- Existe en el catalogo de Sammic un limpiador de rejillas para las rejillas
FMC-8D y FMC-10D.
Broca (Q) y Revolvedor (R). CK-45V/48V y CA-4V.
- Broca (Q): Es utilizada exclusivamente para trabajos en col o similares.
Gracias a ella es posible cortar piezas enteras.
- Eje revolvedor(R): Hay que utilizarlo con todos los productos menos la col
y similares.
Expulsor alto y normal (C).
- Expulsor alto: Para corte de productos voluminosos como la col, la colior,
el apio y para el rallado de productos como queso, zanahorias...
- Expulsor normal: Resto de cortes.
Accesorio “Cutter”.
Mediante el accesorio “Cutter” se puede:
PICAR: Perejil, ajo, cebolla, queso, jamón coci- do, carne cocinada, etc...
SALSAS: Tomate, mayonesa, tártara, alioli, verde, gazpacho, etc...
PURES: Legumbres, verduras, compotas, etc... PASTAS: Gambas, mejil-
lones, ostras, carne, embutidos, etc...
SOPAS / CREMAS: Marisco, ajo, verduras, legumbres, carne, etc...
MANTEQUILLAS DE SABORES: Ajo, perejil, nas hierbas, anchoas, etc...
En repostería:
PICAR: Almendras, avellanas, chocolate, pasas, frutas para macedonia, etc...
PREPARAR: Azúcar glass, pasta de almendras, batir nata; crema de choc-
olate, vainilla, café, fresas y frutas en general, etc...
AFILADO DE CUCHILLAS
ATENCION: Los discos (A), rejillas (B) y el conjunto cuchillas (T) están
provistos de cuchillas muy aladas, por tanto hay que manipularlas
cuidadosamente.

10
- 10 -
Las cuchillas de los discos (A) y del Conjunto Cuchillas (T) se desmontan
fácilmente para poder alarse. Para su alado emplear siempre piedras
blandas conservando el ángulo de corte de la cuchilla.
INCIDENCIAS DE FUNCIONAMIENTO
Estando la máquina preparada para su funcionamiento al pulsar “Marcha”
(A) la máquina no arranca y en el display aparece el mensaje indicativo de
la acción a realizar. Puede que el sensor asociado no se detecte.
- Vericar que todos los componentes están en posición.
- Si tras vericar el punto anterior el error persiste, hay algún problema
en alguna de las seguridades. Llamar a un servicio técnico autorizado por
Sammic,S.L.
- No se enciende la pantalla: El cable plano que une la placa de potencia
y la de control se a soltado o dañado o la placa electrónica de control está
estropeada.
- Para vericar que el teclado funciona correctamente con algún accesorio
montado, pulsar las teclas y vericar que la placa emite un pitido y el display
reacciona. Si no es así cambiar el teclado.
- La máquina estaba en marcha y se ha parado sin pulsar ninguna tecla. Si
estando la máquina en marcha sin actuar sobre ningún dispositivo se para
automáticamente a los 30 minutos.
En modo Cortadora de Hortalizas al bajar el pisador (M) el motor no arranca:
- Si se deja el pisador (M) abierto más de 30 sg es necesario volver a pulsar
“Marcha” (7) para rearmar la cortadora.
- En la CK-35V/38V/45V/48V y CA-3V/4V puede que la tolva esté demasi-
ado llena y el pisador (M) no actúe sobre el micro. Vaciar parte de la tolva
he intentarlo de nuevo.
- Si el ruido de la CK es excesivo, el disco (A) o el Conjunto Cuchillas (C)
roza en alguna parte. Es probable que los rodamientos del eje principal se
haya deteriorado.
El equipo cuenta con protecciones propias que actúan para protegerse y
no dañar partes importantes del mismo. Estas protecciones se representan
con el triangulo rojo (1) y el aro (2) encendidos junto con el texto indicativo.
Que aparezcan esas protecciones no indica que el equipo esté dañado, sino
que ha detectado un estado que ha sido programado para que se proteja.
Para resetear la protección pulsar de nuevo marcha (A). Si el aviso persiste
y no permite funcionar correctamente al equipo, contactar con el servicio
autorizado por SAMMIC. Los avisos que se dan son registrados para poder
ser consultados.
Además de la función FORCE CONTROL que nos permite controlar el
estado del motor, es posible visualizar algunos parámetros de la máquina
mientras esta funcionando. Si mantenemos pulsados a la vez las teclas
de subir y bajar, en la parte superior de la pantalla aparecen 4 números
que de izquierda a derecha nos indican: Intensidad del motor, potencia del
motor, temperatura del modulo de IGBTs y la temperatura en el interior de
la máquina.
Intensidad motor: Decimas de Amperio.
Potencia motor: W
Temperature IGBT: ºC
Temperatura interior: ºC
Si alguna de las alarmas persiste o se sobrepasan los valores indicados en
el manual, vericar y valorar si el trabajo que se está realizando es propor-
cinado e intentar adecuarlo en fuerza y periodo de reposo para tener los
parámetros dentro de márgenes y no hacer saltar las protecciones. Si se
estima que es una anomalía de la máquina contactar con el servicio técnico
autorizado por Sammic.
AJUSTES INICIALES
Conectar la máquina y en los primeros tres segundos si pulsamos:
PULSE (B): Es posible seleccionar el idioma para los mensajes que da la
máquina. Seleccionar el idioma mediante las teclas subir (D) o bajar (E) y
pulsar marcha (A) o desconectar la máquina para salir.
FLECHA INVERSA (C): Accedemos a los contadores que van registrando
el nivel de uso de la máquina. Pulsando subir (D) y bajar (E) vamos viendo:
0 HPOW: Horas conectado a alimentación.
1 HCUT: Horas motor en marcha modo Cutter.
2 HCOR: Horas motor en marcha modo Cortadora Hortalizas.
3 NARR: Número de arranques del motor.
4 NMTERM: Número de maniobras térmicos del motor.
5 NMCIER: Número de maniobras de cierre de bayoneta.
6 NMTAPA: Número de maniobras de la tapa cortadora de hortalizas.
7 NMPCA: Número de maniobras del pisador de la cortadora de hortalizas
y la tapa del Cutter.
Para resetear los contadores mantener pulsado el pulsador de Marcha/
Parada durante 3 segundos.
TEMPORIZADOR (F): Enciende todos los iconos de la pantalla.
BAJAR (E): Aparece la versión de la placa.
SUBIR (D): Aparece la versión del programa.

FIG 1
1 - Informative text
2 - Time display Cutter mode only
3 - SensoForce motor display
4 - Reverse rotation activated Cutter mode only
5 - Detection of cutter head and shaft rotation Cutter mode only
6 - Time Cutter mode only
7 - Detection of cutter head and shaft rotation Cutter mode only
8 - Speed level and associated RPM
9 - Pause
10 - Alert and error indicator
FIG 2
Function
Initial settings
11
Cutter mode Timer activation
Screen display
12+13
Real-time parameter display.
14
Motor ON / Motor OFF
----------
15
Cutter mode Motor ON while
pressed
Select language
16
Cutter mode Activate reverse motor
rotation
Cutter mode Pressing for 3 sec
accesses SensoForce function
Counter display
FIG 3 - Technical description
A - Disk
B - Screen
C - Ejector
D - Keyboard
E - Lid
F - Lower lid
G - Evacuation outlet
H - Base.
I - Lid closure
J - Articulated removable lid
K - Standard hopper
L - Cylindrical hopper and round mallet
M - Plunger
N - Removable pin
O - Removable pin
Y - Bayonet
Z - Bayonet closed
AA - Bayonet open
FIG 4 - Technical description
A - Disk
B - Screen
C - Ejector
D - Keyboard
E - Lid
F - Lower lid
G - Evacuation outlet
H - Base.
I - Lid closure
J - Articulated removable lid
K - Standard hopper
L - Cylindrical hopper and round mallet
M - Plunger
O - Removable pin
P - Bit key and disk protector
Q - Drill bit
R - Disk protector
FIG 5 - Technical description
D - Keyboard
F - Lower lid
H - Base.
S - Pressure pot
T - Blade
U - Pressure pot lid
V - Mixer crank
W - Pot lid gasket
X - Mixer
Y - Bayonet
Z - Bayonet closed
AA - Bayonet open
EN
-11-

Each machine bears the following indications:
-Manufacturer’s name and address: SAMMIC S.L. - Basarte 1 Azkoitia. Gipuzkoa (SPAIN)
-The serial number is printed on the Warranty Card and in the Declaration of Conformity.
MODELS
This manual describes the installation, operation and maintenance of the CK-35/38V and CK- 45/48V, CA-3V/4V and KE-5V/8V. The reference of the
model and its specifications are indicated on the nameplate on the machine. This cutter machine has been designed and manufactured in accordance
with the following European directives:
-Machinery Directive 2006/42/EC.
-Low Voltage Directive 2014/35/CE.
-Electromagnetic Compatibility Directive 2014/30/CE.
-Regulation (EC) No. 1935/2004 on materials and articles intended to come into contact with food
-EN 601-2005 Standard: aluminium alloy cast materials and articles designed to be in contact with food.
-Hygiene and food materials standard: ANSI-NSF 8.
-Vegetable cutting machines standard: UNE-EN 1678.
-Food processors and blenders standard UNE-EN 12852.
-Protection index according to the UNE-EN 60529 standard: Controls IP-55 and rest of machine IP-23
-The 120V/60Hz/1 ~ models comply with the UL-763 and CSAC22.2 standards.
IMPORTANT OBSERVATIONS
Read and follow these instructions attentively to reduce the risk of accidents (short circuits, injuries or fires, etc.),
to get the best performances from the machine and to ensure proper maintenance of the same. Keep the
instructions and ensure that all users of the machine read them before use.
-Since they are fitted with very sharp blades it is important to handle the disks (A), grids (B) and blade
assembly (T) with great care during unpacking, use and cleaning of the machine and its parts. The use of
safety gloves is recommended.
-This machine is for supervised use. Never leave the machine running without supervision.
-Clean the food contact area with lukewarm soapy water, rinse and allow to dry before using the machine
for the first time.
-The machine must be unplugged from the mains at the end of each operation and before any intervention
to change tools or heads, cleaning, review or repair.
-This machine is not designed for use by people (including children) with reduced physical, sensory or mental
capabilities or lacking the necessary experience or knowledge unless they have received supervision or
instructions from a health and safety expert.
-The models cited in the manual have been designed for use in hotels, restaurants, catering and retail
establishments but should never be used for continuous industrial manufacturing.
-The manufacturer declines all responsibility for improper use or uses different from those mentioned above,
such as for sanitary use, tasks involving chemicals or use in explosive atmospheres.
PLACEMENT
It is recommended to place the machine at a comfortable height on a stable surface that does not act as a sounding board. Place the collector under the
food outlet. The machine is not secured and can be moved easily.
ELECTRICAL CONNECTION
WARNING! THE EARTHING CONNECTION IS MANDATORY ELECTROCUTION HAZARD
Check that the machine's electrical specifications match the mains power supply.
The unit is designed for a 230 V 50-60 Hz single-phase or 120 V 50-60 Hz single phase power supply.
Prepare a wall-mounted socket with a general cut-out switch, differential residual current and 2-pole magneto-thermal circuit breakers (13 to 20 A) and
the associated plug. Place a general switch or the plug in an accessible place to disconnect the machine.
The variable frequency drive is fitted with a filter to derive the disturbances to earth. For this reason, the differential residual current circuit breaker may
act unexpectedly. It is advisable to use a suitable residual current device or a super immunised RCD for this machine. The machine is also fitted with an
external screw for connection to an equipotential earth connection system.
INSTRUCTIONS FOR USE
EN
-12-

-Do not allow convenience or familiarity with the product (due to using it repeatedly) to take the place of strict compliance with the safety standards. Stay
alert, pay attention to what you are doing and use common sense when operating the unit
-Do not use the machine while you are tired or under the influence of drugs, alcohol or medication. You may suffer personal injury or material damage if
you use the tool in an unsafe or incorrect manner.
-NEVER open the lid before the motor has completely stopped.
-NEVER attempt to bypass the blocking or safety systems.
-NEVER put your hand in the food outlet or the feeding hoppers.
-Only insert foodstuffs (never objects) into the hoppers.
-NEVER use external objects to guide the ingredients in the feeding hoppers or outlets.
-The machine must not be overloaded.
-Refrain from exerting excessive pressure with the plungers as this may damage the product and overload the motor.
-30-minute working periods with 10-minute breaks are recommended.
CLEANING
-Disassemble and clean the machine at the end of each day or each time you change the product or accessory.
-All components in contact with the food must be cleaned immediately after use using hot water and a food-safe detergent. Then rinse with abundant hot
water and disinfect using an ethyl alcohol-soaked cloth (90º).
DO NOT use abrasive detergents (nitric acid, neat bleach, etc.) or non-stainless steel scourers or scrubbers. They may cause the machine to rust.
-The removable parts of the CK and CA should not be washed in a dishwasher. The detergents can damage the surface finish.
-DO NOT clean the outside of the machine with a direct stream of water. Use a damp cloth and any common detergent for cleaning.
MAINTENANCE
-Regularly check that the machine’s safety devices are working properly. Call the SAMMIC authorised technical service if you detect any anomaly.
-Regularly inspect the drive shaft seal to ensure that the surrounding area is properly protected.
Installing a new seal is recommended every time the drive shaft is loosened for maintenance.
-If the power cable is damaged, a new one must be installed before the machine is used again. Only a SAMMIC authorised technical service may perform
this replacement.
-The noise level in operation is less than 70 dB(A) with the machine placed at a height of 1.6 m and a distance of 1 m. Background noise: 32dB (A).
FUNCTIONS AND OPERATION OF THE ELECTRONIC CONTROL
ON/OFF (14)
Starts the motor if none of the safety devices impedes it. Pressing a second time stops the motor.
PRESS (15)
Only in Cutter mode. The motor starts and runs as long as this key is held down and stops when it is released.
The language selection menu is accessed during the first 3 seconds when this key is pressed.
REVERSING (16)
Pressing this key in cutter mode for 3 seconds accesses the SENSO FORCE function. SensoForce enables the user to adjust the level at which the
acoustic alert indicates that the plunger has reached the desired force.
In Cutter mode, pressing this key changes the rotation direction of the motor. This can be done with the motor running or stopped
The counters that record the work level of the machine are accesses during the first 3 seconds when the key is pressed.
INCREASE (11)
Each time the key is pressed the setting on the display increases. The program version of the power panel appears in the first 3 seconds.
DECREASE (12)
Each time the key is pressed the setting on the display decreases. The program version of the control panel appears in the first 3 seconds.
TIMER (13)
Only in cutter mode. Pressing activates the countdown function. After selecting the time, a second press confirms the selection.
OPERATION
EN
-13-

Two lines are displayed in the centre of the screen (1) when the machine is switched on. Icon number 7 (representing a cutting disk) is displayed if the
“Vegetable Cutter” accessory is mounted and Icon number 5 (representing a rotor) is displayed if the “Cutter” is mounted. This shows that the control
panel has identified each attachment. The speed level and the associated RPM are also displayed.
Speed levels from 1 to 10 can be selected in Cutter mode and from 1 to 5 in “Vegetable Cutter” mode.
-Time control: Only available in “Cutter” mode. The countdown time and automatic shut-down can also be set.
-The appropriate informative text will appear on the screen if “Start” is pressed while any of the safety devices out of position.
START-UP AND GENERAL OPERATION
"Vegetable Cutter" operating mode (CK-35V/38V, CA-3V/8V).
With the machine disconnected from the mains:
-With the bayonet mechanism (Y) open (AA), place the "Vegetable Cutter" accessory on the motor block so that the three lugs are inserted into the holes
of the quick-lock mechanism. Close (Z) the bayonet mechanism (Y) to lock the accessory on the motor block.
-The hinged cover (J) on the CK-35V/38V and CK-45V/48V must be fitted as indicated in the drawings and secured with the pin (O).
-The plunger (M) on the CK-35V/38V must be placed as indicated in the drawings and secured with the pin (N).
-If you wish to use the tube head with the CK-35V/38V and CK-45V/48V, it must be placed as indicated in the drawings and secured with the pin (O).
Fitting the disks (A) and grids (B)
-Open the lock (I) and open the hinged lid (J).
-Place the ejector (C) in its housing in the
dive shaft.
-The grid (B) is inserted into the cavity in the lower cover (D) when the process so requires.
-Fit a disk (A) on the drive shaft. To do so, insert the disk (A) onto the drive shaft and turn it clockwise until it engages with the shaft.
-On the CK-45V/48V and CA-4V, thread the bit (Q) or the mixer (R) - depending on the product to be cut - onto the drive shaft.
-Close (J) and lock (I) the hinged cover.
Start the machine and Icon number 7 (represented by a cutting disk), the speed level and its associated RPM will be displayed on the screen. The speed
can be adjusted with the motor running or stopped.
Pressing "Run" (7) with the hinged lid (J) closed and the plunger (M) down will start the motor. Icon 7 will begin to rotate, indicating that the motor is
engaged.
The “Pause” icon will be displayed if "Start" (7) is pressed with the motor stopped, the hinged lid (J) closed and the plunger (M) up, indicating that the
plunger must be lowered. The motor will start up when the plunger (M) is lowered.
The motor will stop if the plunger (M) is raised.
The motor re-starts automatically when the plunger (M) is lowered. The "Start" button (7) must be pressed again to start the motor if the plunger (M) is
kept in the raised position for more than 30 seconds.
The motor will stop if the hinged lid (J) is opened. The “Start" button (7) must be pressed again to start the machine once the hinged lid (J) has been
closed.
The machine will stop automatically after
30 minutes if it is left running with the plunger (M) in the lowered position.
An indicative text will appear on the screen if any of the safety devices is out position.
FORCE CONTROL function
-With the motor running, ring 3 on the screen indicates load under which it is working. When the indicator approaches the red zone, it means that the
motor is nearing overload. This level varies depending on the features of the product being processed and the force exerted by the plunger.
- An acoustic signal to warn the user that a certain level of force has been reached can be configured. This is useful to ensure that constant force is applied
to obtain uniform cutting.
-Increase the load on the plunger until the acoustic signal sounds, indicating that the desired level of force has been reached. Maintain this load without
increasing the force to obtain uniform cutting throughout the process.
-To set the acoustic signal, hold down the reverse rotation button (C) for 3 seconds to access the menu with which to set the load level at which the
acoustic signal will sound. Press the same key (D) again to exit the menu.
Operation with standard hopper (J) and plunger (M) CK-35V/38V and CA-3V.
-The mallet (L) must be housed and locked in its hole. Rotate it anti-clockwise to do so.
-Start the machine.
-Raise the plunger (M). The motor will stop.
-Insert the products into the standard hopper (J).
-The motor will start and the cutting process begin once the user begins to press down on the plunger (M). Feed the product by gently lowering the
plunger (M). Repeat the process as many times as required.
-Press "Stop" (A) once production has finished.
Operation with the standard intake hopper (K) and plunger (M). CK-45V/48V and CA-4V.
-The mallet (L) must be housed and locked in its hole. Rotate it anti-clockwise to do so.
-Start the machine.
EN
-14-

-Lift the plunger (M) and turn it anti-clockwise to release the food insertion area of the standard hopper (K). The plunger (M) can be left resting on the
plunger support (M). The motor will stop.
-Insert the products into the standard hopper (K).
-The motor starts and the cutting process begins when the plunger (M) is rotated clockwise. Feed the product by gently lowering the plunger (M). Repeat
the process as many times as required.
-Press “Stop” (4) to finish.
Operation with cylindrical hopper (L). CK-35V/38V, CK-45V/48V and CA-3V/4V.
This Ø 55 mm hopper is used to cut long, cylinder-shaped vegetables such as carrots, endives, cucumber, etc.
-Start the machine.
-Release the mallet (L) by rotating it clockwise.
-Insert the products through the hole and push them gently with the “Mallet" (L). Repeat the process as many times as required.
-Press "Stop" (A) once production has finished.
IMPORTANT: Leave the mallet (L) inside the cylindrical hopper when the latter is not in use.
Operation of the CK-35V/38V, CK- 45V/48V and CA-3V/4V with tube head.
-The tube head is must be mounted and locked in place.
-Start the machine.
-Insert the products through the upper holes in the tube head. The cutter will stop automatically after working for 30 minutes. To continue, press “Start”
again.
-Press “Stop” (4) to finish.
"Cutter” operating mode (CK-35V/38V, CK- 45V/48V and KE-5V/8V)
With the machine disconnected from the mains:
-With the bayonet mechanism (Y) open (AA), place the "Cutter" accessory on the motor block so that the three lugs are inserted into the holes of the
quick-lock mechanism. The handle must be placed just above the keypad for the machine to operate. Close (Z) the bayonet mechanism (Y) to lock the
accessory on the motor block.
Fit the "Blade assembly" (T) and close the lid (U) by turning it anticlockwise until it is engaged and locked. The lid (B) has a hole through which to feed the
product while the machine is operating and a scraper which, when rotated, stirs the contents of the vessel (S) so that they are processed more evenly.
When the machine is switched on the screen will display Icon No. 5 (represented by the rotor) together with the speed level and the associated RPM. The
speed can be adjusted with the motor running or stopped.
The motor starts when the “Start” key (A) is pressed and will run until the same key is pressed again or the PULSE B key is held down. It also starts and
runs while the PULSE B key is held down. The icon rotates while the motor is running.
The motor rotation direction can be reversed by pressing the C key, either with the motor running or stopped. The associated icon appears on the screen
and the speed level is represented by the "-" sign, indicating reverse. With the motor running the icon then rotates in the opposite direction.
Each time the bowl is fitted (with each new process) and the motor starts, a counter appears that counts the duration of the process. This time is reset
only when the bowl is removed.
The countdown time can be set by pressing the CLOCK "D" key when fitting the bowl. Accept by pressing the same key again or starting the motor. The
countdown will then start. The timer has an associated indicator circle (2) that provides a visual reference of the time remaining until the end of the process.
When the time reaches zero the motor stops and a “beep” is emitted.
FORCE CONTROL function
With the motor running, ring 3 on the screen indicates load under which it is working. When the indicator approaches the red zone, it means that the motor
is nearing overload. This level varies depending on the features of the product being processed.
CLEANING
Cleaning of the "Vegetable Cutter" accessory CK-35V/38V, CK- 45V/48V and CA-3V/4V:
-Release the lock (I) and open the hinged cover (J).
-On the CK-45V/48V and CA-4V, holding the disk (A) with your hand without touching the blades, use the key (P) supplied with the machine to remove
the bit (Q) or the mixer (R), unscrewing it anticlockwise.
-Remove the disk (A) by turning it clockwise and carefully pulling it upwards. Remove the grid (B) and the ejector (C).
-In the CK-35V/38V and CA-3V the plunger (M) and hinged lid (J) can be dismantled for cleaning. The pins (N and O) must be removed to do so.
WARNING: To be able to remove the products embedded in the grids (B), simply tap them in the cutting direction with an elongated potato or
a whole carrot. This prevents damaging the grid (B). Take care with the edge of the grid (B). Never use hard objects to tap the grid (B).
There is also a grid cleaner in the Sammic catalogue for the FMC-8D and FMC-10D grids.
The SH grater disks are designed so that the plate can be separated from the frame for cleaning.
Cleaning the "Cutter" accessory (CK-35V/38V, CK- 45V/48V and KE-5V/8V):
EN
-15-

-Pour hot water and detergent into the pot and switch the machine on to soften the residue if the fouling is dry and adheres to the pot and the blades.
-To avoid splashes, once the product has been processed, remove the lid (U), place the bayonet safety mechanism (Y) in the open position (AA) and
remove the pot (S) with the blade inside (T).
-The mixer (V+X) can be removed from the lid (U). Holding the mixer (X) in place, tighten and turn the mixer crank (V) to do so. The mixer and the mixer
crank can be separated once these operations have been performed. To reassemble the mixer, insert the mixer (X) into the lid (U) again and the mixer
crank (V) into the mixer (X). Push the mixer (X) and the mixer crank (V) against the lid and turn the mixer crank (X) until it reaches the end stop. Separate
the mixer (X) and the mixer crank (V) once these actions have been performed.
Cleaning the CK motor block:
-The outside of the machine must NEVER be cleaned with a direct jet of water. Use a damp cloth and any common detergent for cleaning. DO NOT use
abrasive detergents (nitric acid, neat bleach, etc.) or non-stainless steel scourers or scrubbers.
“Vegetable Cutter" attachment: Operation of disks (A) and grids (B)
-Disks (A):
-Use disks (A) FC-1+ and FC-2+ to cut potatoes chips or thin 1 and 2-mm slices.
-Disks (A) from FC-3D to FC-25+ to obtain 3 to 25-mm slices of potatoes, carrots, beet, cabbage, cucumber, zucchini, onions, radishes, etc.
-Disks (A) with curved blade for soft products, FCC-2+, FCC-3+ and FCC-5+ to cut tomato, orange, lemon, banana, apple, etc into slices.
-SH-type grater disks (A) 2-7 mm to shred vegetables and grate cheese, bread, nuts, almonds, etc.
-Discs FCE-2, FCE-4 and FCE-8 to cut potato "matchsticks” and carrot, celery, beetroot strips, etc.
-Disks (A) SH-1 and SH-8 to grate bread, cheese, chocolate, etc.
-Disks (A) and grids (B). Possible combinations:
-Disks (A) FC-6D, FC-8D, FC-10D combined with grids (B) FFC-8+ and FFC-10+ to obtain chip-style potatoes.
-Disks (A) FC-3D, FC-6D, FC-8D, FC-10D and FC-
14D combined with grids (B) FMC-8D, FMC-10D and FMC-14D to 3 to 14-mm cubes of potatoes to make tortillas or of vegetables and fruit for fruit salad,
Russian salad, etc.
-Disks (A) FC-20+ and FC-25+ combined with grids (B) FMC-20+ and FMC-25+ make 20x20 and 25x25 cubes.
-There is a grid cleaner for the FMC-8D and FMC-10D grids in the Sammic catalogue.
Bit (Q) and Mixer (R). CK-45V/48V and CA-4V.
-Bit (Q): It is only used when working with cabbage and similar vegetables. It is used to cut whole pieces.
-Mixer shaft (R): It must be used with all food except cabbage and similar vegetables.
High and standard ejector (C).
-High ejector: For cutting bulky products such as cabbage, cauliflower, celery and for grated products such as cheese, carrots, etc.
-Standard ejector: For all other cutting jobs.
“Cutter” attachment
Using the "Cutter" accessory you can:
CHOP: Parsley, garlic, onion, cheese, cooked ham, cooked meat, etc.
SAUCES: Tomato, mayonnaise, tartar, garlic mayonnaise, green sauce, gazpacho, etc.
PUREES: Pulses, vegetables, spreads, etc. PASTA: Prawns, mussels, oysters, meat, sausages, etc.
SOUPS / CREMES: Seafood, garlic, vegetables, legumes, meat, etc.
FLAVOURED BUTTER: Garlic, parsley,
fine herbs, anchovies, etc. Cakes, desserts and pastry:
CHOP: Almonds, hazelnuts, chocolate, raisins, fruit for fruit salad, etc.
PREPARE: Powdered sugar, almond paste, whip cream; creamed chocolate, vanilla, coffee, strawberries and fruit in general, etc.
SHARPENING THE BLADES
WARNING: The discs (A), grids (B) and blade assembly (T) have very sharp edges and must be handled with extreme care.
The disc blades (A) and blade assembly (T) can be removed easily for sharpening. Always use soft stone to avoid damaging the blades’ cutting angle.
TROUBLESHOOTING
The machine fails to start on pressing "Start" (A) when it is ready for operation and the message indicating the action to be performed appears on the
display. The associated sensor may not be working.
-Check that all of the components are in position.
-There is a problem with one of the safety devices if the problem persists. Call a SAMMIC authorised technical service.
-The screen fails to turn on: The flat cable that connects the power and control boards is loose or damaged or the electronic control panel is faulty.
-To verify that the keypad is working properly, press the keys with an accessory fitted and verify that the plate emits a beep and the display is activated.
Otherwise, change the keyboard.
EN
-16-

- The machine was running and stopped without any key being pressed. If the machine is running it will stop automatically after 30 minutes without human
intervention.
In the Vegetable Cutting mode the motor will not start when the plunger (M) is in the lowered position.
-Press "Start" (7) again to reset the cutter IF the plunger (M) is left open for more than 30 seconds.
-On the CK-35V/38V/45V/48V and CA-3V/4V the hopper may be too full and the plunger (M) may not activate the microswitch. Reduce the amount of
product in the hopper and try again.
-The disk (A) or the blade assembly (C) may be rubbing on another part if the machine is excessively noisy. The main shaft bearings have probably
deteriorated.
The unit has its own protection devices that are activated when damage to important components is likely. These protections are represented by a red
triangle (1) and a circle (2) lit simultaneously with the explanatory text. Display of these indicators does not mean that the equipment has been damaged
but it has detected a status that triggers the programmed protection. Press Start (A) again to reset the protection system.. Contact the authorised SAMMIC
technical service if the alert persists and does not permit normal operation of the machine. These alerts are recorded in a log that can be consulted.
In addition to the FORCE CONTROL function that enables users to monitor the status of the motor, it is also possible to display some of the machine’s
parameters while it is running. Pressing and holding the up and down keys simultaneously will display four numbers that indicate the following (from left
to right): Motor intensity, motor power, IGBT module temperature and the internal temperature of the machine.
Motor intensity: Tenths of an Ampere
Motor power: W
IGBT temperature: ºC
Internal temperature: ºC
If any of the alerts persists or if the values indicated in the manual are exceeded, check and asses if the work being done is proportional and try to adjust
it in load and rest period to keep the parameters within the proper ranges to avoid tripping the protections, If you consider that the machine is at fault,
contact Sammic’s authorised technical service.
INITIAL SETTINGS
Pressing the following keys with the machine turned on enables the following functions
PRESS (B): Enables selection of the language of the messages the machine displays. Select the language using the up (D) or down (E) keys and press
Start (A) or disconnect the machine to quit.
BACK ARROW (C): Accesses the counters that record the level of use of the machine. Pressing up (D) and down (E) displays:
0 HPOW: Hours connected to power supply.
1 HCUT: Hours with motor running in Cutter mode.
2 HCOR: Hours with motor running in Vegetable Cutting mode.
3 NARR: Number of motor starts.
4 NMTERM: Number of motor thermal manoeuvres.
5 NMCIER: Number of bayonet closing manoeuvres.
6 NMTAPA: Number of manoeuvres of the vegetable cutting lid.
7 NMPCA: Number of manoeuvres of the vegetable cutter plunger and the cutter lid.
Press and hold the Start/Stop button for 3 seconds to reset the counters.
TIMER (F): Turns on all the screen’s icons.
DOWN (E): The panel version is shown.
UP (D): The program version is shown.
EN
-17-

ABB. 1
1 - Hinweistext
2 - Zeitdarstellung. Nur im Cutter-Modus.
3 - Darstellung SensoForce-Motro.
4 - Umkehrbetrieb aktiviert. Nur im Cutter-Modus.
5 - Erkennung des Cutter-Kopfes und Achsdrehung. Nur im
Cutter-Modus.
6 - Zeit. Nur im Cutter-Modus.
7 - Erkennung Schneidkopf und Achsdrehung. Nur im
Schneidemodus.
8 - Geschwindigkeitsstufe und entsprechende RPM.
9 - Pause.
10 - Warn- und Fehleranzeige.
ABB. 2
Funktion
Erste Einstellung
11
Cutter-Modus. Aktivierung
Zeitschaltuhr
Bildschirmanzeige
12+13
Echtzeitanzeige der Parameter.
14
Motor ON / Motor OFF
----------
15
Cutter-Modus. Bei Drücken ist der
Motor ON.
Sprachauswahl
16
Cutter-Modus. Aktivierung des
Umkehrbetriebs des Motors.
Schneidemodus. 3 s lang drücken,
um auf die Funktion SensoForce
zuzugreifen.
Anzeige der Zähler
ABB. 3 - Technische Beschreibung
A - Scheibe.
B - Gitter.
C - Auswurf.
D - Tastenfeld.
E - Deckel.
F - Untere Abdeckung.
G - Ablauföffnung.
H - Sockel.
I - Deckelverschluss.
J - Abnehmbarer Klappdeckel.
K - Normaler Trichter.
L - Zylindertrichter und Rundstopfer.
M - Andrückvorrichtung.
N - Herausnehmbarer Stift.
O - Herausnehmbarer Stift.
Y - Bajonett.
Z - Geschlossenes Bajonett.
AA - Geöffnetes Bajonett.
ABB. 4 - Technische Beschreibung
A - Scheibe.
B - Gitter.
C - Auswurf.
D - Tastenfeld.
E - Deckel.
F - Untere Abdeckung.
G - Ablauföffnung.
H - Sockel.
I - Deckelverschluss.
J - Abnehmbarer Klappdeckel.
K - Normaler Trichter.
L - Zylindertrichter und Rundstopfer.
M - Andrückvorrichtung.
O - Herausnehmbarer Stift.
P - Spindelschlüssel und Scheibenschutz.
Q - Spindel.
R - Scheibenschutz.
ABB. 5 - Technische Beschreibung
D - Tastenfeld.
F - Untere Abdeckung.
H - Sockel.
S - Topf.
T - Messer.
U - Topfdeckel.
V - Handkurbel für Rührwerk.
W - Topfdeckeldichtung.
X - Rührvorrichtung
Y - Bajonett.
Z - Geschlossenes Bajonett.
AA - Geöffnetes Bajonett.
DE
-18-

Jede Maschine ist mit folgenden Angaben gekennzeichnet:
-Name und Anschrift des Herstellers: SAMMIC S.L - Basarte 1 Azkoitia. Gipuzkoa (SPANIEN)
-Serien-Nr. auf dem Garantieschein und in der Konformitätserklärung.
MODELLE
Dieses Handbuch beschreibt die Installation, den Betrieb und die Wartung der Modelle CK-35/38V und CK-45/48V sowie CA-3V/4V und KE-5V/8V. Die
Referenznummer des Modells und dessen Merkmale sind auf dem Typenschild der Maschine angegeben. Dieser Gemüseschneider wurde im Einklang
mit folgenden Europäischen Richtlinien entwickelt und hergestellt:
-Maschinenrichtlinie 2006/42/EG
-Niederspannungsrichtlinie 2014/35/CE.
-Richtlinie zur elektromagnetischen Verträglichkeit 2014/30/CE.
-Verordnung (EG) Nr. 1935/2004 über Materialien und Gegenstände, die dazu bestimmt sind, mit Lebensmitteln in Berührung zu kommen
-Norm für Aluminiumlegierungen, die mit Nahrungsmitteln in Berührung kommen EN601-2005.
-Norm für Hygiene- und Materialanforderungen Nahrungsmittelindustrie: ANSI-NSF 8.
-Norm für Gemüseschneider: UNE-EN 1678.
-Norm für Lebensmittelverarbeitungs- und Mischgeräte: UNE-EN12852.
-Schutzklasse gemäß der Norm UNE-EN 60529: Bedienelemente IP-55, übrige Teile der Maschine IP- 23.
Die Modelle mit 120V/60Hz/1~ erfüllen die Normen UL-763 und CSAC22.2.
WICHTIGE HINWEISE
-Um mögliche Unfälle (Kurzschlüsse, Verletzungen, Brände, etc.) zu reduzieren sowie die beste Leistung und
eine optimale Erhaltung der Maschine zu erreichen, müssen die nachfolgenden Anweisungen gelesen und
befolgt werden. Bewahren Sie die Anweisungen auf und achten Sie darauf, dass sämtliches Personal diese vor
der Verwendung der Maschine liest.
-Scheiben (A), Gitter (B) und Messersatz (T) verfügen über sehr scharfe Messer, die sowohl beim Auspacken
als auch beim Gebrauch und Reinigen der Maschine mit äußerster Vorsicht behandelt werden müssen. Es
sollten widerstandsfähige Handschuhe verwendet werden.
-Diese Maschine ist für den beaufsichtigten Gebrauch bestimmt. Der unbeaufsichtigte Betrieb der Maschine
ist streng untersagt.
-Vor der ersten Inbetriebnahme der Maschine müssen die Lebensmittelkontaktmaterialien mit Seifenlauge
(lauwarm) gereinigt, abgespült und trocknen gelassen werden.
-Nach jedem Gebrauch und bevor Schritte zum Wechseln von Werkzeugen oder Köpfen, Reinigen,
Überprüfen oder Reparieren der Maschine ausgeführt werden, ist es zwingend notwendig, die Maschinen
vom Netz zu trennen.
-Dieses Gerät darf weder von Kindern noch von Personen mit körperlichen, sensorischen oder geistigen
Einschränkungen bedient werden oder von Personen, die nicht über die nötige Erfahrung und Qualifikation
verfügen, außer letztere wurden in Bezug auf die Bedienung des Gerätes von der für ihre Sicherheit
verantwortlichen Person überwacht und eingewiesen.
-Die in der Gebrauchsanweisung aufgeführten Modelle wurden für den Gebrauch in der Gastronomie, im
Catering und Gewerbe konzipiert und sind jedoch nicht für eine kontinuierliche industrielle Fertigung
bestimmt.
-Der Hersteller übernimmt keine Haftung für Schäden, die aufgrund von inkorrektem Gebrauch oder anderer
Verwendung als oben genannt erfolgen. Beispiele hierfür sind die Verwendung im Gesundheitswesen, im
Chemiebereich oder in explosiven Umgebungen…
STANDORT
Es wird empfohlen, die Maschine auf einer stabilen Oberfläche abzustellen, die nicht als Resonanzkörper wirkt und über eine ausreichende Höhe verfügt,
um ein bequemes und möglichst ermüdungsfreies Arbeiten zu ermöglichen. Der Auffangbehälter muss unter dem Nahrungsmittelauslass gestellt werden.
Die Maschine wird nicht befestigt und kann leicht an einen anderen Ort bewegt werden.
ELEKTRISCHER ANSCHLUSS
ACHTUNG! DIE ERDUNG DES GERÄTS IST VORSCHRIFT. GEFAHR EINES STROMSCHLAGS.
Vergewissern Sie sich, dass die elektrischen Merkmale des Geräts mit denen des Stromnetzes übereinstimmen.
DE
-19-

Dieses Gerät ist für eine einphasige Spannung von 230 V, 50–60 Hz, bzw. von 120 V, 50 bis 60 Hz geeignet.
Sehen Sie eine Wandsteckdose mit allgemeinem Trennschalter, Fehlerstromschutz und thermo-magnetischem 2-poligen Schutzschalter (13 A bis 20 A)
sowie den entsprechenden Stecker vor. Bringen Sie einen Hauptschalter oder den Stecker so an, dass dieser zum Abschalten der Maschine zugänglich
ist.
Der Regler ist mit einem Filter ausgestattet, der die Störungen zur Erdung leitet. Aus diesem Grund kann es vorkommen, dass der Fehlerstromschutz der
Installation unbeabsichtigt ausgelöst wird. Es wird empfohlen, für die Maschine eine eigene Fehlerstrom-Schutzeinrichtung oder einen
„superimmunisierten“ FI-Schalter zu verwenden. Außerdem besitzt die Maschine eine externe Schraube für den Anschluss an ein System mit
Erdpotenzial.
VERWENDUNG
-Auch wenn Sie bereits bestens mit dem Produkt vertraut sind, ist es unerlässlich, dass die Sicherheitsmaßnahmen strikt eingehalten werden, Sie bei
der Verwendung des Geräts wachsam und aufmerksam sind und gesunden Menschenverstand walten lassen.
- Verwenden Sie das Gerät nicht, wenn Sie müde sind oder unter dem Einfluss von Drogen, Alkohol oder Medikamenten stehen. Wenn Sie das Gerät auf
unsichere oder inkorrekte Weise verwenden, können Sie persönliche oder materielle Schäden erleiden.
-Öffnen Sie NIEMALS die Abdeckung, wenn der Motor noch nicht vollständig zum Stillstand gekommen ist.
-Die Verriegelungs- und Sicherheitssysteme dürfen NIEMALS entfernt werden.
-Die Hände dürfen NIEMALS in die Ausgangsöffnungen oder in die Trichter zur Beschickung von Lebensmitteln gehalten werden.
-Führen Sie ausschließlich Lebensmittel (niemals Gegenstände) in die Trichter ein.
-Verwenden Sie NIEMALS externe Hilfsmittel, um die Zutaten in den Beschickungstrichtern oder Ausgangsöffnungen zu führen.
-Die Maschine darf nicht überlastet werden.
-Üben Sie keinen übermäßigen Druck auf die Andrückvorrichtungen an, da dies das Schneidgut beeinträchtigen und den Motor überlasten kann.
-Beim Gebrauch der Maschine sollten 30-minütige Betriebsphasen, gefolgt von 10-minütigen Pausen eingehalten werden.
SÄUBERUNG
- Die Maschine muss am Ende eines jeden Tages oder jedes Mal, wenn die Maschine oder das Zubehör ausgetauscht wird, zerlegt und gereinigt werden.
- Alle Teile, die mit Nahrungsmitteln in Berührung kommen, müssen unmittelbar nach ihrem Einsatz mit heißem Wasser und einem Reinigungsmittel, das
für den Einsatz mit Nahrungsmitteln geeignet ist, gesäubert werden. Nach der Reinigung mit reichlich heißem Wasser wird das Gerät mit einem weichen
Tuch, das mit Äthylalkohol (90 º) getränkt ist, desinfiziert.
-ES DÜRFEN KEINE Scheuermittel (Ätzwasser, konzentriertes Bleichmittel usw.), Scheuerschwämme oder Schaber, die Stahl enthalten, verwendet
werden. Andernfalls könnte dies eine Oxidation der Maschine zur Folge haben.
-Es wird empfohlen, die zerlegbaren Teile des Modells CK und CA nicht im Geschirrspüler zu waschen. Die Reinigungsmittel könnten die Oberfläche
angreifen.
-Das Äußere der Maschine darf NIEMALS mit einem direkten Wasserstrahl gereinigt werden. Benutzen Sie zum Reinigen nur ein feuchtes Tuch und ein
normales Putzmittel.
WARTUNG
-Überprüfen Sie regelmäßig die Sicherheitsmechanismen der Maschine. Falls Sie irgendeine Unregelmäßigkeit entdecken, verständigen Sie einen von
SAMMIC anerkannten Kundendienst.
-Überprüfen Sie den Zustand des Fangrings der Antriebswelle regelmäßig, um die Festigkeit
in diesem Bereich zu gewährleisten. - Immer, wenn die Antriebswelle zu Wartungszwecken gelöst wird, sollte ein neuer Dichtring eingesetzt werden.
-Wenn sich das Netzkabel in einem schlechten Zustand befindet oder Beschädigungen aufweist, muss es vor der Weiterverwendung der Maschine
ersetzt werden. Dieser Austausch darf ausschließlich von einem von SAMMIC anerkannten Kundendienst ausgeführt werden darf.
-Der Lärmpegel der Maschine während des Betriebs, gemessen in 1,6 m Höhe und 1 m Abstand, beträgt 70 dB (A). Hintergrundgeräuschpegel: 32 dB(A).
FUNKTIONEN DER ELEKTRONISCHEN STEUERUNG UND DEREN VERWENDUNG
START/STOPP (14):
Startet den Motor, wenn alle Sicherheitseinrichtungen dies zulassen. Durch ein zweites Drücken wird der Motor gestoppt.
DRÜCKEN (15):
Nur im Cutter-Modus. Durch Drücken der Taste wird der Motor gestartet und beim Loslassen der Taste gestoppt.
Das Sprachauswahlmenü wird innerhalb der ersten 3 Sekunden nach Drücken der Taste aufgerufen.
UMKEHRBETRIEB (16):
Wird diese Taste im Schneidmodus 3 Sekunden lang gedrückt, wird die Funktion SENSO FORCE aufgerufen. Hierbei ist es möglich, den Pegel für das
akustische Signal einzustellen, mit dem signalisiert wird, dass die zu beaufschlagende Kraft der Andrückvorrichtung erreicht wurde.
Durch Drücken dieser Taste im Cutter-Modus wird die Laufrichtung des Motors geändert. Dies kann bei laufendem oder gestopptem Motor erfolgen.
In den ersten 3 Sekunden nach Drücken der Taste werden die Zähler aufgerufen, mit denen der Betrieb der Maschine erfasst wird.
DE
-20-
Other manuals for CK-35V
1
This manual suits for next models
7
Table of contents
Languages:
Other Sammic Cutter manuals
Popular Cutter manuals by other brands

Hitachi Koki
Hitachi Koki CM 12Y Handling instructions

Toolson
Toolson PRO-RF 620 Original operating instructions

Constructor
Constructor CTRTC800-200 Original instructions

Meusburger
Meusburger GMT 6000 operating manual

Tally Dascom
Tally Dascom 7206 Series Installation and user guide

Globe
Globe 82PC300 Service and repair manual