Samson SATELLITE User manual

Owner's Manual

Copyright 2019, v2
Samson Technologies Corp.
278-B Duffy Ave
Hicksville, New York 11801
Phone: 1-800-3-SAMSON (1-800-372-6766)
Fax: 631-784-2201
www.samsontech.com

Owner’s Manual 3
Congratulations on your purchase of the Samson Satellite USB/
iOS Broadcast Microphone. Satellite represents the culmination
of Samson’s history of building world-class microphones, and
position on the leading edge of digital microphone technology.
Designed for capturing high-definition audio on your computer,
iPhone or iPad, the Satellite offers 24-bit/96kHz audio, three
selectable pickups patterns and an innovative fold-back leg design
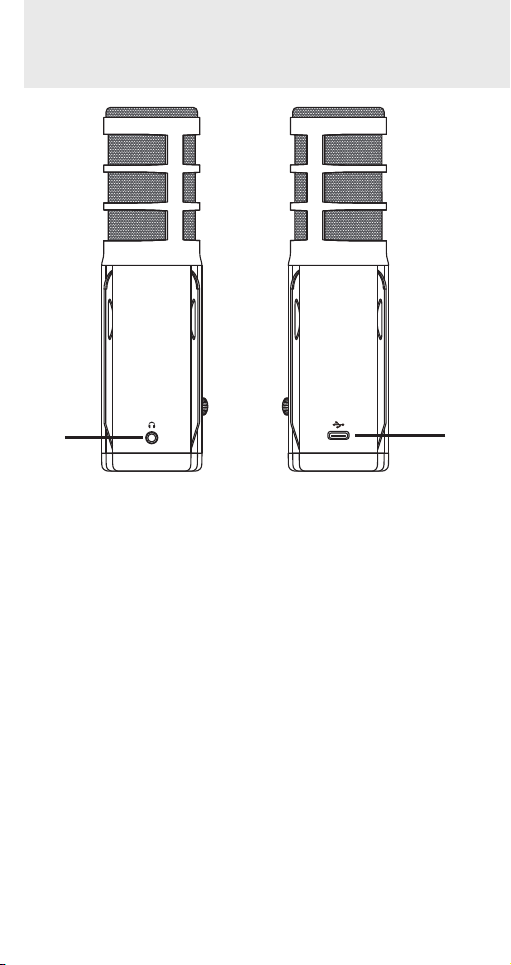
in a portable package. Its 1/8” headphones output allows for zero-
latency monitoring, while a silent mute switch further increases the
production value of your recording. Whether you’re recording your
latest song idea, podcast, or streaming live, the Satellite is the
simplest and most comprehensive solution for high-quality audio
on a Mac, PC, iPhone or iPad. Just plug it in and start creating!
In these pages, you’ll find a detailed description of the features of
the Satellite, as well as step-by-step instructions for its setup and
use. If your microphone was purchased in the United States, you’ll
also find a registration card enclosed—don’t forget to follow the
instructions so that you can receive online technical support and
so that we can send you updated information about this and other
Samson products in the future. Also, be sure to check out our
website www.samsontech.com for complete information about our
full product line.
We recommend you keep the following records for reference, as
well as a copy of your sales receipt:
Serial number: ______________________________________
___
Date of purchase: ___________________________________
___
If you have any questions or comments regarding the Satellite or
any other products from Samson, do no hesitate to contact us at
support@samsontech.com.
With proper care, your Satellite will operate trouble-free for many
years. Should your Satellite ever require servicing, a Return
Authorization (RA) number must be obtained before shipping your
unit to Samson. Without this number, the unit will not be accepted.
Please visit www.samsontech.com/ra for an RA number prior to
shipping your unit. Please retain the original packing materials
and, if possible, return the unit in its original carton. If your
Satellite was purchased outside of the United States, contact your
local distributor for warranty details and service information.
Introduction

Satellite • USB/iOS Broadcast Microphone4
1. Capsule – Dual condenser capsule with 16mm diaphragms.
2. Status Indicator – The three color Power/Clip/Mute LED
lights green to indicate power, flashes red when the input
signal is clipping, and lights amber when the microphone
is muted.
3. Pattern Switch – Select from one of the three pick-up
patterns: Omnidirectional, Unidirectional (Cardioid),
Bidirectional (Figure-8).
4. Mute Button – Mutes the output of the microphone to the
computer and headphone output. The Status Indicator will
illuminate amber when the microphone is muted.
5. Headphone Volume – Control to adjust the overall volume of
the 1/8” Headphone output.
6. Direct MONITOR ON/OFF Switch – This switch turns the
direct monitor on and off. This switch does not affect the
audio from the computer.
7. Stand Mount – Standard 5/8” thread mount to attach the
Satellite to a microphone stand.
1
3
5
2
4
6
Satellite Callouts

Owner’s Manual 5
Satellite Callouts
7. Headphone Output – 3.5mm stereo jack for connecting
headphones or studio monitors. The headphone output
provides a mix of the direct signal (if Direct Monitor is
enabled) from the microphone and the audio playback from
the computer.
8. USB Jack – Micro USB connector for interfacing with your
computer or iOS device. The Satellite can also work with an
Android device with applications that accept external audio
sources using a host OTG adapter.
7
8

Satellite • USB/iOS Broadcast Microphone6
2. Set the Satellite’s pattern switch. If you are
recording a single person, set the switch to the
Cardioid position and be sure to face the front
side, with the Samson logo. If recording two
people, set the microphone to the Bidirectional
position and if recording multiple subjects, set
the switch to the Omnidirectional position.
3. Connect headphones to the
Headphone output located on the
rear of the microphone.
4. Plug the USB cable into
the Satellite and plug the
other end of the cable
into an available USB
port on your computer.
1. Unfold the legs of the Satellite, and position the microphone
on your desktop. The legs can be adjusted to set the angle of
the microphone.
Note: the microphone can also be mounted to a microphone
stand via the standard 5/8” threading on the bottom of the
mic body.
Quick Start

Owner’s Manual 7
Quick Start
5. Set the Satellite as the input and output audio device by
following the steps in the section “Using the Satellite with
Apple OSX” or “Using the Satellite with Windows”.
6. Launch your recording software.
7. Turn down the Headphone Volume control on the Satellite
and if not already set, select the Satellite as the input and
outputs in the software.
8. Create a mono audio track.
9. Arm the tracks for recording.
10. Set the level of the Satellite
by slowly raising the level
of the microphone in your
software while singing or
playing an instrument into the
microphone at the performance level. If you see the peak
indicator illuminate red, your signal will be distorted. Turn the
microphone level control down until it no longer flashes red.
11. Set the direct monitor setting by following the steps in the
section “Direct Monitor”.
12. Press the record button and start creating.
Mono 1
Samson Satellite
My instrument is connected with:
Input Source:
Recording Level:
Monitor:
Mono 1 (Samson Satellite)
On
L R
No Effects
Tracks

Satellite • USB/iOS Broadcast Microphone8
1. Connect the Satellite to the computer using the included
USB cable.
2. Open System Preferences from the dock or the main Apple
Menu.
3. Select the Sound preference icon, choose the Input tab and
select Samson Satellite.
4. Set the Satellite as the output device by clicking the Output tab
and selecting Samson Satellite.
5. To set the sample rate, from the Applications folder, open the
Utilities folder and open Audio MIDI Setup.
6. From the Window menu, select Show Audio Window.
7. Select the Samson Satellite
8. From the Format dropdown menu, select the desired sample
rate and bit depth.
Using the Satellite with Apple OSX

Owner’s Manual 9
1. From the Start Menu, open the Control Panel and
select Sound.
2. Under the Playback and Recording tabs, select the
Samson Satellite as the audio device.
3. To adjust the gain of the microphone, click the
Properties button, and then select the Levels tab. You
can view the volume level as either a percentage or in
dB, by right clicking on the number box.
4. If the microphone LED is lighting red, turn this control
down until the LED no longer flashes red.
5. In the Playback tab, select the Level tab and set
the computer’s Master Volume to 100%. Use the
Headphone Volume knob on the Satellite control the
overall output from the headphones or speaker.
6. To adjust the direct monitoring level in the Playback tab
by moving the fader labeled Microphone.
Using the Satellite with Windows

Satellite • USB/iOS Broadcast Microphone10
Setting Sample Rate in Windows
Sample Rate Conflicts
If you start recording/playback and the microphone’s status indi-
cator starts flashing red continuously, this is due to the comput-
er’s operating system requesting different sample rates for input
and output at the same time. The microphone will still appear to
function, but either the input or output will be garbled, so the LED
is warning you of this problem.
This problem can happen in Windows 7 or Windows 8, and will
happen by default in Windows 10, when playing and recording
simultaneously. It happens with DirectSound, WASAPI Shared
mode, WaveOut, MME, and other software that uses the Windows
Default Format settings.
This will not happen in macOS or iOS, or with Windows software
that uses ASIO4ALL, WASAPI Exclusive mode, WDM, or other
software that sets the sample rates on its own.
To change the default sample rates in Windows 10
1.
In the Windows Search bar, type “sound”, and then select Sound settings
2. Make sure the Samson device is selected in the drop-down
menu and click Device Properties

Owner’s Manual 11
Setting Sample Rate in Windows
3. Scroll down and click Additional device properties
4. Click the Advanced tab

Satellite • USB/iOS Broadcast Microphone12
Setting Sample Rate in Windows
5.Select a bit depth and sample rate from the drop-down menu
6. Press OK until you are back to the Sound properties window
7. Do steps 2 through 5 again, but this time for the Input device, and
make sure the sample rates are the same for both input and output
Sample rates must be the same
Only the sample rate (Hz) needs to match. The bit depth can be
different if needed. For example, these settings are compatible:
Output: 2 channel, 16 bit, 48000 Hz
Input: 1 channel, 24 bit, 48000 Hz
These settings are not compatible:
Output: 2 channel, 24 bit, 48000 Hz
Input: 1 channel, 24 bit, 44100 Hz

Owner’s Manual 13
Connecting to an iPhone or iPad
1. Connect the Satellite to an iPhone or iPad using the included
USB to Lightning cable.
2. The Satellite will receive power from the mobile device and
the status indicator will light green.
3. Open an application that supports external audio devices and
start creating.
Note: It is recommended to put your iOS device in Do Not Disturb
mode or Airplane mode to eliminate the video or audio recording
from being interrupted by a phone call. Leave Airplane Mode off to
keep geolocation information tagged to your files.

Satellite • USB/iOS Broadcast Microphone14
The Satellite has a simple, yet sophisticated direct monitor
system, which provides zero latency monitoring of audio captured
by the microphone.
What is Latency, and what is Zero Latency?
Latency is the delay time between record and playback that is
inherent to computer software when recording and monitoring
simultaneously. Simply stated, when recording, the computer
software needs to recognize the input signal, crunch a bunch
of numbers and then send the signal through to the output.
Depending on several factors like the speed of your computer,
the amount of tracks you’ve recorded, and whether or not you’re
using the effects in the software, this can take a few to several
milliseconds. Even a delay of several milliseconds can sometimes
make it hard for a musician to play on time or may be distracting
when recording. To solve this problem, the Satellite lets you
monitor the microphone signal directly on the headphones without
making the round-trip in and out of the computer. As a result you
hear the input with no latency.
MONITOR ON/OFF Switch
To enable the Direct Monitor, set the MONITOR switch to the ON
position. If you plan to use direct monitoring on the Satellite,
disable software monitoring for the armed (input) tracks.
You may want to turn the Direct Monitor switch off when listening
back to your audio during a mixing session, or if you want to
only hear the captured audio after it has gone through your
computer software effects. To turn the Direct Monitor off, move the
MONITOR switch on the front of the Satellite to the OFF position,
you will hear only the playback from your computer software, with
no input signal.
Direct Monitor

Owner’s Manual 15
An important characteristic of any microphone is its
directionality or polar pattern. The Satellite feature dual 16mm
capsules, allowing for a choice of three distinct polar patterns:
omnidirectional, unidirectional (cardioid), and bidirectional
(figure-8). The microphone pattern can be selected using the
three-position slide switch on the front of the microphone. Each
pattern has distinct pick-up characteristics with respect to
the sensitivity and frequency response to sounds arriving from
different directions. The following section discusses some of the
features of each pattern, to help you choose the best setting for
your application.
Omnidirectional - The omnidirectional
setting reproduces sound from all directions,
(including off-axis), with an even frequency
response, which makes it resistant to the
phenomenon known as proximity effect. It
captures a greater amount of ambient sound
than the other settings, and thus will include
more of the room sound than when using
a directional setting. The omnidirectional
setting is great for recording ensemble performances including
group vocals, brass, woodwind, and other instruments with the
artists facing each other in a circle around the microphone.
Unidirectional (Cardioid) - The cardioid
pickup pattern is the most widely used
for studio and live miking applications. It
captures sound in front of the microphone
and rejects sound from the sides and
back, which allows for better separation
of instruments in the studio, and picks up
more of the instrument sound in relation
to the sound of the room. The separation
also allows for more control and more gain before feedback in live
sound reinforcement situations.
Bidirectional (Figure-8) - This setting
captures sound directly in front and back
of the microphone while rejecting sound on
the left and right sides, and has minimal
off-axis frequency response deterioration.
It is very useful in a variety of stereo
microphone techniques. The figure-8
pattern can be used to simultaneously
capture two instruments or vocalists by
positioning the microphone directly between them, so one is
addressing the front of the microphone and the other the rear.
About Polar Patterns
5
10
15
20
dB
25
45 45
9090
135 135
180
0
5
10
15
20
dB
25
45 45
9090
135 135
180
0
5
10
15
20
dB
25
45 45
9090
135 135
180
0
Omnidirectional
Cardioid
Figure-8

Satellite • USB/iOS Broadcast Microphone16
Specifications
Element Type Dual back electret condenser
Diaphragm Width/Thickness 16mm/3 microns
Polar Pattern Cardioid (unidirectional),
bidirectional (figure-8),
omnidirectional
Frequency Response 20Hz–20kHz
Max Sensitivity -3dB FS @ 80dB SPL
(at maximum gain)
Max. SPL 135dB at 200Hz
Bit Depth/Sample Rate 16 or 24-bit / up to 96kHz
Digital Output USB
Headphone Output/Impedance 1/8” (3.5mm)/ 32Ω
Headphone Power Output Minimum 38mW @ 32Ω
Controls Polar Pattern, Mute,
Headphone Volume, Monitor
On/Off
LED 3-color Power/Clip/Mute
Body Construction/Grille Aluminum/steel
Accessories USB and USB to Lightning
cables
Product Dimensions 8.6” x 1.7” diameter
(218mm x 45mm diameter)
Product Weight 0.75lb (0.34kg)
At Samson, we are continually improving our products, therefore
specifications and images are subject to change without notice.

Owner’s Manual 17
FCC Notice
1. This device complies with Part 15 of the FCC Rules. Operation
is subject to the following two conditions:
(1) This device may not cause harmful interference.
(2) This device must accept any interference received, includ-
ing interference that may cause undesired operation.
2. Changes or modifications not expressly approved by the party
responsible for compliance could void the user’s authority to
operate the equipment.
Note: This equipment has been tested and found to comply with
the limits for a Class B digital device, pursuant to Part 15 of
the FCC rules. These limits are designed to provide reasonable
protection against harmful interference in a residential installation.
This equipment generates, uses and can radiate radio frequen-
cy energy and, if not installed and used in accordance with the
instructions, may cause harmful interference to radio communi-
cations. However, there is no guarantee that the interference will
not occur in a particular installation. If this equipment does cause
harmful interference to radio or television reception, which can
be determined by turning the equipment off and on, the user is
encouraged to try to correct the interference by one or more of the
following measures:
• Reorient or relocate the receiving antenna.
• Increase the separation between the equipment and receiver.
• Connect the equipment into an outlet on a circuit different
from that of the receiver.
• Consult the dealer or an experienced radio/TV technician for
help
If you want to dispose this product, do not mix it with
general household waste. There is a separate collection
system for used electronic products in accordance with
legislation that requires proper treatment, recovery and
recycling.
Private household in the 28 member states of the EU, in Switzer-
land and Norway may return their used electronic products free
of charge to designated collection facilities or to a retailer (if you
purchase a similar new one).
For Countries not mentioned above, please contact your local
authorities for a correct method of disposal.
By doing so you will ensure that your disposed product undergoes
the necessary treatment, recovery and recycling and thus prevent
potential negative effects on the environment and human health.
Important Safety Information

Satellite • USB/iOS Broadcast Microphone18
Important Safety Information
WARNING: Listening to music at high volume levels and for
extended durations can damage one’s hearing. In order to reduce
the risk of damage to hearing, one should lower the volume to a
safe, comfortable level, and reduce the amount of time listening at
high levels.
Please use the following guidelines established by the Occupa-
tional Safety Health Administration (OSHA) on maximum time
exposure to sound pressure levels before hearing damage occurs.
• 90 dB SPL at 8 hours
• 95 dB SPL at 4 hours
• 100 dB SPL at 2 hours
• 105 dB SPL at 1 hour
• 110 dB SPL at 1/2 hour
• 115 dB SPL at 15 minutes
• 120 dB SPL - avoid or damage may occur

Owner’s Manual 19
Declaration
Made for iPhone X, iPhone 8 Plus, iPhone 8, iPhone 7 Plus,
iPhone 7, iPhone SE, iPhone 6s Plus, iPhone 6s, iPhone 6 Plus,
iPhone 6, iPhone 5s, iPad Pro 10.5-inch, iPad Pro 12.9-inch (2nd
generation), iPad Pro 9.7-inch, iPad Pro 12.9-inch (1st gener-
ation), iPad mini 4, iPad Air 2, iPad mini 3, iPad Air, iPad mini
2, iPad (6th generation), iPad (5th generation), iPod touch (6th
generation).
Use of the Made for Apple badges means that an accessory has
been designed to connect specifically to the Apple product(s)
identified in the badge, and has been certified by the developer
to meet Apple performance standards. Apple is not responsible
for the operation of this device or its compliance with safety and
regulatory standards. Please note that the use of this accessory
with an Apple product may affect wireless performance. iPad, iPad
Air, iPad Pro, iPhone, and Lightning are trademarks of Apple Inc.,
registered in the U.S. and other countries. The trademark “iPhone”
is used in Japan with a license from Aiphone K.K.
All other trademarks are the property of their respective owners

Samson Technologies Corp.
278-B Duffy Ave
Hicksville, New York 11801
Phone: 1-800-3-SAMSON (1-800-372-6766)
www.samsontech.com
HAVING TROUBLE WITH YOUR GO MIC MOBILE?
WE CAN HELP!
CONTACT OUR SUPPORT TEAM: support@samsontech.com
Our experts can help you resolve any issues.
Follow us:
@samson @samsontech @samson_technologies
Table of contents
Other Samson Microphone manuals

Samson
Samson Q3 User manual

Samson
Samson UB1 User manual

Samson
Samson CL5 User manual

Samson
Samson Meteor Mic User manual

Samson
Samson Go Mic Direct User manual

Samson
Samson DE50x User manual

Samson
Samson VR88 User manual

Samson
Samson Q1U User manual

Samson
Samson C03 User manual

Samson
Samson G Track User manual

Samson
Samson CL7 User manual

Samson
Samson MTR231 User manual

Samson
Samson MTR201 User manual

Samson
Samson LM10x User manual

Samson
Samson C05 User manual

Samson
Samson DE50 Series User manual

Samson
Samson MTR101 User manual

Samson
Samson R21S User manual

Samson
Samson MTR201 User manual

Samson
Samson SADE10X User manual