Samsung SDP-850 User manual

Samsung Document Camera Basics
Connection
The basic connection setup should already be done for you. If you ever
need to reconnect the computer, document camera, and LCD projector,
here is how it is done. The video signal travels through three VGA
cables as shown in the diagram below: from the computer to a splitter,
and from the splitter to the document camera and monitor. From the
document camera, a VGA cable is connected to the LCD projector. If
the document camera is mounted on the ceiling, the VGA cable attaches
to the media wall plate (located near the teacher workstation) instead of
directly to the LCD projector.
VGA Cable
Wall Plate
LCD Projector
Document Camera
Monitor
Splitter
Power

It is also possible to use the
document camera and LCD
projector without a computer, as
shown in the diagram on the right.
Power Connection
The power is connected as shown
in the diagram on the right.
Control Panel Overview
The document camera has buttons on top. All of these functions can also be controlled from across the room
using the remote. In this overview, we will discuss the most-commonly used buttons.

Power
To turn on the power, press the main POWER button as indicated in the
diagram on the left. (The red light on the front of the base of the camera
indicates that the unit is off. The red light disappears once the unit is
powered on.)
AWC
After the document camera is turned on, it will perform an automatic-
white balance / color (AWC) adjustment.
For best results and most accurate color, place a white piece of paper under the lens when you turn the unit
on. Printed text on white paper is also OK. You can re-adjust the color at any time by pressing the AWC
button.
INT/EXT
Pressing the INT/EXT
button allows the
document camera to
switch between
projecting what is under
the document camera
(INTERNAL) and what
is on your computer
screen (EXTERNAL).
Auto-focus (AF)
Although you can press
the FOCUS + and –
buttons to focus
manually, pressing the
AF button once will
focus for you
automatically.

Zoom In/Out
To zoom in or out, press
the ZOOM + or – button
on the base of the
camera. (NOTE: On the
remote, the buttons are
labeled WIDE and
TELE.)
The Lamp button on the remote control turns the lamp
on and off.
When you press the [Freeze] button on the remote, the
projected image is held on the screen. This allows you
to replace the picture with another one or make
adjustments to the picture using your computer while
the projected view remains unchanged. Pressing the
[Freeze] button again releases the freeze mode.
Setting up the Document Camera
Connect the headlamp to either arm of the document
camera. Connect the chord from the headlamp to the
power supply located on the back of the vertical arm.

Position the camera and arms at ninety degrees to one
another for optimal viewing. Rotate the camera head to
adjust the angle of the projected image. The logo on the
camera head can be used as a guide when projecting a
document.
There is a lens at the end of the document camera
arm. Treat it like you would treat the lens of any
other camera:
•Touching it will leave fingerprints and/or dust.
•Use the included lens cap to cover the lens when
you are not using your camera for a while.
Leave the lens attached for normal use (when projecting
documents on the desktop – distances less than 15
inches away).
If you want to project images from around the room
(or other objects more than 3 feet away), first
unscrew the lens to remove it, and carefully store the
lens in the clear, round case included with your
document camera to protect it from fingerprints, dust, or
damage.

Capturing an Image Using the Samsung Document Camera
If you do not see an icon for the USB viewer software (see left), the Samsung
document camera software will need to be installed before you can capture an image or
a video. Ask your site tech to submit a CSR to have this done.
To capture a still image or a video using the Samsung document camera, you
must make one more connection using the USB cable. Also, the software must
be installed.
•Computer: You can use any USB port on the computer (either in the
front or on the back of the PC).
•Document camera: The square USB port on the document camera is in
the back, shown below.

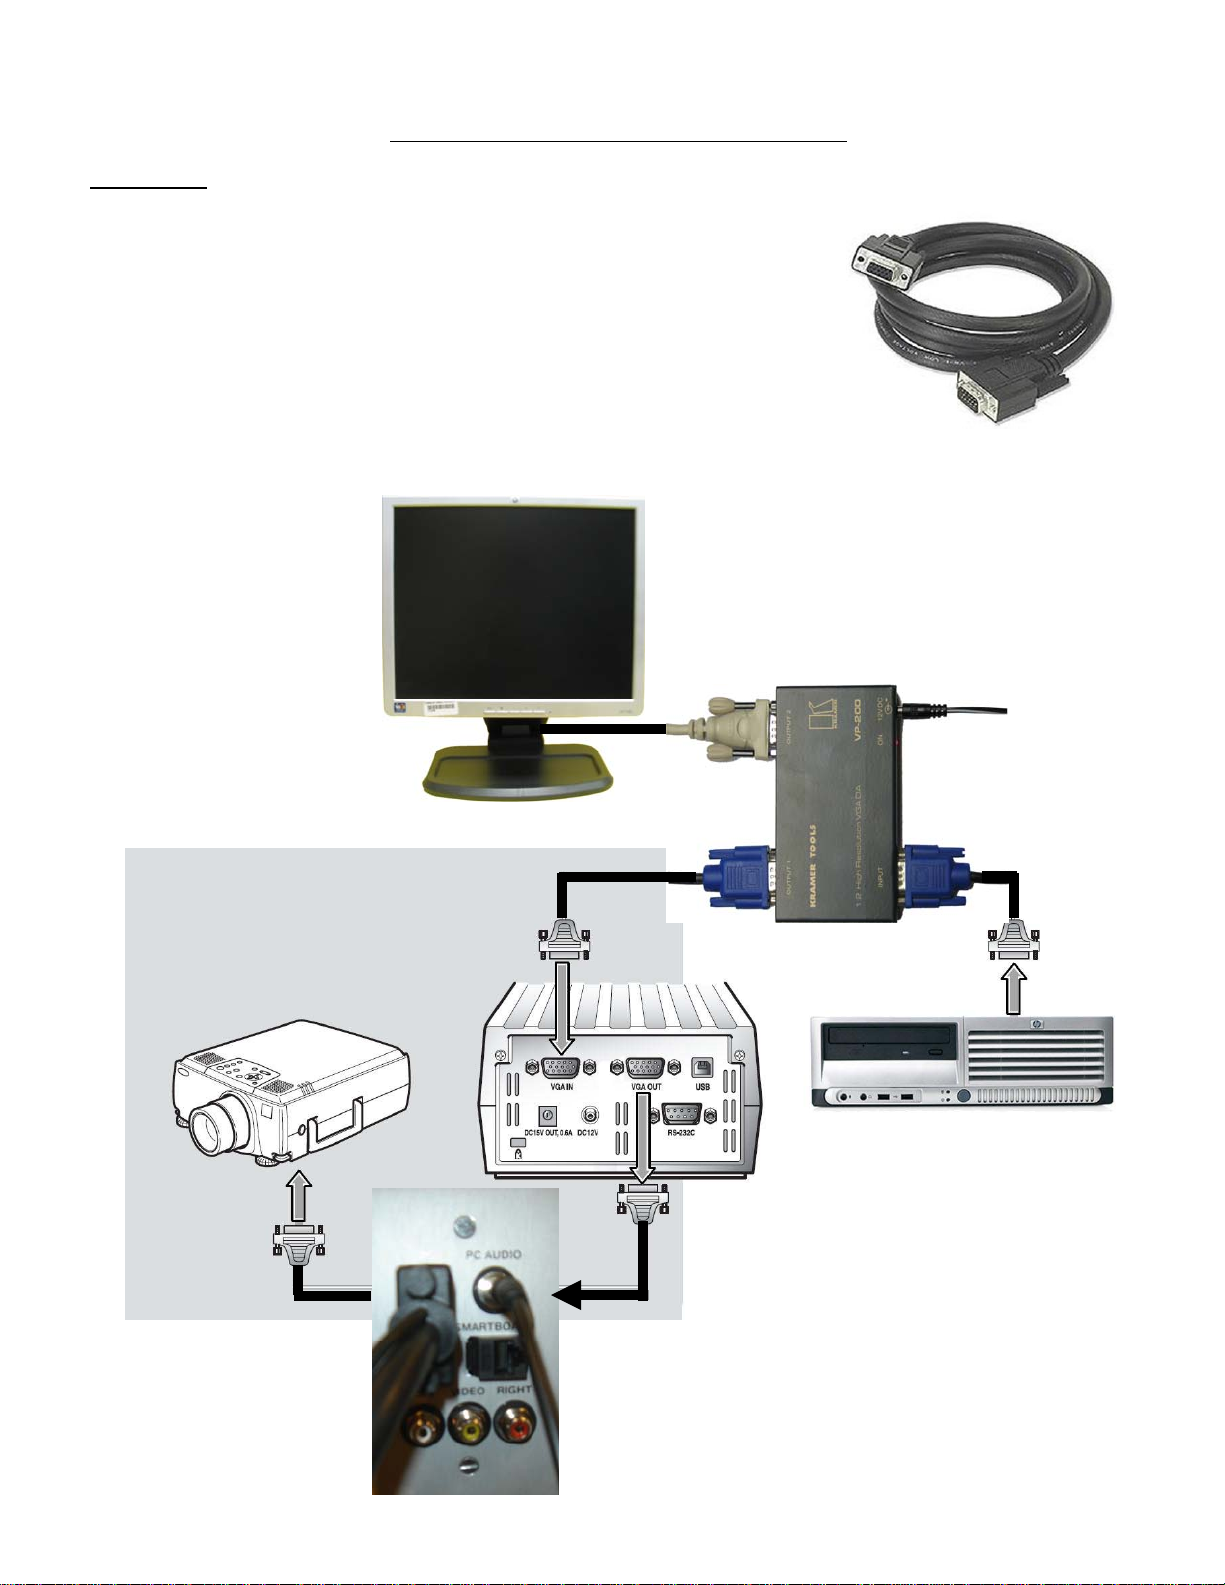
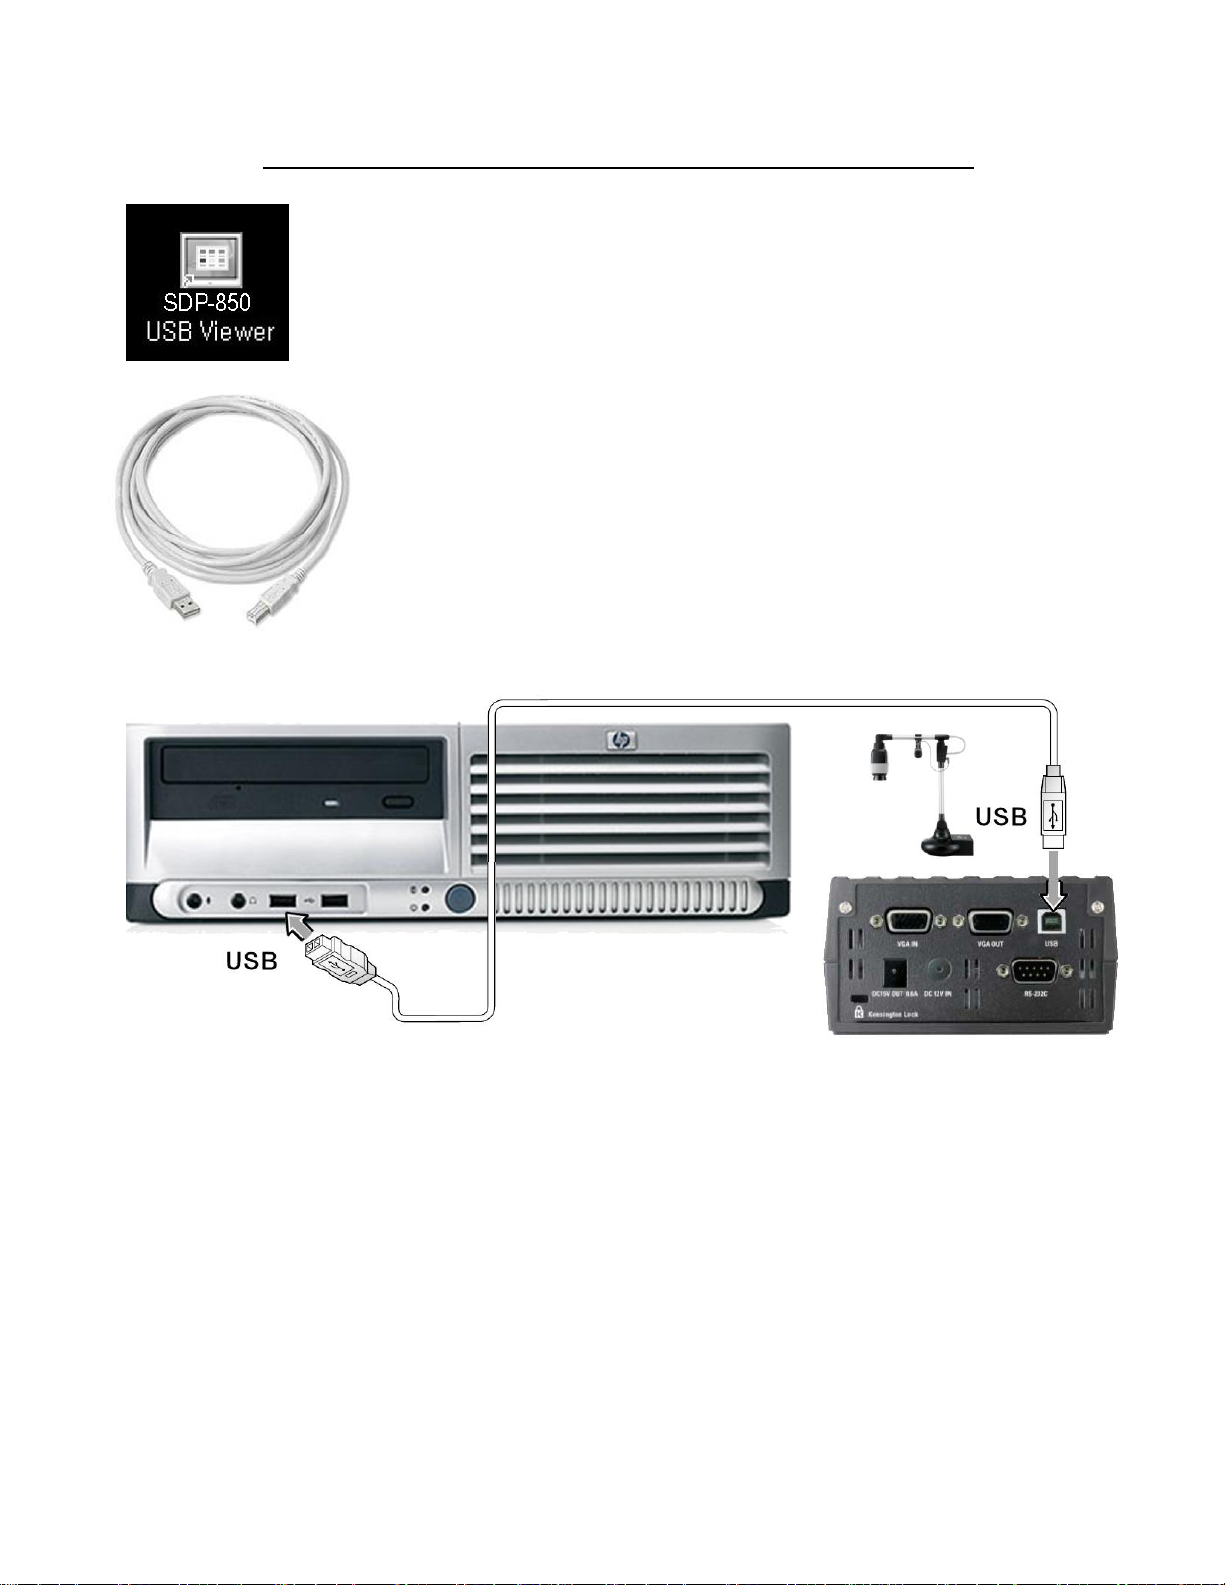
Turn on your computer and the Samsung document camera. Attach the USB cable as described above, if
it not already attached. Press INT/EXT button on document camera to that it displays you computer
screen. Double-click on the icon SDP-850 USB Viewer. The following window will appear:
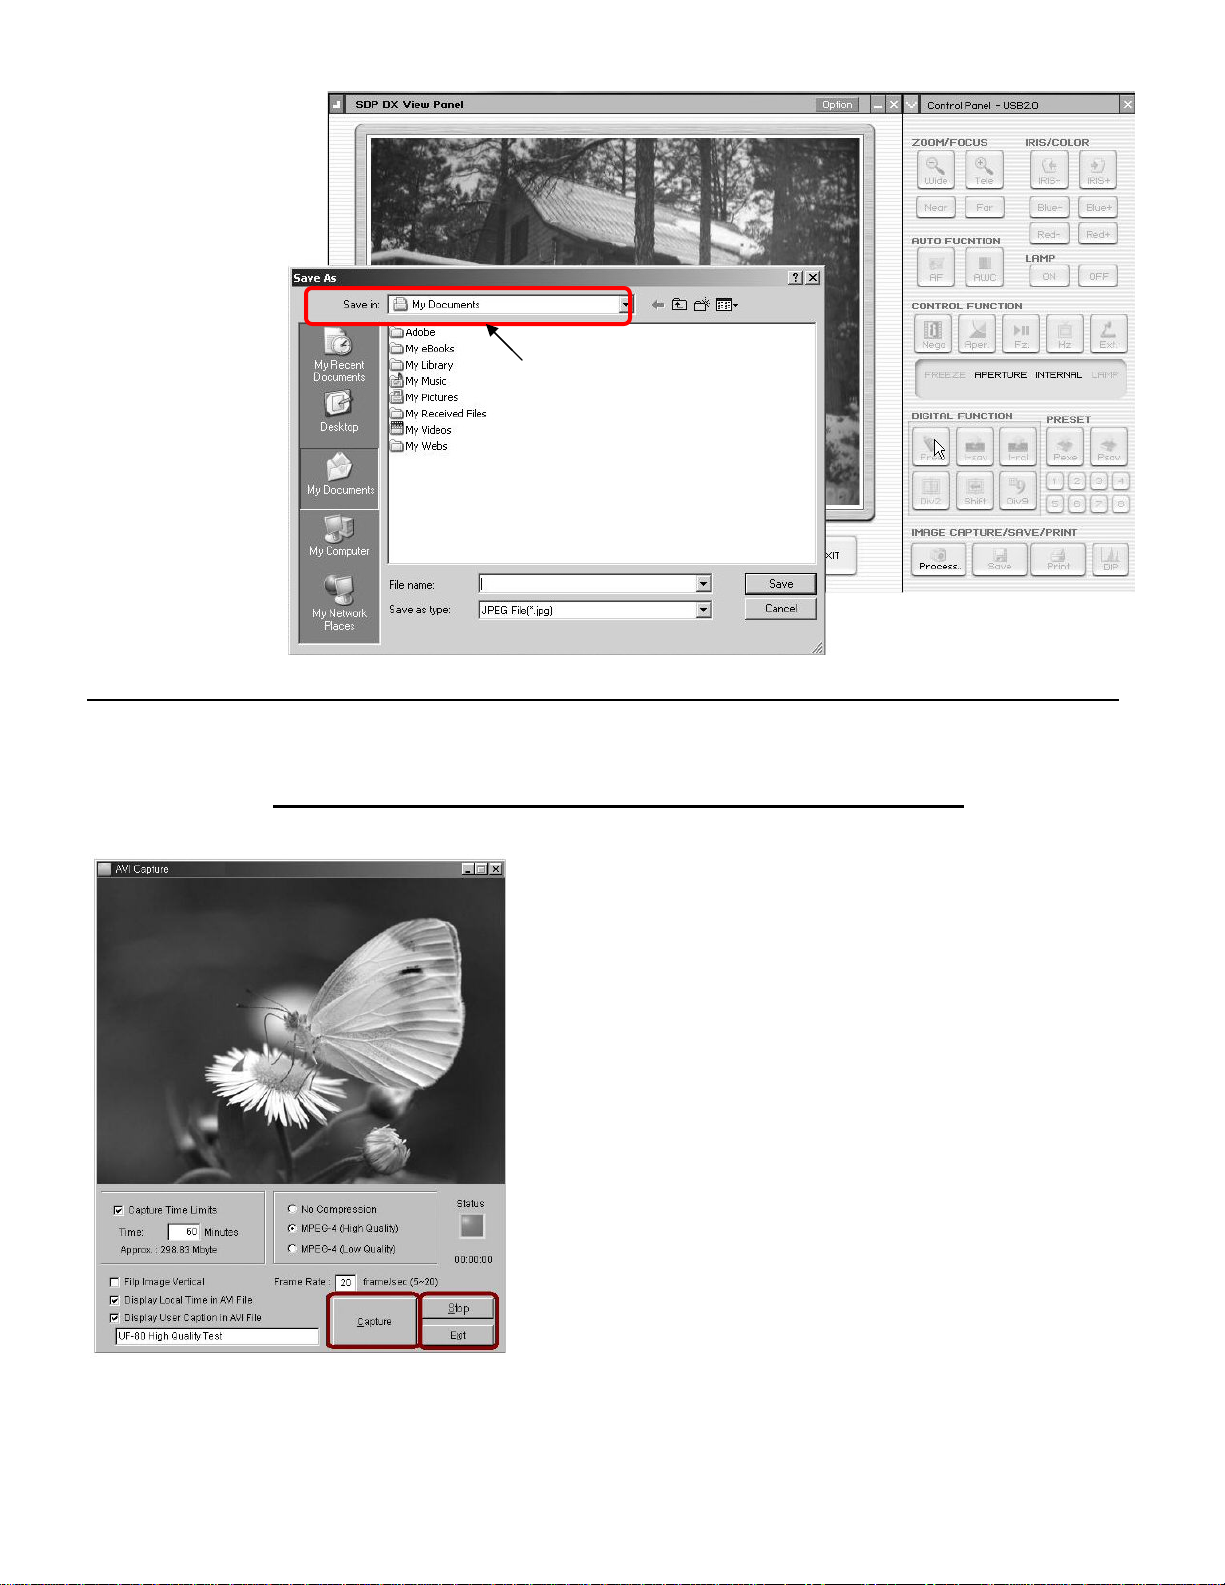
Options: Set Saving Location
Click Option.
Click the
Change
button to
change the
Quick Save
folder
location.
You should
save to your
folder on the
network…
…your K:\
drive space. (The K:\ drive is just a shortcut that points to your folder on the F:\ drive… e.g.,
F:\USERS\your name.)
NOTE: This location should already be set to your folder on the network so that DeepFreeze won’t wipe
them away. If it is not, or if you want to save somewhere else, use Option and Change to change the
Quick Save location. If this is not set correctly, you can ask your site tech to submit a CSR for you.
Quick Saving a picture
Now that you have set up a place for your pictures to go, simply press the F2 button on your computer
keyboard to take a picture. The program will save the current image under the document camera as a file
automatically named using the year, month, day, hour, minute, and second, like:
YYYYMMDDHHMMSS.jpg (e.g., 20070604_105200.jpg).
To view your pictures, double-click on the My Computer icon on your desktop. Browse to the location on
the K:\ drive where you set to Quick Save your pictures. Double-click on any picture you want to view.
View the USB Viewer Image Full Screen
While using the USB Viewer, it is useful to view the
live image under the camera full screen so your
viewers can see better. Click the SCREEN FULL
button to switch to a full screen view.
To escape from the full screen view, press the ESC
button on your computer keyboard.
Exiting the USB Viewer Program
Click the Exit button in the bottom right corner of the
View Panel window.

NOTE: If the Q-Save Button is grayed out, this may indicate that you
do not have USB 2.0 installed in your computer.
If you are unable to
select the Q-Save
button, then select the
Capture button to
save an image to a
folder located in your
F drive.
After selecting
capture select
save to save the
image to a folder
in your F drive.
If you want to
change the image
to be saved, select
release.

The Save in
location should be
a folder in your F
drive. Once you
have changed the
Save in…
location, enter a
name for the file
and click Save.
Capturing a Video Using the Samsung Document Camera
To capture a motion video, first make sure that your
Samsung Digital Presenter is connected to the PC using the
USB cable (described above) and both are turned on. To
start the Samsung Digital Presenter AVI Capture program,
from the desktop, double-click on:
My Computer > Local Disk (C:) > Program Files > SDP-850
Viewer > SDP-850 AVI Capture
Buttons:
•Capture will start the video capture
•Stop will stop the video capture
•Exit closes the program when done
There is a limit to how long a video you may capture. (It
will tell you.) No audio is captured.
NOTE: Video files can take up a lot of space. You may
need only a few seconds or a minute of video to illustrate
your instruction appropriately. (Capturing more than a few minutes of video can produce files that are
unweildly.) Transferring your videos to a USB flash drive (thumb drive) for later playback will relieve the
network storage space required.
Change the save location
to your F:\ drive space.
Do not save in the
My Documents folder.
Other manuals for SDP-850
3
Table of contents
Other Samsung Document Camera manuals