Samwon ENG CNT-700 User manual

COUNTER/TIMER CNT-700 MANUAL
Thank you for your purchase of our Counter/Timer CNT-700 series. Please read this manual carefully and
understand totally before use this device. This manual contains important information to use safely for this
product.
1) Symbols and meaning
The following symbol is very important to use this device safely. Please be sure to handling to carefully this
manual of this symbol.
!
(
Warning
)
This devices dose not verify as safety devices, when you use together with dangerous devices, so please use
after install 2nd safety device before this devices.
(
Danger
)
①electric shock –Never touch the AC terminal with bare or wet hand during power on. It may cause electric
shock.
②Please make sure turn off power when you check power line .
!
(
Caution
)
1.
Please use over M 3.5, width max 7.2m terminal wire for AC power line.
2.
Do not use without manufacture recommended application, it may cause damage of body or broken
of product.
3.
Please prevent the dust, water, oil and debris of wire into the devices. It may cause the fire or
damage of products.
4.
Do not disassemble or convert or remodel without permission from manufacture. it may cause error
and cannot guarantee the quality.
5.
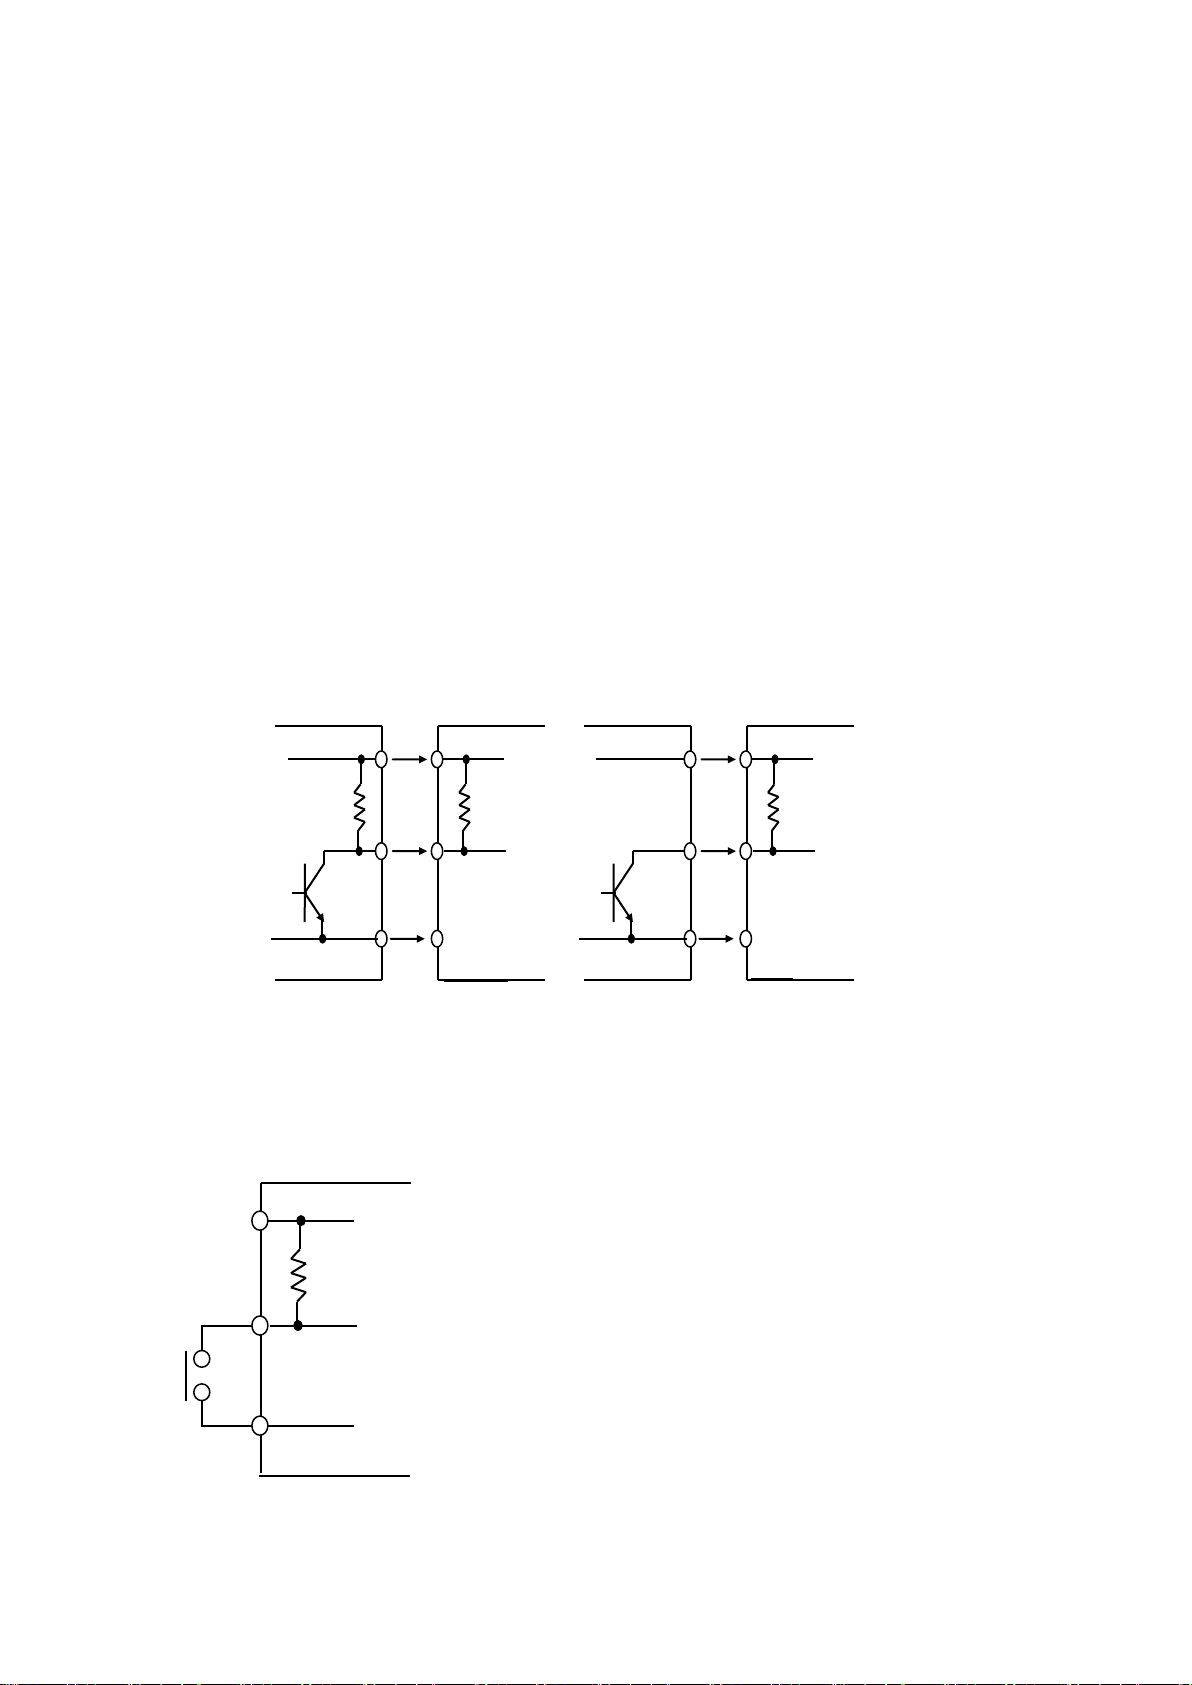
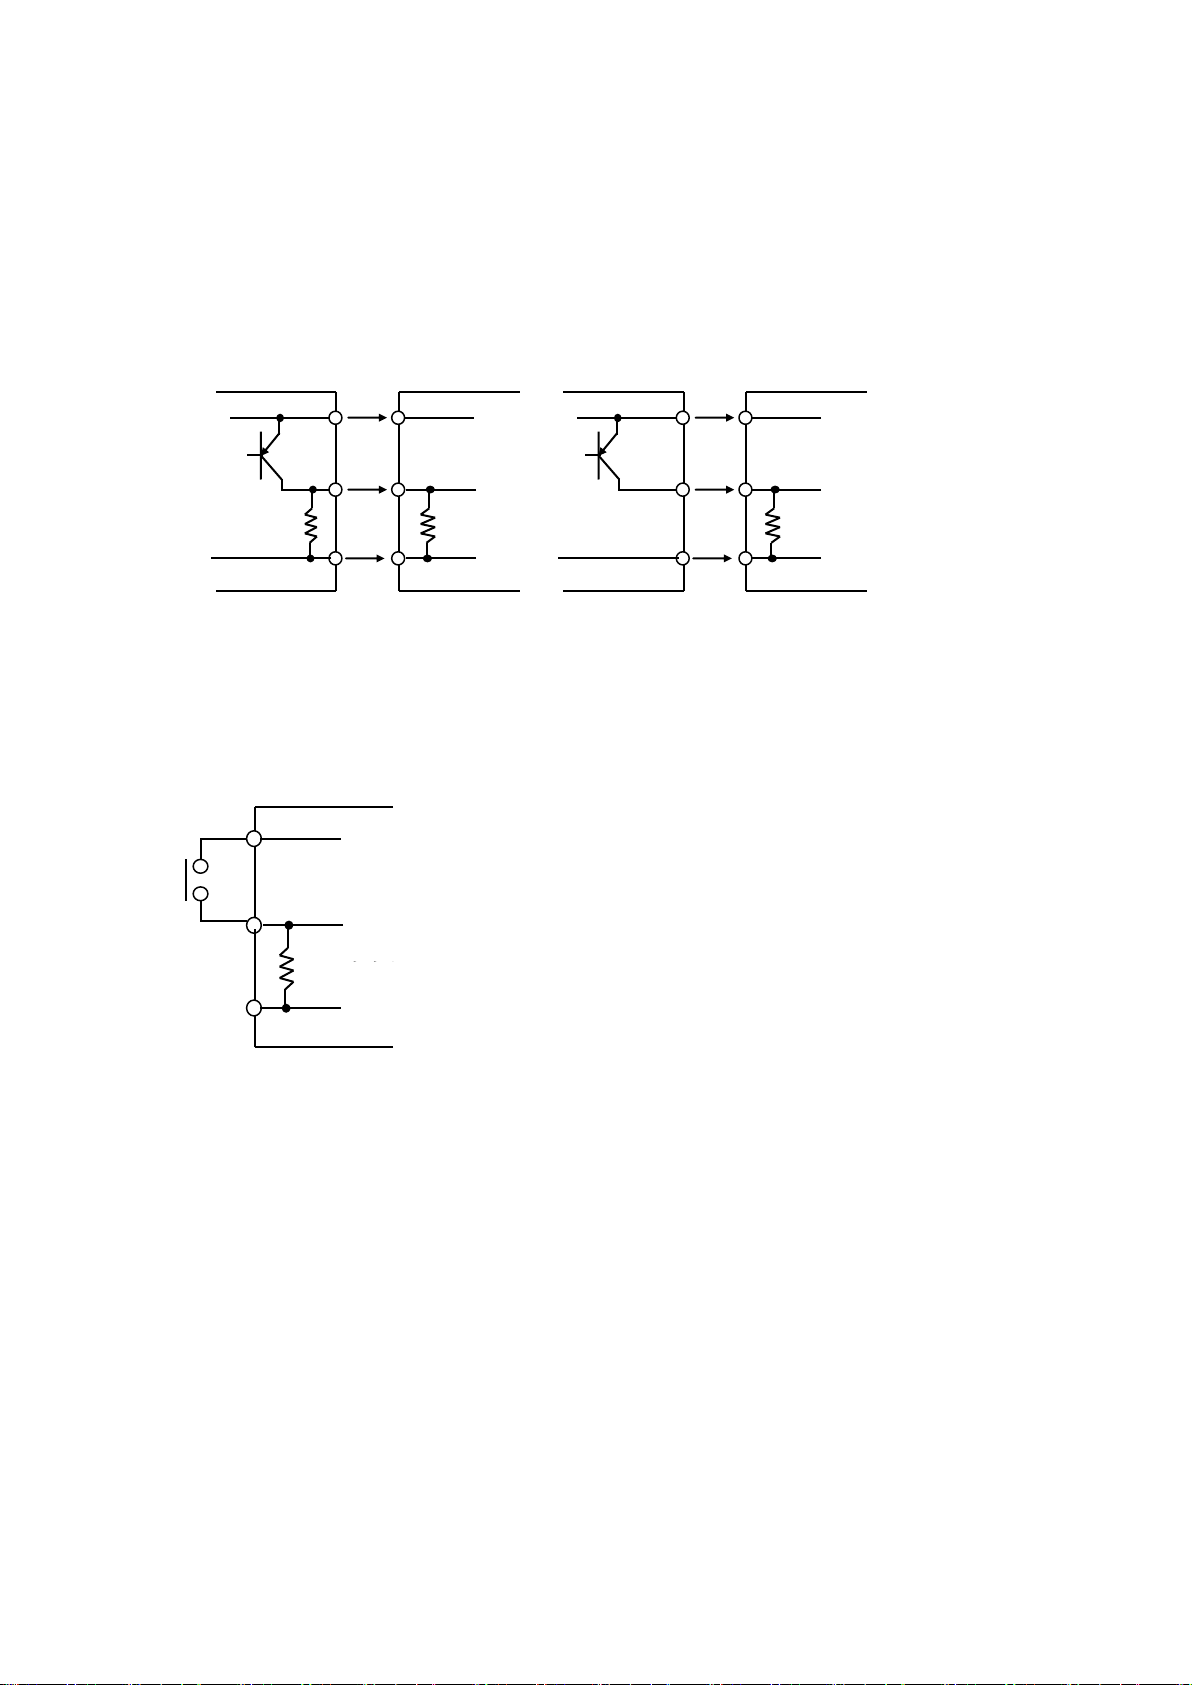
Please be sure making wire separately with power line to reduce inducts noise.
6. Please install the switch or circuit Breaker to protect from over voltage.
7. Please be sure make wire separately with signal line and power line to reduce induct noise
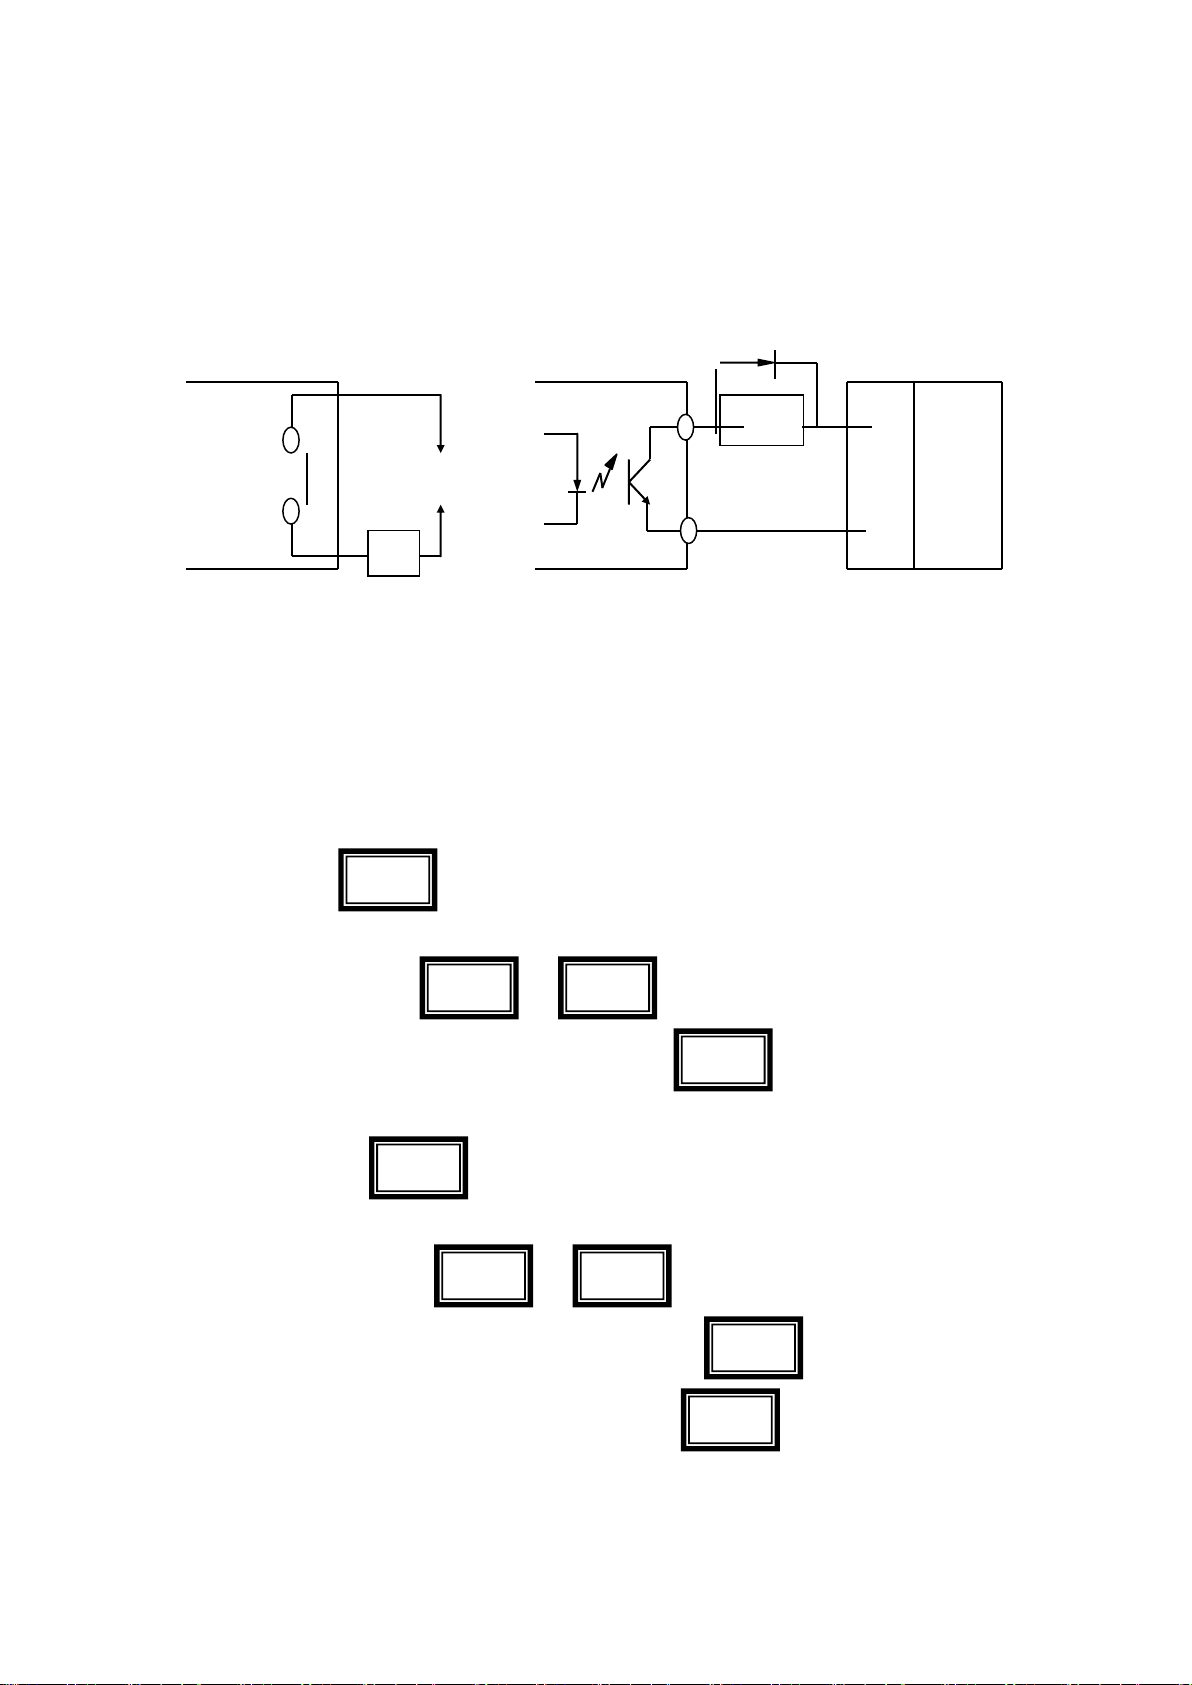
8. Please do not install the devices near high frequency noise generating devices (likes high frequency
welding M/C, high capacity SCR controller, Inverter, etc.)
The above mentioned note is can make error to devices.
Please be sure for follow as described at manual.

1.MODEL & SUFFIX CODE
CNT –700-2P
2.SPECIFICATIONS
Measurement Display
Counter measurement value display
/ Timer time progress value
Parameter Setting value
Display
Counter setting values display
/ Timer setting values display
1/2layer setting/display
LAMP
Blinking when check Setting values and change of set values
Key lock display lamp
Key lock operation display
OUT1/2 display lamp
OUT1/OUT2 operate display
Counter operate display
lamp
Turn on when counter operate
Timer operate display
lamp
Turn on when Timer operate
Reset button
Counter/timer reset button
Setting button
Counter/Timer function selection
Cursor move button
Setting cursor change
Increase button
Setting values increase and change
N : DISPLAY ONLY
1P : 1 LAYER DISPLAY
2P : 2 LAYER DISPLAY
700:
72(W) * 72(H
)
OUTPUT
SIZE

3. PART NAME & FUNCTIONS
Counter Display
Counter Display Counting Values/Timer Display of the Time progress values
Setting Display
Counter Setting Values/Timer setting time indicate
1/2layer Setting/indicate Lamp
Check Setting Values and Blink during change of Setting Vales
Batch Setting/indicate Lamp
Check Batch Setting Values and Blink during change of Setting Vales
Key Lock indicate Lamp
Key Lock Operate indicate
OUT1/2 output indicate Lamp
OUT1/OUT2 Output Operate indicate
Batch output Display Lamp
Batch output operate indicate
Counter Operate indicate Lamp
Blinking during Counter operate
Timer Operate indicate Lamp
Blinking during Timer operate
Reset Button
Reset of Counter/Timer
Batch Button
Setting/Check of Batch Counter
Setting Button
Setting of Counter/Timer Functions
Cursor Movement Button
Setting Position Move
Increase Button
Setting Values Increase/Change
Counter Display
1.PS
RST
BA
SET
PNT
UP
Setting Display
1Layer
Setting/Lamp
2 Layer
Setting/Lamp
Batch Setting Lamp
Lamp
Key Lock Lamp
OUT1 output Lamp
Reset Button
Batch Button
OUT2 output Lamp
Set/Enter Button
Batch Output Lamp
2.PS
BA
LOCK
OUT1
OUT2
BA
OUT
CNT
TMR
Cursor Move Button
Counter Operation Lamp
Increase Button
Timer Operation Lamp

4. DIMENSIONS & PANEL CUTOUT
5. TERMINAL WIREING DIAGRAM
1) CNT-700-1P 2) CNT-400-2P
72
93
7
7
<Panel Cutout Size >
Width: 68
+0.6
High: 68
+0.6
NO COM NC AC IN AC IN
100~240VAC
50~60HZ
+12VDC BATCH
INA INB 100mA 0V RESET INHIBIT RESET
7
6
5
4
3
2
1
9
10
11
12
13
14
8
17
18
16
19
SSR 출력(30VDC 100mA)
COMMON OUT BATCH
OUT
T
+12VDC BATCH
INA INB 100mA 0V RESET INHIBIT RESET
7
6
5
4
3
2
1
9
10
11
12
13
14
8
17
18
16
19
COMMON OUT1 OUT2 BATCH
NO COM NO COM NC AC IN AC IN
100~240VAC
50~60HZ
OUT2
OUT1

3) CNT-700-N
* when select voltage input(PNP) , electric contact input connect
* when select non voltage input(NPN) , electric contact input connect
INA INB +12VDC 0V RESET INHIBIT BATCH
RESET
7
6
5
4
3
2
1
INA INB +12VDC 0V RESET INHIBIT BATCH
RESET
7
6
5
4
3
2
1
AC IN AC IN
100~240VAC
50~60HZ
+12VDC
INA INB 100mA 0V RESET INHIBIT
7
6
5
4
3
2
1
9
10
11
12
13
14
8
17
18
16
19

Note) INA terminal
•When use as a counter :
“
count input
”
or
“
count stop input
”
signal input terminal
•When use as a timer : “START”signal input terminal.
Note) INB/INH terminal
•When use with counter : INB become signal input terminal.
•When use with timer : INH(Inhibit) become signal input terminal.
If signal of the INH terminal active the timer become stop timer
.(Time Hold)
6. INPUT TERMINAL WIREING DIAGRAM
1) INPUT: NON VOLTAGE INPUT(NPN)
(1) NO ELECTRIC CONTACT INPUT
(2) ELECTRIC CONTACT INPUT(SET THE COUNTER COUNT TIME SPEED BETWEEN 1 AND 30cps.)
③
※
+12V
SIGNAL INPU
COUNTER/TIMER
0V
5.6KΩ
※INA(①), INB(②), RESET(⑤),
INHIBIT(⑥), BATCH RESET(⑦),
INPUT PART
INA(⑤), INB/INH(④),
RESET(①) INPUT
SENSOR
SENSOR
COUNTER/TIM
ER
COUNTER/TIM
ER
5.6KΩ
5.6KΩ
③
④
②
※
+12V
SIGNAL
INPUT
(NPN VOLAGE OUTPUT)
③
④
※
(NPN OPEN COLLECTOR OUTPUT)
0V
0V
④
④

2) INPUT: VOLTAGE INPUT(PNP)
(1) NO ELECTRIC CONTACT INPUT
(2) ELECTRIC CONTACT INPUT (COUNTING SPEED SET WITHIN 1~ 30cps.)
* INH(Inhibit) input
(1) INH(Inhibit) input during counter operation : count input ignore
(2) INH(Inhibit) input during Timer operation : timer progress stop
③
④
※
+12V
SIGNAL
/INPUT
입력부
COUNTER/TIMER
0V
5.6KΩ
Sensor
③
④
※
+12V
Signal
/Input
입력부
(PNP Voltage output
Sensor
③
④
※
+12V
(PNP Open collector Output)
Counter/Timer
Counter/Timer
0V
0V
5.6KΩ
5.6KΩ
※INA(①), INB(②), RESET(⑤),
INHIBIT(⑥), BATCH RESET(⑦),
INPUT PART

7. OUTPUT WIRING DIAGRAM
1)
DRY CONTACTOUTPUT 2) OPEN COLLECTOR OUTPUT
3) Caution for the Non Contact(Dry Contact) output connection
* Must Do not exceed Non Contact (Dry Contact) output capacity 30VDC 100mA.
* Please connect the surge abserver ( Diode, Barrister) at the load both side when use induct load likes Relay
8. PROGRAMING (HOW TO SETTING)
1) COUNTER PRE SETTED VALUES CHANGE
.
(1) 1 Layer Display Model Setting
▶Push one time Key during operation mode.
First number will blinking and become setting mode
▶Change setting values use and key.
▶After change with wanted setting value, save new values push by key
(2) 2 Layer Display Model Setting
▶push one time Key during operation mode.
First number will blinking and become setting mode.
▶Change setting values use and key.
▶After change setting values, move 2 layer display setting mode with key.
▶After change with wanted setting value, save new values push by key.
*
During change of the setting values, the count and control output operated automatically.
SET
SET
UP
PNT
SET
UP
PNT
PNT
Load
(LOAD POWER)
COUNTER/TIMER
Load
Load
Power
(DC)
COUNTER/TIMER
카운터/타이머
(+)
(-)
PNT

* After change of setting value to
“
0
”
if push key or input RESET during operate mode, output keep
OFF status.
(but when output mode
”
T
”
status, if set 1layer setting value as
“
0
”
,then1 layer display output keep ON status).
3) TIMER PRE SETTED VALUES CHANGE
.
1) In case of the output mode is not FLK
▶push one time Key during operation mode.
First number will blinking and become setting mode.
▶Change setting values use
and key.
▶After change with wanted setting value, save new values push by key.
2) In case of the output mode is
“
FLK
”
▶Push one time Key during operation mode.
First number will blinking and become t.oFF set vales setting mode.
▶Change setting values use
and key
▶After change with wanted setting value, move to t.on setting mode push by key.
( when timer is on mode status, even if change the setting value, the timer operate normally)
4) KEY LOCK SETTED VALUES CHANGE
To prevent error operation During operate, key lock function can use with this mode .
: key unlock
: key cannot use
”
lock
”
: and key cannot use
”
lock
”
UP
PNT
RST
SET
UP
PNT
PNT
SET
UP
PNT
RST
PNT

Batch Reset
Batch Set
0
Batch output
: key, key, key cannot use
“
lock
”
5) Batch Setting Change
▶Push key one time during operate status mode.
First number will blinking and become batch counter setting mode.
▶Change setting values use and key
▶After change with wanted setting value, move to setting mode push by key.
** During the batch setting values is bigger than batch count values,
If change the batch setting values same or smaller than count values then batch output will be ON
If set the Batch setting values to) then the batch output will be maintain OFF status.
6) Batch Count Operation
1) Count
Batch Counting Values increase untill Batch reset input is initiated
If Batch count values reach to 999999 then go back to 0 like
’
s circulations
Batch Count Value
’
s dose not effected for key and external RESET input signal.
(1) Counter operation
If count values of the setting values of the 1layer model or 2
nd
layer setting values of the 2Layer model reach to batch
setting values then the Batch Output start ON.
(2) Timer operation
If count values of the setting Time values reach same with batch setting values then the Batch Output start ON.
* In case of output mode is
“
FLK
”
: if the Toff, Ton setting time is pass then the Batch count increase.
2) Batch Output
IF Batch output is start ON one time, the Batch will maintain ON status until the Batch Reset input.
RST
SET
UP
PNT
BAN
T
UP
PNT
RST

Batch out is maintain regardless of the power ON/OFF.
Batch Count Value
’
s dose not effected for key and external RESET input signal.
7) SCALE VALUES SETTING
It is useful to change the input pulse value to real change scale values.
Ex) Position control using by counter and encoder. In case of the encoder 1 pulse can show conveyer 0.025mm
movement, set the decimal point at and set scale values 0.025 at scales setting mode.
8) PROGRAMING FLOWCHART (COUNTER)
Change the setting values use by and key.
If push the key, the cursor will move to next step one by one.
* 1 Layer setting model cannot display
“
OUT 1 output time
”
setting mode at
Function setting mode, and the
“
OUT2 output time
”
setting items substitute with
“
OUT output timer (oUt.t)
”
.
* In case of the output mode set as
“
F,N
“
, count values reach to set values it hold output ON status,
“
OUT2 output
time
”
items do not show.
* In case of the output mode set as
“
S, T , D
“
,
“
OUT1, OUT2 output time
”
items do not show. The input mode fixed one
within Ud-A, Ud-B, Ud-C. Please change output mode except S.T.D to change input mode UP or DOWN status.
* In case of output mode with
“
D
”
, and max count speed with 1kcps, electric contact out cannot normal operate by
responds time. So please use as dry contact output mode.
* If output mode change to
“
D
”
at the max count speed 5kcps or 10kcps,the max count speed change to 1cps
automatically. if you want change the max count to 30 or 1kcps,you need resetting that at count speed setting mode. The
function setting modes external input will be ignore and out become OFF. Display only type model cannot display output
mode, output time setting item.
RST
SET
UP
PNT

Operation Mode (Counter)
INPUT MODE ( )
COUNT SPEED ( )
OUTPUT MODE ( )
OUT2 OUT TIME ( )
OUT1OUT TIME ( )
INPUT LOGIC ( )
MIN RESET TIME ( )
DECIMAL POINT ( )
SCALE SET ( )
COUNT MEMORY ( )
KEY LOCK ( )
COUNTER/TIMER SELECT ( )
선택( )
PROGRAMING (COUNTER)
Push 3 second SET key
OPERATION MODE (COUNTER)
Push 3 Second
SET
Key

Input mode
( )
In case of output mode is S, T, D, input mode fixed to
Ud-A, B, C.
Max count
Speed
( )
Maxcount speed base on the INA or INB input signal is1:1
Max count speed setting is applied same time at INA,INB.
In case output mode is
“
D
”
can select one from 1, 30, 1kcps.
outputmode
( )
in case of input mode is Up or Down
in case of input mode is Up/Down-A, B, C
OUT2 outtime
( )
Unit:ms
OUT1 outtime
( )
Unit :ms
Input logic
( )
Select input logic.
voltage : non voltage :
min Reset time
( )
external RESET signal input min time interval(Unit : ms)
Decimal point
( )
Scale setting
( )
Scale setting range : 0.001 ~ 99.999
Scale values(K-Factor) : 1counter value of convert to real scale
Count memory
( )
: count power off reset
(If power off, count reset to 0 )
: count power off memory
(If power off ,count memory before power off)
Key lock
( )
Counter/Timer select )
: Counter
: Timer
* A
”
more than min signal width,
”
B
”
more 1/2 then min signal width
If the signal width is under that, the count can make error ±1 count.
* The meaning of
“
H
”
,
“
L
”
at count table

H
0
계수금지
(Down)
(Up/
Down-
A)
지령입력
(Up)
Voltage input(PNP)
Dry contact input(NPN)
H
5-30VDC
(Short)
L
0-2VDC
(Open)
8) INPUT MODE OF OPERATION (COUNTER)
Input mode
Count diagram
Remarks
INA: count input
INB: count input stop
( limitation of count of INA)
In case of INA is
“
L
”
, count stop setting
(INB:
”
L
”
->
”
H
”
)or unlock of count stop
(INB:
”
H
”
->
”
L
”
)
INA: count stop input
(( limitation of count of INB)
INB: count input
In case of INB is
“
H
”
count stop setting
(INA:
”
H
”
->
”
L
”
) or unlock of count stop
(INA:
”
L
”
->
”
H
”
)
INA: Count input
INB: Count input stop
(limitation of count input of INA)
n=setting values(Preset values)
In case of INA is
“
L
”
count stop setting
(INB:
”
L
”
->
”
H
”
) or unlock of count stop
(INB:
”
H
”
->
”
L
”
) .
INA: Count input stop
(limitation of the count input of INB)
INB: count input
n=setting Values(Preset Values)
In case of INB is
“
H
”
count stop setting
(INA:
”
H
”
->
”
L
”
)or unlock of count stop
(INA:
”
L
”
->
”
H
”
) .
INA: Count input
INB:PLUS(Up)/MINUS(Down) count order input
Incase of INBis
“
L
”
, PLUS Count(Up)
Incase of INBis
“
H
”
, MNUS Count(Down)
INA
INB
Count Value
계수값
L
H
L
계수금지
0
A
A
1
2
3
4
5
H
INA
INB
Count Value
L
H
L
0
0
A
A
1
2
3
4
5
INA
INB
Count Values
H
L
H
L
계수금지
A
A
n
n-1
n-2
n-3
n-4
n-5
0
INA
INB
Count
Values
H
L
H
L
0
계수금지
A
A
n
n-1
n-2
n-3
n-4
n-5
INA
INB
Count Values
계수값
H
L
H
L
0
0
A
A
1
2
3
2
1
2
3

(Up/
Down-
B)
개별입력
(Up/
Down-C)
위상차입력
INA:PULS(Up)Count input
INB:MINUS(Down)Count input
INA and INBis input from
“
L
”
to
“
H
”
simualtanously
It sustain before count input status.
Incase of Encorder output A,B pole connect to couter input
INA, INB, counter mode need set to (Ud-C) mode.
INA
INB
계수값
H
L
H
L
0
0
1
2
3
2
1
2
3
1
INA
INB
Count Values
계수값
H
L
H
L
0
0
1
2
3
2
2
3
1
B
B
B
B

RESET
999999
PRESET
2
PRESET
1
0
OUT
1
OUT2
(OUT
)
RESET
999999
PRESET
2
PRESET
1
0
OUT
1
OUT2
(OUT
)
RESET
999999
PRESET
2
PRESET
1
0
OUT
1
OUT2
(OUT
)
RESET
999999
PRESET
2
PRESET
1
0
OUT
1
OUT2
(OUT
)
RESET
999999
PRESET
2
PRESET
1
0
OUT
1
OUT2
(OUT
)
RESET
999999
PRESET
2
PRESET
1
0
OUT
1
OUT2
(OUT
)
RESET
999999
PRESET
2
PRESET
1
0
OUT
1
OUT2
(OUT
)
RESET
999999
PRESET
2
PRESET
1
0
OUT
1
OUT2
(OUT
)
9) OUTPUT MODE OF OPERATION (COUNTER)
Output Mode
Input mode
Explanations
Up
Down
Up/Down
–
A, B, C
(F)
After Count-up, Display Values increase or
decrease according to input and the output
sustain self output until before initialize of RESET
input
(N)
After Count-up output sustain the Display and
self values until input signal is initialized.
(C)
The display values will be reset start status at
the same time with Count-up.
Self sustain output of OUT1
After One-shot Time of OUT2 become OFF
The One-shot output time of OUT1 is not
connected
with OUT2 output.
(R)
After One-shot Time of OUT2 the display
values will be recover to Reset Start status
The Self sustain output of OUT1 will be OFF after
One-shot time off OUT2.
The One-shot output time of OUT1 is not
connected
with OUT2
(K)
After Count-up, Display Values increase or
decrease according to input and the output
sustain self output until before initialize of
RESET input
Self sustain output of OUT1
After One-shot Time of OUT2 become OFF
The One-shot output time of OUT1 is not
connected
with OUT2
(P)
The Display values after count up will sustain
until during One
–
Shop time of OUT2 and the
Count will restore to Reset Start Status in
same time OUT2 is ON The self sustain
output of OUT1 will be OFF after One Shot
time of OUT2
The One-shot output time of OUT1 is not
connected
with OUT2
(Q)
After Count-up, Display Values increase or
decrease while One Shot Time of OUT2.
Self sustain output of OUT1
After One-shot Time of OUT2 become OFF
The One-shot output time of OUT1 is not
connected
One-shot output(OUT1 output)
Self maintain output
One-shot output
(OUT2 output)
Self maintain output
Accord output

RESET
999999
PRESET
2
PRESET
1
0
OUT
1
OUT2
(OUT
)
RESET
999999
PRESET
2
PRESET
1
0
OUT
1
OUT2
RESE
T
(OUT)
-
999999
RESET
999999
PRESET
2
PRESET
1
0
OUT
1
OUT2
RESE
T
(OUT)
set
키를
3초
이상
누름
PRESE
T1
PRESE
T2
999999
RESET
(OUT)
OUT2
OUT1
0
PRESE
T1
PRESE
T2
999999
RESET
(OUT)
OUT2
OUT1
0
PRESE
T1
PRESE
-
999999
RESET
999999
PRESET
2
PRESET
1
0
OUT
1
OUT2
RESE
T
(OUT)
-
999999
with OUT2
(A)
The Display values and the self sustain output
of OUT1 will sustain after count up until
Reset input is initialized
The One-shot output time of OUT1 is not
connected with OUT2
다.
Up/Down –A,
B, C
(S)
OUT1 output
( while Display (PRESET1)
Sustain ON.
OUT2 output
( while Display (PRESET1)
Sustain ON .
(T)
OUT1 output
( Display Values) (PRESET1)
become OFF .
(but , in case of PRESET1is 0, the OUT1
output
Sustain ON status)
OUT2 output
(While Display values (PRESET2)
Sustain ON status.
(D)
ON status sustain only Preset values
(PRESET1, PRESET2)and Display Values is
accord
Please use non contact output when you
seted count speed to 1kcps
10) TIME RANGE SETTING (TIMER)
TIME RANGE
FUNCTION SETTING MODE AND SETTING VALUES
COUNT DISPLAY
SETTING DISPLAY
0.01s ~ 9999.99s
0.1s ~ 99999.9s
1s ~ 999999s
0.01s ~ 99m59.99s
0.1s ~ 999m59.9s
0.1m ~ 99999.9m
1m ~ 999999m
1s ~ 99h59m59s
1m ~ 9999h59m
11) TIME SETTING MODE (TIMER)
* DURING FUNCTION SETTING MODE,THE INPUT SIGNAL IGNOR AND OUTPUT WILL BE OFF.
* IN CASE OF THE OUTPUT MODE IS FLK, INT, INT1, OFD,THE OUTPUT TIME SETTING MENU DISAPPEAR AT FUNCTION
SETTING MODE .
* IN CASE OF ONLY DISPLAY MODE, THE OUTPUT MODE AND OUTPUT TIME SETTING MENU DISAPPEAR AT FUNCTION
SETTING MODE .
RESET
999999
PRESET
2
PRESET
1
0
OUT
1
OUT2
RESE
T
(OUT)
set
키를
3초
이상
누름
PRESE
T1
PRESE
T2
999999
RESET
(OUT)
OUT2
OUT1
0
PRESE
T1
PRESE
T2
999999
RESET
(OUT)
OUT2
OUT1
0
PRESE
T1
-
999999
RESET
999999
PRESET
2
PRESET
1
0
OUT
1
OUT2
RESE
T
(OUT)
-
999999
RESET
999999
PRESET
2
PRESET
1
0
OUT
1
OUT2
RESE
T
(OUT)
-
999999

* IN CASE OF 2LAYER DISPLAY MODEL,DURING TIMER OPERATION MODE THE OUTPUT WILL LIMITED ONLY TO
OUTPUT ,THE OUTPUT 1 ALWAYS MAINTAIN OFF STATUS.
Change the setting values use by and key.
If push the key, the cursor move to next step one by one.
SET
UP
PNT
OPERATION MODE (TIMER))
TIME RANGE
UP/DOWN MODE ( )
OUTPUT MODE( )
OUTPUT TIME( )
INPUT LOGIC( )
INUT SIGNAL TIME( )
KEY LOCK ( )
COUNTER/TIMER SELECT( )
FUNCTION SETTING
MODE( TIMER)
PUSH OVER 3 SECONDS SET KEY
OPERATION MODE (TIMER)
PUSH OVER 3 SECONDS SET KEY

OUT2
(OUT)
POWER
IN
A
T(설정시간)
OUT2
(OUT)
POWER
IN
A
T(설정시간)
OUT2
(OUT)
T(설정시간)
POWER
Hold
OUT2
(OUT)
IN
A
Toff
POWER
Ton
Toff
POWER
IN
A
INHIBIT
RESET
OUT2(OUT
)
0
설정시간
설정시간
0
t
Up
Display
Down
POWER
INA
INHIBIT
RESET
OUT2(OUT)
0
설정시간
설정시간
0
t
t
t
Up
Display
Down
POWER
INA
INHIBIT
RESET
OUT2(OUT)
0
설정시간
설정시간
0
t
t-a
t
a
Up
Display
Down
POWER
INA
INHIBIT
RESET
OUT2(OUT)
0
Ton 설정시간
Toff 설정시간
0
Ton 설정시간
Toff 설정시간
Tof
f
Ton
T
a
T
b
Ton
Tof
f
Ton
Tof
f
Ton
Tof
f
Up
Display
Down
OUT2
(OUT)
IN
A
T
POWER
T
T
T:설정시간
T
POWE
R
INA
INHIBIT
RESE
T
OUT2(OUT
)
0
설정시간
설정시간
0
OUT2
(T)
INA
T
POWER
T
T
T:설정시간
T
Up
Display
Down
자기
유지
출력
12) OUTPUT OPERATION MODE(TIMER)
* Power Reset : Do not compensate the display values when it power off .(In case of power off the display values initialized)
* Power Hold : Compensate the display values when it power off .(Memorized the display values when it power off before. Restore
Display memorized values before power off when recover to power on)
Output Mode
Time FLOW CHART
Operation Explanation
(OND)
Signal ON Delay(Power Reset)
1) While INA input is ON the Timer Start .
2)in case of the INA input is OFF, Reset
operate.
3)I) In case of INA ON :
Power ON Time Start
Reset OFF Time Start
4) Control Out self sustain operate or One-shot
operate
다.
(OND.1)
Signal ON Delay 1(Power Reset)
1)While INA input is ON the Timer Start.
2) ) In case of INA ON :
Power ON Time Start
Reset OFF Time Start
3)Control Out self sustain operate or One-shot
operate.
4)If repeat INA input ,the first signal only effective.
(OND.2)
Power ON Delay(Power Hold)
1)while Power ON Time Start
2) No INA Function.
3)RESET ON : Time Reset
RESET ON -> when change to OFF Time Start
4) Control out self sustain operate or One-shot
operate.
5) Memorize before Power OFF display values.
(FLK)
Flicker(Power Reset)
1)I) When INA input is ON, the Time Start.
2) In case of INA ON :
Power ON Start
Reset OFF Start
3) Control out self sustain operate ..
4) At pointof INA is ON, during T off setting time
Output become OFFand During Ton setting time,Output become ON
Repeate .
Toff setting Time : Output OFF Time
Ton setting Time : Output ON Time
Ta+Tb=Toff Setting Time
5)OFF setting time (off) and ON setting time
(Ton) must sett saperatley.
6)During FLK output Mode, no One-shot output
i.e Hold output.
7) Please set minimum setting time is over 100ms or more
(FLK.1)
Flicker1 (Power Reset): 자기 유지 출력인 경우
1)I) When INA input is ON, the Time Start.
2) In case of INA ON :
Power ON Start
Reset OFF Start
3) Control out self sustain operate.
4) In case of too small time setting,
Contact put make error of output by responds time
Please set minimum setting time is over 100ms or more
Flicker1 (Power Reset): One-shot 출력인 경우
1) When INA input is ON, the Time Start.
c
OUT2
(OUT)
INA
T
POWER
T-c
T:설정시간
T
HOLD
c
OUT2
(OUT)
INA
T
POWER
T-c
T:정시
T
HOLD

POWE
R
INA
INHIBIT
RESE
T
OUT2(OUT
)
설정시간
설정시간
0
0
t
t
t
INA
T
POWER
OUT2
(OUT)
T
T:설정시간
IN
A
T
POWER
T:설정시간
OUT2
(OUT)
IN
A
T
POWER
T:설정시간
OUT2
(OUT)
OUT2
(OUT)
INA
T
POWER
T-c
c
T:설정시간
T
HOLD
Up
Display
Down
Up
Display
Down
Up
Display
Down
Up
Display
Down
POWER
INA
INHIBIT
RESET
OUT2(OUT)
0
설정시간
설정시간
0
POWER
INA
INHIBIT
RESET
OUT2(OUT)
설정시간
설정시간
0
0
POWER
INA
INHIBIT
RESET
OUT2(OUT)
설정시간
설정시간
0
0
2) In case of INA ON :
Power ON Start
Reset OFF Start
3)Contorl output poerate One-shot .
4) In case of too small time setting,
Contact out put make error of output by responds time
Please set minimum setting time is over 100ms or more
.
(FLK.2)
Flicker2 (Power Hold):In case of Self sustain output
1) Timer start while INA input is ON.
2) During INA ON status :
Power ON Start
Reset OFF Start
3) Control out self sustain operate
4) If reached preseted time values
Control output change(But,Initial Start
OUT2 control output is OFF)
5) In case of too small time setting,
Contact out put make error of output by responds time
Please set minimum setting time is over 100ms or more
(FLK.2)
Flicker2 (Power Hold): In case of One-shot output
1) Timer start while INA input is ON.
2) During INA ON status :
Power ON Start
Reset OFF Start
3) Control output will One-shot operation.
4)In case of set too small time
Contact out put make error of output by responds time ,
So please set Min setting time more 100ms .
(INT)
Interval(Power/Signal Reset)
1) ) Timer start while INA input is ON.
2) Reset operate while IINA is OFF.
3)During INA ON status :
Power ON Start
Reset OFF Start
4)If reached preseted time values it become Auto Reset.
5) Control output will ON while time processing
(INT1)
Interval 1(Power Reset)
1) Timer start while INA input is ON..
2 During INA ON status :
Power ON Start
Reset OFF Start
3) During timer process INA Input ignores.
4) If reached preset time values it become Auto Reset.
5) Control output will ON while time processing
(OFD)
Signal OFF Delay(Power Reset)
1) During INA ON status, control output sustain ON status.
(But, except when Power is OFF and Reset is ON )
2) If reached preset time values it become Auto Reset
t
t
t
a
t-
a
t
Table of contents