Sangean DPR-77 User manual


1
Contents
Controls ...................................................................... 2-3
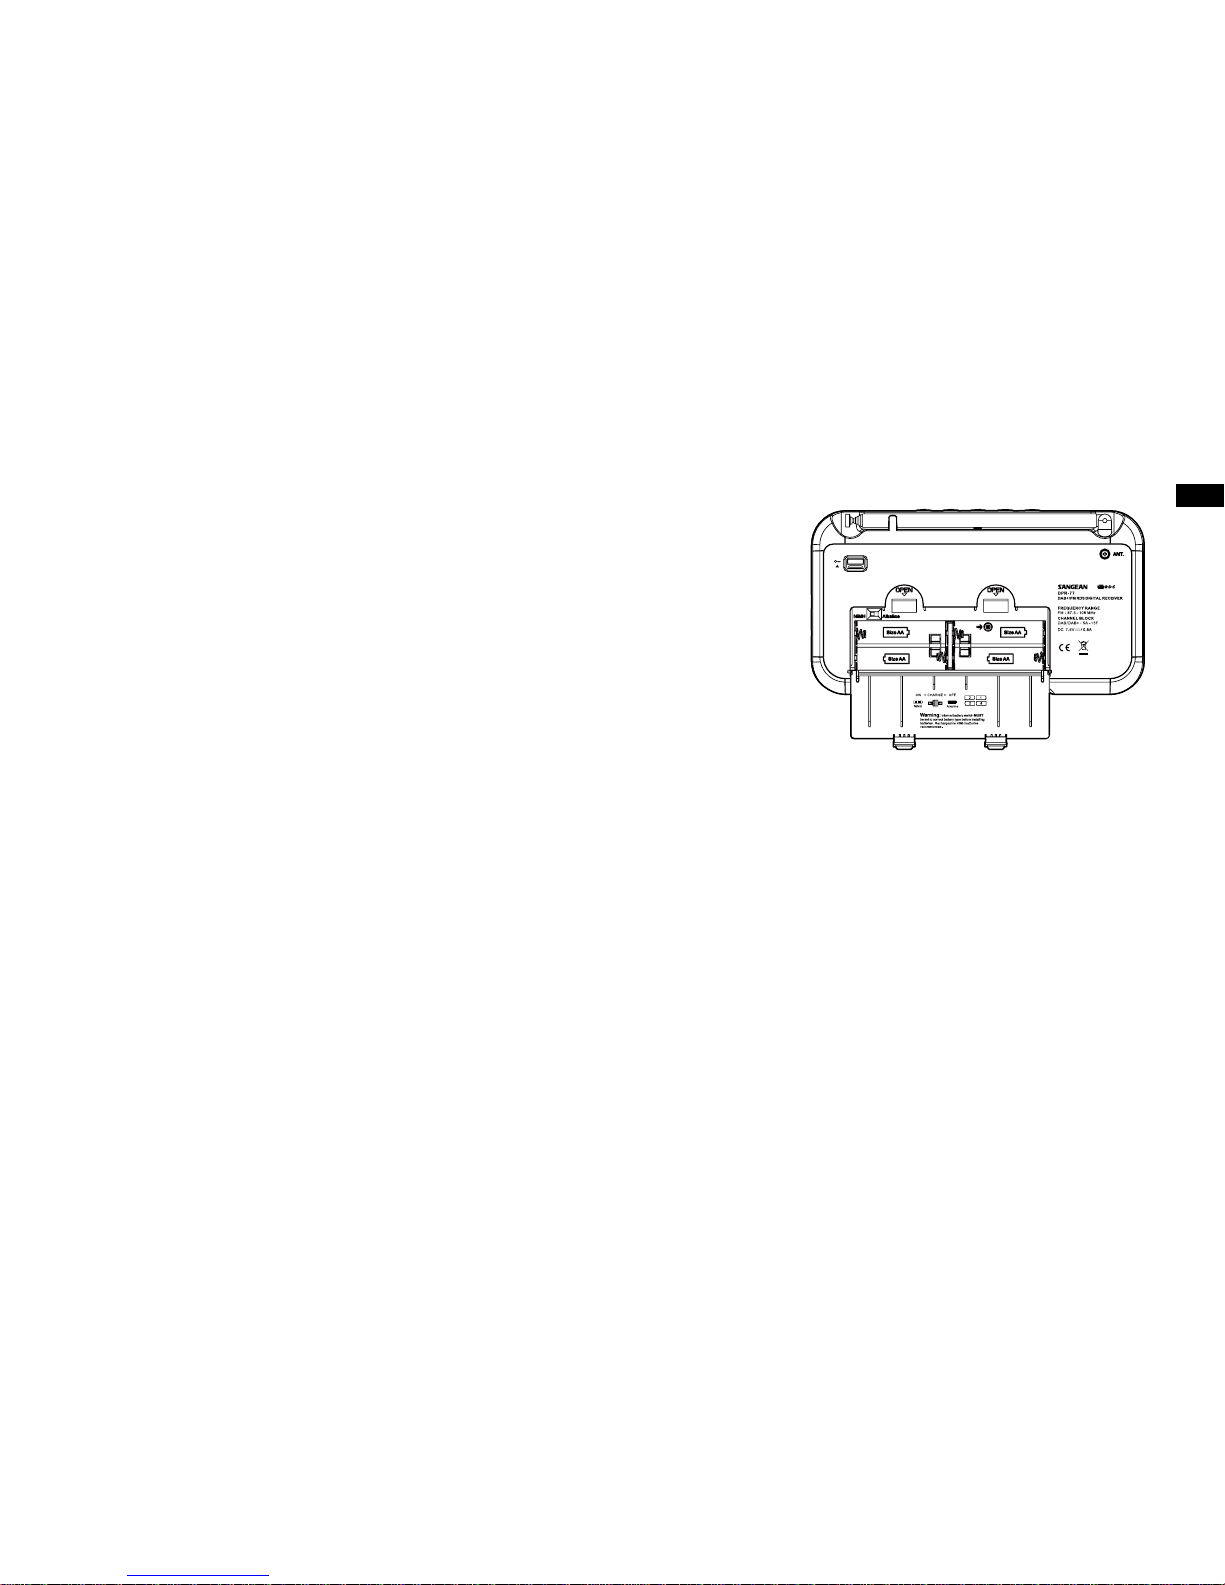
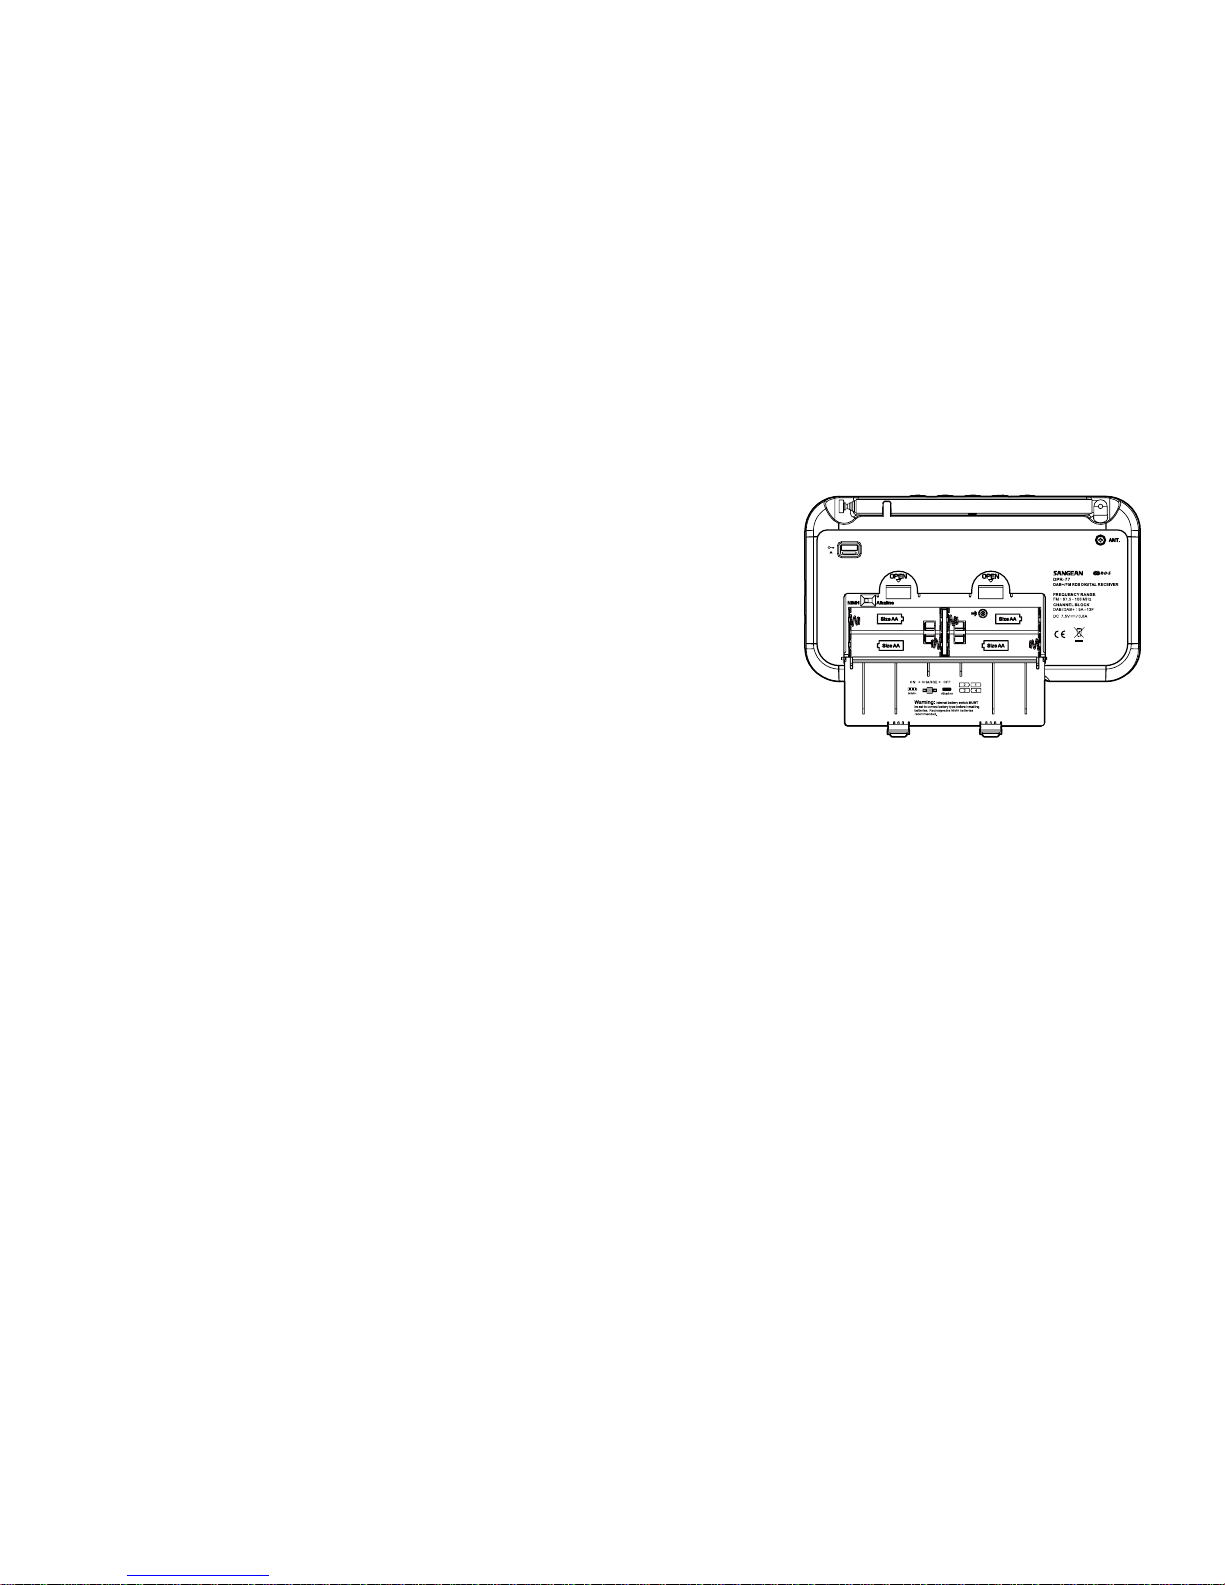
Battery operation ........................................................ 4-5
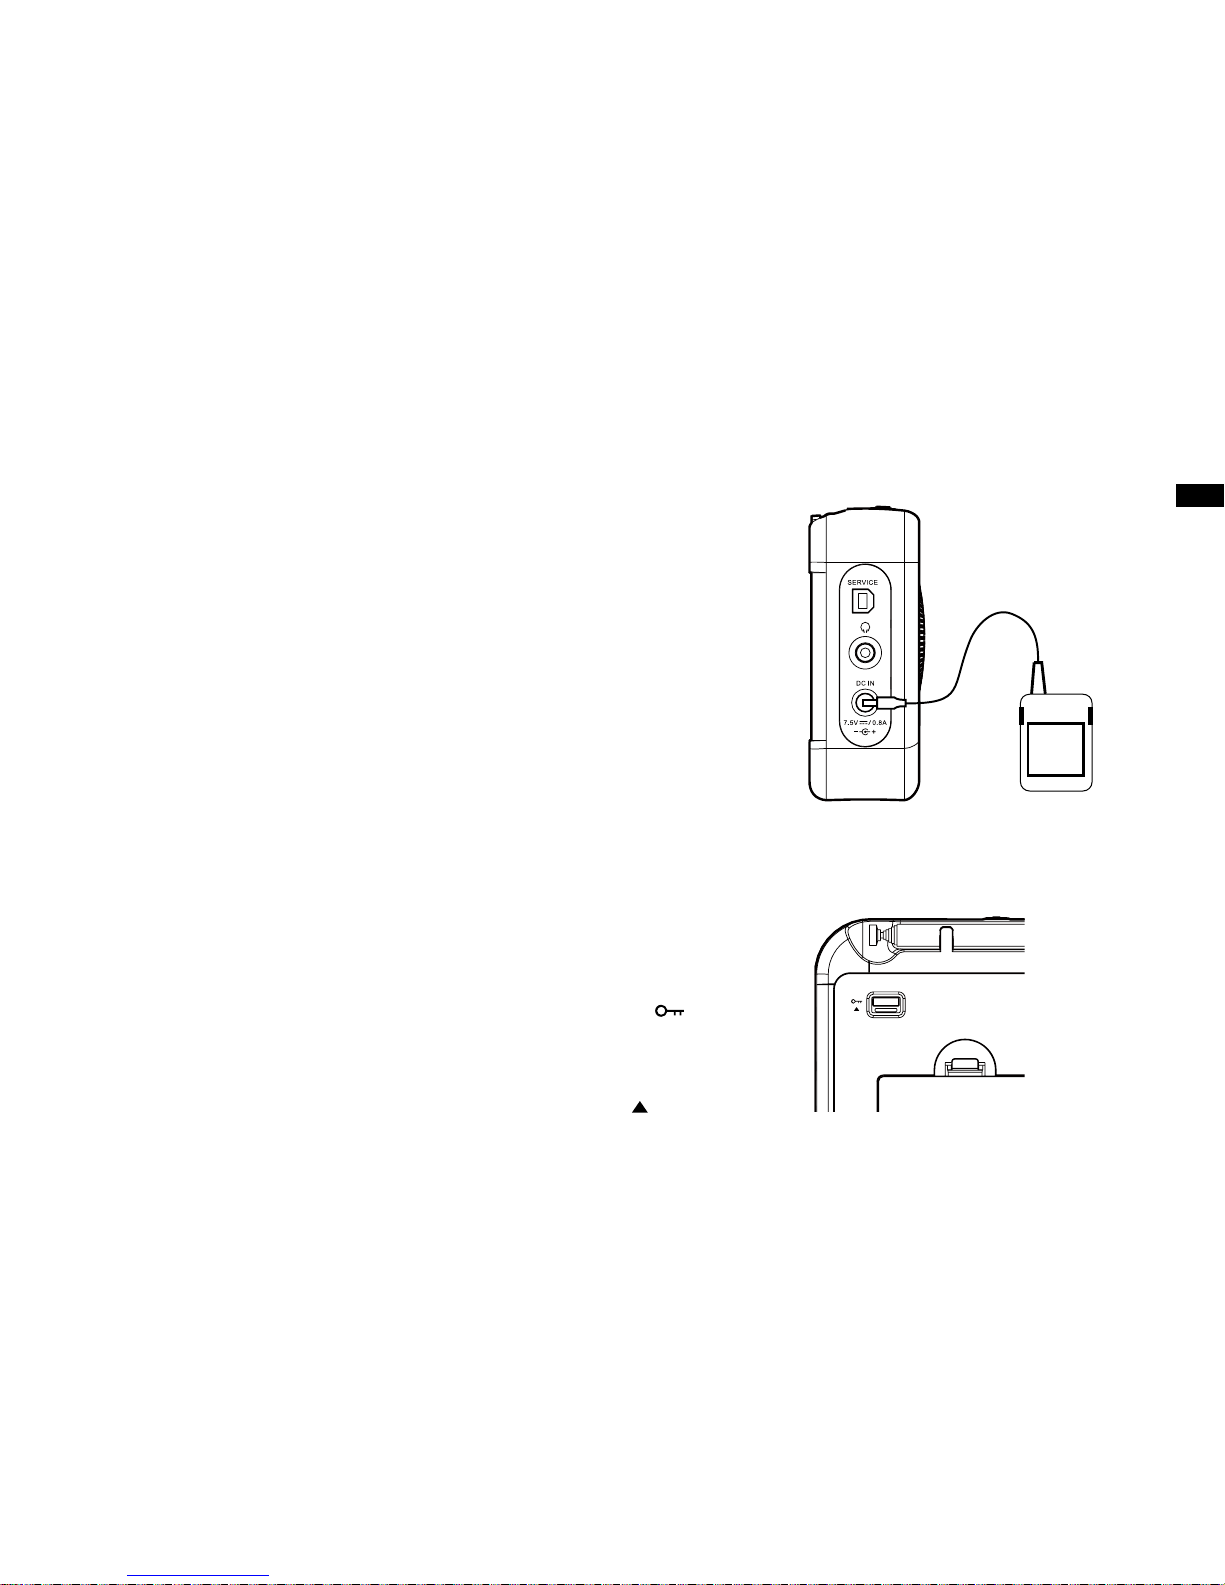
Using the AC adaptor ..................................................... 6
Lock switch .................................................................... 6
Operating your radio - DAB ............................................ 7
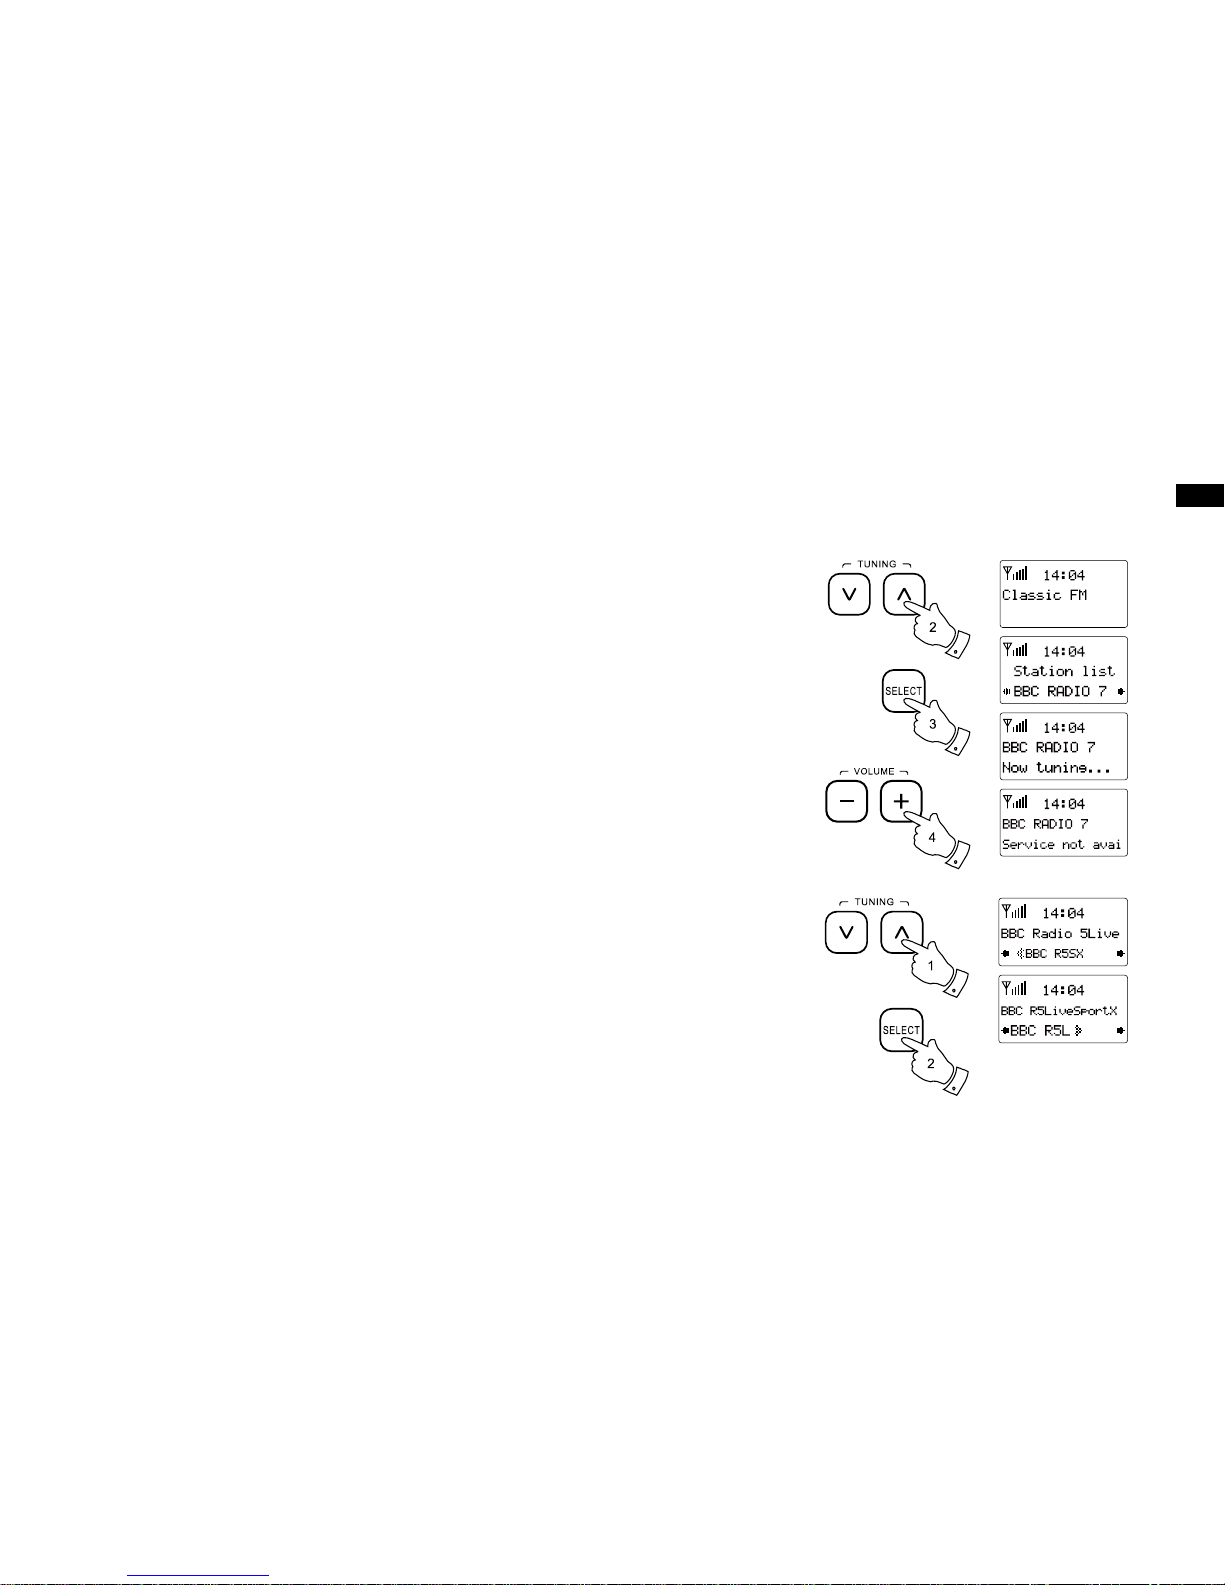
Selecting a station - DAB ............................................... 8
Secondary services - DAB ............................................. 8
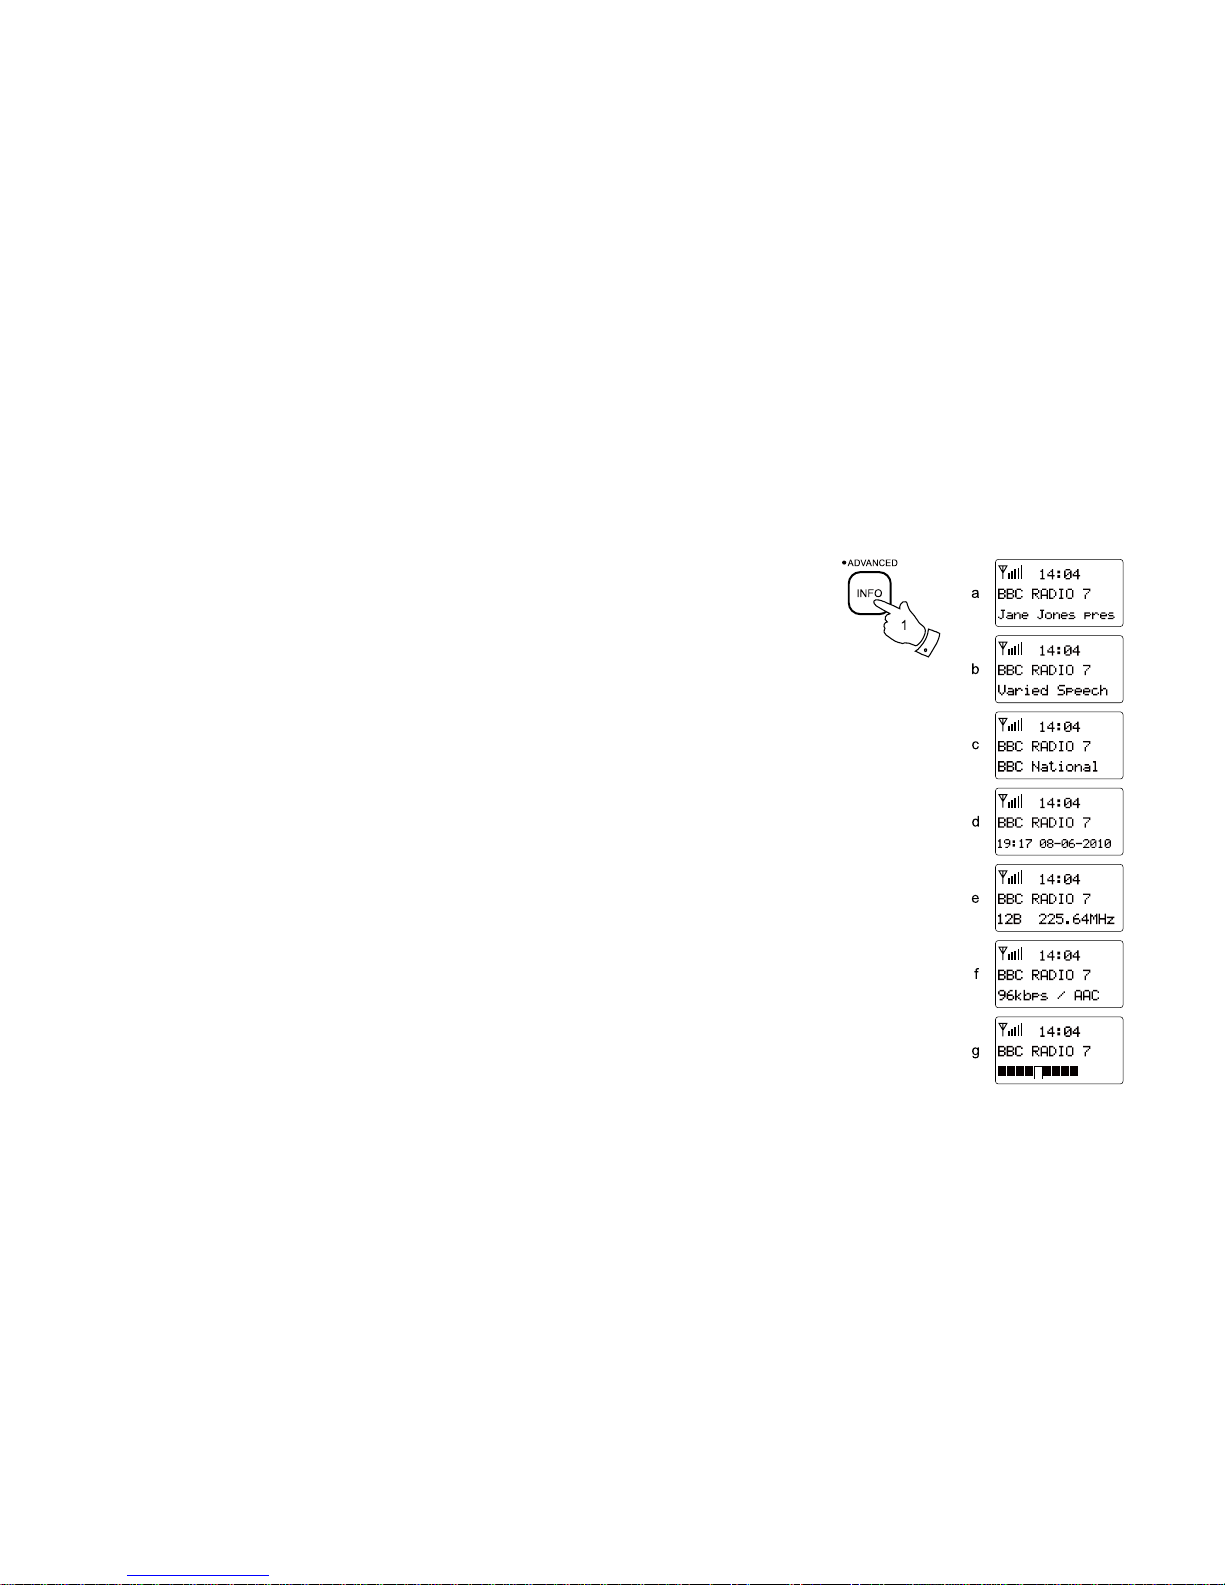
Display modes - DAB .................................................... 9
Finding new stations - DAB .......................................... 10
Manual tuning - DAB .................................................... 10
Dynamic range control - DAB ...................................... 11
Prune stations.............................................................. 12
Operating your radio - FM ............................................ 13
Manual tuning - FM ...................................................... 14
Display modes - FM ..................................................... 15
Presetting stations - DAB and FM ................................ 16
Recalling a preset - DAB and FM ................................ 16
Stereo / Mono setting - FM .......................................... 17
Scan sensitivity setting - FM ........................................ 18
Software version .......................................................... 19
Language selection ...................................................... 19
System reset ................................................................ 20
Headphone socket ....................................................... 21
Display backlight .......................................................... 21
USB socket for software upgrade ................................ 21
Battery information .................................................. 22-24
General ........................................................................ 25
Specications ............................................................... 26
Circuit features ............................................................. 26

GB
2
Controls
1. Speaker
2. Band button
3. Auto Tune button
4. Info button
9. Charge / Battery Low indicator
10. Tuning Up / Down buttons
11. Select button
12. Preset buttons
5. Volume Down button
6. Volume Up button
7. On / Off button
8. Lock switch
(Front)

3
Controls
(Back)
13. Battery compartment
14. Telescopic aerial
15. Headphone socket
16. DC jack socket
17. USB socket for software upgrade
18. Rechargeable / Alkaline battery switch

GB
4
Battery operation using alkaline batteries
1. Remove the battery cover on the back of the unit by sliding the cover in the direction of
the arrow.
2. Slide the switch inside the battery compartment to the Alkaline position.
3. Insert four LR6 (AA size) alkaline batteries into the spaces in the compartment. Take care to
ensure all batteries are inserted with the correct polarity as shown on the back of the radio.
Then replace the battery cover.
Important:
●when using alkaline batteries the battery switch must be placed in the alkaline position.
Failure to do so could result in serious damage to the batteries or radio.
● When the batteries are exhausted, the battery light will show red for a short while. The radio
will then switch itself off. It may not be possible to switch the radio back on until the batteries
are replaced, or until the radio is connected to the mains adaptor.
● If the radio is not to be used for any extended period of time it is recommended that the batteries
are removed from the radio.
●
We would recommend for economy that the DPR-77 is used via the AC adaptor whenever
possible with battery operation for occasional or stand-by use only. If extended listening using
batteries is anticipated, then the use of rechargeable batteries is recommended.

5
Battery operation using rechargeable batteries
1. Remove the battery cover on the back of the unit by sliding the cover in the direction of
the arrow.
2. Slide the switch inside the battery compartment to the NiMH position.
3. Insert four Rechargeable LR6 (AA size) batteries into the spaces in the compartment.
Take care to ensure all batteries are inserted with the correct polarity as shown on the
back of the radio. The radio is designed to be used with Nickel Metal Hydride (NiMH)
rechargeable batteries.
4. Plug the mains adaptor into your radio and then plug the adaptor into the mains.
5. The battery light will ash green indicating batteries are charging. Batteries will be fully charged
in around 7 hours. The battery light shows a steady green light when the battery charging
is complete.
●Important:
when using rechargeable batteries the battery switch must be placed in the NiMH position.
Batteries will only be charged when the radio is switched off and connected to the
AC adaptor.
● When the batteries are exhausted, the battery light will show red for a short while. The radio
will then switch itself off. It may not be possible to switch the radio back on until the batteries
are recharged, or until the radio is connected to the mains adaptor.
● If the radio is not to be used for any extended period of time it is recommended that the batteries
are removed from the radio.
IMPORTANT:
The batteries should not be exposed to excessive heat such as sunshnie, re or the like. After
use, disposable batteries should if possible be taken to a suitable recycling centre. On no account
should batteries be disposed of by incineration.

GB
6
Using the AC adaptor
Your radio is supplied with a Mains Adaptor.
1. Place your radio on a at surface.
2. Insert the adaptor plug into the DC socket located on the left hand side of your radio.
3. Plug the adaptor into a standard 13 amp mains socket outlet. Whenever the adaptor is
used with the radio, it will take power from the mains rather than from the batteries.
The AC adaptor should be disconnected from the mains supply and the radio when not in use.
●IMPORTANT:
The mains adaptor is used as the means of connecting the radio to the mains supply. The
mains socket used for the radio must remain accessible during normal use. In order to
disconnect the radio from the mains completely, the mains adaptor should be removed
from the mains socket outlet completely.
Lock switch
The Lock switch is used to prevent unintentional operation of your radio.
1. Set the Lock switch located on the back of your radio to the ‘Lock’ position . The power
and all other buttons will be disabled, this will prevent accidental operation when your radio
is packed in a suitcase or travel bag.
2. To release the lock, slide the Lock switch down to the ‘Unlock’ position .

7
Operating your radio - DAB
1. Carefully extend the telescopic aerial.
2. Press the On/Off button to switch on your radio. The display will show “Welcome to Digital
Radio” for a few seconds.
3. If this is the rst time the radio is used to scan of the Band III DAB channels will be carried
out. The display will show “Welcome to DAB”. If the radio has been used before the last
used station will be selected.
4. During the scanning process, as new stations are detected the station counter on the right
hand side of the display will increase and stations will be added to the list. The lower line
of the display shows a bar-graph indicating progress of autotune.
5. When the scanning is completed the rst station (in numeric-alpha order 0...9...A....Z) will
be selected.
6. If the station list is still empty after the scan, your radio will show “No DAB Station“ for a
moment.
7. If no signals are found it may be necessary to relocate your radio to a position giving better
reception.

GB
8
Selecting a station - DAB
1. The top line of the display shows the name of the station currently selected.
2. Press the Tuning Up/Down buttons to scroll through the list of available stations.
3. Press and release the Select button to select the station. The display may show “Now
tuning...” while your radio nds the new station.
4. Adjust the Volume up or Down buttons to the required setting.
Note:
If after selecting a station the display shows “Service not available“. it may be necessary
to relocate your radio to a position giving better reception.
Secondary services - DAB
1. Certain radio stations have one or more secondary services associated with them. If a
station has a secondary service associated with it the display will show “>>” next to the
station name on the station list. The secondary service will then appear immediately after
the primary service as you press the Tuning Up button.
2. Press the Select control to select the station.

9
Display modes - DAB
Your radio has seven display modes:-
1. Press the Info button to cycle through the various modes.
a. Scrolling text Displays scrolling text messages such as artist/track name,
phone in number etc.
b. Program Type Displays the type of station being listened to e.g. Pop, Clas-
sic, News etc.
c. Multiplex Name Displays the name of DAB multiplex to which the current
station belongs.
d. Time and date Displays the current the time and date.
e. Frequency Displays the frequency of the DAB multiplex for the station
listened to.
f . Bit rate & audio type Displays the digital bit rate & audio type for the station being
listened to.
g. Signal Strength Displays a graph showing the signal strength for the station
being received.

GB
10
Finding new stations - DAB
As time passes new stations may become available. To nd new stations proceed as follows:-
1.
With the radio switched on and in DAB mode, press and release the Auto Tune button.
The display will show "Scanning..." and your clock radio will perform a scan of the Band III
DAB channels. As new radio stations are found the station counter on the right-hand side
of the display will increase and the radio stations will be added to the list stored in the radio.
Manual Tuning - DAB
Manual tuning allows you to tune directly to the various DAB Band III channels. Note that
DAB stations are located in the range of 5A-13F.
1.
Press and hold the Info button until the display shows “Manual tune”. Release the
Select button.
2. Press either of the Tuning Up/Down buttons to select the required DAB channel.
3. Press and release the Select button to select the required DAB channel. The clear unlled
rectangle indicates the minimum signal level required for satisfactory reception. The signal
strength bar will go up and down showing the changing signal strength as you adjust the
telescopic aerial on your radio.
4. When a DAB signal is found, the display will show the name of the DAB multiplex. Any new
radio stations found will be added to the list stored in the radio.
5. Press and release the Select button to return to the normal DAB tuning mode.

11
Dynamic Range Control settings - DAB
Dynamic Range Control (also known as DRC) can make quieter sounds easier to hear when
your radio is used in a noisy environment.
1. Press the On/Off button to switch on your radio.
2. Press and hold in the Info button. The display will show “Station list.”
3. Press the Tuning Up/Down buttons until the display shows “DRC value”.
4. Press and release the Select button to enter adjustment mode.
5. Press the Tuning Up/Down buttons to select the required DRC setting (the default is 0).
DRC 0 - DRC is switched off, Broadcast DRC will be ignored.
DRC 1 - DRC is set as sent by broadcaster.
DRC 1/2 - DRC level is set to 1/2 that sent by broadcaster.
6. Press and release the Select button to conrm the setting.
The display will return to normal tuning mode.
Note:
Not all DAB broadcasts are able to use the DRC function.
If the broadcast does not support DRC, then the DRC setting in the radio will have no effect.

GB
12
Prune stations
If you move to a different part of the country, some of the stations which were listed may no
longer be available. Also, from time to time, some DAB services may stop broadcasting, or
may change location or frequency. Stations which cannot be found, or which have not been
received for a very long time are shown in the station list with a question mark. The Prune
stations function will delete the marked DAB stations from your station list.
1. Switch on your radio.
2. Press the Band button to select DAB band.
3. Press and hold the Info button to enter the DAB menu.
4. Press the Tuning up/down button until 'Prune' is highlighted.
Press the Select button to enter the setting.
5.
To cause the stations list to be pruned, eliminating unavailable stations press the Tuning
up/down button until 'YES' is highlighted on the display. Press the Select button to cause
the invalid station names to be removed from the station list.
6.
If you do not wish to prune stations, highlight 'NO' and then press the Select button. The
display will revert to the previous menu.
Note:
If you have moved your radio to a different part of the country you should also carry out a
search for new stations (please see the section 'Finding new stations').

13
Operating your radio - FM
1. Carefully extend the telescopic aerial.
2. Press the On/Off button to switch on your radio. The display will show “Welcome to Digital
Radio” for a few seconds.
3. Press the Band button to select the FM band.
4.
Press the Auto tune button. Your radio will scan from the currently displayed frequency
direction upwards and will stop scanning when it nds a station of sufcient strength.
5. The display will show the frequency of the signal which has been found. If RDS information
is available, after a few seconds the display will show the radio station name. The display
will also show “St” and “RDS” on the upper line if the station is received with stereo and
RDS information.
6.
Press and hold the Auto tune button to scan the FM band in a downwards direction (high frequency
to low frequency).
7. When the end of the waveband is reached your radio will recommence tuning from the
opposite end of the waveband.
8. Adjust the Volume control to the required setting.
9. To switch off your radio press the On/Off button.

GB
14
Manual tuning - FM
1. Press the On/Off button to switch on your radio.
2. Press the Band button to select the FM band. Fully extend the Telescopic aerial.
3. Press either the Tuning Up or Down buttons to tune to a station. The frequency will change
in steps of 50kHz. Pressing and holding one of the buttons will advance the frequency
selection several times each second.
4. When the end of the waveband is reached the radio will recommence tuning from the
opposite end of the waveband.
5. Adjust the Volume control to the required setting.

15
Display modes - FM
In FM mode the bottom line of the display can be set any of four display options.
1. Press the Info button to cycle through the various options.
a. Radio text Displays scrolling text messages such as artist/track name,
phone in number etc.
b. Program Type Displays the programme information for the station being lis-
tened to e.g. Pop, Classic, News, etc.
c. Time and date Displays the current time and date.
d. Frequency Displays the frequency of the station being listened to.
Note:
These FM mode information displays are only available when the radio is able to receive
RDS information from the broadcaster.

GB
16
Presetting stations - DAB and FM
There are 5 memory presets for each of the two wavebands.
1. Press the On/Off button to switch on your radio.
2. Tune to the required station as previously described.
3. Press and hold the required Preset button until the display shows, for example, “Preset 1
stored”. The station will be stored under the chosen preset button. Repeat this procedure
for the remaining presets.
4. Stations stored in the presets may be overwritten by following the above procedure.
Recalling a preset - DAB and FM
1. Press the On/Off button to switch on your radio.
2. Select the required waveband.
3. Momentarily press the required Preset button. Your radio will then tune to the station
stored in preset memory.

17
Stereo / Mono setting - FM
Your radio will play stereo broadcasts in stereo so long as the received signal is of adequate
strength. However, as a stereo signal becomes weaker the audio signal will become poorer.
It may be preferable to force the radio to play the station in mono in order to reduce the level
of audio noise.
1. Press the On/Off button to switch on your radio.
2. Tune to the required FM radio station as previously described.
3.
press and release the Select button to switch between 'Force mono' and normal automatic
'Auto stereo / mono' setting.

GB
18
Scan sensitivity setting - FM
Your radio will normally scan for FM broadcasts which are strong enough to give good
reception. However, you may wish the Auto-scan function to also be able to nd weaker
signals, possibly from more distant radio transmitters. Your radio includes a local / distant
option for the Auto-scan function.
1. Press the On/Off button to switch on your radio.
2. If needed, press the Band button to select the FM band.
3. Press and hold the Info button to enter the menu setting.
4. Press and release the Tuning up or down buttons until the display shows “FM Scan Zone”
then press the Select button to enter the scan zone selection menu.
5. Press the Tuning up or down buttons to switch between Local and Distant options on the
lower line of the display. The Distant option will allow the radio to find weaker signals
when scanning.
6. Press the Select button to conrm your selection. The radio will then revert to the normal
information display. The Local or Distant setting is stored in the radio and remains in force
until changed or until a System Reset.
Note:
The intial setting (out of the box, or after a System Reset) causes the radio to ignore weak
(distant) signals.

19
Software version
The software display cannot be altered and is just for your reference.
1. To view the software version on the display press and hold the Info button for 2 seconds.
2. Repeatedly press the Tuning Up/Down button until the display shows “SW version“ on the
lower line. Press the Select button to enter the SW version. The version number is then
shown on the lower line of the display. Press and release the Info button to normal tuning
mode.
Language selection
By default your radio will display all menus and messages in English. You can choose your
preferred language.
1. Switch on your radio.
2. Press and hold the Info button to enter menu of current mode.
3.
Press the Tuning up/down buttons until the display shows “Language“. Press the Select
button to enter the menu.
4.
Press the Tuning up/down button until your preferred language is highlighted and press
the Select button to conrm the setting.
Table of contents
Languages:
Other Sangean Radio manuals

Sangean
Sangean WR-1 User manual

Sangean
Sangean HD Radio HDT-20 User manual

Sangean
Sangean MMR-77 User manual

Sangean
Sangean WR-11 User manual

Sangean
Sangean U-1 User manual

Sangean
Sangean U5 DBT User manual

Sangean
Sangean WFT-1 User manual

Sangean
Sangean WFR-20 User manual

Sangean
Sangean WFT-1 User manual

Sangean
Sangean WR-22 User manual

Sangean
Sangean POCKET 390 User manual

Sangean
Sangean MMR-77 User manual

Sangean
Sangean PT-633 User manual

Sangean
Sangean FAT BOX User manual

Sangean
Sangean PR-D9CL User manual

Sangean
Sangean HDR-16 User manual

Sangean
Sangean WFR-28C User manual

Sangean
Sangean SR-32 User manual

Sangean
Sangean DT-120 User manual

Sangean
Sangean RCR-8WF User manual