Sangean WFT-1Di User manual

Version 1
中文
DNLEFGB
WFT-1Di

1
Table of Contents
Important Safety Instructions .......................................... 2-4
Getting Started ................................................................ 5-6
Controls ......................................................................... 7-10
Network remote control options ................................... 11-14
Getting connected to Internet (for Internet Radio) ....... 15-18
Listening to Internet Radio ........................................... 19-31
Digital Radio (DAB plus) .............................................. 32-37
Clock Operation ........................................................... 38-40
Upgrade rmware ........................................................ 41-42
Trouble Shooting ............................................................... 43
Specication ..................................................................... 44

2
GB
Important Safety Instructions
Read and understand all safety and operating instructions before the
radio is operated.
Retain instruction: The safety and operating instructions should be
retained for future reference.
Heed warnings. All warnings on the appliance and operating instruc-
tions should be followed.
Follow all operations and use instructions.
Only use attachments/accessories specied by the manufacturer.
Use only a dry cloth for cleaning the exterior of the radio.
Ventilation: This radio should be situated so that its location or posi-
tion does not interfere with its proper ventilation. For example, the
radio should not be used on a bed, sofa, rug or other soft surfaces
that may block the ventilation openings. It should not be placed in a
built-in situation like a cabinet that may reduce airow through the
ventilation openings. Also keep 10cm space on the back of the radio.
Water and moisture: The appliance should not be used near water.
Do not use near a bathtub, washbowl, laundry tub, kitchen sink, wet
basement, swimming pool, etc.WARNING! Do not expose this prod-
uct to rain or moisture.
1.
2.
3.
4.
5.
6.
7.
8.
Do not expose this product to splashing or dripping. Objects con-
taining liquid, such as vases or drinking glasses, should not be
placed on top of this product.
Do not install near any heat sources such as radiators, heat regis-
ters, stoves, or other apparatus (including ampliers) that produce
heat.
Do not place the radio on an unstable cart, stand, bracket or table.
The radio may fall, causing serious personal injury and damage to
the radio.
Do not attempt to service the receiver yourself. Removing the cover
may expose you to dangerous voltage, and will void the warranty.
Refer all servicing to authorized service personnel.
Unplug the radio from the AC power outlet before cleaning. Use
only a dry cloth for cleaning the exterior of the radio.
Do not plug the AC lead into the AC outlet if the outlet is still wet.
Make sure that the outlet is dry before and after use.
Power sources: The radio should be operated only from the type of
power source indicated on the marking label. If you are not sure of
the type of power supply to your home, consult your radio dealer or
power company.
9.
10.
11.
12.
13.
14.
15.

3
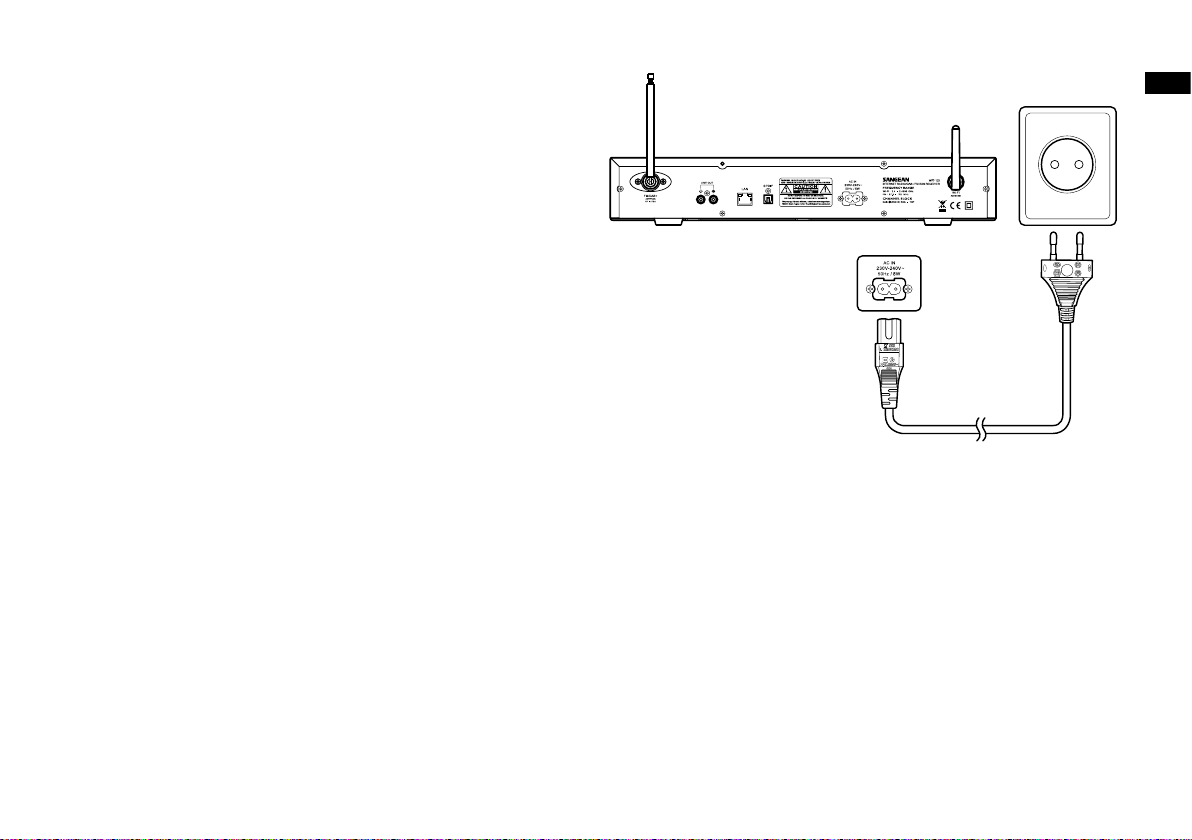
Power cords: The power cord should be positioned so it is not
walked on, pinched, or items placed on top of it. Pay particular at-
tention to cords at plugs, convenience receptacles, and the point
where they exit from the unit. Unplug the power cord by gripping the
power plug, not the cord. Operate the radio using only the current
type of power source indicated. If you are not sure of the type of
power supply to your home, consult your dealer or local power com-
pany.
Do not defeat the safety purpose of the polarized or grounding-type
plug. A polarized plug has two blades with one wider than the other.
A grounding type plug has two blades and a third grounding prong.
The wide blade or the third prongs are provided for your safety. If
the provided plug does not t into your outlet, consult an electrician
for replacement of the obsolete outlet.
Do not overload wall outlets or extension cords. This can result in a
risk of re or electrical shock. Never insert objects of any kind into
the radio through opening.
The power plug should be close to the radio, and easy to be ap-
proached that in case of emergency, to disconnect the power from
the radio, just unplug the power plug from the AC power slot.
Object and Liquid Entry – Never push objects of any kind into this
radio through openings as they may touch dangerous voltage points
or short – out parts that could result in a re or electric shock. Never
spill liquid of any kind on the product.
21.
22.
23.
24.
16.
17.
18.
19.
20.
Unplug this product from the wall outlet and refer servicing to quali-
ed service personnel under the following conditions:
a. When the power supply cord or plug is damaged.
b. If liquid has been spilled or objects have fallen into the product.
c. If the product has been exposed to water or rain.
d. If the product does not operate normally by following the operating
instructions.
e. If the product has been dropped or damaged in any way.
f . When the product exhibits a distinctive change in performance.
If the LCD becomes cracked and damaged, do not touch the liquid.
The changes or modications not expressly approved by the party
responsible for compliance could void the user’s authority to oper-
ate the equipment.
To comply with the FCC RF exposure compliance requirements, no
change to the antenna or the device is permitted. Any change to the
antenna or the device could result in the device exceeding the RF
exposure requirements and void user’s authority to operate the de-
vice.

4
GB
26.25. FCC INFORMATION
The Federal Communication Commission Radio Frequency Interfer-
ence Statement includes the following paragraph:
The equipment has been tested and found to comply with the limits
for a Class B Digital Device, pursuant to part 15 of the FCC Rules.
These limits are designed to provide reasonable protection against
harmful interference in a residential installation. This equipment
generates, uses and can radiate radio frequency energy and, if not
installed and used in accordance with the instruction, may cause
harmful interference to radio communication. However, there is no
grantee that interference will not occur in a particular installation.
If this equipment dose cause harmful interference to radio or televi-
sion reception, which can be determined by turning the equipment
off and on, the user is encouraged to try to correct the interference
by one or more of the following measures:
- Reorient or relocate the receiving antenna.
- Increase the separation between the equipment and receiver.
- Connect the equipment into an outlet on a circuit different from
that to which the receiver is connected.
- Consult the dealer or an experienced radio/TV technician for help.
The user should not modify or change this equipment without writ-
ten approval form SANGEAN ELECTRONICS INC. Modification
could void authority to use this equipment.
Excessive sound pressure on ear - and headphones could impair
the hearing ability.
Higher setting that idle on the equalizer leads to higher signal volt-
ages on the output for ear - and headphones.

5
Getting Started
Congratulations on your purchase of the Sangean WFT-1Di.
Check the package and ensure all the items are present:
Product and Accessories:
● Power Cable: used to power the radio.
● Remote Control: used for remote operation of the radio.
Power Cable
WFT-1Di Wi-Fi TunerRemote Control

6
GB
Power on the radio
1. Connect the power cable with the radio and plug it in to a live outlet
as shown.
2. Press the STANDBY button to turn on the radio.
Note:
Use only the adapter supplied with the radio. Connecting an incompat-
ible power supply will cause permanent damage to the radio.

7
Controls
(Front)
Item Description
1 STANDBY button Turn on/off the radio.
2 TIMER button Press to set sleep time and alarms.
3 VOLUME UP/DOWN button Press to turn the volume UP/down.
4 BAND button Press to switch between modes (Internet Radio, Digital Radio(DAB +) Music Player, FM).
5 LCD display Screen that display texts.
6 INFO button Press to display information on the LCD.
7 EQ button Press to enter Equalizer setup.
8 BACK button Press to backward one page in menu selections. In Music player mode, press to skip to the previous track.
In setup screens, press to go to the previous eld.
9 STOP/PRESET button Press to enter the Preset menu. In Music player mode press to stop the track.
10 FORWARD button Press to move to the right when entering user name or password.
In Music player mode, press to skip to the next.
11 Tuning Knob Rotate to enter menu selections/navigate through selections. Press the knob to conrm selections.
12 Infra-red sensor To communicate with the remote control.
13 Headphone jack Connect to a headphone.

8
GB
Controls
(Rear)
Item Description
14 Antenna for FM and Digital Radio (DAB plus) Connect for FM and Digital Radio (DAB plus).
15 LINE OUT jack-right Connect to an external speaker - right side.
16 LINE OUT jack-left Connect to an external speaker - left side.
17 LAN socket Connect to Ethernet for wired Internet Radio.
18 USB socket Connect to a USB device for software upgrade.
19 Power cord socket Connect to the power cable.
20 WiFi antenna Connect for wireless Internet Radio.

9
Controls
(Remote Control)
A.
B.
C.
D.
E.
F.
G.
H.
I.
J.
K.
L.
M.
N.
O.
P.
Q.
R.
S.
Power button
Volume buttons
Radio Preset buttons
Preset 7,8,9,0,+10 / previous track, pause, next track, add 10
Stop button
TUNE + button
TUNE - button
FORWARD button
Back button
Enter button
INFO button
TIMER button
Music Player button
FM button
Internet Radio button
AUX IN button
DAB button
EQ button
Mute button

10
GB
Item Description
A Power button Turn on/off the radio.
B Volume buttons Press to turn the volume up/down.
C Radio Preset buttons Press to listen to preset stations.
D Preset 7,8,9,0,+10 / previous track, pause,
next track, add 10
Press to listen to preset stations 7, 8, 9, 0, 10 Also for previous track, pause, next track, 10.
E Stop button Press to stop current action. In Music Player mode press to stop the track.
F TUNE + button Navigation button used to go up.
G TUNE - button Navigation button used to go down.
H FORWARD button Press to move to the right when entering user name or password.
In Music player mode, press to skip to the next.
I Back button Press to backward one page in menu selections. In Music player mode, press to skip to the
previous track.
In setup screens, press to go to the previous eld.
J Enter button Press to conrm selection.
K INFO button Press to display information.
L TIMER button Press to set sleep time and alarms.
M Music Player button Press to enter Music player mode.
N FM button Press to enter FM radio mode.
O Internet Radio button Press to enter Internet radio mode.
P AUX IN button Press to enter auxiliary input mode.
Q DAB button Press to enter Digital Radio (DAB plus) mode.
R EQ button Press to enter Equalizer setup.
S Mute button Press to mute the radio.

11
Network remote control options
Network Pin setup (Pin number)
Your radio has the option of being controlled by an application installed
on an Apple iPhone, iPod touch or iPod. The Pin number facility allows
you to ensure that your radio can only be controlled by your own Apple
device rather than someone else’s.
Details of how this feature can be used with your iPhone or iPod touch
are explained in the separate sheet called ‘The app for controlling your
Sangean internet radio.'
Keep network connected
By default, your radio will shut down its WiFi connection when it is in
standby. This minimizes power consumption but it does mean that you
will need to switch that radio on manually in order to use the remote
control software.
If you need to be able to remotely control the radio even when it has
been put into standby, then you can choose to keep the network con-
nected by using the ‘Keep connected’ option in the network setting
menu. In the standby mode display either the WiFi signal indicator is
shown with or without a cross through it according to the chosen net-
work settings.

12
GB
Navigate Menu Selections
There are two ways to navigate through the menu selections.
1. Navigate through the selections by rotating the Turning knob on the
radio clockwise or counter clockwise to move the > symbol and press
the Turning knob to conrm the selection.
Use FORWARD/BACK to enter/go to previous menu.
2. Use the navigation buttons (TUNE +, TUNE-, BACK, FWD) on the
remote control to move the > symbol and press enter to conrm the
selection. Use FORWARD/BACK to enter/go to previous menu.
* If necessary, press the BACK button until you can nd “Main menu”.
Then highlight and press is with the Turning knob. And you can start
to operate the radio.
Menu navigation:

13
Entering Texts
To start using the radio, text entering may be required. For example,
entering user name, password, search station, etc.
To enter texts:
● Rotate the Turning knob to highlight the text/number/symbol.
● Press the Turning knob to conrm.
● Use BKSP to delete.
● Use OK to enter when you are done.
● Use CANCEL to cancel and exit.

14
GB
Language Setup
Choose the language to display on the screen.
● Go to > System settings > Language and select the language.
* If necessary, press the BACK button to nd the “Main menu”

15
Getting connected to Internet (for Internet Radio)
Before you can use your Internet radio, you must have the following:
● A broadband Internet connection or
● A wireless access point (Wi-Fi) or a wired Ethernet connection (10 or
100 M bits/sec with RJ45 connection) connected to your broadband
Internet, preferably via a router. In many cases the broadband modem,
router and wireless access point will be a single combined unit supplied
by your Internet Service Provider or bought from a computer store.
● If your wireless network is congured to use Wired Equivalent Privacy
(WEP) or Wi-Fi Protected Access (WPA) data encryption then you need
to know the WEP or WPA key so you can get the Internet radio to
communicate with the network.
IMPORTANT:
Before you continue, make sure that your wireless access point or
router is powered up and working with your broadband Internet service
(use your computer to verify this). To get this part of the system working
you must read the instructions supplied with the wireless access point
or router.
* There are 2 ways of connecting your radio to the network, wired and
wireless:

16
GB
Connecting to wireless network
1. Make sure you are within range of a wireless network.
2. Go to > System settings > Network > Network wizard > [name of the
wireless network].
3. If your wireless Internet access (router) haven’t been set the password,
the radio will be connected to the Internet. Or,
4. If your wireless Internet access (router) has been set the password,
the display will show either ‘Enter WEP key’ or ‘Enter WPA key’.
You therefore need to enter the correct WEP or WPA key into the
radio to allow it to communicate with your network.

17
If you do not have the WEP or WPA key, then you should obtain it from
the person who set your network. Some Wi-Fi routers may come with a
key already set up by the supplier, in which case you should refer to the
user documentation provided with it.
You will be prompted to enter password:
●Rotate the Turning knob to highlight the text/number/symbol.
● Press the Turning knob to conrm.
●Use BKSP to delete.
●Use OK to enter when you are done.
●Use CANCEL to cancel and exit.
5. Then the screen will show “Connected” when connection had been made.

18
GB
Connecting to wired network
Connect the Ethernet cable into the RJ-45 socket at the back of the ra-
dio. If a wired connection is present then the radio will use this in prefer-
ence to a wireless connection.
There are two indicator lights incorporated into the RJ-45 connector.
If you have problems with your wired connection, they may help you to
identify the possible cause of the problem.
Green ON = Link established, Flashing = Data transfer.
Yellow ON = 100M bps link, OFF = 10M bps link.

19
Listening to Internet Radio
There are 3 ways to enter Internet Radio mode:
1. From the menu selections go to > Main menu > Internet radio or
2. Press the BAND button until you see “Internet radio”, or
3. Press the INTERNET RADIO button on the remote control.
Table of contents
Languages:
Other Sangean Radio manuals

Sangean
Sangean WR-22 User manual

Sangean
Sangean MS-112 User manual

Sangean
Sangean ATS 305 User manual

Sangean
Sangean PR-D5 User manual

Sangean
Sangean Pocket 640 User manual

Sangean
Sangean REVERY R4 WFS-58 User manual

Sangean
Sangean ProTravel PT-50 User manual

Sangean
Sangean dpr-39 User manual

Sangean
Sangean PR-D3L User manual

Sangean
Sangean FatBox FB-100 User manual

Sangean
Sangean WR-2CL User manual

Sangean
Sangean DCR-89+ User manual

Sangean
Sangean ATS-909X 2 User manual

Sangean
Sangean WR-201D User manual

Sangean
Sangean WR-1 User manual

Sangean
Sangean DT-800 User manual

Sangean
Sangean DT-110 User manual

Sangean
Sangean SR-25 User manual

Sangean
Sangean WFR-28BT User manual

Sangean
Sangean DT-500W User manual