Sanosil Q-Jet Superior 2 Series User manual

Sanosil Q-Jet Superior
1
Operation and Maintenance Manual
Sanosil Q-Jet Superior
Series 2
Des M 56en –Superior V2+

Sanosil Q-Jet Superior
2
Table of Contents
1. Introduction ....................................................................................... 3
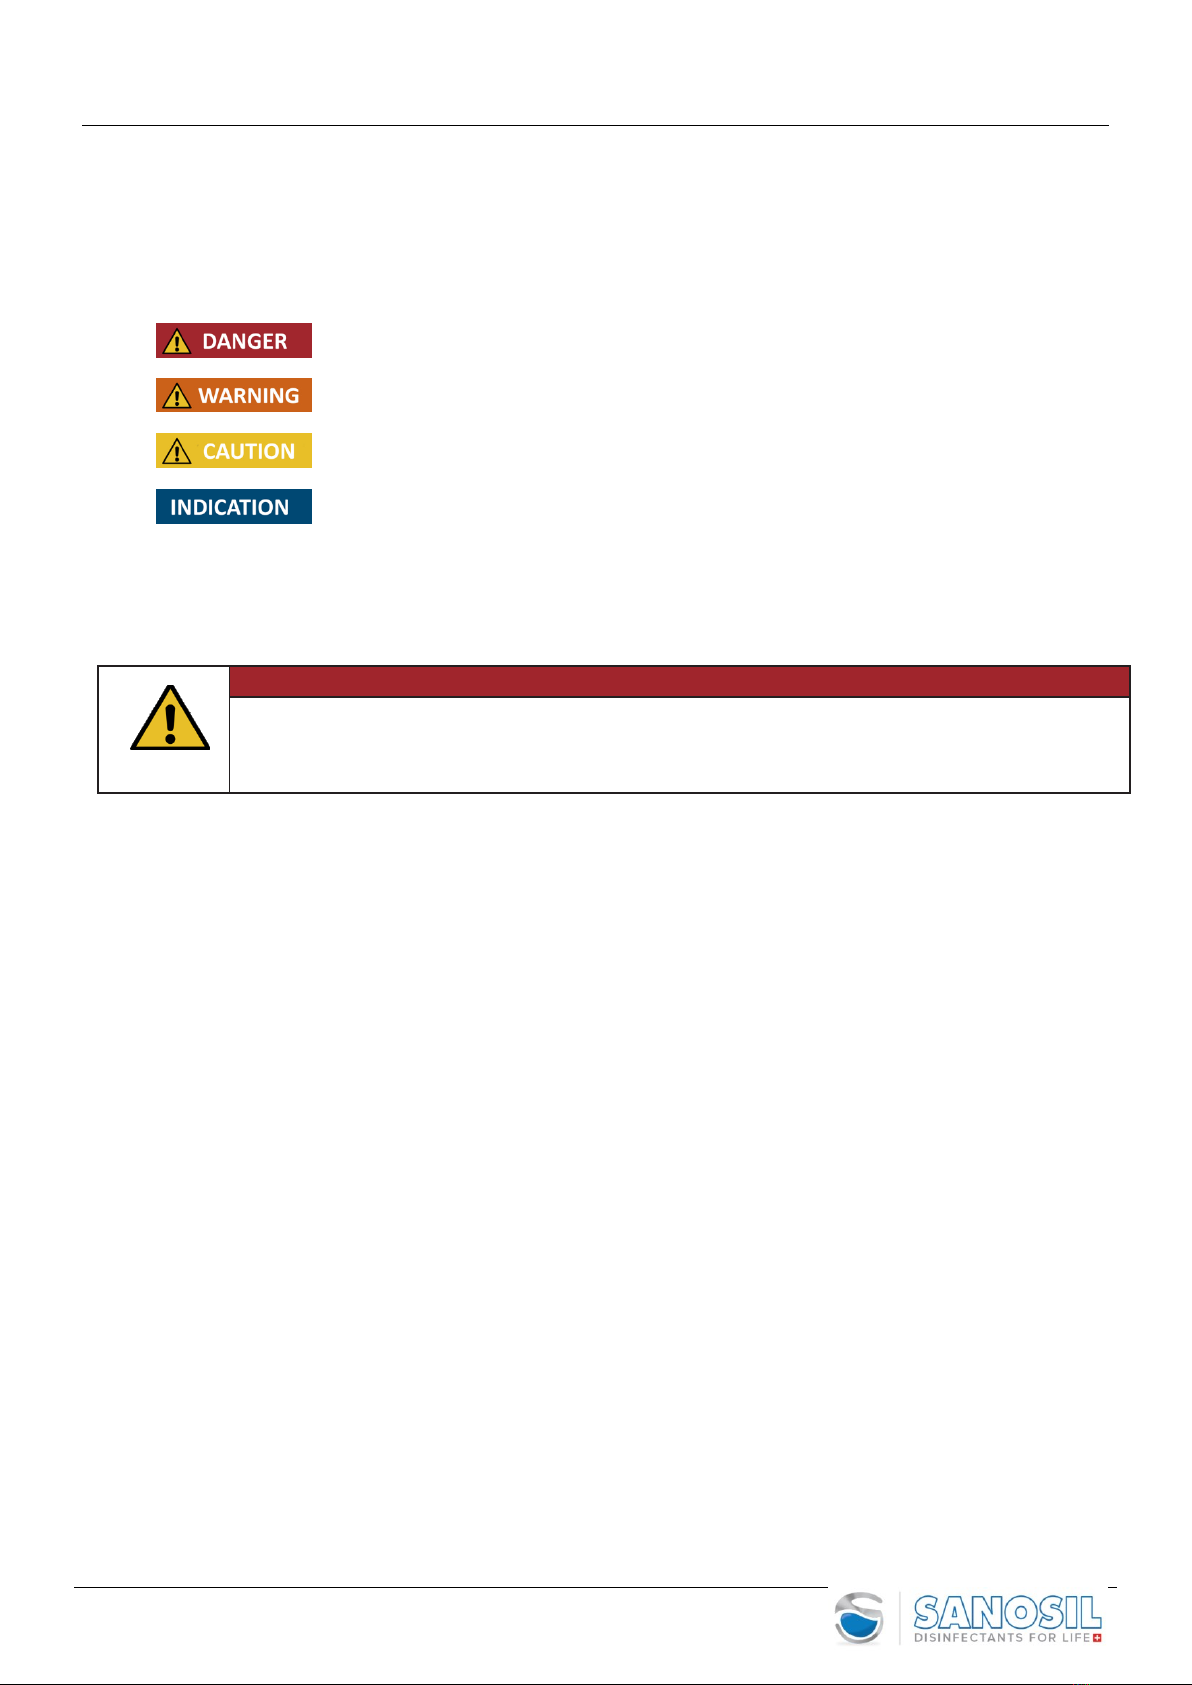
1.1 Used Symbols .......................................................................................................................3
2. Safety................................................................................................. 3
2.1
Intended Usage ....................................................................................................................4
2.2
Inappropriate Usage ............................................................................................................4
2.3
Danger and Caution Warnings.............................................................................................4
2.4
Authorized Persons...............................................................................................................4
2.5
Disclaimer.............................................................................................................................5
2.6
Room Disinfecting with the Sanosil Q-Jet Fogger.................................................................5
2.7
Different ways to use the Sanosil Q-Jet Superior..................................................................5
2.8
Important safety Directions (Read carefully before use)......................................................6
3.
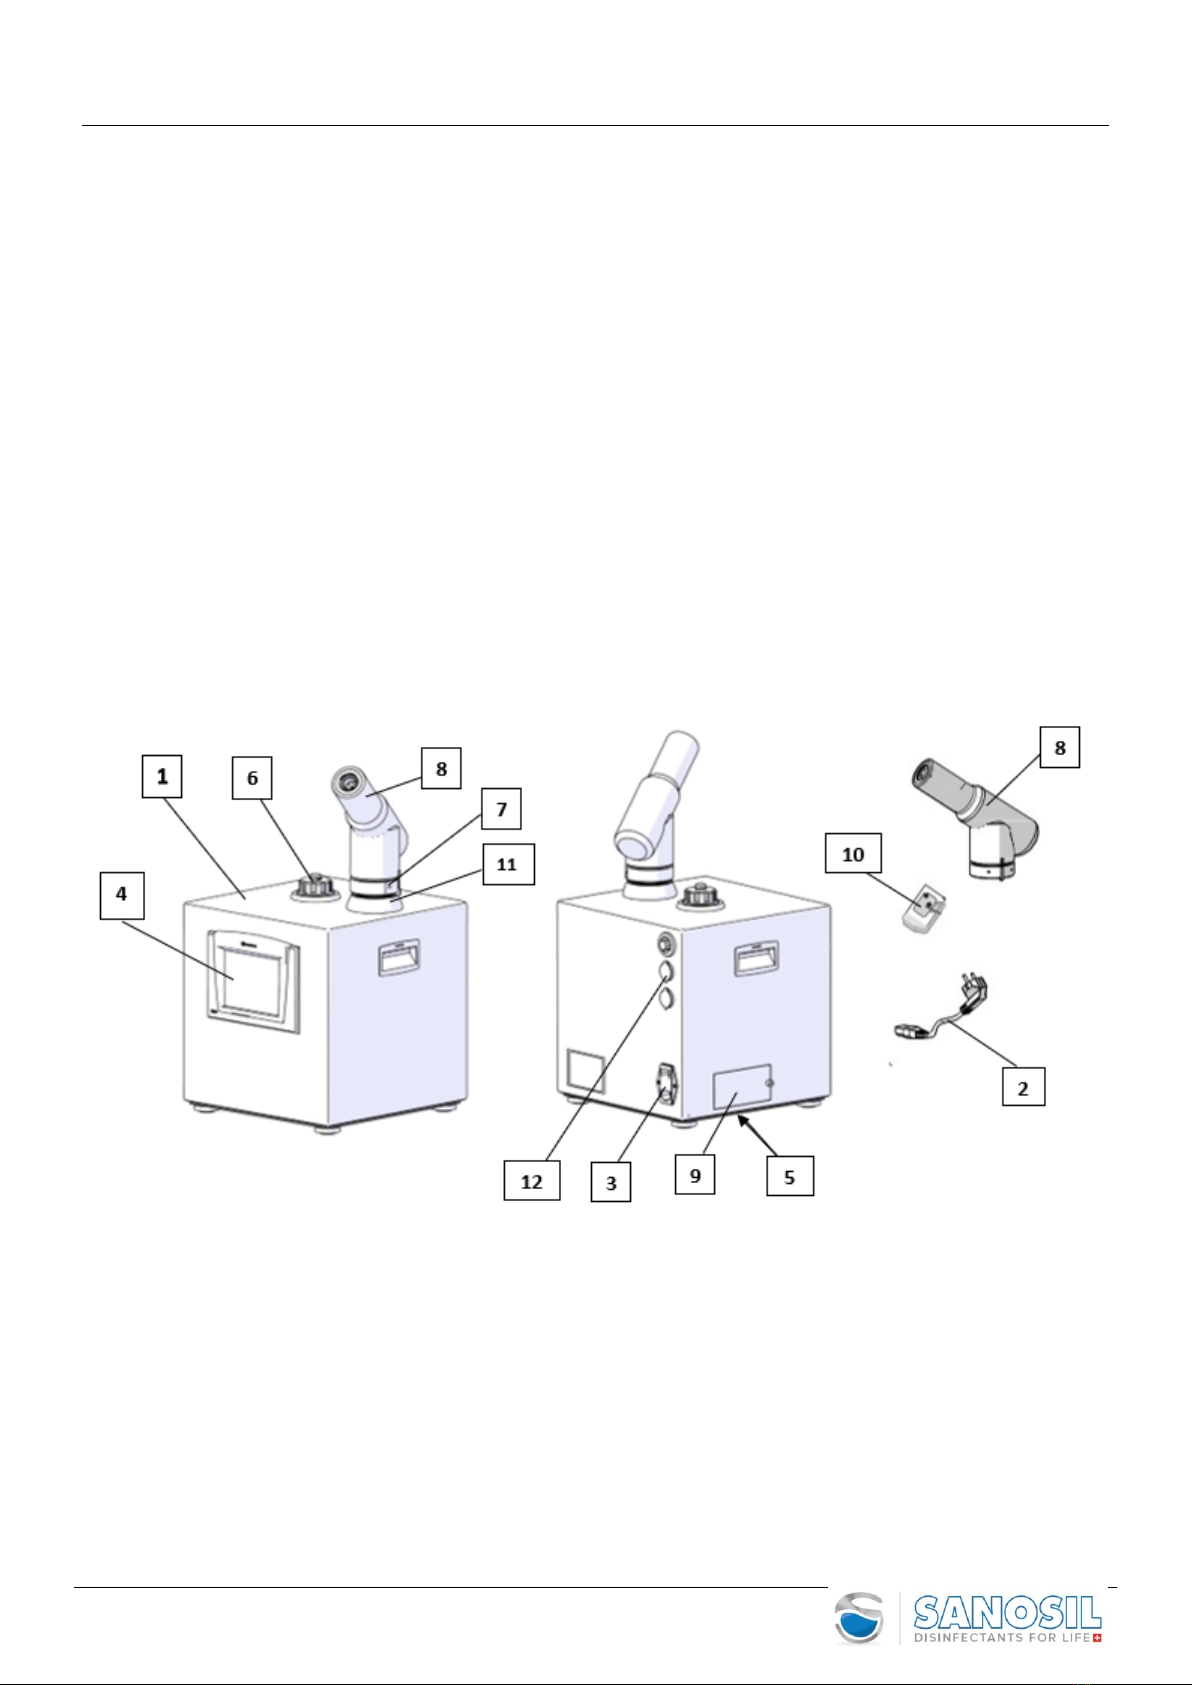
Product Description...........................................................................................7
3.1
Technical Data ......................................................................................................................7
3.2
Parts and Functions..............................................................................................................7
3.3
Package Contents.................................................................................................................7
3.4
Q-Jet Superior Accessories....................................................................................................7
3.5
Spare parts ...........................................................................................................................7
3.6
Recommended Equipment ...................................................................................................7
3.7
Consumables ........................................................................................................................7
3.8
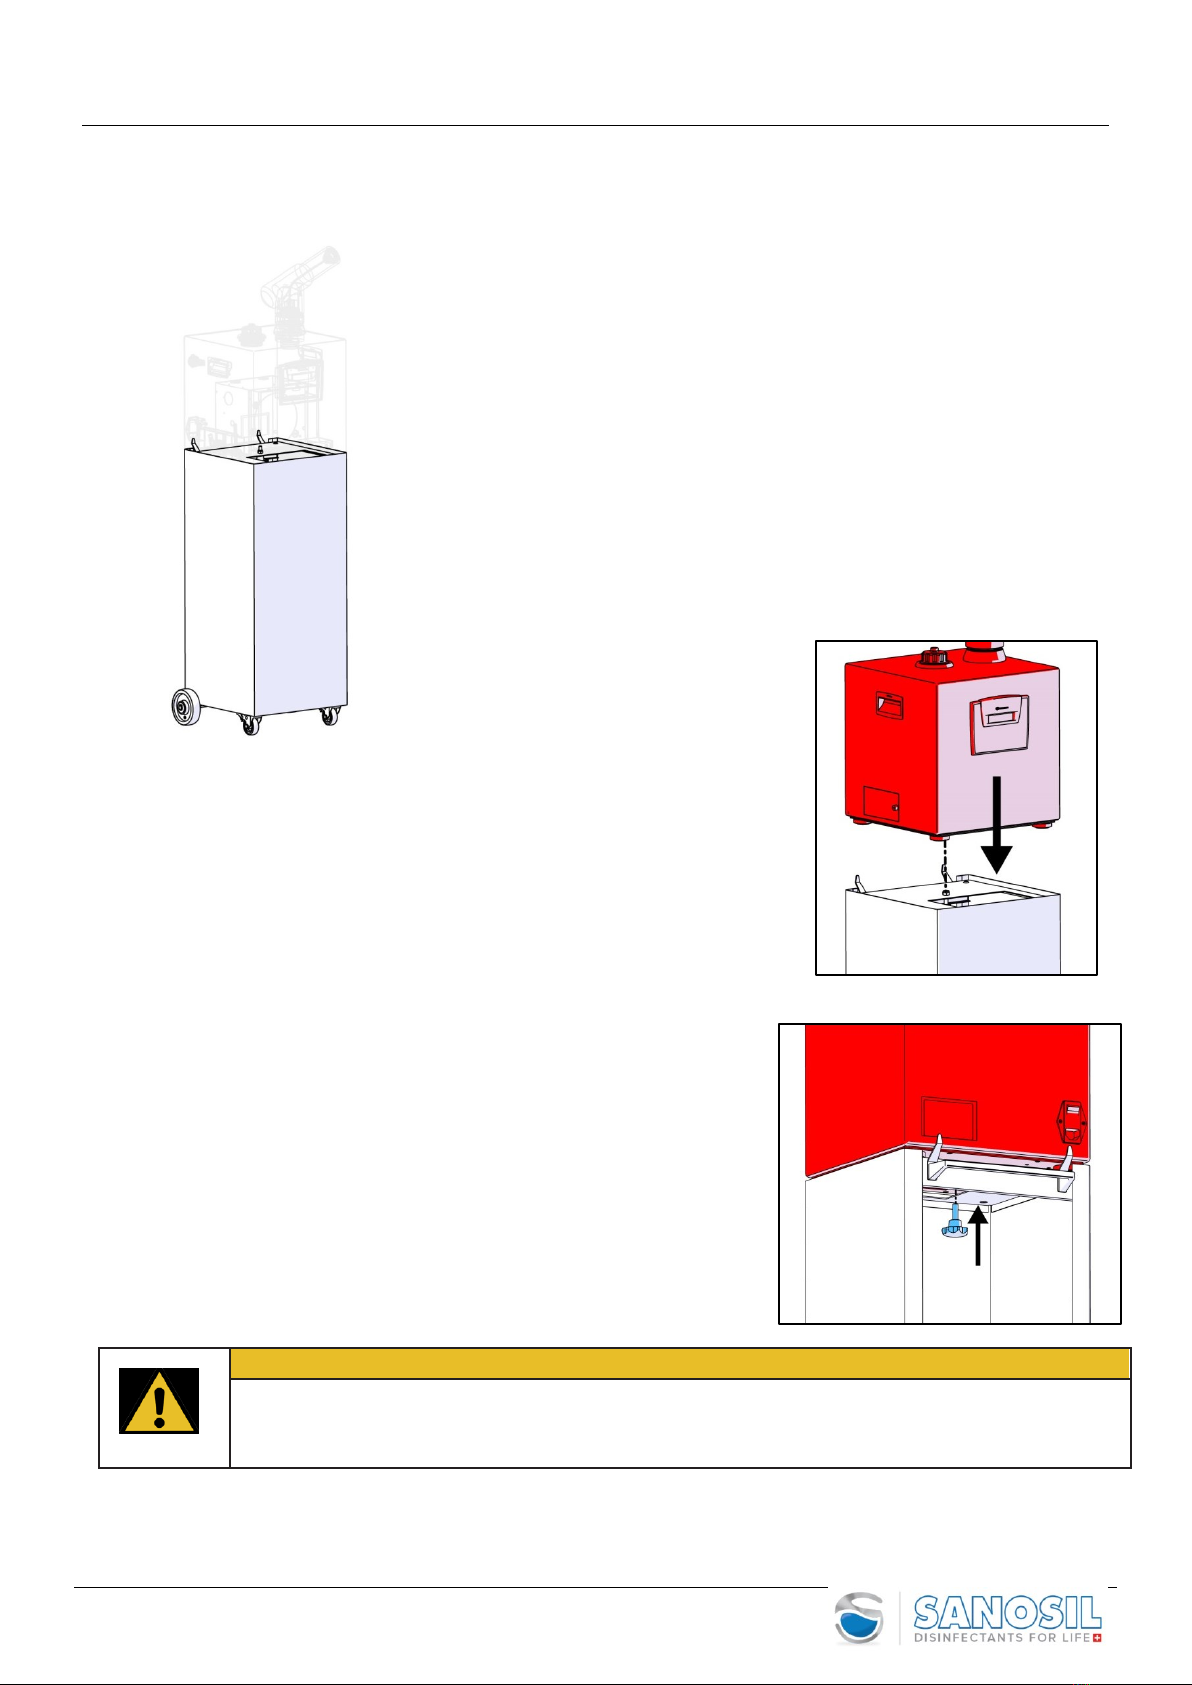
Trolley (optional) ..................................................................................................................8
4.
Getting Started and Operating Instructions ......................................... 9
4.1
Warning ...............................................................................................................................9
4.2
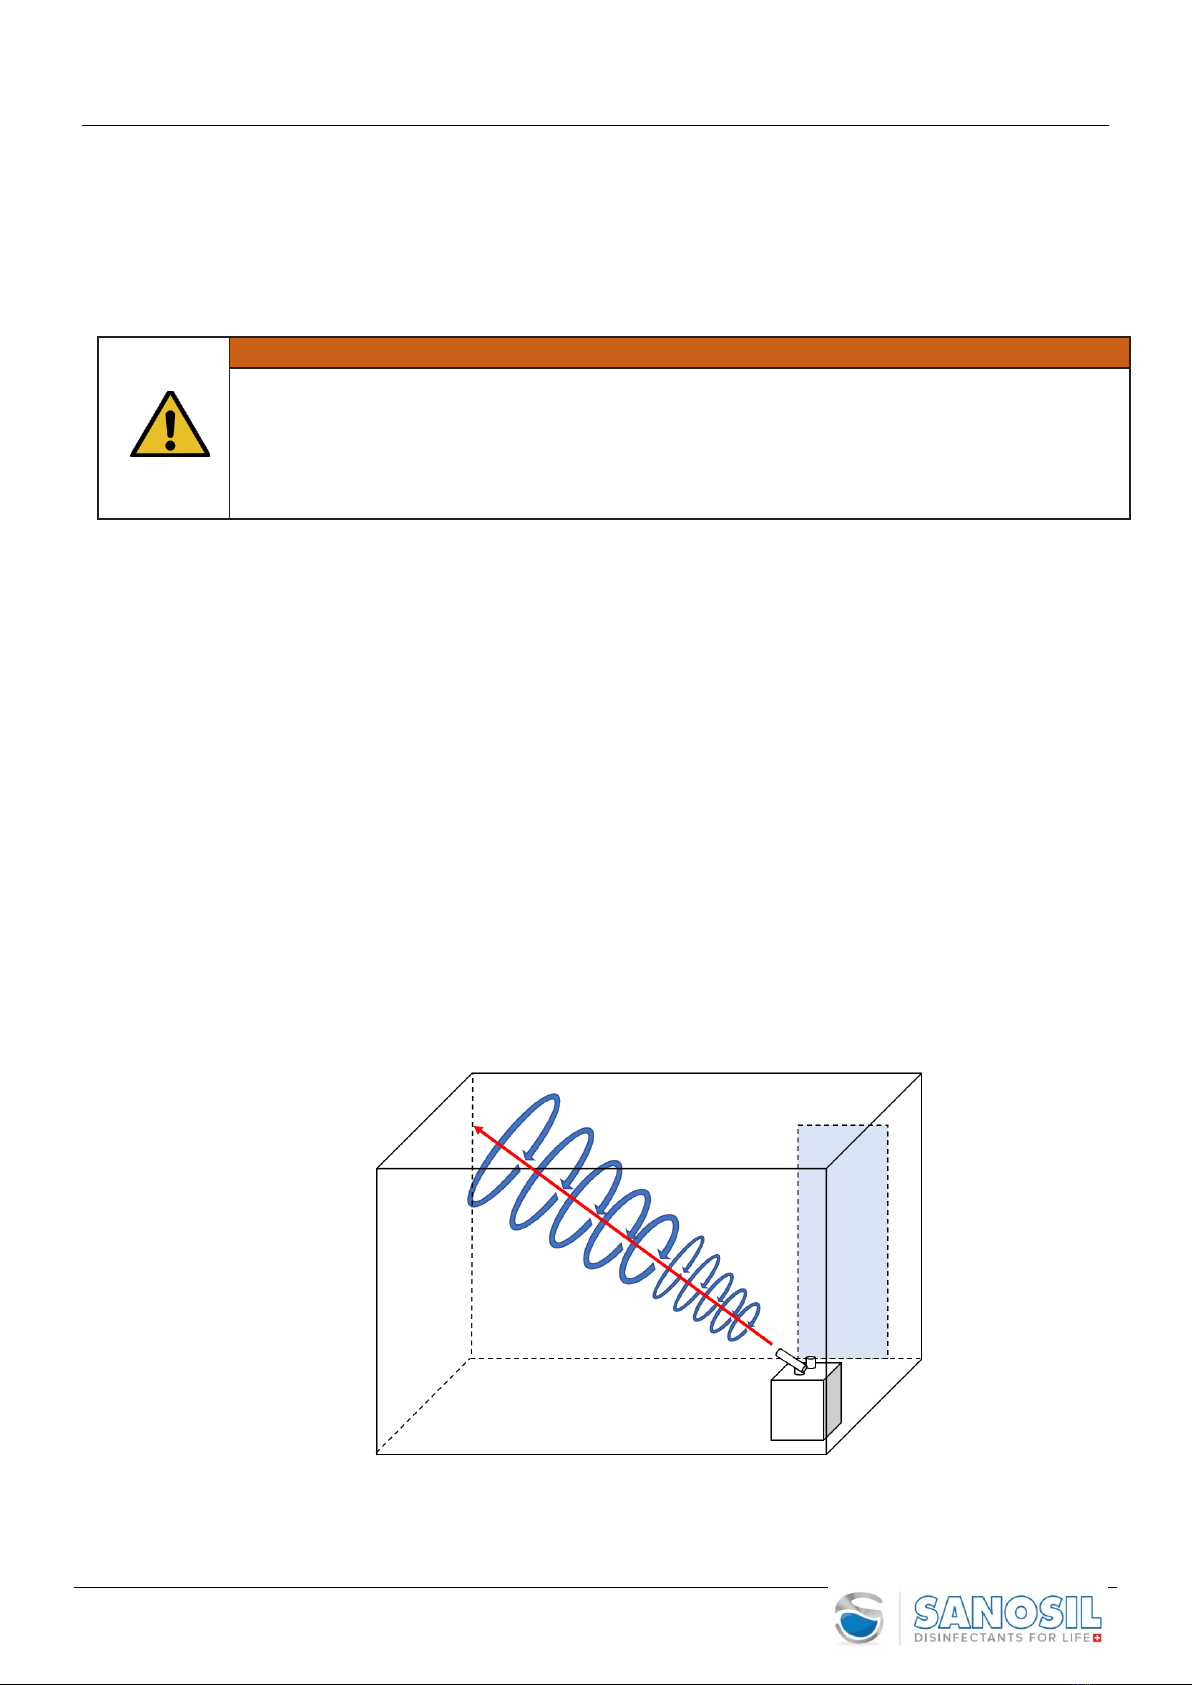
Room Preparation and positioning of device .......................................................................9
4.3
Position...............................................................................................................................10
4.4
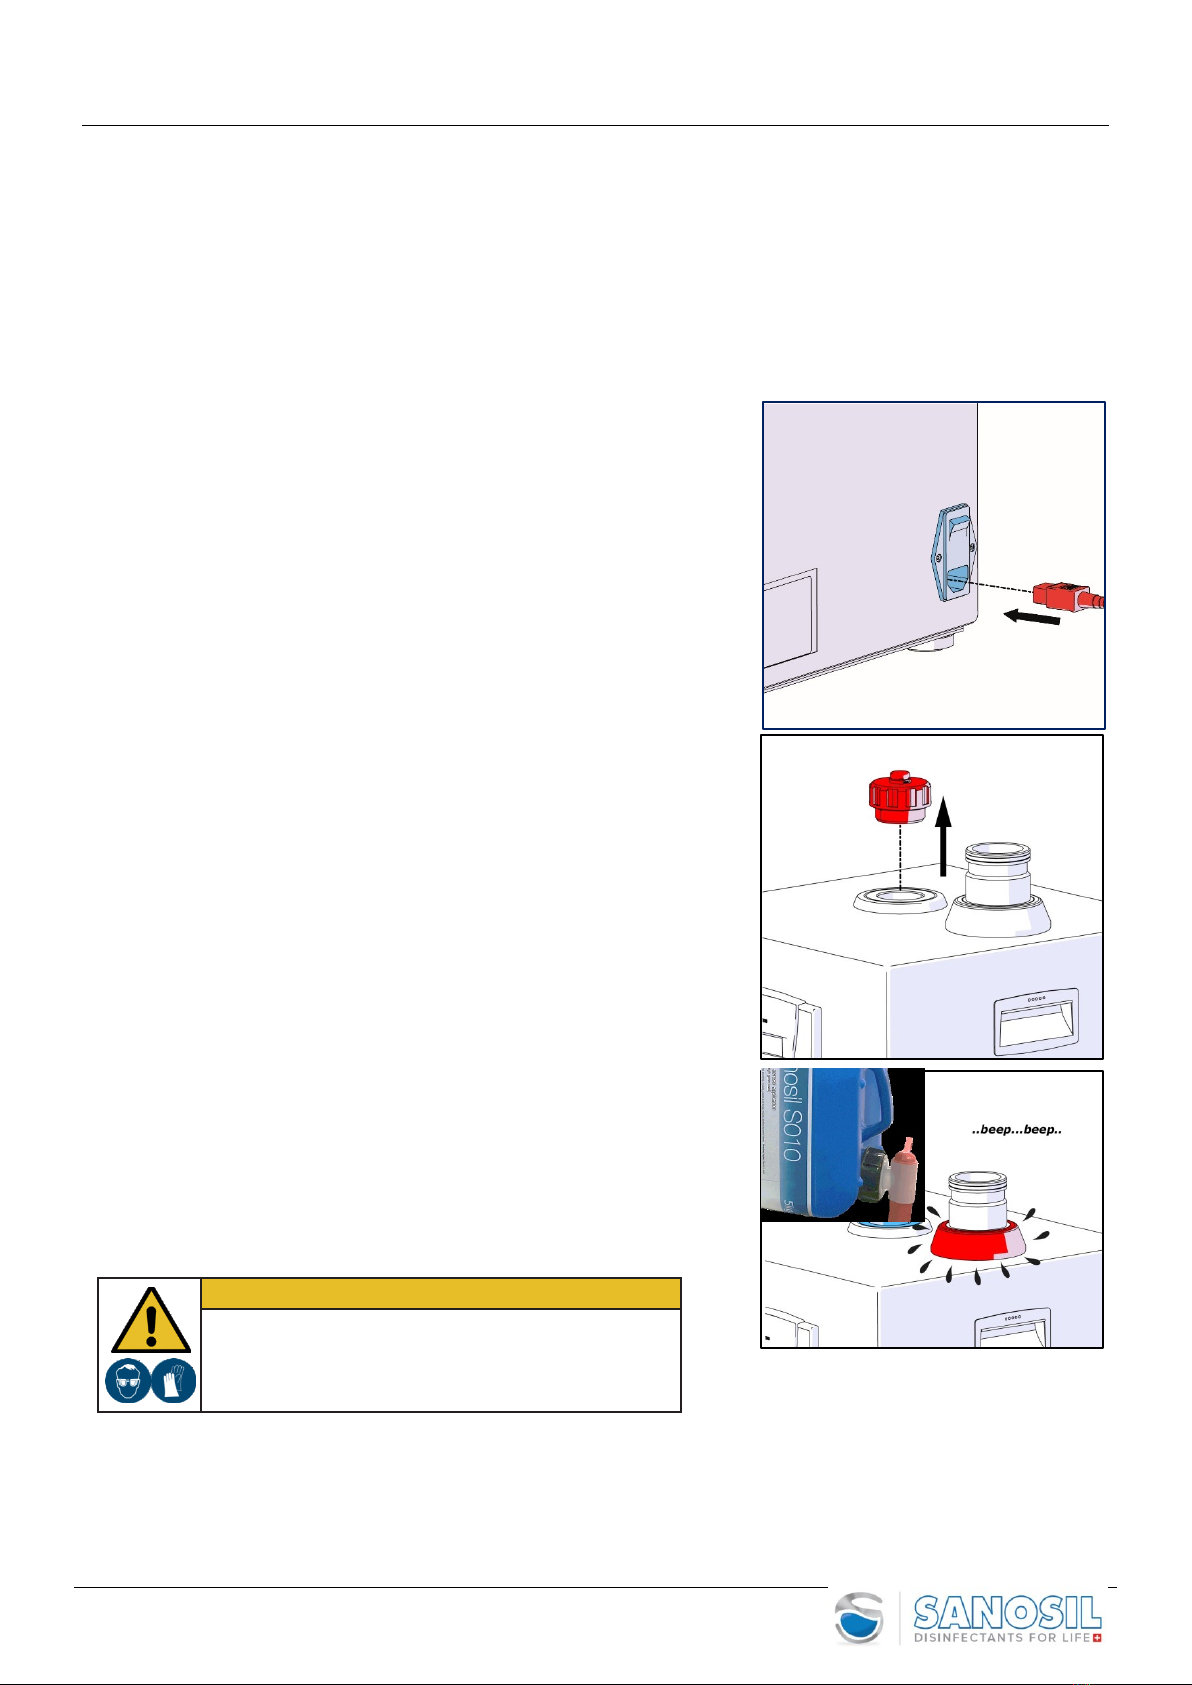
Power Connection ..............................................................................................................10
4.5
Filling..................................................................................................................................10
4.6
Gun (Nozzle) .......................................................................................................................11
4.7
Switch on............................................................................................................................11
5.
Operation......................................................................................... 12
5.1
Settings general (user, date, time, language, network) .....................................................14
5.2
Brief explanations of the display and functions (overview)................................................16
5.3
Diagnosis............................................................................................................................18
5.4
Event Logger (LOG).............................................................................................................18
5.5
Programs (whole room disinfection process) ................................................................19
5.6
Room Preparation ..............................................................................................................19
5.7
Positioning of the device....................................................................................................19
5.8
Fogging time and consumption (standard / higher / high contamination) ........................20
5.9
Dosage values for well precleaned rooms..........................................................................20
5.10
Program Normal ..........................................................................................................21
5.11
Program Normal with timer .........................................................................................23
5.12
Program Pulse (without and with timer settings) .........................................................26
5.13
Program Step...............................................................................................................30
5.14
Program Testing (only for Admin) ......................................................................................33
5.15
Tank, liquid level calibration settings .................................................................................33
5.16
Emptying the Tank.......................................................................................................................... 34
6. Maintenance .................................................................................... 35
6.1
Mandatory replacement of air intake filter........................................................................35
6.2
Regular Visual check and Maintenance..............................................................................36
6.3
Extraordinary Maintenance ...............................................................................................36
7. Troubleshooting ............................................................................... 37
7.1 Table (Anomaly / Possible causes / Remedy).................................................................................. 37
7.2 Alarms, Messages and Actions...........................................................................................38
8. Warranty.......................................................................................... 39
9. Disposal and Decommissioning ......................................................... 39
9.1
Disposal in EU Countries.....................................................................................................39
10 Accessory SD Card ...........................................................................................40
11 Accessory Printer.............................................................................................42
12 CE-Declaration of Conformity..........................................................................43

Sanosil Q-Jet Superior
3
1. Introduction
1.1 Used Symbols
Inside this manual or on the device there are Symbols having the following meaning:
High risk!
Disregard can lead to death or heavy injuries!
Medium risk!
Disregard can lead to death or heavy injuries!
Low risk!
Disregard can lead to medium or light injuries!
Disregard can damage thedevice.
Gives good advice for operating the device.
Further symbols will be explained thereafter.
2. Safety
DANGER
Instruct carefully all Users of the device on how to operate it, its application purposes and the risks
incurred. Make sure this manual is read and understood by all users of thedevice.
Ensure that this manual is always available to the users of the device.

Sanosil Q-Jet Superior
4
2.1 Intended Usage
The device is a nebulizer to be used for indoor applications only. The device is a nebulizer to be used for indoor
applications with Sanosil disinfectants only maximal hydrogen Peroxide content of 7.5%.
Its purpose is to transform the used disinfection liquid into smallest particles and to nebulize them into a room,
thus leading to the consistent disinfection of all uncovered surfaces (3D-disinfection) inside the room.
This device is intended for usage in hospitals, clinics, public transports, etc. as well as in residential-, commercial- and
industrial areas. It is an additional measure following regular cleaning and disinfecting room surfaces. Pre-cleaning
protocol is defined by the respective healthcare facility. Ensure surfaces are dry before nebulizing in order to
maximize the impact.
WARNING
Risk of Damage!
This device nebulizes chemical substances!
The area to be disinfected may only contain items necessary for its use.
Objects made of delicate organic materials, in particular antiques, paintings and precious artifacts
are to be removed!
2.2 Inappropriate Usage
Do always and only use suitable Sanosil disinfectants with a maximal hydrogen Peroxide content of 7.5%. The
usage of any other disinfectant or accessories which are not specifically approved by Sanosil Ltd. is against the
rules herein and can lead to heavy injuries as well as to damaging the device. The device is not meant for use
as a stand-alone disinfection process but rather as an addition to regular cleaning and disinfection.
DANGER
Risk of Injuries!
Danger of explosion!
Do not use any flammable liquids! Do always and only use Sanosil disinfection liquids.
2.3 Danger and Caution Warnings
•
The device must be used in full compliance with this Operation and Maintenance Manual.
•
It is strictly forbidden to use the device in an atmosphere with danger of explosion or flammability, in dusty
areas and in areas with the presence of people or animals. It is an imperative to prevent people from entering
intentionally or inadvertently the room during the nebulization process and during the waiting time
thereafter.
•
The device can only be operated using the original power cord or a country-specific power cord with earthing
wire and plug. Before making electrical connections carefully check that the voltage supplied is compatible
with the voltage marked on the device’s data plate. Any electrical installation work must be carried out by
qualified personnel.
•
The power socket must be easily accessible.
•
Risk of injuries when using not authorized accessories!
•
Therefore, do only use original accessories of SanosilLtd.
•
Place device on a stable, flat, dust-free, not slippery, horizontal surface which can appropriately support its weight.
•
Before removing the rear panel, always disconnect the device from the power supply.
•
When there is liquid inside the tank, do not tilt the device; it could leak from the hydrauliccircuit.
•
Read carefully all indications stated on the label of the Sanosil disinfectant.
2.4 Authorized Persons
The device shall only be used by adults who have been carefully instructed on how to operate it and are well
informed on possible dangers and risks incurred when using the device.
The users must always have a copy of this Operation Manual at their disposal when operating the device and
have read and understood all specific indications stated on the label of the Sanosil disinfectant used.

Sanosil Q-Jet Superior
5
2.5 Disclaimer
Sanosil declines any claims for damages or warranty claims if:
•
The product is used for any other purpose but the ones stated in this OperationManual.
•
Regulations, standards or instructions in this Operation Manual are not adhered to.
•
The product is modified or transformed in any manner.
•
The product is not repaired by an authorized dealer and is used with other but the original spare parts provided by
Sanosil Ltd.
•
The product is used despite obvious safety faults or recognizabledamages.
•
The product was exposed to mechanical tappets or has been dropped.
•
Accessories are used which are not supplied nor specifically authorized by Sanosil Ltd.
2.6 Room Disinfecting with the Sanosil Q-Jet Fogger
How to use the Sanosil Q-Jet Superior:
Room disinfection with Sanosil Disinfectants (only use Sanosil ready for use products containing up to 7.5%
Hydrogen Peroxide) can be used for disinfecting hard, nonporous surfaces in rooms as an adjunct following regular
cleaning and disinfecting of room surfaces. Sanosil ready to use products are recommended for use in fogging
operations as a supplemental measure after regular cleaning and disinfecting procedures. Pre-cleaning protocol
defined by healthcare facility. If other cleaning/disinfecting products than Sanosil products are used, surfaces
MUST BE DRY before fogging. The more thorough the surfaces are cleaned beforehand, the more effective the
adjunct disinfection treatment will be.
Areas should be cleaned daily, after a contamination has been detected, or on an as needed basis depending on
the volume of traffic and use.
•Users should familiarize themselves with Q-Jet operation by reading the Q-Jet User Manual prior to first use.
It is essential that Q-Jet users follow all safety warnings as detailed in this operating manual.
•It is recommended that users read the entire document before proceeding with room disinfecting treatment.
2.7 Different ways to use the Sanosil Q-Jet Superior
a. Overnight disinfection (recommended):
Procedure: Disinfecting process according procedure on page 21, 23, 26, 30 with extended exposure time.
Advantages: Extended exposure time, maximal disinfection efficacy, hydrogen Peroxide level will lower
automatically overnight and has to be measured only once on the next day
Disadvantages: Room cannot be used and Sanosil Q-Jet Superior is not available overnight
b. Standard disinfection without additional measures:
Procedure: Disinfecting process according procedure on page 21, 23, 26, 30 with standard waiting time.
Advantages: Time consumption: 3-10 hours (depends on the room size, humidity and the decomposition
time of hydrogen peroxide in the treated room), Sanosil Q-Jet Superior and room can be re-used
faster
Disadvantages: Additional personal and time needed for hydrogen peroxide level measurements
c. Standard disinfection with speed up measures:
Procedure: Disinfecting process according procedure on page 21 with reduced waiting time.
Advantages: Time consumption: 3-5 hours (depends on the room size and the taken measures to reduce
hydrogen peroxide level in the treated room), Sanosil Q-Jet and room can be reused faster
Disadvantages: Additional personal and time needed to air room, optionally an additional dehumidifier is
needed, slight risk of new contamination through open windows

Sanosil Q-Jet Superior
6
2.8 Important safety Directions (Read carefully before use)
Caution (atomized Sanosil Disinfectant):
1. When the Q-Jet has completed its dispensing cycle, the room will be full of atomized Sanosil Disinfectant. The
treated room MUST REMAIN UNOCCUPIED FOR AT LEAST 120 MINUTES AFTER FOGGING. 120 minutes is the
minimum wait time and means not that the room is safe to re-enter or reoccupy. Length of wait time increases
with fogging quantity (ml/m3).
2. When room re-entry is required before treatment process is completed or to perform a H2O2level check ,
proper personal equipment (PPE) including wraparound style goggles; respirator mask (filter class ABE1)
filtering hydrogen peroxide (for example: 3M 4277 or 3M 7500 mask with 6057 filter) and gloves should be
worn to safely enter the room.
Caution (Sanosil Q-JET device)
A caution statement in this manual identifies a condition or practice, which if not corrected or discontinued immediately,
could lead to serious injury or death.
1. KEEP OUT OF REACH FOR CHILDREN.
2. Carefully read all instructions, warning, caution and first aid statements prior to use.
4. Use only as directed.
5. The device is designed for easy-use. However, only properly trained individuals should use this device.
6. Do not leave the device unattended between uses.
7. Electric shock hazard. Do not plug in if electrical plug or parts are wet.
8. Use only a Sanosil supplied electrical power cord.
9. Take care to prevent water or other fluid from entering the device. Should this occur, allow to completely dry before
use. Check the accuracy of all operating functions.
10. Always unplug the power cord from the outlet before moving the device.
11. There are no user-serviceable parts inside the device other than the nozzle. An operator may only perform
maintenance procedures specifically described in this manual, all other repairs should be made by the manufacturer.
12. Position the device on a secure surface to prevent rolling or moving while in use.
13. Do not tip the device on its side at any time unless completely empty and dry.
as this can cause leakage and damage on electrical parts
14. Do not overfill the tank as this can cause leakage and damage on electrical parts
15. Protect this device from severe impact and shock.
16. While in use, the body of the device may become warm to the touch. Handle with caution.
17. Read the specific warning and caution statements of the Sanosil disinfectant you use.
18. To ensure effectiveness and safety, use only with Sanosil disinfectant. Using any other manufacturer’s disinfecting or
cleaning product will result in serious injury, exposure and environmental damage.
19. Sanosil Ltd. is not responsible for any injury or damage caused by using this device outside of the specific parameters
detailed in this manual.
20. Store in a safe, dry location. Do no place anything on top of the device. Store in an upright position.

Sanosil Q-Jet Superior
7
3.
Product Description
3.1
Technical Data
Powerrequirements:
220 - 240 V, 50/60Hz
Amperage:
5.0 A max. (fuse 6,3 A)
Operatingtemperature / humidity:
5°C to 35°C / max. 45% rH (before fogging) at higher humidity, the humidity must be
lowered before start-up or a lower dosage of the active substance must be selected.
Engine Power:
1173 W
Air flow:
162 m3/h
Tank capacity:
4,5 Liter (4,2 Liter usable)
Casing dimensions:
320 x 320 x 360 mm [12.6 x 12.6 x 14.17 inch]
Weight (empty):
14,4 kg
Weight (filled):
18,9 kg
Noise level:
84 dB (1m)
Powerrequirements:
220 - 240 V, 50/60Hz
3.2
Parts and Functions
1 Device
2Power cord
3ON/OFF-switch
4Display
5Air-filter
6Tank cap
7 Support for Gun (Nozzle)
8 Gun (Nozzle)
9 Service Flap
10 Remote Control
11 LED-Light
12 USB connector
3.3 PackageContents
1 Device
1 Power cord
1 Gun (Nozzle)
1 Remote control
1 Operation and User Manual with attachments
3.4 Q-Jet Superior Accessories
•Trolley
•Case for transportation
•2m Tube
•Printer
3.5 Spare parts
•
Air-filter set (20pc)
3.6 Recommended Equipment
•Respirator mask filter ABE1
•Handheld H2O2Sensor measurement 0-20ppm
(for example Dräger X-am 5100)
•Gloves
3.7 Consumables
•
Sanosil disinfectants

Sanosil Q-Jet Superior
8
3.8 Trolley (optional)
•
place the device on top of trolley
•
secure the device with the screw on the trolley
CAUTION
Risk of crushing!
Hands and fingers can be crushed between device and trolley!
Do always wear device on handle bars while setting the device on the trolley!

Sanosil Q-Jet Superior
9
4.
Getting Started and OperatingInstructions
4.1 Warning
WARNING
Risk of Injuries! This device nebulizes chemical substances!
Do not inhale these substances, always wear safety equipment when filling/emptying tank and pay
attention to optical and acoustic warningsignals.
Read carefully all indications stated on the safety data sheet of the disinfection liquid and fully comply
with them! Make sure NOBODY is in the room and to affix a warning board on the entrance door when
the system starts!
4.2 Room Preparation and positioning of device
4.2.1 Room Preparation
•
Close windows
•
Pull back and secure all room dividing curtains
•
If possible turn off, then cover and seal all air handling units, heaters and smokedetectors
•
Check relative humidity of the room, to be max. 45 % rH. / (before fogging) at higher humidity, the humidity must be
lowered before start-up or a lower dosage of the active substance must be selected.
•
Check temperature of the room, to be between 15 to 35 °C.
•
Affix warning board on entrance door. Seal bottom of room door after exiting (e.g. with large painters’ tape)
4.2.2 Positioning of the device
•Avoid direction of air flow towards entrance door and air conditioning units.
•Position the device in a corner of the room (minimum rear distance to wall 30 cm to enable intake of room air).
•Place device on a stable, flat, dust-free, none slippery, horizontal surface which can appropriately support its weight.
•Minimum distance between Q-Jet Compact 2+ and closest object (wall, door etc.): 6 m
•Point nozzle towards center of the room.
•Do not point nozzle towards smoke detectors and check with facility management to take appropriate measures to
avoid any activation of the detector systems during nebulization process.
Minimum distance between device and next object: 6 m

Sanosil Q-Jet Superior
10
4.3 Position
•
Place device on a stable, flat, dust-free, not slippery, horizontal surface which can appropriately support its weight.
•
Point nozzle towards center of theroom.
•
Do not point nozzle towards smoke detectors and check with facility management to take appropriate measures that
the former will not be activated during nebulizationprocess
4.4 Power Connection
•
Before making electrical connections carefully check that the
voltage supplied is compatible with the voltage marked on
the dataplate.
•
Insert power cord (2) in IEC power socket.
4.5 Filling
•
Remove tank cap (6)
•
Fill disinfection liquid (max. 4.2 liter!)
The system warns of reaching the max. by an acoustic signal (loud beep)
Liquid level is shown on display with % filling level.
•
Wipe-up any spills with a microfiber towel or rag
•
Do not tip the device on its side at any time unless
completely empty and dry.
CAUTION
Risk of Injuries!
Always wear gloves and safety googles when filling
the tank!
Do not overfill! This will damage the device.

Sanosil Q-Jet Superior
11
•
Wind tank cap (6) until shut
•liquid level could be checked on the display.
4.6 Gun (Nozzle)
•
Remove cap from gun support (7)
•
Insert gun (8)
•
Gun must lock: „click“
4.7 Switch on
•
Tip ON/OFF (3) to switch on the device

Sanosil Q-Jet Superior
12
5. Operation
•
Use Touch-Screen Display to navigate and operate the device. Thereafter the different options are
explained and operating instructions aregiven.
General Information:
•
When device is switched on its Home screen is displayed
•
Press on display to get the users’ overview.
Select desired option according to yourauthorization::
-Service: is reserved to the service technician
for the maintenance.
-Admin: is intended for the “department head“, i.e. for the
person instructing the different users and in
charge of the settings for each one of the device’s
users.
-User: is meant for the device’s users /
operators
(corresponding names
can be inputted).
•
Select the input field (blue stars) and this keyboard will bedisplayed.
•
Input password (when needed) and press
Enter: main screen will appear.

Sanosil Q-Jet Superior
13
•
Icons and Information on main screen:
•
Icon Start/Stop
•
Program type, e.g.
•
Icon Timer ON/OFF
•
Icon Settings
•
Icon Diagnosis
•
Icon LOG
•
Room volume to betreated, e.g
•
Authorized person, e.g.
•
Nebulization time, e.g.
•
Messages / Alarm, e.g. ALR-12 : INSUF LIQUID FOR PRG SELECTED

Sanosil Q-Jet Superior
14
5.1 Settings (general)
Settings „ADMINISTRATOR“
•
Following the Administrator’s settings-screen.
•
Pressing button “User” allows input of users’ names as well
as their respective passwords.
•
Date and Time of the operating system are now to beset
Be careful: this input is used for the device’s Timer andLogger!
•
Language of device’s operating system can be changed bypressing
“Language“ (IT/FR/EN/GE).

Sanosil Q-Jet Superior
15
•
Network –Parameters can be set or changed when
selecting “Ethernet” (see 10.1).
•
SMS-function is reserved for a futureapplication.
•
If e-mail application was bought, your service technician will be
enabled to add the necessary e-mail parameters using “Send Mail“
Necessary Data (available at your IT-Department):
-
IP Srv Out: IP Address for outgoing mails
-
P: Port of outgoing TCP server
-
Account: Authorized User on your e-mail server
-
Password: User password
-From: e-mail address recipient
-To: e-mail address sender
-
The option „Daily“ (OK/check mark symbol) enables to send daily
and at the same time an e-mail.
Press „Test Email“ to test configuration and sending oftest-mails.

Sanosil Q-Jet Superior
16
5.2 Brief explanations of the displays and functions
(overview)
•
Starting on main screen, press „F2“ or icon „Settings“ to input
users‘ settings
•
Select desired program type (Normal/Pulse/Step/Testing)
Oder
•
Touch fields:
Volume/Concentration/Code Charge/Typology to
open the respective keyboardscreen.
Input or change values according to your needs and confirmyour
inputs with Enter.
- Volume: room volume in m3 (length x width xheight)
-
Concentration: dosage desired per m3(usually 8, 12, 16ml)
-
Code Charge: Definition of disinfection liquid
- Typology: Name of room (e.g. surgery room 2)
•
For Timer: press “Down Arrow“
(next page)
•
Press button of desired week day.
•
Input desired running time.
-
Up to 3 nebulization sessions a day can be programmed,
theyare displayed on the respectiveboxes
-
Select nebulization type
-
Enable pressing check-box to the left on screen
(OK/checkmark symbol on box = enabled nebulization
session).
F2

Sanosil Q-Jet Superior
17
•
The time of nebulization can be set or changed in the time field,
via the virtualkeyboard.
•
Each input has to be confirmed by pressingEnter!
•
After setting weekly program, press „ESC“ to return on main screen
•
Activate weekly program by pressing icon „TimerON/OFF“
„inactivated“ „activated“
•
„Testing“: Select on screen „Settings“ (see 5.10) mode
„Testing“ and press “Down Arrow”.
•
This page displays several inputs and allows to test outputs,
i.e. Pump, Fan, LED, Buzzer.
•
Press „Start Test“ to start Pump for up to 5 minutes, thus simulating
a working cycle
•
End test by pressing „Stop Test“.

Sanosil Q-Jet Superior
18
F3
F4
5.3 Diagnosis
•
Press F3 or diagnose-icon on main screen or
Following the datadisplayed:
-
Room temperature (Operating temperature 5°C - 40°C)
-
Relative humidity (for best results: from 50% up to85%
-
Liquid level (in %)
-
Total nebulization time (in hours : minutes)
-
Partial nebulization time (in hours)
5.4 Event Logger (LOG)
•
• Press F4 or LOG-icon on main screen or
•
Up to the last 15 events can be scrolled by pressingthe
„arrow-keys”.
•
All events are stored on the SD-card inside thePLC.
Via Ethernet connection this data can be downloaded and
exported to Excel (please see page 40 Accessory Unitronic
SD Card Suite).

Sanosil Q-Jet Superior
19
5.5 Programs (whole room disinfection process)
Following options are available:
- Normal
5.7
One time single disinfection process
- Normal with timer
5.8
One time or multiple Disinfection process set with a timer
- Pulse
5.9
One time single disinfection process with 30Sek. interval liquid dosing pulses
- STEP
5.10
The disinfection process can be splitin different steps(max. 3 cycles)
- Testing
5.11
Device check its filling level (disinfectant in the tank)
WARNING
Risk of Injuries! This device nebulizes chemical substances!
Do not inhale these substances, always wear safety equipment when filling/emptying tank
andpay attention to optical and acoustic warningsignals.
Read carefully all indications stated on the safety data sheet of the disinfection liquid and fully
comply with them! Make sure NOBODY is in the room and to affix a warning board on the
entrance door when the system starts!
5.6 Room Preparation
•Close windows
•Pull back and secure all room dividing curtains
•If possible turn off, then cover and seal all air handling units, heaters and smoke detectors
•Check relative humidity of the room, to be max. 45 % rH. / (before fogging) at higher humidity, the humidity
must be lowered before start-up or a lower dosage of the active substance must be selected.
•Check temperature of the room, to be between 15 to 35 °C.
•Affix warning board on entrance door. Seal bottom of room door after exiting (e.g. with large painters’ tape)
5.7 Positioning of the device
•Avoid direction of air flow towards entrance door and air conditioning units.
•Position the device in a corner of the room (minimum rear distance to wall 30 cm to enable intake of room air).
•Place device on a stable, flat, dust-free, none slippery, horizontal surface which can appropriately support its weight.
•Minimum distance between Q-Jet Compact 2+ and closest object (wall, door etc.): 6 m
•Point nozzle towards center of the room.
•Do not point nozzle towards smoke detectors and check with facility management to take appropriate measures to
avoid any activation of the detector systems during nebulization process.
Minimum distance between device and next object: 6 m

Sanosil Q-Jet Superior
20
5.8 Fogging time and consumption (standard / higher / high contamination)
WARNING
The dosing values below are a recommendation for well pre-cleaned rooms only and are based
on many years of experience and are partly supported by test reports. However, the values
given are not binding as the disinfection effect can be influenced by many factors. Binding proof
of efficacy must be confirmed by microbiological checks after disinfection.
For room treatments according norm Afnor T72-281 (2014) refer to page 31, table 2 (5.13 Step).
The below dosage recommendations are not valid for the norm Afnor T72-281 2014
5.9 Dosage values for well precleaned rooms
Room
Size
Fogging time/consumption
standard contamination
(8ml/m3)
Fogging time/consumtion
higher contamination
(12ml/m3)
Fogging time/consumtion
high contamination
(16ml/m3)
m3
time:
Consumption in
ml:
time:
Consumption in
ml:
time:
Consumption in
ml:
10
3 min
99 ml
5 min
165 ml
6 min
198 ml
20
5 min
165 ml
8 min
264 ml
10 min
330 ml
30
7 min
231 ml
7 min
231 ml
14 min
462 ml
40
10 min
330 ml
11 min
363 ml
20 min
660 ml
50
12 min
396 ml
18 min
594 ml
24 min
792 ml
60
15 min
495 ml
23 min
759 ml
30 min
990 ml
70
17 min
561 ml
26 min
858 ml
34 min
1122 ml
80
19 min
627 ml
19 min
957 ml
38 min
1254 ml
90
22 min
726 ml
33 min
1089 ml
44 min
1452 ml
100
24 min
792 ml
24 min
1188 ml
48 min
1584 ml
150
36 min
1188 ml
54 min
1782 ml
72 min
2376 ml
200
48 min
1584 ml
72 min
2376 ml
96 min
3168 ml
250
60 min
1980 ml
90 min
2970 ml
120 min
3960 ml
275
66 min
2210 ml
99 min
3267 ml
132 min
4420 ml
300
73 min
2409 ml
110 min
3630 ml
---
---
350
85 min
2805 ml
128 min
4224 ml
---
---
400
97 min
3201 ml
---
---
---
---
450
109 min
3597 ml
---
---
---
---
500
120 min
3960 ml
---
---
---
---
550
132 min
4356 ml
---
---
---
---
Check temperature of the room, to be between 15 to 35 °C.
Check relative humidity of the room, to be max. 45 % rH. / (before fogging)
at higher humidity, the humidity must be lowered before start-up or a lower dosage of the active substance must be selected.
Table of contents
Other Sanosil Respiratory Product manuals