Sanosil Q-Jet Advanced 2 Series User manual

Sanosil Q-Jet Advanced
1
Operation and Maintenance Manual
Sanosil Q-Jet Advanced
Series 2
Des M 56en –Advanced V2+
English

Sanosil Q-Jet Advanced
2
Table of Contents
1. Introduction ....................................................................................... 3
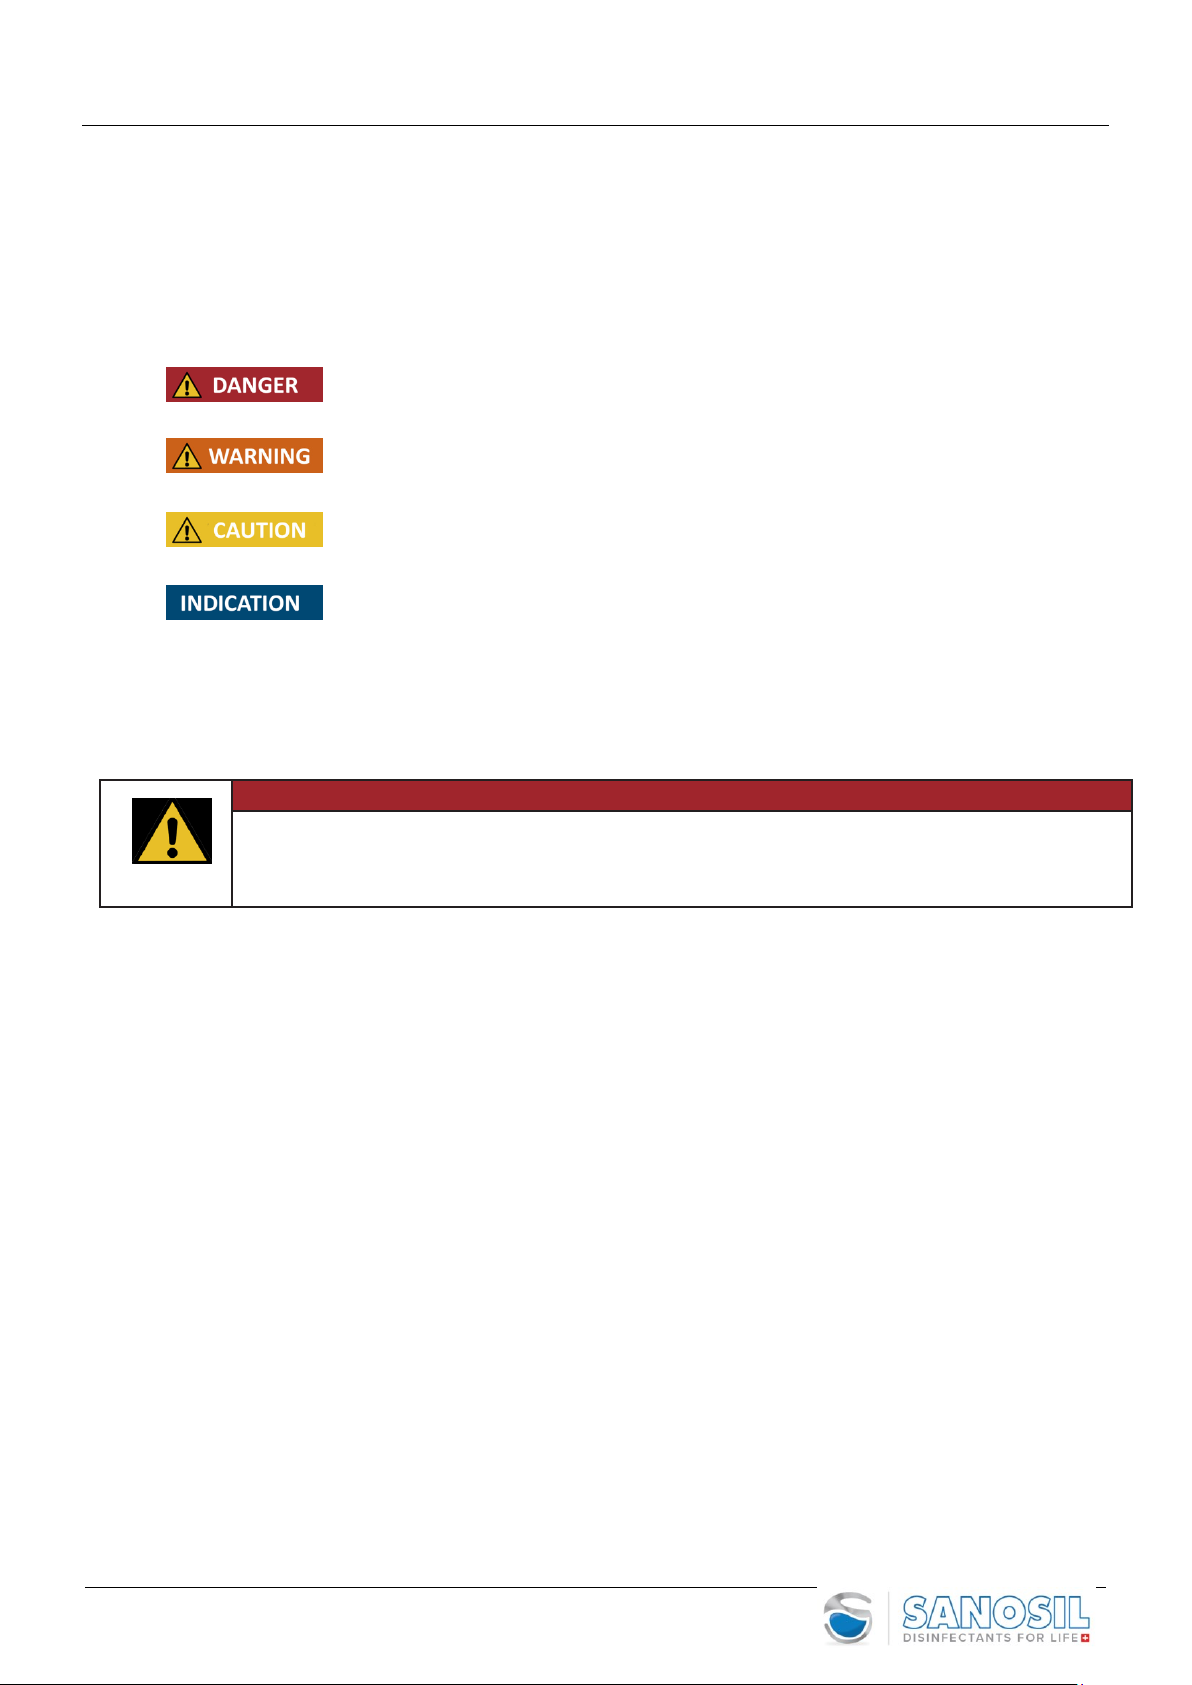
1.1 Used Symbols ......................................................................................................... 3
2. Safety................................................................................................. 3
2.1
Intended Usage ......................................................................................................4
2.2
Inappropriate Usage ..............................................................................................4
2.3
Danger and Caution Warnings...............................................................................4
2.4
Authorized Persons ................................................................................................5
2.5
Disclaimer .............................................................................................................. 5
2.6
Room Disinfecting with the Sanosil Q-Jet Fogger .................................................. 5
2.7
Different ways to use the Sanosil Q-Jet Advanced ................................................. 5
2.8
Important safety directions (read carefully before use).........................................6
3.
Product Description...........................................................................................7
3.1
Technical Data........................................................................................................7
3.2
Parts and Functions................................................................................................ 7
3.3
Package Contents................................................................................................... 7
3.4
Q-Jet Advanced Accessories ................................................................................... 7
3.5
Spare parts............................................................................................................. 7
3.6
Recommended Equipment ..................................................................................... 7
3.7
Consumables ..........................................................................................................7
3.8
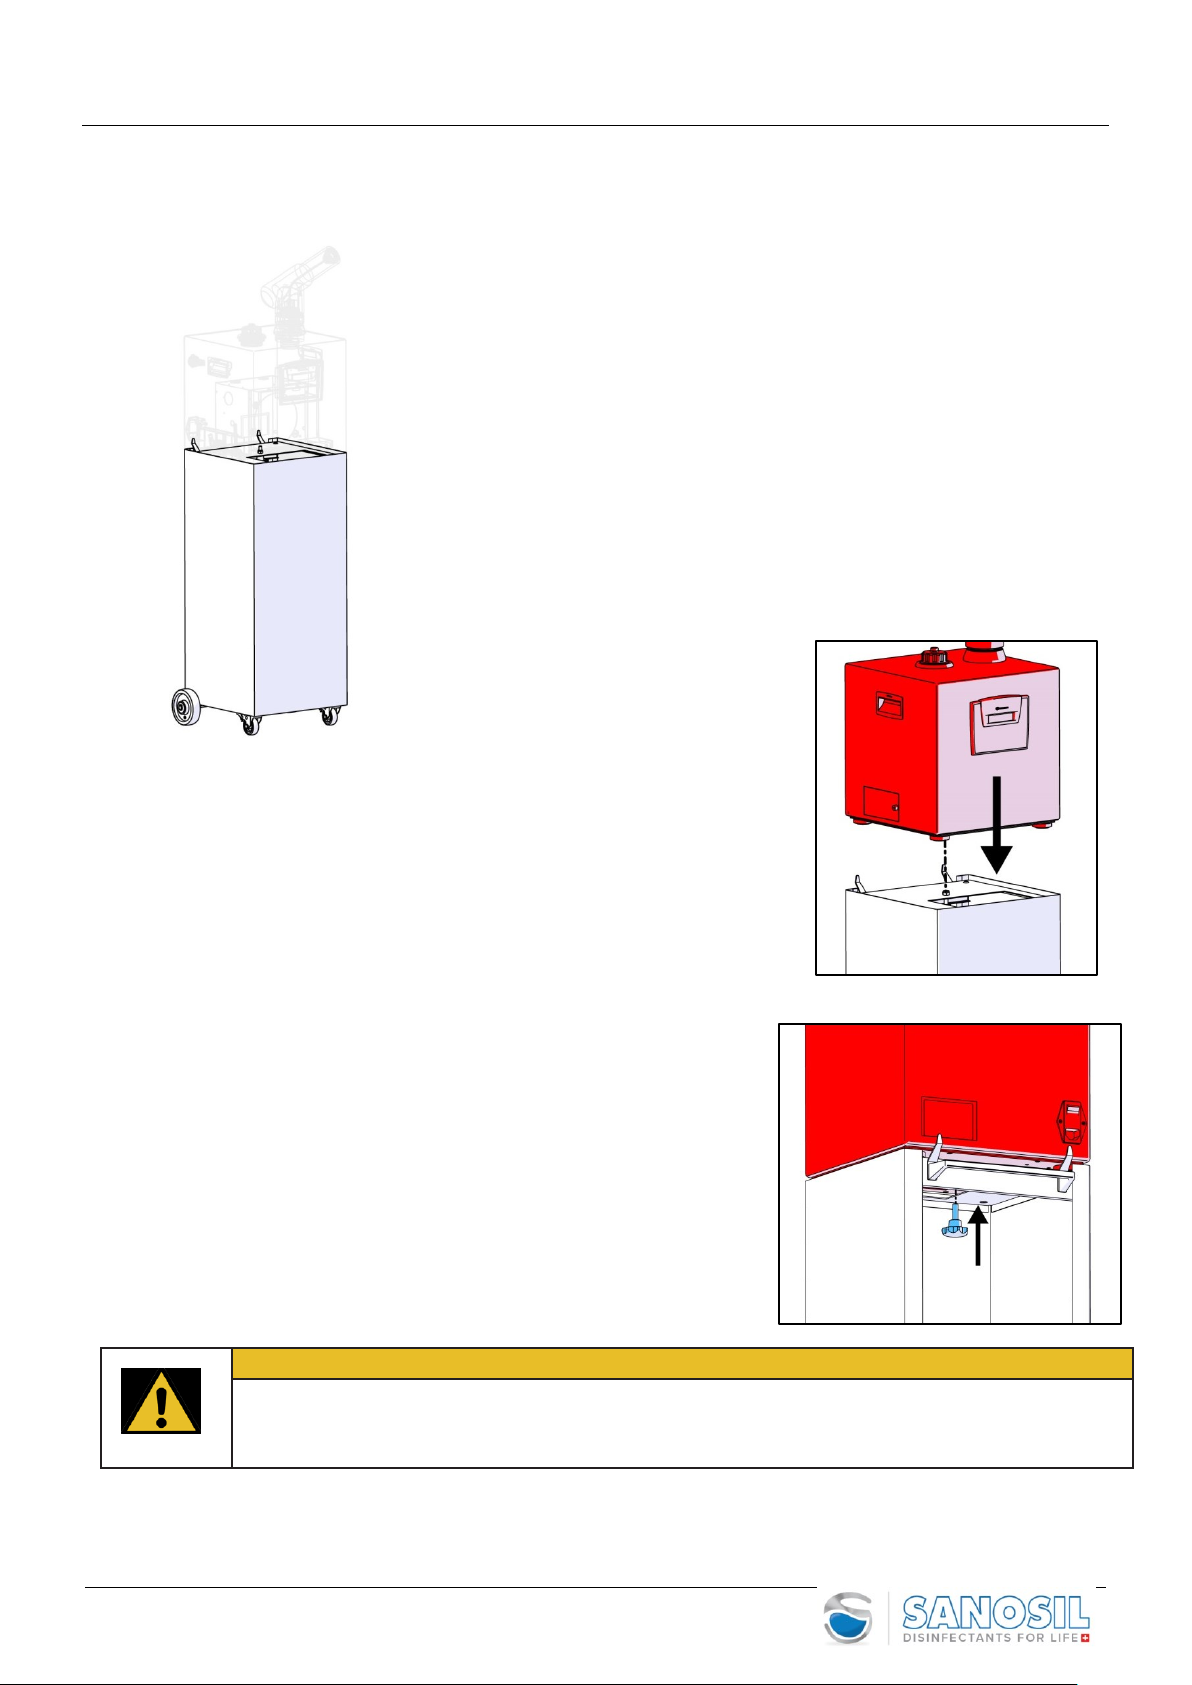
Trolley (optional)....................................................................................................8
4.
Getting Started and Operating Instructions ......................................... 9
4.1
Warning..................................................................................................................9
4.2
Room preparation / positioning ........................................................................... 9
4.3
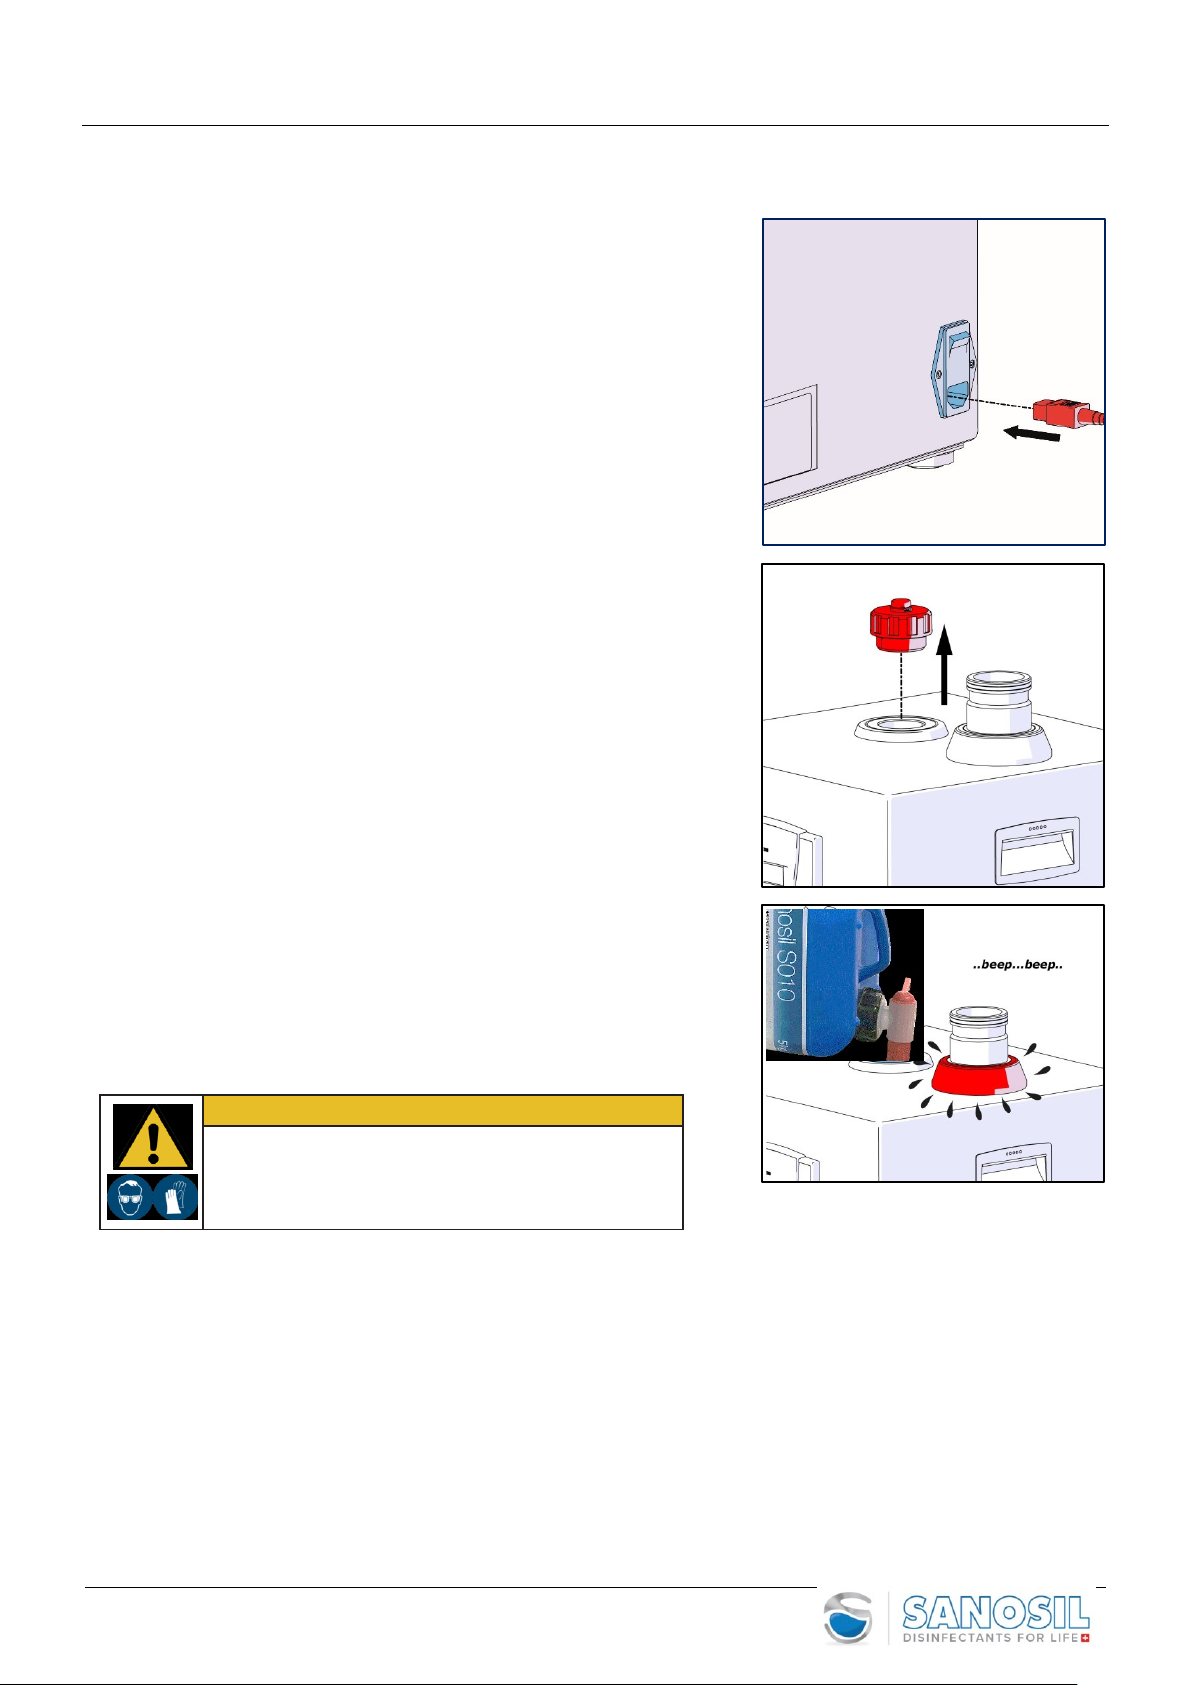
Power Connection ................................................................................................10
4.4
Filling....................................................................................................................10
4.5
Gun (Nozzle).........................................................................................................11
4.6
Switch on.............................................................................................................. 11
5.
Operation......................................................................................... 12
5.1
Programs..............................................................................................................13
5.2
Room Preparation................................................................................................ 13
5.3
Manual program (standard) ................................................................................ 15
5.4
Automatic program (timer).................................................................................. 16
5.5
Step (3 cycles program)........................................................................................18
5.6
Filling(checking filling level) ................................................................................. 21
5.7
Setup Data & Time ............................................................................................... 21
5.8
Diagnosis (operating hours counter)....................................................................21
5.9
Setup Language ................................................................................................... 21
5.10
Test Mode............................................................................................................. 21
5.11
Emptying the Tank.......................................................................................................... 22
5.12
Calibration of tank ...............................................................................................22
6. Maintenance .................................................................................... 23
6.1
Mandatory replacement of air intake filter ......................................................... 23
6.2
Regular Visual check and Maintenance ...............................................................24
6.3
Extraordinary Maintenance ................................................................................. 24
7. Troubleshooting ............................................................................... 25
7.1 Table (Anomaly / Possible causes / Remedy)................................................................. 25
7.2
Warning on Display.............................................................................................. 25
8. Warranty.......................................................................................... 26
9. Disposal and Decommissioning ......................................................... 26
9.1
Disposal in EU Countries ...................................................................................... 26
10. Declaration of Conformity................................................................. 27

Sanosil Q-Jet Advanced
3
1. Introduction
1.1 Used Symbols
Inside this manual or on the device there are Symbols having the following meaning:
High risk!
Disregard can lead to death or heavy injuries!
Medium risk!
Disregard can lead to death or heavy injuries!
Low risk!
Disregard can lead to medium or light injuries!
Disregard can damage thedevice.
Gives good advice for operating the device.
Further symbols will be explained thereafter.
2. Safety
DANGER
Instruct carefully all Users of the device on how to operate it, its application purposes and the risks
incurred. Make sure this manual is read and understood by all users of thedevice.
Ensure that this manual is always available to the users of the device.

Sanosil Q-Jet Advanced
4
2.1 Intended Usage
The device is a nebulizer to be used for indoor applications only. The device is a nebulizer to be used for indoor
applications with Sanosil disinfectants only maximal hydrogen Peroxide content of 7.5%.
Its purpose is to transform the used disinfection liquid into smallest particles and to nebulize them into a room,
thus leading to the consistent disinfection of all uncovered surfaces (3D-disinfection) inside the room.
This device is intended for usage in hospitals, clinics, public transports, etc. as well as in residential-, commercial-
and in- dustrial areas. It is an additional measure following regular cleaning and disinfecting room surfaces. Pre-
cleaning protocol is defined by the respective healthcare facility. Ensure surfaces are dry before nebulizing in order
to maximize the impact.
WARNING
Risk of Damage!
This device nebulizes chemical substances!
The area to be disinfected may only contain items necessary for its use.
Objects made of delicate organic materials, in particular antiques, paintings and precious artifacts
are to be removed!
2.2 Inappropriate Usage
Do always and only use suitable Sanosil disinfectants with a maximal hydrogen Peroxide content of 7.5%. The
usage of any other disinfectant or accessories which are not specifically approved by Sanosil Ltd. is against the
rules herein and can lead to heavy injuries as well as to damaging the device. The device is not meant for use
as a stand-alone disinfection process but rather as an addition to regular cleaning and disinfection.
DANGER
Risk of Injuries!
Danger of explosion!
Do not use any flammable liquids! Do always and only use Sanosil disinfection liquids.
2.3 Danger and Caution Warnings
•
The device must be used in full compliance with this Operation and Maintenance Manual.
•
It is strictly forbidden to use the device in an atmosphere with danger of explosion or flammability, in dusty
areas and in areas with the presence of people or animals. It is an imperative to prevent people from entering
intentionally or inadvertently the room during the nebulization process and during the waiting time
thereafter.
•
The device can only be operated using the original power cord or a country-specific power cord with earthing
wire and plug. Before making electrical connections carefully check that the voltage supplied is compatible
with the voltage marked on the device’s data plate. Any electrical installation work must be carried out by
qualified personnel.
•
The power socket must be easily accessible.
•
Risk of injuries when using not authorized accessories!
•
Therefore, do only use original accessories of SanosilLtd.
•
Place device on a stable, flat, dust-free, not slippery, horizontal surface which can appropriately support its weight.
•
Before removing the rear panel, always disconnect the device from the power supply.
•
When there is liquid inside the tank, do not tilt the device; it could leak from the hydrauliccircuit.
•
Read carefully all indications stated on the label of the Sanosil disinfectant.
2.4 Authorized Persons
The device shall only be used by adults who have been carefully instructed on how to operate it and are well
informed on possible dangers and risks incurred when using the device.
The users must always have a copy of this Operation Manual at their disposal when operating the device and
have read and understood all specific indications stated on the label of the Sanosil disinfectant used.

Sanosil Q-Jet Advanced
5
2.5 Disclaimer
Sanosil declines any claims for damages or warranty claims if:
•
The product is used for any other purpose but the ones stated in this OperationManual.
•
Regulations, standards or instructions in this Operation Manual are not adhered to.
•
The product is modified or transformed in any manner.
•
The product is not repaired by an authorized dealer and is used with other but the original spare parts provided by
Sanosil Ltd.
•
The product is used despite obvious safety faults or recognizabledamages.
•
The product was exposed to mechanical tappets or has beendropped.
•
Accessories are used which are not supplied nor specifically authorized by Sanosil Ltd.
2.6 Room Disinfecting with the Sanosil Q-Jet Fogger
How to use the Sanosil Q-Jet Advanced:
Fogging of Sanosil Disinfectants (only use Sanosil ready for use products containing up to 7.5% hydrogen Peroxide)
can be used for disinfecting hard, nonporous surfaces in rooms as an adjunct following regular cleaning and
disinfecting of room surfaces. Sanosil ready to use products are recommended for use in fogging operations as a
supplemental measure after regular cleaning and disinfecting procedures. Pre-cleaning protocol defined by
healthcare facility. If other cleaning/disinfecting products then Sanosil products are used, surfaces MUST BE DRY
before fogging. The more thorough the surfaces are cleaned beforehand, the more effective the adjunct
disinfection treatment will be.
Areas should be cleaned daily, after a contamination has been detected, or on an as needed basis depending on
the volume of traffic and use.
•Users should familiarize themselves with Q-Jet operation by reading the Q-Jet User Manual prior to first use.
It is essential that Q-Jet users follow all safety warnings as detailed in this operating manual.
•It is recommended that users read the entire document before proceeding with room disinfecting treatment.
2.7 Different ways to use the Sanosil Q-Jet Advanced
a. Overnight disinfection (recommended):
Procedure: Disinfecting process according procedure on page 15, with extended exposure time.
Advantages: Extended exposure time, maximal disinfection efficacy, hydrogen Peroxide level will lower
automatically overnight and has to be measured only once on the next day
Disadvantages: Room cannot be used and Sanosil Q-Jet Advanced is not available overnight
b. Standard disinfection without additional measures:
Procedure: Disinfecting process according procedure on page 15 with standard waiting time.
Advantages: Time consumption: 3-10 hours (depends on the room size, humidity and the decomposition
time of hydrogen peroxide in the treated room), Sanosil Q-Jet Advanced and room can be re-used
faster
Disadvantages: Additional personal and time needed for hydrogen peroxide level measurements
c. Standard disinfection with speed up measures:
Procedure: Disinfecting process according procedure on page 15 with reduced waiting time.
Advantages: Time consumption: 3-5 hours (depends on the room size and the taken measures to reduce
hydrogen peroxide level in the treated room), Sanosil Q-Jet and room can be reused faster
Disadvantages: Additional personal and time needed to air room, optionally an additional dehumidifier is
needed, slight risk of new contamination through open windows

Sanosil Q-Jet Advanced
6
2.8. Important safety Directions (Read carefully before use)
Caution (atomized Sanosil Disinfectant):
1. When the Q-Jet has completed its dispensing cycle, the room will be full of atomized Sanosil Disinfectant. The
treated room MUST REMAIN UNOCCUPIED FOR AT LEAST 120 MINUTES AFTER FOGGING. 120 minutes is the
minimum wait time and means not that the room is safe to re-enter or reoccupy. Length of wait time increases
with fogging quantity (ml/m3).
2. When room re-entry is required before treatment process is completed or to perform a H2O2level check ,
proper personal equipment (PPE) including wraparound style goggles; respirator mask (filter class ABE1)
filtering hydrogen peroxide (for example: 3M 4277 or 3M 7500 mask with 6057 filter) and gloves should be
worn to safely enter the room.
Caution (Sanosil Q-JET device)
A caution statement in this manual identifies a condition or practice, which if not corrected or discontinued immediately,
could lead to serious injury or death.
1. KEEP OUT OF REACH FOR CHILDREN.
2. Carefully read all instructions, warning, caution and first aid statements prior to use.
4. Use only as directed.
5. The device is designed for easy-use. However, only properly trained individuals should use this device.
6. Do not leave the device unattended between uses.
7. Electric shock hazard. Do not plug in if electrical plug or parts are wet.
8. Use only a Sanosil supplied electrical power cord.
9. Take care to prevent water or other fluid from entering the device. Should this occur, allow to completely dry
before use. Check the accuracy of all operating functions.
10. Always unplug the power cord from the outlet before moving the device.
11. There are no user-serviceable parts inside the device other than the nozzle. An operator may only perform
maintenance procedures specifically described in this manual, all other repairs should be made by the
manufacturer.
12. Position the device on a secure surface to prevent rolling or moving while in use.
13. Do not tip the device on its side at any time unless completely empty and dry.
as this can cause leakage and damage on electrical parts
14. Do not overfill the tank as this can cause leakage and damage on electrical parts
15. Protect this device from severe impact and shock.
16. While in use, the body of the device may become warm to the touch. Handle with caution.
17. Read the specific warning and caution statements of the Sanosil disinfectant you use.
18. To ensure effectiveness and safety, use only with Sanosil disinfectant. Using any other manufacturer’s disinfecting
or cleaning product will result in serious injury, exposure and environmental damage.
19. Sanosil Ltd. is not responsible for any injury or damage caused by using this device outside of the specific
parameters detailed in this manual.
20. Store in a safe, dry location. Do no place anything on top of the device. Store in an upright position.

Sanosil Q-Jet Advanced
7
3.
Product Description
3.1
Technical Data
Powerrequirements:
220 - 240 V, 50/60Hz
Amperage:
5.0 A max. (fuse 6,3 A)
Operatingtemperature / humidity:
5°C to 35°C / max. 45% rH (before fogging) at higher humidity, the humidity must be
lowered before start-up or a lower dosage of the active substance must be selected.
Engine Power:
1173 W
Air flow:
162 m3/h
Tank capacity:
4.5 Liter (4.2 Liter usable)
Casing dimensions:
320 x 320 x 360 mm [12.6 x 12.6 x 14.17 inch]
Weight (empty):
14,2 kg
Weight (filled):
18,7 kg
Noise level:
84 dB (1m)
3.2
Parts and Functions
1 Device
2Power cord
3ON/OFF-switch
4Display
5Air-filter
6Tank cap
7 Support for Gun (Nozzle)
8 Gun (Nozzle)
9 Service Flap
10 Remote Control
11. LED –Light
12 USB connector
3.3 PackageContents
1 Device
1 Power cord
1 Gun
1 Operation and User Manual with attachments
2 Set of air intake filters (10 pcs. & 20pcs.)
3.4 Q-Jet Advanced Accessories
•Trolley
•Case for transportation
•2m Tube
3.5 Spare parts
•
Air-filter set (20pc)
3.6 Recommended Equipment
•Respirator mask filter ABE1
•Handheld H2O2Sensor measurement 0-20ppm
(for example Dräger X-am 5100)
•Gloves
3.7 Consumables
•
Sanosil disinfectants
2
3
4
5
6
7
8
9
10
8
12
11

Sanosil Q-Jet Advanced
8
3.8 Trolley (optional)
•
place the device on top of trolley
•
secure the device with the screw on the trolley
CAUTION
Risk of crushing!
Hands and fingers can be crushed between device and trolley!
Do always wear device on handle bars while setting the device on the trolley!

Sanosil Q-Jet Advanced
9
4.
OperatingInstructions
4.1 Warning
WARNING
Risk of Injuries! This device nebulizes chemical substances!
Do not inhale these substances, always wear safety equipment when filling/emptying tank and pay
attention to optical and acoustic warningsignals.
Read carefully all indications stated on the safety data sheet of the disinfection liquid and fully comply
with them! Make sure NOBODY is in the room and to affix a warning board on the entrance door when
the system starts!
4.2 Preparation
4.2.1 Room Preparation
•
Close windows
•
Pull back and secure all room dividing curtains
•
If possible turn off, then cover and seal all air handling units, heaters and smokedetectors
•
Check relative humidity of the room, to be max. 45 % rH. / (before fogging)
at higher humidity, the humidity must be lowered before start-up or a lower dosage of the active substance must be selected.
•
Check temperature of the room, to be between 15 to 35 °C.
•
Affix warning board on entrance door. Seal bottom of room door after exiting (e.g. with large painters’ tape)
4.2.2 Positioning of the device
•Avoid direction of air flow towards entrance door and air conditioning units.
•Position the device in a corner of the room (minimum rear distance to wall 30 cm to enable intake of room air).
•Place device on a stable, flat, dust-free, none slippery, horizontal surface which can appropriately support its weight.
•Minimum distance between Q-Jet Advanced 2+ and closest object (wall, door etc.): 6 m
•Point nozzle towards center of the room.
•Do not point nozzle towards smoke detectors and check with facility management to take appropriate measures to
avoid any activation of the detector systems during nebulization process.
Minimum distance between device and next object: 6 m

Sanosil Q-Jet Advanced
10
4.3 Power Connection
•
Before making electrical connections carefully check that the
voltage supplied is compatible with the voltage marked on
the dataplate.
•
Insert power cord (2) in IEC power socket.
4.4 Filling
•
Remove tank cap (6)
•
Fill disinfection liquid (max. 4.2 liter!)
•
Wipe-up any spills with a clean paper towel or rag
•
Do not tip the device on its side at any time unless completely
empty and dry.
CAUTION
Risk of Injuries!
Always wear gloves and safety googles when filling
the tank!
Do not overfill! This will damage the device.

Sanosil Q-Jet Advanced
11
•
Wind tank cap (6) until shut
•liquid level could be checked on the display.
4.5 Gun (Nozzle)
•
Remove cap from gun support (7)
•
Insert gun (8)
•
Gun must lock: „click“
4.6 Switch on
•
Tip ON/OFF (3) to switch on the device

Sanosil Q-Jet Advanced
12
9
0
5.
Operation
•
To navigate through the main menu use arrow- and
number buttons.
•
Toget to a sub-menu or to confirm selection made,
press Return / ENTER button.
•
Toget back one step inside the menu, press arrow-
button„left“.
•
To stop disinfection process, press „i-button“
Or button on remote control
Display
i-button
Return /
ENTER
Number- Arrow-
buttons buttons
•
After switching on the device, following is shown on thedisplay:
•
Tosee actual software-version, date and time, press button„down“.
•
Press arrow-button „down“ to get following operating modes:
- Operation
[5.1]
- Diagnosis
[5.2]
- Set-up Auto
[5.3]
- Set-up Data & Time
[5.4]
- Set-up language
[5.5]
- Test Mode
[5.6]
•
Confirm your selection pressing ENTER
QJ-ADVANCED
WELCOME
Vers. x.xx
xx/xx/xx xx:xx
i

Sanosil Q-Jet Advanced
13
5.1 Programs
Following options are available:
- MANUAL
5.3
One time single disinfection process
- AUTOMATIC
5.4
Automatic mode allows to set a daily / weekly timer
- STEP
5.5
The disinfection process can be splitin different steps(max. 3 cycles)
- FILLING
5.6
Device check its filling level (disinfectant in the tank)
WARNING
Risk of Injuries!
This device nebulizes chemical substances with a turbine! Do not inhale these substances, always
wear safety equipment when filling/emptying tank and pay attention to optical and acoustic warning
signals. If the disinfected area can’t be leave, always wear safety equipment (respiratory and hearing
protection)!
Read carefully all indications stated on the safety data sheet of the disinfection liquid and fully
comply with them!
5.2 Preparation
WARNING
Risk of Injuries!
This device nebulizes chemical substances!
Before starting this device always affix warning board on entrance door.
Seal bottom of room door after exiting (e.g. with large painters’ tape)
5.2.1 Room Preparation
•
Close windows
•
Pull back and secure all room dividing curtains
•
If possible turn off, then cover and seal all air handling units, heaters and smokedetectors
•
Check relative humidity of the room, to be max. 45 % rH. / (before fogging)
at higher humidity, the humidity must be lowered before start-up or a lower dosage of the active substance must be selected.
•
Check temperature of the room, to be between 15 to 35 °C.
•
Affix warning board on entrance door. Seal bottom of room door after exiting (e.g. with large painters’ tape)
5.2.2 Positioning of the device
•Avoid direction of air flow towards entrance door and air conditioning units.
•Position the device in a corner of the room (minimum rear distance to wall 30 cm to enable intake of room air).
•Place device on a stable, flat, dust-free, none slippery, horizontal surface which can appropriately support its weight.
•Minimum distance between Q-Jet Advanced 2+ and closest object (wall, door etc.): 6 m
•Point nozzle towards center of the room.
•Do not point nozzle towards smoke detectors and check with facility management to take appropriate measures to
avoid any activation of the detector systems during nebulization process.
Minimum distance between device and next object: 6 m

Sanosil Q-Jet Advanced
14
Fogging time and consumption (standard / higher / high contamination)
WARNING
The dosing values below are a recommendation for well pre-cleaned rooms only and are
based on many years of experience and are partly supported by test reports. However, the
values given are not binding as the disinfection effect can be influenced by many factors.
Binding proof of efficacy must be confirmed by microbiological checks after disinfection.
For room treatments according norm Afnor T72-281 (2014) refer to page 18 (5.5 Step).
The below dosage recommendations are not valid for the norm Afnor T72-281 2014
Dosage values for well precleaned rooms
Room
Size
Fogging time/consumption
standard contamination
(8ml/m3)
Fogging time/consumtion
higher contamination
(12ml/m3)
Fogging time/consumtion
high contamination
(16ml/m3)
m3
time:
Consumption in
ml:
time:
Consumption in
ml:
time:
Consumption in
ml:
10
3 min
99 ml
5 min
165 ml
6 min
198 ml
20
5 min
165 ml
8 min
264 ml
10 min
330 ml
30
7 min
231 ml
7 min
231 ml
14 min
462 ml
40
10 min
330 ml
11 min
363 ml
20 min
660 ml
50
12 min
396 ml
18 min
594 ml
24 min
792 ml
60
15 min
495 ml
23 min
759 ml
30 min
990 ml
70
17 min
561 ml
26 min
858 ml
34 min
1122 ml
80
19 min
627 ml
19 min
957 ml
38 min
1254 ml
90
22 min
726 ml
33 min
1089 ml
44 min
1452 ml
100
24 min
792 ml
24 min
1188 ml
48 min
1584 ml
150
36 min
1188 ml
54 min
1782 ml
72 min
2376 ml
200
48 min
1584 ml
72 min
2376 ml
96 min
3168 ml
250
60 min
1980 ml
90 min
2970 ml
120 min
3960 ml
275
66 min
2210 ml
99 min
3267 ml
132 min
4420 ml
300
73 min
2409 ml
110 min
3630 ml
---
---
350
85 min
2805 ml
128 min
4224 ml
---
---
400
97 min
3201 ml
---
---
---
---
450
109 min
3597 ml
---
---
---
---
500
120 min
3960 ml
---
---
---
---
550
132 min
4356 ml
---
---
---
---
Check temperature of the room, to be between 15 to 35 °C.
Check relative humidity of the room, to be max. 45 % rH. / (before fogging)
at higher humidity, the humidity must be lowered before start-up or a lower dosage of the active substance must be selected.

Sanosil Q-Jet Advanced
15
5.3 Manual (Standard)
Please read and follow important safety directions on page 6
before use!
•
Choose MANUAL and confirm with ENTER
•
Enter room’s volume in m3 (MC: 0-999) and desired
concentration of disinfectant, i.e. ml per m3
In the room (low risk 8ml / Standard risk 12ml / high risk 16ml)
(CONCENTRAT: 1-50), press ENTER
•
Automatically calculated time is shown
(e.g. MC:83 and CONCENTRAT: 6 = TIME:30:00)
•
Activate process by pressing ENTER
(active = black dot on display)
•
Start disinfection-program by pressing „i“-button
or using the remote control
•
Device will start in 15 seconds (Red LED flashes!) Please do immediately leave theroom!
•
During the course of the disinfection program the display shows the remaining time (Count-down)
•
At the end of the disinfection program the green LED flashes.
•
Room re-entry minimum waiting-time begins (minimal 120 Minutes)
Recommended minimal “Nebulization time / Minimum waiting time”:
0–20min/120 min, 20–30 min/130min, 30–40 min/140min, 40–50/min/150min, 50–60min and above 160min
•
After the end of the waiting-time the room can be prepared for re-entry
•
Check with a hydrogen peroxide level sensor that the H2O2-Level is below 1ppm
•
Open windows and doors for min. 15 minutes, unseal HVAC vents and restart HVAC system to allow increasedairflow
circulation in the room. Once a safe ppm level is reached, room can be re-used again.
•
Shortening of waiting time: after a minimal waiting time of 120 minutes place a strong dehumidifier in the
middle of the room and dehumidify room for at least 60 minutes or air room by opening a window or HVAC. Use
full protection equipment when placing dehumidifier!
•When room re-entry is required before treatment process is completed or to perform a H2O2level check, proper
personal equipment (PPE) including wraparound style goggles; respirator mask (filter class ABE1) filtering hydrogen
peroxide (for example: 3M 4277 or 3M 7500 mask with 6057 filter) and gloves should be worn to safely enter the room.
WARNING!
Risk of injuries!
Toprevent injuries do always check H2O2-Level before entering the room. When entering room to measure
the H2O2-Value, do always wear full protection equipment, i.e. protection mask, safety googles and gloves.
The disinfected room can only be entered without protection equipment if the H2O2-Value is below1ppm.
Fogging time and consumption (low / normal / high contamination), refer to page 14
•
Tip ON/OFF (3) to switch off device
INDICATION
The liquid inside the device has to be completely emptied (please see chapter 5.11) for
transportation as well as for longer storage of the device!
MC: _83
CONCENTRAT: 6
TIME: 30:00
i
MANUAL
TIME: 30:00

Sanosil Q-Jet Advanced
16
TIME: 30:00
5.4 Automatic (with timer)
Please read and follow important safety directions on page 6
before use!
•
Choose AUTOMATIC mode and confirm by pressing ENTER
•
Pre-set nebulization time is displayed
•
For pre-setting device (set time prior use),
please see below, SETUP TIMER
•
Confirm pre-settings by pressing ENTER
(active = black dot on display)
CAUTION
If AUTOMATIC-mode is „ON“ and disinfection process is set by the weekly-timer, the nebulization time
cannot be over 1 (one) hour! Please make sure that during fogging and after the required waiting
time no living being are allowed to be in the treated room.
SETUP TIMER:
•
Choose mode SETUP AUTO and confirm by pressing ENTER
•
Enter desired values
-
MC = Volume of room in m3
-
CONC = Concentration (dosage) in ml per m3
Nebulization TIME will be calculated automatically
For the approx. fogging time and consumption refer to the table on page 14
•
Weekly timer (press arrow button „down“) (activated days
are shown through filledsquares)
•
Toprogram days press ENTER
- For each day input starting-time and confirm withENTER
•
Toactivate day press “I”-button
(square is filled when day is activated)
•
Device will start at the times programmed Please make sure there are no living beings inside the room!
•
During the course of the disinfection program the display shows the remaining time (Count-down)
•
At the end of the disinfection program the green LED flashes.
•
Room re-entry minimum waiting-time begins (minimal 120 Minutes)
Recommended minimal “Nebulization time / Minimum waiting time”:
0–20min/120 min, 20–30 min/130min, 30–40 min/140min, 40–50/min/150min, 50–60min and above 160min
(a overnight treatment is recommended, see 2.7)
•
After the end of the waiting-time the room can be prepared for re-entry :
•
Check with a hydrogen peroxide level sensor that the H2O2-Level is below 1ppm
•
Open windows and doors for min. 15 minutes, unseal HVAC vents and restart HVAC system to allow increasedairflow
circulation in the room. Once a safe ppm level is reached, room can be re-used again.
Cont. next page
TIME: 30:00
AUTOMATIC
START
WED
HH:xx:xx
MC:180
START
WED
HH:02:30
MC:180
SETUP AUTO
MC: xxx CONC: xx
TIME: xx:xx
M T W T F S S

Sanosil Q-Jet Advanced
17
•
Shortening of waiting time: after a minimal waiting time of 120 minutes place a strong dehumidifier in the
middle of the room and dehumidify room for at least 60 minutes or air room by opening a window or HVAC. Use
full protection equipment when placing dehumidifier!
•When room re-entry is required before treatment process is completed or to perform a H2O2level check, proper
personal equipment (PPE) including wraparound style goggles; respirator mask (filter class ABE1) filtering hydrogen
peroxide (for example: 3M 4277 or 3M 7500 mask with 6057 filter) and gloves should be worn to safely enter the room.
WARNING!
Risk of injuries!
Toprevent injuries do always check H2O2-Level before entering the room. When entering room to measure
the H2O2-Value, do always wear full protection equipment, i.e.protection mask, safety googles and gloves.
The disinfected room can only be entered without protection equipment if the H2O2-Value is below1ppm.
•
Tip ON/OFF (3) to switch off device

Sanosil Q-Jet Advanced
18
5.5 Step (max. 3 cycles)
The complete disinfection process can be splitin different steps
The disinfection result (efficacy) will be higher when done in cycles (up to 100%)
Please read and follow important safety directions on page 6
before use!
•
Choose STEP and confirm by pressing ENTER
•
Up to 3 steps can be set (CYCLE 1-3) asfollows:
ON = cycle’s run-time in min. 0-59 = active fogging time with a dosage of 33ml/min
OFF = cycle’s interval time in min. 0-59 = no fogging, activation and dwell time
•
Press ENTER to confirm each setting!
•
Toget to the different cycles, press every time ENTER
•
Each cycle has an ON- and an OFF- time. Please input for
each cycle the desired time (between 0 and 59 minutes) and
confirm with ENTER. Enter “0”on cycle 3 if not used.
WARNING
The dosing values below/on the next page (19) are a recommendation for well pre-cleaned
rooms only and are based on many years of experience and are partly supported by test
reports. However, the values given are not binding as the disinfection effect can be influenced
by many factors. Proof of efficacy must be confirmed by microbiological checks after
disinfection.
For room treatments according norm Afnor T72-281 (2014) refer to the table on page 19
CYCLE 1
ON: 1m
OFF: 1m
CYCLE 2
ON: 1m
OFF: 1m
STEP
CYCLE 3
ON: 1m
OFF: 1m

Sanosil Q-Jet Advanced
19
•Step Fogging times and consumption (low / high contamination) –not applicable for Afnor T72-281 (2014)
Room
Size
Fogging time/consumption
normal contamination (8ml/m3)
Fogging time/consumption
high contamination (16ml/m3)
m3
Step1
Step2
Step3
ml:
Step1
Step2
Step3
ml:
10
1/30
2/15
0/0
99 ml
2/30
4/15
0/0
198 ml
20
2/30
3/15
0/0
165 ml
4/30
6/15
0/0
330 ml
30
3/30
4/15
0/0
231 ml
6/30
8/15
0/0
462 ml
40
5/30
5/15
0/0
330 ml
10/30
10/15
0/0
660 ml
50
4/30
4/15
4/0
396 ml
8/30
8/15
8/0
792 ml
60
5/30
5/15
5/0
495 ml
10/30
10/15
10/0
990 ml
70
5/30
6/15
6/0
561 ml
10/30
12/15
12/0
1122 ml
80
6/30
6/30
7/0
627 ml
12/30
12/30
14/0
1254 ml
90
7/30
7/30
8/0
726 ml
14/30
14/30
16/0
1452 ml
100
8/30
8/30
8/0
792 ml
16/30
16/30
16/0
1584 ml
150
12/30
12/30
12/0
1188 ml
24/30
24/30
24/0
2376 ml
200
16/30
16/15
16/0
1584 ml
32/30
32/15
32/0
3168 ml
250
20/30
20/15
20/0
1980 ml
40/30
40/15
40/0
3960ml
300
24/30
24/15
25/0
2409 ml
350
28/30
28/15
29/0
2805 ml
400
32/30
32/15
33/0
3201 ml
450
36/30
36/15
37/0
3597 ml
500
40/30
40/15
40/0
3960 ml
550
44/30
44/15
44/0
4356 ml
•Step Fogging times and consumption meeting the norm Afnor T72-281 (2014) with Sanosil S015
For details please refer to the Sanosil test reports T319, T320 and T321
Room
Size
Fogging time/consumption according the norm
Afnor T72-281 (2014), valid for Sanosil S015 for:
bacteria’s, yeasts, molds
(28ml/m3)
Fogging time/consumption according the norm
Afnor T72-281 (2014), valid for Sanosil S015 for:
bacterias, yeasts, molds, spores
(33ml/m3)
m3
Step1
Step2
Step3
ml:
Step1
Step2
Step3
ml:
10
4/30
2/30
2/30
277 ml
5/60
3/60
2/60
330 ml
20
8/30
4/30
4/30
554 ml
10/60
6/60
4/60
660 ml
30
12/30
6/30
6/30
831 ml
15/60
9/60
6/60
990 ml
40
16/30
8/30
8/30
1108 ml
20/60
12/60
8/60
1320 ml
50
20/30
10/30
10/30
1386 ml
25/60
15/60
10/60
1650 ml
60
24/30
12/30
12/30
1663 ml
30/60
18/60
12/60
1980 ml
70
28/30
14/30
14/30
1940 ml
35/60
21/60
14/60
2310 ml
80
32/30
16/30
16/30
2217 ml
40/60
24/60
16/60
2640 ml
90
36/30
18/30
18/30
2495 ml
45/60
27/60
18/60
2970 ml
100
40/30
20/30
20/30
2772 ml
50/60
30/60
20/60
3300 ml
110
44/30
22/30
22/30
3049 ml
55/60
33/60
22/60
3630 ml
120
48/30
24/30
24/30
3326 ml
60/60
36/60
24/60
3960 ml
130
52/30
26/30
26/30
3603 ml
65/60
39/60
26/60
4290 ml
140
56/30
28/30
28/30
3880 ml
150
60/30
30/30
30/30
4158 ml
160
64/30
32/30
32/30
4435 ml
Check temperature of the room, to be between 15 to 35 °C.
Check relative humidity of the room, to be max. 45 % rH. / (before fogging)
at higher humidity, the humidity must be lowered before start-up or a lower dosage of the active substance must be selected.

Sanosil Q-Jet Advanced
20
INDICATION
CAREFUL:
Tank must contain enough liquid for entire selected nebulizationtime!
E.g. three hours of nebulization request a completely filled tank!
•
Toactivate settings press ENTER
(active = black dot on display)
•
Start disinfection-program by pressing either „i“-button
or using the remote control
•
Device will start in 15 seconds (Red LED flashes!) Please do immediately leave theroom!
•
During the course of the disinfection program the display shows the remaining time (Count-down)
•
At the end of the disinfection program the green LED flashes.
•
Room re-entry minimum waiting-time begins (minimal 120 Minutes)
Recommended minimal “Nebulization time / Minimum waiting time”:
0–20min/120 min, 20–30 min/130min, 30–40 min/140min, 40–50/min/150min, 50–60min and above 160min
•
Shortening of waiting time: after a minimal waiting time of 120 minutes place a strong dehumidifier in the
middle of the room and dehumidify room for at least 60 minutes or air room by opening a window or HVAC. Use
full protection equipment when placing dehumidifier!
•
After the end of the waiting-time the room can be prepared for re-entry
•
Check with a hydrogen peroxide level sensor that the H2O2-Level is below 1ppm
•
Open windows and doors for min. 15 minutes, unseal HVAC vents and restart HVAC system to allow increasedairflow
circulation in the room. Once a safe ppm level is reached, room can be re-used again.
•
Shortening of waiting time: after a minimal waiting time of 120 minutes place a strong dehumidifier in the
middle of the room and dehumidify room for at least 60 minutes or air room by opening a window or HVAC. Use
full protection equipment when placing dehumidifier!
•When room re-entry is required before treatment process is completed or to perform a H2O2level check , proper
personal equipment (PPE) including wraparound style goggles; respirator mask (filter class ABE1) filtering hydrogen
peroxide (for example: 3M 4277 or 3M 7500 mask with 6057 filter) and gloves should be worn to safely enter the room.
WARNING!
Risk of injuries!
Toprevent injuries do always check H2O2-Level before entering the room.
When entering room to measure the H2O2-Value, do always wear full protection equipment, i.e. protection
mask, safety googles and gloves.
The disinfected room can only be entered without protection equipment if the H2O2-Value is below1ppm.
•
Tip ON/OFF (3) to switch off device
INDICATION
The liquid inside the device has to be completely emptied (please see chapter 5.11) for
transportation as well as for longer storage of the device!
i
STEP:
Table of contents
Other Sanosil Respiratory Product manuals