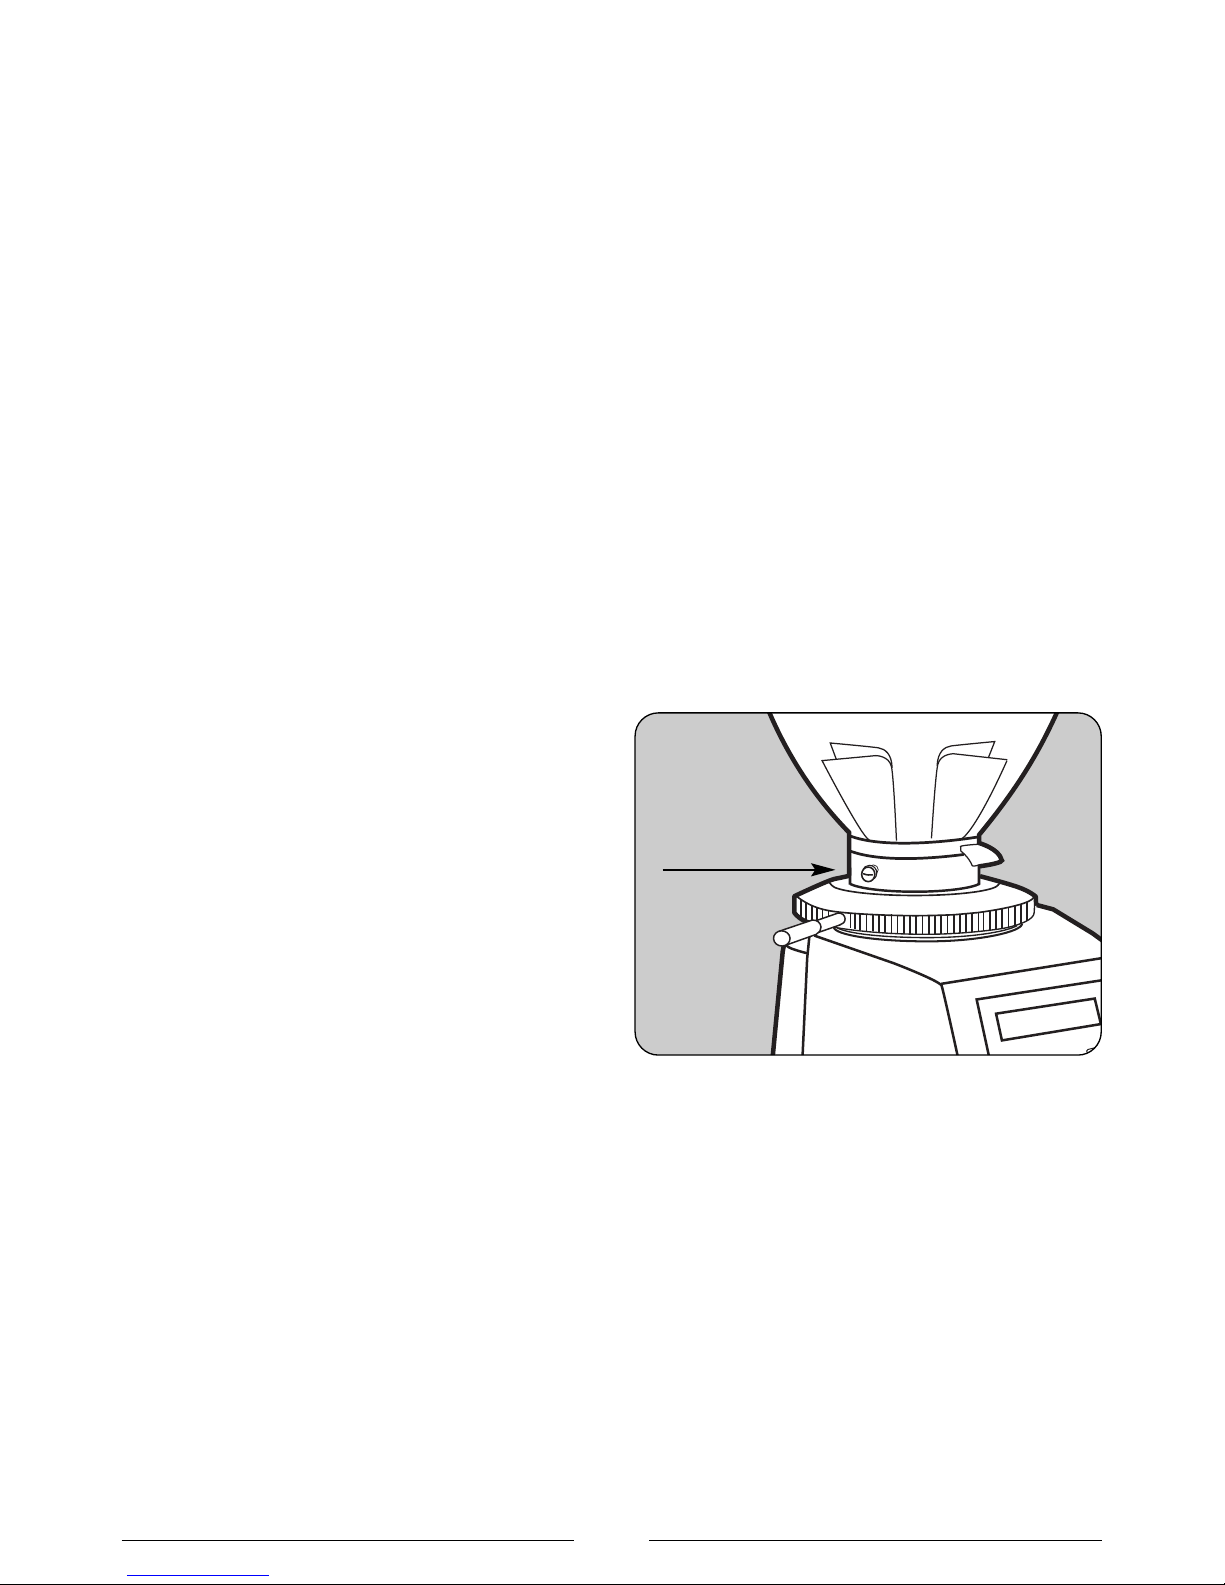
Sanremo SR70 User manual

Macinadosatore Elettronico mod. SR70
mod. SR70
Macinadosatore
Elettronico

Istruzioni per il modello
Instruction for model
Gebrauchsanweisung für das
Notice pour le modèle
Instrucciones para el modelo
Modulo d’ordine ricambi pagina/page/seite/page/página 54
Spare parts order form
Bestellformular für Ersatzteile
Bon de commande de pièces détachées
Impreso para el pedido de recambios
Italiano pagina 4
English page 14
Deutsch seite 24
Français page 34
Español page 44
Macinadosatore
elettronico mod.
SR70

4
AVVERTENZE GENERALI
• Leggere e attenersi attentamente alle avver-
tenze ed alle istruzioni.
Prima dell’utilizzo, verificare che la tensione
della rete corrisponda a quella indicata nella
targa dei dati tecnici della macchina.
• Collegare l’apparecchio solo a prese di cor-
rente aventi portata di 10 A e dotate di una
efficace messa a terra.
•Staccare sempre la spina dalla presa di cor-
rente prima di eseguire qualsiasi manuten-
zione o pulizia sugli apparecchi.
• I modelli MONOFASE vengono forniti già
equipaggiati con cavo e spina per il collega-
mento alla presa.
• Qualsiasi manomissione e allacciamento non
conforme annullano la garanzia del costruttore.
AVVERTENZE PARTICOLARI
•
Non manomettere in alcun modo gli apparecchi.
• Per qualsiasi intervento sulle macchine rivol-
gersi esclusivamente a centri di assistenza
autorizzati.
• Non tirare mai il cavo di alimentazione per
staccare la spina dalla presa.
• Usare l’apparecchio solo per le funzioni al
quale è destinato.
• Sistemare gli apparecchi a una distanza mini-
ma di 5 cm dalla parete, in modo da consen-
tire l’ottimale aerazione.
• Controllare che gli apparecchi siano distanti
da lavelli e getti d’acqua.
• Non lasciare mai incustodito l’apparecchio
acceso. Tenerlo lontano dalla portata dei
bambini e da persone incapaci.
• Non mettere mai in funzione l’apparecchio
che sembri difettoso.
• Usare solo accessori e ricambi originali.
• Non coprire mai gli apparecchi per evitare
pericoli d’incendio.
• Disinserire la spina se l’apparecchio non deve
essere utilizzato per lungo tempo.
• Lasciare raffreddare l’apparecchio prima di
spostarlo.
• Ai fini della sicurezza gli apparecchi sono da
ritenersi sempre, con presa inserita e quindi
in tensione.
• Fare attenzione che per qualche istante dopo
l’arresto le macine possono essere ancora in
rotazione.
• Non immettere liquidi di alcun genere a con-
tatto con le parti interne o esterne dell’appa-
recchio.
• Non mettere assolutamente caffè macinato
nella campana.
• Non toccare l’apparecchio con mani o piedi
umidi o bagnati.
• LA CAMPANA DEVE ESSERE FISSATA AL SISTE-
MA DI MACINATURA DELL’APPARECC IO TRA-
MITE L’APPOSITA VITE che deve essere inseri-
ta nel foro filettato presente sul portamacine
superiore e nel foro presente sul collare della
campana.
• L’inosservanza di queste norme solleva il
costruttore da ogni responsabilità per danni a
persone o cose.
In caso di ostruzione della bocchetta togliere
la spina del macinadosatore dall'alimentazio-
ne di corrente, togliere la campana, svitare la
ghiera, poi pulire con cura rimuovendo tutto il
caffe'.
Qualora il MACINADOSATORE restasse inattivo
per un periodo prolungato, pulirlo con cura,
lavare ed asciugare la campana e lasciarla
aperta.
ATTENZIONE: Organi in movimento.

Introduzione
Fare il caffè è un’arte e per impararne a fondo i segreti bisogna seguire regole precise. La formula per
ottenere una perfetta tazzina di caffè espresso è, infatti, molto articolata e la parte svolta dall’apparec-
chiatura è di estrema importanza. Per una riuscita ottimale ed una qualità indiscutibile è necessario
combinare correttamente tre elementi:
l. una miscela pregiata
2. l’uso appropriato delle apparecchiature disponibili
3. la sapiente abilità e professionalità di chi lo prepara. Per gustare un buon caffè, diversamente da
come si crede, non basta soltanto scegliere una miscela particolare.
L’esperienza e la bravura dell’operatore nel seguire le giuste procedure di preparazione della bevanda e
di utilizzo di macchinari adeguati, contribuiscono in maniera determinante a creare un piccolo capolavo-
ro. Per questo i professionisti danno tanta importanza alla macchina espresso e al macinadosatore.
Conoscere bene questi strumenti, mantenerli in perfetta efficienza ed impiegarli al massimo delle loro
possibilità è un’abilità che appartiene ai veri maestri del caffè.
La qualità di un buon caffè espresso deriva da una serie di operazioni, tra le quali la macinazione ha
un ruolo importante. Il macinadosatore, quindi, rappresenta per l’operatore uno degli strumenti basi-
lari, la cui struttura deve rispondere a determinate caratteristiche che sono: robustezza, resistenza e
funzionalità.
5
Peso 14 Kg
Dimensioni SR70
ITALIANO
61,5 cm
23 cm
27 cm
20,5 cm

6
Imballo
Appena aperto l’imballo, controllare con cura che l’apparecchio sia integro e che non siano presenti
danneggiamenti. In caso di dubbio non utilizzarlo e rivolgersi a personale professionalmente qualifica-
to. Le parti dell’imballaggio non devono essere lasciate alla portata dei bambini in quanto fonte di
potenziale pericolo. Conservare l’imballo fino a garanzia scaduta.
Smaltimento
Evitare di disperdere nell’ambiente gli elementi dell’imballo attenendosi alle leggi vigenti. In caso si
decidesse di non utilizzare più l’apparecchio si raccomanda di renderlo inoperativo staccando la spina
dell’alimentazione elettrica dalla presa di corrente e successivamente tagliando il cavo nel punto di
uscita dall’apparecchio. Per lo smaltimento dei componenti dell’apparecchio rivolgersi a società spe-
cializzate.
Des rizione Generale
Coperchio campana
Campana (contenitore del caffè in grani)
Serranda
Ghiera o vite per la regolazione macinatura
Pannello di controllo
Display
Caffè una tazza / Tasto P1
Macinatura / Tasto P2
Forchetta portafiltro
Caffè due tazze / Tasto P3
Microinterruttore
di attivazione
Interruttore acceso/spento

7
Impiego
Questo apparecchio è stato concepito ESCLUSIVA-
MENTE per macinare caffè in grani. Ogni altro uso
è da considerarsi improprio e pertanto pericoloso.
Il costruttore declina ogni responsabilità per even-
tuali danni dovuti ad uso improprio od errato. Non
utilizzare l’apparecchio per macinare altri tipi di
alimenti o altro.
I MACINADOSATORI E MACINACAFFÈ DI NOSTRA
PRODUZIONE SONO APPARECC I DESTINATI A
PERSONALE TECNICO QUALIFICATO PER UN UTI-
LIZZO ESCLUSIVAMENTE PROFESSIONALE E NON
PER UN USO DOMESTICO. Utilizzatore deve
essere una persona adulta.
Non permettere l’uso da parte di bambini o inca-
paci.
Installazione ed alla iamento
elettri o
L’installazione deve essere effettuata da perso-
nale tecnico qualificato in conformità alle nor-
mative di sicurezza vigenti. Una installazione
errata può causare danni a persone, animali o
cose, per i quali il costruttore non può essere
considerato responsabile.
• L’apparecchio deve essere posizionato su di
una superficie stabile e piana.
• Prima di inserire la spina controllare che i
valori di tensione e di frequenza della rete di
alimentazione elettrica corrispondano a quel-
li indicati sulla etichetta contenente i dati tec-
nici dell’apparecchio.
• La presa di corrente deve essere fornita di un
contatto di terra efficiente. È importante quin-
di verificare che l’impianto di messa a terra sia
efficace e conforme alle attuali norme di sicu-
rezza. In caso di dubbio far eseguire da parte
di personale professionalmente qualificato un
accurato controllo all’impianto.
È OBBLIGATORIO IL COLLEGAMENTO A TER-
RA DELL’APPARECC IO.
Il costruttore declina ogni responsabilità qua-
lora questa norma non venga rispettata.
• È importante verificare che la portata elettrica
dell’impianto sia adeguata alla potenza e/o
corrente assorbite dall’apparecchio indicate
sulla etichetta contenente i dati tecnici e che
la presa sia protetta contro le sovracorrenti.
• Non utilizzare prolunghe, adattatori elettrici
per prese multiple o collegamenti volanti.
• II senso di rotazione del motore deve essere
orario. L’eventuale inversione di rotazione dei
motori trifase, mediante inversione di due
conduttori di alimentazione all’interno della
spina, deve essere effettuata da personale
qualificato.
Funzionamento dell’appare hio
PREPARAZIONE
Verificare che la campana sia posizionata corretta-
mente sull’apparecchio e fissata al portamacine
superiore tramite l’apposita vite. Chiudere la ser-
randa e riempire la campana con caffè in grani.
Aprire la serranda in modo da consentire l’entra-
ta dei chicchi di caffè nel sistema di macinatura.
AVVIAMENTO ED ARRESTO
MACINADOSATORI ELETTRONICI
Agire sull’interruttore sia per l’avviamento che
per l’arresto.
Avviamento: interruttore in posizione “I”.
Arresto: interruttore in posizione “O”.
DESCRIZIONE GENERALE
Il controllo possiede tre pulsanti per la selezione
della dose da macinare:
P1: Selezione dose per un caffè
P2: Macinazione manuale
P3: Selezione dose per due caffè
Vite fissaggio
campana

8
DESCRIZIONE FUNZIONAMENTO
In stand-by il display visualizza a tempo, informa-
zioni inerenti il lavoro della macchina, come: caf-
fè fatti nell’arco della giornata, durante la settima-
na in corso, la vita del macinino, data, giorno del-
la settimana ed ora.
Il tocco di una preselezione come P1 oP3 fa lam-
peggiare il pulsante sfiorato, al consenso del pul-
sante di start P2 parte la macinazione per il tem-
po preimpostato.
Al termine dell’operazione vengono aggiornati i
contatori. La pressione continua del pulsante P2
aziona il motore macine senza bisogno del con-
senso dell’ingresso di “START PRESENZA PORTA-
FILTRO”.
Durante la macinazione continua viene visualizza-
to il tempo in secondi e decimi di secondo. La
macinazione continua corrisponde all’incremento
di un caffè.
IMPOSTAZIONI UTENTE
Per accedere al menu UTENTE mantenere premu-
to per circa 5 sec. Il pulsante P1.
Tramite P3 si avanza nei menu con P2 si incre-
menta il valore corrente, con P1 si decrementa il
valore corrente.
VOCI MENU UTENTE:
- Lingua: Italiano, Inglese, Tedesco, Francese,
Spagnolo
- Regolazione ora, minuti
- Regolazione data
- Regolazione giorno settimana
- Regolazione luminosità tasti
(In percentuale da 1—100)
IMPOSTAZIONI DI FABBRICA
Per accedere al menu IMPOSTAZIONI mantenere
premuto per circa 5 sec. Il pulsante P3.
Tramite P3 si avanza nei menu con P2 si incre-
menta il valore corrente, con P1 si decrementa il
valore corrente.
VOCI MENU FABBRICA:
- Tempo macinazione un caffè
- Tempo macinazione due caffè
- Ore sostituzione macine
- Azzeramento ore parziale macine
- Visualizzazione caffè nell’ultimo mese
- Ricarica default (ripristino parametri di fabbrica)
- Visualizzazione statistiche
TOTALE CAFFE GIO
Num 24 13:40
Lingua
Italiana
CAFFE SETTIMANA
Num 350 13:40
T

9
REGOLAZIONE DELLA MACINATURA
Per macinare il caffè
più o meno fine si
deve agire sulla ghie-
ra di regolazione
posta sotto la campa-
na.
Per aumentare la
grossezza del maci-
nato è necessario ruotare la ghiera in senso ora-
rio; per diminuirla è necessario ruotare la ghiera
in senso antiorario. La ghiera rimane nella posi-
zione fissata senza necessità di alcun arresto. La
regolazione va effettuata con motore avviato e
possibilmente senza caffè tra le macine.
Macinare piccoli quantitativi di caffè per la ricer-
ca della granulosità ottimale. Nella versione
Macina-dosatore se l’erogazione della macchina
per espresso è molto rapida significa che il caffè
è macinato troppo grosso.
Se viceversa l’erogazione è molto lenta significa
che il caffè è macinato troppo fine. Deve comun-
que essere considerato che sono molteplici le
condizioni che possono influenzare la corretta
erogazione, quali la grammatura della dose, la
pressatura, la regolazione della macchina espres-
so e la pulizia dei filtri.
REGOLAZIONE DELLA DOSE
DEL CAFFÈ MACINATO
Per la regolazione della dosatura si deve accede-
re alle IMPOSTAZIONI DI FABBRICA, selezionare
il TEMPO DI MACINATURA, l’opzione MACINA 1 o
2 caffe e poi incrementare il TEMPO DI MACINA-
TURA col tasto P2 o diminuirlo col tasto P1.
SOSTITUZIONE MACINE
Questo macinadosatore elettronico avvisa dopo
aver raggiunto il volore impostato di fabbrica la
sostituzione delle macine,con un avviso che
appare dopo le statistiche.
IMPORTANTE: Dopo aver sostituito le macine
bisogna fare l'azzeramento parziale: Entrare nel
menu IMPOSTAZIONI DI FABBRICA, proseguire
fino alla voce AZZERA PARZIALE poi premere il
tasto P1.
Avvertenze per l’uso
• Non lasciare l’apparecchio in funzione senza
caffè nella campana..
Protezioni
PROTETTORE TERMICO
Il motore dell’apparecchio è protetto da eccessi-
vi riscaldamenti dovuti a sovracorrenti da un pro-
tettore termico che interviene interrompendo l’a-
limentazione del motore. Nel caso si verificasse
l’intervento dei protettore termico, causato da
anomalie di funzionamento come ad esempio
un blocco delle macine, è necessario spegnere
l’apparecchio agendo sull’interruttore, TOGLIERE
LA SPINA DI COLLEGAMENTO DALLA RETE ELET-
TRICA E RIVOLGERSI A PERSONALE TECNICA-
MENTE QUALIFICATO. NON INTERVENIRE MAI
SULL’APPARECC IO SOTTO TENSIONE PER IL
RISC IO C E IL MOTORE POSSA RIPARTIRE
IMPROVVISAMENTE. Se l’apparecchio si è surri-
scaldato a causa del blocco del motore è neces-
sario attendere il raffreddamento prima di inter-
venire.
Macina 2 caffe
Sec. 4,0
SOSTITUIRE
MACINE

10
VITI DI SICUREZZA
• La campana deve essere sempre fissata al
portamacine superiore tramite l’apposita vite
che non deve mai essere rimossa dall’utente.
• Per proteggere la rimozione della ghiera di
regolazione e il conseguente accesso alle par-
ti rotanti è presente sulla ghiera stessa una
vite anti-svitamento: tale vite deve essere
posizionata in quello dei due fori presenti sul-
la ghiera che permette la più ampia e oppor-
tuna regolazione di macinatura e non deve
mai essere rimossa dall’utente.
PROTEZIONE USCITA-CAFFÈ
La protezione uscita-caffè deve essere sempre fis-
sata al gruppo dosatore tramite le apposite viti che
non devono mai essere rimosse dall’utente.
LA RIMOZIONE DELLA PROTEZIONE USCITA-
CAFFÈ PUÒ ESSERE EFFETTUATA ESCLUSIVAMEN-
TE DA PERSONALE TECNICO QUALIFICATO SOLO
DOPO AVER SCOLLEGATO L’APPARECC IO DALLA
RETE DI ALIMENTAZIONE RIMUOVENDO LA SPINA
DALLA PRESA.
Prima di ricollegare l’apparecchio alla rete, rimon-
tare la protezione.
Rumorosità
Paesi CEE:
La massima emissione sonora dei nostri macina-
dosatori e macinacaffè, misurata in camera river-
berante UNI EN ISO 3741 in accordi con le nor-
me EN 60704-1, risulta in accordo con le norme
EN 60704-1 : 1998 e EN 607043 : 1996. Il livello
equivalente di esposizione sonora per un opera-
tore, legato ESCLUSIVAMENTE ad un funziona-
mento limite dell’apparecchio di 240 min. su
otto ore, è pari a 78 dB(A), in accordo con la
Direttiva Europea 86/188/EEC e successiva revi-
sione 2003/1 0/EEC. L’utilizzo dell’apparecchio
non necessita pertanto di nessuna precauzione
contro rischi derivanti da esposizione al rumore
nei luoghi di lavoro (articoli 3-8 della DE 2003/1
0/EEC).
Manutenzione
È indispensabile effettuare periodiche verifiche sul-
lo stato del cavo e della spina di alimentazione.
IN CASO DI DANNEGGIAMENTO DEL CAVO 0
DELLA SPINA DI ALIMENTAZIONE RIC IEDERE
L’INTERVENTO DI PERSONALE TECNICO QUALIFI-
CATO PER LA SOSTITUZIONE IN MODO DA PRE-
VENIRE OGNI RISC IO.
NEGLI APPARECC I CON MARCATURA CE PER
APRIRE LA PIASTRA DI FONDO PER INTERVENI-
RE SUL CAVO È NECESSARIO L’USO DI UN UTEN-
SILE SPECIALE.
Si raccomanda di utilizzare solo ricambi originali.
Per assicurare l’efficienza dell’apparecchio è indi-
spensabile far effettuare da personale tecnico
qualificato la manutenzione periodica con detta-
gliati controlli sullo stato dei componenti mag-
giormente soggetti ad usura.
È necessario verificare periodicamente lo stato di
usura delle macine. Un ottimo stato delle maci-
ne garantisce una elevata qualità della macinatu-
ra con maggior produttività e limitazione di surri-
scaldamento.
Pulizia dell’appare hio
TOGLIERE LA TENSIONE DI ALIMENTAZIONE DELL’AP-
PARECC IO RIMUOVENDO DALLA PRESA LA SPINA
PRIMA DI INIZIARE LA PULIZIA. L’APPARECC IO
NON DEVE ESSERE PULITO CON UN GETTO D’ACQUA.
Non installare l’apparecchio in locali in cui è prevista
la pulizia con getti d’acqua.
È NECESSARIO FAR EFFETTUARE PERIODICAMENTE
LA PULIZIA DELL’APPARECC IO ESCLUSIVAMENTE
DA PERSONALE TECNICO QUALIFICATO.
Per la pulizia utilizzare panni o pennelli perfettamen-
te puliti e igienizzati. Non utilizzare prodotti abrasivi
per non togliere ai particolari la loro lucentezza.
Campana
Lavare la campana dopo averla rimossa dall’ap-
parecchio (svitando la relativa vite di fissaggio),
con acqua e sapone neutro, risciacquarla accura-
tamente con acqua tiepida e asciugarla perfetta-
mente. Si consiglia di effettuare periodicamente
la pulizia della campana.
Dopo la pulizia la campana deve essere fissata al
portamacine superiore tramite l’apposita vite.

11
Sistema di macinatura
Rimuovere la vite di sicurezza che vieta la rimo-
zione della ghiera di regolazione. Svitare la ghie-
ra di regolazione ruotandola in senso orario.
Dopo aver tolto il portamacine superiore pulire
accuratamente le macine, i filetti e l’intero siste-
ma di macinatura utilizzando un pennello ed un
panno asciutto.
Dopo aver riposizionato il portamacine superiore
nella sua sede, riavvitare la ghiera di regolazione,
reinserire la vite antisvitamento in quello dei due
fori che permette la maggior regolazione e dopo
aver riposizionato la campana fissandola oppor-
tunamente, effettuare la regolazione del grado di
macinatura.
Visualizzazione Statisti he
Le statistiche che scorrono quando il macinadosa-
tore è in standby si possono nascondere:
Entrare nelle impostazioni di fabbrica poi scorre-
re fino alla voce VISUALIZZA STATISTIC E, con i
tasti P1 eP2 selezionare NO per togliere le stati-
stiche.
Una volta impostata la funzione Visualizza statisti-
che NO, l'operatore vede sul display solo il giorno
l'ora e la data.
NB: Il tecnico autorizzato può visualizzare le statisti-
che premendo contemporaneamente i pulsanti P1
eP2, i tre pulsanti P1 P2 P3 lampeggeranno conti-
nuamente visualizzando le statistiche fino a quanto
il tecnico non decida di toccare un qualsiasi tasto
ritornando al menu di standby.
VISUALIZZA
STATISTICHE
SI

18
12
21
5
9
20
2
3
4
1
6
7
8
10
11
14
15
14
16
17
19
13
22
23
24
25
26
27
Macinadosatore eletttronico mod.
SR70

Ma inadosatore elettroni o mod. SR70
POSIZIONE CODICE DESCRIZIONE PZ
110751000 Campana completa 1
2 10751002 Coperchio campana 1
3 10751001 Campana 1
4 10751003 Linguetta campana 1
510752022 Ghiera di regolazione STD 1
6 10752016 Porta macina fissa D64 1
7 10752086 Coppia di Macine D64 SR70 1
8 10752008 Vite albero motore TE 8X20 SX 1
9 10752006 Porta macina rotante D64 1
10 10752011 Molla di contrasto porta macina 3
11A 10754017 Corpo grigio 1
11B 10754015 Corpo rosso 1
11C 10454021 Corpo bianco R9003 1
11D 10754022 Corpo arancio 1
11E 10754023 Corpo alluminio lucido 1
11F 10754026 Corpo cromato 1
11G 10754030 Corpo bianco perla 1
11 10754016 Corpo nero 1
12 10754019 Interruttore di potenza 0-1 1
13 10752073 Forcella SR70 1
14 10754011 Cuschinetto 6202-ZZ 2
15 10754000 Motore F5 completo V220 1
16 10754003 Calotta motore D35 1
17 10754002 Fondello 1
18 10754008 Piedino 4
19 10755120 Leva ghiera 1
20 10752089 Condensatore 10 MF V230 SR70 1
21 10754012 Spina Shuko V220 1
22 10752092 Retina SR70 1
23 10752071 Tubo uscita SR70 1
24 10752010 Tappino SR70 1
25A 10752329 Scheda elettronica SR70 V230 1
25B 10752331 Scheda elettronica SR70 V110 1
26 10754082 Interruttore Generale 0-1 1
27 10752075 Microinterruttore con bottone SR70 1

14
GENERAL WARNINGS
• Read thoroughly and stick closely to the
instructions and warnings.
• Before use, ensure that the mains voltage is
the same as the voltage indicated on the data
plate of the machine.
• Connect the appliance only to 10 Amp. sock-
ets that are efficiently earthed.
•Always remove the plug from the socket
before carrying out any maintenance or
cleaning of the appliances.
• SINGLEP ASE models are supplied complete
with cable and plug for connection to the
socket.
• Any tampering with the machine or connec-
tions not complying with the above indications
invalidate the manufacturer’s guarantee.
PARTICULAR ARNINGS
• Never tamper with the machines anyway.
• For all interventions or tampering on the
machines, always apply only to the authorized
service centre.
• Never pull the power cable to remove the
plug from the socket.
• Only use the appliance for the purposes it is
meant for.
• Position the appliance a minimum of 5 cm
from wails so as to allow good aviation.
• Keep the appl ance away from sinks and jets
of water.
• Never leave the machine unguarded when
switched on.
• Keep it out of the reach of children and
incompetent people.
• Never switch on a machine that seems to be
faulty.
• Use only original accessories and parts.
• To avoid the danger of fire, never cover the
appliance.
• Unplug the appliance from the mains when it
is not in use.
• Let the appliance cool down before moving it
• In the interest of safety, the appliance must
always be considered as live.
• Take care, as the grinding blades may continue
rotating for a short while even after the appli-
ance is switched off.
• Do not let liquids of any kind come into contact
with the internal or external parts of the appli-
ance.
• Never put ground coffee in the hopper intended
only for coffee beans.
• Do not tamper with the appliance.
• Do not touch the appliance with damp or wet
hands or feet.
• T E OPPER MUST BE FASTENED TO T E
APPLIANCES GRINDING SYSTEM BY MEANS
OF T E RELEVANT SCREW which must be
inserted in the threaded hole located on the
upper grinding blade holder and in the hole
on the neck of the hopper.
• The manufacturer cannot be held responsible
for bodily injury or damage to property if these
regulations are not complied with.
If the outlet gets blocked, unplug the
grinder/doser from the socket, remove the
hopper, unscrew the ring nut and clean thor-
oughly removing all the coffee.
If the coffee grinder is to remain inactive for a
long period, clean it carefully, dry the top con-
tainer and leave it open.
ATTENTION: Moving parts.

15
Introdu tion
Sce time immemorial, making a coffee has been an art.Precise rules have thereby to be fulfil to suceed
in it. The formula to get a perfect cup of express coffee is in fact, deeply articulated as well as high
affected by the quality of the coffee machine.
Aiming to a successful outcome in term of indisputable quality as well as breathtaking tastefulness, it
is necessary to properly combine three elements:
1. An appreciated mixture
2. The appropriate use of available equipments
3. The wise ability and professionalism of whom prepares.
It isn’t true that is just necessary to have the right mixture because without other components we can’t
do a good coffee cup.
The operator’s experience and capabilities, to follow procedures of preparation of the coffee and use
of suitable machines, strongly influenced the ctreation of the small masterpiece.
That’s why professionals give a crucial importance to espresso machine and coffee grinder. Knowing
and getting accustomed to them, mantainig them in peerfect efficiency and employing them as much
as possibleto know well these tools, to mantain them in perfect efficiency and to employ at the most
them their possibilities is an ability that belongs to the varous teachers of the coffee. The quality of a
good coffee derives from a series of operations among wich the grinding has an important role.
The coffeegrinder therefore represents for the operator one of the fundamental tools, whose structure
must respond to determine charateristics that are sturdiness, resistance and functionality.
Weight 14 Kg
Dimensions SR70
ENGLIS
61,5 cm
23 cm 27 cm
20,5 cm

16
Pa kaging
On opening the packaging, check carefully to make sure the appliance is intact and that there are no
signs of damage. If in any doubt, do not use the unit and contact personnel with the appropriate pro-
fessional skills. The packaging materials must be kept out of the reach of children as they represent a
potential source of danger. Keep the packaging until the warranty has expired.
Disposal
Do not litter: dispose of the packaging materials according to the laws in force. Should you decide not
to use the appliance any more, remember to unplug it so that it cannot be used, and then cut the
cable in the point where it comes out of the appliance. Contact specialized firms for information on
the disposal of the components of the appliance.
General des ription
opper cover
opper (coffee bean container)
Locking slide
Coffee grinding adjustment disk
Control panel
Display
One cup / Button P1
Grinding / Button P2
Filter holder fork
Two cups / Button P3
Start microswitch
On/Off switch

17
Use
This appliance has been designed solely for
grinding coffee beans. Any other use is under-
stood to be improper, and consequently haz-
ardous. The manufacturer cannot be held
responsible for any damage as a result of
improper or incorrect use.
Do not use the appliance for grinding other types
of food, or anything else.
T E COFFEE GRINDERS AND COFFEE GRINDER-
DOSERS MANUFACTURED BY OUR COMPANY
ARE INTENDED FOR SKILLED PERSONNEL ONLY
FOR PROFESSIONAL USE AND NOT FOR OUSE-
OLD USE. The user must be an adult. Do not
allow children or incapable persons to use the
appliance.
Installation and wiring
The appliance must be installed by skilled techni-
cal personnel in conformity with the safety rules in
force. Incorrect installation may result in injury of
persons or animals, or damage to property, for
which the manufacturer cannot be held responsi-
ble.
• The appliance must be placed on a stable, flat
surface.
• Before plugging in the appliance, make sure
the voltage and frequency values of the sup-
ply mains correspond to the ratings indicated
on the label featuring the appliance’s techni-
cal data.
• The wall socket must be fitted with an effi-
cient earth contact. Consequently, it is essen-
tial to make sure the earth system is efficient
and in conformity with current safety rules. If
in any doubt, have the system thoroughly
checked by per-sonnel with the appropriate
professional skills.
• IT IS COMPULSORY TO EART T E APPLIANCE.
•
The manufacturer cannot be held responsible in
the event this regulation is not complied with.
• It is essential to make sure the ratings of the
system are suitable for the power absorbed
by the appliance - as indicated on the label
featuring the technical data - and that the wall
socket is protected against over currents.
• Do not use extension cables, plug adapters
for multiple sockets or makeshift connections.
• The motor must rotate clockwise. If the rota-
tion of three-phase motors is to be inverted,
by inverting the two power supply wires
inside the plug, this must be carried out by
skilled personnel.
Operation of the applian e
PRELIMINARIES
Make sure the hopper is positioned correctly on
the appliance and is fastened to the upper grind-
ing blade holder by means of the relevant screw.
Close the locking slide and fill the hopper with cof-
fee beans. Open the locking slide so that the beans
are allowed to drop into the grinding system.
S ITCHING THE APPLIANCE ON AND OFF
ELECTRONIC GRINDERS/DOSERS
The on-off switch is used to turn the appliance both
on and off.
To switch on: set the switch to “I”.
To switch off: set the switch to “O”.
GENERAL DESCRIPTION
The control has three buttons for the selection of
the quantity to be ground:
P1: Dose for one coffee
P2: Manual grinding
P3: Dose for two coffees
opper safety
screw

18
OPERATION
In stand-by, the display shows information
regarding the machine operation, such as: coffees
made in a day, during the current week, grinder’s
life, date, day of the week and time.
When touching P1 or P3, the button starts flash-
ing, when the P2 start button is pressed, grinding
starts for the pre-set time.
At the end, the counters are updated. Keeping the
P2 button pressed makes the motor run without
the consent of the “FILTER OLDER START” input.
During continuous grinding, the time in seconds
and tens of a second is shown. For counting pur-
poses, continuous grinding corresponds to one
cup.
USER SETTINGS
To access the User’s Menu, keep the P1 button
pressed for about 5 seconds. To go through the
menu, use P3; to increase the current value, use
P2; to decrease the current value, use P1.
User’s Menu Settings:
- Language: Italian, English, German,
French, Spanish
- our, minute adjustment
- Date adjustment
- Week day adjustment
- Button brightness adjustment
(In percentage from 1 to 100)
FACTORY-SET SETTINGS
To access the SETTINGS Menu, keep the P3 but-
ton pressed for about 5 seconds.
To go through the menu, use P3; to increase the
current value, use P2; to decrease the current
value, use P1.
Factory-set settings
- One cup grinding time
- Two cups grinding time
- Grinders’ replacement hours
- Grinders’ partial time zero setting
- Last month’s cups display
- Default reset (factory-set parameters’ reset)
- Statistical displays
ADJUSTING GRINDING
In order to achieve fin-
er or coarser grinding
the adjustment disk
located under the
hopper.
In order to increase
the coarseness of the
ground coffee, the
disk must be rotated
clockwise; to decrease, turn the disk anticlockwise.
The disk remains in the chosen position without
having to be locked in place. The adjustment must
be performed with the motor on, and preferably
without any coffee between the grinding blades.
Grind small amounts of coffee in order to deter-
mine the optimal degree of fineness.
In the grinder-doser version, if the coffee comes out
of the espresso coffee machine very quickly, it
means the coffee is ground too coarse. Vice versa,
if it comes out too slowly, it means the coffee is
TOTAL CUPS DAILY
Num 24 13:40
Language
English
OTAL CUPS WEEKLY
Num 350 13:40
T

19
ground too fine. Nonetheless, bear in mind that
there are many conditions liable to influence the
correct supply, such as the weight of the portions,
the compacting, the espresso machine settings, and
the cleaning of the filters.
COFFEE DOSE ADJUSTMENT
For dosing, go to FACTORY SETTINGS, select the
Grinding Time, the 1 or 2 cups’ option and then
increase the grinding time with P2 or decrease it
with P1.
GRINDER REPLACEMENT
When this electronic grinder/doser reaches the
value set in the factory for the replacement of the
grinders, a warning appears after the statistics.
IMPORTANT: Partial zeroing is needed after
replacing the grinders:
Enter the FACTORY-SET SETTINGS and go to PAR-
TIAL ZERO SETTING and press the P1 button.
Warnings regarding operation
• Do not leave the appliances turned ON without
coffee in the hopper..
Safety devi es
T ERMAL OVERLOAD PROTECTION
The appliance’s motor is protected against over-
heating resulting from overcurrents by a thermal
overload protection which, when tripped, cuts off
the power supply to the motor. Should the protec-
tion trip as a result of anomalous operation, such as
the grinding blades jamming, the appliance must
be turned off using the on-off switch, UNPLUGGED
FROM T E MAINS, AND SKILLED TEC NICAL PER-
SONNEL CONTACTED. NEVER PERFORM ANY
WORK ON T E APPLIANCE W ILE IT IS ATTAC ED
TO T E MAINS, TO AVOID T E RISK T AT MOTOR
TURNS ON SUDDENLY.
If the appliance overheats as a result of the motor
stopping, allow the appliance to cool down before
performing any repair work.
SAFETY SCRE S
The hopper must always be attached to the upper
grinding blade hol-der using the relevant screw,
which must not be removed by the user under any
circumstances.
In order to prevent the adjustment disk from being
removed - which would make the rotating parts
accessible - there is a safety screw on the actual
disk: said screw must be positioned in whichever of
the two holes on the disk enables the wider and
most suitable range of grinding adjustment, and
must not be removed by the user under any cir-
cumstances.
COFFEE OUTLET GUARD
The coffee outlet guard must always be fixed to the
doser using the relevant screws, wich must never
be removed by the user.
The removal of the coffee outlet guard can be done
by skilled technical personnel only after disconnect-
ing the appliance from the power supply by unplug-
ging. Before reconnecting the appliance to the
power supply, fix the safety device to the doser by
the relevant screws.
Noise level
EEC Countries:
The maximum noise emission of our coffee
grinders and grinders/dosers measured in UNI EN
ISO 3741 reverberating chamber in compliance
with the EN 60704-1 regulations, is compliant with
the EN 60704-1 : 1998 and EN 607043 : 1996 reg-
ulations. The daily personal noise exposure of a
worker, due only to an appliance’s limit operation
Grind 2 cups
Sec 4,0
BLANDES
REPLACEMENT
O

20
of 240 min. per eight hours, is 78 dB(A), according
to ED 86/188/EEC and ED 200311 0/EEC.
Therefore during he appliance’s normal operation,
no pro-visions are to be taken in order to prevent
such risks arising or likely to arise from noise expo-
sure at work (articles 3-8 of ED 2003/10/EEC).
Maintenan e
It is essential to check the state of the supply cable
and plug periodically.
IN T E EVENT T E SUPPLY CABLE OR PLUG ARE
DAMAGED, CALL IN SKILLED TEC NICAL PERSON-
NEL TO REPLACE T EM, T IS TO PREVENT ANY
RISK. IN CE-CERTIFIED APPLIANCES A SPECIAL
TOOL IS REQUIRED TO OPEN T E BASE PLATE TO
GET AT T E CABLE.
It is recommended to use original spare parts only.
In order to assure the lasting efficiency of the appli-
ance, skilled technical personnel must be called in
to perform periodical maintenance, including
detailed checks of the state of those components
subject to wear.
The state of the grinding blades must be checked
periodically. Keeping the grinding blades in an
excellent state assures high-quality grinding, result-
ing in greater productivity and limited overheating.
Cleaning the applian e
DISCONNECT T E APPLIANCE’S POWER SUPPLY
BY UNPLUGGING IT BEFORE CLEANING.
T E APPLIANCE MUST NOT BE CLEANED USING
WATER JETS.
Do not install the appliance in rooms where water
jets are used for cleaning.
T E APPLIANCE MUST BE CLEANED PERIODICALLY
BY SKILLED TEC NICAL PERSONNEL ONLY.
Use perfectly clean, disinfected cloths or brushes for
cleaning.
Do not use abrasive products as these are liable to
take the sheen off shiny parts.
Hopper
Wash the hopper once it has been removed from
the appliance (unscrewing the relevant fastening
screw), using neutral soap and water, rinse abun-
dantly with lukewarm water and dry thoroughly.
It is advisable to clean the hopper periodically.
Once the hopper has been cleaned, it must be
attached to the upper grinding blade holder using
the relevant screw.
Grinding system
Remove the safety screw which prevents the adjust-
ment disk from being removed. Unscrew the
adjustment disk by turning it clockwise. aving
removed the upper grinding blade holder, clean the
grinding blades, threads and the entire grinding sys-
tem thoroughly using a clean brush and cloth.
aving refitted the upper grinding blade holder in
the relevant slot, screw the adjustment disk back
on, put the self-locking screw back in whichever of
the two holes on the disk enables the best adjust-
ment and, having refitted the hopper and secured,
adjust the grinding as required.
Statisti s display
It is possible to hide the statistics that can be
scrolled through when the grinder/doser is in
standby:
Enter the factory-set settings then scroll to S OW
STATISTICS, with the P1 and P2 buttons select NO
to hide the statistics.
Once NO is set in the Statistics Display, the opera-
tor can see only the date, time and day.
NB: The authorized engineer can display the statis-
tics by pressing the P1 and P2 buttons simultane-
ously; P1,P2 and P3 will flash constantly and the
statistics shall be displayed till the engineer touches
any button and return to the standby menu.
SHOW
STATISTICS
YES JA SI OU

18
12
21
5
9
20
2
3
4
1
6
7
8
10
11
14
15
14
16
17
19
13
22
23
24
25
26
27
mod.
SR70
Electronic coffee grinder-doser
Table of contents
Languages:
Other Sanremo Coffee Grinder manuals