Sanremo Stardust SR64OD User manual

SR64OD
SR83OD
Libretto Istruzioni
Instruction Booklet
Bedienungsanleitung
Livert D’Instructions
Libro De Instructiones


Congratulazioni per aver acquistato un prodotto SANREMO: ogni nostro articolo
è frutto di un’ attenta ricerca, in costante collaborazione con gli amanti del caffè
di tutto il mondo. Ecco perché è per noi estremamente importante la tua opinio-
ne: grazie alla tua esperienza e collaborazione sapremo migliorare ogni giorno
di più, per ottenere sempre il meglio in ogni creazione SANREMO.
SANREMO, think about it.
Congratulations on purchasing your SANREMO machine: each one of our
products is the result of careful research, in constant collaboration with coffee
lovers from all over the world. That’s why your thoughts are important to us:
your experience and collaboration makes us improve every day, and you can
always get the best out of every SANREMO creation.
SANREMO, think about it.


16
ENGLISH SR64OD - SR83OD
WARNINGS
• Read thoroughly and sck closely to the
instrucons and warnings.
• Before use, ensure that the mains voltage
is the same as the voltage indicated on the
data plate of the machine.
• Connect the grinder-doser only to 10 A
sockets that are efficiently earthed.
• Always remove the plug from the socket
before carrying out any maintenance or
clean- ing of the grinder-dosers.
• Single phase models are supplied
complete with cable and plug for
connecon to the socket.
• Any tampering with the grinder-doser or
connecons not complying with the above
indicaons invalidate the manufacturer’s
guarantee.
• Do not operate the grinder-doser
without coee in the hopper.
• Never tamper with the machines in any
way.
• For any intervenon on the machines,
always apply only to the authorized
service centre.
• Never pull the power cable to remove
the plug from the socket.
• Only use the grinder-doser for the
purposes it is meant for.
• Posion the grinder-doser a minimum
of 5 cm from walls so as to allow good
venlaon.
• Keep the grinder-doser away from sinks
and jets of water.
• Never leave the grinder-doser unguarded
when switched on.
• This grinder-doser is not to be used by
people with limited mental or physical
abilies or by children less than aged 8,
or by people lacking in the appropriate
knowledge or experience, unless properly
supervised by someone responsible for
their safety.
• Children must be supervised to make
sure they don’t play with the appliance.
• Cleaning and maintenance must not be
done by children without supervision.
• Never switch on the grinder-doser if it
seems to be faulty.
• Use only original accessories and parts.
• To avoid the danger of fire, never cover
the grinder-doser.
• If the power cable is damaged, it must
be replaced by the manufacturer, its
technical department or a person with
similar experience in order to avoid any
risk.
• Unplug the grinder-doser from the mains
when not in use for a long period.
• Let the grinder-doser cool down before
moving it.
• In the interest of safety, the grinder-doser
must always be considered connected and
live.
• Take care, as the grinding blades may
connue rotang for a short while even
aer the grinder-doser is switched o.

ENGLISH
SR64OD - SR83OD
17
• Do not let liquids of any kind come into
contact with the internal or external parts
of the grinder-doser.
• Never put ground coee in the hopper
intended only for coee beans.
• Do not tamper with the grinder-doser.
• Do not touch the grinder-doser with
damp or wet hands or feet.
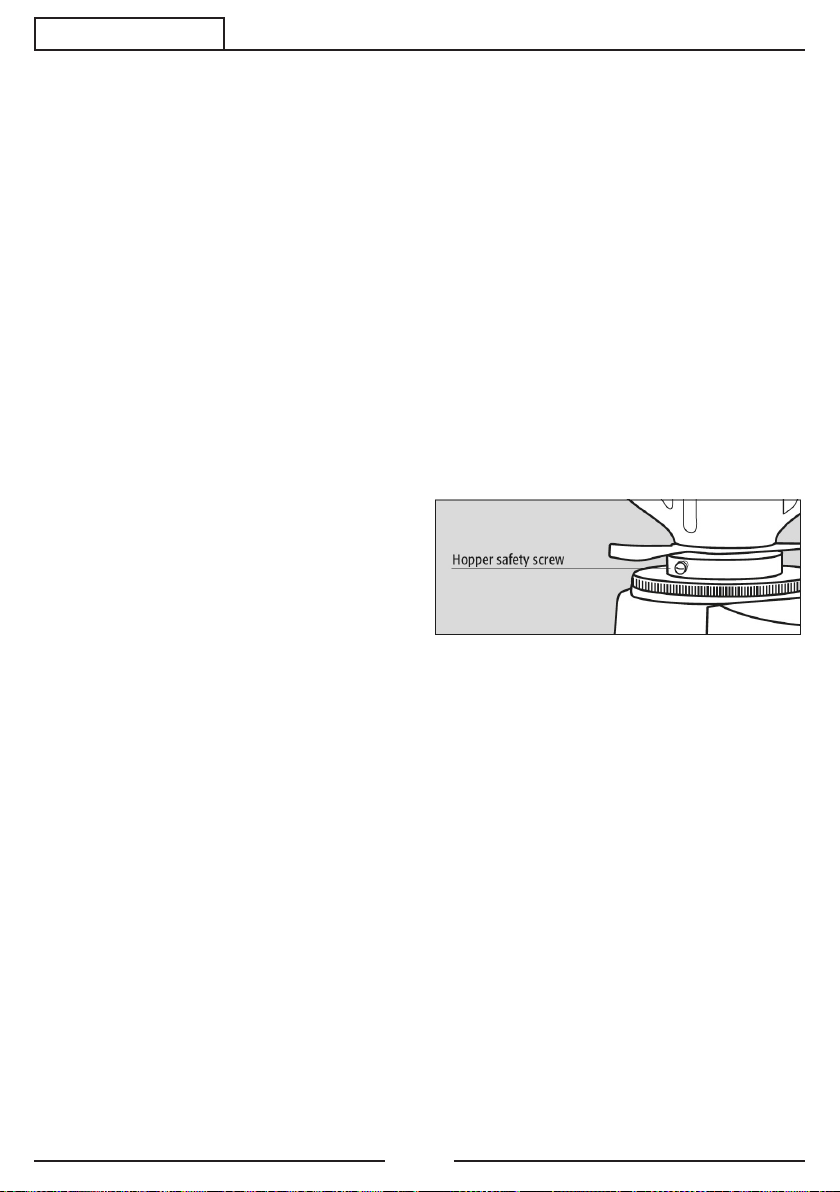
• The hopper must be fastened to the
grinder- doser grinding system by means
of the relevant screw which must be
inserted in the threaded hole located on
the upper grinding blade holder and in the
hole on the neck of the hopper.
• Make sure that the coee outlet is
free from any obstrucon otherwise the
appliance will stop.
• The manufacturer cannot be held
responsible for bodily injury or damage
to property if these regulaons are not
complied with.
• Operang temperature: -10°C +60°C
Storage temperature: -40°C +70°C
• USA & CANADA - duty cycle: 25s “ON” |
60s “OFF”
If the grinder-doser is to remain
inacve for a long period, clean it
carefully, wash and dry the hopper
and leave it open.
ATTENTION: Moving parts.
INTRODUCTION
Making coee is an art. Precise rules
need to be followed in order to
succeed. The formula for a perfect cup
of espresso coee involves various
steps and the coee machine plays a
very important role. For a successful
result and unquesonable quality, it is
necessary to correctly combine three
factors:
• A high-quality blend.
• The appropriate use of available
appliances.
• The skill and professionalism of
the person who makes it. Contrary
to belief, to enjoy a good cup of
coee, it is not enough to choose
the right blend.
The operator’s experience and skills
in following the right procedures
for making a coee and the use of
suitable appliances strongly influence
the creaon of a small masterpiece.
Therefore, professionals place
crucial importance on the espresso
machine and grinder-doser. Knowing
how to use these appliances well,
maintaining them in perfect working
order and using them at their best,
is a skill belonging to professional
coee makers. The quality of a good
espresso coee comes from a series of
operaons, including grinding which
plays an important role. Therefore,
for the operator, the grinder-doser is
one of the fundamental appliances,

18
ENGLISH SR64OD - SR83OD
whose structure must meet certain characteriscs of sturdiness, resistance and
funconality.
PACKAGING
On opening the packaging, check
carefully to make sure the grinder-
doser is intact and that there are no
signs of damage. If in any doubt, do
not use the appliance and contact
personnel with the appropriate
professional skills. Packaging materials
must be kept out of the reach of
children, as they are a potenal source
of danger. Keep the packaging unl the
warranty has expired.
DISPOSAL
Do not, dispose of the packaging
materials in any way other than
according to the laws in force. If you
decide not to use the grinder-doser
anymore, remember to unplug it so it
cannot be used, and then cut the cable
at the point where it comes out of the
grinder-doser. Contact specialized
firms for informaon on the disposal
of the grinder-doser components.

ENGLISH
SR64OD - SR83OD
19
GENERAL DESCRIPTION
USE
This grinder-doser has been designed
solely for grinding coee beans.
Any other use must be understood
as improper, and consequently
hazardous. The manufacturer cannot
be held responsible for any damage
as a result of improper or incorrect
use. Do not use the grinder-doser
for grinding other types of food, or
anything else. The grinder-doser and
coee grinders manufactured by our
company are intended for skilled
personnel for professional use only,
not for household use
WARNINGS FOR INSTALLATION
AND ELECTRICAL CONNECTIONS
The grinder-doser must be installed
by skilled technical personnel in
compliance with the safety regulaons
in force. Incorrect installaon may
result in injury to people, animals or
things, for which the manufacturer
cannot be held responsible.

20
ENGLISH SR64OD - SR83OD
• The grinder-doser must be placed
on a stable, flat surface.
• Before plugging in the grinder-
doser, make sure the voltage and
frequency values of the supply
mains correspond to the rangs
indicated on the label featuring
the grinder- doser technical data.
• The wall socket must be fied
with an efficient earth contact.
Consequently, it is essenal to
make sure the earth system is
efficient and in conformity with
current safety regulaons. If in any
doubt, have the system thoroughly
checked by personnel with the
appropriate professional skills.
• It is compulsory to earth the
grinder-doser. The manufacturer
cannot be held responsible in the
event of non-observance of this
regulaon.
• It is essenal to make sure the
rangs of the system are suitable
for the power absorbed by the
grinder-doser (as indicated on
the label featuring the technical
data) and that the wall socket is
protected against over currents.
• Do not use extension cables, plug
adapters for mulple sockets or
makeshi connecons.
• The motor must rotate clockwise. If
the rotaon of three phase motors
is to be inverted,by inverng the
two power supply wires inside the
plug, this must be carried out by
skilled personnel.
OPERATING THE GRINDER-DOSER
Preliminaries
Make sure the hopper is posioned
correctly on the coee grinder-doser
and is fastened to the upper grinding
blade holder by means of the relevant
screw. Close the locking slide and fill
the hopper with coee beans. Open
the locking slide so that the beans
are allowed to drop into the grinding
system.
Switching on and o
On: set the switch to 1.
O: set the switch to 0.
LED indicator light
O: grinder o.
On: grinder on.
Flashing: the grinder is grinding (the
motor is working).
Selecon buons
The control panel has three blue LED
buons for selecng the quanty
required for grinding. When pressed,
an acousc sound is released:

ENGLISH
SR64OD - SR83OD
21
move through the menu and change
the seng. Use the buon . to
select and confirm. Exit the menu aer
confirming by pressing the buon
• Language
English, Italiano, Español, Français,
Deutsch, Português, Chinese, Russian,
Korean, Malaysian, Thai, Greek.
• Time
Set me.
• Time Layout
12 or 24 hours.
• Date
Set date.
• Temperature
Cengrade or Fahrenheit.
• Brightness
Percentage.
• Informaon
Firmware version and Serial Number.
SETTINGS MENU
To access the user menu, keep the
buon pressed unl an intermient
sound starts (about 5 secs.). Three
yellow buons will light up. Use
the buons and , to move
through the menu and change the
seng. Use the buon .Exit the
menu aer confirming by pressing the
buon
USER MENU
To access the user menu, keep
the buon pressed unl an
intermient sound starts (about 5
secs.). Three yellow buons will light
up. Use the buons and , to
: Single dose.
: Connuous manual grinding.
: Double dose.
Display
When the grinder-doser is switched
on, the display shows, on the le, the
temperature, the number of coees
made throughout the day (Today),
during the current week (Week) and
the Total. On the right, it shows the
percentage humidity, the me, the
date and the grinding mode selected
in green.

22
ENGLISH SR64OD - SR83OD
• Grinding Time
Single and double grinding secs.
• Mills Replacement
Hours.
• Mills Reset
Reset mills mer.
• Factory Reset
Restore factory sengs.
• Stascs
Show stascs.
• Manual Grinding
Acvate manual grinding
buon.
• Grinding Mode
Standard, Automac, PRE/SEL e
Direct.
COFFEE DOSE ADJUSTMENT
Access the sengs menu, select
Grinding Time. Then select the seconds
for single grinding opon and confirm.
Adjust the seconds for the double
grinding opon and confirm again.
MILLS REPLACEMENT
When the grinding mills need to be
replaced, a warning appears on the
display. The state of wear can be
monitored by accessing the sengs
menu and selecng Mills Replacement.
Important: Aer replacing the
grinding mills, the replacement mer
needs to be reset. To do this, access
the sengs menu, select Mills Reset
and confirm the reset.
GRINDING MODE
Standard
Press for the required dose using the
buons or . The selected
buon will begin to flash. When the
filter holder cup is pressed, the start
micro switch acvates grinding. When
the buon is pressed, connuous
grinding is acvated unl the buon
is released. The Standard mode is
factory-set. To reselect it, access the
sengs menu, select Grinding Mode
and then Standard. In this way, the
buons will light up.
Automac
Access the sengs menu, select
Grinding Mode and then Automac.
For a single dose, press the start micro
switch once with the filter holder cup.
For a double dose, press twice quickly.
In this way, the connuous grinding
(buon ) and the buons
and are deacvated.
PRE/SEL
Access the sengs menu, select
Grinding Mode and then PRE/SEL.
Press the required dose using buon
or . The selected buon
will remain on and acve. Grinding
starts when the start micro switch is
pressed by the filter holder cup. To

ENGLISH
SR64OD - SR83OD
23
switch from one dose to another, press
the appropriate buon. In this way,
connuous grinding (buon ) is
deacvated.
Direct
Access the sengs menu, select
Grinding Mode and then Direct. Press
the required dose by using the buon
or . When the buon
is pressed, connuous grinding is
acvated unl the buon is released.
In this way, the start micro switch is
deacvated and the buons light up.
•During the grinding process, the
me is displayed in seconds and
tenths of a second.
•The buon for the selected dose
flashes during dispensing.
•Aer dispensing, the counters are
updated.
•For counng purposes, connuous
grinding corresponds to a single
dose.
ADJUSTING GRINDING
In order to achieve finer or coarser
grinding and therefore vary the
granulometry, use the adjustment disk
located under the hopper. To increase
the coarseness of the ground coee,
the adjustment disk must be rotated
clock- wise, pressing the adjustment
disk lock down- wards, to decrease
turn the disk anclockwise.
The adjustment must be performed
with the motor on, and possibly
without coee between the grinding
blades.
It is advisable to grind small amounts
of coee to facilitate a visual check of
opmum granulometry and, if required,
adjust the grinding adjustment disk. If
the coee comes out of the espresso
coee machine very quickly, it means
that the coee is ground too coarse.
Vice versa, if it comes out too slowly, it
means the coee is ground too fine.
Nonetheless, bear in mind that there
are many condions liable to influence
the correct supply, such as the weight
of the porons, the compacng, the
espresso ma- chine sengs and the
cleaning of the filters
SAFETY DEVICES
Thermal overload protecon
The grinder-doser motor is protected
against overheang resulng from
over currents by a thermal overload
protecon which, when tripped, cuts
o the power supply to the motor. If
the thermal protecon device should
automacally turn on in the event of
anomalous operaon (such as the
grinding blades jamming), turn o

24
ENGLISH SR64OD - SR83OD
grinder-doser using the On-O switch,
unplug it from the mains, and contact
skilled technical personnel. Never
perform any work on the grinder-
doser while it is aached to the mains,
in order to prevent the motor from
turning on suddenly. If the grinder-
doser overheats as a result of the
motor stopping, allow the grinder-
doser to cool down before performing
any repair work.
Adjustment disk lock
In order to prevent the adjustment
disk from being removed, which would
make the rotang parts accessible,
there is an an-unscrewing adjustment
disk lock (safe) posioned under the
adjustment disk.
Coee outlet guard
The coee outlet guard must always
be fixed to the doser unit using the
relevant screws, which must never be
removed by the user. The removal of
the coee outlet guard can be done
by skilled technical personnel only
aer disconnecng the grinder-doser
from the power supply by unplugging.
Before reconnecng the grinder-doser
to the power supply, replace the safety
device.
NOISE LEVEL
EEC Countries - The maximum noise
emission of our coee grinders and
grinders/dosers measured in UNI
EN ISO 3741 reverberang chamber
in compliance with the EN 60704-1
regulaons, is compliant with the EN
60704-1 : 1998 and EN 607043 : 1996
regulaons. The equivalent level of
noise exposure of a worker, exclusively
related to limit of 240 min. per eight
hours of use of the appliance, is
equal to 78 dB(A), in compliance with
ED 86/188/EEC and ED 200311 0/
EEC. Therefore, when operang the
appliance, no provisions need to be
taken in order to prevent such risks
arising from noise exposure in the
workplace (arcles 3-8 of ED 2003/10/
EEC).
MAINTENANCE
It is essenal to periodically check the
state of the supply cable and plug.
In the event the supply cable or plug
are damaged, call in skilled technical
personnel to replace them, in order
to prevent any risk. In CE-cerfied
appliances a special tool is required to
open the base plate to access the cable.
We recommend using original spare
parts only. In order to assure the lasng
efficiency of the appliance, skilled
technical personnel must be called in
to perform periodical maintenance,
including detailed checks of the state
of those components subject to wear.
The state of the grinding blades must
be checked periodically. Keeping the
grinding blades in an excellent state
assures high-quality grinding, resulng
in greater producvity and limited

ENGLISH
SR64OD - SR83OD
25
overheang.
CLEANING THE APPLIANCE
Disconnect the power supply from
the grinder-doser by unplugging it
before cleaning. The appliance must
not be cleaned using water jets.
Do not install the grinder-doser in
rooms where water jets are used for
cleaning. The grinder-doser must
be cleaned periodically by skilled
technical personnel only. Use perfectly
clean, disinfected cloths or brushes for
cleaning. Do not use abrasive products
as these are liable to take the sheen
o shiny parts.
Hopper
Wash the hopper once it has
been removed from the appliance
(unscrewing the relevant fastening
screw), using neutral soap and water,
rinse abundantly with lukewarm water
and dry thoroughly. It is advisable to
clean the hopper periodically. Once
the hopper has been cleaned, it must
be aached to the upper grinding
blade holder using the relevant screw.
Grinding system
Remove the safety screw which
prevents the adjustment disk
from being removed. Unscrew the
adjustment disk by turning it clockwise.
Having removed the upper grinding
blade holder, clean the grinding blades,
the threads and the enre grinding
system thoroughly using a clean brush
and cloth. Having refied the upper
grinding blade holder in the relevant
slot, screw the adjustment disk back
on, and aer refing and securing the
hopper adjust the grinding as required.
DIRECTIVE
2002/96EC (RAEE):
INFORMATION
FOR USERS
This informaon is addressed only to
the own- ers of appliances bearing
the symbol (Fig. A) on the adhesive
label with the technical data applied
to the product (serial number label):
This symbol means that, according
to the cur- rent regulaons, this is
an electrical or electronic unit and
complies with EU Direcve 2002/96/
EC (RAEE). Therefore, at the end of its
life, it must be disposed of separately
from domesc waste, by delivering it
free of charge to a recycling centre for
electrical and electron- ic appliances,
or by returning it to the retailer when
you purchase a similar unit. The user is
responsible for delivering the unit, at
the end of its life, to the appropriate
recycling centre otherwise he/she
will incur the penales provided for
by the waste regulaons in force at
the me. The recycling centre will
then decide whether the unit has
to be recycled, treated or disposed
of in an environmentally friendly

26
ENGLISH SR64OD - SR83OD
manner, liming its eect on the
environment and public health. For
more detailed informaon regarding
available recycling centres, con- tact
your local waste department or the
store where the unit was purchased.
Manufacturers and importers comply
with their responsibility for the
recycling, treatment or disposal both
directly or by taking part in a collecve
system.

66
ENGLISH SR64OD

ENGLISH
SR64OD
67
POS. CODICE DESCRIZIONE PZ
64 10720004 COMPLETE BELL SR64A/M/OD - SR83A/OD 1
70 10720002 BELL COVER SR64A/M/OD - SR83A/OD 1
71 10720001 SIMPLE BELL SR64A/M/OD - SR83A/OD 1
72 10720003 BELL TAB SR64A/M/OD - SR83A/OD 1
90 10760002 0-1 POWER SWITCH 1
94 10722060 BLACK BREMAS KNOB 1
100 10790002 FIXED GRINDER SUPPORT D64 SR64A/M/OD - SR83A 1
101 10790003 REGOLATION CHROM RING NUT SR64A/M/OD 1
108 10740011 AISI304 M5 7X50 RING NUT LEVER 1
109 10710002 M8X15 SX INOX ROTATING FIXING SCREW 1
110 10711015 SPRING 1
111 10720015 12,42X1,78 VITON 70 2050 SEAL O-RING 1
112 10790127 BLOCK RING NUT PIN WHIT LEVER 1
113 10770009 COMPRESSION SPRING FOR BLOCK RING NUT 1
120 10710117 D64 M4X10 TCI INOX GRINDER FIXING SCREW 1
126 10740013 D64 PLANE GRINDER SR64OD 1
126A 10740028 D64 PLANE GRINDER RED SPEED SR64OD 1
132 10790001 ROTATING GRINDER HOLDER SR64A/M/OD 1
142 10730003 THREE HOLE DISK 2,00mm D55 1
143 10730004 THREE HOLE DISK 0,60mm D55 1
144 10770010 BEARING TILL 1
146 10770001 GRINDER HOLDER CONTRAST SPRING 1
151 10750006 STATOR H70 230/50 3W KW0,18 SR64A/M/OD 1
152 10750002 STATOR H70 110/60 3W KW0,18 SR64A/M/OD UL 1
153 10750007 ROTOR H 70 R66.20.01 3W SI2 SR64A/M/OD 1
165 10790029 MOTOR CAP SR64A/M/OD 1
169 107900128 COMPLETE ELECTRONIC LED CARD V220 (SPARE PARTS) 1

68
ENGLISH SR64OD
POS. CODICE DESCRIZIONE PZ
170 10790130 COMPLETE ELECTRONIC LED CARD V110 (SPARE PARTS) 1
184 10760021 ELECTRONIC WIRING V220 SR64OD 1
185 10760125 ELECTRONIC WIRING V110 SR64OD 1
201 10720030 COMPLETE BLOCK CABLE (SPARE PARTS) 1
202 10720035 D19 H13 FOOT 1
203 10760004 SHUKO PLUG NO WIRING V220 2MT SHEATH 1
203B 10760033 AUSTRALIAN PLUG 1
203C 10760046 BRAZIL PLUG 1
203M 10760030 ENGLISH PLUG 1
203N 10760031 UL PLUG 1
206 10780037 BODY BOTTOM SR64A/M/OD - SR63A-SR71C V2 1
207 10730101 BOTTOM HOLE CLOSER SHEET 1
227 10760134 METAL CONDENSOR 45 MICRO HOLES F.S. 6,3 (V110) UL 1
228 10760472 METAL CONDENSOR 12,5 MICRO HOLES (V230) 1
234 10720158 UNIFIED SPONGE FOR CLEANING TUBE 1
238 10730060 7/10/12,5 CONDENSATE BRACKET 1
240 10730061 40-45-55-65 CONDENSATE BRACKET 1
243 10730021 COFFEE COLLECTING PLATE SR64A/M/OD - SR63C-SR71C 1
246 10730020 GRID SR64OD - SR64OD EVO 1
252 10760013 ELECTRONIC MICRO SWITCH 1
253 10760132 ELECTRONIC MICRO SWITCH V110 UL 1
254 10740021 MICRO ELECTRONIC RING NUT 1
255 10790567 COMPLETE STRUCTURE FOR CLEANING TUBE 1
255A 10730008 UNIFICATE ELECTRONIC OUTPUT TUBE 1
256 10790566 CLEANING TUBE COMPLETE COVER 1
257 10760559 CLEANING TUBE LED 1

ENGLISH
SR64OD
69
POS. CODICE DESCRIZIONE PZ
170 10790130 COMPLETE ELECTRONIC LED CARD V110 (SPARE PARTS) 1
184 10760021 ELECTRONIC WIRING V220 SR64OD 1
185 10760125 ELECTRONIC WIRING V110 SR64OD 1
201 10720030 COMPLETE BLOCK CABLE (SPARE PARTS) 1
202 10720035 D19 H13 FOOT 1
203 10760004 SHUKO PLUG NO WIRING V220 2MT SHEATH 1
203B 10760033 AUSTRALIAN PLUG 1
203C 10760046 BRAZIL PLUG 1
203M 10760030 ENGLISH PLUG 1
203N 10760031 UL PLUG 1
206 10780037 BODY BOTTOM SR64A/M/OD - SR63A-SR71C V2 1
207 10730101 BOTTOM HOLE CLOSER SHEET 1
227 10760134 METAL CONDENSOR 45 MICRO HOLES F.S. 6,3 (V110) UL 1
228 10760472 METAL CONDENSOR 12,5 MICRO HOLES (V230) 1
234 10720158 UNIFIED SPONGE FOR CLEANING TUBE 1
238 10730060 7/10/12,5 CONDENSATE BRACKET 1
240 10730061 40-45-55-65 CONDENSATE BRACKET 1
243 10730021 COFFEE COLLECTING PLATE SR64A/M/OD - SR63C-SR71C 1
246 10730020 GRID SR64OD - SR64OD EVO 1
252 10760013 ELECTRONIC MICRO SWITCH 1
253 10760132 ELECTRONIC MICRO SWITCH V110 UL 1
254 10740021 MICRO ELECTRONIC RING NUT 1
255 10790567 COMPLETE STRUCTURE FOR CLEANING TUBE 1
255A 10730008 UNIFICATE ELECTRONIC OUTPUT TUBE 1
256 10790566 CLEANING TUBE COMPLETE COVER 1
257 10760559 CLEANING TUBE LED 1
POS. CODICE DESCRIZIONE PZ
264 10790506 ELECTRONIC GRINDER DOSER FORK SR64OD / EVO WITH
TREATMENT 1
270 10720091 ELECTRONIC DASHBOARD ADHESIVE TAP 1
271 10720166 BODY HOLES TAP 1
272 10720154 ABS PRESSER 50/53 D 1
278A 10790577 COMPLETE WHITE ELECTRONIC DASHBOARD SR64OD V2 1
278B 10790578 COMPLETE PEARL WHITE ELECTRONIC DASHBOARD
SR64OD V2 1
278C 10790579 COMPLETE BLACK ELECTRONIC DASHBOARD SR64OD V2 1
278D 10790580 COMPLETE MATT BLACK ELECTRONIC DASHBOARD
SR64OD V2 1
278F 10790581 COMPLETE RED ELECTRONIC DASHBOARD SR64OD V2 1
278G 10790582 COMPLETE GRAY ELECTRONIC DASHBOARD SR64OD V2 1

70
ENGLISH SR83OD
This manual suits for next models
1
Table of contents
Other Sanremo Coffee Grinder manuals