manuals.online logo
Brands
  1. Home
  2. •
  3. Brands
  4. •
  5. SANSTAND
  6. •
  7. Dispenser
  8. •
  9. SANSTAND AUTDISP User manual

SANSTAND AUTDISP User manual

PACK CONTENTS
1 x pre-assembled base unit
1 x main panel with dispenser bracket attached
1 x dispenser with key to open lid
1 x 500ml sanitiser
4 x AA batteries
1 x ttings bag containing:
4 x bolts
4 x nuts
4 x white nut caps
1 x allen key
Floor Units
ASSEMBLY INSTRUCTIONS:
1. Open the large at box containing the
front/side panel, and remove the base unit
from the other smaller box.
2. Stand the base unit on its rubber feet, and fold
up the aps on the side to 90° (do not fold
them back down once folded up to 90°).
3. Carefully stand front panel upright, and fold
the triangular shaped sides so they are 90° to
the front (do not fold them back at once
folded to 90°).
4. Insert the 4 bolts through the 4 holes on the
outside of the side panel, so they align with
the holes in the base unit.
5. Place the nuts on the bolts and tighten using
the tool provided on the bolt and the white
cap on the nut.
6. Insert 4 x AA batteries into battery
compartment on bottom of dispenser.
7. Take dispenser, remove lid using white key,
remove lid, ll with sanitiser GEL and attach
to bracket on the stand.
8. Please follow detailed instructions for the
dispenser overleaf.
To order more SanStand products or if you have
any questions, please contact us today:
www.sanstand.co.uk
[email protected]o.uk
0845 519 5442
INSTRUCTIONS
SPECIFICATION
MODEL AUTDISP
OUTER SIZE L110*W100*H165MM
CAPACITY 700ml
DROP VOLUME 0.8-1ml
WEIGHT 480g
MATERIAL ABS, AS
BATTERY 5X1.5V “AA”
TECHNICAL PARAMETERS
ELECTRICAL SOURCE VOLTAGE DC6V
STATIC CURRENT 60UA
WORKING CURRENT 200MA
POWER 4W
EFFECT DISTANCE 0-10CM
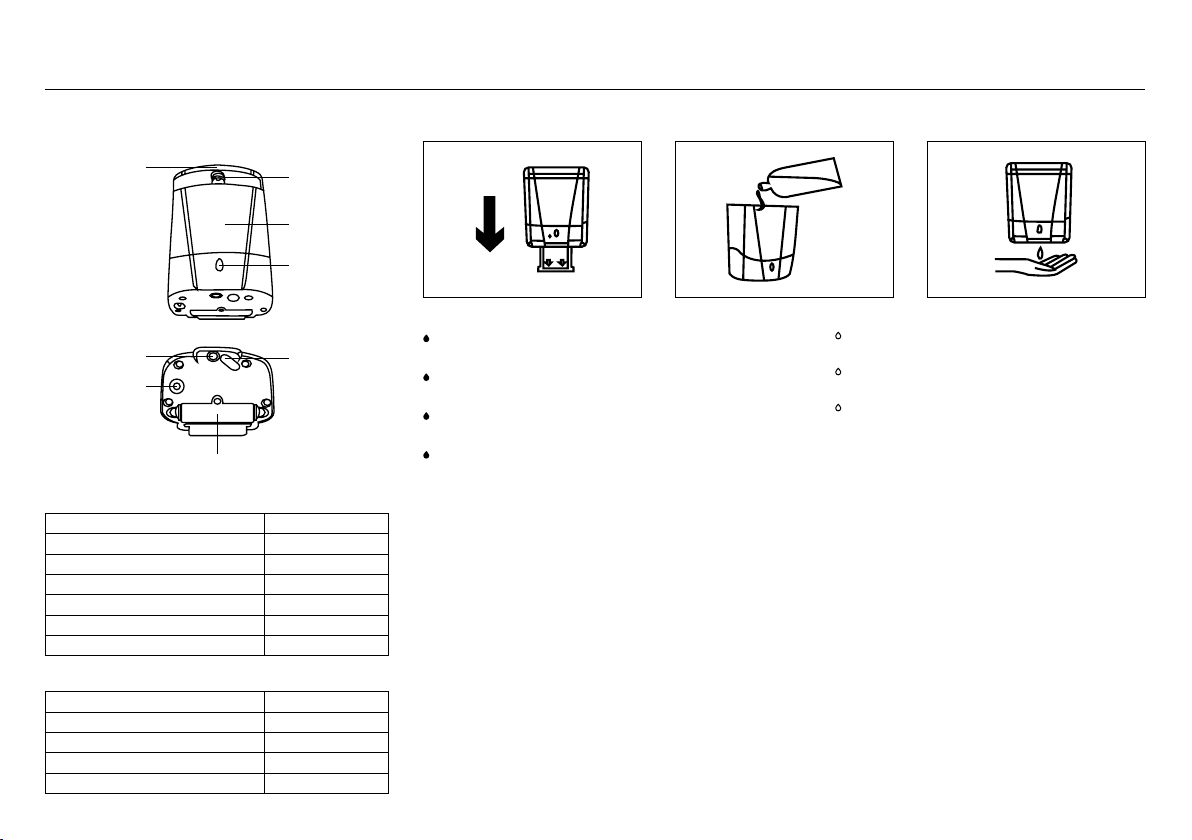
Cover Key
Container
LED lamp
Infrared sensor
window
Battery compartment
Pump
Power
on/o
SETUP
FEATURES
The sensor is at the base of the dispenser with eect
range of 0-10cm underneath the sensor.
Continually ashing LED light in standby mode
indicates battery replacment is necessary.
This product is not fully waterproof and should not
be placed in a continually damp environment.
The dispenser works both inside and outside
but should be kept out of direct sunlight as this
can aect the both the sanitiser gel and also the
function of the sensor.
INSTALLATION AND USE
1. Slide the dispenser into the mounting plate (gure 1).
2. Insert batteries into battery compartment with
polarity as indicated (alkaline batteries are
recommended).
3. Open the cover and pour the liquid into the
container (gure 2).
4. Put your hand 0-10cm under the sensor and allow
the dispenser to operate until the sanitiser gel
runs from the nozzle (gure 3). When using the
dispenser for the rst time you may need to
activate the dispenser upto 15 times to enable
the sanitiser gel to work through the pump
before it will dispense.
5. Power On/O button
First press will turn on giving a standard
dispense and LED light ashes once.
Second press will increase to a double
dispense and LED light ashes twice
Third press will turn the dispenser o
and LED light glows for one second
The two dierent settings can be used to give
the right amount of sanitiser gel, ensuring when
itis thicker incolder conditions an eective
doseisdelivered everytime.
IF THE DISPENSER DOESN’T TURN ON
1. Check the batteries are inserted with polarity as
indicated in the battery compartment.
2. Check that the power is on.
IF THE DISPENSER DOESN’T DISPENSE
1. The dispenser needs to be used several times upon
rst use.
2. The sanitiser gel may congeal in cold temperatures.
Use warm water (aproximately 60°c) to disperse the
congealed sanitiser gel.
3. Check that there is gel in the dispenser.
Figure 1 Figure 2 Figure 3
Automatic Soap Dispenser: User manual

Other SANSTAND Dispenser manuals

SANSTAND SANTOP User manual

SANSTAND

SANSTAND SANTOP User manual

SANSTAND SANWALL User manual

SANSTAND

SANSTAND SANWALL User manual

Popular Dispenser manuals by other brands

FISNAR FCG-300 manual

FISNAR

FISNAR FCG-300 manual

Hilti HDE 500-A22 Operating	 instruction

Hilti

Hilti HDE 500-A22 Operating instruction

lancer 4400 Series installation guide

lancer

lancer 4400 Series installation guide

U-Line H-16 quick start guide

U-Line

U-Line H-16 quick start guide

San Jamar EZ-Fit Lid L2200C Instruction guide

San Jamar

San Jamar EZ-Fit Lid L2200C Instruction guide

Hirschmann Laborgeräte ceramus-classic instruction manual

Hirschmann Laborgeräte

Hirschmann Laborgeräte ceramus-classic instruction manual

Graco EFR Instructions - parts

Graco

Graco EFR Instructions - parts

Bobrick 82216 Instruction for installation and maintenance

Bobrick

Bobrick 82216 Instruction for installation and maintenance

Bartscher 200065 instruction manual

Bartscher

Bartscher 200065 instruction manual

saro ISOD 12 operating instructions

saro

saro ISOD 12 operating instructions

Cornelius 2 Flavor Post-Mix Cold Coffee Dispenser Quest... Service manual

Cornelius

Cornelius 2 Flavor Post-Mix Cold Coffee Dispenser Quest... Service manual

Coca-Cola freestyle 8000 user guide

Coca-Cola

Coca-Cola freestyle 8000 user guide

Hampton Research HR8-170 user guide

Hampton Research

Hampton Research HR8-170 user guide

Sanela SLZN 84J 85848 Instructions for use

Sanela

Sanela SLZN 84J 85848 Instructions for use

Dolphin BC194 Instructions to Replace Wearing Parts

Dolphin

Dolphin BC194 Instructions to Replace Wearing Parts

Toto DSE102E owner's manual

Toto

Toto DSE102E owner's manual

U-Line H-1132 Mounting instructions

U-Line

U-Line H-1132 Mounting instructions

Dudley Classic 1L Auto Soap Dispenser 50310 Installation and user guide

Dudley

Dudley Classic 1L Auto Soap Dispenser 50310 Installation and user guide

manuals.online logo
manuals.online logoBrands
  • About & Mission
  • Contact us
  • Privacy Policy
  • Terms and Conditions

Copyright 2025 Manuals.Online. All Rights Reserved.