Thank you for purchasing this SANYO product. For safe
and correct use, please read these instructions carefully.
Please keep the instructions for later reference.
Input DC 5 V, max. 500 mA
Input DC 5 V, max. 500 mA
Output DC 1.2 V, 850 mA x 1 (Quick), 450 mA x 2
Output DC 1.2 V, 850 mA x 1 (Quick), 450 mA x 2
eneloop Ni-MH AA (typ. 2000 mAh)
1 pc. 140 min, 2 pcs. 280 min
eneloop Ni-MH AAA (typ. 800 mAh)
1 pc. 60 min, 2 pcs. 120 min
(*) Guideline value only; actual charging times may vary slightly. Please refer
to Operating Instructions.
Dimensions (L x W x H) 93 x 47 x 17.5 mm
Dimensions (L x W x H) 93 x 47 x 17.5 mm
Models with a USB port as standard equipment
where the computer manufacturer guarantees
the operation of the USB port and has a USB
port fitted as Standard equipment.
Discharging (battery use) -5 °C – 50 °C
Discharging (battery use) -5 °C – 50 °C
Usage outside of these temperature ranges may decrease the performance
and/or the life of the battery.
• This is a small and slim eneloop charger for AA and AAA
• One or two AA or AAA eneloop batteries can be charged.
• No AC adapter is required.
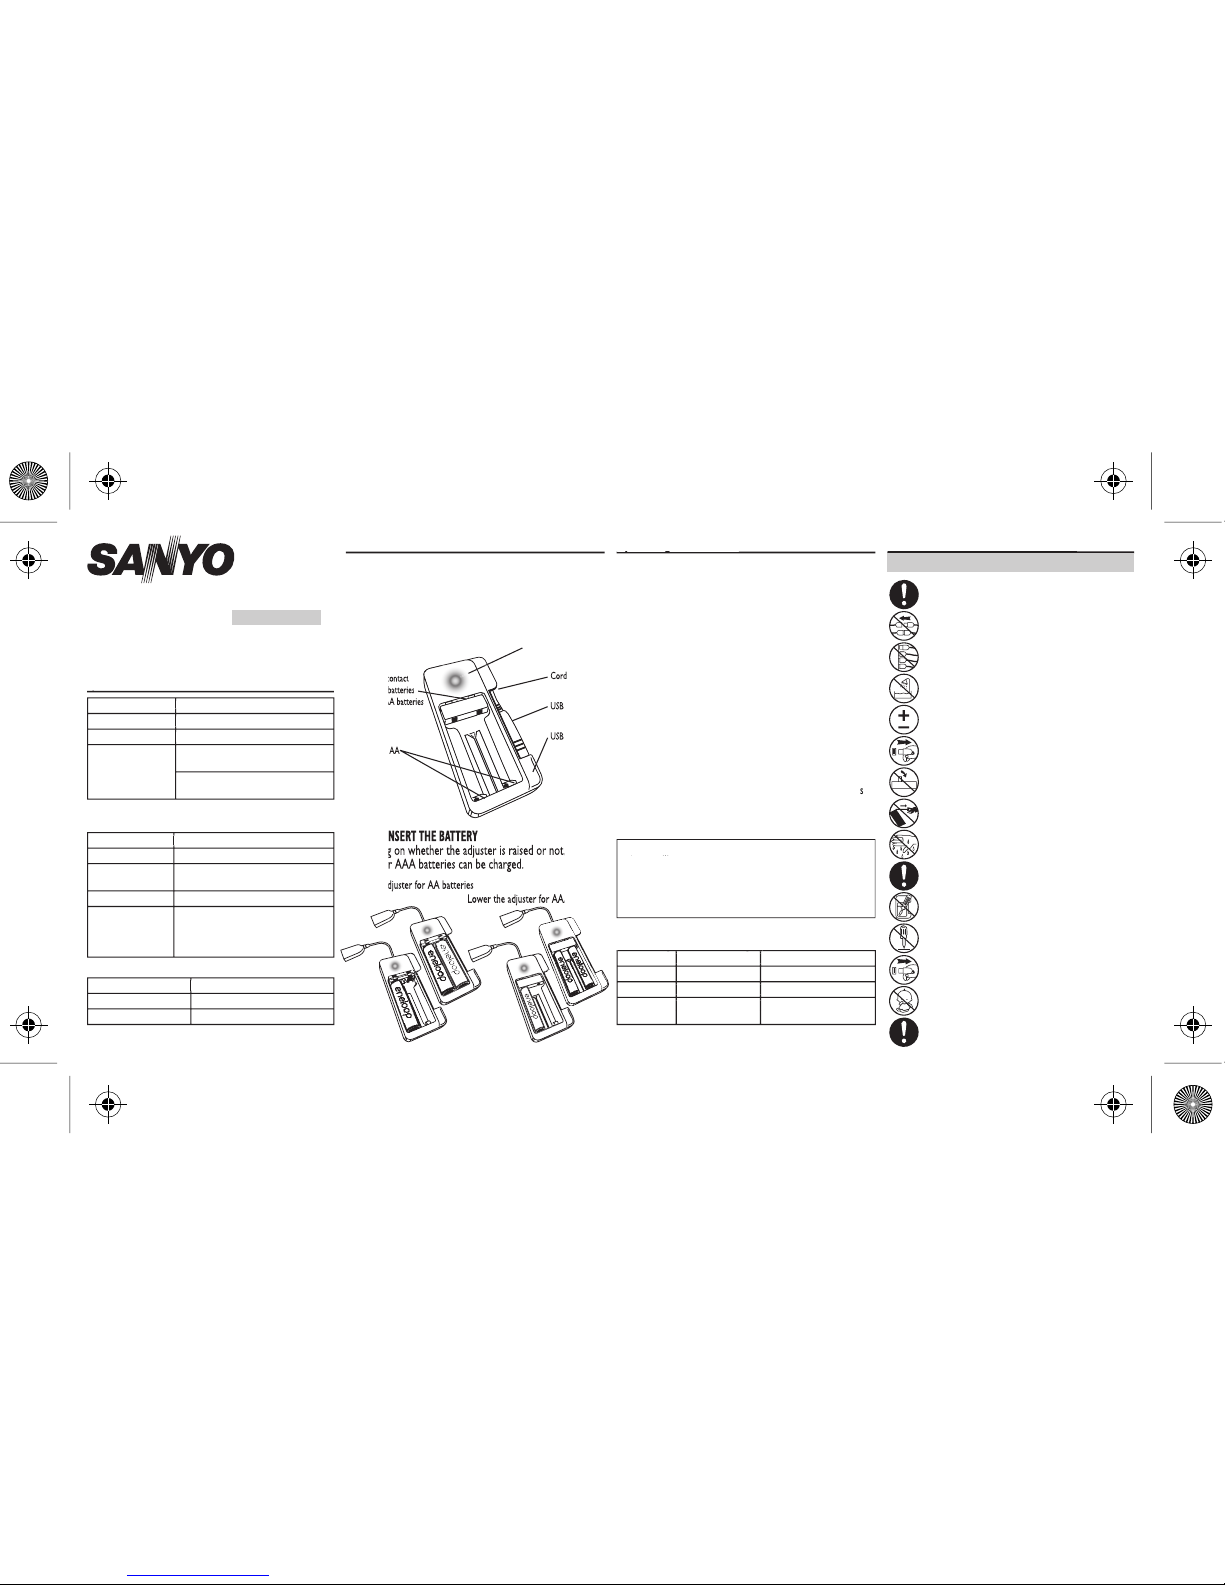
HOW TO INSERT THE BATTERY
Depending on whether the adjuster is raised or not, one or
two AA or AAA batteries can be charged.
1. Insert one or two eneloop batteries into the charger. Raise or lower
ster depending on the type of battery to be charged.
• Raise the adjuster to charge AA batteries.
• Lower the adjuster to charge AAA batteries.
• AA and AAA batteries cannot be charged at the same time.
Note: Insert the batteries matching the polarity of the charger.
2. Insert the USB connector of the charger into the USB port of an
operating computer. Charging takes place when the LED charge
Note: Do not connect other equipment to other USB ports on the
computer while charging or the required Power may be exceeded.
Charging might be stopped or the computer damaged or Data lost.
The power supply capacity may be exceeded and charging may
become impossible or the computer may be damaged and important
3. When charging has been completed the LED Charge indicator
remains lit. Remove the USB connector from the USB port of the
computer and remove the battery (batteries).
• Directly after completion of charging, the battery is hot, but thi
Note: If the adjuster has been raised, lower the adjuster for storage.
Cautions for Battery Charger Usage
Cautions for Battery Charger Usage
The following can be considered when the charge time is exceeded:
• The personal computer has entered standby mode during
• The personal computer has entered standby mode during
charging. (*)
• The personal computer has entered standby mode during
• The available power is insufficient because other equipment is
connected to other USB ports.
• Charging has been paused for temperature protection.
• During charging of one battery, another battery has been added.
(*) Please refer to the instructions for your computer and cancel standby mode.
– – – – – – – – Approx. every 1.5 sec Charging
– – – – – – – – Approx. every 1.5 sec Charging
––––––––––– Steady Charging completed (*)
––––––––––– Steady Charging completed (*)
- - - - - - - - - - - Approx. every 0.5 sec Battery abnormal
- - - - - - - - - - - Approx. every 0.5 sec Battery abnormal
Not lit Stop during charging (computer
Not lit Stop during charging (computer
(*) When two batteries are being charged, the condition where charging of
batteries has been completed.
LED Charge indication light
LED Charge indication light
Raise the adjuster for AA batteries
• This charger is only for AA and AAA Ni-MH
• Do not attempt to charge alkaline batteries.
• Do not connect equipment to other USB ports while
available power required may be
exceeded and the computer may be damaged or data
• Do not connect via a USB connection cable. This may
cause interference with other electrical equipment.
• Do not use the charger in areas of high humidity or
where it may be exposed to water.
• Insert the batteries into the charger with matched
• Disconnect the charger from the port after
• Lower the adjuster when the charger is not being
used. Put the USB connector into USB housing of the
• Do not pull the USB connector and the cord
• Do not touch the charger or the batteries with wet
• Use the charger in the temperature range from 0 °C
• Do not insert Metallic objects other than eneloop
batteries into the charger.
• Do not modify or disassemble the charger.
• In case of abnormalities or trouble, disconnect the
USB connector from the computer port and contact
• Keep the charger out of reach of small children. If
children are to use the charger, keep them under
• Do not store the charger in locations with high
HOW TO INSERT THE BATTERY
Depending on whether the adjuster is raised or not, one or
two AA or AAA batteries can be charged.
Raise the adjuster for AA batteries


