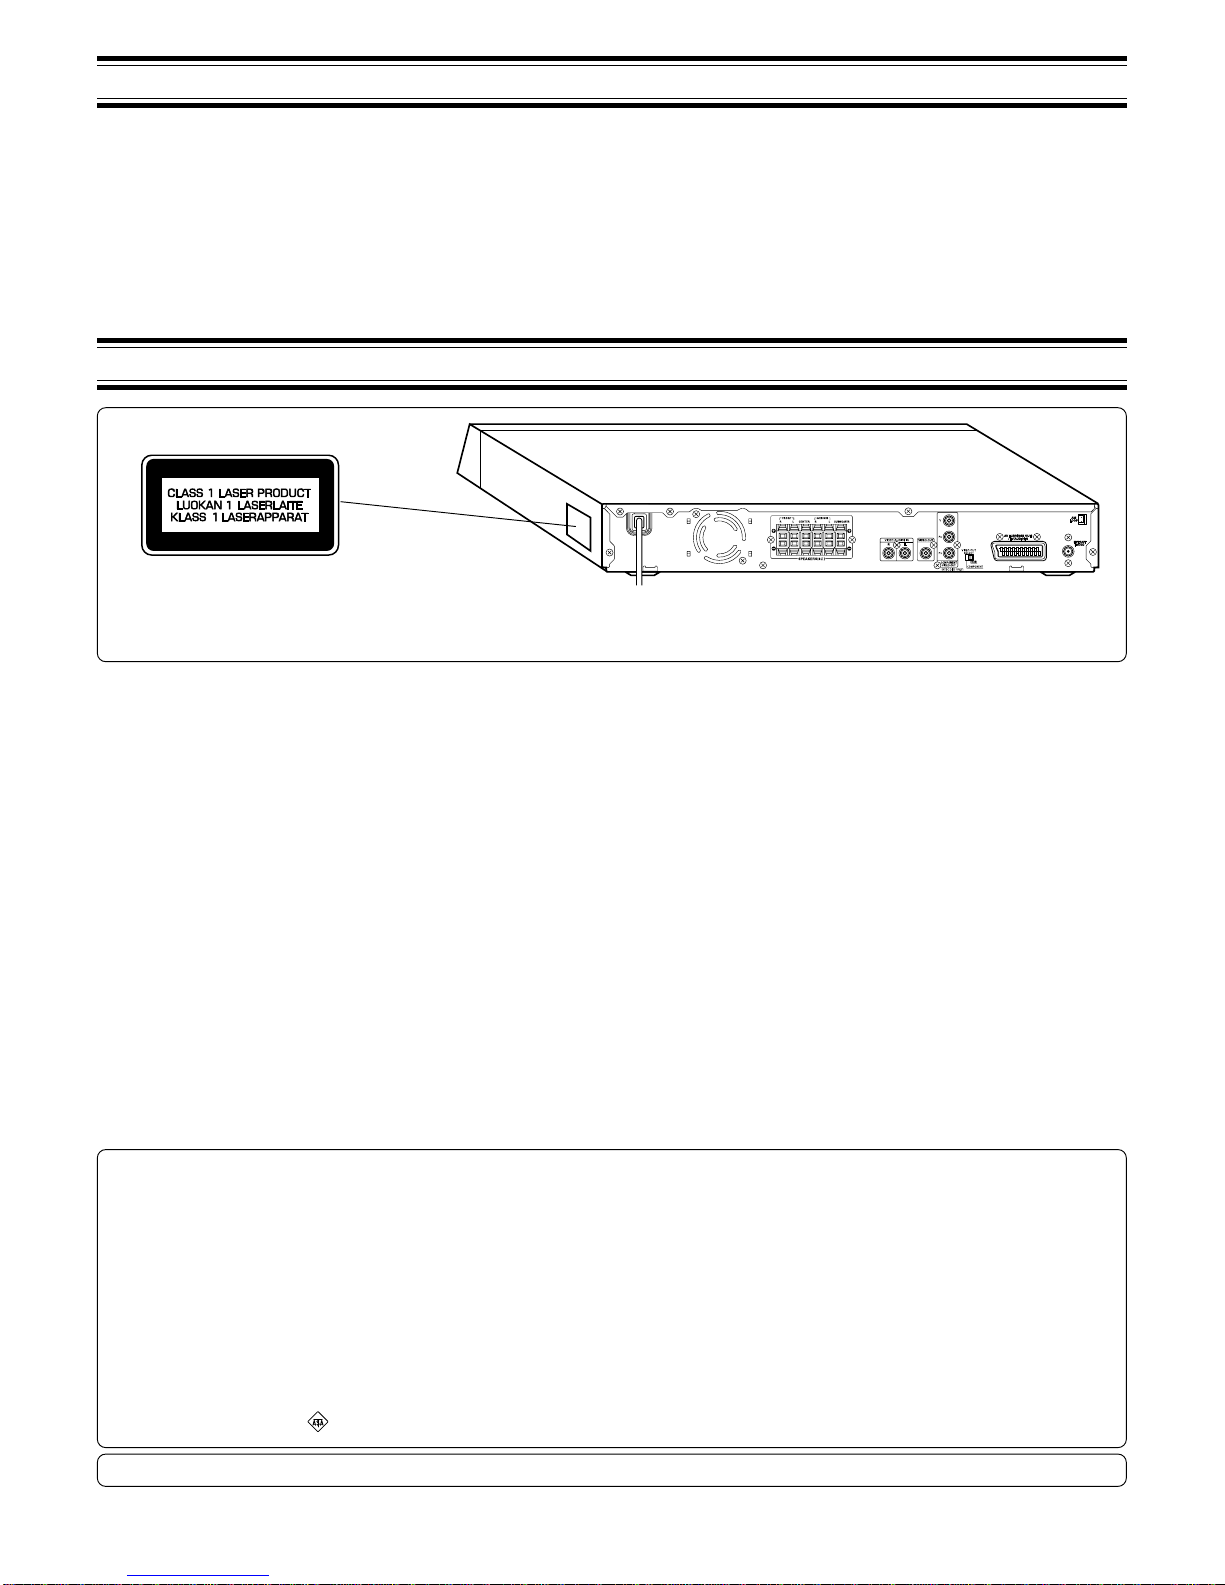
Sanyo DC-TS780 User manual

INSTRUCTION MANUAL
DVD Home Theatre System
DC-TS780
REMOTE CONTROLLER RB-TS780
JCX-TS780
DVD Receiver
SX-TS780W
Subwoofer
SX-TS780S
Satellite speaker
Problems with set-up?
Call freephone
0870 240 7475

1
PRECAUTIONS
CAUTION
THIS PRODUCT CONTAINS A LOW POWER LASER DEVICE, TO ENSURE CONTINUED SAFETY DO NOT REMOVE ANY COVERS OR
ATTEMPT TO GAIN ACCESS TO THE INSIDE OF THE PRODUCT. REFER ALL SERVICING TO QUALIFIED PERSONNEL.
- The apparatus shall not be exposed to dripping or splashing.
- No objects filled with liquids, such as vases, shall be placed on the
apparatus.
- Do not use where there are extremes of temperature (below 5°C or
exceeding 35°C) or where direct sunlight may strike it.
- Because of the DVD player’s extremely low noise and wide dynamic
range, there might be a tendency to set the volume on the amplifier
unnecessarily high. Doing so may produce an excessively large
output from the amplifier which could damage your speakers.
- Suddenchangesintheambienttemperaturemaycausecondensation
toformontheopticallensinsidetheunit.Ifthishappens,takeoutthe
disc, leave the unit for about 2 hours, and then proceed to operate.
- Whencarryingtheunit,besure to removeadisc which maybeinside
andturnthepoweroff.Waitatleast10seconds,thenunplugthemains
lead from the AC outlet. Carrying the unit with a disc inside may
damage the disc and/or the unit.
- Donotinstallthisequipmentinaconfinedspace,suchasabookcase
or built in cabinet.
- The unit is automatically set to the screen saver mode after
approximately5minuteshaveelapsedunderthestoporpausemode.
- Placing the unit in a well ventilated area is strongly recommended.
Do not place any object on the top of the unit.
Do not block ventilation holes.
The cabinet of the unit warms up when it is used for a long time, but
it is not a malfunction.
Important Information:
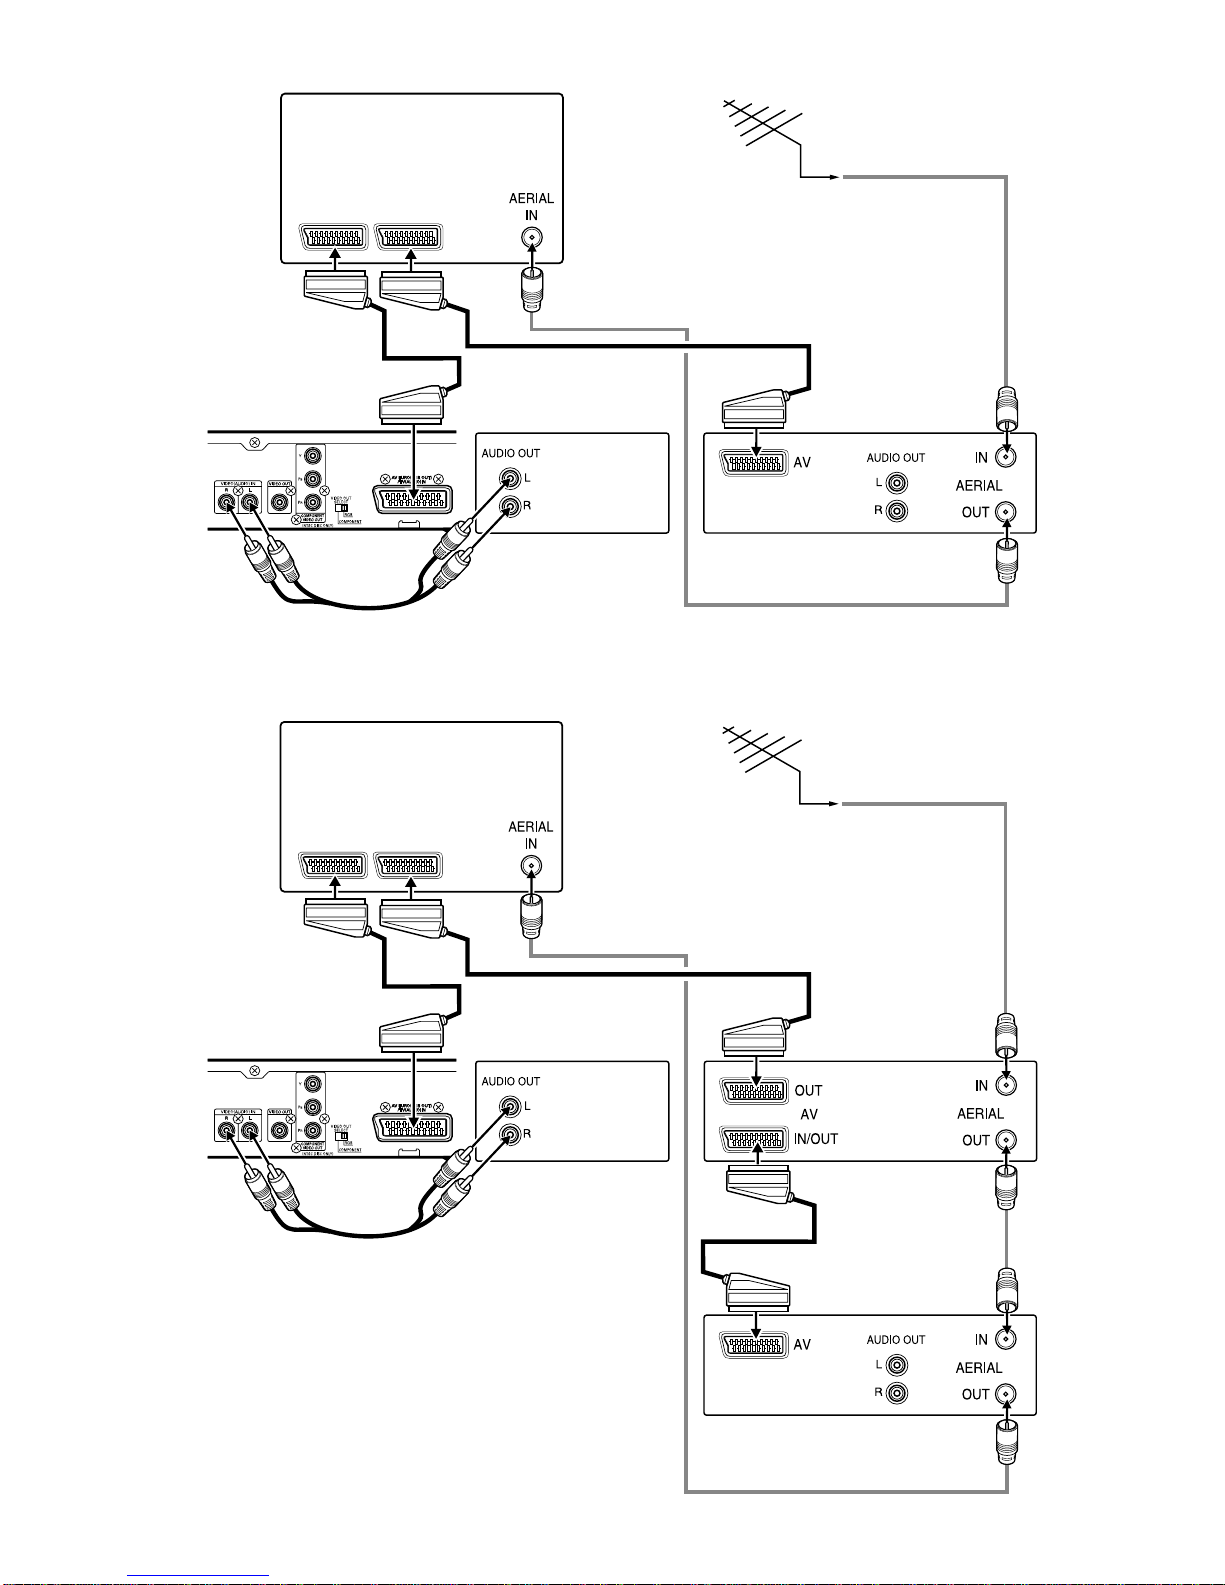
To connect this unit to a TV, TV must have a Video input socket or an
EURO-AV/SCART socket. You cannot use an RF input socket or aerial
terminal to connect this unit.
Thisproductincorporatescopyrightprotectiontechnologythatisprotected
by method claims of certain U.S. patents and other intellectual property
rightsowned by Macrovision Corporation andotherrights owners. Use of
this copyright protection technology must be authorized by Macrovision
Corporation,andisintendedforhomeandotherlimitedviewingusesonly
unless otherwise authorized by Macrovision Corporation. Reverse
engineering or disassembly is prohibited.
CONTENTS
PRECAUTIONS .......................................... 1
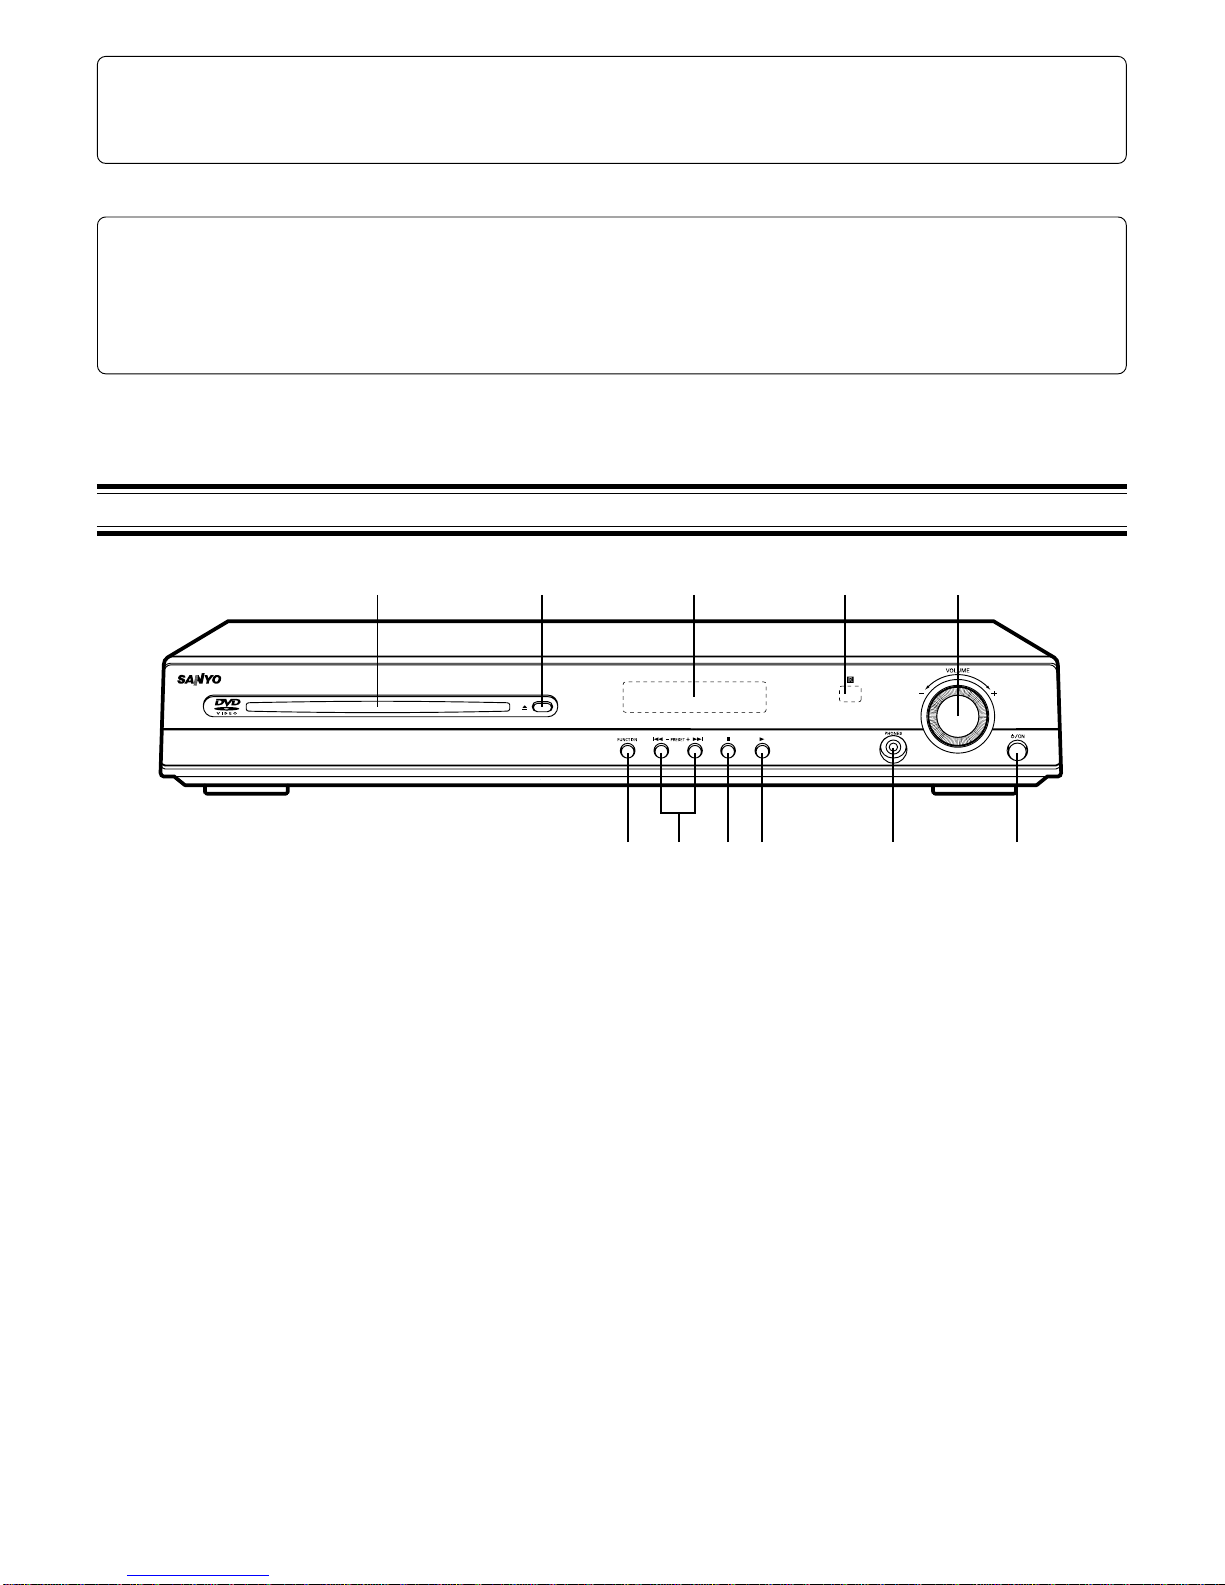
CONTROLS ................................................ 2
REMOTE CONTROL .................................. 3
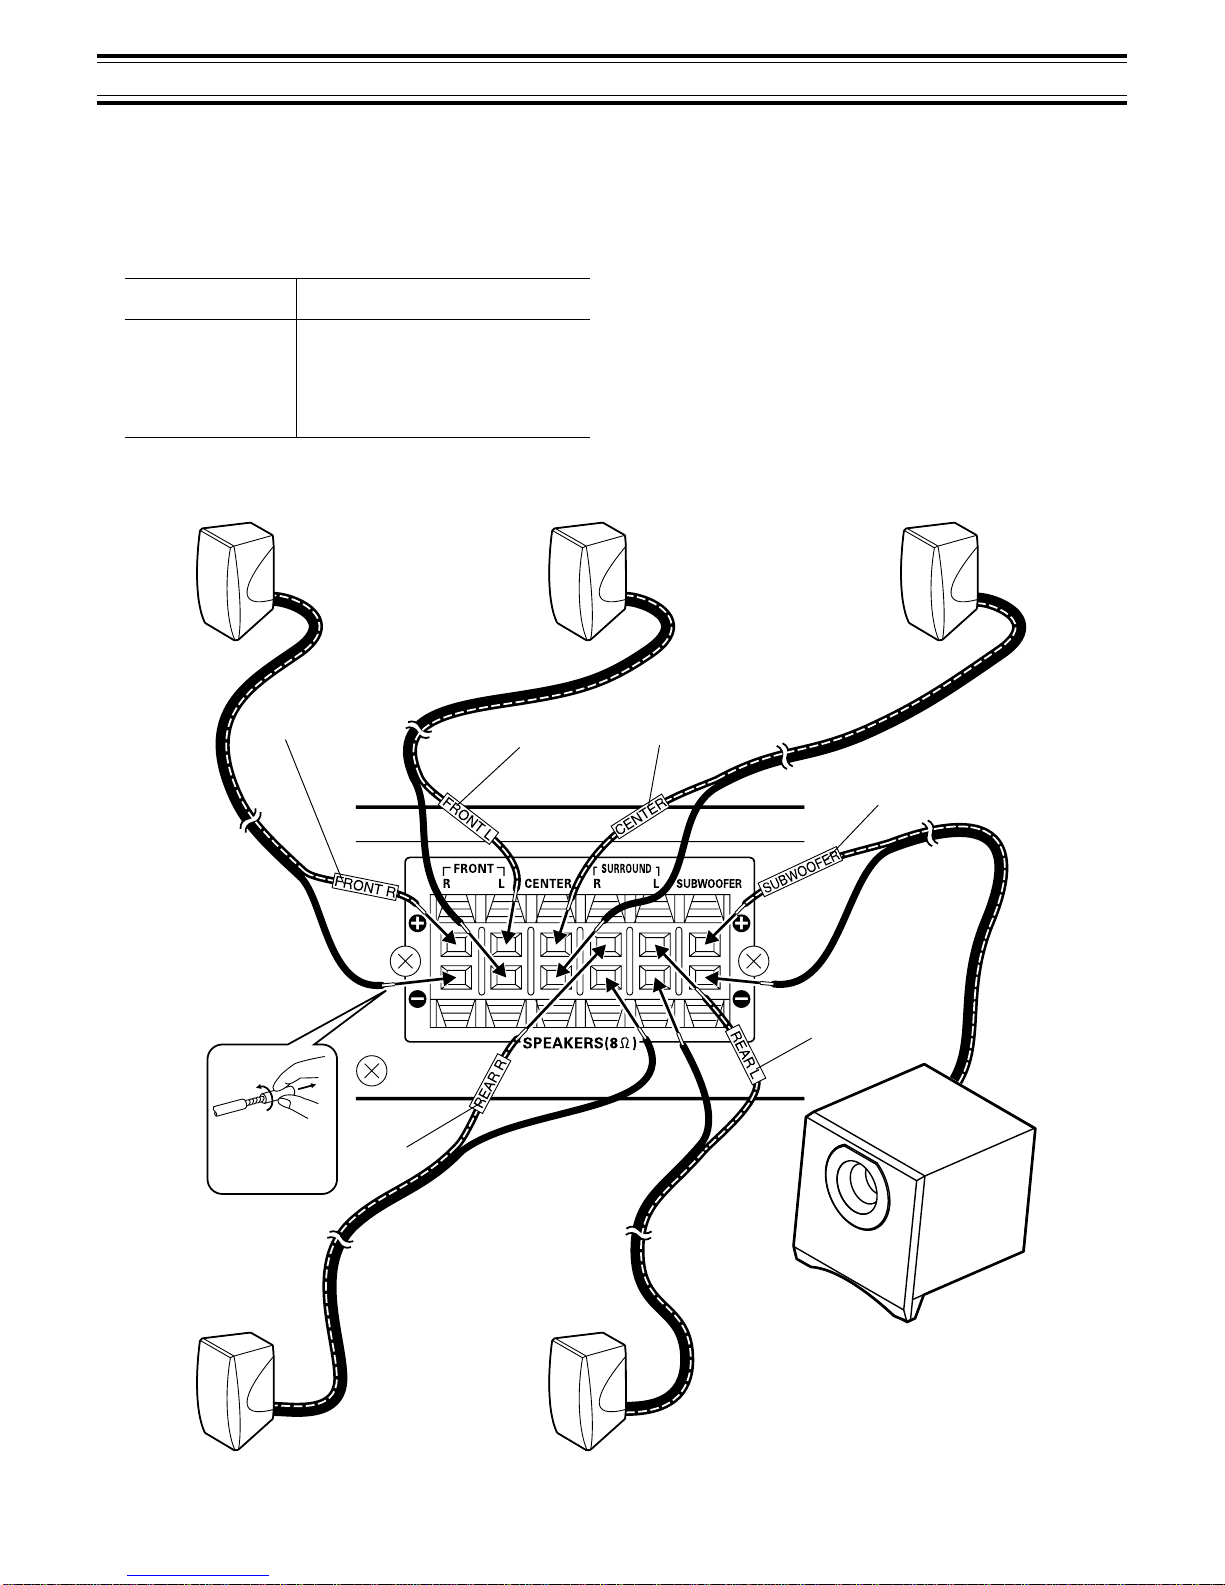
BASIC CONNECTIONS .............................. 4
ADDITIONAL CONNECTIONS EXAMPLES .......
7
SYSTEM CONNECTIONS EXAMPLES ...... 8
BEFORE OPERATION ..............................10
VARIOUS ADJUSTINGS ........................... 11
PLAYABLE DISCS .................................... 12
DISC PLAY ............................................... 13
VARIOUS DISC PLAYING FUNCTIONS .... 15
INITIAL SETTINGS .................................... 19
LANGUAGE CODE LIST ........................... 21
MP3 CD OPERATION ................................ 22
The unit is not disconnected from the mains unless it is unplugged from the AC outlet.
IMPORTANT
If the plug supplied with this equipment is not suitable for the socket
outlets in your home it should be cut off and replaced with the correct
type.
Disposal of Plug
If the non rewireable plug is to be cut off, the removed plug should be
disposed of carefully as there is a shock hazard should the plug be
inserted into a live socket.
Replacing Fuse
The detachable fuse cover must be replaced after changing the fuse.
Only a 3A fuse should be used and should comply with BS1362 and
should carry the ASTA mark .
Thewiresinthemainsleadarecolouredinaccordancewiththefollowing
code; Blue Neutral
Brown Live
The wires in the mains lead must be connected to the terminals in the
plug as follows;
Wire colour Plug terminal marking
Blue N or Black or Blue
Brown L or Red or Brown
Do not connect either wire to the earth terminal.
Ifthemainsplugcontainsafusethisshouldbe3A,ifaplugwithoutafuse
is used the distribution board fuse should not be greater than 5A.
PICTURE CD OPERATION ........................ 23
LISTENING TO THE RADIO .................... 24
LISTENING TO OTHER SOURCES ........ 24
SLEEP TIMER OPERATION .................... 25
MAINTENANCE ....................................... 25
TROUBLESHOOTING GUIDE ................. 25
SPECIFICATIONS .................................... 26

2
CONTROLS
1. Loading slot
2. Eject button (q)
3. Display
4. Remote sensor (IR)
5. Volume control (VOLUME)
6. Power button (z/ON)
7. Headphones socket (PHONES)
8. Play button (a)
9. Stop button (n)
10. Preset tuning, Skip/Next/Previous buttons (f– PRESET + e)
11. Function button (FUNCTION)
ACCESSORIES
RB-TS780 remote control
R6 (HP 7) battery x 2
AM loop aerial
FM aerial wire
Video lead
2 3 451
7 6891011
Either the main unit or remote control can be operated. However, for convenience, this instruction manual
explains operation using the remote control.
Note:
This handling description is printed prior to product development.
When a part of the product specification must be changed to improve operability or other functions, priority is given to the product specification itself.
In such instances, the instruction manual may not entirely match all the functions of the actual product.
Therefore, the actual product and packaging, as well as the name and illustration, may differ from the manual.

3
REMOTE CONTROL
Note:
In this instruction manual, any operation of
pressinganybuttonwhilepressingtheSHIFT
button is as shown below.
Example:“PresstheSHIFT+1ANGLE
buttons.”
Controls
1. Power button (z/ON)
2. Number and other function buttons
Number buttons (1 - 9, 0)
Angle button (ANGLE)
Angle replay button (A.REPLAY)
Zoom button (ZOOM)
Audio button (AUDIO)
Sleep button (SLEEP)
3. Tuner controls
FM mode button (FM MODE)
Tuner function/Band select button (TUNE/
BAND)
Tuning buttons (TUNE)
Preset tuning buttons (PRESET)
4. Amplifier controls
Surround button (SURROUND)
Muting button (MUTE)
Bass button (BASS)
Sound preset button (SOUND)
Function button (FUNCTION)
Volume buttons (VOLUME)
5. Shift button (SHIFT)
6. Eject button (q)
7. Return button (RETURN)
8. Clear button (CLEAR)
9. Test tone button (TEST)
10. Trim button (TRIM)
11. Menu button (MENU)
12. Directional arrow buttons (4, a, 5, b)
13. On-screen display button (ON SCREEN)
14. Play button (a)
15. Stop button (n)
Remote sensor
Inserting batteries
Install two “R6 (HP 7)”batteries. Remote control range
Note:
Remove the batteries if the remote control is not to be used for a month
or more. Batteries left in the unit may leak and cause damage.
Within approx.
6 meters
16. Skip/Next/Previous buttons (f, e)
17. Subtitle on/off button (S.T.ON/OFF)
18. Subtitle change button (S.T.CH)
19. Repeat button (REPEAT)
20. A-B repeat button (A-B REP)
21. Last memory button (L.MEMO)
22. Search mode button (SEARCH MODE)
23. Forward slow button (F.SLOW )
24. Reverse slow button (R.SLOW )
30°30°
REMOTE CONTROLLER RB-TS780
1
4
5
2
3
REMOTE CONTROLLER RB-TS780
31
22
2425
29
27
26
28
23
21
6
9
1030
12
7
8
1415
17
19
18
11
13
16
20
25. Fastforward/Fastreversebuttons(d,c)
26. Pause/Step button (k)
27. Top menu button (TOP MENU)
28. Enter button (ENTER)
29. Setup button (SETUP)
30. Picture mode button (PICTURE MODE)
31. Programme/Random play button
(PROGRAM/RANDOM)

4
BASIC CONNECTIONS
After all connections have been made, connect the mains lead to an AC outlet.
Note:
- Do not connect the mains lead to an AC outlet until all connections have been made.
- The system is not completely disconnected from the mains when the z/ON button is set to the zposition.
Speaker connections
To achieve proper stereo reproduction, connect the speaker wires without shorting to adjacent wires as shown in figure.
Tube of speaker wire Use
(Positive polarity)
FRONT R (Red) Front right speaker
FRONT L (White) Front left speaker
CENTER (Green) Centre speaker
REAR R (Gray) Surround right speaker
REAR L (Blue) Surround left speaker
SUBWOOFER (Violet) Subwoofer
Note:
The SPEAKERS sockets are designed for use only with the supplied
speakers.Donotusewithotherspeakers.Connectingotherspeakermay
damage the speaker and/or the unit.
If using other speakers, check their impedance/input power.
8 Ωor more/70 W or more
Front right speaker Front left speaker Centre speaker
Surround right speaker Surround left speaker
Subwoofer
Twist and pull it
off.
Red White
Violet
Blue
Gray
Green

5
Speaker placement
Example: To hang the speaker on a wall Example: To mount the speaker with a stand
Approx. 3 mm
Stand
(not supplied)
Screw/Nut(notsupplied)
Built-in special nut,
“M5”size
Round head screw
(not supplied)
Surround right speaker
Surround left speaker
Subwoofer
Front right speaker
Front left speaker
Centre speaker
The centre and front left/right speakers have built-in magnetic stray field
compensation. They may be placed close to a TV without affecting the
colour purity.
Place the front left/right speakers either side of the TV.
Place the centre speaker directly above the TV.
Thefront,centre,andsurroundspeakersshouldbeplacedatapproximately
the same distance from the listening position.
The surround left/right speakers and subwoofer do not have build-in
magnetic stray field compensation.
Keep enough distance between the subwoofer and the TV so as not to
garble the TV screen.
Place the surround speakers either sides of the listening position, or
slightly to the rear, approximately 60 cm ~ 1 meter higher than ear level.
Note:
The angles in the diagramme are approximate.
Note: Take care when installing the speakers. They may cause damage or serious injury should they fall from their mountings.
Front left speaker Front right speaker
Centre speaker
Surround left
speaker Surround right
speaker
Subwoofer
OR

6
Connecting to a TV with the video lead
Connect the video lead between the VIDEO OUT socket of the unit and the video input socket of the TV.
Notes on connections
- Please refer to the instruction manuals for the equipments that you are connecting (TV, VCR, etc.).
- Whenyouconnect the unit to your TV andotherequipment,be sure to turn off the poweranddisconnectall of the equipments from theACoutletuntil
all the connections have been made.
- Do not connect the VIDEO OUT, COMPONENT VIDEO OUT and AV EURO (RGB OUT)/TV (AUDIO) IN sockets of the unit to a VCR directly.
The playback picture will be distorted because DVD discs are copy protected.
- Please consult your local audio/video dealer for more details.
TV
Aerial connections
AM loop aerial
In areas close to a transmitter the simple indoor aerial is sufficient to
receive broadcasts. Extend the aerial wire as straight as possible and,
while listening to the sound from the system, secure it in a position which
yields minimal distortion and noise.
In fringe areas or where reception is distorted or noisy, an FM external
aerial (not supplied) should be connected instead of the simple indoor
aerial. Consult your dealer.
Screws (not supplied)
Aerial wire
FM external aerial
AM loop aerial
Assemble the loop aerial.
Unwind the aerial wires, then connect the plug to the AM LOOP terminal.
Ifyouhavedifficultyinsertingtheplug,turnitoverandreinsertit.Placethe
loop aerial in a position which yields the best AM reception, or attach it to
a wall or other surface.
Note:
To minimize noise, the speaker, mains and any other leads should not
comeclosetotheindoororexternalaerialleadandAMloopaerial.Donot
place the aerial leads close to the system.
Video lead

7
ADDITIONAL CONNECTIONS EXAMPLES
Connecting to a TV with an EURO-AV/SCART lead
Please follow the steps below before turning on the power.
1. If your TV has an EURO-AV/SCART socket, connect the unit as
shown.(DonotconnectthevideoleadtotheVIDEOOUTsocket.)You
can enjoy high quality picture playback.
2. Set the VIDEO OUT SELECT switch to RGB.
Connecting to a TV with a Component video lead
(Only for TV with NTSC colour system capability)
Please follow these steps before turning on the power.
1. If your TV has component video input sockets, connect the unit as
shown. (The VIDEO OUT socket connection is not necessary.) You
can enjoy high quality picture playback.
2. Set the VIDEO OUT SELECT switch to COMPONENT.
An LCD video projector with NTSC colour system capability can also be
connected.
Audio/Video equipment connection
ConnectanaudioleadbetweentheVIDEO(AUDIO)INsocketsoftheunit
and the audio output sockets of the audio/video equipment.
Headphones
Connect stereo headphones (not supplied) to the PHONES socket for
monitoring or for private listening. The speakers are automatically
disconnected when headphones are connected.
TV
EURO-AV/SCART lead (not supplied)
Audio lead (not supplied)
Audio/Video equipment
(such as MD deck etc.)
EURO-AV/SCART
(RGB input facility)
TV (or LCD video projector) with NTSC colour system capability
Component video lead
(not supplied)
Manufactured under license from Dolby Laboratories.
“Dolby”, “Pro Logic”and the double-D symbol are trademarks of Dolby Laboratories.
“DTS”and “DTS Digital Surround”are registered trademarks of Digital Theater Systems, Inc.

8
SYSTEM CONNECTIONS EXAMPLES
JCX-TS780, TV and Audio equipment
JCX-TS780, TV and VCR
TV
EURO-AV/SCART lead (not supplied)
Audio lead (not supplied)
Aerial
Aerial lead (not supplied)
JCX-TS780
TV
Aerial
Aerial lead (not supplied)
EURO-AV/SCART lead
(not supplied) EURO-AV/SCART lead (not supplied)
Aerial lead (not supplied)
JCX-TS780
VCR
Audio lead (not supplied)
EURO-AV/SCART
(RGB input facility)
EURO-AV/SCART
(Audio monitor out)
Audio equipment
(such as MD deck etc.)

9
JCX-TS780, TV, VCR and Audio equipment
JCX-TS780, TV, VCR, STB (Set Top Box) and Audio equipment
TV
EURO-AV/SCART lead
(not supplied)
Audio lead (not supplied)
Aerial
Aerial lead (not supplied)
JCX-TS780
TV Aerial
EURO-AV/SCART
lead (not supplied)
Aerial lead (not supplied)
JCX-TS780
Audio lead (not supplied)
Aerial lead (not supplied)
VCR
VCR
Set Top Box
(not supplied)
Aerial lead (not supplied)
Aerial lead
(not supplied)
Audio equipment
(such as MD deck etc.)
EURO-AV/SCART
(Audio monitor out)
Audio equipment
(such as MD deck etc.)
EURO-AV/SCART lead (not supplied)
EURO-AV/SCART lead
(not supplied)
EURO-AV/SCART lead (not supplied)
EURO-AV/SCART
(Audio monitor out)

10
BEFORE OPERATION
Either the main unit or remote control can be operated. However,
forconvenience,thisinstructionmanualexplainsoperationusing
the remote control.
Turning the power on and off
Press the z/ON button. “HELLO”appears briefly on the display. (After
connecting the mains lead, when you press the z/ON button for the first
time,thevolume-resetfeature automatically sets the initial volume level.)
Toturnthepoweroff,pressthez/ONbuttonagain.“GOOD-BYE”appears
briefly.
- When the mains lead is connected to the AC outlet, the unit will
respond to commands from the remote control.
Direct start function
If the following buttons are pressed when the unit is in standby, the unit
turns on automatically and the selected function is activated.
Remote control a(Play), TUNE/BAND, q
Main unit a, q
Selecting the function
Pressthe FUNCTION buttontoselect the desiredfunction.Each time the
button is pressed, the display changes as follows:
DVD/CD
v
TV
v
VIDEO
v
FM TUNER
v
AM TUNER
v
. . .
- When the function selection is changed, disc play is automatically
stopped.
Adjusting the volume
Press the VOLUME “+”or “–” button (or turn the VOLUME control on the
main unit). The volume level appears on the display (VOLUME 0 ~
VOLUME MAX).
To reduce the volume temporarily
Press the MUTE button. “MUTE”blinks on the display. To restore the
previous volume setting, press the MUTE button again.
Selecting the sound mode
1. PresstheSOUNDbuttonrepeatedlytoselectthedesiredsoundmode
(“BASS”, “TREBLE”or “NIGHT”).
2. Press the button as desired.
Sound mode Press Display change
BASS 5or 4“–5”~ “+5”
TREBLE 5or 4“–5”~ “+5”
NIGHT ENTER “ON”or “OFF”
Note for “NIGHT”:
WhenenjoyingaDVDdiscwiththevolumesetlowatnight,selectthis
mode. It enhances spoken lines making speech clearer.
3. Repeat steps 1 - 2 for another sound mode.
4. Press the SOUND button repeatedly to close the display.
Bass boost system
Press the BASS button to select the desired bass boost effect.
BASS BOOST
v
BASS OFF
v
NORMAL . . .
Adjusting the display brightness
While pressing the nbutton on the main unit, press the ON SCREEN
button on the remote control.
DARK
wv
NORMAL

11
Selecting surround mode
PresstheSURROUNDbuttontoselectthesurroundmode.Eachtimethe
button is pressed, the surround mode changes as follows:
AUTO SURR
v
5.1ch SURR
v
2.1ch ST . . .
When “DVD/CD”function is selected
AUTO SURR
The unit selects the surround mode automatically depending on the
disc.
- IfaDVDdiscisencodedwithDolbyDigital5.1channel,itisplayed
back with Dolby Digital 5.1 channel surround sound.
Not all DVD discs are encoded with Dolby Digital 5.1 channel
surround sound.
- If a DVD disc is encoded with Dolby Digital 2 channel or mono, it
is played back with Dolby Pro Logic mode. “DOLBY PL”appears
briefly on the display.
- If a DVD disc is encoded with 2 channel Liner PCM (stereo), it is
played back with Dolby Pro Logic mode. “DOLBY PL”appears
briefly on the display.
- If a DVD or CD disc is encoded with DTS Surround, it is played
back with DTS surround sound.
- VideoandAudioCDsareplayedbackwithDolbyProLogicmode.
- MP3 CDs are played back with Virtual 5.1 channel surround
sound.
5.1ch SURR
Disc is played back with Virtual 5.1 channel surround sound.
2.1ch ST
Thesurroundmodeissetto2.1channel(Frontleftandrightspeakers,
and Subwoofer).
When “TV (stereo)”, “VIDEO”or “FM TUNER (stereo)”is selected
AUTO SURR/5.1ch SURR
The surround mode is set to Virtual 5.1 channel surround sound.
2.1ch ST
The surround mode is set to 2.1 channel.
When“TV(mono)”,“FMTUNER(mono)”or“AM TUNER”is selected
AUTO SURR/5.1ch SURR
Front left and right speakers, Centre speaker and Subwoofer sound.
2.1ch ST
The surround mode is set to 2.1 channel.
Note:
- When using headphones, the surround/bass boost mode does not
change. If the SURROUND or BASS button is pressed, “-SURR-”or
“-BASS-”appears briefly on the display.
- WhenreceivingweakFMbroadcasts,setthemodeto“2.1chST”.The
sound quality may improve.
VARIOUS ADJUSTINGS
Adjusting the speaker volume balance
This unit is set to the standard level before shipping from the factory. You
may not need adjustment.
However, depending on the size of the room and the placement of the
speakers, you may need a fine adjustment.
In this case, follow the steps below. Please use the remote control at the
listening point.
1. Press the FUNCTION button to select “DVD/CD”.
2. Press the nbutton to stop play completely.
3. Press the TEST button. The speaker screen appears.
“FNT-L 0”appears on the display.
Thetesttonewillbeheard fromeachspeaker sequentiallyasfollows:
TV screen Display Speaker
Front-L FNT-L 0 Front left speaker
Center CENT 0 Centre speaker
Front-R FNT-R 0 Front right speaker
Surround-R SUR-R 0 Surround right speaker
Surround-L SUR-L 0 Surround left speaker
4. Press the VOLUME “+”or “–” button until the test tone is at a
comfortable level.
5. If the test tone level is not the same from each speaker, press the 5
or 4button to adjust it while the speaker is activated. The level
appears.
Front-L/Front-R: “–10”~ “0”
Center/Surround-R/Surround-L: “–10”~ “+10”
If necessary, repeat this step again.
6. Press the TEST button to turn the test tone off.
Note:
If no adjustments are made, the original display returns after the test
tone has cycled round 5 times.
Adjusting the subwoofer level
1. Press the TRIM button. “FNT-L 0”appears on the display.
Note: No test tone.
2. Press the ENTER button repeatedly to select “SUB.W 0”.
Each time the button is pressed, the display shows the selected
speaker and tone level.
3. Press the 5or 4button to adjust the level as desired.
SUB.W: “–10”~ “+10”
Note:
If another speaker is selected, the level can also be changed as
above.
4. Press the TRIM button to turn it off.
Note:
If no adjustments are made, the original display returns after
approximately 10 seconds.
Set the delay time for your centre and surround speakers. See “Setting
audio”on Page 20.

12
PLAYABLE DISCS
The following types of discs can be played on this unit.
Region number
Region number (Regional restriction code) is built-in to the unit and DVD
discs.
There is a region number on the rear of the unit.
The same region number or region number “ALL”of DVD discs can be
used on this unit.
DVD disc
There are the marks on some DVD disc packages.
Example:
Multiple languages Multi-aspect
Multi-language subtitles Region number
Multi-angle Closed caption
DVD discs are divided into titles, and the titles are sub-divided into
chapters.
Video CD/Audio CD disc
Video CD/Audio CD discs are divided into tracks.
Note:
- Only the above types of discs can be played on this unit.
DVD-Audio,DVD-ROM, DVD-RAM,DVD-RW (VRmode),CD-ROM,
CVD, SACD, etc. cannot be played.
- This unit can play back Video CDs (VCD).
- Some DVD-R, DVD-RW (Video mode), DVD+R, DVD+RW and
SVCD discs can be played.
- This unit is to be used exclusively with the PAL (or NTSC) colour
system discs. SECAM system discs cannot be used with this unit.
- ForDVDdiscs: The video output signal format can be selected(“PAL
60”or “NTSC”) when playing back the NTSC discs.
- For MP3 CD, please see Page 22.
- For Picture/JPEG CD, please see Page 23.
Notes on handling discs
- Do not expose the disc to direct sunlight, high humidity or high
temperatures for extended periods of time.
- Discs should be returned to their cases after use.
- Do not apply paper or write anything on the disc surface.
- Handle the disc by its edge. Do not touch the playing surface (glossy
side).
- Fingerprintsanddustshouldbecarefullywipedofftheplayingsurface
of the disc with a soft cloth.
Wipe in a straight motion from the centre to the outside of the disc.
- Never use chemicals such as record cleaning sprays, antistatic
sprays or fluids, benzene or thinner to clean discs.
Disc type and logo mark
DVD Video
Audio CD
Title 1
Chapter 1 Chapter 2
Title 2
Chapter 1 Chapter 2 Chapter 3
Track 1 Track 2 Track 3 Track 4 Track 5

13
CAUTION:
- Neverputanythingexceptadiscintotheloadingslot.Foreignobjects
can damage the unit.
- Do not apply pressure to the disc after automatic loading begins.
- Donotpullthediscoutwhilethedisc isretractinginto theloadingslot.
This will damage the inside of the unit and the disc.
When operation buttons are pressed, that operation is displayed
on the TV screen for several seconds.
1. Press the FUNCTION button to select “DVD/CD”. “SANYO”logo
appears on the TV screen.
2. Push the disc (label facing up) gently into the loading slot until
automatic loading begins, then release the disc.
“LOADING”then “READING”appears on the display.
Note:
Some discs may start play automatically.
Starting play
Press the a(Play) button. The DVD/CD function is selected and play
starts automatically.
Example:
Note:
If “NO DISC”appears on the display, load the disc.
- If the disc is loaded with the label side downward (and it is a single
sided disc), or if a badly scratched disc is loaded, “NO DISC”or “NO
PLAY”appears. If this occurs, load the disc correctly or replace the
disc.
Preparations
- Turn on the TV and select the video input for this unit.
Select the playback picture size according to the aspect ratio of the
TV. (See “Setting display”on Page 19.)
- Selectthe desired language for the on-screenmenusif required. The
following languages can be selected.
English (default), Spanish, French, German, Portuguese
(See “Setting language”on Page 19.)
When the COMPONENT VIDEO OUT sockets of the unit are connected
to the component video input sockets of a TV with NTSC colour system
andprogressive-scan capability,youcan select theProgressive position.
Note:
Initial setting is Interlace. If you use a TV with PAL colour system only
or non-progressive-scan TV with NTSC, skip this section.
1. Turn on the power (TV and this unit).
2. Press the FUNCTION button to select “DVD/CD”.
3. In the no disc mode,press and hold down the ebuttonon the main
unit until “ ” (Progressive) appears briefly on the TV screen.
If you want to switch the setting back again, press and hold down the
ebutton until “ ” (Interlace) appears briefly.
4. Select“NTSCDisc:NTSC”on“Settingdisplay”setting(SeePage19.)
Note:
In Progressive mode, the closed caption may not appear on the
screen.
Progressive scanning
(Only for TV with NTSC colour system capability)
While interlaced scanning produces one frame of video in two fields,
progressive scanning creates one frame in one field. Conventional
interlacedscanningconstitutesonesecondwith30frames(60fields),but
progressivescanningconstitutesitwith60framesfromscratch.Progressive
scanningcanreproducesharperpicturewithhighresolutionforstillimage
or other picture containing long texts or horizontal lines.
This model has compliance with 525p (progressive) system.
Interlaced scanning
Progressive scanning
DISC PLAY
Important note:
- This instruction manual explains the basic instruction of this unit.
- Some DVD or VCD discs have different functions that may not be explained in this instruction manual. You may need extra instructions. In this
case, please follow the instructions displayed on the TV screen or jacket or case of the disc.
- The disc information takes priority in various setting.
-“”may appear on the TV screen during operation. This icon means that the function is not available on the disc now.
- In this instruction manual, the language in on-screen display is English. If you changed the language, please follow the selected language in on-
screen display.
- The screen shown as an example in this manual may be different from the actual screen.
- For improvement, on-screen displays subject to change without notice.
Chapter number Elapsed playing time

14
Continuing play from where you stopped watching (Last memory
play) [DVD]
1. During play, press the L.MEMO button at the point from which you
wantto resume playlater.“STOP”appears on thedisplay.Play stops
automatically.
2. Remove the disc or turn off the power.
3. Load the disc (and press the a(Play) button), or turn on the power.
“Last Memo Play?”screen appears.
4. Press the 4button to select “Yes”.
5. Press the ENTER button. Play resumes from the point where you
stopped.
Note:
- Point on up to 3 discs can be memorized.
- TheLast MemoryPlaymode maynot workcorrectlywith somediscs.
What is “PBC”?
“PBC”isanabbreviationfor“PlaybackControl”thatreferstocontrolcodes
prerecorded on Video CDs.
During playback of Video CD with PBC, “PBC”appears on the display.
Disc lock function
You can lock the disc to prevent misuse by young children.
1. Press and hold down the qbutton.
2. Load the disc while holding the qbutton down until “LOCKED”
appears on the display.
The qbutton will not function.
To release this function, press the qbutton until “UNLOCKED”
appears on the display.
If a menu appears on the TV screen...
Press the 4, a, 5or bbutton (or the number buttons)
to select the menu, then press the ENTER button.
Playback of the selected menu starts.
Note:
For more details, please refer to the jacket or case of the disc.
Stopping play
[DVD] [VCD]
- Press the nbutton once.
Whenyoupressthea(Play)button,playstartsautomaticallyfromthe
point where you stopped.
Note:
Some discs may not resume play.
- Press the nbutton twice. The unit stops completely.
Whenyou press thea(Play) button, playstartsfrom the beginningof
the disc.
[CD]
- Press the nbutton. The unit stops completely.
Ejecting disc
1. Stop the disc play completely.
2. Press the qbutton. “EJECT”appears briefly on the display and the
disc is automatically ejected.
CAUTION:
Nevertouchthediscwhilethediscbeingejected.Thiswilldamagethe
inside of the unit and the disc.
3. Remove the disc
Note:
After you press the qbutton to eject the disc, you must remove the disc
from the loading slot. If you do not remove the disc within approximately
2 minutes, the disc is automatically retracted into the loading slot.
(The memory is released.)

15
VARIOUS DISC PLAYING FUNCTIONS
“”may appear on the TV screen during operation. This icon means that the function is not available on the disc now.
Selecting a DVD menu [DVD]
1. Pressthe MENU buttonduring play. TheDVDmenu screenappears.
2. Press the 4, 5, bor abutton (or the number buttons) to select the
desiredmenu,thenpresstheENTERbutton.Theselectedmenuplay
starts.
Selecting a top menu [DVD]
1. Press the TOP MENU button. The top menu appears.
2. Press the 4, 5, bor abutton (or the number buttons) to select the
desired menu, then press the ENTER button. The selected title play
starts.
Note:
Selecting a menu operation may differ depending on the disc used and
may not be possible on some discs.
Return button (RETURN) for Video CD
Normally, it returns to the previous menu when the RETURN button is
pressed during play.
Note:
The operation differs according to the content of the Video CD.
Chapter (Track) skip
Skipping forward
Press the ebutton during play to skip to the next chapter (or track). A
chapter (or track) is skipped each time the button is pressed.
Skipping backward
Press the fbutton during play to skip back to the beginning of the
chapter(ortrack)currentlyplayed.Pressthebuttonagainimmediatelyto
skip back to the beginning of the previous chapter (or track).
Title search [DVD]
1. Press the SEARCH MODE button once.
Example:
2. Press the number buttons to enter the title number.
Example:
To select No. 12, press 1, then 2.
- If you make a mistake, press the CLEAR button.
3. PresstheENTERora(Play)button.Playstartsfromtheselectedtitle.
Chapter search [DVD]
1. Press the SEARCH MODE button twice during play.
Example:
2. Press the number buttons to enter the chapter number.
3. Press the ENTER or a(Play) button. Play starts from the selected
chapter.
Track search [VCD] [CD]
Press the number buttons to enter the track number, then press the
ENTER or a(Play) button. Play starts from the selected track.
Time search
1. Press the SEARCH MODE button three times (DVD) or once (VCD/
CD) during play.
Example:
2. Press the number buttons to enter the time.
Example:
20 minutes 5 seconds Press 2, 0, 0 then 5.
1 hour 4 minutes 35 seconds Press 1, 0, 4, 3 then 5.
- If you make a mistake, press the CLEAR button.
3. Press the ENTER or a(Play) button. Play starts from the searched
time (DVD) or searched time in the track (VCD/CD).
Fast play
Pressthe cordbutton repeatedlytoselect the fastspeed forward or
reverse play during play or still picture (pause).
[DVD] [VCD]
“c1”, “c2”, “c3”, “c4”or “d1”, “d2”, “d3”, “d4”
[CD]
“c1”, “c2”or “d1”, “d2”
Press the a(Play) button to return to normal play.
Slow-motion play
[DVD]: Forward/Reverse slow play, [VCD]: Forward slow play only
Press the F.SLOW or R.SLOW button repeatedly to select the
forward or reverse slow speed play during play or still picture.
“1”, “2”, “3”, “4”or “1”, “2”, “3”, “4”
Press the a(Play) button to return to normal play.
Note:
The sound is muted during fast play or slow-motion play in DVD/VCD.
Still picture (Pause)
[DVD] [VCD]: Still picture mode, [CD]: Pause mode
Press the kbutton during play.
Press the a(Play) button to return to normal play.
Note: The sound is muted.
Frame by frame advance play [DVD] [VCD]
Press the kbutton during still play. Each time the button is pressed, the
picture advances one frame.
Press the a(Play) button to return to normal play.
Note:
- The sound is muted.
- Frame play is operative in forward mode only.

16
Picture zoom [DVD]
1. Press the SHIFT + 3 ZOOM buttons during normal, slow or still play.
- If you quit the screen, press the SHIFT + 3 ZOOM buttons.
2. Press the 4, a,5orbbutton, then the ENTER, or press the number
button to select the zoom point.
The screen is magnified. “1”appears briefly on the screen.
If necessary, press the 4, a, 5or bbutton repeatedly to move the
screen.
3. Press the SHIFT + 3 ZOOM buttons again. The screen is magnified
more than “1”. “2”appears briefly.
4. Press the SHIFT + 3 ZOOM buttons to return to the original screen.
Note:
Picture zoom may not work on some discs.
Selecting the desired camera angle [DVD]
In the case of a DVD disc (multi angle) that contains scenes shot
simultaneously from multiple camera angles, it is possible to select the
desired camera angle.
Press the SHIFT + 1 ANGLE buttons repeatedly during play until the
desired angle appears.
Example:
Angle replay [DVD]
During Multi-angle play screen, press the SHIFT + 2 A.REPLAY buttons.
The unit skips back to last approximately 10 seconds, changes it to the
next camera angle and plays it, and continues play.
Repeat play
Press the REPEAT button during play. Each time the button is pressed,
the repeat mode changes as follows.
TV screen Operation
[DVD]
Chapter Repeat of chapter being played
Title Repeat of title being played
Off Repeat off mode
[VCD] [CD]
1 Repeat of track being played
All Repeat all tracks
Off Repeat off mode
During programmed play [VCD] [CD]
Program 1 Repeat of track being played
Program All Repeat all programmed tracks
Off Repeat off mode
Designated range repeat play (A-B Repeat)
1. Press the A-B REP button during play at the beginning of the section
you want to repeat (Point A). “A-”appears on the screen.
2. Press the A-B REP button again at the end of the section (Point B).
“B”appears.
The section between points A and B is played repeatedly.
3. To return to normal play, press the A-B REP button again.
Note:
Repeat play or A-B repeat play mode may not work correctly with some
discs.
Notes on using Video CD with PBC
TousetherepeatplayorA-Brepeatplaymode,selectPBCoffplaymode
as follows.
In the stop mode, press the number buttons to select the track number
then press the a(Play) button.
Random play [CD]
1. Press the PROGRAM/RANDOM button once in the stop mode.
“Random”appears on the screen.
2. Press the a(Play) button to begin random play. The unit will
automatically select tracks at random.
Note:
The A-B REP and SEARCH MODE buttons do not work during random
play.

17
Programmed play [VCD] [CD]
Up to 20 selections can be programmed.
Programming procedure
1. Press the PROGRAM/RANDOM button once (VCD) or twice (CD) in
the stop mode. The programme mode screen appears.
2. Press the number buttons to select the track number.
Example:
To select track No.3, press 0, then 3.
To select track No.24, press 2, then 4.
- If you make a mistake, press the CLEAR button.
3. Press the 5button to move the highlighted box down.
Example:
4. Repeat step 2 - 3 as above to select other tracks.
5. Press the a(Play) button to start play.
When all programmed selections have played, the unit stops
automatically.
- The programme contents are retained in memory.
Note:
To play the programme again, press the PROGRAM/RANDOM button
once (VCD) or twice (CD) to call up the programme mode screen, then
press the a(Play) button.
To clear the programme one by one
Intheprogrammemode, press the4, a, 5or bbutton to select the track
number. Then press the CLEAR button.
To clear all the programmes
In the programme mode, press the 4button to select “All Clear”. Then
press the ENTER button.
To change the programme
1. In the programme mode, press the 4, a, 5or bbutton to select the
track number.
2. Press the number buttons to enter the track number to be replaced.
Press the PROGRAM/RANDOM button to quit the programme mode
screen.
Selecting subtitle language [DVD]
Thisoperationworksonlywithdiscsonwhichmultiplesubtitle languages
are recorded.
1. PresstheS.T.ON/OFFbuttonduringplay.Thesubtitlelanguagemark
appears on the screen (Example: 1/3 en). If “Off”appears,
press the button again.
2. PresstheS.T.CHbuttonrepeatedlyuntilthedesiredsubtitlelanguage
appears on the screen.
Example:
After few seconds, “ ” disappears.
Note:
- In some cases, the subtitle language is not changed to the selected
one.
- When a disc supporting closed caption is played, the subtitle and the
closedcaptionmayoverlapeachotherontheTVscreen. Inthiscase,
turn the subtitle off.
- When the desired language is not selected even if the button is
pressed, the language is not available on the disc.
- Whenthepoweristurnedonorthediscisreplaced,selectthesubtitle
language again.
- If the subtitle language is not necessary, press the S.T.ON/OFF
button to select “Off”.
Selecting audio soundtrack language [DVD]
This operation works only with discs on which multiple audio soundtrack
languages are recorded.
Press the SHIFT + 5 AUDIO buttons repeatedly during play until the
desired language appears on the screen.
Example:
Note:
- When the desired language is not selected even if the button is
pressed, the language is not available on the disc.
- When the power is turned on or the disc is replaced, select the
language again.
- Ifthelanguageisnotrecordedonthedisc,onlytheavailablelanguage
on the disc will be heard.
Changing the audio channel output [VCD]
During VCD play, press the SHIFT + 5 AUDIO buttons to select an audio
channel.
Left Mono
v
Right Mono
v
Stereo
v
...
Hello!
French
Holà!¡Hola!
French
DTS sound

18
Example for VCD:
1. Press the ON SCREEN button during play.
2. Press the ON SCREEN button again.
3. Press the ON SCREEN button again to close the disc information.
Note:
For Audio CD, please refer to “Example for VCD”as above.
Selecting picture mode
Press the PICTURE MODE button. Each time the button is pressed, the
picture mode changes as follows:
Standard
v
Mild
v
Black and White
v
...
Selecting on-screen information
Press the ON SCREEN button repeatedly to show the disc information
(Title, Chapter, Title elapsed playing time, Language, etc.).
Example for DVD:
1. Press the ON SCREEN button during play.
2. Press the ON SCREEN button again.
3. Press the ON SCREEN button again to close the disc information.
Track number
Title elapsed playing time
Subtitle language
Camera angle
Chapter remaining playing time
A kind of audio
Audio language
Title number
Chapter number
Chapter remaining playing time
Title elapsed playing time
Track elapsed playing time

19
Setting display
1. PresstheSETUPbuttoninthestopmode.Thesetupscreenappears.
2. Press the a(Directional arrow) button to select “Display”, then press
the ENTER button. “Display”screen appears.
3. Pressthe5or4buttontoselecttheitem(highlighted),thenpressthe
ENTER button. The submenu appears.
Example: To set “TV Type”
4. Press the 5or 4button to select the submenu (highlighted).
Example: To select “TV Type: 4:3 PS”
5. Press the ENTER button. (In this example, “TV Type: 4:3 PS”
remains.)
6. Repeat steps 3 - 5 for other items.
7. Press the 4button to skip back to the setup screen (or press the
SETUP button).
TV Type:
Select the appropriate setting for your TV screen size.
4:3 LB (Letterbox):
SelectwhenaconventionalTVsetisconnected.
Whenthe wide screen disc is played, the black
bands appear at the top and bottom of screen.
4:3 PS (Panscan):
SelectwhenaconventionalTVsetisconnected.
Whenthewidescreendiscisplayed,itdisplays
pictures cropped to fill your TV screen. The left
and right edges are cut off.
16:9 :
SelectwhenawidescreenTVsetisconnected.
Playedin“FULL”size. (Settingthewidescreen
TV to “FULL”mode is also necessary.)
Note:
- The screen size may differ depending on the DVD discs.
- If you select “16:9”to get rid of the black bands on screen when wide
screen disc is played, picture may be slightly distorted.
- In some discs, even if “4:3 PS”is selected, the black bands may
remain on the screen.
NTSC Disc:
Selectthe video output signalformatto “PAL 60”or “NTSC”whenplaying
back the NTSC discs.
Cut off
INITIAL SETTINGS
Once the initial settings have been completed, the unit can always be
operated under the same conditions.
The settings will be retained in the memory until they are changed, even
if the power is turned off.
Setting language
1. PresstheSETUPbuttoninthestopmode.Thesetupscreenappears
and “Language”is highlighted.
2. Press the ENTER button. “Language”screen appears.
3. Press the 5or 4button to select the item (highlighted).
Example: To set “OSD”(On screen display)
4. Press the ENTER button. The submenu appears.
Example:
5. Press the 5or 4button to select the language (highlighted).
6. Press the ENTER button. The selected language remains.
7. Repeat steps 3 - 6 for other items.
Note:
If “Others”is selected, enter the language code. (See “LANGUAGE
CODE LIST”on Page 21.)
8. Press the 4button to skip back to the setup screen (or press the
SETUP button to quit the setup screen).
Note:
- You cannot switch audio sound track languages if there is only one
language recorded on the disc.
- When you play a DVD disc, the unit automatically displays the pre-
selected subtitle language if it is included on the disc.
For improvement, on-screen displays subject to change without
notice.
Other manuals for DC-TS780
1
This manual suits for next models
3
Table of contents
Other Sanyo Home Theater System manuals

Sanyo
Sanyo DCS-TS750 User manual

Sanyo
Sanyo DWM-3900 User manual

Sanyo
Sanyo DVR-HT120 User manual

Sanyo
Sanyo DC-TS760 User manual

Sanyo
Sanyo DC-HT818 User manual

Sanyo
Sanyo DC-TS780 User manual

Sanyo
Sanyo DWM-3900 User manual

Sanyo
Sanyo DWM-3000 User manual

Sanyo
Sanyo DC-TS760 User manual

Sanyo
Sanyo DC-TS760 User manual

Sanyo
Sanyo DC-DVD888 User manual

Sanyo
Sanyo DC-TS960WL User manual

Sanyo
Sanyo DC-TS960WL User manual

Sanyo
Sanyo DWM-2500 User manual

Sanyo
Sanyo DWM-4500 User manual

Sanyo
Sanyo DC-AVD8501 User manual

Sanyo
Sanyo DC-PT100 User manual

Sanyo
Sanyo DWM-2600 User manual

Sanyo
Sanyo DC-TS765KR User manual

Sanyo
Sanyo DVR-HT120 User manual