Sanyo CA21FS2 User manual

CP21FS2
CA21FS2
CP29EF2
CA29EF1
CP29EF1
CA29EF2D
CA29EF2DT
CA29KF5
INSTRUCTION MANUAL
Colour Television
Flat Screen
Multi System
CATV Hyper Band
256 Programmes with Automatic Tuning
AV Stereo Sound System
INST. MANUAL-C7GV-E 10/10/06 8:26 AM Page 1

2
Warnings and Cautions
If the television is to be built into a compartment or
similarly enclosed, the minimum distances must be
maintained. Heat build-up can reduce the service
life of your television, and can also be dangerous.
Never stand on, lean on or push suddenly the tele-
vision or its stand.
You should pay special attention to children.
Serious injury may result if it should fall.
Do not place your television on an unstable cart,
stand, shelf or table. Serious injury to an individual,
and damage to the television, may result if it
should fall.
When the television receiver is not used for an
extended period of time, it is advisable to discon-
nect the AC power cord from the AC outlet.
Avoid exposing the television receiver to direct
sunlight and other source of the heat.
Do not stand the television receiver directly on
other products which give off heat. E.g. video cas-
sette players, audio amplifiers.
Do not block the ventilation holes in the back
cover.
Adequate ventilation is essential to prevent failure
of electrical components.
Do not squash power supply cord under the tele-
vision receiver.
Warning
High voltages are used in the operation of this
television receiver. Do not remove the cabinet
back from your set. Refer servicing to qualified
service personnel.
To prevent fire or electrical shock hazard, do
not expose the television receiver to rain or
moisture.
Do not drop or push objects into the
television cabinet slots or openings.
Never spill any kind of liquid on the
television receiver.
Caution
Warning
Warning
Caution
Caution
Caution
Caution
Caution
5cm
10cm
10cm
20cm
Minimum distances
Caution
INST. MANUAL-C7GV-E 10/10/06 8:26 AM Page 2

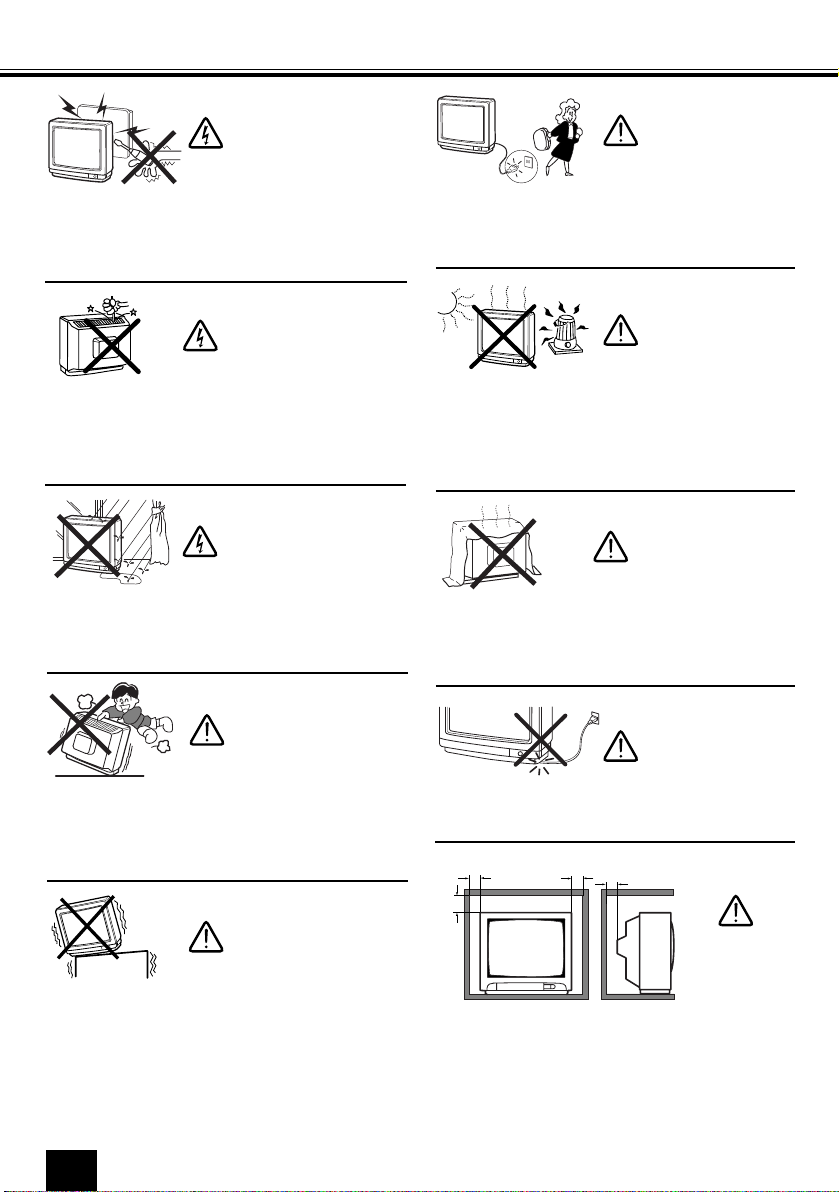
Warnings and Cautions . . . . . . . . . . . . . . 2
Contents . . . . . . . . . . . . . . . . . . . . . . . . . 3
Plug & Play . . . . . . . . . . . . . . . . . . . . . . . 3
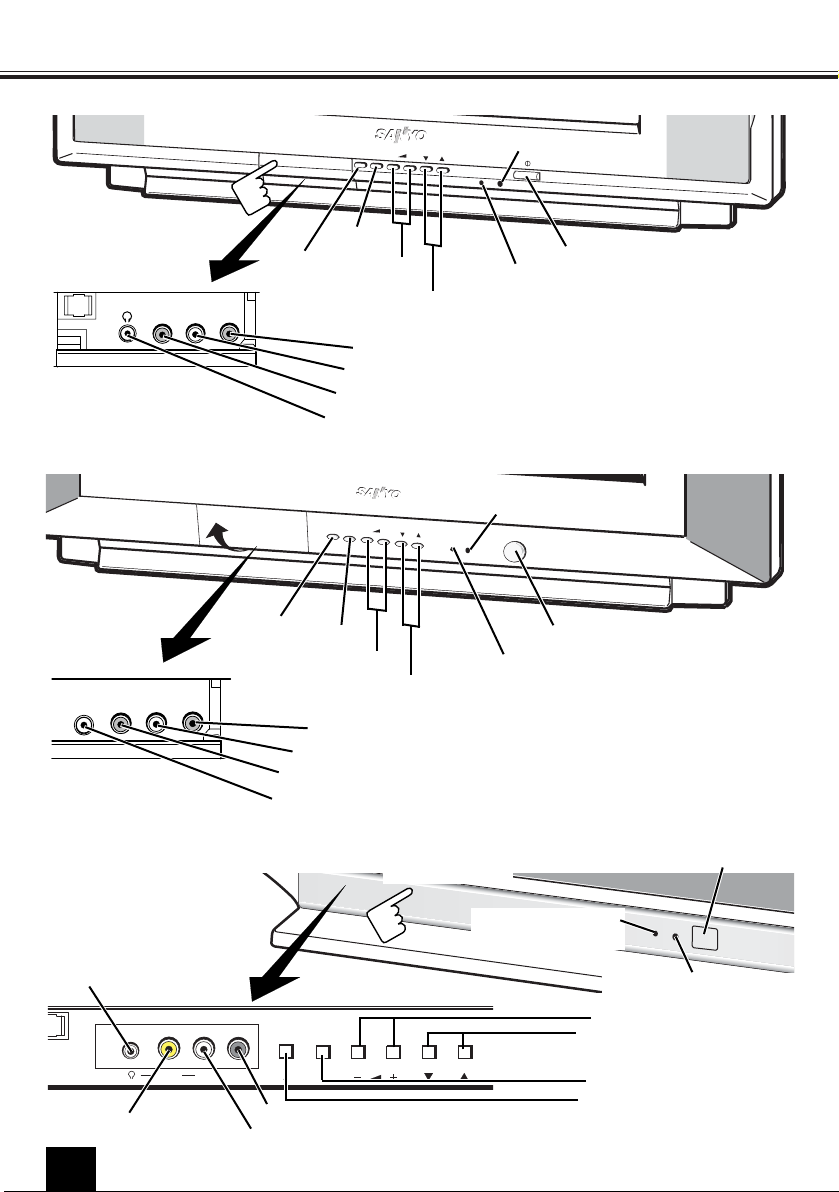
Front Control . . . . . . . . . . . . . . . . . . . . . 4
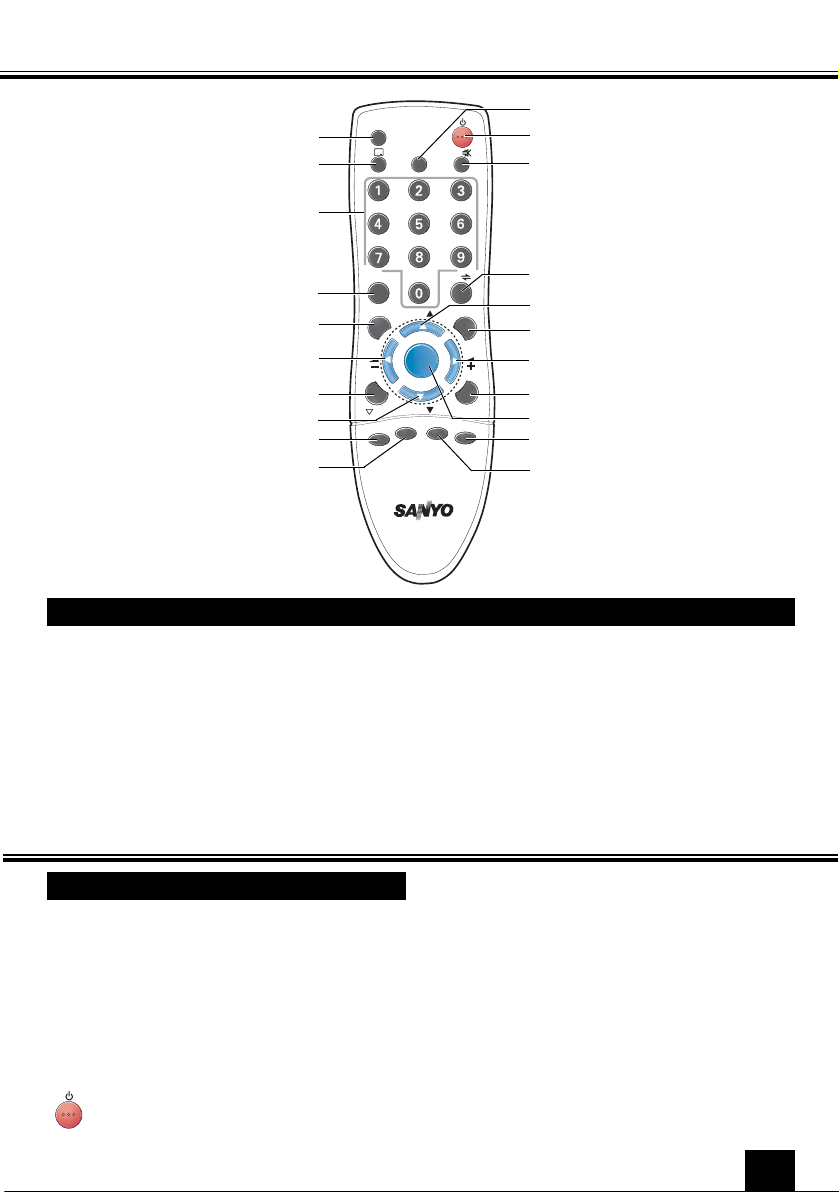
Remote Control Transmitter . . . . . . . . . . 5
Battery Installation of
the Remote Control Transmitter . . . . . . . 5
General Operation
Power ON/OFF . . . . . . . . . . . . . . . . . 5
Auto Shut Off Function . . . . . . . . . . . 6
Direct Programme Selection . . . . . . . 6
Programme UP and Down . . . . . . . . . 6
Channel Scanning . . . . . . . . . . . . . . . 6
Volume Control . . . . . . . . . . . . . . . . . 6
Recall . . . . . . . . . . . . . . . . . . . . . . . . 6
Sound Mute . . . . . . . . . . . . . . . . . . . 6
Alternate . . . . . . . . . . . . . . . . . . . . . . 6
Quick Picture Controls . . . . . . . . . . . . 6
Bass Expander . . . . . . . . . . . . . . . . . 6
Surround ON/OFF . . . . . . . . . . . . . . . 6
Off Timer . . . . . . . . . . . . . . . . . . . . . . 7
On Timer . . . . . . . . . . . . . . . . . . . . . . 7
Colour and Sound System
Setting of the Colour System . . . . . . . 7
Setting of the Sound system . . . . . . . . 7-8
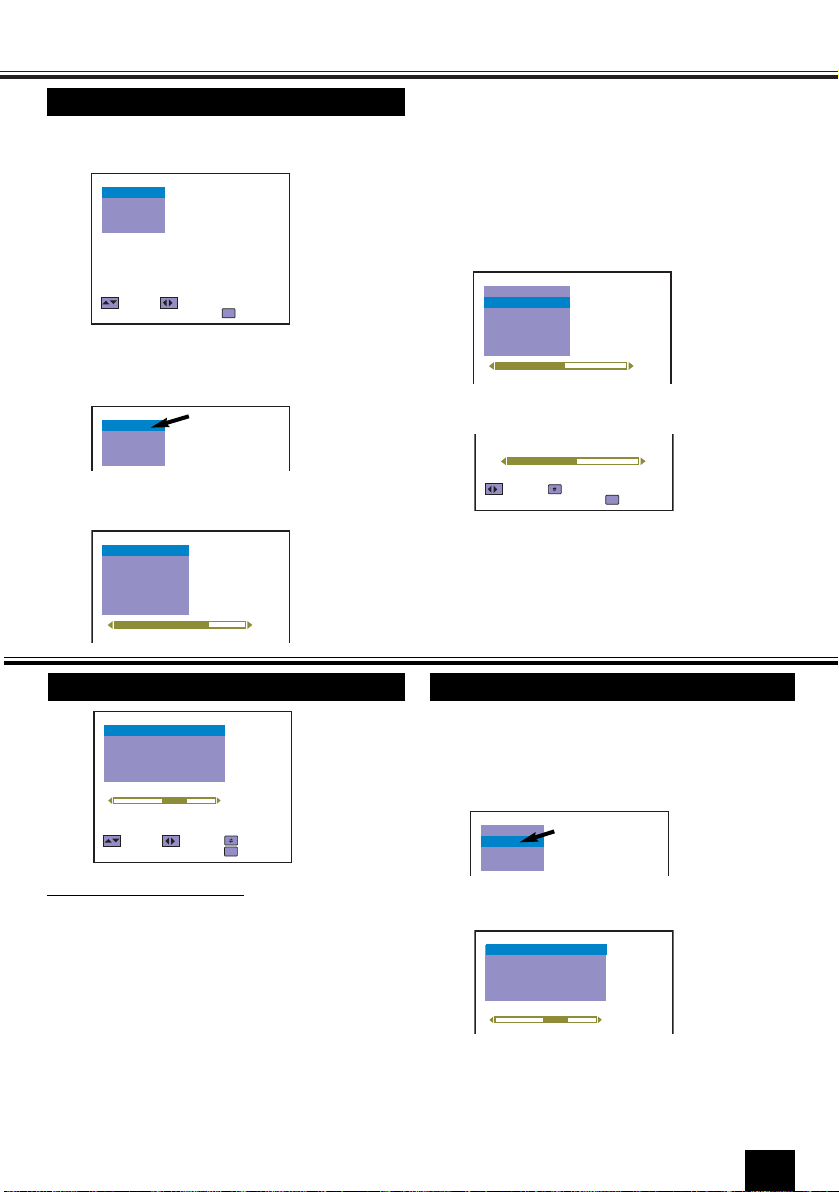
Picture Adjustment . . . . . . . . . . . . . . . . . 8-9
Audio Adjustment . . . . . . . . . . . . . . . . . . 9
Tuning of the Channels
Automatic Tuning . . . . . . . . . . . . . . . 10
Semi-Auto Tuning and Manual Tuning
.
.10
Channel Copy . . . . . . . . . . . . . . . . . . 11
Channel Swapping . . . . . . . . . . . . . . 11
Skip Channel Set and Cancel . . . . . . . . 11-12
Setting of the Private Position . . . . . . . . 12
Setting of the OSD Language . . . . . . . . . 13
Connecting Other Equipment
Connecting to the Rear AV1 Input
Jacks . . . . . . . . . . . . . . . . . . . . . . . . . . .13-14
Selecting the Colour System in AV
Mode . . . . . . . . . . . . . . . . . . . . . . . . 14
S-VHS VCR/DVD Player Connection . 14
Connecting to a DVD Player with AV1(DVD)
Video Component Input Terminal . . . . . . 15
Connecting to the Front AV2 Input
Jacks . . . . . . . . . . . . . . . . . . . . . . . . . . . 15
Connecting to the Monitor Output
Jacks . . . . . . . . . . . . . . . . . . . . . . . . . . . 16
AV Connection to the Aerial Socket . . . . 16
Aerial Connection . . . . . . . . . . . . . . . . . . 17
Care and Cleaning . . . . . . . . . . . . . . . . . . 17
Specifications . . . . . . . . . . . . . . . . . . . . . 18
Helpful
Hints-Problems/Solutions . . . . . . . . . . . 19
Plug & Play
Contents
I AM SEARCHING
ALL PROGRAMMES.
PLEASE WAIT.
AUTO SET-UP
COMPLETED.
HAPPY VIEWING !
1
This TV set provides a self-automatic tuning and
sorting system function called “Plug & Play”. It
automatically begins searching and storing of all
available channels when switching-on the TV set
for the first time.
2Press any of the control buttons to make the
ending message disappear. Or will
automatically return to normal TV display
after 10 seconds.
After completing this procedure, the programme
position 1 is selected and the ending messages on
the screen.
Note: The Plug & Play can be cancelled at any
time by pressing the MENU button.
✐ This procedure only appears at the first
switch-on time.
1Connect power cord of the TV set to a wall
outlet, and turn on the TV set by pressing the
Mains ON/OFF button. Self-automatic tuning
system will be started as follows;
Let’s start !
NO STATION.
PLEASE CONNECT
ANTENNA PLUG.
■ If no TV stations are found, the display shown
below will appear. Please check if the antenna
is connected properly.
If it isn’t connected properly, connect antenna and
Automatic Tuning will be reset.
Automatic setting up channels
3
Note: Model CP29EF2, CP21FS2 & CP29EF1
is not equipped with Multi Personal Preference
Level function.
For position 1 through to position 30, the picture
settings (Colour, Brightness and Contrast) and the
volume level that you choose can be stored sepa-
rately in memory for each position. Thus you can
enjoy watching TV channels with optimum picture
and volume settings, even if you change from one
channel to another.
Multi Personal Preference Level
INST. MANUAL-C7GV-E 10/10/06 8:26 AM Page 3

4
Model CP29EF2, CA29EF1, CP29EF1, CA29EF2D, CA29EF2DT
Model CA29KF5
Front Controls Each button listed in this section has the same function as it’s
corresponding button on the remote control.
L-AUDIO-R
VIDEO
CH
TV/AV
-
+
MENU
Mains ON/OFF Button
Stand-by and Power Indicator
MENU
Programme UP/DOWN
VOLUME
TV/AV
Selector
CH
POWER
TV/AV
-
+
MENU
Remote Control Detector
Stand-by and Power Indicator
Mains ON/OFF Button
Remote Control Detector
Programme UP/DOWN
VOLUME
MENU
TV/AV
Selector
Headphone Jack (Mini Stereo Jack)
Audio Input Jack-Left (AV2)
Audio Input Jack-Right (AV2)
Press to open
Pull to open
L-AUDIO-R
VIDEO
AV2 INPUT
Headphone Jack (Mini Stereo Jack) (For model CM29KF8C/A)
Audio Input Jack-Left (AV2)
Video Input Jack (AV2)
Audio Input Jack-Right (AV2)
Model CA21FS2, CP21FS2
POWER
L
-
AUDIO
-
R
VIDEO
TV/AV MENU CH
Press to open Mains ON/OFF Button
Stand-by and Power
Indicator
Remote Control Detector
Programme UP/DOWN
VOLUME
MENU
TV/AV Selector
Audio Input Jack-Right (AV2)
Audio Input Jack-Left (AV2)
Video Input Jack (AV2)
Headphone Jack
(Mini Stereo Jack)
Video Input Jack (AV2)
INST. MANUAL-C7GV-E 10/10/06 8:26 AM Page 4

Remote Control Transmitter
5
1. Open the battery cover.
2. Install two “AA” 1.5 volt batteries so that the “+” and “-” marks on the batteries match the “+” and
“ - ” marks inside the unit.
3. Close the battery cover.
Note: Replace the batteries when the TV set is showing the following symptoms:
Operation is unsteady or erratic, sometimes the TV set does not work with transmitter.
Discharged batteries may leak and damage the unit. The normal life of batteries should be from
nine to ten months.
-/- -
-/- -
PP
BASS SOUND S. SYS
SURROUND
A•B
PICTURE
SWAP CH SCAN
TIMER
JXPSC
TV / AV
MENU
CH
CH
Power ON/OFF button
ALTERNATE button
VOLUME + button
TIMER button
MUTE button
CHANNEL SCAN button
SURROUND button
PICTURE MODE button
Programme UP button
RECALL/COLOUR SYSTEM button
MENU button
TV / AV Selector button
Programme Selector button
SWAP button
VOLUME - button
STEREO/MONO button
Programme DOWN button
BASS EXPANDER button
SOUND MODE button
(This button is not used)
SOUND SYSTEM button
DIGIT button
Battery Installation of the Remote Control Transmitter
General Operation
Important !
Be sure to set the Mains ON/OFF switch to the off
position, if the power failure occurs while viewing.
To switch on or off the TV ;
Press the Mains ON/OFF button.
The power of the TV is turned on or off complete-
ly. If no picture appears but the Standby and
Power indicator illuminates, press the POWER
ON/OFF button of the remote control transmitter
as the TV set is in standby mode.
To set the TV to standby mode;
Press the POWER ON/OFF button.
During Standby mode the Standby and
Power indicator illuminates more brightly.
To turn on the TV from the standby mode, press
any of the following button.
●POWER ON/OFF button of the remote control
transmitter.
● Programme UP/DOWN of the remote control
transmitter or the TV set.
●1to 9,0 button on the remote control
transmitter.
Power ON/OFF
-/- -
-/- - -/- - -/- -
-/- -
-/- -
-/- -
INST. MANUAL-C7GV-E 10/10/06 8:26 AM Page 5

6
General Operation
This TV set incorporates the AUTO SHUT OFF
function. Even if the TV is left on after you have
gone to sleep, the TV set changes to the standby
mode within 10 minutes after all broadcasts have
ended.
OFF 0:10
Press the Programme UP (CH▲ ) button
to select the next programme position.
Press the Programme DOWN (CH▼ )
button to select the previous programme posi-
tion.
Press the CHANNEL SCAN button to search for a
programme. The channel positions are automati-
cally scanned, and the channel scanning will stop
at the position where it began. To stop at the posi-
tion you want, press this button again.
11
10
9
8
7
-/- -
-/- - -/- - -/- -
-/- -
-/- -
-/- -
CH SCAN
Auto shut Off Function
Direct Programme Selection
-/- -
-/- - -/- - -/- -
-/- -
-/- -
-/- -
-/- -
-/- - -/- - -/- -
-/- -
-/- -
-/- -
-/- -
-/- - -/- - -/- -
-/- -
-/- -
-/- -
-/- -
Programme Up and Down
-/- -
-/- - -/- - -/- -
-/- -
-/- -
-/- -
CH
-/- -
-/- - -/- - -/- -
-/- -
-/- -
-/- -
CH
Channel Scanning
Increase or decrease the sound volume level by
pressing the VOLUME (+ or -) buttons.
SOUND
BASS EXPANDER ON
Volume Control
-/- -
-/- - -/- - -/- -
-/- -
-/- -
-/- -
-/- -
-/- - -/- - -/- -
-/- -
-/- -
-/- -
Should you wish to mute the sound (e.g.
While talking on the telephone), press the
SOUND MUTE button. To switch the
sound back on, press the SOUND MUTE
button again or VOLUME (+ or -) button.
Press the ALTERNATE button, and the pro-
gramme position will alternately select the
previous position and the present position.
To display the on screen indications, press
the RECALL/COLOUR SYSTEM button.
Screen display disappears after about 5 seconds.
29
AUTO
OFF 0:30
ON 3:30 6
Off Timer
On Timer
Programme
Position
BG
Sound
System
Colour
System
RECALL
-/- -
-/- - -/- - -/- -
-/- -
-/- -
-/- -
Sound Mute
-/- -
-/- - -/- - -/- -
-/- -
-/- -
-/- -
-/- -
-/- - -/- - -/- -
-/- -
-/- -
PP
-/- -
ALTERNATE
Press the PICTURE MODE button to select
the following picture modes; “PERSONAL”,
”DYNAMIC”, ”NATURAL”, “ECO” and
“GAME”. Select picture modes to suit pic-
ture type you are watching.
To get a emphasis bass sound, press the BASS
EXPANDER button.
BASS EXPANDER ON
OFF
SURROUND ON
Press the SURROUND button to enjoy Surround
sound.
OFF
Quick Picture Controls
Bass Expander
Surround ON/OFF
-/- -
-/- - -/- - -/- -
-/- -
-/- -
-/- -
PICTURE
-/- -
-/- - -/- - -/- -
-/- -
-/- -
BASS
-/- -
-/- -
-/- - -/- - -/- -
-/- -
-/- -
SURROUND
-/- -
■ For direct access to select programmes
using (0~9) NUMERIC button.
■ To select programmes position more
than 9, press DIGIT button, and then
insert programme position number one
by one.
(Example: for programme position 17,
Press
the Digit button
“1”button. Press “7”
button. For programme position 125
Press the
Digit button twice. Press “2”button. Press “5”
button.
For programme position 225
Press
the Digit button 3 times. Press “2”
button. Press “5”button.)
INST. MANUAL-C7GV-E 10/10/06 8:26 AM Page 6

General Operation
■If no operation is performed after the TV has
been switched on by the ON TIMER, such as
if you are not at home, the TV will be
automatcally switched off after approximately
2 hours.
■If the TV is already switched on when the time
set for the ON TIMER has been reached, only
the programme position will be changed to the
set programme position.
■Cancelling ON TIMER. To cancel the ON
TIMER, press the VOLUME (+or -) button to
set it to “ON 0:00” while the ON TIMER screen
is shown. Switching off the TV by pressing the
Mains ON/OFF button will also cancel the
ON TIMER settings.
■The OFF TIMER cancels when the TV set is
turned off or if a power failure occurs.
The OFF TIMER will switch off the TV automatical-
ly after 30 minutes, 1 hour, 1 hour and 30 minutes,
or 2 hours.
1Press the TIMER button.
2Press the VOLUME ( + or -) button to select
the time period.
OFF 0:00
■ Just one minute before switching off the TV,
“OFF 0:01” will be display on the screen.
■To cancel the OFF TIMER, select “OFF 0:00”
by pressing the VOLUME (+ or - ) button.
When the ON TIMER is set. TV will automatically
be switched on to the selected programme position
when the specified time has elapsed.
1Press the TIMER button twice.
(ON TIMER setting
mode)
ON 0:00 2
Programme position for when TV is
switched on by ON TIMER.
2Press the VOLUME ( + or -) button. The set
time will be increased or decreased by 10
minutes each time the button is pressed ; the
maximum time which can be set is 24 hours.
OFF TIMER
ON TIMER
3Use Direct programme Selection to insert pro-
grammme position for when TV is switched
on by ON TIMER. (see page 6.)
Colour and Sound System
6
AUTO
6
PAL
6
NTSC4.43
6
NTSC
Normally, set the colour system to “AUTO”, if the
clear picture cannot be obtained even when the
broadcasting or AV signal is received, press the
RECALL/COLOUR SYSTEM button repeatedly
until the optimum image can be produced.
(Refer to Broadcast Transmission System List
indicated by the last of this page in a setup of
Colour System.)
Each time the RECALL/COLOUR SYSTEM but-
ton is pressed, colour system changes as follows;
Setting of the Colour System
To set the sound system, make it during Semi-Auto
Tuning or Manual Tuning mode.
When the sound is not clear or no sound is pro-
duced on a programme number position, select
sound system repeatedly until the optimum sound
is obtained.
(Refer to Broadcast Transmission System List
indicated by the last of this page in a setup of
Sound System.)
Setting of the Sound System
To select sound system:
■Press the SOUND SYSTEM button to select
the sound system directly. The sound system
will be memorized automatically.
7
INST. MANUAL-C7GV-E 10/10/06 8:26 AM Page 7

8
Colour and Sound System
or:
BG
(5.5MHz)
DK
(6.5MHz)
I
(6.0MHz)
M
(4.5MHz)
SEARCH
SYSTEM
MODE
POSITION
SEMI
START
2
AUTO
SKIP
MEMORY
OFF
--
SIF BG
SELECT ADJUST BACK
PP
M
EXIT
2) To enter a sound system selection into the
memory, select “MEMORY” and press the
VOLUME + or
-
button.
(Semi-Auto or Manual Tuning mode )
Broadcast Transmission System List
Area Country
Sound
System
Colour
System
Middle
East
Asia
Oceania
PAL B/G
Australia,
New Zealand, etc.
Union of Arab Emirates,
Kuwait, Oman, Qatar,
Yemen,
Bahrain,
etc.
Indonesia, Malaysia,
Singapore, Thailand,
etc.
PAL B/G
China,
etc.
PAL D/K
Hong kong
PAL I
Saudi Arabia,
Iraq, Iran, Lebanon,etc.
B/G
SECAM
Russian Federation,etc.
D/K
SECAM
Myanmar, etc.
M
NTSC
1) Select “SIF” with the Progamme UP or DOWN
button in the Semi-auto or Manual Tuning
mode.Then press the VOLUME ( + or
-
)
button to select a optimum sound system.
Picture Adjustment
BRIGHT
TINT
CONTRAST
SHARPNESS
SELECT ADJUST BACK
PP
M
EXIT
COLOUR
Picture Adjustment Item
COLOUR :Adjusts colour intensity.
BRIGHT : Adjusts picture brightness.
CONTRAST : Adjusts picture contrast.
TINT : Adjust colour tints. (Displayed only on
NTSC or NTSC4.43 system signal
reception.)
SHARPNESS : Adjusts picture detail.
WHITE TONE : Adjusts white balance.
FINE TUNING : Fine tuning in case of weak
broadcast signal or poor reception. Only
displayed in TV mode. Will not be displayed in
AV mode.
Page 1
The 2nd page is not displayed when there is no
TINT adjustment.
Page 2
FINE TUNING
SELECT ADJUST BACK
PP
M
EXIT
WHITE TONE
Picture Adjustment Menu
SEARCH
SYSTEM
MODE
POSITION
SEMI
START
2
AUTO
SKIP OFF
SIF BG
SELECT ADJUST BACK
PP
M
EXIT
MEMORY OK
INST. MANUAL-C7GV-E 10/10/06 8:26 AM Page 8

AUDIO
LANGUAGE
PRESET
SELECT ENTER
M
EXIT
PICTURE
1Press the MENU button for MAIN menu
display.
(MAIN MENU)
Picture Adjustment
Basic Picture Adjustment Operation
AUDIO
LANGUAGE
PRESET
PICTURE
Approximately five seconds after you release the
VOLUME (+ /
-
)button, the screen display switch-
es from the adjustment screen to the normal TV
screen.
2When “PICTURE” is not selected, select
“PICTURE” with the Programme UP or
DOWN button.
4Select desired control by pressing the
Programme UP or DOWN button.
SHARPNESS
CONTRAST
WHITE TONE
FINE TUNING
COLOUR
BRIGHT
ADJUST
BRIGHT
BACK
M
EXIT
PP
3Press the VOLUME + or
-
button to display
Picture Adjustment menu.
5Press the VOLUME + or
-
button to alter
settings.
■To return to Main menu, press the
ALTERNATE button.
■To return to the normal TV mode, press the
MENU button. ( Or will automatically return to
the normal TV mode after 20 seconds.)
BRIGHT
SHARPNESS
CONTRAST
WHITE TONE
FINE TUNING
COLOUR
Audio Adjustment
1Press the MENU button for MAIN menu dis-
play.
BASS EXPANDER OFF
BALANCE
SURROUND OFF
SELECT ADJUST BACK
PP
M
EXIT
BASS
TREBLE
Audio Adjustment Item
BASS : Bass Adjustment
TREBLE :Treble Adjustment
BALANCE : Left/right speaker volume balance
adjustment
BASS EXPANDER :Operates BASS EXPANDER
on and off
SURROUND :Operates SURROUND on and off.
Note: When the stereo signal is inputted from the
right and left audio input terminals in the AV mode,
surround mode is changed as follows;
“SURROUND” ON and “SURROUND OFF”.
Audio Adjustment Menu Audio Adjustment Operation
2Select “AUDIO “ by pressing the Programme
UP or DOWN button.
LANGUAGE
PRESET
PICTURE
AUDIO
3Press the VOLUME + or
-
button for Audio
Adjustment menu display.
BASS EXPANDER OFF
BALANCE
SURROUND OFF
BASS
TREBLE
■ To return to Main menu, press the ALTERNATE
button.
■To return to normal TV mode, press the MENU
button. (Or will automatically return to normal
TV mode after 20 seconds.)
9
INST. MANUAL-C7GV-E 10/10/06 8:26 AM Page 9

Tuning of the Channels
AUDIO
LANGUAGE
PICTURE
PRESET
Up to 256 broadcast stations in your reception
area can be stored in the electronic memory.
There are three ways of tuning as follows;
1. Automatic Tuning (the basic way):
All receivable channels are automatically tuned
in and memorized in consecutive programme
position.
2. Semi-Auto Tuning:
Use to preset a receivable channel in any
desired programme position, e.g. the position
with the same number as the channel.
3. Manual Tuning:
Manually tune a channel if it cannot be
automatically tuned, such as when the signal is
poor.
1Press the MENU button for MAIN menu
display.
2Select “PRESET” by pressing the
Programme UP or DOWN button.
3Press the VOLUME + or
-
button for
PRESET menu display. On entering PRESET
display, Automatic Tuning will be selected
initially.
Automatic Tuning
■The Automatic Tuning operation can be
cancelled at any time by pressing the
Programme UP or DOWN button.
4Select “SEARCH” by pressing the
Programme UP or DOWN button.
SYSTEM
POSITION 1
AUTO
SIF BG
MODE AUTO
SEARCH START
After all receivable channels have been found and
stored, the TV set automatically returns to pro-
gramme position “1”.
-/- -
-/- - -/- - -/- -
-/- -
-/- -
-/- -
MENU
CH
CH
1
10
5Press the VOLUME (+) button to start
channel tuning.
SEARCH
SYSTEM
POSITION
START
1
AUTO
SIF BG
MODE AUTO
1Press the MENU button for MAIN menu
display.
2Select “PRESET” by pressing the
Programme UP or DOWN button.
3Press the VOLUME + or
-
button for
PRESET menu display. On entering
PRESET display, Automatic Tuning will
be selected initially.
4Select “SEMI” or “MANUAL” by pressing the
VOLUME + or
-
button.
Semi-Auto Tuning and Manual Tuning
8Press the MENU button to return to normal
TV display.
6Once desired channel is located, select
“MEMORY” by pressing the Programme UP
or DOWN button.
The VOLUME + button will move tuning toward
the higher frequencies, and the VOLUME
-
button will move tuning toward the lower
frequencies.
5Select “SEARCH” by pressing the
Programme UP or DOWN button.
Semi-Auto Tuning:
Press and release the VOLUME + or
-
button
to search for required TV station. Once a
station is located, tuning will automatically
stop. Continue till desired channel is located.
Manual Tuning :
Press and hold the VOLUME + or
-
button to
search for required TV station.
SYSTEM
POSITION 6
AUTO
MODE SEMI
SEARCH START
SYSTEM
POSITION 6
AUTO
MODE SEMI
SEARCH
SYSTEM
POSITION 6
AUTO
MODE MANUAL
SEARCH
7Press the VOLUME + or
-
button to enter the
desired channel into Programme Position 6.
To pre-set other Programme Positions, repeat
steps 5
-
8.
SKIP OFF
SELECT ADJUST BACK
PP
M
EXIT
MEMORY OK
INST. MANUAL-C7GV-E 10/10/06 8:26 AM Page 10

1Select programme position “6”.
11
Tuning of the Channels
2Enter to SEMI-AUTO or MANUAL tuning
mode. (Refer to page 10.)
3Select “POSITION” with the Programme UP
or DOWN button.
This function can be utilized after Automatic
Tuning.
For example, to copy a TV channel on pro-
gramme position “2” onto programme position
“6”;
1Select programme position “2” .
2
4Select position “6” with the VOLUME + or
-
button.
SEARCH
SYSTEM
START
AUTO
SIF BG
MODE SEMI
POSITION 6
5Select “MEMORY” by pressing the
Progamme UP or DOWN button.
7Press the MENU button to return to normal
TV display.
Channel Copy
6Press the VOLUME + or
-
button to
memorize.
Channel Swapping
The two TV channels will now have changed
places.
Use this channel swapping feature to swap the
channels between two stored programme position.
This feature is particularly useful after automatic
tuning.
2Press the SWAP button.
For example, to swap the channel between pro-
gramme position “6” and programme position
“12”.
612
SWAP 6 AND
-
3Press the DIGIT button, “ 1“ button and then
“ 2” button on the remote control to enter
programme number 12. (For example, to
enter programme number “ 3 “, press “ 3”
button only. )
SWAP 6 AND 12
6
12
4Press the SWAP button.
12
SWAPPING
1Enter to SEMI-AUTO or MANUAL tuning
mode. (Refer to page 10.)
2Select “POSITION” with the Progamme UP
or DOWN button.
When there is a position you do not use, Position
4 for example, by setting the SKIP Channel func-
tion it is possible to jump over this position, when
you are selecting a channel using the Progamme
UP/DOWN or CHANNEL SCAN button.
345
Skip
For example, to set programme position “4” as
Skip channel ;
SEARCH
SYSTEM
START
AUTO
SKIP
MEMORY
OFF
--
SIF BG
MODE SEMI
POSITION 4
Skip Channel Set and Cancel
3Press remote control “4” button to select pro-
gramme position 4. Use the DIGIT button
and Progamme Selector (Number buttons)
to enter programme number. Do not use the
VOLUME + or
-
button to enter programme
position in this settings.
INST. MANUAL-C7GV-E 10/10/06 8:26 AM Page 11

Tuning of the Channels
6Press the MENU button to return to normal
TV display.
4Select “SKIP” by pressing the Progamme
UP or DOWN button,then press the
VOLUME + or
-
button to set SKIP to ON.
To cancel Skip Channel function, set to OFF.
5Select “MEMORY” by pressing the
Progamme UP or DOWN button, then press
the VOLUME + or
-
button for memory.
Any number of channels maybe set as Skip
Channels.
SEARCH
SYSTEM
START
AUTO
MEMORY
--
SIF BG
SELECT ADJUST BACK
PP
M
EXIT
MODE SEMI
POSITION 4
SKIP ON
Setting of the Private Position
For example, to set the programme position
“15” as the private position.
1Select programme position “15”.
15
2Press and hold the RECALL/COLOUR SYS
TEM button for more than 2 seconds.
15
The programme number “15” will shift to centre of
the screen.
15
AUTO
The picture will disappear, and “ 15” will be dis-
play on the screen.
The private position setting is now completed.
3Press the MENU button.
Private position is used to restrict of pro-
gramme positions that you do not want others
to watch. Any position can be set as the Private
position.
BG
How to set the Private Position
12
15
AUTO
BG
15
15
1Select private position (In this case position “15”).
2Press and hold the RECALL/COLOUR
SYSTEM button for more than 2 seconds.
3Press the RECALL/COLOUR SYSTEM
button for watching a TV programme.
Note: The position “15” is still in the private position.
15
AUTO
BG
To View a programme on Private Position
The private position is now cancelled.
1Select private position (position “15”).
2Press and hold the RECALL/COLOUR
SYSTEM button for more than 2 seconds.
3Press the MENU button.
15
AUTO
BG
Cancelling of the Private Position
15
15
SEARCH
SYSTEM
START
AUTO
SIF BG
MODE SEMI
POSITION 4
SKIP ON
MEMORY OK
INST. MANUAL-C7GV-E 10/10/06 8:26 AM Page 12

Setting of the OSD (On Screen Display) Language
1Press the MENU button for MAIN menu dis
play.
AUDIO
LANGUAGE
PRESET
PICTURE
2Select “LANGUAGE “ by pressing the
Programme UP or DOWN button.
AUDIO
PRESET
PICTURE
LANGUAGE
3Press the VOLUME + or
-
button for
Language menu display.
PCC
NN
y
FRANCAIS
BAHASA INDONESIA
ENGLISH
VIETNAMESE
Select “ENGLISH”, “ ”, “VIETNAMESE”,
“”, “FRANÇAIS”, “BAHASA INDONE-
SIA” by pressing the
Progamme
UP or DOWN
button. To return to the normal TV mode, press
the MENU button.
P
C
NN
y
C
4Press the MENU button to return to normal
TV display.
Connecting other Equipment
You may connect the audio and video output terminals of the DVD player or VIDEO recorder to the input
terminals of the TV set to enjoy the DVD and VIDEO programs.
Connecting to the Rear AV1 Input Jacks
When the audio signal from the VCR is stereo, be sure to connect the right and left channels to the respec-
tive right and left AUDIO IN terminals. Then select “STEREO” channel of the audio channel in the TV set
with the remote control button.
A B
STEREO MONO
Each time the button is pressed, the AV Stereo mode is changed as follow,
A B
When the stereo signal is inputted from the right and left audio input terminals, each time the
SURROUND button is pressed (or selection of On-screen Menu), surround mode is changed as follows;
“ SURROUND ON”, and “SURROUND OFF”.
SURROUND OFF
SURROUND ON
■If the external equipment is a monaural one, connect it to the left terminal of AUDIO IN.
Note: The effect of surround is not obtained although the switching of surround is displayed in this
monaural connection.
13
PLAYBACK
■To watch video input picture, select AV1 position by pressing the TV/AV Selector.
To Video Output
To Audio Output (Right)
To Audio Output (Left) VCR
MONITOR OUT
/
DVD
R
L
(MONO)
VIDEO
R
L
INPUT
V
D
E
O
I
AV1
INST. MANUAL-C7GV-E 10/10/06 8:26 AM Page 13

Connecting other Equipment
■ When watching a video program input from the AV1 terminal, press the TV/AV button to select AV1.
Whenever the TV/AV button is pressed, the mode will change as follows:
Colour system setting for AV position is automatically stored in the memory.
Each time the RECALL/COLOUR SYSTEM button is pressed, colour system is changed as follow;
Depending on the type of video tape or connected AV equipment being used, it may be necessary to
select colour system. In this case, press the RECALL/COLOUR SYSTEM button and select a suitable
colour system.
■ You can select a TV programme while watching a playback from a VCR
For example:
● To select programme position “9” while watching a playback from external VCR, press “9” button of the
remote control. The TV set returns to the TV mode and programme “9” will be selected.
● To select the programme position “26”, press Digit (--/-) button, “2” then “6” button. Then TV set returns
to the TV mode and programme position “26” will be selected.
Note: Pressing either of the PROGRAMME UP or DOWN buttons of the remote control or the TV will
return the TV to the TV mode.
AV1
AUTO
AV1
PAL
AV1
NTSC4.43
AV1
NTSC
Selecting the Colour System in AV Mode
S-VHS VCR / DVD Player Connection (for model with S-VIDEO input)
AV1
■To watch a S-VHS video, select AV1 position by pressing the TV/AV Selector.
Note: S-VIDEO terminal takes priority over AV1 input. While a S-VIDEO terminal is connected, the AV1
terminal for normal VCR input can not be used. To use the AV1 terminal for normal VCR input,
disconnect the S-VIDEO terminal.
14
TV mode
AV1 AV1(DVD)
28 AV2
(This AV1(DVD) will be
displayed for model with
DVD Component input.)
Y
S-VIDEO
CR
CB
R
L
(MONO)
S-WOOFER
VIDEO
R
L
V
D
E
O
IPLAY
Connect it to the S-VIDEO terminal, you will enjoy
high quality picture from the DVD player.
S-VIDEO cord
VCR
INST. MANUAL-C7GV-E 10/10/06 8:26 AM Page 14

L-AUDIO-R
VIDEO
Connecting other Equipment
15
Connect the component output terminal on your DVD player to the component video input terminal of
this product. (NOTE: When a signal of Y,Cb,Cr/Y,Pb,Pris received, the output signal from monitor output
terminal will be corresponding but without colour (black and white image).)
Connecting to a DVD Player with AV1(DVD) Video Component
Input Terminal (Y, Cb or Cr) (for model with DVD Component input)
Y
MONITOR OUT
AV1/DVD
CR
CB
R
L
(MONO)
VIDEO
R
L
INPUT
V
D
E
O
I
PLAY
To Video Component Output
To Audio Output (Left)
To Audio Output (Right)
DVD Player with
Video Component
(Y, CB, CR) or
(Y, PB, PR)
TV mode
AV1 AV1(DVD)
28 AV2
In this connection status, whenever the TV/AV button is pressed, the mode will change as follows:
■Make sure the component video terminal (Y, Cbor Cr) is connected correctly.
■To watch a program in this connection status, select AV1(DVD).
(This AV1(DVD) will be
displayed for model with
DVD Component input.)
Connecting to the Front AV2 Input Jacks
It is convenient to use the AV input jack on the front panel for equipment that is often connected and dis-
connected.
Video Camera,
TV Game etc.
To video and
audio outputs
PLAYBACK
(Stereo)
AV2
■To watch the Front AV2 video input picture, select AV2
position by pressing the TV/AV Selector.
INST. MANUAL-C7GV-E 10/10/06 8:26 AM Page 15

For further details concerning this connection and adjustment, refer to the operating instructions
for the AV equipment.
■To dub video from the AV1 terminal input, select
AV1 position by pressing the TV/AV Selector.
■To record TV programme, select TV mode by
pressing the TV/AV Selector and record the
desired programme.
AV1
15
The picture signal being displayed on the TV screen is output through the Monitor Output Jacks. Use these
terminals to record TV broadcasts and for video dubbing from AV1 or AV2 input terminals.
Connecting to the Monitor Output Jacks
TV mode
Recording TV broadcasts or tape dubbing
To Video Input
To Audio Input (Right)
To Audio Input (Left)
VCR for
Recording
MONITOR OUT
/DVD
R
L
(MONO)
VIDEO
R
L
INPUT
V
D
E
O
I
Aerial Socket
The AV apparatus can also be connected to the aerial socket of your TV receiver.
Presetting to watch the video input
1. Playback the VCR .
2. Tune a VCR playback in programme position that you want. (See Semi-Auto Tuning and Manual
Tuning on pages 10.)
VCR for playback
ANT.75
PLAYBACK
AV Connection to the Aerial Socket
16
Connecting other Equipment
INST. MANUAL-C7GV-E 10/10/06 8:26 AM Page 16

17
Care and Cleaning
The surface of the cabinet can be damaged if not properly maintained. Many common household aerosol
sprays, cleaning agents, solvents and polishes will cause permanent damage to the fine surface.
1. Unplug the power cord before cleaning the Television.
2. Clean the screen with a soft cloth dampened with glass cleaner or warm water.
3. Clean the cabinet with a soft cloth dampened with a mild household detergent and warm water. Dry
thoroughly.
Note: NEVER spray liquids on the screen because they can run down and drip onto the chassis. This
may cause component failure not covered under Warranty.
Connect the cable with a plug from a UHF (or VHF) aerial to the aerial socket on the cabinet back.
Connecting Outdoor Aerial
Aerial Cable
Aerial Socket
For all aerial circuit problems please consult your local dealer.
Outdoor Aerial
ANT.75
Aerial Connection
INST. MANUAL-C7GV-E 10/10/06 8:26 AM Page 17

18
Spesifications
Power Source AC110-240 Volts, 50/60Hz
AC220-240 Volts, 50/60Hz (Only for model CA29EF1, CP29EF1)
Colour System PAL/NTSC4.43/NTSC/PAL-60Hz
Sound System B/G, I, D/KK’, M/M
Channel Coverage
VHF: E2-E12, R1-R12, K1-K9, J1-J12, A2-A13 // 0-11, 5A (AUS), 1-11 (NZ)
UHF: 21-69, A14-A69, J13-J62 // 28-69 (AUS)
CATV: S1
-
S41, X, Y, Z, Z+1, Z+2
Aerial input impedance 75 Ω
Audio output (RMS) 7.5W + 7.5W (all models)
Speakers
model CP29EF2, CA29EF1, CP29EF1, CA29EF2D, CA29EF2DT, CA21FS2,
CP21FS2: 6 cmx 12 cm x 2 pcs
model CA29KF5: 8 cm x 13 cm x 2 pcs
Ext. terminals
S-Video Input: Din 4 pin x 1 (Separated Y/C Signals Input) (Model CP29EF2, CA21FS2, CP21FS2 only)
DVD Video Component: Composite/Component Y, CB,CR input
(Model CA29EF2D, CA29EF2DT,
CA29KF5, CA29EF1, CP29EF1, CA21FS2, CP21FS2 only)
Video Inputs: Phone Jack x 2 (1.0Vp-p, impedance 75 Ω)
Audio Inputs: Phone Jack (L/R) x 2 (436mVrms, impedance more than 40KΩ)
Video monitor outputs: Phone Jack x 1 (1.0Vp-p, impedance 75 Ω)
Audio monitor outputs: Phone Jack (L/R) x 1 (436mVrms, impedance less than 600Ω)
Stereo Headphone: Mini Stereo Jack x 1
External speaker terminal (For super woofer): x 1 (Model CA21FS2, CP21FS2 only)
Dimension: model CP29EF2, CA29EF1, CP29EF1, CA29EF2D,
CA29EF2DT:
750(W) x 581(H) x 497(D) mm
model
CA29KF5: 816(W) x 583(H) x 504(D) mm
model
CA21FS1, CP21FS2: 654(W) x 471.5(H) x 394.3(D) mm
Weight: model CP29EF2, CA29EF1, CP29EF1, CA29EF2D, CA29EF2DT: approx. 47.5 Kg
model CA29KF5: approx. 46.7 Kg
model CA21FS2, CP21FS2: approx. 21.6 Kg
Specifications subject to change without notice.
INST. MANUAL-C7GV-E 10/10/06 8:26 AM Page 18

19
Helpful Hints - Problems/Solutions
Before requesting service check the following chart.
“GHOSTS”
Reflections of signals from mountains or high buildings will cause multiple images, called “Ghosts”.
These abnormal conditions can be reduced to minimum by repositioning aerial or by installing new one
suited for your area.
“INTERFERENCE”
Interference may be caused by electrical appliances, car ignition systems, etc. This should normally be
a temporary condition, but should this interference persist, contact your dealer.
The following faults are not caused by the receiver:
●Check aerial connection on back of TV set.
●Check aerial for broken wires. ● Re-orient aerial.
Problem: Check these Conditions / Try these solutions:
●Check if TV is plugged in.
●Try a different channel, if OK, probably station trouble.
No picture,
no sound
●Adjust Brightness or Contrast control.
●Adjust Fine Tuning. (See page 8.) ● Check aerial connection.
Poor picture,
sound OK
No colour,
Picture OK
●Adjust Colour or Tint control. ●Adjust Fine Tuning. (See page 8.)
●
Check aerial connection.
●
Is the programme in colour ? Try a different channel.
● Select other colour system. (See Setting of the Colour System on page 7.)
Weak picture
No sound or poor
sound.
●
Sound Mute may be on. Press the
SOUND MUTE
button on the remote control.
●Adjust Volume. ●
May be station trouble. Try a different channel.
● Select other sound system. (See Setting of the Sound System on page 7-8.)
Remote Control
will not work.
●Check batteries. Replace batteries.
●Check if TV set is plugged in. Aim remote control towards front of TV.
Cannot select or
scan some channels.
●Channel may be removed from memory. Add channel to memory manually.
(See “Skip Channel Set and Cancel” on page 11-12.)
●Check aerial connection.
●This is a normal condition during warm-up and cool down of the plastic
cabinet parts.
Blue screen with AV1
or AV1(DVD) or AV2
is displayed
●Check AV connection. Press the TV/AV Selection button.
● Check external equipment. Switch on external equipment.
●Check to see if channel is set as the Private Position. See “Setting of the
Private Position” on page 12.
Black screen with
and programme
position displayed.
Cabinet makes
popping sound.
INST. MANUAL-C7GV-E 10/10/06 8:26 AM Page 19

SANYO ELECTRIC Co., Ltd.
Part No. 1AA6P1P4980-E C7GV-E (FC6-A)
INST. MANUAL-C7GV-E 10/10/06 8:26 AM Page 20
This manual suits for next models
7
Table of contents
Other Sanyo TV manuals

Sanyo
Sanyo P46841-03 User manual

Sanyo
Sanyo CP29AF2X User manual

Sanyo
Sanyo CW21CF1 User manual

Sanyo
Sanyo CE25B5-C User manual

Sanyo
Sanyo CE25D6-C User manual

Sanyo
Sanyo 25BN1 User manual

Sanyo
Sanyo C29LK39S User manual

Sanyo
Sanyo C21LF41 User manual

Sanyo
Sanyo CE28SN3-C User manual

Sanyo
Sanyo CPP3359TX-00 User manual

Sanyo
Sanyo CT21MF2v User manual

Sanyo
Sanyo DS20424 User manual

Sanyo
Sanyo CP21G1(C) User manual

Sanyo
Sanyo CE32WN6F-C User manual

Sanyo
Sanyo CE21D3-C User manual

Sanyo
Sanyo DP26746 - 26" LCD TV Instruction Manual

Sanyo
Sanyo CE14AT2-GB User manual

Sanyo
Sanyo C21TF26S User manual

Sanyo
Sanyo H3ELM User manual

Sanyo
Sanyo AVM-2120MA User manual