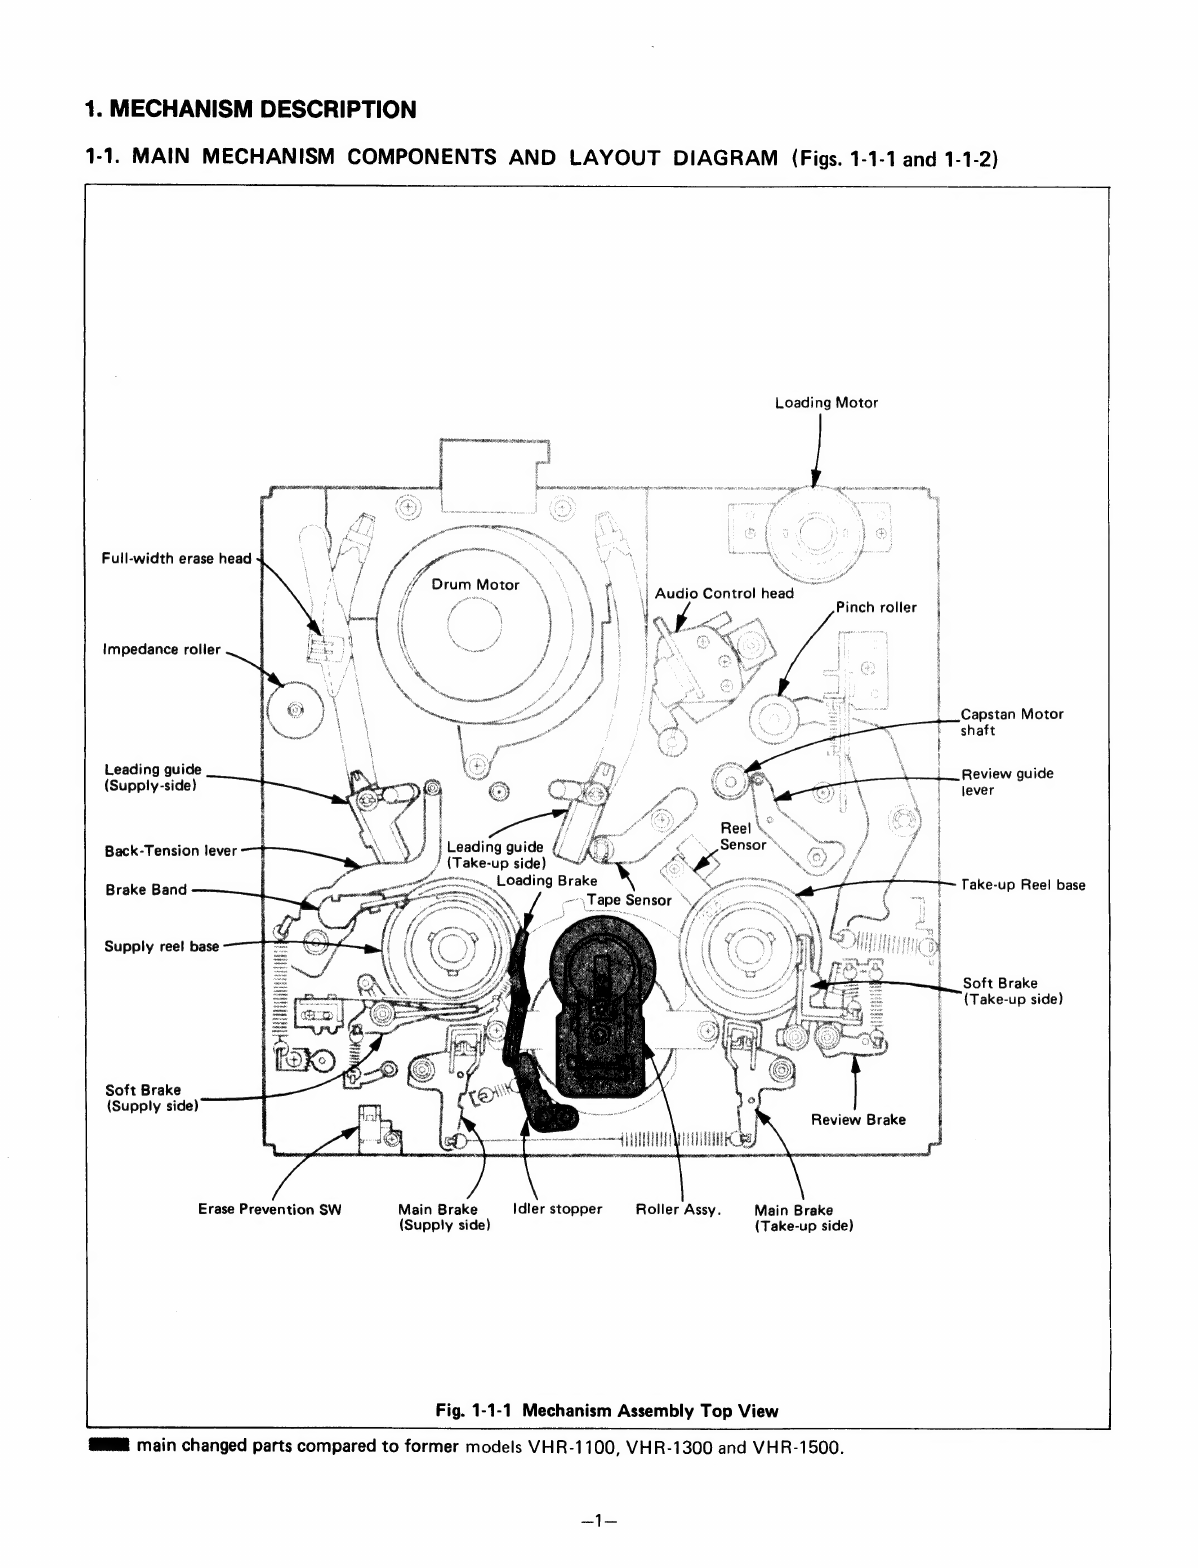
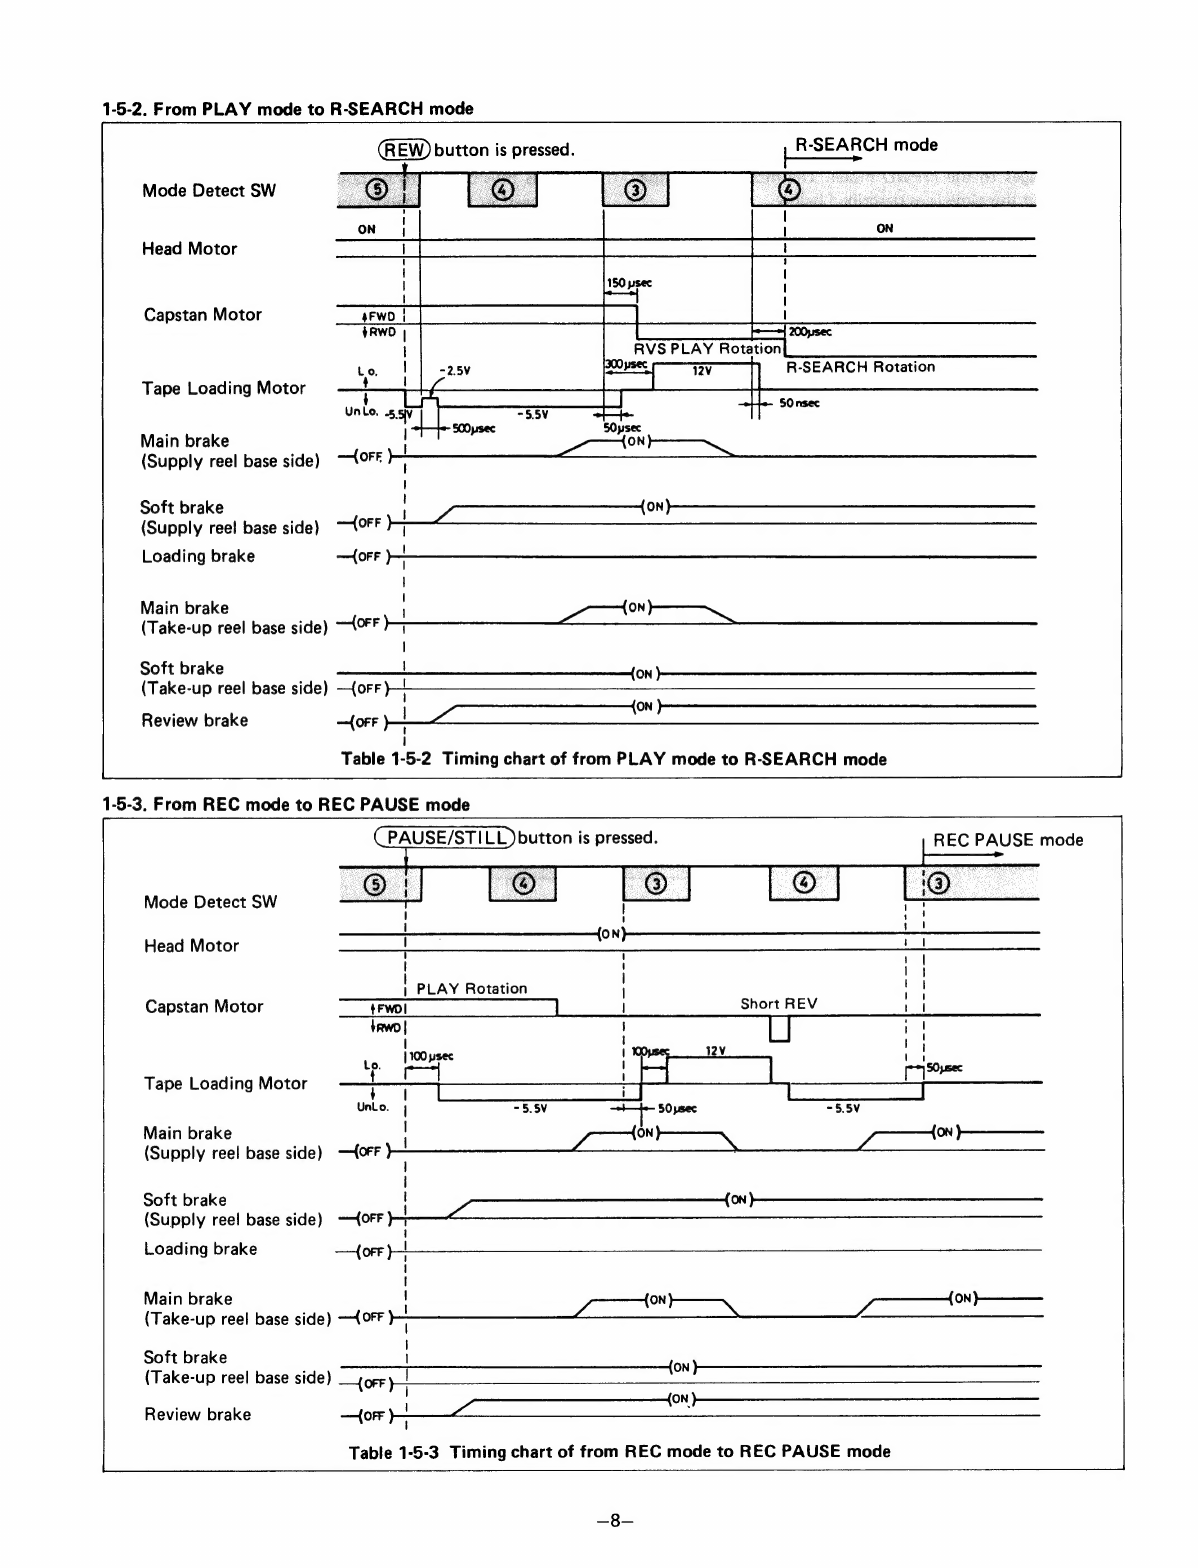
Sanyo VHR-1110 Series User manual

SERVICE
MANUAL
COLOUR
VIDEO
CASSETTE
RECORDER
VHS
PAL
Models
VHR-1110
eee
VHR-1700M
VHR-2300
rl
n
VHR-2500
Series
and
VHR-2350EE
VHR-2700
MECHANISM
DESCRIPTION
AND
MECHANISM
ADJUSTMENT
TABLE
OF
CONTENTS
1.
MECHANIMS
DESCRIPTION
PAGE
1-1.
MAIN
MECHANISM
COMPONENTS
AND
LAYOUT
DIAGRAM
...........
0.00
eve
eeee
1~2
1-2,
OUTLINE
OF
MECHANISM
OPERATION
..........
0...
cece
ee
te
eee
eens
3
1-3...
DIFFERENCES
FROM
PREVIOUS
MODELS
20
o
a
ta
eee
eee
ee
Rea
wae
3~5
1-4,
MECANISM
OPERATION
INEACH
MODE
...........
0.
cece
cee
et
ee
eee
6
be
“OPERATION
JIN-EACH
MODE:
2.4.54
4
44
te
eG
ee
and
mae
eee
ORM
OR
ae
ak
ae
7~10
2.
MECHANISM
ADJUSTMENT
2-1.
JIGS
AND
TOOLS
FOR
ADJUSTMENT...
10...
..
eee
ce
ee
ee
tees
11
2-2.
STANDARD
MAINTENANCE
TIMETABLE...
1...
ee
ee ee
tees
12
28
CLE
IN
IN Gi
i
set
seca
akg
Meck,
Wee
ott
hs
ke
th
Sole
tee
ae
etc
hte
here.
nepal
nara
tere
ab
ea
ab
at
Beata
13
2-4.
MECHANISM
REPAIR
AND
PARTS
REPLACEMENT
........
0...
cee eee
eee
eee
14~21
2-5.
PREPARATIONS
FOR
ADJUSTMENT...
0.0...
0...
eee
ee
ee
ens
22
2-62
“ADJUSTMENT
«sae
Seeley
&
be
eG
Re
iees
Pa
hE
O
OSE
ASE
eS
Ses
23~28
2-7.
CHECKING
AND
ADJUSTING
THE
TAPE-TRANSPORT
SYSTEM
..........
0000s
eee
29~31
Reference
No.
WM-18674

1.
MECHANISM
DESCRIPTION
1-1.
MAIN
MECHANISM
COMPONENTS
AND
LAYOUT
DIAGRAM
(Figs.
1-1-1
and
1-1-2)
Loading
Motor
Full-width
erase
head
8g
RABIES
DCN
ASO
IEE
Impedance
roller
Bs
3
ii
=
avin
re
=
2.
o
os
Capstan
Motor
shaft
Leading
guide
Review
guide
(Supply-side)
lever
Leading
guide
(Take-up
side)
:
Loading
Brake
NI
Tape
Sensor
™
Back-Tension
lever
Brake
Band
Take-up
Reel
base
Supply
reel
base
Se
ee
ees
Soft
Brake
(Take-up
side)
Soft
Brake
(Supply
side)
Erase
Prevention
SW
Main
Brake
Idler
stopper
Roller
Assy.
Main
Brake
(Supply
side)
(Take-up
side)
Fig.
1-1-1
Mechanism
Assembly
Top
View
SR
main
changed
parts
compared
to
former
models
VHR-1100,
VHR-1300
and
VHR-1500.

Pulley
(Loading
Motor)
Small
belt
Two-step
Pulley
Large
Beit
Small
Pulley
eee
ress
tit
geal
|
Press-fit
gear
nae
a
(Supply
side)
1
Capstan
Motor
Large
Pulley
Capstat
belt
;
%
Two-step
gear
m
:
(small)
Two-step
gear
Main
Slide
Sector
gear
Solenoid
!
VA
(VHR-2500
|
i
x
¢
Sneeptaiar
‘
Momentary
Brake
'
Intermediate
gear
series
only)
Mode
Detection
switch
Review
gear
Main
slip
gear
POM.
Lever
Sub
slide
Momentary
Brake
slip
gear
Fig.
1-1-2
Mechanism
Assembly
Bottom
View

1-2.
OUTLINE
OF
MECHANISM
OPERATION
The
greatest
change
compared
to
former
models
(VHR-
1100,
VHR-1300
and
VHR-1500
series)
is
the
change
of
rotation
of
both
reel
bases
from
the
reel
motor
to
the
capstan
motor.
well
as
the
movement
of
both
guides,
the
transition
device
to
each
mode,
and
the
safety
device,
are
fundamentally
the
same
as
for
previous
models
(VHR-1100,
VHR-1300
and
VHR-1500
series),
so
their
description
is
omitted
here.
1-3.
DIFFERENCES
FROM
PREVIOUS
MODELS
(VHR-1100,
VHR-1300
and
VHR-1500
series)
There
are
five
points
which
are
different,
regarding
the
mechanism’s
main
components,
between
this
mechanism
and
that
of
former
models.
The
operation
of
those
components
is
described
below.
1-3-1.
Method
of
drive
transmission
of
both
reel
bases
By
using
this
mechanism,
the
reel
motor
is
eliminated,
and
the
rotation
of
the
capstan
is
transmitted
via
the
belt
to
the
main
slip
gear;
the
direction
of
reel
base
rotation
depends
upon
the
direction
of
rotation
of
the
capstan.
As
a
result,
it
can
be
seen
that
the
function
of
the
newly
added
main
slip
gear
is
very
important.
Figure
1-3-1
shows
the
rotation-transmission
system.
*Main
slip
gear:
The
slip
mechanism
functions
during
the
PLAY,
REC,
F/R-SEARCH
and
SLOW
modes.
In
other
words,
because
force
is
transmitted
from
the
pulley
gear
to
the
drive
gear
via
the
felt
for
slippage
during
these
modes,
the
rpm
of
the
drive
gear
is
caused
to
be
reduced
to
less
than
the
rpm
of
the
pulley
gear.
The
pulley
gear
and
the
drive
gear
are
locked
during
the
F-FWD
and
REW
modes,
with
the
result
that
the
rotation
of
the
pulley
gear
and
of
the
drive
gear
is
the
same
rotation.
*
Review
gear:
The
review
gear
is
engaged
with
the
main
slip
gear
during
the
R-SEARCH
mode.
Capstan
Motor
Main
slip
gear
Drive
gear
Pulley
gear
Supply,
Take-up
reel
base
Drive
gear
Felt
for
slippage
Pulley
gear
Roller
Assy.
Fig.
1-3-1

1-3-2.
Main
slip
gear
(Fig.
1-3-2(a)
and
Fig.
1-3-2(b))
The
main
slip
gear
is
composed
of
the
pulley
gear
and
the
drive
gear.
A
slip
mechanism
made
of
felt
is
incorporated
at
the
drive
gear
side.
Figure
1-3-2(a)
shows
the
ordinary
conditions
(PLAY,
REC,
F/R-SEARCH,
UNLOADING,
SLOW,
etc.).
When
the
capstan
motor
rotates
during
these
conditions,
the
pulley
gear
is
caused
to
be
driven,
and
thus
the
drive
gear
is
caused
to
be
driven
via
the
slip
mechanism.
Figure
1-3-2(b)
shows
the
fast
forward
and
rewind
condi-
tions.
The
FF
lever
is
caused
to
move
in
the-»direction
by
the
sub
slide
being
activated
in
the
loading
direction
by
the
movement
of
the
cam.
As
a
result
of
this
action,
the
spring
coil
located
between
the
FF
lever
and
the
direct
lever
is
caused
to
be
pulled,
with
the
result
that
the
lock
ring
is
caused
to
be
activated
in
the
lifting
direction.
As
a
result,
the
pulley
gear
and
the
drive
gear
are
caused
to
be
locked,
and,
when
the
capstan
motor
rotates,
the
pulley
gear
and
drive
gear
rotate
as
a
unified
component,
with
the
result
that
there
is
no
slippage.
Pulle
eet
a
ald
Main
slip
Spring
Direct
lever
Fig.
1-3-2(a)
Slip
condition
FF
lever
Direct
lever
Fig.
1-3-2(b)
Lock
condition
—4q—

1-3-3.
Review
gear
This
gear
functions
during
the
R-SSEARCH
mode.
Because
tape
take-up
during
the
R-SSEARCH
mode
is
via
the
drum,
a
stronger
rotation
(than
for
the
F-SEARCH
mode)
is
necessary.
Detection
Main
slide
(The
rotation
torque
during
the
F-SSEARCH
mode
is
70
+15g-cm,
and
during
the
RSSEARCH
mode
is
200
+30g-cm.)
For
this
reason,
the
review
gear
is
used
to
increase
the
rotation
torque
of
the
main
slip
gear
(pulley
gear
and
drive
gear).
Main
Slip
Gear
ee
ee
Review
gear
Moving
the
main
slide
from
PLAY
mode
©
to
R-SEARCH
mode@®.
Fig.
1-3-3
1-3-4,
Capstan
“soft’”’
braking
by
solenoid
(Fig.
1-3-4
VHR-2500
series
only)
The
“soft”
braking
is
switched
ON
during
the
SLOW
mode
and
the
STILL
mode.
The
capstan
motor
operates
under
intermittent
drive
conditions
during
the
SLOW
mode
and
the
STILL
mode.
In
order
to
stabilized
the
intermittent
drive
of
the
capstan
motor,
a
solenoid
is
used
to
apply
braking
to
the
capstan
motor.
Capstan
Motor
Capstan
soft
brake
Solenoid
The
voltage
applied
from
the
system-control
circuitry
to
both
terminals
of
the
solenoid
during
the
SLOW
mode
and
the
STILL
mode
is
13V.
1-3-5.
Loading
brake
(Fig.
1-3-5)
In
order
to
eliminate
tape
loosening
or
slack
during
the
loading
operation,
braking
is
applied
to
the
supply
reel
base
side
during
loading.
When
the
loading
operation
is
finished,
the
loading
brake
is
released.
Ue
j
ifn
gy
Nn
Pde
Loading
brake
Supply
reel
base
5
E
:
O
Idler
stopper

1-4.
MECHANISM
OPERATION
IN
EACH
MODE
a
ets
Capstan
Motor
Drum
Motor
Loading
Motor
(Table
cerns
Supply
|
Take-up
|Supply
|
Take-up
side
side
side
side
|
SoftBrake
|
Brake
Mode
Detection
Loading
Brake
(Supply
Reel
Base)
Position
ON
OFF
ON>OFF
ON
ON
PLAY/REC|
OFF
ON
OFF
|
OFF
(CW)
oan
F-SEARCH|
OFF
ON
OFF
|
OFF
(CW)
con
ON
REVERS
rite
ee.
bee
ac
ace
MORE
gee
lh
Ane
Rox
SLOW
(VHR-2500|
OFF
OFF
|
OFF
ON
OFF
OFF
series
only)
(cew)
ON
ON
ON>OFF
PAUSE
OFF
OFF
(ewocew)
coed
OFF
|
OFF
ata
ON
OFF
@)
ON
ON>OFF
EJECT
icw)
OFF
eewl
OFF OFF
ON
ON ON
OFF
OFF
Gd)
Notes:
1.
CW:
clockwise
CCW:
counterclockwise
The
rotation
of
the
front-loading,
reel,
capstan
and
drum
motors
is
as
seen
from
the
chassis
top,
and
the
rotation
of
the
loading
motor
is
a
seen
from
the
bottom
of
the
chassis.
ON/OFF
of
brakes:
ON:
Brake
is
applied
to
reel
base.
OFF:
Brake
is
not
applied
to
reel
base.
nS
Table
1-4-1

1-5,
OPERATION
IN
EACH
MODE
For
this
model,
both
ree!
bases
are
rotated
according
to
the
drive
by
the
capstan
motor.
As
a
result,
the
method
employed
for
transmission
of
the
rotation
of
both
reel
bases
has
been
changed
from
the
reel
motor
used
for
previous
models
(VHR-1100,
VHR-1300
and
VHR-1500
series)
to
the
capstan
motor.
Even
though
the
operation
for
each
mode
has
changed
from
the
reel
motor
to
the
capstan
motor,
the
movement
of
the
mechanism
is
fundamentally
the
same
as
for
previous
models.
1-5-1.
From
STOP
mode
to
PLAY
mode
CPLAY)
button
is
pressed.
Mode
Detect
SW
®@.
Head
Motor
100ps
PLA
Capstan
Motor:
RWO
|
12V
Lo.
Tape
Loading
Motor
‘aoe
Unto.
Main
brake
ro
100ms
The
movement
of
the
motor
and
brakes
during
the
follow-
ing
four
operations
is
described
by
timing
chart,
and
the
explanation
is
omitted
here.
(1)
From
STOP
mode
to
PLAY
mode
(2)
From
PLAY
mode
to
R-SEARCH
mode
(3)
From
REC
mode
to
REC
PAUSE
mode
(4)
From
STOP
mode
to
F-FWD
(REW)
mode
(5)
From
PLAY
mode
to
STOP
mode
Moving
the
Leading
guide
to
loading
direction.
PLAY
mode
(@!
Leo)
Y
Rotation
PLAY
Rotation
a
5SV
1
DY,
Cie
eS
SOS)
<r
(Supply
reel
base
side)
~{OFF
Soft
brake
(Supply
reel
base
side)
(
;
{ON
Loading
brake
;
\
'
Main
brake
fh
eo
(Take-up
ree!
base
aie
ggg
Sl
ae
es
i]
Soft
brake
1
rc,
Cr
(Take-up
reel
base
Sid@)
ope
pes
ee
ee
Review
brake
;
ON
a
SE
ae
ees
Table
1-5-1
Timing
chart
of
from
STOP
mode
to
PLAY
mode

1-5-2.
From
PLAY
mode
to
R-SEARCH
mode
button
is
pressed.
|
R-SEARCH
mode
Mode
Detect
SW
—_
Head
Motor
(i
Seen
i
f]
1
{
|
u
1
Capstan
Motor
sewo;
|
rt—“:;Cs*s*s*~C—C—C—s—~sdrSCSCidY
#RWO
|
PF
200s
ec
|
RVS
PLAY
Rotation
Lo.
300
psec
a
R-SEARCH
Rotation
Tape
Loading
Motor
p
g
5,
ee
Tl
Sonsec
Main
brake
Unlo.
5.5V
|
l
(Supply
reel
base
side)
—{OFF
Soft
brake
ON
(Supply
ree!
base
side)
(OFF
Loading
brake
—(oFF
Main
brake
ON
(Take-up
reel
base
side)
(FF
Soft
brake
$n
(Take-up
reel
base
side)
—{orrF
}p—-—
$$
ON
Review
brake
—(OFF
ec
eS
I
Table
1-5-2
Timing
chart
of
from
PLAY
mode
to
R-SEARCH
mode
1-5-3.
From
REC
mode
to
REC
PAUSE
mode
PAUSE/STILL)
button
is
pressed.
REC
PAUSE
mode
Mode
Detect
SW
Nn
Head
Motor
1
|
I
i
|
'
y
|
Capstan
Motor
+Fwol
Short
REV
{RWD
|
:
I.
12V
ry
+
|
tot
' 1
|
I
1
PLAY
Rotation
|
!
|
tol
i
l
! i
|
an)
[7]
sec
3
L
ri
ed
mate
:
|
Tape
Loading
Motor
¢}
>]
=
9°
=5.5V
5Opsec
-5.5V
Main
brake
(Supply
reel
base
side)
—{oFF
ae
Gree
ee
(Supply
reel
base
side)
—{OFF
Loading
brake
(FF
jp
Main
brake
(Take-up
reel
base
side)
—{OFF
|
Soft
brake
(Take-up
reel
base
side)
CN
a
evant
Se
ee
AREF
Si
Se
ae
Table
1-5-3
Timing
chart
of
from
REC
mode
to
REC
PAUSE
mode
—38—

1-5-4.
From
STOP
mode
to
F-FWD
mode
(See
Fig.
1-5-1,
Table
1-5-4)
When
the
FF
button
is
pressed
during
the
STOP
mode,
the
mode
changes
to
the
F-FWD
mode.
The
movement
of
the
main
gear
at
this
time
is
as
described
below.
As
a
result
of
the
movement
of
the
sub
slide
in
Fig.
1-5-1
in
the
direction
of
arrow
G),
the
FF
lever
is
caused
(by
the
hook
of
the
sub
slide)
to
move
in
the
direction
of
sub
slide
@.
Direct
lever
to
be
moved
in
the
perpendicular
up
direction
@
Review
gear
button
is
pressed.
Mode
Detect
SW
chs
@)
Head
Motor
Capstan
Motor
Tape
Loading
Motor
Main
brake
Soft
brake
Direct
Lever
F-FWD
(REW)mode
The
spring
located
between
the
FF
lever
and
the
direct
lever
is
thus
caused
to
be
pulled,
causing
the
direct
lever
to
be
moved
in
the
perpendicular
up
direction,
with
the
result
that
the
main
gear
@)
is
driven
directly.
At
the
same
time,
the
review
gear
is
caused
to
move
away
from
the
main
gear,
with
the
result
that
the
main
gear
rotates
at
high
speed.
F-F
Lever
Q+—
Sub
slide
Main
slip
gear
STOP
mode
'
.
psec
ON
FE
(Supply
reel
base
side)
—(OFF
)
|
(OFF
|
i
Loading
brake
|
|
|
Main
brake
on
(Take-up
reel
base
side)
|
Soft
brake
(Take-up
reel
base
side)
—{orF
)
oN
}-—
Review
brake
——{
OFF
oe
|
sa
cg
aaa
!
Table
1-5-4
Timing
chart
of
from
STOP
mode
to
F-FWD
(REW)
mode

1-5-5
From
PLAY
mode
to
STOP
mode
Moving
the
Leading
guide
to
unloading
direction.
STOP)
button
is
pressed.
STOP
mode
Mode
Detect
SW
Head
Motor
Main
brake
(Supply
reel
base
side)
—lorr
Soft
brake
(Supply
reel
base
side)
—OFF
Loading
brake
—{OFF
Main
brake
(Take-up
reel
base
side)
(FF
Soft
brake
(on
(Take-up
reel
base
side)
—{orr
}————
$$
:
ON
Review
brake
PE
Sa)
2
ESS
ED
aera
re
‘
Table
1-5-5
Timing
chart
of
from
PLAY
mode
to
STOP
mode
—10—

2.
MECHANISM
ADJUSTMENTS
2-1.
JIGS
AND
TOOLS
FOR
ADJUSTMENT
a
La
Cassette
stand
plate
gauge
VHJ-0001
Adjustment
of
reel
height
peed
Position
adjustment
gauge
VHJ-0013
Adjustment
of
back
tension
guide
(New)
es
Te
[eons
[vino
[ie
Te
|
eeesmeie
[vs
|
teen
ee
ee
a
ee
P|
ete
[vom
|
Attn
a
ca
Torque
gauge
driver
VHJ-0021
Adjustment
of
fixed
order
screw
Position
adjustment
gauge
VHJ-0024
Adjustment
of
tape
sensor
position
VHJ-0001
VHJ-0013
(New)
VJ-0017
.
:
No.
3
VHJ-0058,
VJ-0108
a=

VHJ-0004
VHJ-0008,
VHJ-0009,
VHJ-0020
(New
|
VHJ-0016
(New)
VHJ-0021
(New)
VHJ-0024
2-2.
STANDARD
MAINTENANCE
TIMETABLE
In
order
to
keep
the
VCR
in
peak
working
order,
care
for
the
parts
indicated
in
Table
2-2-1
at
the
periods
given.
SUPPLY
REEL
O
:
Cleaning
CO
:
Parts
replacement
Table
2-2-1
4
:
Lubrication
=

2-3.
CLEANING
2-3-1.
VIDEO
HEAD
(See
Fig.
7-3-1.)
(1)
Turn
off
the
power.
[Set
the
power
switch
to
the
OFF
position.
]
(2)
Move
the
video
head
drum
to
a
position
at
which
the
video
heads
are
easy
to
clean.
(3)
Wipe
each
head
several
times
with
the
deerskin
part
of
the
head
cleaning
stick.
If
the
heads
are
extremely
dirty,
wipe
more
times.
(Note)
@
When
pressing
a
finger
on
the
head
cleaning
stick
to
clean
the
heads,
do
not
press
too
hard.
e
Do
not
move
the
head
cleaning
stick
up
and
down
against
the
video
heads;
doing
so
will
damage
the
heads.
Cleaning
stick
2-3-2.
TAPE
PATH
Clean
the
surfaces
of
the
tape
guides
and
the
drum
tape
path
by
using
a
soft
cloth
or
cleaning
stick
moistened
with
an
alcohol.
(Note)
When
cleaning
the
drum
surfaces,
be
careful
not
to
contact
the
video
heads.
ae
ee
ae
2-3-3.
PINCH
ROLLER,
CAPSTAN,
SUPPLY
AND
TAKE-
UP
REEL
BASE
(1)
Using
a
soft
cloth
moistened
with
alcohol,
clean
the
surfaces
of
the
pinch
roller,
capstan,
supply
and
take-up
reel
base.
(2)
If
there
are
scratches
on
the
pinch
roller,
remove
the
E-ring
and
replace
the
pinch
roller
lever
assembly.
2-3-4.
CLEANING
THE
AUDIO/CONTROL
HEAD
AND
FULL-ERASE
HEAD
(See
Fig.
2-3-2,
2-3-3.)
Apply
alcohol
to
the
cleaning
stick,
and
move
the
cleaning
stick
against
the
heads
in
the
direction
of
the
head
gap.
Full-erase
head
Cleaning
stick
Fig.
2-3-2
Audio/control!
head
Cleaning
stick

2-4.
MECHANISM
REPAIR
AND
APRTS
REPLACEMENT
2-4-1.
BACK
TENSION
BRAKE
BAND
(See
Fig.
2-4-1.)
(1)
Remove
the
spring
(a).
(2)
Remove
the
screw
(b)
and
washers
(c),
and
then
remove
the
brake
band
and
backtension
lever.
(3)
Disconnect
the
brake
band
lever
from
the
back
tension
lever.
(4)
Install
the
new
brake
band
by
reversing
the
removal
procedure.
(Note)
Be
careful
not
to
crease
or
scratch
the
new
brake
band.
(5)
Adjust
the
position
of
the
back
tension
lever.
Back
tension
Brake
band
bracket
2-4-2.
FRONT
LOADING
MOTOR
(See
Fig.
2-4-2.)
(1)
Disconnect
the
MC-32
printed
circuit
board
from
the
solder
terminals
of
the
front
loading
motor.
(2)
Remove
the
front
loading
motor
belt.
(3)
Remove
the
screws
(a)
which
hold
the
front
loading
motor.
(4)
Replace
the
front
loading
motor,
and
install
it
in
the
reverse
order
of
removal.
MC-32
Printed
circuit
board
Front
loading
motor
—14—

2-4-3.
SUPPLY
REEL
BASE
(See
Fig.
2-4-3.)
(1)
Remove
the
fix
screw
of
brake
band.
(refer
to
Fig.
2-4-1)
(2)
Remove
the
spring
(a),
and
then
remove
the
supply
soft
brake.
(3)
Remove
the
washer
(b),
and
then
remove
the
main
srip
gear.
(4)
Remove
the
three
screws
(c),
and
then
remove
the
bracket
with
roller
assembly.
(5)
Remove
the
supply
reel
base.
(Note)
Be
careful
not
to
lose
the
height
adjustment
spacer.
(6)
Wipe
off
the
old
oil
from
the
reel
shaft
by
using
a
cloth
moistened
with
alcohol,
and
then
apply
a
small
amount
of
new
oil.
(7)
If
a
new
supply
reel
base
is
being
installed,
adjust
the
Supply
reel
base
Hight
adjustment
spacer
hg
reel
base
height.
Spring
eed
Supply
soft
brake
Roller
Assy.
Main
slip
gear
2-4-4.
TAKE-UP
REEL
BASE
(See
Fig.
2-4-3.)
(1)
Remove
the
one
screw
(c),
and
then
remove
the
bracket.
(2)
Remove
the
spring
(d),
and
then
remove
the
take-up
soft
brake.
(3)
Remove
the
take-up
reel
base.
(Note)
Be
careful
not
to
lose
the
height
adjustment
spacer.
(4)
Wipe
off
the
old
oil
from
the
reel
shaft
by
using
a
cloth
moistened
with
alcohol,
and
then
apply
a
small
amount
of
new
oil.
(5)
If
a
new
take-up
reel
base
is
being
installed,
adjust
the
reel
base
height.
Take-up
reel
base
Height
adjustment
spacer
oo
(d)
Take-up
soft
brake
Ge

2-4-5.
CAPSTAN
MOTOR
(See
Fig.
2-4-4.)
(1)
Disconnect
the
capstan
motor
connector.
(Note)
Be
sure
that
the
power
is
off
[the
power
switch
in
the
OFF
position}
when
connecting
or
disconnecting
the
connector.
(2)
Remove
the
screws
(a),
and
then
remove
the
bracket.
(3)
Remove
the
screws
(b)
securing
the
capstan
motor,
and
then
remove
the
motor.
(4)
Install
the
new
capstan
motor
by
using
the
reverse
order
of
the
removal
procedure.
Capstan
motor
Bracket
Fig.
2-4-4
2-4-6.
ROLLER
ASSEMBLY
(See
Fig.
2-4-5)
(1)
Remove
the
washer
(a),
and
than
remove
the
roller
assembly.
(2)
Install
the
new
roller
assembly
by
using
the
reverse
order
of
the
removal
procedure.
Washer
(a)
Roller
Assy.
—16—

2-4-7.
UPPER
DRUM
(See
Fig.
2-4-6.)
2-4-8.
DRUM
MOTOR
(See
Fig.
2-4-7.)
(Models
VHR-2100EX,
VHR-2300
EX,
G)
(Models
VHR-2100
EX,
VHR-2300
EX,
G)
(1)
Remove
the
screw
(a),
then
remove
the
brush.
(1)
Remove
the
screws
(a)
securing
the
rotor,
and
then
(2)
Remove
the
screws
(b)
which
hold
the
upper
drum,
remove
the
rotor.
and
than
remove
the
soldered
lead
wire.
(2)
Remove
the
screws
(b)
securing
the
stator,
and
then
(Note)
remove
the
stator.
Be
careful
to
the
solder
the
lead
wire
at
correct
position.
(3)
Install
the
new
drum
motor
by
using
the
reverse
order
(3)
Check
the
tape
path.
of
the
removal
procedure.
VIDEO
HEAD
LEAD
WIRE
POSITION
(TOP
VIEW)
RED
TUBE
(don’t
remove)
Yellow
lead
wire
Red
lead
wire
Brown
lead
wire
Yellow
lead
wire
BROWN
TUBE
Fig.
2-4-6
(Note)
Use
the
torque
gauge
screwdriver
(VHJ-0014)
for
installa-
tion
of
the
stator
and
rotor.
The
tightening
torque
of
the
stator
is
3kg-cm,
and
for
the
rotor
is
2kg-cm.
(When
installing,
first
tighten
to
a
tem-
porary
tighteness
and
then
tighten
to
the
specified
torque.)
=

2-4-9.
DRUM
ASSY.
(See
Fig.
2-4-8.)
(Models
VHR-2100
EX,
VHR-2300EX,
G)
(1)
Remove
the
screw
(a),
and
then
remove
the
brush.
(4)
Remove
the
screws
(c),
and
then
remove
the
drum
(2)
Remove
the
screws
(b),
and
then
remove
the
shield
assembly.
plate.
(Be
careful
not
contact
the
video
heads)
(3)
Remove
the
soldered
lead
wire
of
MC-30.
(5)
Install
the
new
drum
assembly
by
using
the
reverse
order
of
the
removal
procedures.
(b)
Shield
plate
Drum
Assy.
|
Q
ee
drum
rotaly
trans,
lead
a
install
position
P.C.B.
MC-30
(Black
marking)
(Black
marking)
eA
a
Green
wire
Red
wire
From
under
drum
Trans.
—18—

2-4-10.
UPPER
DRUM
(See
Fig.
2-4-9.)
Models
VHR-1110,
VHR-2100,
VHR-2300,
VHR-2500
series
and
VHR-1700M,
VHR-2350EE
except
models
VHR-2100EX,
VHR-2300EX,
G.
(1)
Remove
the
screws
(a)
which
hold
the
upper
drum,
and
then
remove
the
soldered
lead
wire.
(Note)
Be
careful
to
the
solder
the
lead
wire
at
the
correct
posi-
tion.
(2)
Check
the
tape
path.
VIDEO
HEAD
LEAD
WIRE
POSITION
[Top
view]
(Models:
VHR-1100,
VHR-2100,
VHR-2300
series
and
VHR-1700M,
VHR-2350EE
except
models
VHR-2100EX,
VHR-2300EX,
G)
Yellow
lead
wire
Red
lead
wire
(don’t
remove)
White
lead
wire
Yellow
lead
wire
(Models:
VHR-2500
series)
Red
lead
wire
Blue
lead
wire
Yellow
lead
wire
Upper
drum
Red
lead
wire
Red
lead
wire
White
lead
wire
Fig.
2-4-9
2-4-11.
DRUM
MOTOR
(See
Fig.
2-4-10.)
Models
VHR-1110,
VHR-2100,
VHR-2300,
VHR-2500
series
and
VHR-1700M,
VHR-2350EE
except
models
VHR-2100EX,
VHR-2300EX,
G.
(1)
Remove
the
screws
(a),
than
remove
the
brush.
(2)
Remove
the
screws
(b)
securing
the
rotor,
and
then
remove
the
rotor.
(3)
Remove
the
screws
(c)
securing
the
stator,
and
then
remove
the
stator.
(4)
Install
the
new
drum
motor
by
using
the
reverse
order
of
the
removal
procedure.
C
Speacer
————>-
(0
or
1)
Rotor
Fig.
2-4-10
(Note)
e
Use
the
torque
gauge
screwdriver
(VHJ-0014)
for
installa-
tion
of
the
stator
and
rotor.
The
tightening
torque
of
the
stator
is
3
kg-cm,
and
for
the
rotor
is
2
kg-cm.
(When
installing,
first
tighten
to
a
tempo-
rary
tighteness
and
then
tighten
to
the
specified
torque.)
This manual suits for next models
6
Table of contents
Other Sanyo VCR System manuals

Sanyo
Sanyo VHR-H601 User manual

Sanyo
Sanyo VHR-H530 User manual

Sanyo
Sanyo VHR-740 User manual

Sanyo
Sanyo SRT-612DC User manual

Sanyo
Sanyo VHR-650 User manual

Sanyo
Sanyo VHR-690 User manual

Sanyo
Sanyo VHR-490 User manual

Sanyo
Sanyo TLS-924 Manual

Sanyo
Sanyo SRT-7072 User manual

Sanyo
Sanyo TLS-9960 User manual

Sanyo
Sanyo VHR-690 User manual

Sanyo
Sanyo VHR-M261EV User manual

Sanyo
Sanyo TLS-9024P User manual

Sanyo
Sanyo VWM-950 User manual

Sanyo
Sanyo VHR-M439 User manual

Sanyo
Sanyo SRT-8040 User manual

Sanyo
Sanyo VHR-489SP User manual

Sanyo
Sanyo VHR-310 User manual

Sanyo
Sanyo VHR-M341 User manual

Sanyo
Sanyo VHR-590 User manual