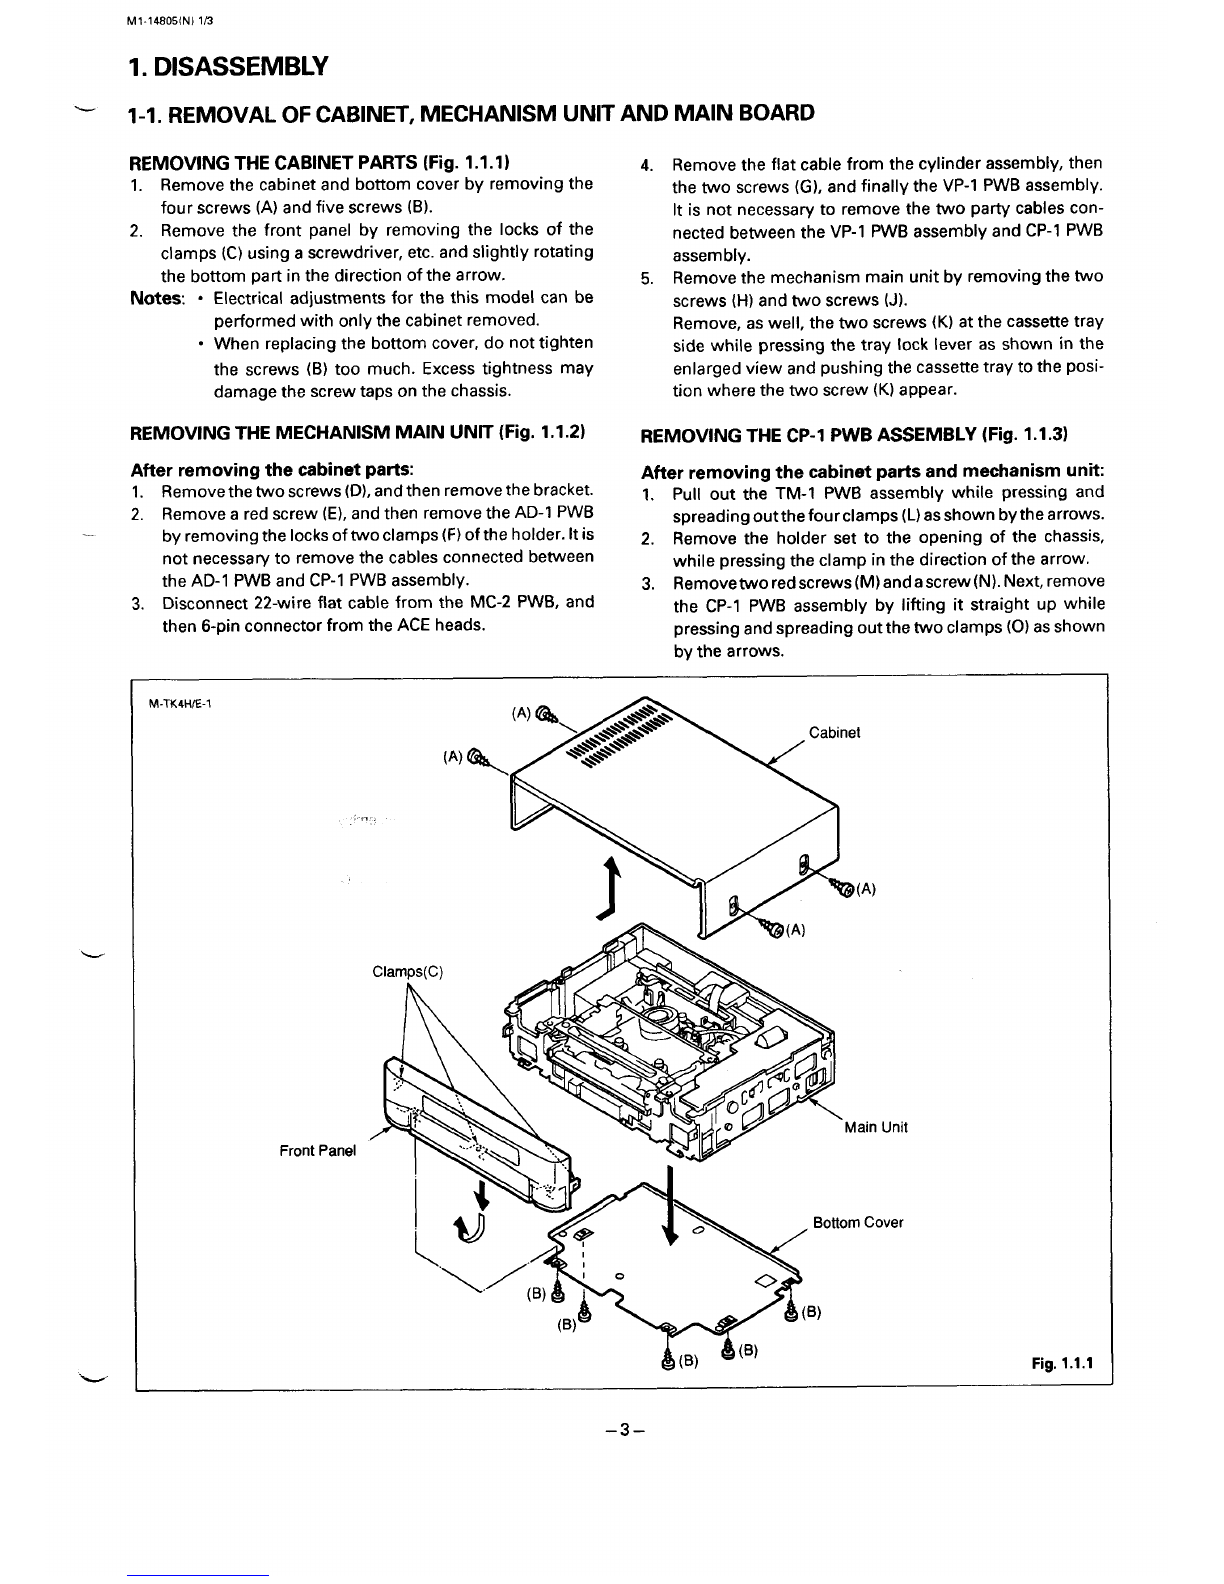
Sanyo VHR-490 User manual

FILE NO.
.-
SERVICE MANUAL
Video Cassette Recorder VHR-490
(New Zealand)
CONTENTS
SELF-DIAGNOSIS DISPLAY .., .........................2
I. DISASSEMBLY .....................................3
2. ELECTRICAL ADJUSTMENT .........................6
3. TEST POINT FOR TAPE PATH ADJUSTMENT .........14
4. PARTS LIST
“b ACCESSORIES ...................................15
PACKING MATERIALS .............................15
CABINET &CHASSIS PARTS ,......................15
MECHANISM PARTS ............, ..................16
ELECTRICAL PARTS ...............................19
CIRCUIT DIAGRAMS (Refer to the separate volume)
~] PAL
Please see other materials with Reference No.
given in table below.
Materials Model No. Reference No.
Mechanism
Manual
=
~‘RODucT‘AFETY‘OT’cE~
The components designated by asymbol (~)in this schematic diagrsm designates components whose value are of special significance
to product safety. Should any component designated by asymbol need to be replaced, use only the part designated in the Parts List.
Do not deviate from the resistance, wattage and voltage ratings shown.
NOTE: 1. Parts order must contain model number, part number and description.
2. Substitute parts may resupplied asthe service parts.
3. N.S. P.: Notavailable as service parts.
Design and specifications are subject to change without notice. .
TK4H/Nz14314s56 REFERENCE No. SM531382

PLwMECHA(l)1/1
SELF-DIAGNOSIS DISPLAY
This unit displays the results of the self-diagnosis it carries out in two digits on the front panel indicator when problems occur.
Although these digits will only roughly tell you what kind of problems have occurred, use them when servicing the unit.
1, Displaying the Self-Diagnosis Results
●Press the STOP button for about 10 seconds continuously. Two digits (see below) showing the results of the self-diagnosis
will be displayed for three seconds at the hours part of the timer. All other parts of the timer will go off. The time will
automatically return after the three seconds.
●If no mechanism unit problems have occurred up to now, “00” will be displayed.
E
,1-, ,,; ;;j
Self-diagnosis digits
2. Self-Diagnosis Results
F
No,
01
02
Problem Main Possible Cause Mechanism Operations and
State After Occurrence
Shifts to the STOP mode.
The cylinder motor does not rotate. ●The cylinder motor isfaulty.
●The controlofthe cylinder motor is
faulty.
●Thetapewindsaround thecylinder. w
d
The take-up reel does not rotate. ●The take-up reel is caught.
●Tha belt is faulty.
●The take-up torque has decreased.
●The capstan motor is faulty.
●The control of the capstan motor is
faulty.
Shifts to tha STOP mode.
F
03
04
The capstan motor does not rotate. Shifts to the STOP mode.
The tape cannot be loaded with the
cassette inserted.
(But unloading can be performed.)
●Error in the operations of the tape
loading mechanism.
●Foreign particles in the tape load-
ing mechanism.
●The tape end sensor is faulty.
●The reel brake of the tape cassetta
has not been released.
●The tape guide is caught.
●The loading motor is faulty.
●The control of the loading motor is
faulty.
Unloads, shifts to the INITIAL mode,
and the power goes off.
F
05
06
The power is forcibly turned off with the
mechanism at its current position.
Tape loading and unloading cannot be
performed with tha cassetta inserted.
Front unloading cannot be performed
when ejecting the cassette.
(Front loading can be performed.)
●The cassette holder mechanism is
faulty.
●The front door is caught.
Front loads and shifk to tha STOP or
INITIAL mode.
When the power switch is turned on
before eject operations:
Shifts to the STOP mode.
When the power switch is turned off
before eject operations:
Shifts to the INITIAL mode and
the power goes off.
The power isforciblyturned offwith the
mechanism at itscurrent position.
07
08
09
Front loading and front unloading
cannot be performad when ejecting
tha cassette.
●The tape cassette is caught in the
cassette holder mechanism.
●The gears of the front loading
drive mechanism heve not en-
craged rxoDerlv.
The power is forcibly turned off with
the mechanism at its current position.
The machanism becomes 1(BRAKE)
while moving from 2(STOP, FF/REW),
3(STILL), 4(PLAY), and to 5(IDLER).
The mechanism becomes 7(INITIAL)
while moving from 1(BRAKE), 2(STOP,
FF/REW), 3(STILL), 4(PLAY), and to 5
(IDLER).
●The mechanism position switch
contact is faulty.
●The mechanism position switch
contact is faulty. Carries out tape take-up operations,
shifts to the INITIAL mods, and the
power goes off.
Note: For details of mechanism operations corresponding to the mechanism positions of the self-diagnosis numbers 08 and
09 above, refer to the separate volume on the mechanism manual. These manual reference numbers are ahown in the
cover.
–2–

Ml 14805(N)1/3
1. DISASSEMBLY
-I-I .REMOVAL OF CABINET, MECHANISM UNIT AND MAIN BOARD
REMOVING THE CABINETPARTS(Fig. 1.1 .1) 4.
1. Remove the cabinet and bottom cover by removing the
four screws (A) and five screws (B).
2. Remove the front panel by removing the locks of the
clamps (C) using ascrewdriver, etc. and slightly rotating
the bottom part in the direction of the arrow. 5.
Notes ●Electrical adjustments for the this model can be
performed with only the cabinet removed.
●When replacing the bottom cover, do not tighten
the screws (B) too much. Excess tightness may
damage the screw taps on the chassis.
Remove the flat cable from the cylinder assembly, then
the two screws (G), and finally the VP-1 PWB assembly.
It is not necessary to remove the two party cables con-
nected between the VP-1 PWB assembly and CP-I PWB
assembly.
Remove the mechanism main unit by removing the two
screws (H) and two screws (J).
Remove, as well, the two screws (K) at the cassette tray
side while pressing the tray lock lever as shown in the
enlarged view and pushing the cassette tray to the posi-
tion where the two screw (K) appear.
REMOVING THE MECHANISM MAIN UNIT (Fig. 1.1 .2) REMOVING THE CP-1 PWB ASSEMBLY (Fig. 1.1 .3)
After removing the cabinet parts:
1. Remove the two screws (D), and then remove the bracket.
2. Remove ared screw (E), and then remove the AD-1 PWB
by removing the locks of two clamps (F) of the holder. It is
not necessary to remove the cables connected between
the AD-1 PWB and CP-I PWB assembly.
3. Disconnect 22-wire flat cable from the MC-2 PWB, and
then 6-pin connector from the ACE heads.
After removing the cabinet parts and mechanism unit:
1. Pull out the TM-1 PWB assembly while pressing and
spreading outthefourclamps (L) as shown by the arrows.
2. Remove the holder set to the opening of the chassis,
while pressing the clamp in the direction of the arrow.
3. Remove two red screws (M) andascrew(N). Next, remove
the CP-I PWB assembly by lifting it straight up while
pressing and spreading out the two clamps (0) as shown
by the arrows.
M-TK4HE-1 (A)@\
(A)\
.,,-,
%\fil
Clamps(C) &s
Front Panel ‘kJ$.\\
km/Al
Fig. 1.1.1
–3–

M1-14805(N)2/3
M-TK4HiE-2 S(D) VP-1 PVVB Assembly
‘‘Bracke<@(D)~ ~“;~WFlatCable!(E)
Tray 1
.ockLever
Cassette Tray
‘,lst,able-%~=
ACE Hea
1- 1
ICla~ps(F)
Main Unit
Fig. 1.1.2
M .TK4H/E3
CP-1
Socket of ACE Heads
MechanismMain Unit\
4
CassetteHolder
KCN811
/
*
MC-2 PWB
L- VP.-I PWB Assembly
22-wire Flat Cable
/
TM-8
PWB Assembl
TM-1 P
Clamps
Chassis
Fig. 1.1.3
–4–
—
4’

MI-14856(N)3i3
TEMPORARILY SEITING UP AND CONNECTING MAIN PWB ASSEMBLY
The following is an example of how to place and connect the main PWB not requiring ajig, when repairing the
CP-1 PWB assembly (Fig. 1.1.4)
1.
P2.
3.
—
Place the mechanism main unit at the fixed position on 4. Place the CP-I PWB assembly above the mechanism
the chassis. main unit along the cassette holder. Insert the tip (P) of
Insert the VP-1 PWB assembly at the fixed position of the terminal board into the opening (Q) at the side of the
the mechanism unit and connect the flat cable of the chassis, as shown in the enlarge view.
cylinder assembly.
Connect 22-wire flat cable to the MC-2 PWB ,and 6-pin
connector to the socket of the ACE heads.
L
L
M-TK4H/E-4 CP-I PWB Assembly
Assembly
(P)
6-pin connector MC~2 PWB Fig. 1.1.4
1-2, MAIN CIRCUIT BOARD
L-TK4H/Nz
Shield Case
(Power Supply Part) rVP-1 PWB Assembly
TM.
Unit)
Unit
-CP-I PWB
Fig. 1.2.1
–5-

S1-14B56(N)1/2
2. ELECTRICALADJUSTMENT
PREPARATION
This VCR need 3basic presetting by using the menus displayed on-screen.
After all connection have been made, then follow steps 1to 3to preset the VCR.
The 3presetting steps will be displayed in sequence on TV screen. The setting are entered with the remote control.
Turn on the VCR
1. Adjusting the TV receiver to the video channel: The WELCOME screen will appear. When the video channel has been preset,
press the OK button on the remote control.
2. Language selection: Select the desired language, then press the OK button.
3. Tuning control adjustments: When the channel position has been preset, press the MENLUTV button.
When steps 1to 3have been finish, ready to operate the ail operating mode.
2-1. SERVO CIRCUIT ADJUSTMENT
.These adjustments should be carried out upon completion of the tape transpo~ adjustments.
●If the tape transport adjustments (except the tilt adjustment) are carried out after these adjustments, follow the procedures
again in Section 2-1-3. SWITCHING POSITION ADJ.
.When acassette tape is loaded, auto-tracking will be set immediately after starting the first playback. As this will deviate the
tracking center set, be sure to press the channel buttons (+) or (-) once directly after starting playback to prevent auto-tracking
from being set. w
2-1-1. TEST EQUIPMENT AND STANDARDS REQUIRED
Oscilloscope Vertical sensitivi~ 5mV/DIV, external trigger
Band width: more than 10 MHz I
Alignment Tape VHJ-0009 or VHJ-0023: SP mode, monoscope, 6KHz I
IBlank Tape IVHS-type cassette tape I
IMonitor TV I I
+
2-1-2. LOCATION OF ADJUSTMENT POINTS
PlB24300B-Sl/4
\
o
.................
a!,.., Iclol ~
o
:...:
Iclll
0“ .
/...,
;
“!
:..0.;:i
VR351 ~i
SW-P ; j
::
:: c
::
::
TN-5 PWB ~~
ii
::
,.:
,------,
[
.,
Iu-Irwu
:........................V.OUT
CP-1 PWB (FOIL SIDE)
s-
Fig. 2.1.1
“d
–6–

SI-14S05(N)2/2
P1B25800B-S1
DI
o
VP-1 PWB Assembly Fig. 2.1.2
Note:
.Self-recording means “Record any broadcasting or video
.signal and play back the just-recorded portion”.
2-1-3. SWITCHING POSITION ADJ.
‘w
IMeasuring point
TPIOI
(VIDEO OUT)
TP183 (SW-P)
Measuring Equipment ADJ. Condition
Oscilloscope PLAY mode
Alignment tape
(VHJ-0009 or
VHJ-0023)
ADJ. Location ADJ. Value
VR351 (SW-P) 6.5 Hf0.5 H
1. Set the tracking control position to the center by pressing
CHANNEL buttons (+) and (-) simultaneously.
(Tracking center position is displayed on the indicator
panel as shown “T -:- “)
2. Adjust VR351 (SW-P) so that the width”~ becomes 6.5 H
~0.5 Has shown in Fig. 2.1.3.
WS.SWP
T= 6.5 Ht0.5 H
P+
M&fl””u,,
Front edge of
Ivertical sync signal
\t
Rise RF. SW. PULSE
Fig. 2.1.3
2-1-4. SLOW TRACKING ADJ.
~
Measuring Point Maasuring Equipment
Broadcasting
Monitor
I
ADJ. Condition
Self-recording
(SP mode)
SLOW mode
Blank tape
.————-————-.
Self-recording
(LP mode)
SLOW mode
Blank tape
AW. Location ADJ. Value
CHANNEL (+) button —
CHANNEL (-) button
1.
2.
3.
4.
5
6.
Set the tracking control to the center position by pressing
CHANNEL buttons (+) and (-) simuhaneouslY.
(Tracking center position is displayed on the indicator
panel as shown “T -:- “)
Play back the self-recoreded portion and set the VCR in
the SLOW mode with the remote control unit.
Confirm that there is no noise on the slow playback
display.
Press the CHANNEL button (+) about three times and
check that noise dose not appear at the upper part of the
display.
Adjust the tracking control to the center again.
Press the CHANNEL button (-) the same number of times
as in the step 4(about three times) and check that noise
dose not appear at the lower part of the display.
Notes
●CHANNEL button also servers as TRACKING button.
.When the CHANNEL button is released, after afew
seconds, the display on the indicator is turned to time
display.
–7–

VI 14805{N)l/4
2-2. VIDEO CIRCUIT ADJUSTMENT
●Before making the following adjustments, Section 2-1. SERVO CIRCUIT ADJUSTMENT should be completed.
.Use the relay jig to provide simple adjustment of the VP-1 PWB assembly.
2-2-1. TEST EQUIPMENT AND STANDARDS REQUIRED
Color Bar Signal Generator PAL Color bar signel with 100’%.white level (EBU color barsignel)
Oscilloscope Vertical sensitivity: 5mV/DIV, external trigger
Band width: more than 10 MHz
Digital Voltmeter DC range
Alignment Tape VHJ-0008 or VHJ-0023: SP mode, color bar, 1kHz
(Color bar signal waveform is described below. Refer to Fig. 2.2.1)
Blank Tape VHS-type cassette tape
Oscilloscope Probe Input capacity: less than 25 pF (10:1)
less than 40 pF (1:1)
Covering frequency: DC -40 MHz (10:1)
DC-30 MHZ(1:I)
Frequency Counter 8significant digits
Adjustment Relay Jig VHJ-0067: 12-wire flat cable for VP-1 PWB Assembly
ALIGNMENT TAPE COLOR BAR SIGNAL
WPV-TCS
I07WJ-P
lvp-p IPIll-.
‘H.Sync Signal
COLOR BAR SIGNAL WAVEFORM (VHJ-0008)
Fig. 2.2.1
WPV-TCP
w
m
03 z
.= so
co~al
3~$gg$:
(75%)
vu 100%
White Black
COLOR BAR PATTERN (VHJ-0008) ON MONITOR TV
Fig. 2.2.2
2-2-2. ADJUSTMENT RELAY JIG
Connect the flat cable end from the cylinder assembly to the
VP-1 PWB assembly using the relay jig to provide simple
repairing and adjustment of the VP-1 PWB assembly, as
shown in Fig. 2.2.3. Further, when adjusting the VP-1 PWB
assembly, be sure to make contact an end of shield case with
bracket of the VP-1 PWB assembly to maintain the shield
effect. If the VP-1 PWB assembly does not contact, there is
insufficient ground and no proper play back image can be
obtained.
WPV-TK4HE
Bracket _
T-w7P v~-1 PWB Assembly
\
F&$
Fig. 2.2.3
–8–

VI-14656(N)2/4
2-2-3. LOCATION OF ADJUSTMENT POINTS
L
-
P1B256WB-V1
TP182~
TP183 m
TP181 IREC CURRENT]
Shield case
o
VP-1 PWB Assembly Fig. 2.2.4
PlB24300B-Vl/4
t‘o uoc1 0“ *
.-
,....,
... :e: :
1..’ ...
1r) $..,.
.. ..
..... VR351 [
IC602 SW-P :
#
IC351
3
................
POWER
SUPPLY
PART
..................
IC301 TN-5 PWB ~
:-
:-
::
::
:.
:J
Iclol :....-:
#
::
:...:
ICI11
VRI04 IC302
“’62 VR102 “DEV
CTI 20 ~A:c /0
Vco :&j IC161 <
............,
,. ..:;---:i~--i~ ---: TP103 ‘.------. ”.-’ Tuner/lF/R
.?Y
,..-.:.,.?-;:,6?: o
!;p;o:’”’::~;;~3v~oT~pwBu!:’’’’:::’
.; V.OUT CAR PB-Y ~
.,
.,
Conv
...... (
;C
.......
CP-I PWB (FOIL SIDE) Fig. 2.2.5
–9–

V1-14SOO(N)3/4
Notes:
●Self-recording means “Record the video signal and play
back the just-recorded portion”.
●Connect the monitor TV to the VIDEO OUTPUT terminal,
before making following adjustments.
2-2-4. AGC LEVEL ADJ.
Measuring Point Measuring Equipment AIM, Condition
TP102 Color bar generator E-E mode
Oscilloscope
(10:1 probe)
ADJ. Location ADJ. Value
WPV-PBY White
1Vp-p f
~IH+F@ 2.2.7
I
2-2-6. CARRIER SET ADJ.
VRI02 (AGC) 0.5 Vp-P ?0.025 VP-P
1. Connect the color bar generator to the VIDEO INPUT
terminal.
2. Adjust VRI02 (AGC) for O.5Vp-p+O.025Vp-p as shown in
Fig. 2.2.6.
WPV-AGC 100’% White
+
0.5 Vp-p *0.025 Vp-p
Lr
Fig. 2.2.6
2-2-5. PB-Y LEVEL ADJ.
Measuring Point Measuring Equipment ADJ. Condition
TPIO1 Oscilloscope PLAY (SP) mode
(10:1 probe) Alignment tape
(VHJ-0008 or
VHJ-0023)
AQJ. Location ADJ. Value
IVRIOI (PB-Y) I1Vp-p f0.05 Vp-p /
1. Terminate the VIDEO OUTPUT terminal with a75f2
resistor.
2. Adjust VRIOI (PB-Y) for the video luminance signal level
of 1Vp-p f0.05 Vp-p. (Refer to Fig. 2.2.7)
Measuring Point Measuring Equipment ADJ. Condition
TPI03 Color bar generator REC (SP) mode
Frequency counter
ADJ. Location ADJ, Value
VRI03 (CAR) 3.83 MHz *0.05 MHz u
1.
2.
Connect the color bar generator to the VIDEO INPUT
terminal.
After removing the first color bar signal input from the
video input terminal, immediately adjust VRI03 (CAR) so
that the frequency becomes 3,83 MHz f0.05 MHz.
2-2-7. DEVIATION ADJ.
~
Measuring Point Measuring Equipment ADJ. Condition
ADJ. Location ADJ. Value
VRI04 (DEV) 1Vp-p to.05vp-p
1. Record the color bar signal on the blank tape.
2. Play back of the just-recorded portion.
3. Adjust VRI04 (DEV) for 1Vp-p f0.05 Vp-p as shown in
Fig. 2.2.8.
4. If the adjustment value is not satisfactory, adjust VRI04
(DEV) and repeat steps 2to 3.
WPV-OEV
O% White
1Vp-p
#
~lH~ Fig. 2.2.8
–1o-

v1-14805(N)4/4
2-2-8. CREC CURRENT ADJ.
Measuring Point Measuring Equipment ADJ. Condition
TP181 Color bar generator REC (SP) mode
(on VP-1 PWB) Oscilloscope Blank tape
(1:1 probe)
ALU Location ADJ. Value
VR181 (REC-C) 150 mVp-p * 5 mVp-p
1. Connect the ground of the oscilloscope totheshield case
of the VP-1 PWB assembly.
2. Adjust VR182 (REC-Y) for the minimum video luminance
signal level.
3. Adjust VR181 (REC-C) so that the video chrominance
signal level is 150 mVpp f5mVp-p. (Refer to Fig. 2.2.9)
WWCREC
150 mVp-p
Fig. 2.2.9
2-2-9. YREC CURRENT ADJ.
Measuring Point Measuring Equipment
TP181 Color bar generator
(on W-1 PwB) Oscilloscope
(1:1probe)
,
ALU Condition
Recode
Blank tape
LIADJ. Location IAIXL Value
VR182 (REC-Y) 470 mVp-p *10 mVp-p
1.
2.
Connect the ground of the oscilloscope to the shield case
of the VP-1 PWB assembly.
Adjust VR182 (REC-Y) so that the video luminance signal
level at the sync tip is 470 mVp-p *10 mVp-p. (Refer to
Fig. 2.2.10)
-YREC
mVp-p
Sy~c Tip Fig. 2.2.10
2-2-10. VCO (on screen assist) ADJ.
1II(
Measuring Point Measuring Equipment ADJ. Condition
TP120 Color bar generator E-E mode
Digital voltmeter
ADJ. Location ADJ. Value
CT120 (VCO) 2.5 Vk 0.3 V
1. Connect the digital voltmeter (DC range) to TP120 and
GND.
2. Adjust CT120 (VCO) so that the voltage is 2,5 V10.3 V.
–11–

A1-14805(N)1/2
2-3. AUDIO CIRCUIT ADJUSTMENT
.Before making these adjustments, (especially, the tape
guide height and audio control erase head height adjust-
ments) should be carried out, so that the tape traveling
between the loading guide pole and the audio control
erase head runs without fluttering, twisting, curling.
2-3-1. TEST EQUIPMENT AND STANDARDS REQUIRED
.Before making these adjustments, Section 2-1. SERVO
and Section 2-2. VIDEO circuit adjustments should be
carried out.
Oscilloscope
AC Voltmeter
Frequency Counter
Blank Tape
Vertical sensitivity :10 mV/DIV
Band width :more than 30 MHz
Effective value indication
Input frequency :10 HZ -20 kHz
Input Impedance :more than 1MQ
Measurement level :lmV (full scale)
Input frequency :20 Hz -10 MHz
VHS-tvDe cassette taDe
2-3-2. LOCATION OF ADJUSTMENT POINTS
P1BZS1OOC-A1
IC231
“---:VR233
TP233c@: ~-FO
.....
VR234 :~‘; o
R-FO i.-.’
TP;34 n
TP211
●
TP2?2
(GND)
@
..-...
VR201
BIAS
AD-1 PWB (FOIL SIDE) Fig. 2.3.1
.
–12–

A1-14805(N)2/2
AUDIO NORMAL CIRCUIT
Notes:
w●Set the following switch or On-screen menu to the posi-
tions indicated below, before making following adjust-
ments.
SWfTCH or ON-SCREEN MENU POSITION
TAPE SPEED (Remote control) SP
O/AV (Remote control) AV
AV (SYSTEM SETTING menu) AVI
AUDIO (SYSTEM SEITING menu) MONO
To select AV and AUDIO mode
1. Press the MENWTV button on the remote control, the
MAIN MENU appears.
2. “MODEm is selected, then press the OK button. MODE
SEITING menu will appear.
3. “SYSTEM” is selected, then press the OK button.
RECORDING AND PlAYBACK SYSTEM SETTING menu
—will appear.
4. ‘AV” :“AVI” and “AUDIO’ :“MONO” are selected, press
the OK button.
.Self- recording means “Record the AUDIO signal and play
back the just-recorded portion.
2-3-3. BIAS LEVEL ADJ.
m
Measuring Point Measuring Equipment 3
ADJ. Condition
REC (SP) mode
Blank tape
ADJ. Location ADJ. Value
VR201 (BIAS) 24 mVrms
1. Load the VCR with ablank tape and select the REC (SP)
mode without all incoming signal.
2. After confirming on the oscilloscope that a 70 kHz *5kHz
sine wave is being output, adjust VR201 (BIAS) so that the
AC voltmeter’s reading is 24 mVrms.
AUDIO FM (Hi-Fi) CIRCUIT
Notes:
.Before making these adjustments, check that the surface
of the parts touching the tape such as the A-FM head or
guides are clean.
●Set the following switch or On-screen menu to the posi-
tions indicated below, before making following adjust-
ments.
SWITCH or ON-SCREEN MENU POSITION
TAPE SPEED (Remote control) SP
O/AV (Remote control) AV
AV (SYSTEM SEITl NG menu) AVI
AUDIO (SYSTEM SEITING menu) ST
To select AV and AUDIO mode
1. Press the MENU/TV button on the remote control, the
MAIN MENU appears.
2. “MODE’ is selected, then press the OK button. MODE
SEITING menu will appear.
3. ‘SYSTEM- is selected, then press the OK button.
RECORDING AND PLAYBACK SYSTEM SEITING menu
will appear.
4. ‘AVg :‘AVI”, “AUDIO” :“ST” are selected, press the OK
button.
2-3-4. A-FM CARRIER FREQUENCY ADJ.
Measuring Point Measuring Equipment ADJ. Condition
TP233 (1.4 MHz) Frequency counter REC (SP) mode
TP234 (1.8 MHz) Blank tape
ADJ. Location ADJ. Value
VR233 (L-FO) 1.4 MHz +4/-8 kHz
— — ———. _— _—— ___
VR;34;R-FO) 1.8 MHz +4/-8 kHz
1.
2.
3.
Connect afrequency counter to TP233 (Lch), TP234 (Rch)
and ground.
Adjust VR233 (L-FO) so that in the zero level signal status
the frequency at TP233 becomes 1.4MHz +41-6 kHz.
Adjust VR234 (R-FO) so that in the zero level signal status
the frequency at TP234 becomes 1.8MHz +4/-6 kHz.
–13–

T TK4H/NZ(N)1/1
2-4. TUNER AND IF CIRCUITS ADJUSTMENT
.When any malfunction occurs in the TUNER circuit the
whole unit must be replaced.
.An adjustment of the IF circuit is shown as follows.
2-4-1. TEST EQUIPMENT AND STANDARD REQUIRED
Monitor TV
Note: The TUNER unit does not need any adjustments,
because precise adjustments have been performed
before shipment.
2-4-2. LOCATION OF ADJUSTMENT POINT 2-4-3. RF AGC ADJ.
PPFUSO03.3-R1
7L
[
VR (RF AGC) A..
Tuner/lF/FfF
Conv. Unit 4(
Rear Panel
CP-I PWB
IF UNIT(PARTS SIDE) Fig. 2.4.1
Measuring Point IMeasuring Equipment IADJ. Condition
Picture of Monitor TV E-E mode
monitor TV
ADJ. Location IADJ. Value
VR (RF AGC) S/N is best point
(on the IF circuit)
1.
2.
3.
4.
Connect the monitor TV to VHF/UHF ANTENNA OUTPUT -
terminal.
Connect the VHF antenna to VHF/UHF ANTENNA INPUT
terminal.
Receive the middle electrical field (70 dB~ -90 dB~) of the
VHF high channel, and slowly turn VR (RF AGC) from the
point where snow-noise is present to the point where it
just disappears from the monitor TV.
Confirm bymonitorlVthat there is no beat and saturation
(SIN is best point) when receiving any TV channel.
3. TEST POINT FOR TAPE PATHADJUSTMENT
Test point TP182 (ENV) and TP183 (SW-P) for tape path adjustment is shown in Figure below.
For adjustment, refer to the Mechanism Service Technical lnformation(WM-530599 and MS531346).
P1B36800B-T3 .,.’
!,
.,, -
TP182 ~] .
TP183 ~]
TP181 IREC ~1
Shieldcase
VP-1 PWB Assembly Fig.3.1
–14–

4. PARTS LIST
LOCOTION P9RTS NO.
ACCESSijRIES
645002 7482
613 1453227
613 1S69720
6130966773
OR 613011 7359
OR 613 132 6132
OR 613 132 5975
A6450027642
DESCRIPTION
REMOCON(WITH COVER BATTERY)
COVER BATTERY(FOR REMOCON)
INSTRUCTION MANUAL
COBLE,r)NT
CORD
C(+BLE,r4NT
CORO
CORO,POWER
*%***x***************************************************%*****
PACKINGilATERIALS
613 157 5059 CARTONCASE
613 150 2277 CUSHION,FRDNT
613 150 2284 CUSH1ON,BACK
613099 1768 POLYECOVER,INNER-K
LOCATION PORTS NO.
CABNET&CHASSISPARTS
CH-1 411 1370007
CH-2 411 021 7907
CH-3 613 1548015
CH-4 411 0477509
CH-5 4120289406
CH-6 613 1407015
CH-7 411 021 3800
CH-8 613 1569669
CH-10 613 157 5110
CH- 11 6450046025
CH-12 613 1545281
CH-14 613 121 1001
CH-15 613 1532465
CH- 16 613 1574830
CH-17 613 140 7459
CH-18 613 1584037
CH-19 613 1450707
CH-20 613 1392182
CH-21 613 157 43?7
CH-22 613 1573970
DESCRIPTION
SCR L-TPG BIN 3X1O
SCR S-TPG BIN 4X12
COMPL PWB,VP-1
SCR PAN+FLG 3X6
SPECIhL SCREW
COVER TOP
SCR S-TPG BIN 3X1O
TERMINAL
COMPL PWB,CP- 1-h
TUNER, RF/TU/IF
COMPL PWB,TN-5
ST9N0, FELT, FRONT
COMPL PWB.TM-1
000R ChSSETTE
SPRING
IYSSY.Ci)BINET FRONT
STQNO ,BACK
COUER BOTTOM
COMPL PWB,TB- 1
COMPL PWB,AO- 1
Undesignated numeral shows
Location No.: CH-
N.S.P.:Not available as service parts
L
+-1
4-X3
Mech’anlamyr>
17
–15–

MECHANISM PARTS
LOCATION PARTS NO.
MECHANISMPARTS1
DR-1
DR-2
DR-3
DR-4
OR-5
OR-6
OR-7
OR-8
OR-9
OR
DR-10
OR
OR-1 1
OR-12
MB-1
MB-2
MB-3
MB-4
MB-5
MB-6
MB-7
MB-8
MB-9
MB-10
MB-11
MB-12
MB-13
MB-14
MB-15
MB-16
MB-17
MB-18
MB-19
MB-20
MB-21
MB-22
MB-23
MB-24
OR
MB-28
MB-29
MB-30
MB-31
MB-32
MB-33
MB-34
MB-35
MB-36
MB-37
MB-38
MB-39
MB-40
MB-41
MB-42
MB-43
MB-44
OR
MB-45
MB-46
MB-47
MB-48
MB-49
MB-50
MB-51
MB-52
MB-53
6130975355
411 038 1608
6130975362
6130959881
613097 2170
6130889072
411 047 7509
411 047 5000
613 1323520
6130857279
411 044 8301
411 0449209
6130224019
411 044 9001
613 1234802
6130533227
613 1234970
411 004 5302
613 1239418
613 1528079
613021 9800
411 1092008
613022 1797
613 1445741
613 110 1692
4120158207
411 1200007
613 1203631
613022 1582
6130949240
613022 1575
6130222725
6130222534
613094 1206
613 1342910
411 0468002
411 0232801
411 0233303
411 021 3107
613077 3227
6130270382
6130788320
613 117 0599
6130939159
6130938374
6130773616
613 121 9960
6130929945
613 1328075
613 1535107
613 1100374
411 126 5303
6130929921
6130925985
6130925992
6130925886
613 1388628
6130270627
6130929938
6130222985
412 0334106
6130773579
613 1029293
613022 1568
6130220158
613 1479951
DESCRIPTION
COMPL,CYLINOER>4H6P-R
SCR PAN+W 3X8
ASSY,CYLINDER,UPR 4H6P-R
ASSY,CYLINDER,LWR 6K
SPACER,MOTOR 0.3T
BASE,CYLINDER
SCR PAN+FLG 3X6
SCR PAN+FLG 2.6X8
STATOR,MOTOR CYL
STATOR,MOTOR CYL
SCR PAN+SW 2.3X1O
SCR PAN+SW 2.3X8
ROTOR,MOTOR CYL
SCR PAN+SW 2.3X6
SLEEVE
SPECIAL WASHER
TAPE GUIOE
NUT HEX (3)
CAP
SLIDE,ACT PINCH
ASSY,LEUER,CAM PINCH
WASHER Y 3.1X8X0.5
SPRING,ACE HEAD
COMPL,BRACKET,HEAO
SLEEVE,ACE HEAO
SPECIAL NUT (M5)
SCR PAN+SW+W 2.6X5
BRACKET,STOPPER
SPRING,SLIDE BRAKE
COMPL,SLIDE,C(VI
SPRING,LINK LOCK
OAMPER
GEAR,FRONT LOAD
ASSY,LEVER,FRONT
GE9R,HELICAL FRONT
SCR PAN+SW+W 2.6X6
SCR S-TPG PAN 2.6X6
SCR S-TPG PRN 2.6X8
SCR S-TPG BIN 2.6X8
HOLOER,WORM
WASHER
ASSY,WORM.FRONT
BRACKET,HOLDER
PLATE,NUT
OAMPER.HOTOR
OAMPER.WORM
ASSY,LOADING MOTOR
OAMPER,MOTOR
COMPL PCB,MC-3
COMPL PWB,MC-2
ROTARY SWITCH
SCR PAN 2.6X13
ASSY,SLIDE,FRONT
SPRING,LEVER LOAO
SPRING,LEVER ACT
HOLOER.WORM
HOLOER,WORM
WASHER 2.1X6X0.5
ASSY,WORM,LOAO
BELT,LOAOING
WASHER SLIT 2.6X5X0.50
GEAR,HELICAL
ASSY,LEVER.REV GUIDE
SPRING.REVIEW LEVER
COMPL,PINCH ROLLER
SPRING,PINCH ROLLER
LOCATION
MB-54
MB-55
MB-57
MB-58
MB-59
MB-60
MB-61
MB-63
MB-66
MB-67
MB-80
MB-81
MB-82
MB-83
MB-84
MB-90
PARTS NO.
411 1092107
6130788160
613 1357655
613 1455009
613 1455016
411 0630904
6130220233
6450002533
613 153 1871
613022 1698
411 109 1803
613 1574052
613 143 1881
613 1198593
613 1429055
613 1538627
DB803500
DESCRIPTION MBoo50##
WASHER Y 3.6X6X0.5
COMPL,LEVER.ACTBRAKE
PLATE,BGR
ASSY>MOUNTING,ROLLERS
ASSYtflOUNTING,ROLLER T
SCR SET HEX-SCT 2X3
ASSY,GUIOE,ROLLER
HEAO,FULL ERASE
LEVER,FE HEAO
SPRING.ERASE HEAO
WASHER Y 2.6X6X0.5
ASSY,ROLLER,CLEANER
ASSY,LEVER,CLEANER
SPRING
BRACKET,CLEANER
FLEXIBLE FLAT CABLE,CN811-CN303
****%%********* *******************************x****************
MECHANISMPARTS2
MC-1
MC-2
MC-3
MC-6
MC-7
MC-8
MC-9
MC-10
MC-12
MC-13
MC-14
MC-15
MC-16
MC-17
MC-18
MC-19
MC-20
MC-22
MC-23
MC-24
MC-25
MC-26
MC-27
MC-28
MC-29
MC-30
MC-31
MC-34
MC-35
MC-36
MC-37
MC-38
MC-40
MC-41
6450005053
6130222978
613 1354609
613022 1520
6130823434
613022 1711
613081 7518
6130982285
411 021 3107
411 1092008
613 1429093
6130222701
411 109 1902
613 1357686
613 1357532
411 109 1803
613 1357648
411 0476809
613021 9763
613 1357662
613022 1551
613021 9879
6130906373
613022 1704
613021 9862
6130222039
613091 3104
411 0286309
4120158603
613 1309890
4120454606
411 0920906
411 1000300
613 1209060
MOTOR,CAPSTAN OC 3W
BELT,REEL ORIVE
COMPL,LEVER,CLUTCH
SPRING,LEVER CLUTCH
LEVER.CHANGE CLUTCH
SPRING,CHANGE CLUTCH
ASSY,BRAKE CAPSTAN
SPRINGtCAPSTAN
SCR S-TPG BIN 2.6X8
WASHER Y 3.1X8X0.5
SLIDE,CAM PLATE
CAtl,MODE
WASHER Y 3.1X6X0.5
CAMrMAIN
ASSY,RACK,LOAD
WASHER Y 2.6X6X0.5
SPACER,RACK LOAO
SCR PAN+FLG 3X4
ASSY,EARTH,CYL
GEAR,LOAD TAKE UP
SPRING,GEAR LOAO T
ASSY,LEVER,LOAD T
GEAR,LOAO S
SPRING,GEAR LDAO S
ASSY,LEVER,LOAO S
LEVER,RETURN TENSION
ASSY,LEVER CONTROL
SCR S-TPG PAN 2.6X6
SPECIAL WASHER 3.1X6X0.25
ASSY,GEAR,FRICTION ~
SPECIAL WASHER 2.4X6X0.25
WASHER Z 2.6X1OXO.5
SCR S-TPG BIN 2.6X5
COMPL,MC-1
–16–

MECHANISM PARTS 1
6
5
I92TP1/MB-l I
MECHANISM PARTS 2
Undesignated numeral shows
Location No.:MC- 12+ ?
N.S.P. 16-9 I
3
-kYE!!!2 N.S.P.:Not available as service parts
–17–

LOCfiTION PARTS NO.
MECHANISMPARTS3
CD-1
CD-4
co-5
CD-6
CD-7
CD-8
co-9
CD-10
CD-11
CD-12
CD-13
CD-14
CO-15
CD-16
CD-17
CD-18
CD-19
CO-20
CD-21
CD-22
CO-24
CD-27
CO-28
CO-31
MA-1
MA-2
MA-3
MA-4
MA-5
MA-6
OR
MA-7
OR
613 1429581
613 022 0585
407 098 3201
411 015 9801
613 022 1643
613022 0073
613 022 2695
613 141 6109
613 13? 8962
6130222626
613021 9657
411 027 1305
6130950949
411 1069208
613 022 0943
6130222619
613022 1667
6130222596
613022 0097
613022 1674
613022 4064
613 124 5006
613 1256149
411 001 8702
613 1000391
6130857996
613021 9701
411 1442803
411 109 1605
613 135 7068
613 1357549
613 135 7075
613 1432963
DESCRIPTION LOCATION
COMPL.CASSETTE MECHANISM
LIO
PHOTO COUPLE PN150SAN
RING E 2.3
SPRING,LINK L
ASSY,GEAR,LEVER L
RACK
GEAR,LOCK
ASSY,LEUER,PINION
GEAR,PINION
ASSY,BRACKET,GEAR
SCR S-TPG BIN 2.6X4
SW,SPECIAL
SCR PAN+SW+W 2X9
HOLOER,TR!4NSISTOR
GEAR,IDLER
SPRING,GEAR MAIN
GEAR,MAIN
ASSY,GEAR,LEVER R
SPRING,LINK R
BOARO,UNDER
LEVER,SAFETY SW
SPRING,SAFETY SW
SCR BIN 3X6
ASSY,LEVER,TENSION
SPRING,LEVER TENSION
ASSY,HOLOER,BAND
SCR PAN+SW+W 2.6X6
WASHER Y 2.6X6X0.25
ASSY,REEL,SUPPLY
ASSY,REEL,SUPPLY
ASSY,REEL,TAKE UP
ASSY ,REEL ,TAKE UP
MA-8
OR
OR
MA-9
OR
MA-10
OR
MA-11
MA-12
OR
MA-15
MA-16
MA-17
MA-18
MA-19
MA-20
MA-21
MA-22
MA-23
MA-24
MA-25
MA-26
MA-27
M4-28
MA-29
MA-30
MA-31
MA-32
MA-33
MA-34
MA-35
MA-36
MA-37
MA-38
MA-39
--------------- ,
l ---------------------------------------------------------- -. ----,
PARTS NO.
412021 5306
4120158900
4120158504
411 109 1506
411 109 1407
613 1357150
613 1429116
4120267305
613 135 7167
6131429109
4120424302
613 1357099
411 120 1301
613 1357082
411 021 3107
613 1209053
4070167205
613021 9985
613 1429086
613022 1612
613022 1506
6130980106
6130773647
613022 1490
6130222374
6130848871
6130220004
6130809216
6130862914
6130809209
411 1093005
6130222015
4120159501
411 021 7907
4120454606
CB602700
DESCRIPTION MBO050##
SPECIAL WASHER 3.1X6X0.3
SPECIAL WASHER 3.IX6X0.4
SPECIAL WASHER 3.1X6X0.5
WASHER Y 2.1X6X0.25
WASHER Y 2.1X5X0.25
GEAR,REEL SUPPLY
GEAR,REEL SUPPLY
SPECIAL WASHER 2.6X6X0.25
GEAR,REEL TAKE UP
GEAR,REEL TAKE UP
SPECIAL SCREW 2,6X4
COMPLrIOLER,CLUTCH
WASHER Y 2.1X4X0.25
ASSY,IDLER
SCR S-TPG BIN 2.6X8
COMPL PCB,MC-4
LED LN59
ASSY,SLIDE,ACT PLATE
SLIOE,C BRAKE
SPRING,RETURN SLIDE
SPRING,SUB T
ASSY,BRAKE SUB T
PULLEY,REEL
SPRING,SUB SUPPLY
SLIOE.ACT BRAKE
BRAKE,SUB SUPPLY
ASSY,SLIDE,M PLATE
ASSY,BRAKE,SUPPLY
SPRING,MAIN BRAKE
ASSY,BRAKE,TAKE UP
WASHER Y 2.6X5X0.5
LEVER,CONT PLATE
SPECIAL WASHER
SCR S-TPG BIN 4X12
SPECIAL WASHER 2.4X6X0.25
Undesignated numeral shows
Locatio% No.:MA- &’-l5
!‘--1--=-3-%+19
N.S.P.:Not available as service parts ‘0
&.~, ~:
39 -D&
MECHANISM PARTS 1
–18–

ELECTRICAL PARTS
NOTE;
1. Materialsof Capacitor and Reaistoraare abbreviatedaafollows;
uReaiatora TA-SOLID TantalumSolid Capacitor
MT-FILM Metallized Film Reaiator AL-SOLID AluminumSolid Capacitor
MT-GLAZE Metall ized Glaze Reai ator NP-ELECT Non-Polarized Electrolytic
OXIDE-MT Oxide Metallized Film Reaiator Cepacitor
OS-SOLID Aluminum Solid Capaciton with
Capacitor Organic Semiconductive
MT-POLYEST Metallized Polyester Capacitor Electrolytic Capacitor
MT-COMPO Metall ized Composite Capacitor DL-ELECT Double Layered Electrolytic
Capacitor
2. Tolerance of Capacitor(l OpFover) and Reai~or arenoted withtillow~klea.
F........=-. *1% G............*20~ J-.. -........*WO K ......=....*1OVO
M .........-..*20% N ..-...-.....*30% z-.....-.....+80% -–20%
3. Capecitora
U:UF P:PF
4. Inductors
UH :uti MH :mH
5. N.S.P. :Not availabla as service parts.
6. The ceramic capacitor and resiatora mounted on tha PWB,may be two different types of parts, chip[leadleaa)type or diacrete(with lead
wire) type.lherefore, even though the location number ia the aame,you may encountar either chip or discrete parta on the PWB.
LOCATION PARTS NO. DESCRIPTION LOCATION
CCMPLPHB,CP-I-A Q1621
.— COMPL.NO 613 1575110 Q1622
OR
(SEMC6NDUCT6RS) OR
Q1OO2
OR
OR
OR
Q1003
OR
OR
OR
Q1OO4
OR
OR
OR
Q1OO6
OR
OR
OR
Q1011
OR
Q1012
OR
OR
OR
Q1151
OR
91152
OR
Q1301
OR
Q1312
OR
OR
OR
Q1313
OR
91601
OR
Q1621
OR
OR
OR
405057 6201
4050576409
405 1237002
405 123 7101
4050640100
4050640209
405 1236708
405 1236807
4050640100
4050640209
405 1236708
405 1236807
4050576201
405057 6409
405 1237002
405 1237101
4050639708
405 1236500
4050576201
4050576409
405 1237002
405 1237101
4050639906
405 1236401
4050639609
405 124 2709
4050639104
405 123 6609
4050576201
405057 6409
405 1237002
405 123 7101
4050639708
405 1236500
4050044601
405006 1806
4050192005
4050192807
405011 8401
405011 8500
TR 2SC4038-Q
TR 2SC4038-R
TR 2S01991A-Q
TR 2S01991A-R
TR 2SA1561-Q
TR 2SA1561-R
TR 2SB1320A-Q
TR 2SB1320A-R
TR 2SA1561-Q
TR 2SA1561-R
TR 2SB1320A-Q
TR 2SB1320A-R
TR 2SC4038-Q
TR 2SC4038-R
TR 2S01991A-Q
TR 2S01991A-R
TR 0TC144EL
TR UN6213
TR 2SC4038-Q
TR 2SC4038-R
TR 2S01991A-Q
TR 2S01991A-R
TR OTC124EL
TR UN6212
TR OTA114EL
TR UN6111
TR 0TA144EL
TR UN6113
TR 2SC4038-Q
TR 2SC4038-R
TR 2S019919-Q
TR 2S01991A-R
TR 0TC144EL
TR UN6213
TR 2SA608-F-SPA
TR 2SA933S-R
TR 2SC536-E-SPA
TR 2SC536-F-SPA
TR 2SC1740S-Q
TR 2SC1740S-R
OR
Q1623
OR
OR
OR
Q3503
OR
Q3504
OR
Q3551
OR
OR
OR
Q3552
OR
OR
OR
Q3553
OR
OR
OR
Q5001
OR
Q5002
OR
Q5003
Q5004
OR
Q5101
OR
Q5102
OR
Q5103
OR
Q5104
OR
Q6001
PARTS NO.
4050930607
4050576201
4050576409
405 1237002
405 1237101
4050640100
4050640209
405 1236708
405 !23 6807
4050639708
405 1236500
4050639708
405 1236500
4050576201
405057 6409
405 1237002
405 1237101
4050576201
4050576409
405 1237002
405 1237101
4050576201
4050576409
405 1237002
405 1237101
4050946905
405 1260208
4050137006
4050137303
405 006 6702
4050137006
4050137303
4050137006
405 013 7303
4050137006
4050137303
4050037603
4050002205
4050182501
4050006104
4050736407
DESCRIPTION
TR KSC2785-Y
TR 2SC4038-Q
TR 2SC4038-R
TR 2SD1991A-Q
TR 2SD1991A-R
TR 2SA1561-Q
TR 2SA1561-R
TR 2SB1320A-Q
TR 2SB1320A-R
TR OTC144EL
TR UN6213
TR DTC144EL
TR UN6213
TR 2SC4038-Q
TR 2SC4038-R
TR 2S01991A-Q
TR 2SD1991A-R
TR 2SC4038-Q
TR 2SC4038-R
TR 2SD1991A-Q
TR 2SD1991A-R
TR 2SC4038-Q
TR 2SC4038-R
TR 2SD1991A-Q
TR 2S01991A-R
TR 2SK1460
TR 2SK1460LS
TR 2SC2274-F
TR 2SC2274K-F
TR 2SA984-F
TR 2SC2274-F
TR 2SC2274K-F
TR 2SC2274-F
TR 2SC2274K-F
TR 2SC2274-F
TR 2SC2274K-F
TR 2S(41345
TR 0TA144ES
TR 2SC3399
TR DTC144ES
TR 2SK772-E
–19–

...
LOCATION
Q6001
OR
OR
OR
OR
OR
Q6002
OR
Q6004
Q6005
OR
Q6006
OR
Q6008
OR
OR
OR
OR
Q6051
OR
OR
OR
OR
Q6052
OR
OR
OR
Q6901
OR
OR
OR
OR
Q6902
OR
OR
OR
OR
Q6903
OR
OR
OR
OR
Q6904
OR
Q6921
OR
PARTS NO.
4050736506
4050269004
4050269103
405 1147806
405 1147905
405 114 8001
4050182501
4050006104
4050189500
4050037603
4050002205
4050182501
4050006104
4050192005
405011 8401
4050930607
4050192807
405011 8500
4050044007
405006 1707
4050930508
4050044601
405006 1806
4050576201
4050576409
405 1237002
405 1237101
4050192005
405011 8401
4050930607
4050192807
405011 8500
405 004 4007
405006 1707
4050930508
4050044601
405006 1806
4050192005
405011 8401
4050930607
4050192807
405011 8500
4050182501
4050006104
4050848209
4050848308
IC101
OR
Iclll
IC161
OR
IC162
IC301
IC302
IC303
OR
IC351
IC511
IC512
IC602
OR
OR
IC691
(INTEGRATEDCIRCUITS)
4093260204
4093339900
4092976205
4090034501
409 1203401
410 1743200
410211 5303
4093142005
4093130903
4092434101
4093233109
4090677203
4092252309
410 1773702
4092836905
410 1726906
4090196209
DESCRIPTION
TR 2SK772-F
TR 2SK222-D
TR 2SK222-E
TR 2SK1104-P
TR 2SK1104-Q
TR 2SK1104-R
TR 2SC3399
TR 0TC144ES
TR 2SC3901
TR 2SA1345
TR OTA144ES
TR 2SC3399
TR DTC144ES
TR 2SC536-E-SPA
TR 2SC1740S-Q
TR KSC2785-Y
TR 2SC536-F-SPA
TR 2SC1740S-R
TR 2SA608-E-SPA
TR 2SA933S-Q
TR KSA1175-Y
TR 2SA608-F-SPA
TR 2SA933S-R
TR 2SC4038-Q
TR 2SC4038-R
TR 2S01991A-Q
TR 2S0199113-R
TR 2SC536-E-SP(i
TR 2SC1740S-Q
TR KSC2785-Y
TR 2SC536-F-SP19
TR 2SC1740S-R
TR 2SA608-E-SPA
TR 2SA933S-Q
TR KSA1175-Y
TR 2SA608-F-SPA
TR 2SA933S-R
TR 2SC536-E-SPA
TR 2SC1740S-Q
TR KSC2785-Y
TR 2SC536-F-SPA
TR 2SC1740S-R
TR 2SC3399
TR OTC144ES
TR 2SC2960-F-SPQ
TR 2SC2960-G-SPA
IC LA7345AM
IC LA7345AM-MPB
IC LC89925
IC BA7021
IC LA7221
IC LC74760M-8797
IC LC866648V-5554
IC LB1643
IC MN1381-L
IC MN1380-L
IC BU2896K
IC L5431
IC PQ12RF11
IC AT24CO4-1OPC
IC LE24C04S1
IC X24C04P-C7346
IC LA791O
LOCATION
IC692
OR
(DIbDES)
01003
OR
01004
OR
01008
OR
01009
OR
01301
OR
01601
OR
01602
OR
01611
OR
01621
OR
D1622
OR
03001
OR
03105
OR
03106
OR
D3107
OR
D3111
OR
03113
OR
03121
OR
03122
OR
03123
OR
03502
OR
D351O
OR
D3554
OR
05001
D5003
05004
05006
D501O
05013 h
05101
D5102
D5103
D5104
D5105
05108
05109
05110
OR
D5112
06901
PARTS NO.
4090268203
409057 5103
4070079904
4070124406
4070079904
4070124406
407 0079904
4070124406
4070079904
4070124406
407 0079904
4070124406
407 007 9904
4070124406
4070079904
4070124406
4070707104
4070536704
4070079904
4070124406
4070079904
4070124406
4070124406
4070079904
4070124406
407 0079904
407 0124406
407 0079904
4070124406
407 0079904
407 0124406
4070079904
4070124406
4070079904
4070124406
4070079904
4070124406
4070079904
4070124406
4070079904
4070079904
4070124406
4070079904
4070124406
4070079904
4070124406
407 1348900
4070782705
4070782705
4070782705
407091 6704
407 151 3308
407 1695806
407 169 5707
4070782705
4070782705
407 1006909
4070638903
4070638903
407004 9709
4070058701
4070638903
4070124406
DESCRIPTION
IC L5631
IC UPC574J
OIOOE GMAO1
OIOOE 1SS133
OIOOE GMAOI
OIODE 1SS133
DIOOE GMAOI
OIODE 1SS133
OIOOE GMAO1
OIODE 1SS133
OIOOE GMAO1
OIOOE 1SS133
OIODE GMAO1
OIODE 1SS133
OIODE GMAO1
OIODE 1SS133
ZENER OIOOE GZS5.6X
ZENER OIOOE MTZ5.6B
OIOOE GMAO1
DIODE 1SS133
OIOOE GMAO1
DIOOE 1SS133
OIOOE 1SS133
OIODE GMAO1
OIODE 1SS133
OIOOE GMAO1
DIODE 1SS133
OIODE GMOO1
DIOOE 1SS133
OIOOE GMAO1
OIOOE 1SS133
OIOOE GMAO1
OIODE 1SS133
OIODE GMAO1
DIODE 1SS133
OIOOE GMAOI
OIOOE 1SS133
OIODE GMAO1
OIODE 1SS133
OIODE GMAO1
OIODE GMAO1
DIODE 1SS133
DIODE GMAO1
DIODE 1SS133
DIODE GMAO1
OIODE 1SS133
OIODE OBC1OG
OIODE 1SS244
OIODE 1SS244
DIOOE 1SS244
OIODE APOIC
PHOTO COUPLE PC120FB
OIOOE RK36-LE-C4
DIODE RL2Z-LF-C4
OIOOE 1SS244
OIOOE 1SS244
OIODE AGO1
ZENER OIODE MTZJ5.6C
ZENER DIODE MTZJ5.6C
DIODE OSK1OC
DIODE ERA15-02
ZENER DIODE MTZJ5.6C
OIODE 1SS133
–20–
Other manuals for VHR-490
1
Table of contents
Other Sanyo VCR System manuals

Sanyo
Sanyo VHR-M262EV User manual

Sanyo
Sanyo VHR-VT821A NZ User manual

Sanyo
Sanyo VHR-M261EV User manual

Sanyo
Sanyo SRT-4040 Manual

Sanyo
Sanyo VZU-232CA User manual

Sanyo
Sanyo VHR-H690 User manual

Sanyo
Sanyo VHR-310 User manual

Sanyo
Sanyo VHR-450 User manual

Sanyo
Sanyo VHR-VX600 User manual

Sanyo
Sanyo VHR-VK210A User manual

Sanyo
Sanyo VHR-790 User manual

Sanyo
Sanyo VHR-790 User manual

Sanyo
Sanyo SRT-2400 User manual

Sanyo
Sanyo SRT-6000 User manual

Sanyo
Sanyo VHR-730 User manual

Sanyo
Sanyo SRT-8040 User manual

Sanyo
Sanyo VHR-490 User manual

Sanyo
Sanyo VHR-279E User manual

Sanyo
Sanyo VHP-VX50 User manual

Sanyo
Sanyo VHR-VK210P User manual