Saris 4412F User manual

Freedom EX - 2 Bike
Assembly Instructions | Instrucciones de montaje | Instructions d’assemblage
4412F

TELL US WHAT YOU THINK
SARIS.COM/FEEDBACK
REGISTER YOUR PRODUCT FOR UPDATES
SARIS.COM/REGISTRATION

3
LONG FOR THE RIDE
Just as no garage is complete without a bicycle, at Saris, we believe no car is
complete without a bike rack.
Since setting off on this journey nearly 30 years ago, Saris racks have freed
millions of bike-lovers to explore new territory and terrain, take part in group
rides, bike pool to races, and commute to and from work.
And we continue to do so in style.
As the all-time #1 best-selling bike rack, Saris Bones® continues to set the
standard for excellence in design. Today all Saris bicycle racks are intuitive to
load and secure, and guaranteed for life.
Built by cyclists for cyclists in Madison, Wisconsin, we strive to create the
world’s best bike racks.
Because cycling is what we live for.

4
Max = 60 lbs/kg 27
Máx.= 27 kg (60 libras)
Max = 60lb/27kg
Max = 120 lbs/54kg
Máx.= 54 kg (120 libras)
Max = 120lb/54kg
For relevant patents, see www.saris.com/patents
Para las patentes pertinentes, consulte www.saris.com/patents
Pour les brevets concernés, consultez www.saris.com/patents
View our installation video at
Vea nuestro vídeo de instalación en
Visionnez notre vidéo d’installation à l’adresse
http://www.saris.com/en/instructional-videos-1.html
Specifications: 4412F
* Guía de
adaptación
* Guide de
compatibilité
Fit
Guide
1.800.783.7257
http://www.saris.com/en/vehicle-racks.html
Customer Service
1-800-783-7257
saris.com

5
Tools Needed: Items Included:
x 1
x 2
M10 x 60 M10
8mm
Accesorios opcionales
Accessoires en option
Herramientas necesarias:
Outils nécessaires:
Artículos incluidos
éléments inclus
Fits up to 5” tires
Adjustable or 19mm and 17mm
#4419 Fat Tire Wheel Trays
Optional Accessories:
View our installation video at
Vea nuestro vídeo de instalación en
Visionnez notre vidéo d’installation à l’adresse
http://www.saris.com/en/instructional-videos-1.html
x 3
x 4
M10 x 120

Install receiver and secure with pin and lock.
Note: If your receiver is 1.25” remove the adapter block as shown.
Tools Required: 19mm (3/4’’) wrench, 5mm hex key (to remove
adapter block)
Instalar el receptor y asegurar con el pasador y el candado. Nota:
Si el receptor es de 1,25”, retire el bloque de adaptador como se
muestra.
Herramientas necesarias: Llave de 19mm (3/4”), llave hexagonal de
5mm (para retirar el bloque adaptador)
Installez le récepteur de barre et arrimez-le à l’aide de la broche et
du mécanisme d’arrêt. Remarque: si votre récepteur de barre est un
modèle 1,25”, ôtez le bloc adaptateur comme illustré.
Outils nécessaires: clé 19mm (3/4’’), clé hexagonale 5mm (pour ôter
le bloc adaptateur)
1
INSTALL RACK / INSTALAR PORTABICICLETAS / INSTALLATION DU PORTEVÉLOS
EN
ES
FR
6
2”
1.25”

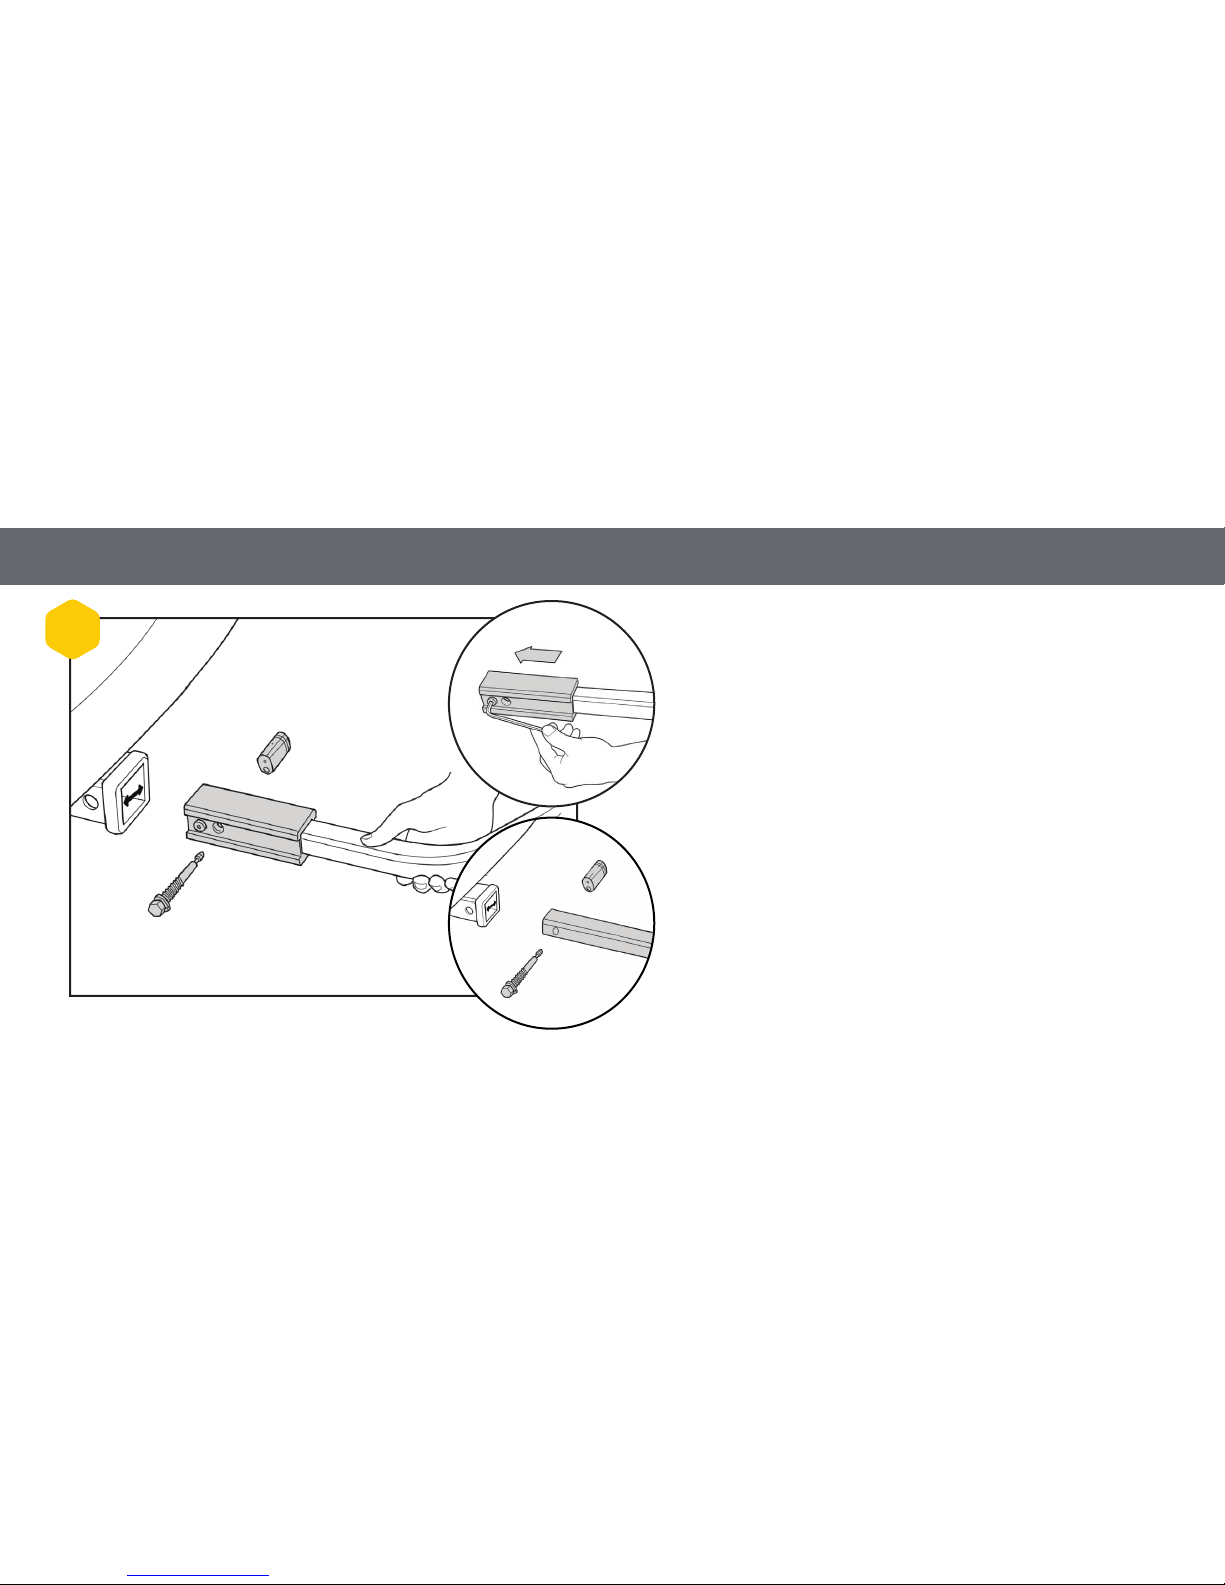
Lay horizontal bar on to receiver plate, lining up front plate with bar and
receiver. Secure with bolts & nuts, using 17mm (9/16”) wrench and 8mm
hex key.
NOTE : Remove rubber tips
Tools Required: 17mm wrench, 8mm hex key
Colocar la barra horizontal sobre la placa del receptor, alineando la
placa frontal con la barra y el receptor. Fijarla con los pernos & nueces,
utilizando la llave fija de 17 mm (9/16”) y la llave hexagonal de 8 mm
NOTA: Retirar los extremos de goma
Herramientas necesarias: Llave hexagonal de 17mm, llave
hexagonal de 8mm
Placez la barre horizontale sur la plaque du récepteur, en alignant la
partie avant de la plaque sur la barre et sur le récepteur. Sécurisez les
boulons à l’aide d’une clé & des noisettes 17mm (9/16”) et d’une clé
hexagonale 8mm.
REMARQUE: ôtez les embouts en plastique.
Outils nécessaires: clé hexagonale 17mm, clé hexagonale 8mm.
EN
ES
FR
2
7

Secure upright with M10 x 120 bolt and nut using 17mm (9/16”)
wrench and 8 mm hex key.
Tools Required: 17mm wrench, 8mm hex key
Asegure el montante con un tornillo M10 x 120 y una tuerca usando
una llave de 17 mm (9/16”) y una llave hexagonal de 8 mm.
Herramientas necesarias: llave de 17mm, llave hexagonal de 8mm
Fixez le montant avec un boulon et un écrou M10 x 120 à l’aide
d’une clé hexagonale de 17 mm (9/16”) et d’une clé hexagonale de
8 mm.
Outils requis: clé 17 mm, clé hexagonale 8 mm
EN
ES
FR
3
8

9
Slide on outer wheel trays to complete rack assembly. (Wheel tray with
white reflectors installed on passenger side of vehicle facing away from the
vehicle.)
Deslizar las bandejas para ruedas exteriores para completar el montaje del
portabicicletas. (Bandeja para ruedas con reflectores blancos instalada en
el lado del acompañante del vehículo apuntando hacia afuera del mismo).
Faites glisser l’ensemble dans les plateaux de roue extérieurs pour
terminer l’assemblage. (Placez le plateau de roue pourvu de réflecteurs
blancs du côté passager du véhicule, les réflecteurs vers l’extérieur).
EN
ES
FR
A
A
B
B
BB
A
A
4

Load bikes. Heaviest bike closest to car. Adjust wheel tray if necessary.
Tighten wheel tray knob.
Cargar las bicicletas. La bicicleta más pesada debe colocarse en la
posición más cercana al vehículo. Ajustar las bandejas para ruedas en
caso necesario. Apriete el mando de la rueda
Chargement des vélos Chargez le vélo le plus lourd contre la voiture.
Ajustez le plateau de roue si nécessaire. Serrez le bouton de traction.
EN
ES
FR
1
10
LOAD BIKES / CARGAR BICICLETAS / CHARGEMENT DES VÉLOS

Secure bike wheel straps and down tube cradle.
Asegure las correas de las ruedas de la bicicleta y la base del tubo.
Fixez les sangles des roues et le berceau du tube descendant.
EN
ES
FR
2
11

To lock bikes, use provided locking cable to lock bikes to vehicle’s hitch.
Para bloquear las bicicletas, use el cable de bloqueo provisto para
asegurar las bicicletas al enganche del vehículo.
Pour verrouiller les vélos, utilisez le câble de verrouillage fourni pour
verrouiller les vélos sur l’attelage du véhicule.
EN
ES
FR
3
12

13
Pull handle, tilt rack away from vehicle.
Caution: hold bikes with available hand.
Tirar del tirador, inclinar el portabicicletas alejándolo del vehículo.
Precaución: Sujetar las bicicletas con la otra mano.
Tirez sur la poignée pour basculer le porte-vélos en l’éloignant du
véhicule.
Mise en garde: Tenez les vélos d’une main.
1EN
ES
FR
HATCH ACCESS / ACCESO A SOMBREADO / ACCÈS À LA TRAPPE

Access Hatch.
Acceder al maletero
Accès au coffre
EN
ES
FR
2
14

15
Push rack into place. You will hear audible “click” when in place.
Empujar el portabicicletas a su posición,
oirá “clic” audible cuando esté en su lugar.
Replacez le porte-vélos en poussant dessus, vous entendrez un «clic»
audible en place.
EN
ES
FR
3

Pull hande, Fold up rack toward vehicle
Tirar hande, Plegar el bastidor en dirección al vehículo.
Tirer Hande, Poussez le porte-vélos vers le véhicule pour le plier.
1EN
ES
FR
16
RACK STORAGE / ALMACENAMIENTO DEL PORTABICICLETAS / RANGEMENT DU PORTEVÉLOS

17
RACK STORAGE / ALMACENAMIENTO DEL PORTABICICLETAS / RANGEMENT DU PORTEVÉLOS Technical Specifications
Bike carrier weight: 26lb/ 11.8kg
Permitted load capacity: 120lb/ 54.4kg
Max bike weight: 60 lb/27.2 kg
CAUTIONS:
• All requirements for compatability/fit as stated in the current Saris vehicle/carrier compatability guide must be followed. (Available at any Saris dealer or www.saris.com). If
your vehicle is not listed or you have any questions, please call our customer service at 800-783-7257 or visit www.saris.com.
• Read and follow instructions carefully. Save owner’s manual for future reference or parts information. Ensure that any other users of the bicycle carrier are familiar with their
content.
• Drive slowly over speed bumps, 5 to 10 mph max speed.
• It’s the end users responsibility to ensure that use of this product meets all local and state laws.
• When cleaning vehicle and rack, use only water soluble cleaners. Do not take rack through car wash.
• Make sure bike tires are not directly behind exhaust pipe.
• Do not mount to any type of trailer, towed vehicle, RV.
• Do not use with hitch extender.
• Prior to usage on the road, remove all loose parts from bicycle, including (but not limited to) child seat, basket, lock, light, pump, etc.
• This carrier is not recommended for off-road use or for use at speed exceeding 70 mph (113 km/h).
• The handling characteristics of a vehicle will change when a rear bicycles carrier is fitted and especially when it is loaded (in particular crosswind sensitivity, handling on
bends and braking). Driving techniques should be altered to allow for these changes, reduce speed, especially on bends and allowing for longer braking distances.
• The vehicle’s total length increases when the bike carrier is attached. The bikes themselves may increase the vehicle’s total width and height. Take care when reversing
and/or entering garages or ferries, etc.
• Remove carrier from vehicle when not in use.
• This carrier is constructed to carry standard-bike-frames. It is not intended for use with tandem or recumbent bicycles.
• Replace any mounting strap at the first sign of wear. Replacement parts are available through your local Saris dealer or call 1-800-783-7257.
EN

18
• Tighten straps regularly during the journey.
• Vehicle should be in good condition in the area at which the hitch is located.
• Do not exceed maximum load capacity of carrier (120 lbs max or 60 lbs max per bike!) Secure properly and adjust for even load distribution, loading the heaviest/biggest
bike first and closest to the vehicle.
• Saris absolves itself of responsibility for any personal injuries or consequential damage to property or wealth caused by incorrect fitting or use.
Warning and Disclaimer:
This carrier has been designed to carry bicycles on specific vehicles. Before installation, user must read and follow current Saris Fit Guide (available through Saris dealer) recommen-
dations and enclosed instructions. Fit recommendations are based on vehicle’s standard features; optional features may affect the fit recommendations. User must attach carrier
correctly to the vehicle, check its attachment before each use, and inspect carrier parts for wear. Carrier’s attachment to the vehicle is critical and beyond the control of the manufac-
turer. Manufacturer and seller expressly disclaim any and all liability for personal injury, property damage or loss, whether direct, indirect, or incidental, resulting from the incorrect
attachment, improper use, inadequate maintenance, or neglect of this carrier.
OFFICIAL WARRANTY TERMS
Saris Cycling Group, Inc (SCG), parent company of Saris Racks, warrants our product to the original consumer to be free from defects in materials and workmanship. Please retain
your sales slip for your records, as proof of purchase will be required.
WARRANTY TERM
Car Racks: As long as original owner owns product.
Home storage/bike storage: as long as original owner owns product
Kool Rack: 1 year
Parking Racks: 1 year

19
EN
Note: No damage to mounting surfaces is covered.
Any product or part thereof found to be defective within the term as set forth above will be replaced without charge provided that: (1) its failure resulted from a defect in material or
workmanship and not from normal wear and tear expected in the use of the product; (2) the product was not misused, improperly assembled, improperly maintained or damaged by
accident; (3) there was no failure to follow instructions or warnings in Owner’s Manual; (4) no alterations or modifications were made; and (5) the product or part is delivered, freight
prepaid, to Saris Cycling Group or an authorized service center. Please call 1-800-783-7257 to obtain return authorization prior to return. SCG reserves the right to inspect any product
before issuing a replacement. SCG’s only obligation shall be to replace such products or parts that it determines are defective.
LIMITATIONS
The foregoing warranties are in lieu of and exclude all other warranties not expressly set forth herein, whether expressed or implied by operation of law or otherwise. Other than as set
forth above, SCG makes no warranty, whether express, implied or statutory, with respect to any product, including, but not limited to, warranties of reliability, merchantability fitness
for a particular purpose, or those arising from any course of performance, dealing, usage or trade. SCG shall not be liable for incidental or consequential losses, damages or expenses
in connection with its products. SCG’s liability hereunder is expressly limited to the replacement of goods not complying with this warranty or, at SCG’s election, to the repayment of
an amount of the purchase price of the product in question. Some states do not permit the exclusion or limitation of implied warranties or incidental or consequential damages, so the
preceding limitations and exclusions may not apply to you.
EXCLUSIONS
· If consumer does not heed cautions listed in Instruction Manual, damage is not covered under warranty
· Impact/collision damage is not covered under warranty
· Cradles and strap damage due to improper arm placement are not covered under warranty
· Carrying anything other than a bicycle is not covered under warranty
· Rust is wear and tear and is preventable with rack maintenance
· Weather impact (UV, salt air/water)

20
RECOMMENDED RACK MAINTENANCE
Each use:
· Wipe down trunk rack feet
· Check straps for signs of wear
· Check bike cradles and wheel scoops
· Check for loose bolts
Every 90 days actions
· Clean with water and mild soap
· Lubricate locks if applicable (use wet, oil based lubricant; NO WD-40)
· Grease hitch bolt threads
· Check for scratches in paint
Lifetime warranty available in North America only.
Contact Us for more information.
This manual suits for next models
1
Table of contents
Other Saris Bicycle Accessories manuals