SATA AE5808 User manual

EN
中文 PT JARU KODE ES
使用说明书 \ User’s Manual \ Bedienungsanleitung \ Инструкция по эксплуатации
사용설명서 \ Manual de instruções \ 取扱説明書 \ Manual del uso
便携智能充电机
Portable Batteny Charger
Tragbares intelligentes Ladegerät
Переносное интеллектуальное зарядное устройство
휴대용 스마트 충전기
Carregador inteligente portátil
ポータブル知能充電器
Cargador inteligente portátil
AE5808


3
AE5808 ESPT JARUEN DE KO
中文
目录
第一章 主要安全事项:.......................................................................................................................................4
第二章 充电准备:..................................................................................................................................................5
第三章 功能描述及面板介绍:......................................................................................................................7
第四章 可能的充电问题及维护:................................................................................................................ 9
第五章 爆炸图及配件:.....................................................................................................................................10

4
AE5808 ESPT JARUEN DE KO
中文
第一章 主要安全事项:
- 此说明书包括重要的安全及操作说明,请妥善保存,以备后续参考。
- 注意:本充电机只适用于为车用铅酸可充电电池。若用于为其它类型的电池充电,可能会产生爆炸,造成人身伤害
和财产损失。
- 不要将充电机暴露在雨雪或高湿环境中。
- 使用电池充电器制造商不推荐或出售的附件可能会引发火灾、触电或个人伤害。
- 在不使用充电机的时候,请拔下电源插头,切断输入,并且将输入输出线捆扎包好,使之不受损伤。
- 请尽量不要使用电源延长线。使用不适当的延长线可能导致火灾和触电的危险。如果必须使用电源延长线,请确保:
a. 延长线插头上的插脚与充电器插头的插脚数量,尺寸和形状完全相同。
b. 如果延长线的长度 ≤ 7.5m,请使用截面不小于 0.8mm2的导线,如果延长线的长度 ≤ 30m,请使用截面不小于 1.3mm2
的导线,如果延长线的长度 ≤ 45m,请使用截面不小于 2.08mm2的导线。
- 充电机电线或插头破损时请勿使用,应立即更换电线或插头。
- 如果受到冲击,跌落或其他方式损坏,请勿使用充电机。请将充电机送到有资质或指定的维修处检查,确保没有问题后,
方可使用。
- 请勿擅自拆卸充电机。需要维修时,请将充电机送至有资质或指定的维修处维修。拆装不当可能导致触电或火灾。
- 为了减少电击危险,请在进行任何维护或清洁之前先拔掉充电器插头,断开电源。仅仅关闭输出不能降低这种风险。
- 警告:爆炸性气体的危险
a. 铅酸蓄电池在正常的使用期间都会产生少量爆炸性气体。由于这个原因,在使用之前请仔细阅读本手册,并遵守
相关说明。
b. 为了降低电池爆炸的风险,请按照电池制造商和制造商发布的任何您打算在电池附近使用的设备说明进行操作。
检查并注意这些产品和设备上的警示标记。
- 注意事项:
a. 当您在铅酸蓄电池附近工作时,请避免电池电解液与皮肤、眼睛、衣服等接触。如果电解液不慎接触皮肤或衣物,
请立即用肥皂和水清洗,如果进入眼睛,立即用清水清洗至少 10 分钟,并立即就医。
b. 不要在电池或发动机附近吸烟,避免火花或火焰。
c. 请注意不要将金属工具掉到电池上而造成电池短路,进而产生爆炸的危险。
d. 请勿尝试用本充电机为其他非充电电池充电。不要对已结冰的电池充电。

5
AE5808 ESPT JARUEN DE KO
中文
第二章 充电准备:
2.1 充电准备:
- 如果需要从车辆中取出电池进行充电,请务必确保车辆中的所有设备均已关闭,以免引起电弧,并 且先拆掉电池的
接地端子。
- 为电池充电时,请确保电池周围的区域通风良好,以确保将充电过程中产生的气体及时排走。
- 由于电池使用时会产生气体而失水,必要时可为电池加入适量蒸馏水,以补充因析气而产生的失水。 操作时请严格
按照电池说明书的要求来进行,包括充电时是否去掉电池盖,以及所建议的充电倍率等。
- 明确电池的额定电压,并确保所设置的输出电压与电池的额定电压相匹配。
2.2 充电位置要求:
- 在输出 DC 线允许的情况下,尽量使充电机远离电池。
- 切勿将充电器直接放在正在充电的电池上,电池产生的气体会腐蚀并损坏充电机。
- 切勿将电池放置在充电器上,其电解液会腐蚀并损坏充电机。
- 不要在封闭的地方操作充电器。
2.3 输出线连接注意事项:
- 连接电池时,请确保充电器的输出是处于关闭状态,并且充电机的插头与市电是断开的。
- 将夹子连接到电池的正负极上(红色夹子接正极,黑色夹子接负极)并确保连接可靠。
2.4 当给在车电池充电,连线时,请遵守以下步骤。如有不慎,可能因连接顺序错误而产生火花,甚至使电池有 爆炸的风险:
- 固定好交流电源线和直流充电线,以免受到机器其他部件压坏或人为损坏。
- 检查电池柱的极性。确定电池的哪个电极与机箱连接。如果负极接地到底盘(大多数车辆),请参阅项目“c”;如
果正极接地到机箱,请参阅项目“d”。
- 对于负极接地的车辆,将充电器正极(红)夹子连接到电池正极,将负极(黑)夹子连接到车辆底盘或其他可靠的
接地部位,远离电池。不能将夹子连接到化油器、燃油管路或钣金车身等部位。
- 对于正极接地的车辆,将充电器负极(黑)夹子连接到电池负极,将正极(红)夹子连接到车辆底盘或其他可靠的
接地部位,远离电池。不能将夹子连接到化油器、燃油管路或钣金车身等部位。
- 断开充电器时,将输出关闭,断开 AC 插头,从车载机箱中取出夹子,然后从电池端子上取下夹子。
2.5 当电池在车外单独充电时,请遵守这些步骤。如有不慎,可能因连接顺序错误而产生火花,甚至使电池 因此而有爆
炸的风险:
- 检查电池柱的极性。
- 确保电池与充电机之间距离 ≥ 0.6m。
- 将充电机输出正极(红)夹子连接到电池正极,充电机输出负极(黑)夹子连接到电池负极。
- 插上电源插头,选择相应的档位进行充电。
- 断开充电机时,请务必按照连接步骤的逆向进行。
- 海运(船上用)电池必须将电池拆下来在岸上进行充电。若要在船上充电,需要设计海洋专用的充电机。

6
AE5808 ESPT JARUEN DE KO
中文
2.6 充电时长:
- 从电池铭牌上查阅到电池的额定容量(安时数),以及电池的建议充电电流,如果查不到,请联系 电池供应商。
- 设定充电电流(不要大于电池的建议充电电流)。
- 充电时间(从空电到满电)约为:电池标称容量(Ah)/ 充电电流(A)×1.25= 充电时间(hr)
注意:
- 充电时间是大概的,而且因电池而异。
2.7 操作说明:
- 使用充电机之前阅读所有的安全和连接说明,不正确的操作会损坏电池,并产生严重的个人损伤甚至死亡。

7
AE5808 ESPT JARUEN DE KO
中文
3.3 电压选择开关用途:
-12V —充12V 的电池
-24V —充24V 的电池
3.4 电流选择开关用途:
-20A —给大型电池充电,如不需维修的汽车、轻型卡车等。
-10A —给中型电池充电,如小型卡车、轮船等。草坪拖拉机、轻型卡车等。
-2A —给小型电池充电,如草坪拖拉机、摩托车等。如果电池尺寸未知,使用这项设置充电,以免将电池过充。
3.5 显示选择开关用途:
-电池电压(V)— 在LED 显示屏上显示电池的电压。
-充电电流(A)— 在LED 显示屏上显示充电时的电流,此显示 5s 后会跳回到电池电压。
-电池电量百分比(%)— 在LED 显示屏上显示充电时估测的电池充电百分比,此显示 5s 后会跳回到电池电压。
3.6 充电:
- 充电机与电池连接见本说明的第二章 2.2 至2.5 节细则。
- 充电机与交流插座连接,电源指示 LED 亮起。
- 给电池设定合适的充电电压。
第三章 功能描述及面板介绍:
3.1 这款充电机可满足大多数汽车电池充电的需求,主要具备如下特征:
-7 段式充电模式,LED 数码显示和 LED 状态指示。
- 充电开 / 关按键
- 电压选择开关:12V/24V
- 充电电流选择开关:2A/10A/20A(12V 档) 和2A/10A(24V 档)
- 显示开关有以下选择:电池电压、充电电流、电池电量百分比
LED 数码显示屏、相应功能的 LED 指示灯
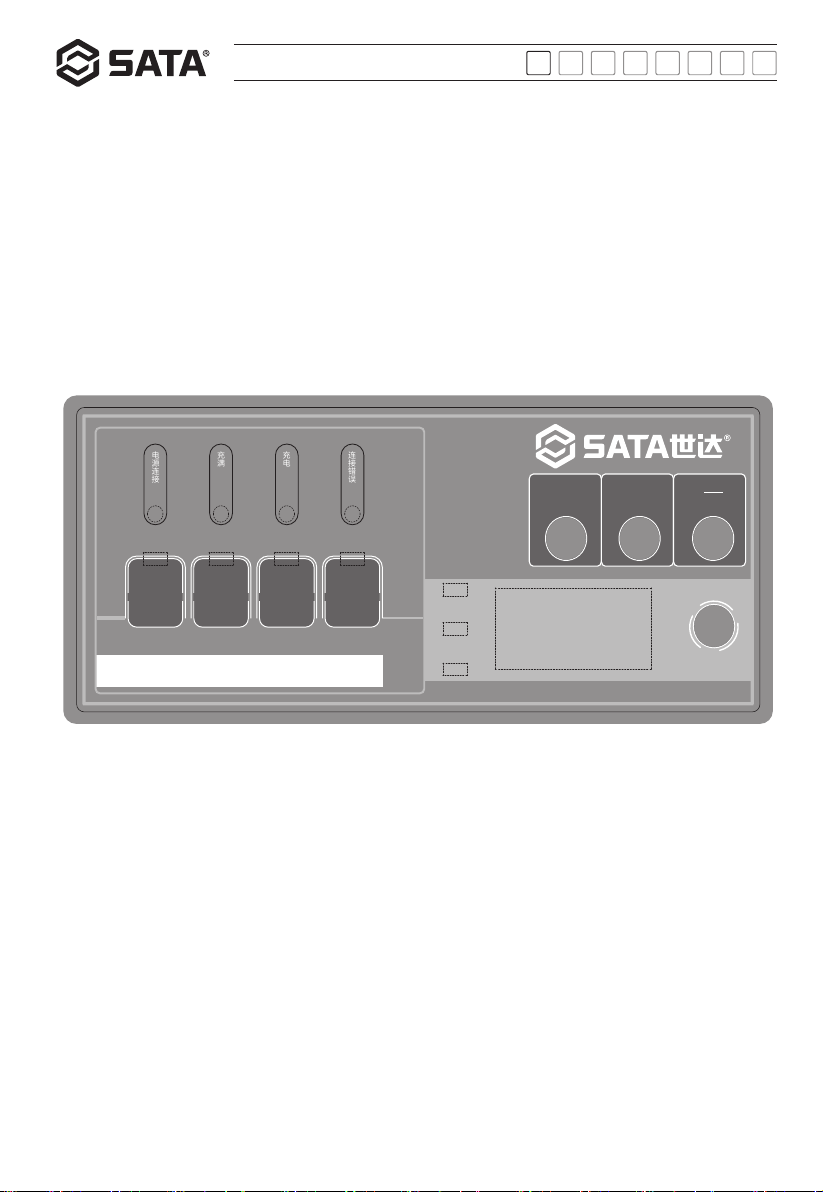
3.2 控制板:
AE5808
电源连接
连接错误
充满 充电
AMP AMP AMP
12/24V 2/10/20AMP
2 10 V
A
%
20
涓流充电 常规充电 快速充电 坏电池
显示模式
电压选择 电流选择 开
关
12/24V 2/10/20AMP 便携智能充电机

8
AE5808 ESPT JARUEN DE KO
中文
- 给电池设定合适的电流等级,电流指示 LED 亮起。
- 按动开 / 关键开始充电。
- 如果充电机没有检测到正确连接的电池,错接 LED 或坏电池 LED 会亮起,直到电池被检测到。这两个 LED 指示灯亮起
时充电不会进行,当开始充电时,充电 LED 会亮起。
- 充电完成时,按动开 / 关键终止充电,并将充电机从交流插座上拔下。
3.7 自动 7 段式充电:
- 自动电池充电机7 段式充电、高效率充电技术、嵌入的微程序控制集成电路能够保证快速、安全地为可用电池完成充电。
3.8 自动微程序控制单元充电:
- 阶段 1 诊断:分析电池能否被充电,从而避免了给缺陷电池充电;如果电池电压为 0V-0.5V,表明充电机发生错接;
电压在 0.5V-1.5V 时为坏电池;电压在 1.5V-12V(12V 档) 1.5-24V(24V 档) 之间时,将会开始预充阶段;电压在 12V-14V(12V 档)
24V-28V(24V 档) 之间时,将会开始恒电流充电阶段;电压在 14V-15V(12V 档) 28V-30V(24V 档) 时表示已接近充满;如果电
压大于 15.5V(12V 档)31V(12V 档),表明充电机发生错接。
- 阶段 2 预充阶段:如果电池电压在 1.5V-12V 之间时,充电机将会以小的电流给电池充电,以使电池有更好的维护。
- 阶段 3 软启动阶段:充电电流由小电流预充逐渐增大至 CC 恒流充电。
- 阶段 4 CC1,CC2,CC3(恒电流阶段):快速充电状态。根据电池状态自动调整充电电流,从而使电池寿命得以延长。
- 阶段 5 CV(恒压)吸收充电阶段:充电电压保持在 14.6V(12V 档) 29.2V(24V 档),但是充电电流逐渐下降直到电池被充满。
- 阶段 6 休息检测:电池充满后,充电将被切断。充电机对电池进行实时监控,如果电池电压 2 分钟之后下降到
12.8V(12V 档) 25.6V(24V 档) 以下,充电机将进入下一阶段充电。
- 阶段 7 再充电:充电机会对电池进行再次充电(重复阶段 1-6)

9
AE5808 ESPT JARUEN DE KO
中文
4.1 维修说明:
- 维修或清洁前请确保证充电机没有插市电。
- 贮存在干净、干燥的地方
- 不用时将电缆盘绕起来
- 用微湿的布清洁外壳和电缆
- 用水和小苏打的混合溶液清洗夹子上的腐蚀物
- 定期检查电缆开裂及其他损坏进行检查,如有必要对其进行更换
第四章 可能的充电问题及维护:
问题 原因 解决办法
坏电池
电池电压低于 2V 时坏电池 LED 会亮 起;
或者电池有故障,如开短、短 路或严
重硫化。
让专业技术人员对电池进行测试。
电池不能充电
缺少交流输入电源 确认充电机插入交流插座,电源连接 LED 亮起。
电池接线柱的错误连接 拔下充电机并检查电池连接;确保电池接线柱
/ 极柱和 / 或车辆底座连接良好。
错误的充电电压选择 检查电池充电时所选择的充电电压是正确的。
电池电压过低 确认电池充了足够长的时间。
充电的电池温度太低
如果电池在极度冷(温度低于 0℃)的条件下
充电 此时不能接受高速率的充电,因此开始的
充电速 率低。充电的速率会随着电池温度升高
而加快。
警告
所有维修服务应由专业人士完成

10
AE5808 ESPT JARUEN DE KO
中文
第五章 爆炸图及配件:
序号 世达配件编号 零件名称
1 SCPAE5808-01 AE5808 右前盖
2 SCPAE5808-02 风扇
3 SCPAE5808-03 H 型十字槽盘头黑自攻螺钉 ST3.5X13
4 SCPAE5808-04 前PCB 板
5 SCPAE5808-05 H 型十字槽盘头全螺纹自攻螺钉 ST2.9X8 黑锌 GB845-2000
6 SCPAE5808-06 PG9 黑色线卡
7 SCPAE5808-07 AE5808 右后盖
8 SCPAE5808-08 H 型十字槽盘头黑自攻螺钉 ST3.5X19
9 SCPAE5808-09 AE5808 左前盖
10 SCPAE5808-10 AE5808 主前盖
11 SCPAE5808-11 AE5808 拎手
12 SCPAE5808-12 主PCB 板
13 SCPAE5808-13 AE5808 通风挡板
14 SCPAE5808-14 AE5808 主后盖
15 SCPAE5808-15 AE5808 左后盖
16 SCPAE5808-16 输出线 +F20 夹+F33 手柄(红 / 黑)
17 SCPAE5808-17 国标黑色电源线
5 9 10 3 5 11 12 3 6 14 3 15
8
8
16
16
17887363321 5554
13

11
AE5808 ESPT JARUEN DE KO
中文
Table of Contents
Chapter I Important Safety Precautions:................................................................................................................12
Chapter II Charging Preparation:................................................................................................................................13
Chapter III Function Description and Panel Introductions:...............................................................................15
Chapter IV Possible Charging Faults and Maintenance:.................................................................................... 17
Chapter V Exploded View and parts:.........................................................................................................................18

12
AE5808 ESPT JARUEN DE KO
中文
Chapter I Important Safety Precautions:
- This Manual contains important safety and operating instructions. Please keep it for future reference.
-Note: This charger is only suitable for automotive lead-acid rechargeable batteries. If used to charge other types of batteries, it may
explode, causing personal injury or property damage.
- Do not expose the charger to rain, snow or moisture.
- Using accessories not recommended or sold by the battery charger manufacturer may cause fire, electric shock or personal injury.
-When the charger is not in use, disconnect the power plug to cut off the input, and bundle the input and output cables so that they are
not damaged.
-Please try not to use the power extension cable. Use of improper extension cables can result in fire or electric shock. If a power extension
cable is required, make sure that:
a. The pins on the extension cable plug and the charger plug are the same in quantity, size and shape.
b. If the length of the extension cable is no more than 7.5m, use a cable with a cross section of not less than 0.8mm2. If the length of the
extension cable is no more than 30m, use a cable with a cross section of not less than 1.3mm2. If the length of the extension cable is
no more than 45m, use a cable with a cross section of not less than 2.08mm2.
- Do not use the charger cable or plug when it is damaged. Replace the cable or plug immediately.
-Do not use the charger if it is impacted, dropped or otherwise damaged. Please take the charger to a qualified or designated service
center for inspection to ensure that there are no problems before use.
-Do not disassemble the charger by yourself. When repairs are required, take the charger to a qualified or designated service center for
repair. Improper disassembly and assembly may result in electric shock or fire.
-To reduce the risk of electric shock, unplug the charger to disconnect the power supply before performing any maintenance or cleaning.
Simply turning off the output does not reduce this risk.
- Warning: Danger of explosive gas
a. Lead-acid batteries produce a small amount of explosive gas during normal use. For this reason, please read this Manual carefully and
follow the instructions before use.
b. To reduce the risk of battery explosion, follow the instructions issued by the battery manufacturer and manufacturer of any equipment
you intend to use near the battery. Check and pay attention to the warning signs on these products and equipment.
-Notes:
a. When working near a lead-acid battery, prevent battery electrolyte coming into contact with your skin, eyes, clothing, etc. If the
electrolyte gets onto your skin or clothing, wash it off immediately with soap and water. If it gets into your eyes, flush with water for at
least 10 minutes and seek medical attention immediately.
b. Do not smoke near the battery or engine to avoid sparks or flames.
c. Be careful not to drop a metal tool onto the battery and thus cause the battery to be short-circuited, which may result in an explosion.
d. Do not attempt to charge other non-rechargeable batteries with this charger. Do not charge a frozen battery.

13
AE5808 ESPT JARUEN DE KO
中文
Chapter II Charging Preparation:
2.1 Charging preparation:
-If you need to remove the battery from the vehicle for charging, make sure that all equipment in the vehicle is turned off to avoid arcing
and remove the ground terminal of the battery first.
-When charging the battery, make sure that the area around the battery is well ventilated to ensure that the gas generated during
charging are removed in time.
-Since the battery may lose water due to gassing during use, if necessary, add an appropriate amount of distilled water. Please strictly
follow the requirements specified in the User’s Manual of the battery during operation, including whether to remove the battery cover
during charging and the recommended charging rate.
- Identify the rated voltage of battery and ensure that the set output voltage matches the rated voltage.
2.2 Requirements for charging location:
- Keep the charger away from the battery as far as the output DC cable allows.
- Do not place the charger directly on the battery being charged. The gas generated by the battery can corrode and damage the charger.
- Do not place the battery on the charger. Its electrolyte can corrode and damage the charger.
- Do not operate the charger in a closed space.
2.3 Precautions for connection of output cable:
- When connecting the battery, make sure that the charger output is off and the charger plug is disconnected from the mains.
-Connect the clips to the positive and negative poles of the battery (red clip to positive pole and black clip to negative pole) and ensure
secure connection.
2.4 When charging on-board battery, please follow the steps below for connections. A wrong connection sequence due to carelessness
may result in sparks or even battery explosion:
-Fix the AC power cable and DC charging cable to protect them from being crushed or damaged by other parts of the machine or man-
made damage.
-Check the polarity of the battery poles. Determine which pole of the battery is connected to the chassis. If the negative pole is grounded
to the chassis (for most vehicles), see item “c”; if the positive pole is grounded to the chassis, refer to item “d”.
-For vehicles with negative pole grounded, connect the positive (red) clip of the charger to the positive pole of the battery and the negative
(black) clip to the vehicle chassis or other reliable grounding location away from the battery. Do not connect the clip to the carburetor,
fuel pipeline, body panel, etc.
-For vehicles with positive pole grounded, connect the negative (black) clip of the charger to the negative pole of the battery and the
positive (red) clip to the vehicle chassis or other reliable grounding location away from the battery. Do not connect the clip to the
carburetor, fuel pipeline, body panel, etc.
-When disconnecting the charger, turn off the output, disconnect the AC plug, remove the clip at the vehicle chassis, and then remove the
clip at the battery terminal.
2.5 Please follow these steps when the battery is charged outside the vehicle. A wrong connection sequence due to carelessness may
result in sparks or even battery explosion:
- Check the polarity of the battery poles.
- Make sure that the distance between the battery and the charger is no less than 0.6m.
-Connect the positive (red) clip of the charger output to the positive pole of the battery, and the negative (black) clip to the negative pole
of the battery.
- Connect the power plug and select the appropriate position for charging.
- Make sure to disconnect the charger in the reverse order of connection.
- Marine (on-board) batteries must be removed and charged on shore. To charge on board, a marine-specific charger is required.
2.6 Charging time:
-Check the battery rated capacity (Ah) and the recommended charging current for the battery on the battery nameplate. If not available,
contact the battery supplier.

14
AE5808 ESPT JARUEN DE KO
中文
- Set the charging current (not exceed the recommended charging current of the battery).
- Charging time (from empty to full) is approximately: battery nominal capacity (Ah)/charging current (A) ×1.25 = charging time (hr)
- Note: Charging time is approximate and varies from battery to battery.
Note:
- Charging time is approximate and varies from battery to battery.
2.7 Operation instructions:
-Read all safety and connection instructions before using the charger. Improper operation can damage the battery and cause serious
personal injury or death.

15
AE5808 ESPT JARUEN DE KO
中文
3.3 Usage of voltage selection switch:
- 12V - for charging 12V battery
- 24V - for charging 24V battery
3.4 Usage of current selection switch:
- 20A - for charging large batteries used in maintenance-free vehicles, light trucks, etc.
- 10A - designed for charging medium batteries used in small trucks, ships, etc. Lawn tractors, light trucks, etc.
-2A - for charging small batteries used in lawn tractors, motorcycles, etc. If the battery size is unknown, use this set to avoid overcharging
the battery.
3.5 Usage of display selection switch:
- Battery voltage (V) - the battery voltage is displayed on the LED display.
- Charging current (A) - the current during charging is displayed on the LED display. This display will return to the battery voltage after 5s.
-Charge percentage (%) - the estimated charge percentage during charging is displayed on the LED display. This display will return to the
battery voltage after 5s.
3.6 Charging:
- Connect the charger to the battery as described in Sections 2.2 to 2.5 in Chapter II of this Manual.
- Connect the charger to the AC socket and the power indicator LED will light up.
AE5808
Power connection
Improper
connection
Fully charged
Charging
AMP AMP AMP
12/24V 2/10/20AMP
2 10 V
A
%
20
Trickle charge Normal charge Quick charge Faulty battery
Display mode
Voltage selection Current selection ON
OFF
12/24V 2/10/20AMP Portable Smart Charger
Chapter III Function Description and Panel Introductions:
3.1 This charger can meet the requirements for charging most automotive batteries, and mainly has the following characteristics:
- 7-stage charging mode, LED digital display and LED status indication.
- Charging On/Off button
- Voltage selection switch: 12V/24V
- Charging current selection switch: 2A/10A/20A (12V position) and 2A/10A (24V position)
- The display switch has the following options: battery voltage, charging current, charge percentage
- LED digital display, LED indicators of corresponding functions
3.2 Control panel:

16
AE5808 ESPT JARUEN DE KO
中文
- Set an appropriate charging voltage for the battery.
- Set an appropriate current level for the battery and the current indicator LED will light up.
- Press the On/Off button to start charging.
-If the charger does not detect a properly connected battery, the Improper connection LED or the Faulty battery LED will light up until the
battery is detected. Charging will not work when these two LEDs are lit, and the charging LED will light up when charging begins.
- When charging is complete, press the On/Off button to end charging and unplug the charger from the AC socket.
3.7 Automatic 7-stage charging:
-The automatic battery charger features with 7-stage charging, high efficiency and built-in microprogrammed control ICs that ensure
quick and safe charging of available batteries.
3.8 Charging with automatic microprogrammed control unit:
-Stage 1 Diagnosis: Analyze whether the battery can be charged, thus avoiding charging a defective battery; if the battery voltage is
0V-0.5V, it indicates that the charger is connected incorrectly; if the voltage is 0.5V-1.5V, it indicates a faulty battery; if the voltage is 1.5-
12V (12V position) or 1.5V-24V (24V position), the precharge stage will start; if the voltage is 12V-14V (12V position) or 24V-28V (24V position),
the constant-current charge stage will start; if the voltage is 14V-15V (12V position) or 28V-30V (24V position), it indicates that the battery
is almost charged fully; if the voltage is greater than 15.5V (12V position) or 31V (12V position), it indicates that the charger is connected
incorrectly.
-Stage 2 Precharge stage: If the battery voltage is 1.5V-12V, the charger will charge the battery with a small current to make the
battery better maintained.
- Stage 3 Soft start stage: The charging current is gradually increased from small current precharge to CC constant-current charge.
-Stage 4 CC1, CC2, CC3 (constant-current stage): Quick charge state. The charging current is automatically adjusted based on the
battery status to extend battery life.
-Stage 5 CV (constant voltage) absorption charge stage: The charging voltage is maintained at 14.6V (12V position) or 29.2V (24V
position), but the charging current is gradually reduced until the battery is fully charged.
-Stage 6 Rest and detection: After the battery is fully charged, the charger will be cut off. The charger monitors the battery in real
time. If the battery voltage drops below 12.8V (12V position) or 25.6V (24V position) after 2 minutes, the charger will enter the next stage of
charging.
- Stage 7 Recharge: The charger recharges the battery (repeats Stages 1-6).

17
AE5808 ESPT JARUEN DE KO
中文
4.1 Repair instructions:
- Before repairing or cleaning, please make sure that the charger is not connected to the mains.
- Store it in a clean, dry place
- Wind the cable when not in use
- Clean the casing and cable with a slightly damp cloth
- Wash off the corrosives on the clips with a mixture of water and baking soda
- Regularly check the cable for cracks and other damage and replace if necessary
Chapter IV Possible Charging Faults and Maintenance:
Fault Cause Solution
Faulty battery
The Faulty battery LED will light up when
the battery voltage is lower than 2V; or the
battery has a fault such as open circuit, short
circuit or severe vulcanization.
Ask the professional technician to test the battery.
Battery can't be charged
AC input power not available Check that the charger is plugged into an AC socket
and the Power connection LED is lit.
Wrong connection of battery terminals
Unplug the charger and check the battery connections;
make sure the battery terminals/poles and/or the
vehicle chassis are properly connected.
Wrong charging voltage selected Check that the charging voltage selected when
charging the battery is correct.
Battery voltage is too low Make sure that the battery is charged for a enough
long time
The temperature of charged battery is too
low
If the battery is charged under extremely cold
conditions (temperature below 0°C), high-rate
charging is not acceptable at this time, so the initial
charging rate is low. The charging rate increases as
the battery temperature increases.
Warning:
All repairs should be done by professionals

18
AE5808 ESPT JARUEN DE KO
中文
Chapter V Exploded View and parts:
S/N SATA part No. Part Name
1 SCPAE5808-01 AE5808 right front cover
2 SCPAE5808-02 Fan
3 SCPAE5808-03 H-shaped cross recessed pan head black tapping screw ST3.5X13
4 SCPAE5808-04 Front PCB
5 SCPAE5808-05 H-shaped cross recessed pan head fully threaded tapping screw ST2.9X8, black zinc, GB845-2000
6 SCPAE5808-06 PG9 black cable retainer
7 SCPAE5808-07 AE5808 right rear cover
8 SCPAE5808-08 H-shaped cross recessed pan head black tapping screw ST3.5X19
9 SCPAE5808-09 AE5808 left front cover
10 SCPAE5808-10 AE5808 main front cover
11 SCPAE5808-11 AE5808 handle
12 SCPAE5808-12 Main PCB
13 SCPAE5808-13 AE5808 draught damper
14 SCPAE5808-14 AE5808 main rear cover
15 SCPAE5808-15 AE5808 left rear cover
16 SCPAE5808-16 Output cable +F20 clip +F33 handle (red/black)
17 SCPAE5808-17 GB black power cable
5 9 10 3 5 11 12 3 6 14 3 15
8
8
16
16
17887363321 5554
13

19
AE5808 ESPT JARUEN DE KO
中文
Verzeichnis
Kapitel 1 Wichtige Sicherheitshinweise:..................................................................................................................20
Kapitel 2 Ladevorbereitung: .........................................................................................................................................21
Kapitel 3 Funktionsbeschreibung und Bedienfeldeinführung:....................................................................... 23
Kapitel 4 Mögliche Ladeprobleme und Wartung:................................................................................................ 25
Kapitel 5 Explosionszeichnungen und Zubehör:...................................................................................................26

20
AE5808 ESPT JARUEN DE KO
中文
Kapitel 1 Wichtige Sicherheitshinweise:
- Diese Anleitung enthält wichtige Sicherheits- und Betriebsanweisungen. Bitte bewahren Sie es zum späteren Nachschlagen auf.
-Hinweis: Dieses Ladegerät ist nur für Akkus für Blei-Säure-Akkus geeignet.Wenn Sie andere Akkutypen aufladen, kann diese explodieren
und zu Personen- und Sachschäden führen.
- Setzen Sie das Ladegerät weder Regen noch Schnee oder hoher Luftfeuchtigkeit aus.
-Die Verwendung vom Zubehör, das nicht vom Hersteller des Akkuladegeräts empfohlen oder verkauft wird, kann zu Bränden,
Stromschlägen oder Verletzungen führen.
-Wenn Sie das Ladegerät nicht verwenden, ziehen Sie das Netzkabel ab, schneiden Sie den Eingang ab und bündeln Sie die Eingangs- und
Ausgangskabel, damit sie nicht beschädigt werden.
-Bitte versuchen Sie nicht, das Verlängerungskabel zu verwenden.Die unsachgemäße Verwendung von Verlängerungskabeln kann zu Feuer
und Stromschlag führen.Wenn Sie ein Verlängerungskabel verwenden müssen, stellen Sie Folgendes sicher:
a. Die Anzahl der Stifte am Stecker des Verlängerungskabels und am Stecker des Ladegeräts sind in Größe und Form identisch.
b. Wenn die Länge des Verlängerungsleitung ≤ 7,5 m, verwenden Sie ein Kabel mit einem Querschnitt von mindestens 0,8 mm2. Wenn die
Länge des Verlängerungskabels ≤ 30 m ist, verwenden Sie ein Kabel mit einem Querschnitt von mindestens 1,3 mm2. Wenn die Länge
des Verlängerungskabels ≤ 45 m ist, verwenden Sie ein Kabel mit einem Querschnitt von mindestens 2,08 mm2.
- Verwenden Sie das Kabel oder den Stecker des Ladegeräts nicht, wenn es beschädigt ist. Ersetzen Sie das Kabel oder den Stecker sofort.
-Verwenden Sie das Ladegerät nicht, wenn es gestoßen, fallengelassen oder anderweitig beschädigt ist.Bitte bringen Sie das Ladegerät
zur Überprüfung zu einem qualifizierten oder ausgewiesenen Kundendienst, um sicherzustellen, dass vor dem Gebrauch keine Probleme
auftreten.
- Zerlegen Sie das Ladegerät nicht.Wenn Reparaturen erforderlich sind, bringen Sie das Ladegerät zur Reparatur zu einer qualifizierten oder
ausgewiesenen Serviceeinrichtung.Eine unsachgemäße Demontage kann zu Stromschlägen oder Bränden führen.
-Um das Risiko eines Stromschlags zu verringern, ziehen Sie das Ladegerät aus der Steckdose und trennen Sie es vom Stromnetz, bevor
Sie Wartungs- oder Reinigungsarbeiten durchführen.Durch einfaches Ausschalten des Ausgangs wird dieses Risiko nicht verringert.
- Warnung: Explosionsgefahr durch Gase
a. Blei-Säure-Akkus erzeugen bei normalem Gebrauch eine geringe Menge explosiven Gases.Lesen Sie daher diese Anleitung sorgfältig
durch und befolgen Sie die Anweisungen, bevor Sie es verwenden.
b. Um das Risiko einer Akkuexplosion zu verringern, befolgen Sie die Anweisungen des Akkuherstellers und des Herstellers für alle Geräte,
die Sie in der Nähe des Akkus verwenden möchten.Prüfen und beachten Sie die Warnhinweise auf diesen Produkten und Geräten.
-Hinweis:
a. Vermeiden Sie bei Arbeiten in der Nähe von Blei-Säure-Akkun den Kontakt mit Haut, Augen, Kleidung usw.Wenn der Elektrolyt
versehentlich mit Haut oder Kleidung in Berührung kommt, waschen Sie ihn sofort mit Wasser und Seife ab. Wenn er in Ihre Augen
gelangt, waschen Sie ihn mindestens 10 Minuten lang mit Wasser ab und suchen Sie sofort einen Arzt auf.
b. Rauchen Sie nicht in der Nähe des Akkus oder des Motors, um Funken oder Flammen zu vermeiden.
c. Lassen Sie das Metallwerkzeug nicht auf den Akku fallen und schließen Sie den Akku kurz, da dies zu einer Explosion führen kann.
d. Versuchen Sie nicht, andere nicht wiederaufladbare Akkun mit diesem Ladegerät aufzuladen.Laden Sie den gefrorenen Akku nicht auf.
Table of contents
Languages:
Other SATA Batteries Charger manuals
Popular Batteries Charger manuals by other brands

ULTIMATE SPEED
ULTIMATE SPEED ULG 17 A1 Operation and safety notes translation of the original instructions

Bosch
Bosch Surly BCS210 owner's manual

Makita
Makita Makstar DC18SD manual

Dometic
Dometic DEL90 quick start guide

Keba
Keba KeContact X Series Configuration manual

Motorola
Motorola PMLN6393 Series user guide