manuals.online logo
Brands
  1. Home
  2. •
  3. Brands
  4. •
  5. SATO KEIRYOKI
  6. •
  7. Measuring Instrument
  8. •
  9. SATO KEIRYOKI PC-53D User manual

SATO KEIRYOKI PC-53D User manual

Instruction Manual
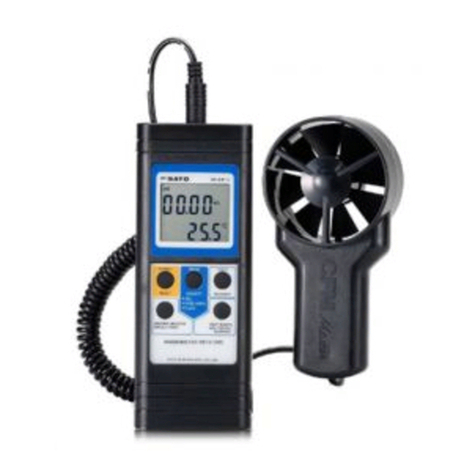
No. 7650-20 Mini Anemometer
Model PC-53D
3-4, Kanda-kajicho, Chiyoda-ku, Tokyo 101-0045 Japan
URL: http://www.sksato.co.jp/english/
O.02
1
Thank you for purchasing the Anemometer model PC-53D.
- This model is designed to measure wind velocity, temperature and humidity. Please do not use it for the
other purposes.
- Read this manual thoroughly before use and keep it in a safe place for future references.
Warning
The PC-53D is not explosion-proof. Do not use it in an atmosphere containing flammable gas.
Beware of explosion!
There is a risk of explosion
If you have any questions about this product, please contact the store from which the unit was
purchased or our service network.
Caution
In order to use the PC-53D properly, please follow the undermentioned instructions.
-The units other than m/s (meter/second) are displayed for the reference purpose. We guarantee the
measuring accuracy for the values with m/s only.
-Use this unit only in standard atmosphere but the others.
-This unit isn’t water-proof structure. Do not get wet the unit.
-Be sure to use the unit within the measuring range. Using the unit outside the specified measuring
range results in failure or damage.
-If the condensation occurs on the unit, immediately turn the power off and let it dry naturally at normal
temperature before use.
-Use of the unit in electrically noisy environments results in unstable display, increased error.
-If the unit is left in a car during summer time, heat from sunlight may results in failure. Do not leave it
such a place.
-As measuring the wind velocity by holding this unit out of a car window while driving is very dangerous,
never do it.
-Do not disassemble, modify the unit nor use the wrong battery. Doing so result in inaccurate
measurement or failure.
-This model is a precision unit. Do not drop the unit or apply impact to it.
-Do not wash or wipe this unit with alcohol, thinner, or other organic solvents. If the unit becomes dirty,
wipe it with a tightly-wrung towel or the like that has been dipped in warm water with a neutral
detergent.
-If the unit is not to be used for a long time, remove the battery. Otherwise, the battery may leak fluid,
which may result in failure.
-Keep batteries out of reach of children. If you swallow a battery accidentally, consult a doctor
immediately.
-For repair, contact the store from which the unit was purchased or our service network.
Overview
The PC-53D is a compact and lightweight portable anemometer.
Moreover, a temperature and humidity sensors are built in a compact body.
This is a multifunctional anemometer which measures temperature and humidity in the atmosphere, and
displays the dew point and wet-bulb temperature by calculation. An external temperature probe is also
usable.
2
Features
- Pocket-size, easy to carry
- Measurement of wind velocity, temperature and humidity is possible.
- Display of various calculated values
The wind chill factor, Beaufort wind scale, dew point and wet bulb temperature can be calculated and
displayed.
- Auto power-off function
This function is to conserve battery power for user from forgetting the turn-off the power of this unit.
1. Names and Functions of Components
1-1. Main unit
①LCD display : Display the measured values and the operating status of the unit.
*For more detail, please refer to the section “1-2. LCD display panel”.
②HOLD/○
lkey : Pressing this key turns the power on or off.
③UNIT/MODE key : Use to switch the measured unit or measurement mode.
④Wind velocity sensor : The wind velocity is measured.
⑤Temperature/Humidity sensor
: The part which the temperature and humidity are measured.
⑥Outlet for external temperature sensor
: The part which the external sensor is attached
⑦Battery lid/battery compartment
: This lid covers the coin cell battery (CR2032) compartment.
①
②
③
④
⑤
⑥
⑦
3
1-2. LCD display
①7-segment display
: It displays each measured value.
②Unit of wind velocity
: It displays the measurement units for wind velocity
BF (Beaufort scale)
FT/M (feet/minute)
M/H (mile/hour)
KMH (kilo meter/hour)
M/S (meter/second)
KNT (knot)
③MAX : Lit while the unit is in the mode for the maximum wind velocity measurement.
④H : Lit while the measured value is hold.
⑤WCl : Lit while the unit is in the mode for the wind chill measurement.
⑥DP : Lit while the unit is in the mode for the dew point measurement.
⑦WBT : Lit while the unit is in the mode for the wet bulb temperature measurement.
⑧EXT : Lit while the external temperature probe is measuring the temperature.
⑨Low battery : Lit when the battery is low and let you know to change the battery.
⑩°C %rh : Characters of unit of temperature(°C), unit of humidity(%rh)
2. Installing or Replacing the Battery
Replace the battery as follows before using the unit for the first time or when low battery is displayed.
(1) Remove the battery lid by turning it counter-clockwise by using a coin or the like.
(2) In case of replacing a battery, take out the used battery.
(3) Insert the coin cell battery (CR2032). Check the polar direction of positive
and negative and place the battery correctly (Placing the battery between
positive metal fitting and negative metal fitting)
After the placement of the battery, that of the positive terminal (+) is
facing upward.
(4) Reinstall the battery lid in the reverse order of removal.
Caution
- If the low battery is displayed, replace the battery immediately with a new one (CR2032).
- Measurements while the battery power is insufficient may result in faulty measurement.
- Always use the new battery
- Do not throw the used battery in the fire.
- For environmental preservation dispose the used batteries according to the regulation of each local
government
3. Measuring Procedures
(1) Press the HOLD/○
lkey. After the whole area of the display is lit, It is ready to measure.
* The display mode just before turning off is held. After replacement of batteries, the display is a Wind
Velocity Measurement Mode.
4
(2) Choose the Mode of measurement by pressing the UNIT/MODE key.
a) Wind Velocity Measurement Mode
Wind Velocity Measurement Mode is to measure the Wind Velocity.
While the wind velocity is displayed and hold the HOLD/○
lkey, each time the UNIT/MODE key is
pressed, the unit set is cycled as follows. Choose the measurement unit displayed.
b) Max Wind Velocity Measurement Mode
Display the updated maximum value of wind velocity during measurement.
NB. The maximum value is reset as the unit is turned off.
c) Temperature Measurement Mode
Temperature Measurement Mode is to measure the temperature.
d) Humidity Measurement Mode
Humidity Measurement Mode is to measure the humidity.
e) Wind Chill Measurement Mode
Wind Chill Measurement Mode is to display the Wind Chill.
f) Dew Point Measurement Mode
Dew Point Measurement Mode is to display the dew point temperature by calculating from
temperature and humidity.
g) Wet-bulb Temperature Measurement Mode
Wet-bulb Measurement Mode is to display the Wet-bulb temperature by calculating from
temperature and humidity.
(3)Direct the unit in the way that the wind measured comes through the unit from back (the side which serial
number is printed) to front (the side of LCD display).
(4)Turn off the unit by pressing the HOLD/○
lkey 2 seconds or more after use.
Caution
- Do not use the unit in the environment beyond the specified operating condition. It may lead to failure of
the unit.
BF
FT/M
M/H
KMH
M/S
KNT
a) Wind Velocity Measurement Mode
Wind Velocity Unit is displayed
h) External Temperature Measurement
Mode “EXT”is displayed
b) Max Wind Velocity Measurement Mode
“MAX”is displayed
g) Wet-bulb Temperature Measurement
Mode “WBT”is displayed
c) Temperature Measurement Mode
“°C”is displayed
f) Dew Point Measurement Mode
“DP”is displayed
d) Humidity Measurement Mode
“%rh”is displayed
e) Wind Chill Measurement Mode
“WCl”is displayed
5
- Measurement outside the specified range may result in failure or damage of the unit. Do not use the unit
in such a manner.
- The rapid change of ambient temperature might affect the measurement accuracy. To assure the
measurement accuracy, wait until the unit adapts the ambient temperature.
Hold Function
When the temperature changes too frequently during measurement, press the HOLD/○
lkey to hold the
measured value for easier reading.
•How to activate the hold function
①Press HOLD/○
lkey in the measurement mode. The “H”character is displayed and the measured
value is being held.
②Press the HOLD/○
lkey again to release the Hold function. The “H”character is disappeared and it
returns to measurement mode.
Using the external temperature probe
Measuring the temperature with external temperature probe.
•How to measure the temperature
①Connect the external temperature probe to the unit.
②Turn the power of the unit on and press the UNIT/MODE key to switch to the EXT display.
The value measured by the external temperature probe will be displayed.
Auto power-off function
If the unit is not operated for approximately 5 minutes, the power will be automatically turned off. This Auto
power-off function conserves battery power even if you forget to turn the power off.
•How to release the Auto power-off function
①Turn the power off and keep pressing the HOLD/○
lkey for 2 seconds or more.
②When the character “n”is displayed after the entire display is lighted-up, release the HOLD/○
l
key. The character “n”is cleared and the unit is in measurement mode. The Auto power-off function
will be deactivated.
Caution
Once the unit is turned off, the Auto power-off function is activated again.
If the Auto power-off function is not required, release the Auto power-off function whenever you start up the
unit.
4. Error message
Measurement Target
Error
Code
Cause
Solution
Wind Velocity
Temperature
Humidity
Dew point
Wet-bulb temperature
H02
Measured value is lower than
the measurement range
Use the unit within measurement
ranges. If error message is still shown,
stop using it and contact the store you
purchased it or our service network
H03
Measured value is higher
the measurement range
Humidity,
Dew point
Wet-bulb temperature
E04
E33
Out of the temperature
measurement range.
Or the unit has defect.
6
5. Specifications
Product name
No.7650-20 Mini-Anemometer
Model
PC-53D
Measurement range
Temperature
0.0 to 50.0°C
Humidity
10.0 to 95.0%rh
Wind velocity
meter/second
1.1 to 18.0m/s
feet/minute
217 to 3540FTM
knot
2.1 to 35.0KNT
kilo meter/hour
4.0 to 64.0KMH
mile/hour
2.5 to 40.0M/H
Beaufort scale
1 to 8
Accuracy
Temperature
±1°C
Humidity
±5%rh (at 20 to 30°C, 40 to 70%rh), ±8%rh (at others)
External temperature
±1°C
Wind velocity
±1.1m/s (at 1.1 to 10.0m/s), ±2.0m/s (at others)
Resolution
Temperature
0.1°C
Humidity
0.1%rh
External temperature
0.1°C
Wind velocity
meter/second
0.1
feet/minute
1
knot
0.1
kilo meter/hour
0.1
mile/hour
0.1
Beaufort scale
(1)
Dew point display
range
-20.0 to 49.0°C
(display value calculated from temperature and humidity within measuring range)
Wet-bulb temp. display
range
-5.0 to 49.0°C
(display value calculated from temperature and humidity within measuring range)
Measurement
sampling time
about 1 second
(As for the wind velocity, moving average value of 2 seconds is displayed )
Sensing elements
Temperature: Thermistor
Humidity: Electrostatic capacity humidity sensor
Wind velocity: Vane (propeller) rotation detection
Operation ambient
0 to 50°C, Less than 95%rh (no condensation)
Storage temp.
-10 to 50°C (no condensation)
Power
Lithium button battery (CR2032) x 1
Battery life
about 140 hours (continuous use)
Materials
Main unit : ABS resin
Vane: ABS resin
External temperature probe sensing stem: SUS
Dimensions
Main unit: 46(W) x 136 (H) x 17(D) mm
External probe: stem about 4 mm dia. x 100 mm (L), cable length about 1m
Weight
Main unit: about 57g (including a battery), External probe: about 32g
Accessory
Lithium button battery (CR2032) x 1, Instruction manual x 1
Hand strap x 1 External probe x 1

This manual suits for next models

1

Other SATO KEIRYOKI Measuring Instrument manuals

SATO KEIRYOKI SK-610PH-II User manual

SATO KEIRYOKI

SATO KEIRYOKI SK-610PH-II User manual

SATO KEIRYOKI 7720-00 User manual

SATO KEIRYOKI

SATO KEIRYOKI 7720-00 User manual

SATO KEIRYOKI SK-50TCH User manual

SATO KEIRYOKI

SATO KEIRYOKI SK-50TCH User manual

SATO KEIRYOKI S270WP Series User manual

SATO KEIRYOKI

SATO KEIRYOKI S270WP Series User manual

SATO KEIRYOKI SK-93F-II User manual

SATO KEIRYOKI

SATO KEIRYOKI SK-93F-II User manual

SATO KEIRYOKI SK-130ITH User manual

SATO KEIRYOKI

SATO KEIRYOKI SK-130ITH User manual

SATO KEIRYOKI 7820-00 User manual

SATO KEIRYOKI

SATO KEIRYOKI 7820-00 User manual

SATO KEIRYOKI SK-M460-TRH User manual

SATO KEIRYOKI

SATO KEIRYOKI SK-M460-TRH User manual

SATO KEIRYOKI PC-7700II User manual

SATO KEIRYOKI

SATO KEIRYOKI PC-7700II User manual

SATO KEIRYOKI Sophia User manual

SATO KEIRYOKI

SATO KEIRYOKI Sophia User manual

SATO KEIRYOKI NSII-TQ User manual

SATO KEIRYOKI

SATO KEIRYOKI NSII-TQ User manual

SATO KEIRYOKI SK-5RAD-MR User manual

SATO KEIRYOKI

SATO KEIRYOKI SK-5RAD-MR User manual

SATO KEIRYOKI 7790-00 User manual

SATO KEIRYOKI

SATO KEIRYOKI 7790-00 User manual

SATO KEIRYOKI PALMA 2 User manual

SATO KEIRYOKI

SATO KEIRYOKI PALMA 2 User manual

SATO KEIRYOKI SK-RHG User manual

SATO KEIRYOKI

SATO KEIRYOKI SK-RHG User manual

SATO KEIRYOKI SK-181GT User manual

SATO KEIRYOKI

SATO KEIRYOKI SK-181GT User manual

SATO KEIRYOKI 1722-00 User manual

SATO KEIRYOKI

SATO KEIRYOKI 1722-00 User manual

SATO KEIRYOKI SK-5RAD-SP User manual

SATO KEIRYOKI

SATO KEIRYOKI SK-5RAD-SP User manual

SATO KEIRYOKI 1410-00 User manual

SATO KEIRYOKI

SATO KEIRYOKI 1410-00 User manual

SATO KEIRYOKI 7542-00 User manual

SATO KEIRYOKI

SATO KEIRYOKI 7542-00 User manual

SATO KEIRYOKI SWPII-07 User manual

SATO KEIRYOKI

SATO KEIRYOKI SWPII-07 User manual

SATO KEIRYOKI SK-M350-TRH-I User manual

SATO KEIRYOKI

SATO KEIRYOKI SK-M350-TRH-I User manual

SATO KEIRYOKI PC-7900GT User manual

SATO KEIRYOKI

SATO KEIRYOKI PC-7900GT User manual
SATO KEIRYOKI SK-620PHII User manual

SATO KEIRYOKI

SATO KEIRYOKI SK-620PHII User manual

Popular Measuring Instrument manuals by other brands

Ankom A2000 Service Procedure

Ankom

Ankom A2000 Service Procedure

Lambda SR1 Operation manual

Lambda

Lambda SR1 Operation manual

Renishaw APCA Series Installation and user guide

Renishaw

Renishaw APCA Series Installation and user guide

LaserLiner BeamControl-Master BCM operating instructions

LaserLiner

LaserLiner BeamControl-Master BCM operating instructions

Fotric 226B Quick start manual

Fotric

Fotric 226B Quick start manual

Vemer Tuo Wi-Fi RF Bianco user manual

Vemer

Vemer Tuo Wi-Fi RF Bianco user manual

BASETech EM-3000 operating instructions

BASETech

BASETech EM-3000 operating instructions

DeWalt DW040 Original instructions

DeWalt

DeWalt DW040 Original instructions

SICK GRL18V operating instructions

SICK

SICK GRL18V operating instructions

LG RC278 owner's manual

LG

LG RC278 owner's manual

Bushnell 20-5103 user guide

Bushnell

Bushnell 20-5103 user guide

Agilent Technologies 1145A User's and service guide

Agilent Technologies

Agilent Technologies 1145A User's and service guide

Helwett Packard 4339B user guide

Helwett Packard

Helwett Packard 4339B user guide

CPN MC3 ELITE operating manual

CPN

CPN MC3 ELITE operating manual

Badger Meter ModMAG M Series installation manual

Badger Meter

Badger Meter ModMAG M Series installation manual

Ametek 888 user manual

Ametek

Ametek 888 user manual

Pfeiffer Vacuum IKR 251 operating instructions

Pfeiffer Vacuum

Pfeiffer Vacuum IKR 251 operating instructions

LaserLiner MeterMaster Plus quick start guide

LaserLiner

LaserLiner MeterMaster Plus quick start guide

manuals.online logo
manuals.online logoBrands
  • About & Mission
  • Contact us
  • Privacy Policy
  • Terms and Conditions

Copyright 2025 Manuals.Online. All Rights Reserved.