manuals.online logo
Brands
  1. Home
  2. •
  3. Brands
  4. •
  5. SATO KEIRYOKI
  6. •
  7. Measuring Instrument
  8. •
  9. SATO KEIRYOKI PC-7900GT User manual

SATO KEIRYOKI PC-7900GT User manual

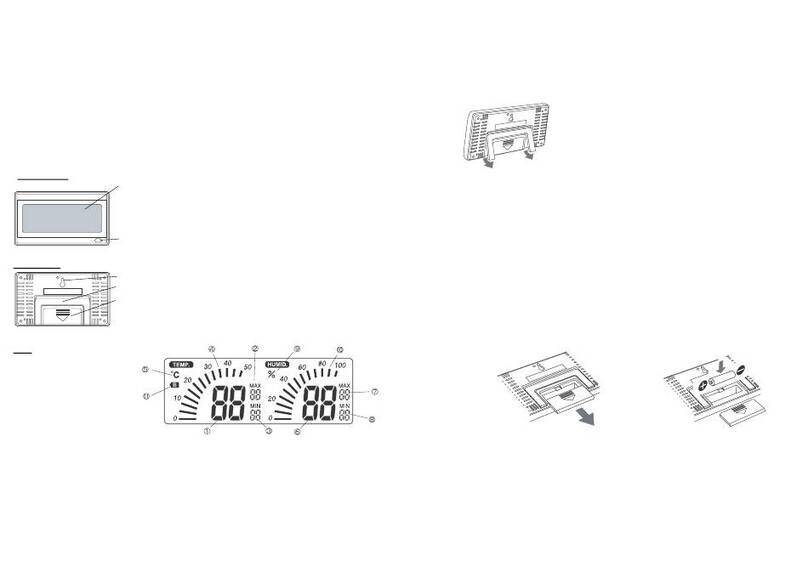
Heat stress monitor
(indicates the level with 5 steps)
Low battery mark
(If this mark appears, immediately replace the batteries)
Temperature (ºC)
Humidity (%)
Time
Instruction Manual
Digital Thermohygrometer w/Heat Stress Monitor
Model PC-7900GT
Thank you for purchasing the digital thermohygrometer with heat stress monitor model PC-7900GT.
- This product is designed to measure temperature and humidity of atmosphere and indicate the heat
stress exposure with 5 steps. Do not use it for other purposes.
- This heat stress monitor is applicable for household use only. The index is just for the reference to
control air-condition or manage health condition.
- Read this manual thoroughly before use and keep it in a safe place for your future references.
Names of section
Front view Rear view
Replacing Batteries
When the battery power becomes low, the display dims and measurement errors occur. Replace all
two batteries to new ones.
* The low battery mark ( ) will appear on the LCD when replacement of batteries is required.
(1) Remove the battery compartment lid by sliding it downward.
(2) Pull the pickup string to get out the battery compartment.
Be careful not to break the string with a strong pull.
(3) Remove the used batteries and
load two new AAA batteries with
correct polarity (+) (-) as
instructed in the battery
compartment.
(4) Set in the battery compartment and
close the lid.
Dispose of used batteries according to your local waste disposal regulations for environmental
conservation.
System Reset
Use the reset key to return correct indication. This key is useful when
the temperature or humidity values is inaccurately indicated by inference
of the electrostatic action or when the batteries are replacement.
In this case, data are erased and the time displays as 00:00.
Set the time with the following procedure.
Press the RESET key with a thin stick like a toothpick.
How to Use
•Insert the batteries at the start.
Setting Time
Press the SET key for three sec. to change to the time setting mode.
(1) “24H”brinks. Press the MAX or MIN key to select
24H or 12H display.
(2) Press the SET key and “hour”starts flashing. Press the MAX
(numbers up) or MIN (numbers down) key to set the hours.
(3) Press the SET key again and minute starts flashing. Press the
MAX (numbers up) or MIN (numbers down) key to set the
minute.
(4) Press the SET key and setting of the time is now complete.
Note: If no key is pressed for one minute, the setting of the time automatically exits.
LCD display for
thermohygrometer
LCD display
for clock
RESET key
(system reset)
MAX key
MIN key
SET key
LCD display for
Heat stress monitor
Battery
compartment lid
(2)
Battery
compartment
toothpick
(1)
pickup string
Battery
compartment lid
1
2
On Thermohygrometer
It takes about 30 minutes that the unit adapts the measurement environment before taking
accurate measurements.
•Press the MAX key to display the maximum temperature and humidity.
* MAX is flashing. Pressing the MAX key again returns to
display the current temperature and humidity.
If no key is pressed for one minute, display will automatically return
to current temperature and humidity.
•Press the MIN key to display the minimum temperature and humidity.
* MIN is flashing. Pressing the MIN key again returns to display
the current temperature and humidity.
If no key is pressed for one minute, display will automatically return
to current temperature and humidity.
The memory that holds the maximum and minimum temperature and/or humidity values is clear
at the time of the battery replacement or by pressing RESET key.
* “Hi”displays when temperature is higher than 50ºC or humidity is higher than 90%.
* “Lo” displays when temperature is lower than -9.9ºC or humidity is lower than 20%.
* “---“displays when humidity is lower than 17% or lower than 30% when
temperature is lower than 15ºC.
NB. When“---“ appears, the indication of heat stress monitor will not display
On Heat Stress Monitor
NB. - The index is just for the reference to control
air-condition or manage health condition.
- How you feel may vary among different individuals
and health condition
- The index by this devise may not correspond to the
warning or alert of heat stress exposure announced
by public agency.
Indications of heat stress are displayed with 5 levels based on the current temperature and humidity.
WBGT (°C)
Level of Risk
Recommended Actions
5
Above 31
Danger
Stop all physical exercises except special occasions
4
Above 28
Warning
Avoid hard physical exercises
3
Above 25
Alert
Take frequent rests and hydration
2
21 to 25
Caution
Take frequent hydration
1
Below 21
Low risk
Take proper hydration
Cautions in Use
The instrument is delicately made. Be careful not to drop it or give a shock to it.
The instrument is desktop type. Do not mount it on a wall.
The instrument is not waterproof. Avoid a direct contact with water.
Do not use the instrument at a place exposed to direct sunlight or near a heater. Doing so may cause
deformation of the casing and/or measurement errors.
Use a cloth moistened with neutral detergent water when cleaning the instrument. Do not use alcohol,
thinner or any other organic detergents etc. for cleaning.
Do not install the unit near a TV, cell phone or microwave oven. Otherwise, the readings of
temperature and humidity may become unstable due to electromagnetic interference. Avoid exposing
the unit to strong electromagnetic fields.
Never dissemble or alter the instrument.
4
3
Warnings
The index of the heat stress monitor is applicable to the air control or health management and is not
the devise to directly prevent heat attack.
Do not solder, short-circuit, disassemble, heat or fire a battery. Doing so may cause an exothermic
heat, a leakage of battery fluid or an explosion.
If the leaked fluid is spilt on your clothes or your skin, wash it off with water and if it gets into your
eyes, wash it off with clean water and seek a medical attention immediately.
Batteries pose a danger of suffocation or poisoning if swallowed. Keep batteries out of reach of
children.
When the battery is not in use, insulate the terminals with tape to prevent contact with other metal
objects or batteries. Otherwise, a short circuit may occur and cause a fire or explosion.
For environmental conservation, dispose used batteries in compliance with local rules and
regulations.
Cautions
Do not break the LCD panel to avoid any injuries.
Never touch the liquid inside even if the LCD panel broke or a battery leaks. Doing so may cause
skin irritations. If swallowed, wash out with water and seek medical attention immediately. If the
liquid comes in contacts with the eyes or skin, wash them with clean water for at least 15 minutes
and seek a medical attention.
If the instrument is in use for a long period of time, remove the batteries to avoid any leakage of the
battery fluid which could damage the instrument.
Specifications
Name No. 1075-00 Digital Thermohygrometer with Heat Stress Monitor
Model PC-7900GT
Measuring Range Temperature : -9.9 to 50.0C
Humidity : 20 to 90% rh
Display Range Temperature : -9.9 to 50.0C
Humidity : 20 to 90% rh
Accuracy Temperature : ±1C
Humidity : ±5% at 40 to 70% and 20 to 30C
±8% at other than above
Resolution Temperature : 0.1C
Humidity : 1%rh
Operating Condition Main body : -9.9 to 50.0C, less than 90% rh (no condensing)
Storage Condition Main body : -9.9 to 50.0C, less than 90% rh (no condensing)
Sampling Time Every 1 min.
Accuracy of clock Within ±30 sec. per month
Display Functions Temperature
Lo is displayed at less than -9.9C and Hi at more than 50C
R. Humidity:
Lo is displayed at less than 20%rh and Hi at more than 90%rh
(“---“is displayed at less than 17%rh and at less than 30%rh at less than 15C)
MAX/MIN temperature and humidity,
Clock (hour, minute * switchable 12/24 hour)
Heat Stress Monitor (scales of one to five)
Low battery mark
Power Requirements AAA” size manganese battery ×2
Battery Life approximately one year (at 20C, 50%rh)
Materials ABS reign, Acrylic resin (main unit)
Dimensions (W) 135 (H) 91(D) 67 mm
Weight approx. 160g (including a battery)
Standard Accessories “AAA” size manganese battery ×2
No. 3, Nishi Fukudacho, Kanda, Chiyodaku, Tokyo 101-0037 JAPAN
TEL:+81(0)3-3254-8117 FAX:(0)3-3254-8123 URL: http://www.sksato.co.jp/english/
5

Other SATO KEIRYOKI Measuring Instrument manuals
SATO KEIRYOKI PALMA 2 User manual

SATO KEIRYOKI

SATO KEIRYOKI PALMA 2 User manual

SATO KEIRYOKI 1722-00 User manual

SATO KEIRYOKI

SATO KEIRYOKI 1722-00 User manual

SATO KEIRYOKI PC-5200TRH User manual

SATO KEIRYOKI

SATO KEIRYOKI PC-5200TRH User manual

SATO KEIRYOKI SK-130ITH User manual

SATO KEIRYOKI

SATO KEIRYOKI SK-130ITH User manual

SATO KEIRYOKI 7542-00 User manual

SATO KEIRYOKI

SATO KEIRYOKI 7542-00 User manual

SATO KEIRYOKI SK-100R User manual

SATO KEIRYOKI

SATO KEIRYOKI SK-100R User manual

SATO KEIRYOKI SK-M460-TRH User manual

SATO KEIRYOKI

SATO KEIRYOKI SK-M460-TRH User manual

SATO KEIRYOKI PC-7700 II User manual

SATO KEIRYOKI

SATO KEIRYOKI PC-7700 II User manual

SATO KEIRYOKI SWPII-07 User manual

SATO KEIRYOKI

SATO KEIRYOKI SWPII-07 User manual

SATO KEIRYOKI SK-620PH User manual

SATO KEIRYOKI

SATO KEIRYOKI SK-620PH User manual

SATO KEIRYOKI SK-630PH Series User manual

SATO KEIRYOKI

SATO KEIRYOKI SK-630PH Series User manual

SATO KEIRYOKI SK-5RAD-MR User manual

SATO KEIRYOKI

SATO KEIRYOKI SK-5RAD-MR User manual

SATO KEIRYOKI SK-620PHII User manual

SATO KEIRYOKI

SATO KEIRYOKI SK-620PHII User manual

SATO KEIRYOKI SK-181GT User manual

SATO KEIRYOKI

SATO KEIRYOKI SK-181GT User manual

SATO KEIRYOKI SK-93F-II User manual

SATO KEIRYOKI

SATO KEIRYOKI SK-93F-II User manual

SATO KEIRYOKI 7720-00 User manual

SATO KEIRYOKI

SATO KEIRYOKI 7720-00 User manual

SATO KEIRYOKI 7820-00 User manual

SATO KEIRYOKI

SATO KEIRYOKI 7820-00 User manual

SATO KEIRYOKI SK-M350-TRH-I User manual

SATO KEIRYOKI

SATO KEIRYOKI SK-M350-TRH-I User manual

SATO KEIRYOKI 1410-00 User manual

SATO KEIRYOKI

SATO KEIRYOKI 1410-00 User manual

SATO KEIRYOKI WVAT6D0-3-10 User manual
SATO KEIRYOKI

SATO KEIRYOKI WVAT6D0-3-10 User manual

SATO KEIRYOKI PC-7700II User manual

SATO KEIRYOKI

SATO KEIRYOKI PC-7700II User manual

SATO KEIRYOKI Sophia User manual

SATO KEIRYOKI

SATO KEIRYOKI Sophia User manual
SATO KEIRYOKI SK-5RAD-SP User manual

SATO KEIRYOKI

SATO KEIRYOKI SK-5RAD-SP User manual

SATO KEIRYOKI PC-5400TRH User manual

SATO KEIRYOKI

SATO KEIRYOKI PC-5400TRH User manual

Popular Measuring Instrument manuals by other brands

GWF Unico Installation and operating instructions

GWF

GWF Unico Installation and operating instructions

SCHOTT handylab pH 12 operating manual

SCHOTT

SCHOTT handylab pH 12 operating manual

Eastron SDM72DM user manual

Eastron

Eastron SDM72DM user manual

Pentair LINCOLN A Series Owner's/operator's manual

Pentair

Pentair LINCOLN A Series Owner's/operator's manual

Hioki TM6102 instruction manual

Hioki

Hioki TM6102 instruction manual

ITRON Intelis installation guide

ITRON

ITRON Intelis installation guide

PCB Piezotronics 356M98 Installation and operating manual

PCB Piezotronics

PCB Piezotronics 356M98 Installation and operating manual

tibelec Nano-pince instructions

tibelec

tibelec Nano-pince instructions

Martek Instruments Mark 25 instruction manual

Martek Instruments

Martek Instruments Mark 25 instruction manual

Keysight Technologies P50 B Series quick start guide

Keysight Technologies

Keysight Technologies P50 B Series quick start guide

GE DigitalFlow GS868 Programming manual

GE

GE DigitalFlow GS868 Programming manual

Oro Technology W410 user manual

Oro Technology

Oro Technology W410 user manual

smart-me 212062 quick start guide

smart-me

smart-me 212062 quick start guide

Hioki PQ3100 Measurement guide

Hioki

Hioki PQ3100 Measurement guide

Warmbier SRM 110 user manual

Warmbier

Warmbier SRM 110 user manual

MICRO-EPSILON colorCONTROL MFA-1 instruction manual

MICRO-EPSILON

MICRO-EPSILON colorCONTROL MFA-1 instruction manual

Bellingham + Stanley Ltd. E-Line instruction manual

Bellingham + Stanley Ltd.

Bellingham + Stanley Ltd. E-Line instruction manual

Casella STORM Guardian Operator's handbook

Casella

Casella STORM Guardian Operator's handbook

manuals.online logo
manuals.online logoBrands
  • About & Mission
  • Contact us
  • Privacy Policy
  • Terms and Conditions

Copyright 2025 Manuals.Online. All Rights Reserved.