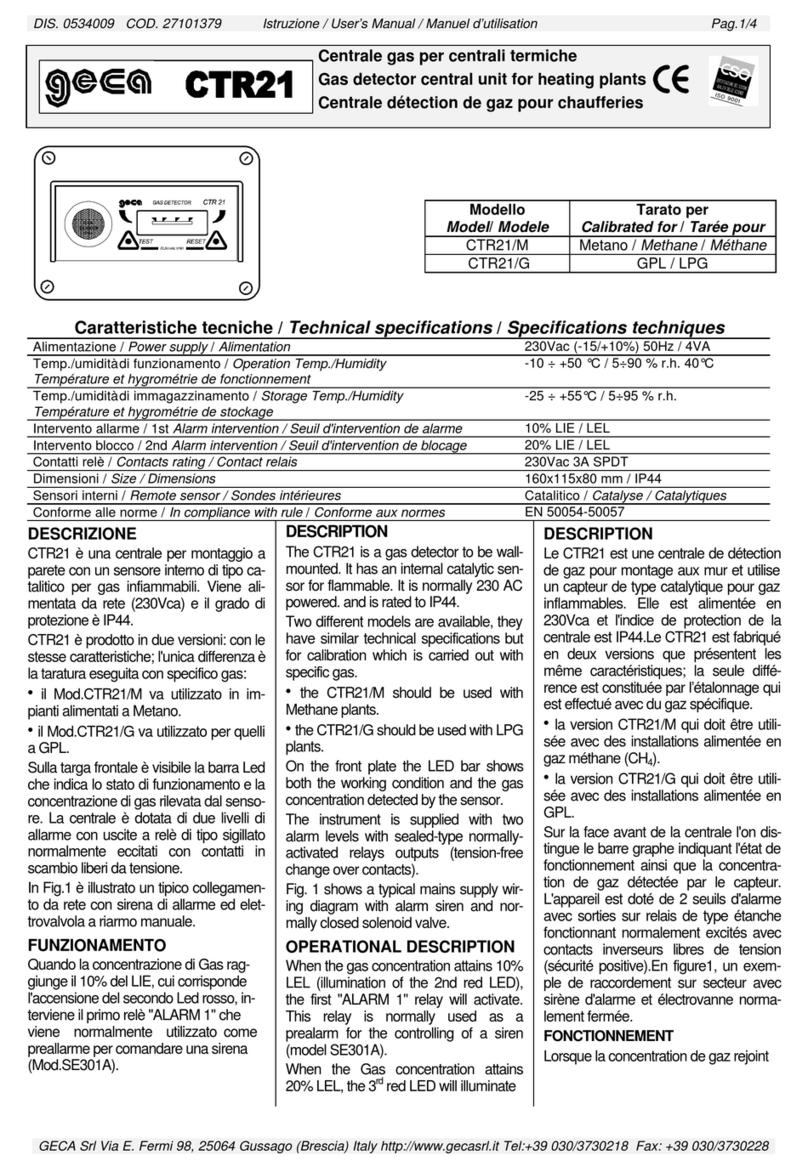
SATO SK-50TCH User manual

INSTRUCTION MANUAL
CO2 Monitor Model SK-50TCH
No. 1737-00
SATO KEIRYOKI MFG. CO., LTD.

Introduction
Thank you for purchasing the CO2 Monitor Model SK-50CTH.
This product measures indoor carbon dioxide concentration (“CO2 level”), temperature, and
humidity to serve as a reference to observe the necessity of ventilation. Do not use it for other
purposes. Read this manual thoroughly before use and keep the manual for future reference.
PRECAUTION
SK-50CTH is designed to be used in ambient atmosphere. Do not use it to monitor the CO2 level as
high as being harmful to life.
Also, check if it is not damaged or is lacking of accessories before use. Contact a dealer or us in
case of such problems.
WARNING
Never use this instrument in an atmosphere exposed to inflammable gases as it may
explode.
If there is anything you are not clear about the safety, contact a dealer or us.
CAUTION
Keep the followings for proper use of the instrument:
DO NOT USE THE INSTRUMENT IN THE AIR OTHER THAN AMBIENT ATMOSPHERE.
SK-50TCH is a precision instrument. Do not drop or give shocks to it.
Do not disassemble or alter the instrument to avoid any malfunctions and damages.
This instrument is not waterproof. Never let it get wet.
If the instrument gets condensed with moisture, turn the power off immediately and dry it naturally
under room temperature before use.
If you store or transport the instrument, use packing materials which are originally contained when
you have purchased it. Using bubble buffers or antistatic bags, which have a distinctive color such
as blue, pink, or rose pink in general, may damage the membranes of the humidity sensor.
Dusty environment damages the CO2 sensor and the humidity sensor.
Electrically noisy environment may cause unstable measured values and errors in accuracy.
Use of the instrument out of its measuring range can cause malfunctions.
Do not wash or wipe the instrument with alcohol, thinner, or any other solvents. If the instrument
gets dirty, wipe it with a tightly wrung towel that has been dipped in warm detergent water.
Contact a distributor or us for repairs.
Overview of CO2 Level
CO2 level stands for density of CO2 in the air by volume, and is expressed in units of ppm (parts per
million). The global average CO2 level in 2019 was 410 ppm, and is estimated to be several tens of

ppm higher in urbanized areas. Each breath exhaled from a person contains around 40000 ppm of
CO2 thus the level in a closed room increases in general. If the level in the whole air exceeds
approximately 30000 ppm, it can be harmful to life.
The risk of occurrence of a cluster of infection disease arises in closed, poorly ventilated spaces.
Measurement of CO2 level is thus an effective method to discover bad ventilation. The WHO (World
Health Organization) recommends that the indoor CO2 level should not exceed 1000 ppm, and many
governments such as those of the USA and Japan issue the same level of regulations. For a detail
safety standard, refer to a guideline instructed by your local authorities.
Features
Precise NDIR sensor
An NDIR (non-dispersive infrared) gas detector serves as a CO2 sensor to achieve long life and
eliminate the influence of other gases.
Vivid 7-segment LED
A clear green digital display enables easy reading of measured values.
CO2 level alert
Notifies of CO2 level by an LED light lit in three colors and a buzzer.
Self-recalibration of CO2 sensor
The sensor can be recalibrated at your site to help stable measurement for a long time.
Names of Components
FRONT REAR RIGHT
①LED light: Changes its color corresponding to CO2 level.
②CO2 level
③Temperature: Shows set values in setting mode.
④Humidity: Shows setting items in setting mode.
⑤Buzzer sign: Turns on when the buzzer is valid.
⑥MUTE/+ key: Tap to stop beeping when it is activated,
or to increase the set value in setting mode.
⑦SET key: Tap to move to setting mode. In setting mode, tap to fix the set value.
Wall mount
hole
Power
socket
Stand
Vent
hole
Vent
hole

Installation
Do not install SK-50CTH in the following locations to avoid incorrect measurement in an indoor
environment:
near air conditioners, heaters, vent holes, windows, or doors
where is exposed to direct sunlight, wind, or an exhaled breath
Note: Keep 50 cm (2 ft) away from a nearby person at least.
Flip up the stand in the rear side and put the instrument on a flat surface for table use.
To mount on a wall, use the hole in the rear side to hook up the device.
CAUTION
Be sure to confirm that the instrument will not drop when mounted on a wall.
Do not block the vent hole.
How to Measure
1. Insert the Type-C end of the USB cable into the power socket of the instrument.
2. Insert the other end of the cable into the attached AC adapter, then connect it to an AC inlet.
3. Measured values are shown after warm-up operations.
CAUTION
Do not handle the USB cable or AC adapter with a wet hand, or it can cause electric shock or a
short circuit.
The attached USB cable is only for power supply. Do not use it for other purposes.
Measurement accuracy can be worsened the ambient environment changes drastically. Let it
warm up for a while.
⚫CO2 Alert
CO2 level
LED light
Buzzer
Underlined parts can be modified
in setting mode. The left shows
factory setting. Refer to “Settings”
for details.
800 ppm or less
Lighting in green
None
800 to 1000 ppm
Lighting in amber
None
Over 1000 ppm
Blinking in red
Off
When the buzzer is turned on, the instrument continues beeping as long as the CO2 level exceeds
the set value. Tap MUTE/+ key to stop it. Blinking of a red light will remain regardless of the key.
After the beeping stops, it beeps again if the level falls below the threshold and exceeds it again.

Settings
⚫Flowchart
Measurement mode Touch SET key for 3 seconds
Setting mode
Alert setting (ALr): Changes the threshold of CO2 alert with a red light
Tap SET key
Buzzer setting (bUr): Turns on or off the buzzer
Tap SET key
LED light brilliance setting (bL): Modifies how bright the LED light is
Tap SET key
* Letters in parentheses above are indicated on the humidity segment.
1. Touch the SET key for 3 seconds or more to enter setting mode when the instrument is
connected to power.
2. Change set values by tapping the MUTE/+ key.
3. Fix the set value by tapping the SET key. The display shows a next item.
4. After all of three settings are configured, the display indicates “END/ESC” then the device
switches to measurement mode. Also, it automatically fixes the set value and turns back to
measurement mode if no key is tapped for 25 seconds in setting mode.
Note: Every set value is maintained even if disconnected from power.
⚫Alert Setting (Factory setting: 1000 ppm)
1. Move to the alert setting (ALr).
2. Change the threshold CO2 level by tapping the MUTE/+ key.
Available range: 800 to 3000 ppm in steps of 100 ppm
Note: The LED light is not lit in amber if the value is set to be 800 ppm.
3. Fix the set value by tapping the SET key.
⚫Buzzer Setting (Factory setting: Off)
1. Move to the buzzer setting (bUr).
2. Turn on or off the CO2 alert buzzer by tapping the MUTE/+ key.
3. Tap the SET key. The buzzer sign is lit if the buzzer is turned on.
⚫LED Light Brilliance Setting (Factory setting: 1)
1. Move to the LED light brilliance setting (bL).
2. Change the brightness of the LED light by tapping the MUTE/+ key.
Available range: 0 (see below), from 1 (darkest three colors) to 10 (brightest)
Note: If set as “0” the light is not lit in green or amber, and only blinks in red.
3. Fix the set value by tapping the SET key.

Recalibration of CO2 Sensor
Accuracy of the CO2 sensor gets gradually worsened due to the contamination of dust and aged
deterioration. For a stable long-term measurement, it is advised to recalibrate it once in six months.
1. Be sure to follow the conditions below:
the room must be unmanned, well-
ventilated with a window open;
the device is placed aside the window
where wind blows;
not to touch the rear side, or breathe upon
the instrument.
2. Let the device stay still for around 10 minutes to
stabilize the measured value.
3. Touch both the SET key and the MUTE/+ key
simultaneously for more than 3 seconds until the
letters of “CAL” blinks on the display.
4. Tap the SET key. Countdown from 300 begins on the display.
Note: Recalibration is suspended if the MUTE/+ key is touched for 3 seconds.
5. When approximately 5 minutes have passed and the countdown finishes, recalibration is
complete and the device returns to measurement mode.
CAUTION
Do not recalibrate when it rains or snows as the instrument may get wet.
Do not get close to or breathe upon the instrument during recalibration. Otherwise, the
recalibration may fail.
Troubleshooting
The instrument may be out of order if the following countermeasures do not work. Contact a dealer
or us for assistance in such case.
Trouble
Possible cause
Solution
Power cannot
be turned on.
The USB cable is not plugged tightly.
Insert the cable into sockets firmly.
The USB cable is disconnected internally.
Replace with a new cable.
Measured
value is not
stable.
The air inside and outside the instrument
is not mixed well.
Let it stay still to warm up.
Electric noises affect the state.
Do not use the instrument where
electric noises are generated.

Error Displays
Refer to the following if error codes are displayed on any segment of the panel.
If these solutions do not work, contact a dealer or us for further assistance.
Segment
Code
Description
Solution
CO2
Temp.
Humid.
E02
Measured value is under
the display range.
Use within the measuring range.
If these errors occur on CO2, measure the outdoor
air and confirm that the indication is close to 400
ppm.
E03
Measured value is over
the display range.
CO2
E17
Recalibration has ended
in failure.
If the instrument is unplugged during recalibration,
this error occurs and it returns to measurement
mode. Refer to “Recalibration of CO2 Sensor” and
try the processes again.
If not above, the failure may be due to high CO2
level. Bring the device outdoors and recalibrate.
E01
The sensor is
malfunctioning.
Stop using the product and contact a dealer of
your purchase or us for further assistance.
Temp.
E31
Humid.
E34
Specifications
Name and Cat. No.
CO2 Monitor Model SK-50CTH (Cat. No. 1737-00)
Measured elements
CO2 level
Temperature
Humidity
Measuring range
200 to 5000 ppm
0.0 to 50.0°C
10.0 to 95.0%rh
Accuracy
±5%rdg or ±50 ppm
whichever is larger (200 to
3000 ppm); ±7%rdg (other)
±0.6°C
(20.0 to 40.0°C);
±1.0°C (other)
±5.0%rh (40.0 to
70.0%rh, 20 to 30°C);
±7.0%rh (other)
Resolution
1 ppm
0.1°C
0.1%rh
Sampling time
5 sec.
2 sec.
2 sec.
Buzzer volume
64 dB from 10 cm away
Operation ambient
0 to 50°C, 95%rh or less without condensing
Storage ambient
−10 to 50°C without condensing
Power
5 VDC, 500 mA via USB Type-C terminal
Materials
Case: ABS resin; Panel: acrylic glass
Dimensions
226 (W) x 152 (H) x 45 (D) mm
Weight
450 g
Accessories
USB cable (Type-C to A), AC adapter (100 to 240 VAC), instruction manual
Specifications and appearance are subject to change without notice for improvement.

Warranty Policy
Our products are warranted to be free from defects in materials and workmanship for a period of one
year from the date of shipment. If repair or adjustment is necessary and has not been the result of
abuse or misuse within the said period, please return the units on freight prepaid basis and correction
of the defect will be made without charges. We alone will determine if the product problem is due to
deviations or customer misuse.
Out-of-warranty products will be repaired on charge basis.
Warranty during transportation
The warranty during transportation only applies to the products that we arrange the shipment. The
case that the products had been purchased in domestic and were sent to overseas by the purchaser
is out of warranty.
Return of items
Authorization must be obtained from us before returning items for any reason. When applying for
authorization, please include data regarding the reasons the items are to be returned.
SATO KEIRYOKI MFG. CO., LTD.
3-4, Kanda-kajicho, Chiyoda-ku, Tokyo 101-0045 Japan
URL: https://www.sksato.co.jp/en
VER. 1.1, AUG 2021
This manual suits for next models
1
Table of contents
