Save Phace TEP User manual

TEP™
Owners Guide
Tactical Eye Protector For the
Most Insane Adrenaline Junkie!
Grunt - Elite - Recon - Delta - Sly
www.savephace.com

TEP™ – Tactical Eye Protector For The Most Insane Adrenaline Junkie!
Each of our TEP™ Series are designed to take on the most belligerent,
competitive, disapproving environment known to man.
WE ARE NOT COPY CATS - WE ARE INNOVATORS! Our new Thermal Lens
technology (Series Specic) is another rst in the goggle market. NO OTHER
goggle company in the world uses Thermal Lens Technology!
Save Phace is passionate about protecting your most important weapon; “your
eyes” so you don’t have to worry about anything except executing your mission!

1
Save Phace TEP’s™ meet or exceed the below Safety Standards:
• U.S Military Spec MIL-DTL-43511D (Recon, Delta and Elite)
• ANSI Z87.1 2010 (ALL)
• U.S Federal OSHA (Recon, Delta and Elite)
FEATURES INCLUDE:
• 100% UVA/UVB Protection
• Comfortable Sure Grip adjustable strap
• Thermal Pane Lenses (Series Specic)
• Distortion Free Viewing
• Interchangeable Lenses (Series Specic)
• Military Grade Anti/Scratch and Anti /Fog Coatings
• Superb Impact protection
TEP™ - Tactical Eye Protector
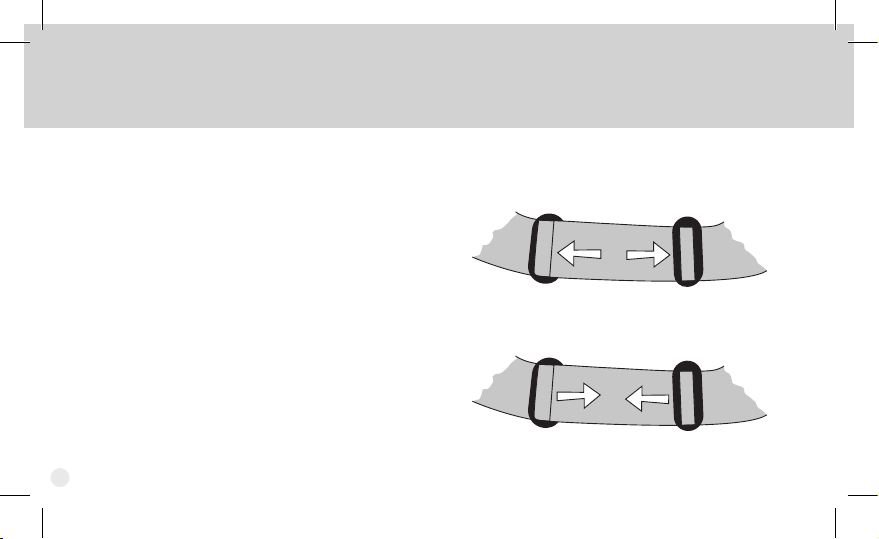
1. To tighten the strap, simply pull each of
the 2 slide buckles evenly in the direction
toward the frame.
2. To loosen the strap, slide the 2 buckles
evenly toward the center (rear) of the strap.
Strap Adjustment
2
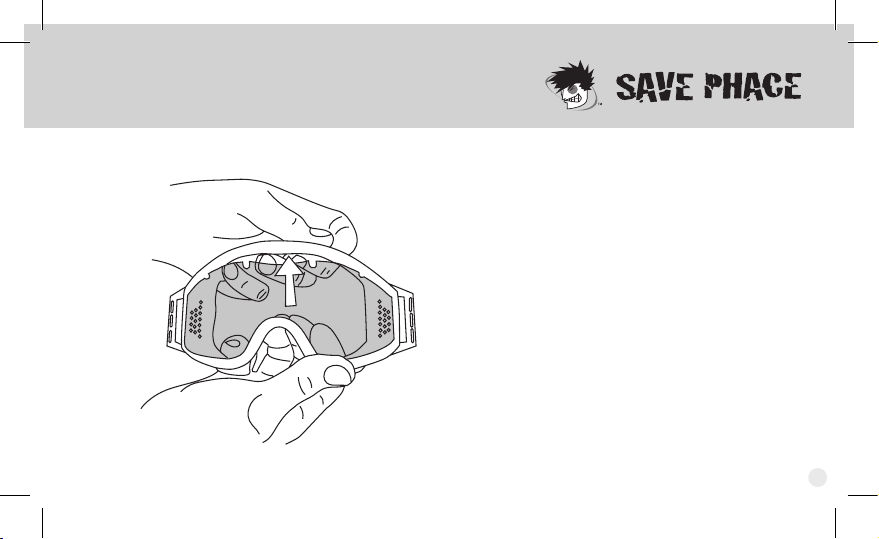
Lenses are easily removed by peeling
the goggle frame away from the lens,
starting at the top and working around
the sides, then across the bottom.
Lens Removal (Series Specic)
3

Lens Installation (Series Specic)
1. Place one end of the lens into the
corresponding groove in the side of the
frame.
2. Continue inserting the lens along the
bottom of the goggle frame and across the
nose, tting the lens retention holes into
goggle frame posts.
4
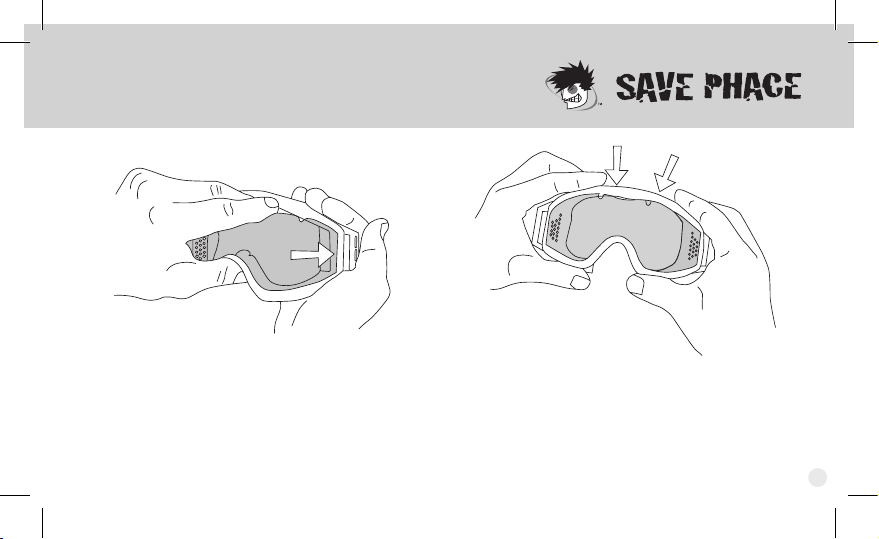
3. Insert the other side of the lens into the
goggle frame.
4. Finish with the top, making sure that the
goggle frame posts are rmly seated in the
corresponding lens holes.
To keep the lens clean during the installation process,
hold it by the edges and avoid contact with the lens surface.
5
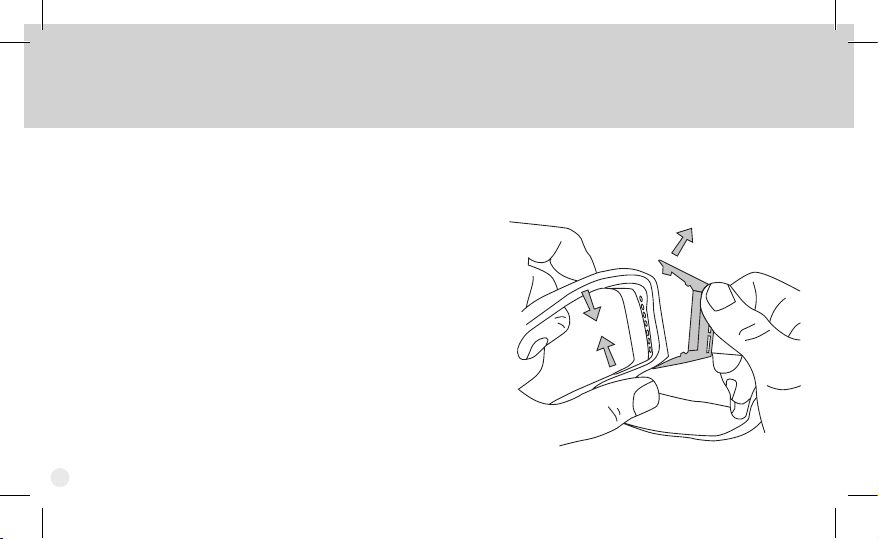
Strap Removal & Re-attachment
1. Begin by removing the lens
(see lens removal instructions).
2. Compress the frame down and away, then work
the Outrigger pins out of the frame.
3. To re-attach the strap, simply reverse the process.
(If both sides of the strap have been removed,
identify the correct clip, as marked for the user’s
right and left.) Start at the bottom of the goggle
by positioning the clip into the frame, then t the
top of the clip into the frame.
4. Re-install the lens.
There may be cases that require the removal of the goggle strap (Series Specic). For example, to install the SpeedSleeve (see
Accessories), you will rst need to remove (and subsequently re-attach) one side of the strap.
6
Accessories (Series Specic)
Prescription Inserts: These Rx lens frames accommodate corrective lenses and easily
install inside the goggle frame.
SpeedSleeves: Eliminate lint on the lens and keep the goggle and lens clean & scratch-
free when not being worn.
Replacement Lenses: Replacement lenses for the TEP™ are available in a variety of colors.
Visit www.savephace.com for the latest
Save Phace products and accessories
7

Maintenance
LENS CARE - Save Phace lenses have been specially coated to offer outstanding abrasion
resistance and fog-resistance. Special care is required to keep them performing at their best.
• NEVER, EVER, EVER submerge the thermal pane lenses into water!!!!!! If you do IT WILL
permanently damage the lens AND void the warranty.
• Clean the lens with water only. Do not use cleaners or solvents.
• Use a damp soft cloth to gently wipe clean. Never use paper products to clean the lenses and
avoid wiping the lens surface when dry or dirty as this may scratch the lens.
• If the lens is cracked or severely scratched, replace the lens.
GOGGLE CARE
• To clean the goggle, (Series Specic) remove the lens and clean separately. The frame and strap
may be gently hand washed in a mild soup solution, rinsed and air dried.
• Store goggle in a cool, dry place away from direct sunlight.
• If storing the goggle on a helmet, loosen the straps to prevent stretching.
8
Table of contents
Other Save Phace Safety Equipment manuals

Popular Safety Equipment manuals by other brands

Lanex
Lanex PB-20 instruction manual

SKYLOTEC
SKYLOTEC ANCHOR ROPES Instructions for use

Besto
Besto Buoyancy Aid 50N Instructions for use

TEUFELBERGER
TEUFELBERGER NODUS Manufacturer's information and instructions for use

Troy Lee Designs
Troy Lee Designs Tbone Product owners manual

Innova
Innova Xtirpa Instruction and safety manual

bolle SAFETY
bolle SAFETY B810 quick start guide

SHENZHEN FANHAI SANJIANG ELECTRONICS
SHENZHEN FANHAI SANJIANG ELECTRONICS A9060T instruction manual

Hiltron security
Hiltron security POWER8E Installation and use manual

Salewa
Salewa MTN SPIKE user manual

Hatco
Hatco B-950P installation guide

Sitec
Sitec TX MATIC operating manual


