manuals.online logo
Brands
  1. Home
  2. •
  3. Brands
  4. •
  5. SC Johnson Professional
  6. •
  7. Dispenser
  8. •
  9. SC Johnson Professional Stoko Vario Ultra Guide

SC Johnson Professional Stoko Vario Ultra Guide

Other SC Johnson Professional Dispenser manuals

SC Johnson Professional Stoko Vario mat Guide

SC Johnson Professional

SC Johnson Professional Stoko Vario mat Guide

SC Johnson Professional TouchFREE Dispenser User manual

SC Johnson Professional

SC Johnson Professional TouchFREE Dispenser User manual

Popular Dispenser manuals by other brands

BOWMAN CL003-0111 manual

BOWMAN

BOWMAN CL003-0111 manual

SIKA Power Cure operating instructions

SIKA

SIKA Power Cure operating instructions

Silver King Majestic SK12MAJ Technical manual and replacement parts list

Silver King

Silver King Majestic SK12MAJ Technical manual and replacement parts list

Franke F3Dn Twin Service manual

Franke

Franke F3Dn Twin Service manual

HURAKAN HKN-MT1 manual

HURAKAN

HURAKAN HKN-MT1 manual

STIEBEL ELTRON UltraHot Plus Operation and installation instructions

STIEBEL ELTRON

STIEBEL ELTRON UltraHot Plus Operation and installation instructions

Bobrick B-828 troubleshooting guide

Bobrick

Bobrick B-828 troubleshooting guide

DAN DRYER 282 installation guide

DAN DRYER

DAN DRYER 282 installation guide

Essity Tork 473208 manual

Essity

Essity Tork 473208 manual

CBS SD300BU-88 COMPONENT MAINTENANCE MANUAL WITH ILLUSTRATED PARTS LIST

CBS

CBS SD300BU-88 COMPONENT MAINTENANCE MANUAL WITH ILLUSTRATED PARTS LIST

Sealey MK77 manual

Sealey

Sealey MK77 manual

Fluid Management Accutinter 1600 End user guide

Fluid Management

Fluid Management Accutinter 1600 End user guide

Franke DVS SD99-010 Installation and operating instructions

Franke

Franke DVS SD99-010 Installation and operating instructions

Graco Dispensit 1053-10C operation & maintenance

Graco

Graco Dispensit 1053-10C operation & maintenance

DPR SED02 user manual

DPR

DPR SED02 user manual

ITALTINTO i50 user manual

ITALTINTO

ITALTINTO i50 user manual

Coca-Cola FREESTYLE 9000 user guide

Coca-Cola

Coca-Cola FREESTYLE 9000 user guide

Hewi 805.06.150 Mounting instructions

Hewi

Hewi 805.06.150 Mounting instructions

manuals.online logo
manuals.online logoBrands
  • About & Mission
  • Contact us
  • Privacy Policy
  • Terms and Conditions

Copyright 2025 Manuals.Online. All Rights Reserved.

1
2
3
Alt gegen Neu ohne Bohren
Exchange of dispenser without drilling new holes
Pas de perçage! Le nouveau remplace l’ancien
Recambio del dosicador sin necesidad de taladrar de nuevo
Vervanging van oude naar nieuwe zonder boren
Ombytning af dispenser uden at bore nye huller
Dispenserbyte utan att borra nya hål
Skifte av dispenser uten å bore nye hull
Sostituzione distributore senza effettuare nuovi buchi
Mudança de doseador sem nova furaçáo
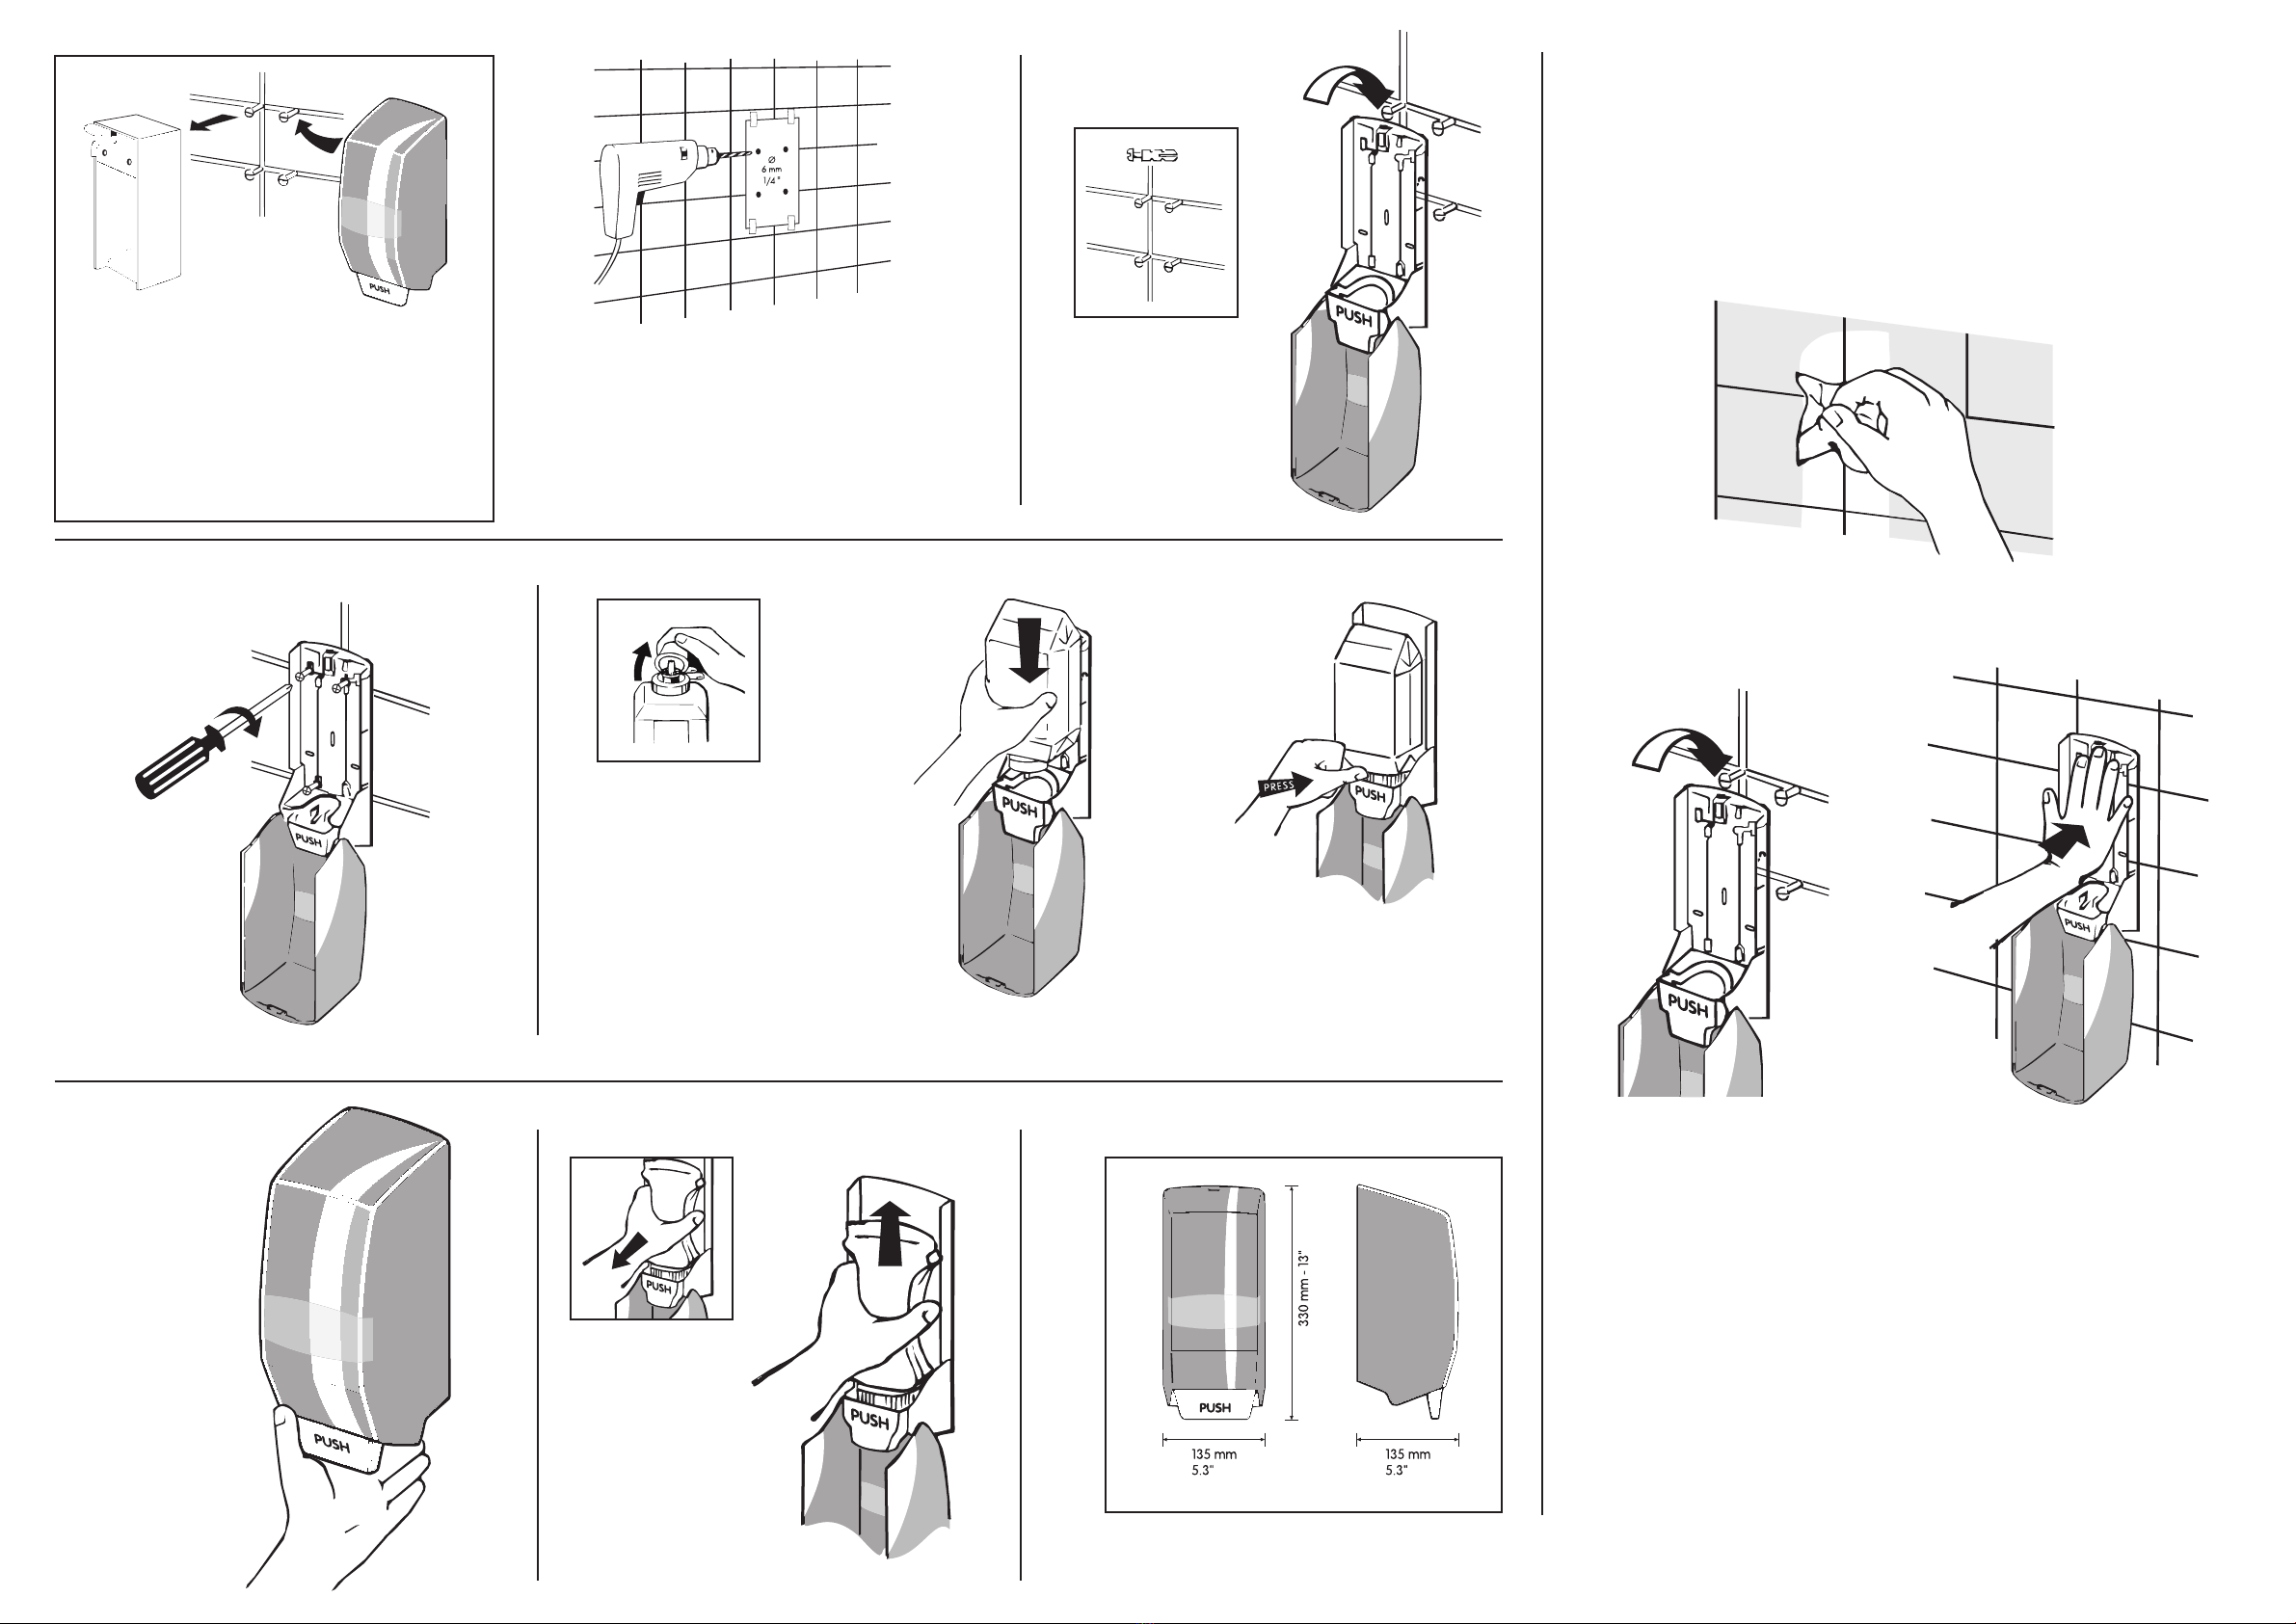
Bohrschablone anlegen
Place the drilling stencil on the wall
Positionner le gabarit
Colocar la plantilla para el taladro
Plaats het sjabloon met de aan-
duiding voor de boorgaatjes op
de muur
5
8
Bedienen
Operate
Le distributeur est prét à
l’emploi
Operar
Gebruiksklaar
Klar!
Klar til brug
Benytt dispenseren ved å
trykke på håndtaket
Attivare
Dosear normalmente
Ankleben des Spenders
Die Klebeäche muss trocken, glattächig, hart
und sauber sein; empfohlene Beispiele:
Kachelwand, Glasäche, Edelstahlwand
1. Mit beiliegendem Alkoholtuch Klebe-
äche entfetten und trocknen lassen.
2. Weißes Schutzpapier entfernen!
Beiliegenden Doppelklebestreifen auf die
saubere Spenderrückwand kleben und gut
andrücken.
Tape Installation
The surface must be dry, smooth, hard and
clean; for example tile, glass, stainless steel.
1. Clean back mounting plate and wall surface
with alcohol wipe and allow to dry.
2. Remove light colored paper backing from
foam tape and apply to the clean, dry
mounting plate. Apply moderate hand
pressure to assure good adhesion.
3. Remove brown paper backing from the
second side of the foam tape. Apply open
dispenser to desired location pressing
rmly on the mounting plate in all areas
where the foam tape is applied.
4. Wait 24 hours before loading the dispenser
with product so that the adhesive will have
time to set.
5. If installation is for a shower area, we
suggest using a silicone caulking to seal
around back plate to keep moisture from
penetrating foam adhesive.
4
4 x
Placera borrmallen pa vaggen
Plasser borrmalen på veggen
Placer boreskabelonen på væggen
Posizionare la mascherina alla parete
(e perforare)
Posicionar o padrão de perfuração
Flasche entnehmen
To remove bottle
Sortir le acon
Sacar la botella
Fles verwijderen
Udtagning af aske
Ta ur Softbox
Fjerning av dispenserfylling
Togliere il acone
Retirar a garrafa
3. Braunes Schutzpapier entfernen!
Spender im geöffneten Zustand an die
entfettete Wand-Klebeäche drücken.
4. Gut andrücken und 24 Stunden anziehen
lassen. Erst dann die STOKO ® Softasche in
den Spender einsetzen und bedienen.
5. Bei Montage im Nassbereich empfehlen wir
eine Silikonversiegelung der Klebeäche.
9
6
10
7
Stoko Vario Ultra®
Montage- und Bedienungsanleitung
Instructions and mounting manual
Instructions de Montage et mode d’utilisation
Manual de instrucciones y montaje
Montage- en gebruiksaanwijzing
Monterings- og brugsvejledning
Instruktioner och monteringsanvisning
Instruksjons- og monteringsanvisning
Istruzioni per il montaggio
Manual de instruções e montagem
Juni 2020_26581
Stoko Vario Ultra®
SC Johnson Professional GmbH
Girmesgath 5
47803 Krefeld
Postfach 10 05 51
47705 Krefeld
Tel. Deutschland 0800-1002730
Fax +49 2151 73801502
Tel. Österreich/Schweiz 0800-100273
info.proDE@scj.com | www.scjp.com