SCA 394021 Setup guide


1 2
IMPORTANT SAFETY INFORMATION:
Read all safety warnings and instructions.
Save all warnings and instructions for future reference.
GENERAL SAFETY WARNINGS:
1. Deflate tyre completely before changing.
2. Do not use old or repaired tyres or tubes. Replacement tyres or tubes must be new.
3. Do not exceed rated rim capacity.
4. Wear safety goggles and work gloves during assembly and use.
5. Read manual before use.
6. Inspect before every use; do not use if parts loose or damaged.
7. This product can only be used with SCA Portable Tyre Changer PLU 345858 .
8. Do not change automobile tyres with this product. For use with motorcycle tyres only.
9. Keep the work area clean and well lit. Cluttered and dark areas increase the risks of
injury to persons.
10. Stay alert. Watch what you are doing and use common sense when operating the
Motorcycle Tyre Changer Adaptor.
11. Do not overreach. Keep proper footing and balance at all times. Proper footing and
balance enables better control of the tool in unexpected situations.
12. Assemble only according to these instructions. Improper assembly can create hazards.
13. This product is not a toy. Do not allow children to play with or ntear this item.
14. Use as intended only.
SPECIFICATIONS:
Rim Capacity: 11” - 25” Diameter
ASSEMBLY INSTRUCTIONS:
Read the ENTIRE IMPORTANT SAFETY
INFORMATION section at the beginning
of this document including all text under
subheadings therein before set up or
use of this product.
1. Attach Adjustable Support Tube (8)
and Support Tubes (5) to Base (9) with
Bolts (12), Flat washers Ø10(7), Lock
washers Ø10(16) and Nuts (13).
2. Thread Bolts (11) loosely into
Adjustable Wheel Clamp.
3. Thread Knob (10) into Base. (See
Figure A.)
WARRANTY
This product is guaranteed against defects for a period of 12 months from date of
purchase. This warranty is provided by Super Cheap Auto Pty Ltd ACN 085 395 124
(Supercheap Auto) of 751 Gympie Rd Lawnton QLD 4501 Ph (07) 3482 7500. Supercheap
Auto will offer a repair, replacement product or store credit if the product is assessed as
being defective during the warranty period.
To claim under this warranty, take this product to the Front Service Desk of your nearest
Supercheap Auto store. For store locations, visit www.supercheapauto.com.au (AUS)
or www.supercheapauto.co.nz (NZ). You will need your receipt or proof of purchase.
Additional information may be requested of you to process your claim. Should you not
be able to provide proof of purchase with a receipt or a bank statement, identification
showing your name, address and signature may be required to process your claim.
This product may need to be sent to the manufacturer to assess the defect before
determining any claim. Faults or defects caused by product modification, misuse and
abuse, normal wear and tear or failure to follow user instructions are not covered under
this warranty.
Our goods come with guarantees that cannot be excluded under the Australian Consumer
Law. You are entitled to a replacement or refund for a major failure and for compensation
for any other reasonably foreseeable loss or damage. You are also entitled to have the
goods repaired or replaced if the goods fail to be of acceptable quality and the failure
does not amount to a major failure.
Any expenses incurred relating to the return of this product to store will normally have
to be paid by you. For more information contact your nearest Supercheap Auto store.
The benefits to the consumer given by this warranty are in addition to other rights and
remedies of the Australian Consumer Law in relation to the goods and services to which
this warranty relates.

1 2
4. Set Shoe against edge of rim.
Note: To adjust Shoe, remove R-Clip and Pin,
move Shoe, then replace Pin and R-Clip.
5. Push down on Mount/Demount Bar, forcing
bead off the rim. Repeat in several locations if
necessary.
6. After bead is broken, turn tyre over and break
bead on other side. (See Figure D.)
COMPONENTS:
REMOVING TOP BEAD:
1. Loosen Knob on Support Arm, pull Center Post up enough for tyre to clear, then tighten Knob.
2. Place tyre on Changer, making sure edges of Wheel Clamps are positioned between tyre and
rim. (See Figure F.)
Note: If tyre has rotor, place it on Changer rotor side up.
3. Turn Handle to tighten Adjustable Wheel Clamp until rim is firmly secure and will not move,
then tighten bolts on Adjustable Wheel Clamp.
4. Lower and secure Center Post.
4. Mount Motorcycle Tyre Changer Adaptor
Base over Portable Tyre Changer Center Post.
Secure by tightening Knob.
5. Slide Wheel Clamps (4) onto Support Tubes
and secure with Bolts (6),Flat washers
Ø10(7),and Nuts (13). (See Figure B.)
6. Attach Vertical Support Bar (3) to Adjustable
Support Tube and secure with Bolts (14),Flat
washers Ø10(7),Lock washers Ø10(16) and
Nuts (13).
7. Attach Support Arm (2) to Vertical Support
Bar and secure with Bolts (14),Flat washers
Ø10(7),Lock washers Ø10(16) and Nuts (13).
8. Slide Center Post (1) down Support Arm tube
and into Base. Thread Knob (10) into Support
Arm.
9. Secure Center Post by tightening Knob. (See Figure c.)
DEMOUNTING TYRE:
BEAD BREAKING:
Note: Before removing tyre, mark rotation
direction on rim to ensure correct replacement.
Note: Use tyre lubricant (not included) as
needed.
1. Remove valve cap. Deflate tyre by removing
valve core with valve core remover (not
included).
For Tubed Tyres: Remove valve nut.
CAUTION! Tyre is under extreme pressure.
Maintain firm grip on core and remover to
prevent pressure from propelling them and
causing injury.
2. Lubricate area where sidewall meets rim.
Note: Use blocks and rim protectors (not
included) to protect rim and/or rotor from
damage.
3. Insert flat end of Mount/Demount Bar (from Portable Tyre Changer) into Bead Breaker
Handle.
Figure F
Edge of
Wheel clamp

1 2
For Tubed Tyre:
c. Insert tube into tyre, align valve stem and push through rim.
d. Add enough compressed air to give tube shape.
e. Loosely secure valve stem with valve nut.
3. Lubricate both sides of tyre, at bead and sidewall, as needed.
4. Place tyre at an angle over rim and push down. It should easily pop over rim.
For Tubed Tyre: Be careful to not pinch tube.
5. Lower and secure Center Post.
6. Lubricate again as needed.
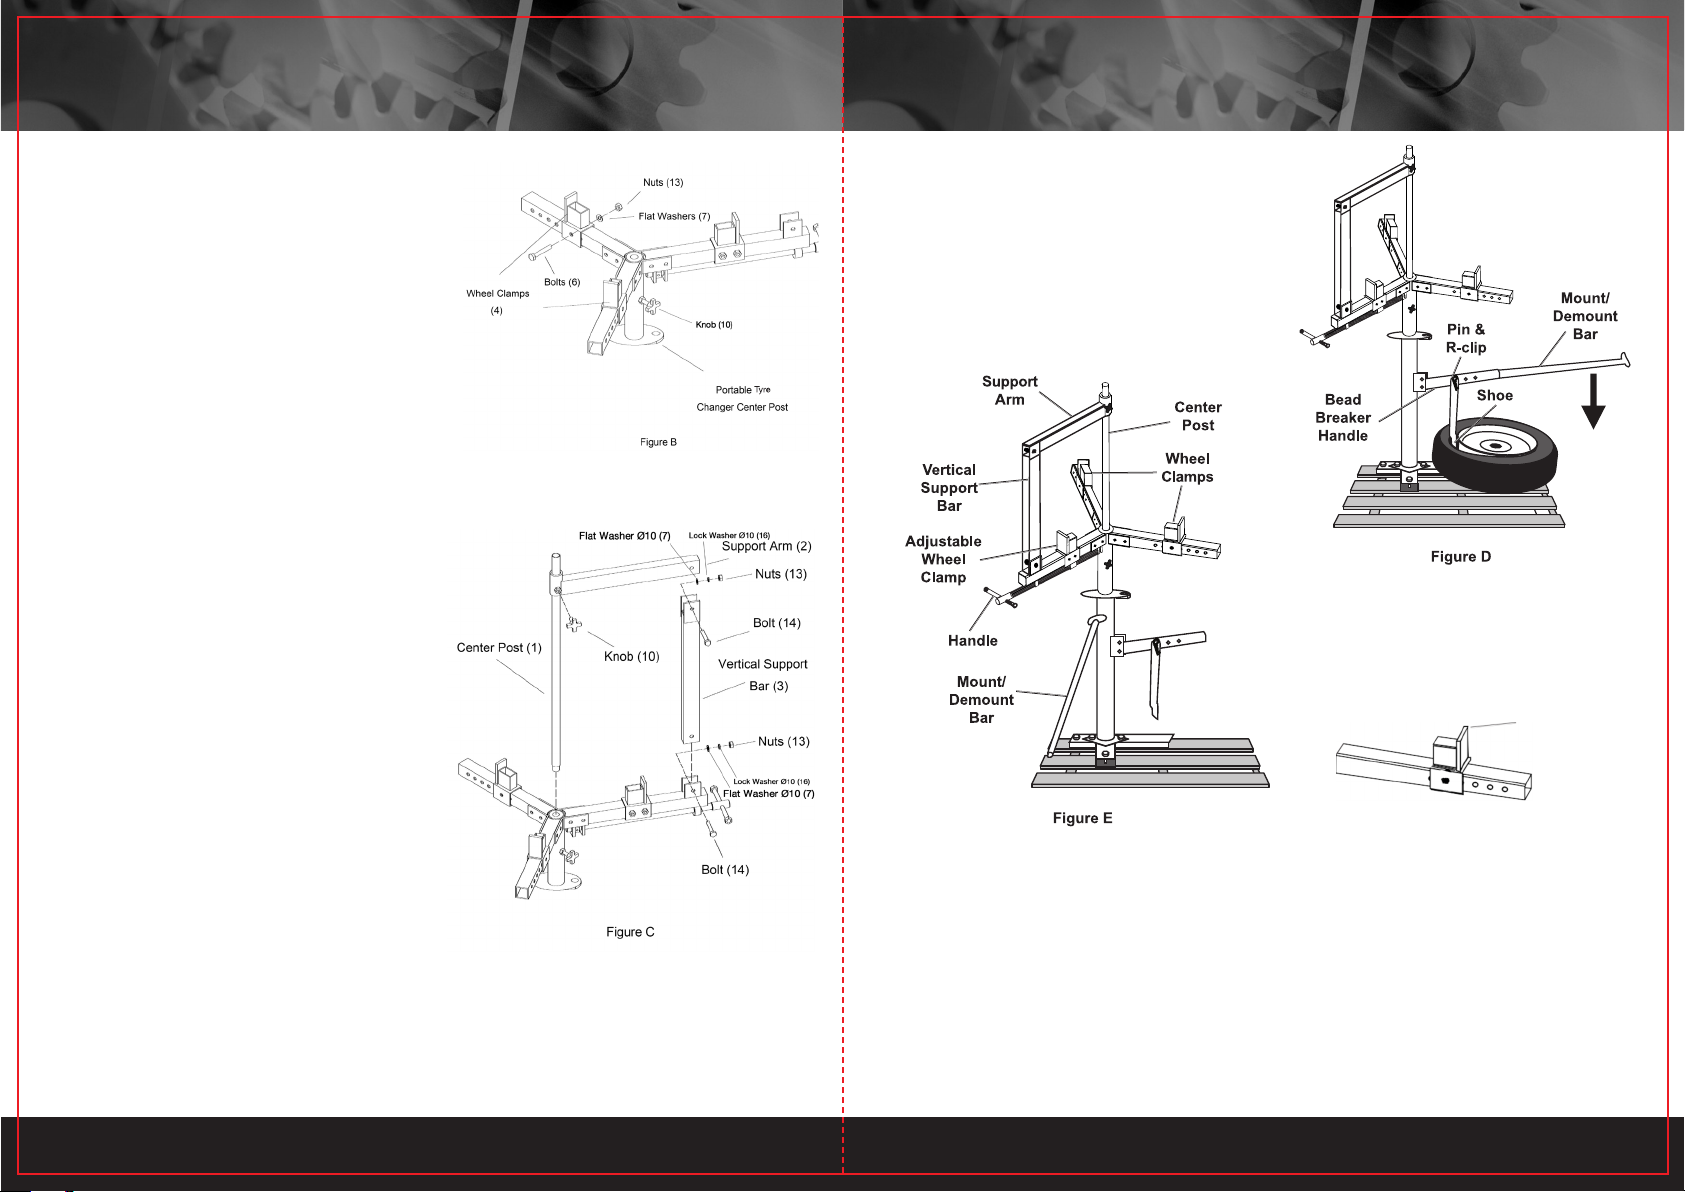
7. Starting to left of Vertical Support Bar, lay Mount/Demount Bar across rim, inserting hook
end under rim.
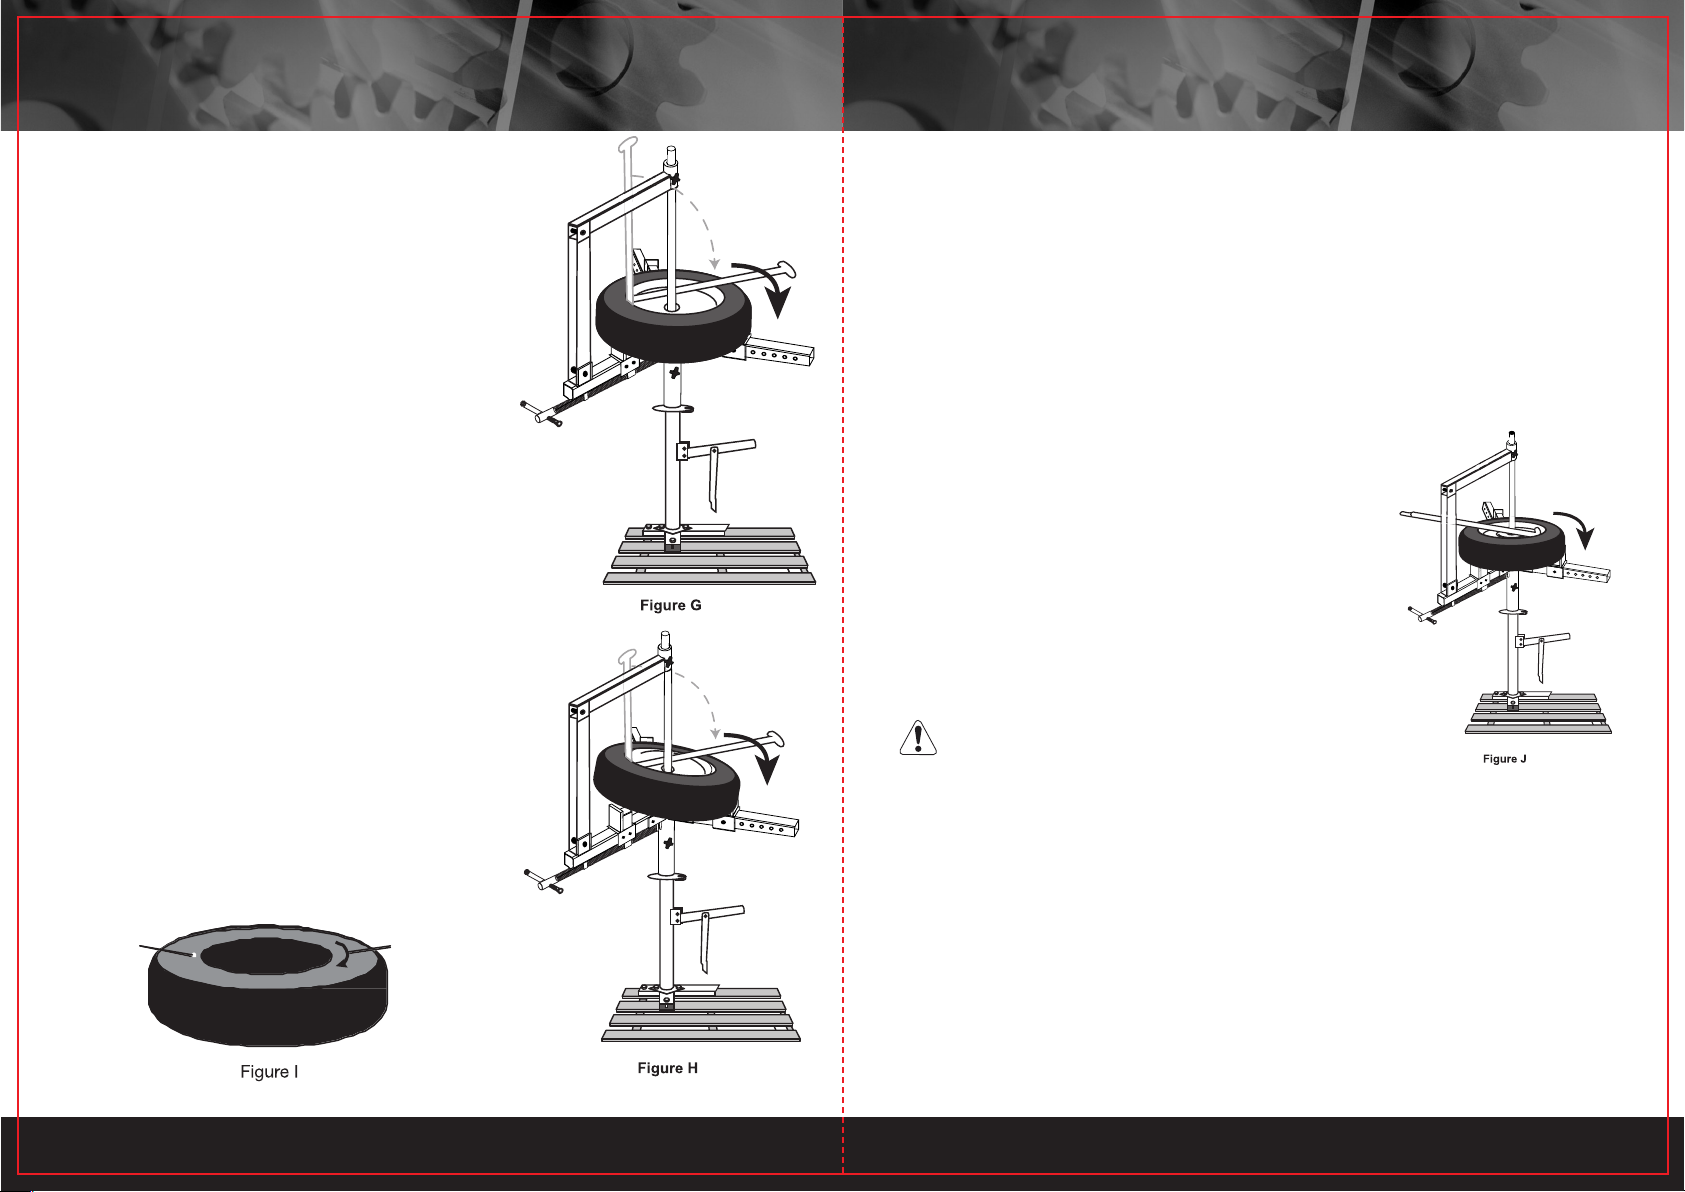
8. Push down on tyre while sliding Mount/Demount Bar clockwise around rim, using Center
Post for leverage. (See Figure J.)
9. After bead is completely under rim, pull up and secure
Center Post and remove tyre.
10. Fill tyre or tube with compressed air until both beads pop.
For Tubeless Tyre: Replace valve core.
For Tubed Tyre: Tighten valve nut.
WARNING! Check for leaks and balance tyre before installing.
11. After installation, inflate tyre to manufacturer’s
recommended pressure, then replace valve cap.
MAINTENANCE INSTRUCTIONS:
WARNING: TO PREVENT SERIOUS INJURY FROM TOOL
FAILURE:
Do not use damaged equipment.
MAINTENANCE AND CLEANING:
1. BEFORE EACH USE, inspect the general condition of the Motorcycle Tyre Changer
Adaptor. Check for:
• loose hardware,
• misalignment or binding of moving parts,
• cracked or broken parts, and
• any other condition that may affect its safe operation.
2. AFTER USE, wipe external surfaces of Motorcycle Tire Changer Adaptor with clean cloth.
5. Lubricate as needed.
6. Starting to left of Vertical Support Bar, force flat end
of Mount/Demount Bar straight down between tyre and
rim.
7. Pull Mount/Demount Bar across tyre to force bead up
over rim.
8. Slide Mount/Demount Bar clockwise around tyre,
using Center Post for leverage, until bead is completely
off rim. (See Figure G.)
REMOVING BOTTOM BEAD:
1. Starting to left of Vertical Support Bar, lift up tyre,
then force flat end of Mount/Demount Bar straight
down between tyre and rim until Mount/Demount Bar is
hooked under bottom bead.
2. Pull Mount/Demount Bar across tyre and, while
lifting up on tyre, slide Mount/Demount Bar clockwise
around rim, using Center Post for leverage until bead is
completely off rim. (See Figure H.)
3. Pull up and secure Center Post, then remove tyre.
For Tubed Tyre: Remove tube from tyre.
MOUNTING TYRE:
WARNING! Do not use old or repaired tyres or tubes.
Replacement tyres or tubes must be new.
1. Clean rim edges, then set tyre on top of rim.
2. Check marks on sidewall for rotation direction and
valve stem alignment:
a. Make sure arrow on tyre matches rotation marking on
rim.
b. If there is a dot on tyre, align it with valve stem. (See
Figure I.)
Procedures not specifically explained in this manual
must be performed only by a qualified technician.
Rotation
Direction
Valve Stem
Location

1 2
ASSEMBLY DIAGRAM:PARTS LIST:
Part Description Qty Part Description Qty
1 Center Post 1 10 Knob 2
2 Support Arm 1 11 Bolt (M10x25) 2
3 Vertical Support Bar 1 12 Bolt (M10x70) 6
4 Wheel Clamp 2 13 Nut (M10) 10
5 Support Tube 2 14 Bolt (M10x60) 2
6 Bolt (M10x65) 2 15 Handle 1
7 Flat Washer Ø10 10 16 Lock Washer Ø10 8
8 Adjustable Support Tube 1 17 Nut M12 2
9 Base 1
Table of contents