Funk-Codetaster UKP-4
Frequenz: 280-870 MHz
Kanäle: 4
Batterie: 2x 1.5 V/ AAA
Sendeleistung: 9.5 dBm
Arbeitstemperatur: -10°C - +40°C
IP: 44
Artikelnummer: ST121001
Modellnummer: UKP-4
•Die Tasteneingabe wird stets durch einen Piepton bestätigt. Sollten Sie keinen Piepton hören, dann wurde die Eingabe
nicht angenommen. Versuchen Sie es in diesem Fall erneut.
•Geben Sie Codetaster, sowie Betätigungscode niemals in Kinderhände
•Die Codetaster dürfen ausschließlich von Personen bedient werden die mit der Anlage vertraut sind und in deren
Funktion eingewiesen sind
•Verwenden Sie den Codetaster ausschließlich, wenn Sie das Tor einsehen können
•Das Anlernen des Codetasters muss stets in der Nähe des Torantriebs vorgenommen werden. Verwenden Sie
ausschließlich Originalteile
•Beim Einlernen des Funk-Codetasters kann die Torfahrt versehentlich ausgelöst werden.
•IP 44 - Schützen Sie den Codetaster vor Witterung wie Regen, Schnee, Sonneneinstrahlung oder ansonsten kann die
Funktion des Senders beeinträchtigt werden
•Bringen Sie den Funk-Codetaster unbedingt in der Nähe des Torantriebs an
•Zum Wechseln der Batterie lösen Sie bitte die Schraube an der Unterseite des Funk-Codetasters, entfernen Sie den
Funk-Codetaster von der Montageplatte und lösen Sie anschließend die beiden Schrauben auf der Rückseite.
Programmierung für folgende Hersteller (Festcode):
•Came: T431/ T434/ TOP 432A/ TOP 434A/ TOP 432/ TAM32SA/ TOP 432NA
•Dickert 433 MHz: MAHS433
•Hörmann 868 MHz (blaue Tasten): HSM4/ HS4/ HSE2/ HSP4/ HS1
•Marantec 433 MHz: Digital 101/ 12/ 302/ 304/ 323/ 321/ 382/ 384/ 313
•Marantec 868 MHz: Digital 101/ 12/ 302/ 304/ 323/ 321/ 382/ 384/ 313
•Somfy: Telis/ K-Easy/ K-Easy New/ K-Easy Old/ Mitto Key Go RTS/ Telis RTS/ Keytis RTS/ Keytis RTS NS/ Alarma
•Alle weiteren Hersteller mit Festcode aus der Kompatibilitätsliste
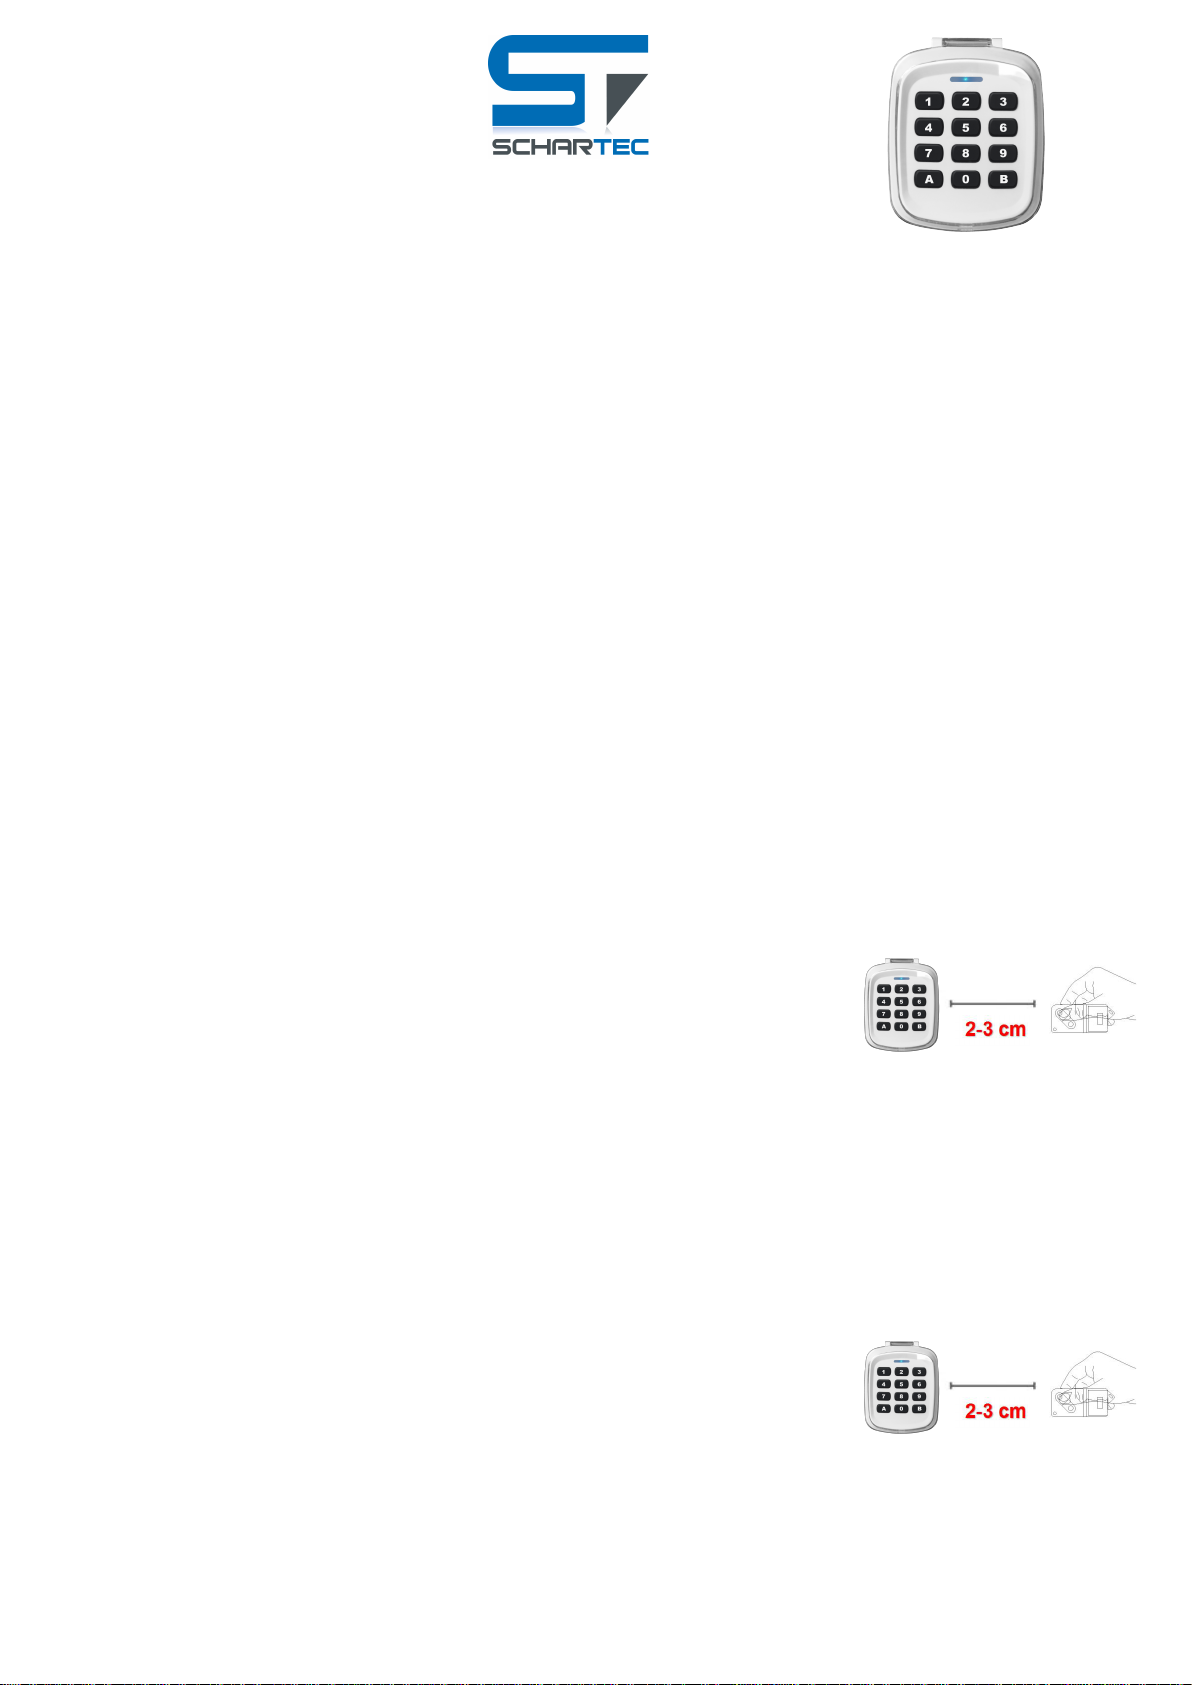
1. Drücken Sie eine beliebige Taste um den Codetaster zu aktivieren.
2. Drücken und halten Sie Taste A und betätigen Sie anschließend die Taste B
viermal hintereinander. Die LED am Codetaster fängt an langsam zu blinken.
3. Halten Sie nun einen original Handsender von ihrem Torantrieb mit ca. 2-3 cm
Entfernung an den Funk-Codetaster und halten Sie die zu übertragende Taste
für ca. 3 Sekunden gedrückt. Die LED des Codetasters blinkt schnell.
4. Drücken Sie nun die Taste 1, 2, 3 oder 4 (je nachdem welchen Kanal Sie
verwenden möchten) auf dem Codetaster um den Code zu speichern.
1. Drücken Sie eine beliebige Taste um den Codetaster zu aktivieren.
2. Drücken und halten Sie Taste A und betätigen Sie anschließend die Taste B viermal
hintereinander. Die LED am Codetaster fängt an langsam zu blinken.
3. Halten Sie nun einen original Handsender von ihrem Torantrieb mit ca. 2-3 cm
Entfernung an den Funk-Codetaster und halten Sie die zu übertragende Taste für
ca. 3 Sekunden gedrückt. Die LED des Codetasters blinkt schnell.
4. Drücken Sie nun die Taste 1, 2, 3 oder 4 (je nachdem welchen Kanal Sie verwenden
möchten) auf dem Codetaster um den Code zu speichern.
5. Drücken Sie die Programmiertaste/ Lerntaste an ihrem Antrieb und geben Sie
anschließend den 6-stelligen Code des eingelernten Kanals 1-mal am Codetaster
ein. Der Codetaster ist nun eingelernt. Bei Schellenberg Torantrieben den 6-
stelligen Code 2-mal hintereinander eingeben.
WICHTIG! Wenn Sie nicht wissen wie ein Funksender an Ihrem Torantrieb angelernt
werden kann, dann lesen Sie bitte in der Anleitung Ihres Torantriebs nach!
Programmierung für folgende Hersteller (Rolling-Code):
•Schellenberg 433 MHz: SMART Drive 10/ SMART Drive 14
•Sommer - Aperto 868 MHz: 4020V000/ 4025V000/ 4026V000/ 4031V000/ 4011V000/4035V002
•Tormatic - Novoferm 433 MHz: Novotron 502/ Novotron 522/ Vivotron/ MHS43-2/ MAX43-2/ MIX43-2
ACHTUNG!


